
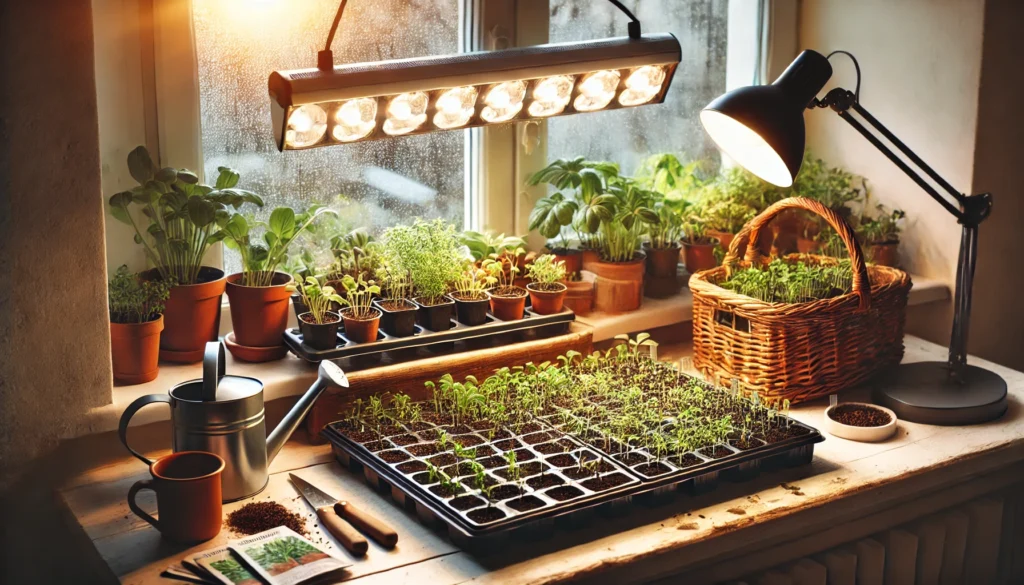
Starting your garden from scratch doesn’t mean waiting for warm weather—learning how to start seeds indoors is the secret to getting a head start on the growing season 🌞. Imagine nurturing tiny seeds into strong, healthy plants right from your kitchen windowsill or a cozy corner in your home 🪴.
It’s more than just a gardening hack—it’s an empowering, budget-friendly way to grow exactly what you want, when you want 💪. Whether you’re dreaming of juicy tomatoes 🍅, vibrant flowers 🌸, or crisp greens 🥬, this beginner-friendly guide on how to start seeds indoors will walk you through every step of the indoor seed-starting process to set your garden up for success.
🌱 Why Start Seeds Indoors?
Starting seeds indoors isn’t just a gardening trend—it’s a smart, rewarding way to take control of your plant journey right from the beginning. Whether you’re dreaming of juicy tomatoes, colorful blooms, or fresh herbs on your windowsill, how to start seeds indoors gives you a head start and so much more. Here’s why it’s a game-changer:
🕰️ Get a Head Start on the Growing Season
Instead of waiting for spring to warm up, you can begin growing weeks earlier from the comfort of your home. This is especially helpful if you live in a cooler climate or have a short growing season. By the time the weather cooperates, your plants are already strong and garden-ready.
💸 Save Money (and Grow More!)
A single seed packet can cost less than a cup of coffee but grow dozens of plants. That’s a big difference compared to buying fully grown plants at the nursery. You’ll be able to fill your garden (and your friends’ gardens too!) without breaking the bank.

🦠 Healthier, Stronger Plants
When you start your own seeds, you have full control over soil quality, watering, and temperature. This means fewer pests, diseases, and transplant shock—just strong, healthy seedlings that are ready to take off when they hit the soil outdoors.
🌿 More Variety and Creativity
Garden centers usually stock the same limited varieties. But seed catalogs? Oh, they’re full of wonders—think purple carrots, striped tomatoes, exotic herbs, and heirloom flowers. Indoor seed starting opens the door to a more creative, customized garden.
🧘 Learn and Grow With Your Plants
There’s something deeply satisfying about watching a tiny seed become a living plant. It teaches patience, care, and attentiveness—plus, it’s just plain magical. You’ll find yourself bonding with your plants long before they ever go outside.
Starting seeds indoors isn’t just for expert gardeners—anyone can do it with the right guidance. And as you’ll see in the next sections, it’s easier than you think.
🧰 What You’ll Need to Start Seeds Indoors
Starting seeds indoors is easier than you might think—especially when you’ve got the right tools by your side. 🌿 Whether you’re a total beginner or looking to refine your setup, here’s your essential checklist for how to start seeds indoors and set your seedlings up for success:
1. 🌾 Quality Seeds
Choose fresh, high-germination seeds from a reliable source. Look for information on the packet—like expiration date, planting depth, and days to germination. Whether you’re going heirloom, organic, or hybrid, pick seeds that match your gardening goals and growing zone.
2. 🪴 Seed-Starting Mix
Not all soils are created equal! Use a light, sterile seed-starting mix—not regular garden soil or potting mix. Seed mixes are designed to drain well and support delicate roots while protecting them from disease.
3. 🌱 Seed Trays or Small Containers
Shallow seed trays, peat pots, cell packs, or even repurposed yogurt cups work well—just make sure they have good drainage holes. Cleanliness is key to prevent fungal problems, so always start with sanitized containers.
4. 🌫️ Humidity Dome or Plastic Wrap
A clear plastic cover or humidity dome helps trap warmth and moisture—perfect for encouraging germination. No dome? Plastic wrap or even a reused salad container lid can do the trick. Just remember to remove the cover once your seedlings sprout!
5. 💡 Grow Lights or Sunny Windowsill
Your baby plants will need 12–16 hours of light per day. A bright south-facing window might work, but full-spectrum LED grow lights will give the best results and prevent leggy, stretched-out seedlings.
6. 🔥 Heat Mat (Optional but Helpful)
Many seeds germinate best with cozy warmth. A seedling heat mat keeps the soil evenly warm—especially helpful for heat-loving crops like tomatoes, peppers, and eggplant.
7. 💦 Spray Bottle or Gentle Watering Can
Moisture is essential—but be gentle! A spray bottle is perfect for light misting, especially before germination. Once your seedlings grow, switch to a small-spouted watering can or bottom-watering tray to avoid disturbing tender roots.
8. 🏷️ Plant Labels
Trust us—you’ll forget what you planted where 😅. Use popsicle sticks, reusable tags, or masking tape to label each tray with the plant name and sowing date. It’ll save you from mystery-plant surprises later on!
9. 🌿 Fertilizer (For Later Stages)
Once your seedlings have developed their first set of true leaves, feed them a gentle, water-soluble fertilizer. Use one that’s specially formulated for seedlings or dilute a balanced fertilizer to half strength.
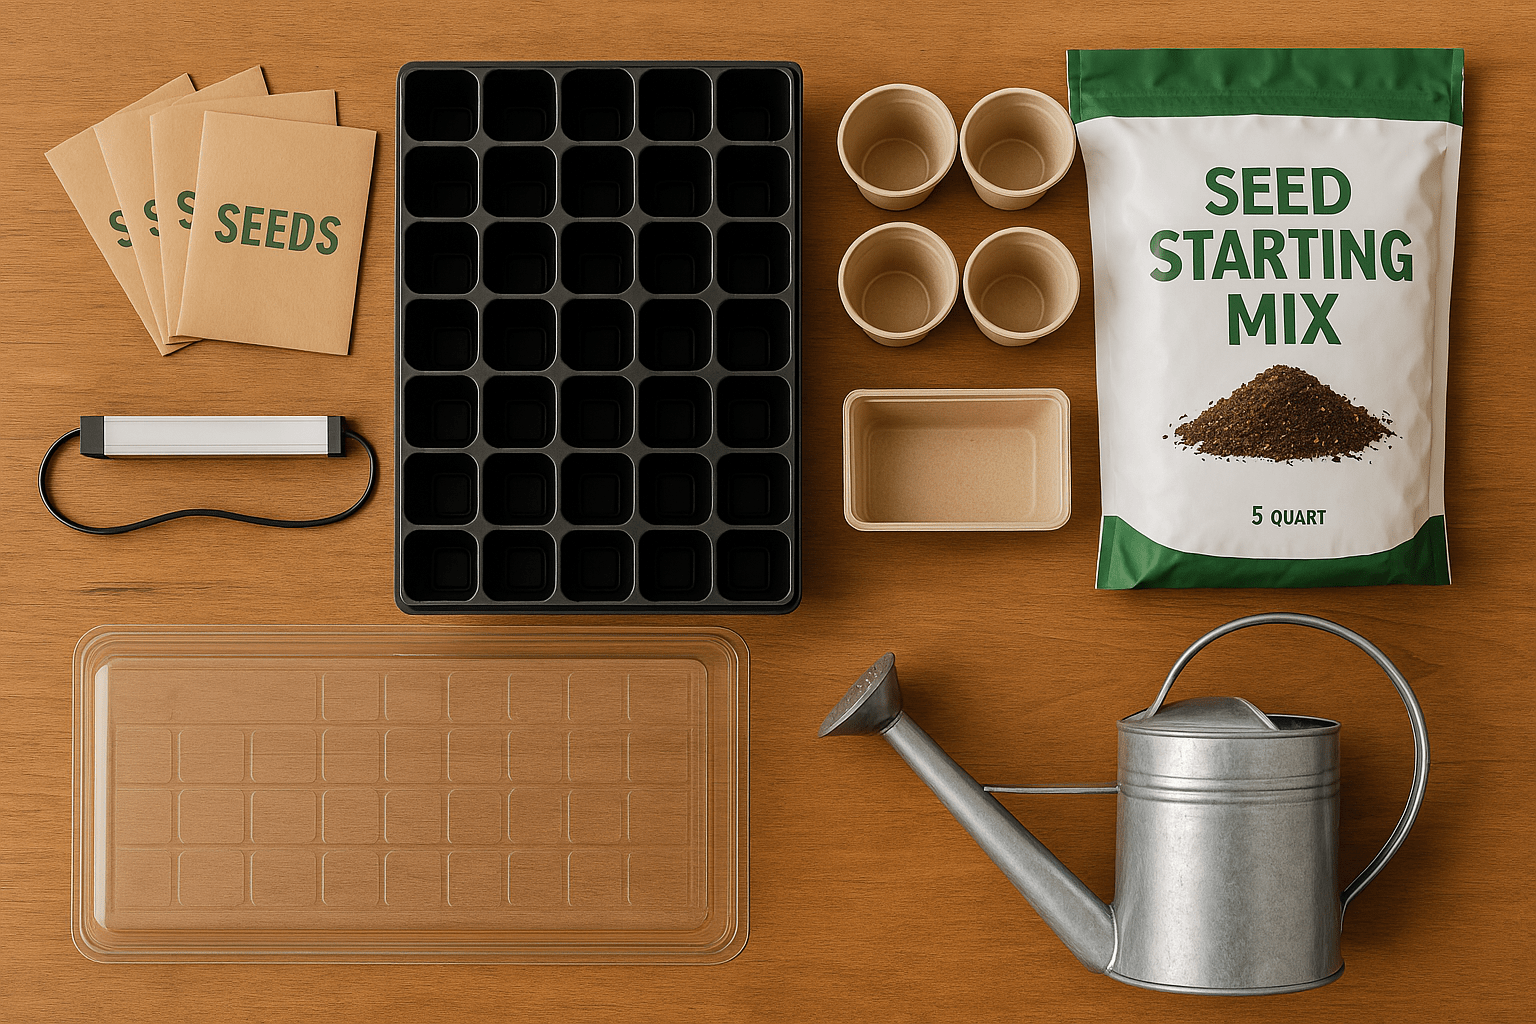
With this setup, you’re not just starting seeds—you’re starting a garden with intention, care, and creativity 💚. These tools will help your seeds thrive and set you on the path to a strong, beautiful growing season.
🪴 Step-by-Step – How to Start Seeds Indoors
Starting seeds indoors is like waking nature up early—right on your windowsill! 🌞 Here’s a simple, clear guide on how to start seeds indoors to help you go from seed packet to sprout with confidence and joy:
Step 1: Read Your Seed Packet Carefully
Before you touch the soil, take a moment to read each seed packet. 🌾 It tells you the planting depth, spacing, germination time, and when to transplant outdoors. Different seeds = different needs!
Step 2: Moisten Your Seed-Starting Mix
Pour your seed-starting mix into a bowl and gently moisten it with water. You want it damp like a wrung-out sponge—not soaking. This helps seeds settle in evenly when you plant.
Step 3: Fill Your Trays or Containers
Scoop the damp mix into your seed trays or containers. Lightly press it down to remove air pockets but don’t pack it too tightly. Leave a little space at the top so you can water without overflow.
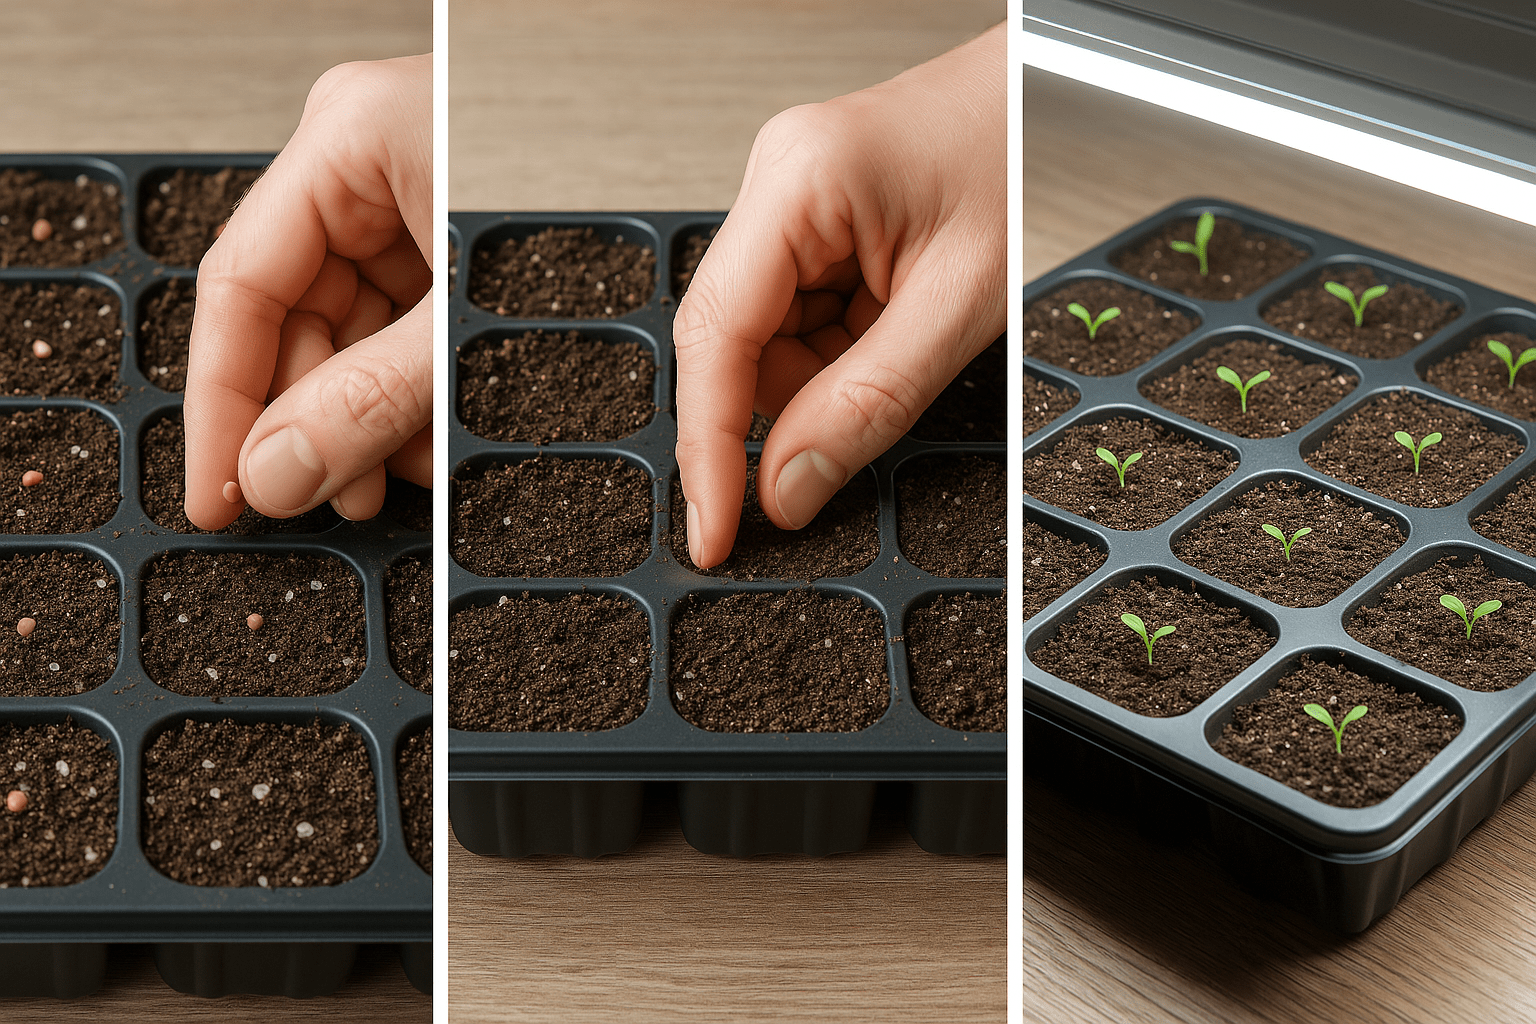
Step 4: Plant the Seeds
Make small holes using a pencil or your finger (follow the depth on the packet). Drop 1–2 seeds into each hole. Cover gently with mix and lightly pat the surface to secure them.
Step 5: Label Everything
Use plant markers or even a bit of tape and write the plant name + date. Future you will be so thankful when things start sprouting! 🏷️
Step 6: Add Moisture and Cover
Lightly mist the surface with a spray bottle, then cover your trays with a humidity dome, plastic wrap, or clear lid. This keeps warmth and moisture locked in during the germination phase.
Step 7: Place in a Warm Spot
Most seeds like temps between 65–75°F (18–24°C) to germinate. Use a seedling heat mat or place the tray on top of a fridge or near a warm window—but not in direct sun yet.
Step 8: Watch for Sprouts!
Germination takes anywhere from a few days to a few weeks, depending on the plant. 🌱 As soon as you see green shoots, remove the cover and move the tray to bright light—either a sunny window or under grow lights.
Step 9: Water Gently and Consistently
Keep the mix moist, not soggy. Bottom watering (placing the tray in water for 10–15 minutes) is a great way to hydrate without disturbing roots. Avoid letting them dry out completely!
Step 10: Thin the Seedlings
Once seedlings have two sets of leaves, trim the weaker ones at the base with scissors, leaving the strongest in each cell. This gives the remaining plant room to thrive 🌿
Step 11: Begin Fertilizing
When true leaves appear, feed with a half-strength liquid fertilizer once a week. This gives your babies a nutritional boost for steady growth.
Step 12: Harden Off Before Transplanting
About 1–2 weeks before planting outdoors, start hardening off your seedlings by taking them outside for a few hours each day. Gradually increase sun and wind exposure to get them garden-ready.
🌼 And there you have it! You’ve gone from seed to sprout—indoors and in style. With just a bit of daily care and patience, you’ll have strong, healthy plants ready to take on the great outdoors.
🚫 Common Mistakes to Avoid
Starting seeds indoors is an exciting adventure, but even small mistakes can slow down your progress or harm your plants. Avoid these common pitfalls when learning how to start seeds indoors, and your seeds will be well on their way to healthy growth. Let’s dive in! 🌿
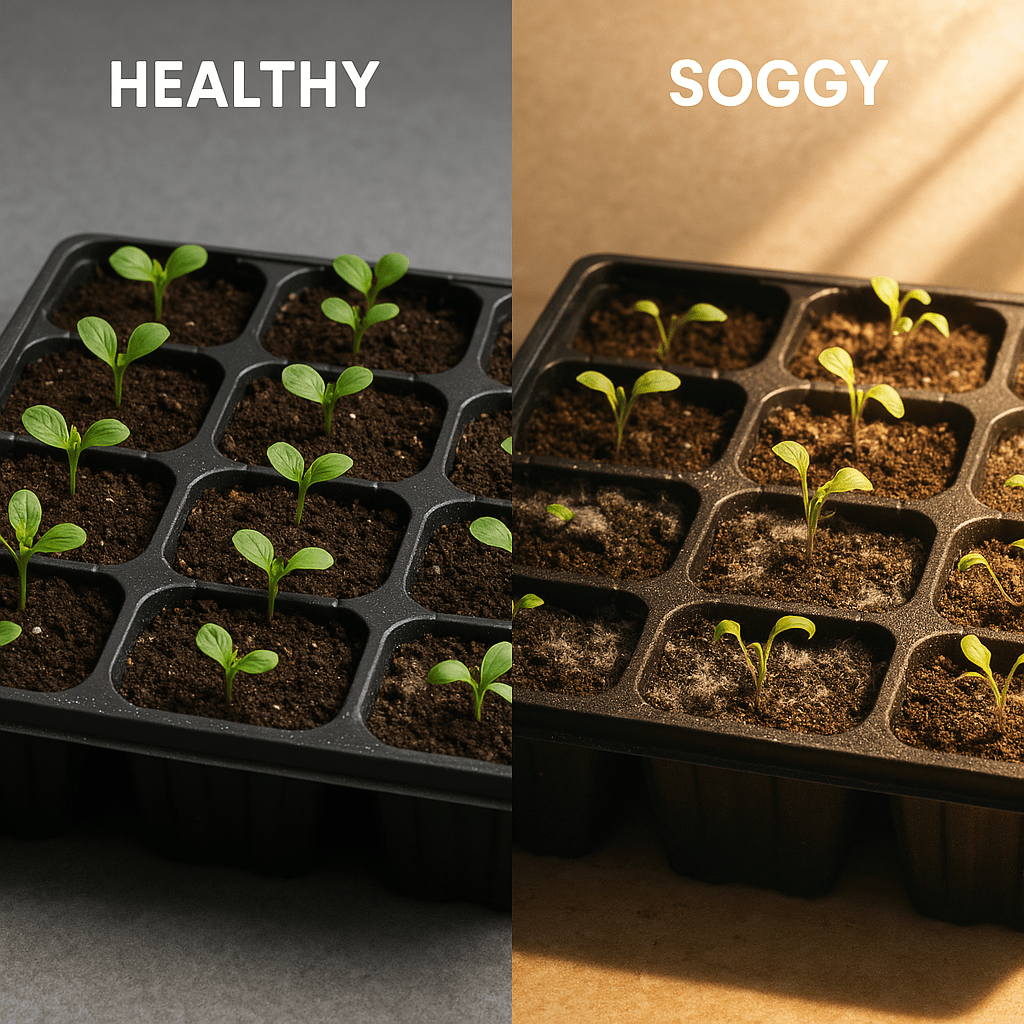
1. Overwatering 💦
Watering is important, but too much water can drown your seeds and cause root rot. Always check the soil’s moisture level before watering. If the top inch is dry, it’s time to water, but avoid sogginess. 🌧️
Tip: Use a spray bottle or water from the bottom to gently hydrate your seedlings.
2. Poor Drainage 🚱
If your containers don’t have drainage holes, water can get trapped, suffocating the roots. Always use containers that allow excess water to escape. Without proper drainage, your seedlings may suffer from root rot or fungal diseases. 🐛
Tip: You can easily recycle containers like yogurt cups or egg cartons as long as you poke a few holes in the bottom for drainage.
3. Wrong Light Conditions 💡
Not all seeds thrive in the same lighting! Placing your seedlings in too much direct sunlight or too little can lead to leggy, weak plants. Most seedlings need 12-16 hours of light daily.
Tip: If you don’t have a bright window, invest in full-spectrum
to keep your seedlings strong and sturdy.
4. Ignoring Pest Problems 🐜
Tiny pests like aphids or mealybugs can silently harm your seedlings. Regularly inspect your plants for any signs of pests, and take action immediately.
Tip: If you spot pests, treat them early with natural remedies like neem oil or insecticidal soap to avoid a bigger infestation later on.
5. Incorrect Fertilization 🌾
Too much fertilizer can burn your delicate seedlings, while too little can stunt their growth. Wait until your seedlings develop their first true leaves before fertilizing, and use a gentle, water-soluble fertilizer.
Tip: Always dilute the fertilizer to half strength to avoid overwhelming your plants.
6. Not Repotting When Needed 🌍
If your seedlings outgrow their containers, their roots can become tangled and bound, limiting their ability to absorb water and nutrients. Repot your plants when they start showing signs of overcrowding.
Tip: Watch for roots peeking through the drainage holes or around the edges of the pot.
7. Skipping Pruning ✂️
Pruning might seem unnecessary at first, but it’s key for healthy growth. Pruning helps plants grow fuller, stronger, and more compact. If left unchecked, your plants might become leggy and weak.
Tip: Use clean, sharp scissors to remove dead or damaged leaves, and trim any leggy growth to encourage new, healthy shoots.
8. Wrong Temperature or Humidity 🌡️
Too cold or too hot can stress your seedlings. Keep them in a consistent temperature range of 65–75°F (18–24°C). Also, if your home is dry, use a humidity dome or mist the plants regularly to keep moisture levels in check.
Tip: Invest in a seedling heat mat to maintain a steady, warm temperature for faster germination.
By keeping an eye on these potential mistakes, you’ll ensure your indoor seed-starting journey is a smooth and successful one. 🌱
Remember, every mistake is a learning opportunity! You’ll grow alongside your plants—both figuratively and literally. Keep experimenting, and enjoy the process. Happy planting! 🌻
🌿 When and How to Transplant Seedlings
Transplanting seedlings is an exciting part of the process, but it’s important to do it at the right time to give your plants the best chance of thriving. Understanding how to start seeds indoors and when to transplant them will set you up for success. Let’s dive into the details of when to transplant and the best methods for success. 🪴
When to Transplant Seedlings 🕒
Knowing the right time to transplant your seedlings is crucial to their success. Too early, and they might not survive the outdoor conditions; too late, and they could become stressed or root-bound. Here are the key signs to watch for:
1. 4–6 Weeks After Germination
Most seedlings are ready to transplant when they have at least 2–3 sets of true leaves. These are the leaves that appear after the initial seed leaves, and they indicate that the plant is strong enough to handle the transplant.
2. Check the Roots 🌱
Gently lift the seedling out of its container to check the roots. If they are starting to circle around the bottom or sides of the container, it’s time to transplant.
3. Outdoor Conditions ☀️
Wait until after the last frost date for your area. This ensures that the temperature is warm enough for your seedlings to adjust to outdoor life without the threat of frost. 🌸
Tip: You can check the local frost dates or use a soil thermometer to ensure the soil temperature is warm enough (about 50–60°F/10–15°C for most plants).
4. Harden Off Seedlings 🌞
Before transplanting, you need to “harden off” your seedlings. This gradual process helps them adjust to the outdoor conditions without shock. Start by exposing your seedlings to outdoor conditions for 1–2 hours in a shaded area, and then gradually increase the exposure time and sunlight each day. This process should take about 7–10 days.
How to Transplant Seedlings 🌿
Once your seedlings are ready for the great outdoors, here’s a step-by-step guide on how to transplant them successfully.
1. Choose the Right Time of Day 🌄
Transplant your seedlings in the early morning or late afternoon when the sun is less intense. This reduces the risk of heat stress and gives your seedlings a chance to settle into their new environment without the harsh midday sun.
2. Prepare the Soil 🌍
Before transplanting, make sure your garden soil is ready! Loosen the soil with a garden fork or trowel, and add compost or organic matter to enrich it. Ensure the soil is moist but not soggy. If you’re planting in containers, make sure to use well-draining potting soil.
3. Handle Seedlings Gently 🤲
Always handle seedlings by the leaves (not the delicate stem!) to avoid damage. Hold them gently and be mindful not to disturb the roots too much.
4. Dig a Proper Hole 🕳️
Dig a hole that’s deep and wide enough to accommodate the seedling’s root ball. For plants like tomatoes, which have long stems, you can bury part of the stem to encourage better root development.
5. Water Immediately 💧
Once the seedling is in the ground, water it right away. This helps settle the soil around the roots and reduces transplant shock. Be sure to water the base of the plant—not the leaves—to avoid wetting them.
6. Provide Shade (Optional) 🌤️
If the sun is very strong, provide your transplanted seedlings with some shade for the first few days. You can use shade cloth, an upturned bucket, or even plant nearby taller plants to give your seedlings some relief.
Pro Tip:
Transplanting is best done on a cloudy day or just before rain. This reduces stress on the plants and gives them time to adjust to their new environment.

Transplanting seedlings is a big step toward creating a thriving garden. By timing it right and following these steps on how to start seeds indoors, you’ll give your plants the best chance to grow strong and healthy. 🌻 Keep an eye on the weather, be patient, and watch your garden bloom!
Happy gardening, and enjoy watching your seedlings grow into beautiful, mature plants! 🌷🌱
🌟 Final Tips for Success in Gardening 🌟
As you continue growing your seedlings into vibrant plants, these expert tips on how to start seeds indoors will guide you in achieving the best results. These tips apply to both beginner and seasoned gardeners, helping you nurture your plants with care and patience. 🌸
1. Know Your Plant’s Needs 🌱
Each plant is unique and has specific water, light, and soil preferences. To set yourself up for success, always research the needs of each plant before planting. Whether it’s full sun, partial shade, or indirect light, understanding the conditions your plant thrives in will make all the difference.
2. Don’t Overwater 🚰
Overwatering is one of the most common mistakes gardeners make. Most plants prefer to dry out slightly between waterings. Always check the top inch of the soil before watering—if it feels dry, then it’s time to water. Overwatering can lead to root rot, mold, and stress. 🌧️
3. Feed Regularly, But Wisely 🌿
Fertilizing is important to support healthy growth and blooms, but it’s easy to overdo it. Use a balanced fertilizer during the growing season and follow the package instructions carefully. Avoid excessive fertilizing, as this can burn the roots and harm your plants. A little goes a long way! 🥬
4. Prune for Health and Shape ✂️
Regular pruning is essential for promoting healthy growth, improving airflow, and encouraging new shoots. Use clean, sharp tools and remove dead or damaged leaves and stems. Pruning also helps to keep your plants looking tidy and well-shaped, so they thrive. 🌺
5. Watch for Pests Early 🐛
Pests can cause damage if left unchecked. Regularly inspect your plants for signs of pests like aphids, spider mites, or mealybugs. If you notice any, take action early with organic solutions like neem oil or insecticidal soap to keep the infestation under control. Early detection is key! 🕷️
6. Repot When Necessary 🪴
If your plant seems root-bound (roots circling the pot) or if its growth has slowed, it’s time to repot into a larger container. Repotting allows the roots to spread out and absorb more nutrients. Use fresh potting soil to give your plant a boost. 🌿
7. Be Patient and Observant ⏳
Plants take time to grow, and sometimes they need a little more care and attention than we expect. Observe your plants regularly—notice how they respond to care, light, and placement. Small adjustments, like moving them to a sunnier spot or giving them a bit more water, can make a big difference. 🌻
8. Keep Learning 📚
Gardening is an ongoing learning process. No matter how long you’ve been gardening, there’s always something new to discover. Stay curious, read up on new techniques, ask questions, and experiment with different methods. Every season is an opportunity to improve your skills and grow even better plants. 🌱

Bonus Tip: Celebrate Your Progress! 🎉
Whether you’re growing veggies, flowers, or houseplants, take time to celebrate your successes. Even small victories, like your first bloom or harvesting your first homegrown tomato, are worth acknowledging. Gardening is a journey, and every step is worth appreciating! 🌸🌿
By following these final tips for success, you’ll set your garden up for long-term growth and beauty. Learning how to start seeds indoors and applying these tips will help you nurture your plants with care. Gardening requires patience, consistency, and a bit of trial and error, but the rewards—lush greenery, beautiful flowers, and delicious homegrown food—are so worth the effort. 🌺🌿
Happy gardening, and enjoy the process of watching your plants grow and flourish! 🌼
Final Thoughts 💭
Starting seeds indoors is an incredibly rewarding experience that gives you the power to nurture plants from the very beginning, providing you with stronger, healthier growth and a deeper connection to your garden. From the excitement of watching tiny seeds sprout to the joy of transplanting thriving seedlings into your outdoor space, the entire process is an opportunity for learning, growth, and success. 🌸

Remember, the process of how to start seeds indoors is an experiment each year—don’t be afraid to try new techniques, track your results, and learn from each planting season. Whether you’re growing vegetables for your kitchen or flowers to brighten your home, starting seeds indoors is the first step toward a bountiful and fulfilling gardening experience.
So, grab your seed packets, gather your supplies, and get started today! Your garden is waiting to grow—one seed at a time. 🌱✨ Happy gardening! 🌻