

If you’re passionate about roses and eager to grow healthier, more vibrant plants, mastering grafting techniques like chip budding and T-budding roses is a game-changer. These proven methods allow you to propagate strong, disease-resistant rose varieties, while also enhancing bloom quality and growth. Whether you’re a seasoned gardener or just starting, this comprehensive guide will walk you through the essentials of chip budding and T-budding, offering practical tips and step-by-step instructions. By the end of this article, you’ll have the confidence to graft roses like a pro, taking your gardening skills to the next level.
Understanding Grafting in Roses 🌹
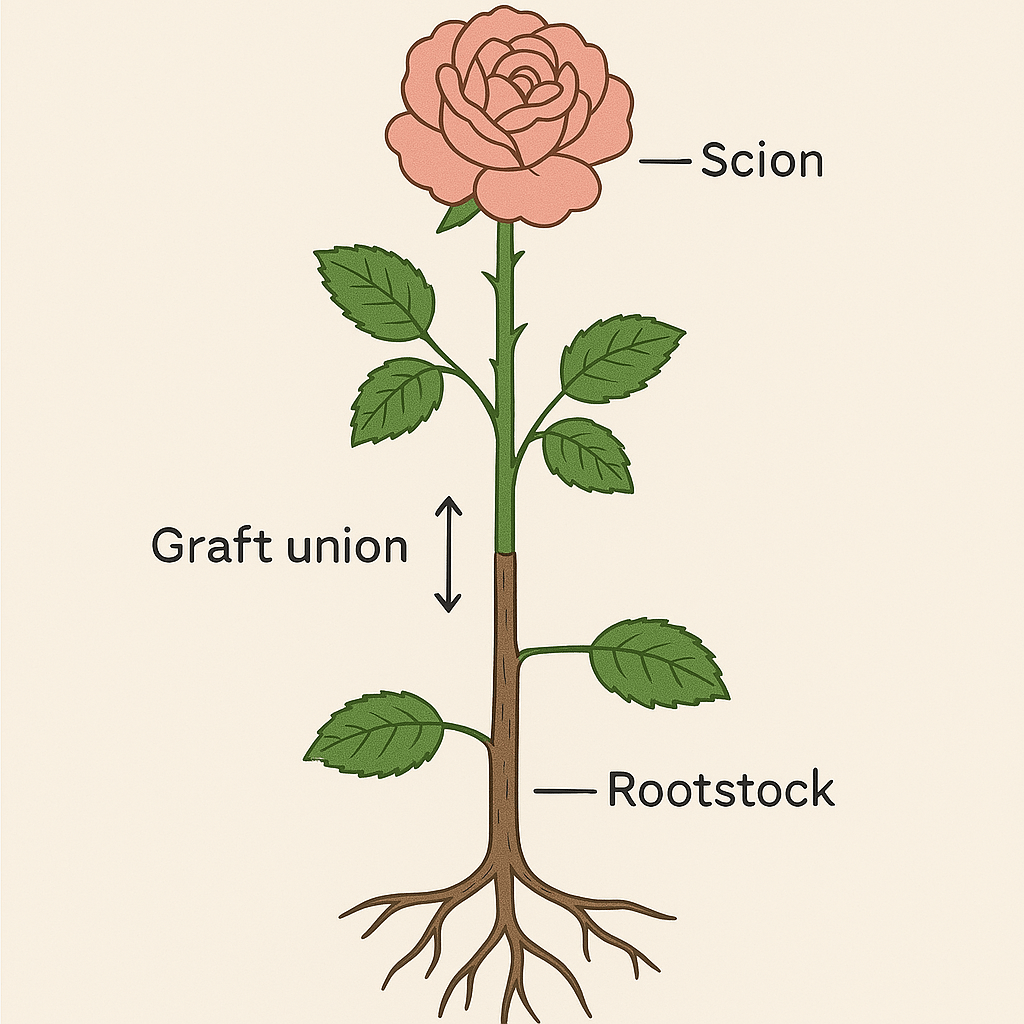
Grafting is a technique where you join two plant parts—the rootstock and the scion—to grow a single, healthy plant. In roses, this method helps create stronger, more vibrant plants that bloom better and resist diseases. 🌱
Why Graft Roses?
- Improved Growth: Grafting allows roses to grow faster and stronger, leading to healthier plants.
• Better Disease Resistance: By using a robust rootstock, grafted roses can better fight off diseases and pests. 🛡️
• Preserve Varieties: It helps maintain the characteristics of specific rose varieties, even if they’re hard to grow from seeds. 🌸
Chip Budding and T-Budding are two of the most common grafting techniques used with roses, each offering its unique advantages. But before you dive into these methods, it’s essential to understand how grafting works and why it’s such a powerful tool for rose gardeners. 💡
What is Chip Budding? 🌱
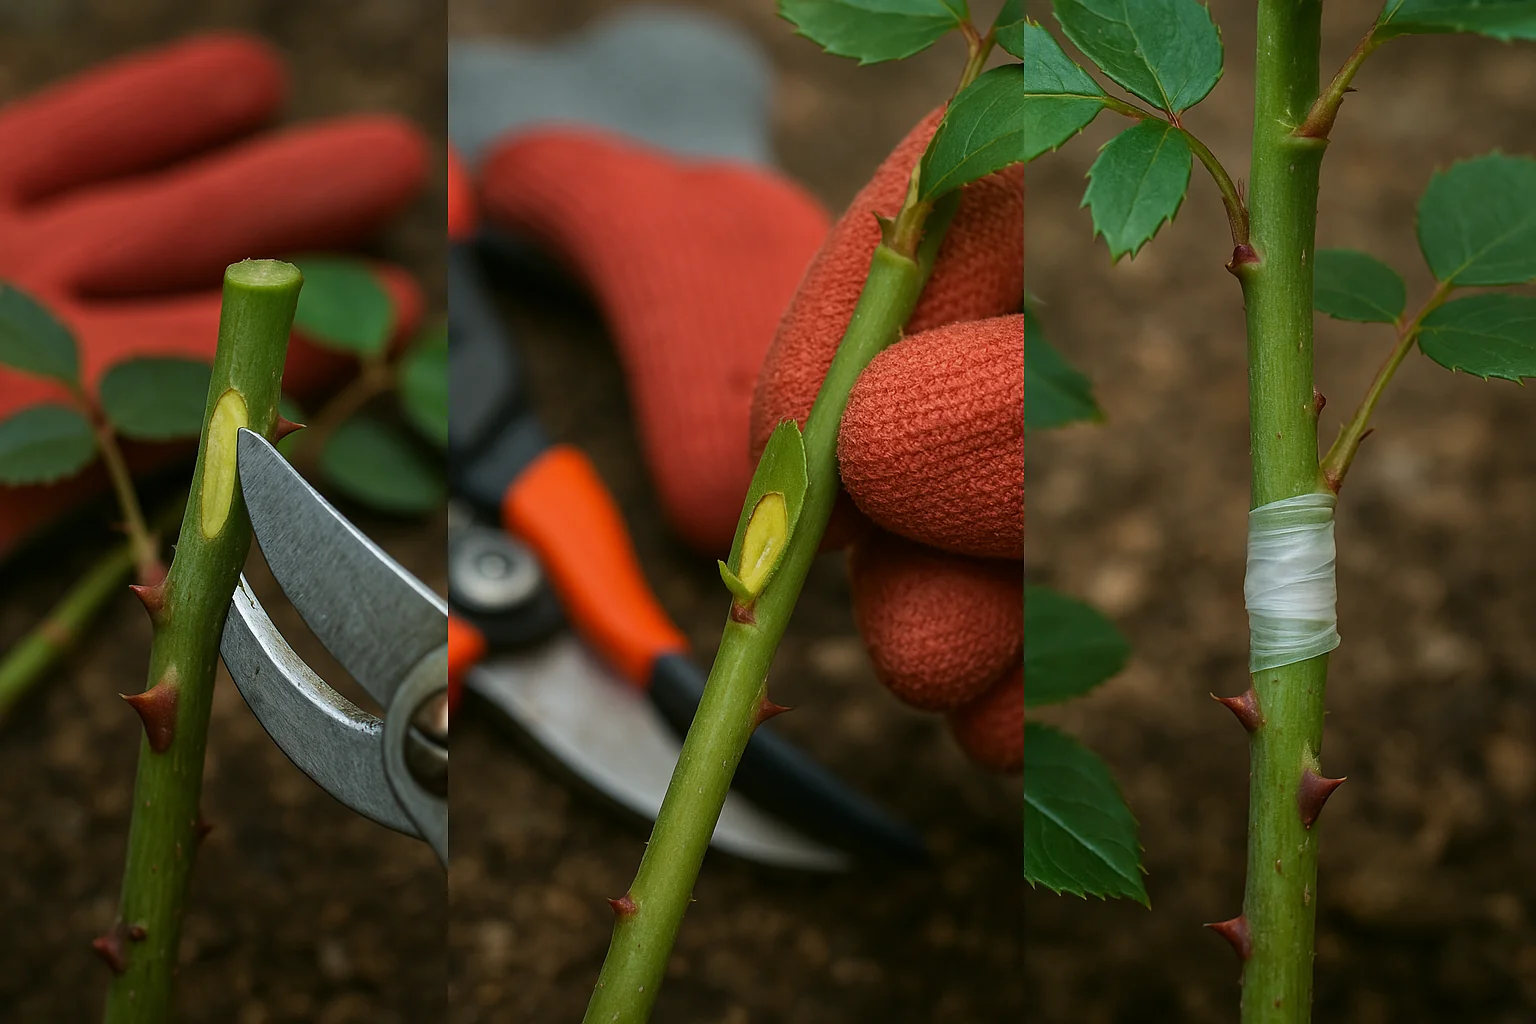
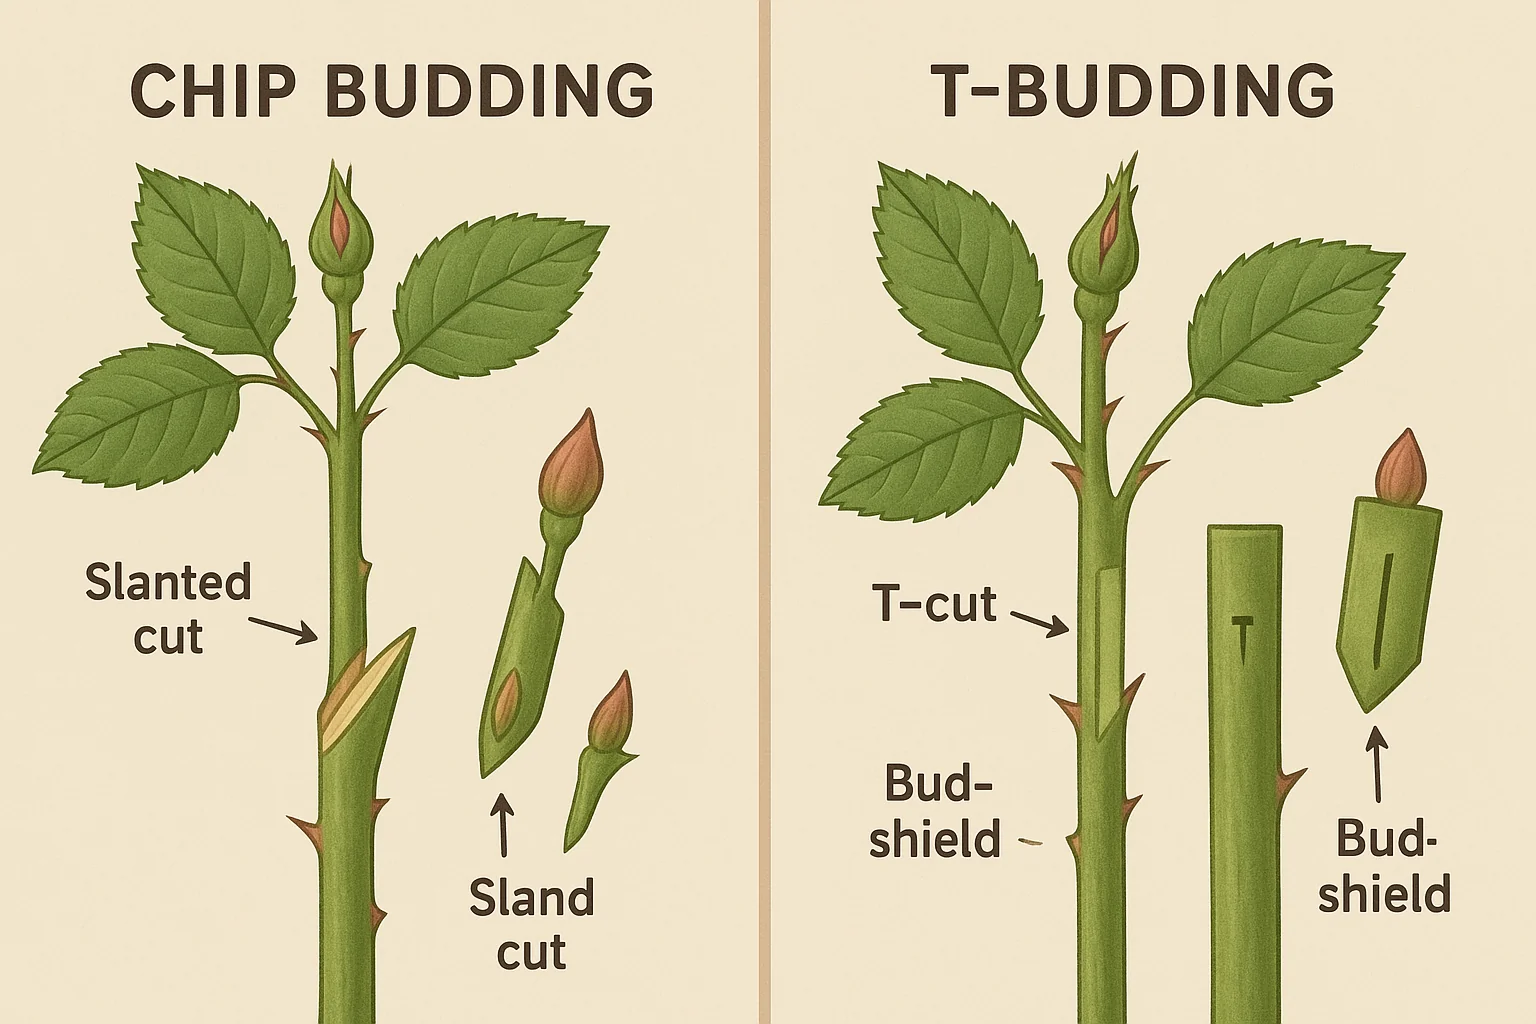
Chip budding is a popular grafting technique where a small “chip” of wood, including a bud, is cut from the desired rose variety (scion) and inserted into the rootstock. It’s simple, effective, and perfect for beginners! 🌿
How it Works:
- Choose the Scion and Rootstock: Select a healthy, disease-free rootstock and a rose variety with the best traits you want to preserve. 🌹
- Make a Chip Cut: You’ll make a small, slanted cut on the rootstock to remove a “chip” of its bark. ✂️
- Insert the Bud: Place the scion’s bud into the cut, aligning it carefully.
- Secure the Graft: Wrap the graft with tape or parafilm to hold everything in place while it heals. 🎀
- Care and Patience: Keep the grafted area moist and protect it from strong sun. In a few weeks, the bud should start to grow!
Why Choose Chip Budding?
- It’s perfect for small cuts, which means less stress on the plant. 🌞
• Ideal for late summer or early fall, when the rootstock is active but the scion is still dormant. ⏳
Chip budding is a great way to propagate roses without a lot of experience, and it offers high success rates when done correctly! 🌷
What is T-Budding? 🌿
T-budding is another popular grafting technique used for roses, and it’s known for being quick and highly effective. It’s called T-budding because you make a T-shaped cut in the rootstock before inserting the bud. 🛠️
How it Works:
- Select the Rootstock and Scion: Choose a healthy rootstock and a bud from your desired rose variety. 🌹
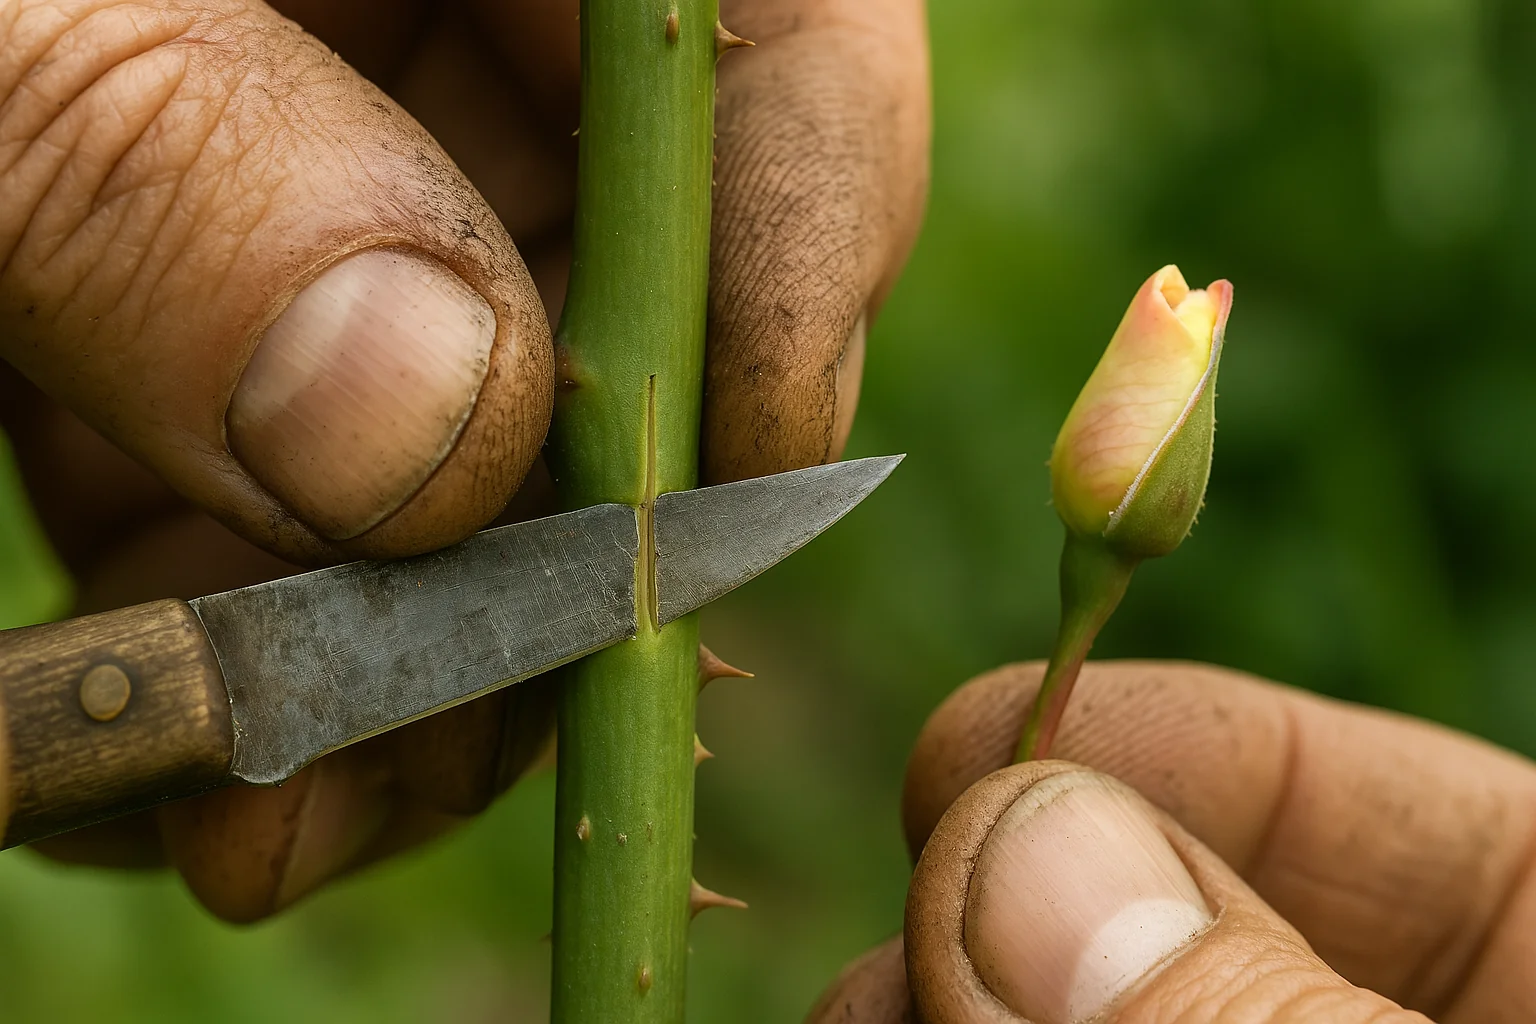
- Make the T-Cut: On the rootstock, make a vertical cut, then a horizontal cut at the top to form the shape of a “T.” ✂️
- Prepare the Bud: Carefully cut a healthy bud from the scion, ensuring it’s still attached to a small piece of bark. 🪴
- Insert the Bud: Gently slide the bud into the T-cut, making sure it fits snugly.
- Wrap and Secure: Use tape or grafting parafilm to keep the bud in place. 🎀
- Care for the Graft: Like with chip budding, ensure the graft site stays moist and shielded from harsh sunlight. 🌞
Why Choose T-Budding?
- It’s ideal for larger rootstocks, as the T-cut allows for better bud insertion. 🌱
• T-budding has a high success rate, especially for grafting in late summer or early fall, when the rootstock is actively growing.
T-budding is a simple, reliable way to propagate roses, and with practice, you’ll see beautiful, thriving rose bushes in no time! 🌹
Chip Budding vs. T-Budding: Which Technique to Choose? 🤔🌹
Both chip budding and T-budding are effective grafting methods for roses, but they each have unique advantages depending on your needs and the conditions of your garden. Here’s a quick comparison to help you decide which technique is right for you:
Chip Budding 🌱
- Best For: Small, younger rootstocks or when you have limited scion material.
• Advantages:
– Easier for beginners to learn and execute.
– Perfect for grafting during late summer or fall.
– Smaller cuts, causing less stress to the plant.
• Ideal Conditions: When rootstocks are actively growing but not too thick.
T-Budding 🌿
- Best For: Larger rootstocks or when you need to graft many plants at once.
• Advantages:
– Higher success rate, especially with larger rootstocks.
– Faster and more efficient for large-scale propagation.
– Works great in late summer or early fall when the rootstock is actively growing.
• Ideal Conditions: Ideal for thicker, more mature rootstocks.
Which One to Choose?
- For Beginners: If you’re new to grafting, chip budding is a great starting point due to its simplicity and smaller cuts. 🌼
• For Larger Projects: If you’re grafting a lot of roses or working with bigger `, T-budding is the way to go! 🌻
Both techniques can help you grow beautiful, healthy roses. It all depends on your preferences and the specific conditions of your grafting project! 🌸
Common Mistakes to Avoid in Grafting Roses 🚫🌹
Grafting roses can be rewarding, but even experienced gardeners can make mistakes. Avoid these common errors to increase your chances of success:
1. Over-tightening the Wrap 🚫🎀
Wrapping the graft site too tightly can cut off the flow of nutrients and prevent the bud from taking. Wrap snugly, but not too tight—just enough to hold the bud in place.
2. Poor Scion or Rootstock Selection 🌱❌
Always choose healthy, disease-free scion and rootstock. Using weak or damaged plant parts can lead to graft failure, no matter how well you perform the technique.
3. Grafting at the Wrong Time 🕰️🌞
Timing is crucial! Grafting during the wrong season, like winter when plants are dormant, can harm the plant. Late summer or early fall is ideal for chip and T-budding.
4. Inadequate Aftercare 💧🌿
Once your graft is done, proper care is essential. Neglecting to water or protect your graft from too much sunlight can stunt growth and lead to failure. Keep the graft moist and shaded until it heals.
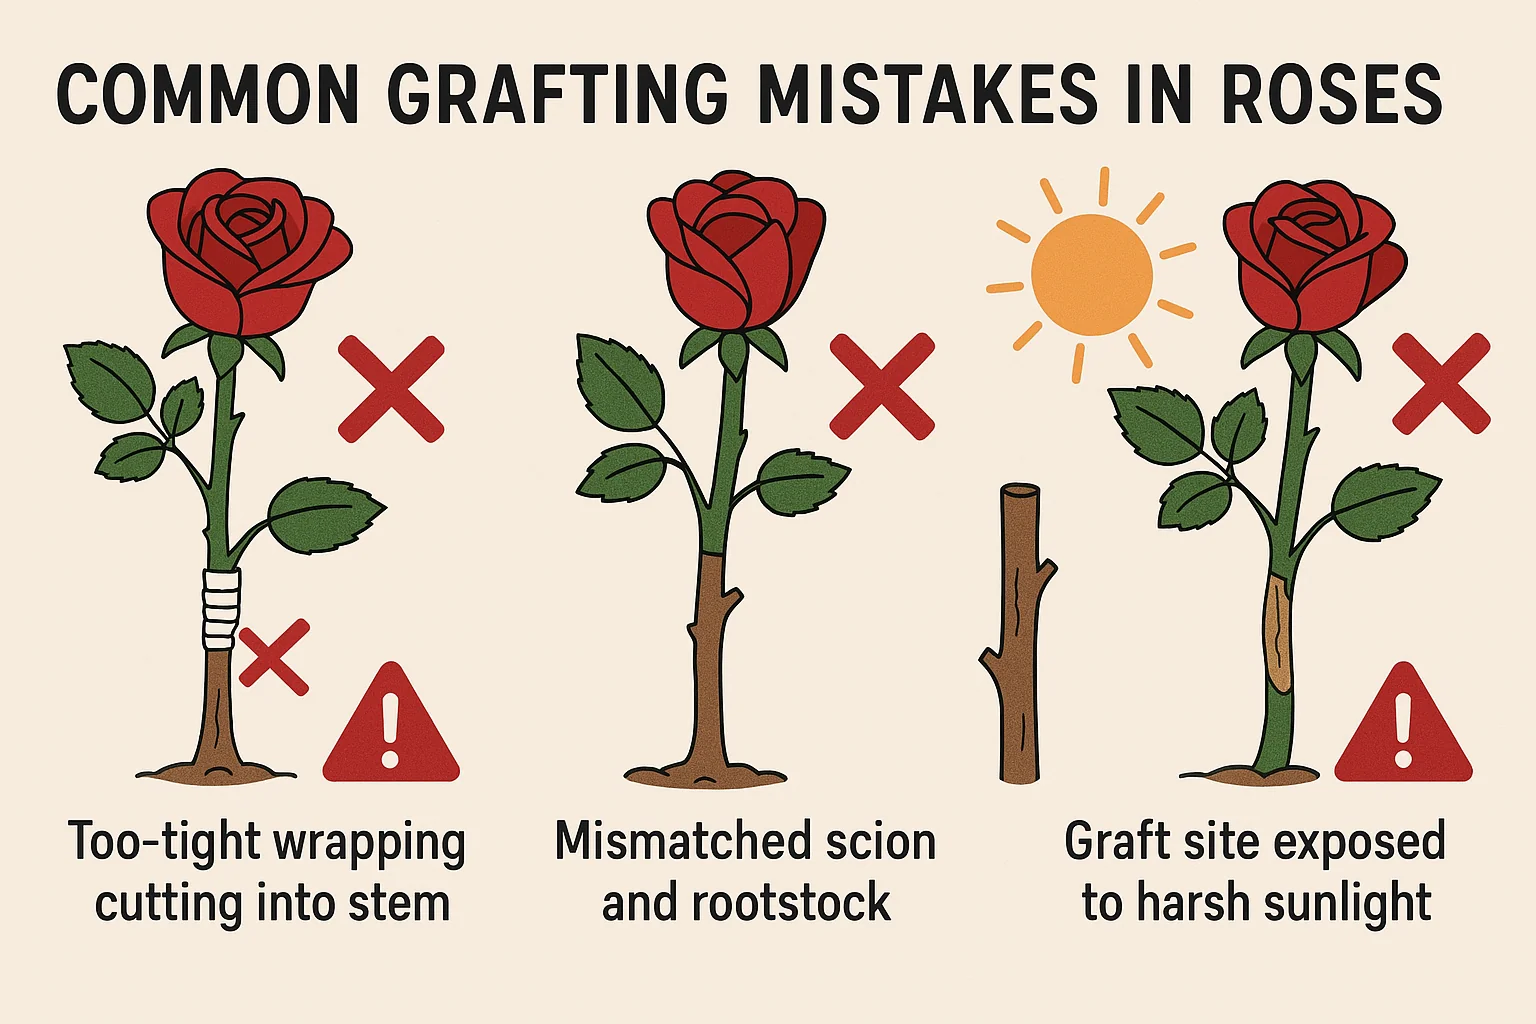
5. Not Checking for Compatibility 🌱🔍
Make sure your rootstock and scion are compatible. If they’re too different in size or type, the graft won’t take properly. Do a little research to ensure they’re a good match.
Avoiding these simple mistakes will give you the best chance at successfully grafted roses that thrive and bloom beautifully! 🌸
Aftercare for Grafted Roses 🌹💧
Once your grafting process is complete, the aftercare is key to ensuring the graft heals properly and your roses thrive. Here’s how to give your grafted roses the best care:
1. Watering 💦
Keep the grafted area moist but not soggy. Water regularly to encourage the bud to establish roots, but make sure the soil drains well to avoid rot. 🌱
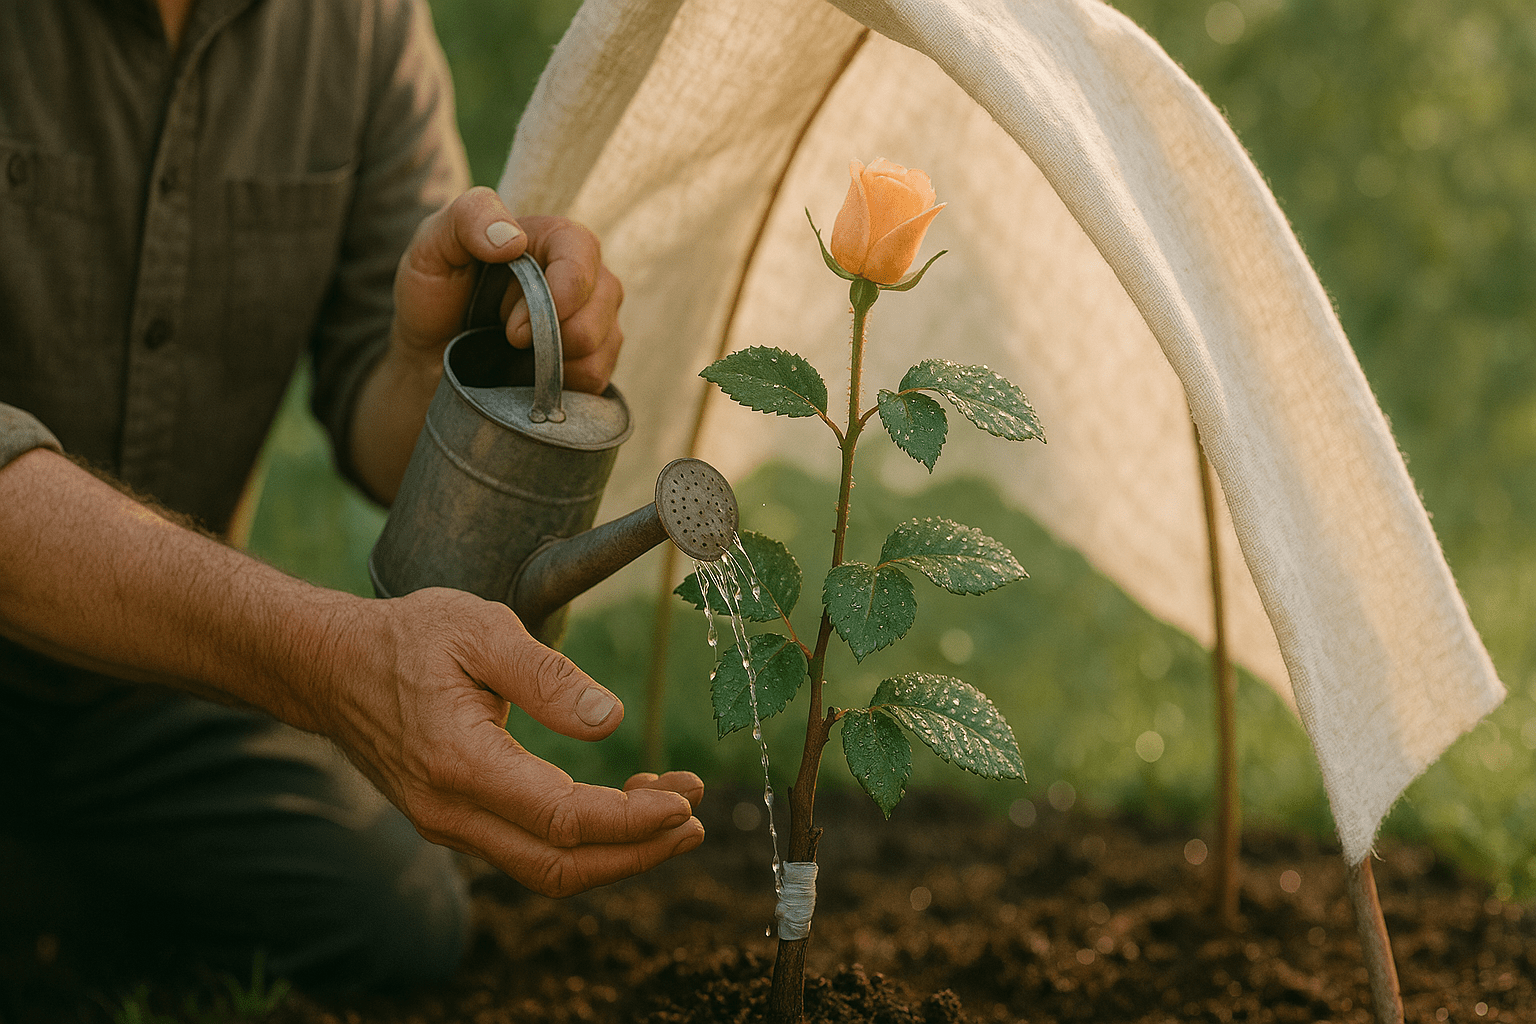
2. Protect from Sunlight 🌞
New grafts are sensitive to direct sunlight. After grafting, protect the grafted area by shading it with a cloth or using a temporary cover to keep it from drying out. Once the bud begins to grow, you can gradually expose it to more light.
3. Remove Grafting Tape 🎀
Check the graft regularly. Once the bud begins to show signs of growth (typically after a few weeks), carefully remove the grafting tape. Be gentle to avoid damaging the bud or the rootstock.
4. Monitor for Pests and Disease 🦗🦠
Keep an eye on your grafted rose for signs of pests or disease. Aphids and fungal infections can be common issues. If you spot any problems, treat them promptly with organic pest control methods or fungicides.
5. Prune Carefully ✂️
Once the graft has taken, remove any unwanted growth on the rootstock, allowing the grafted bud to take center stage. This will help the graft grow strong and healthy.
With proper aftercare, your grafted roses will grow into strong, vibrant plants. Be patient, as it can take some time for the graft to fully take hold, but with attention and care, your roses will thrive! 🌹✨
Troubleshooting Common Grafting Problems ⚠️🌹
Even with the best care, sometimes grafts don’t take as expected. Here are some common problems you may encounter and how to fix them:
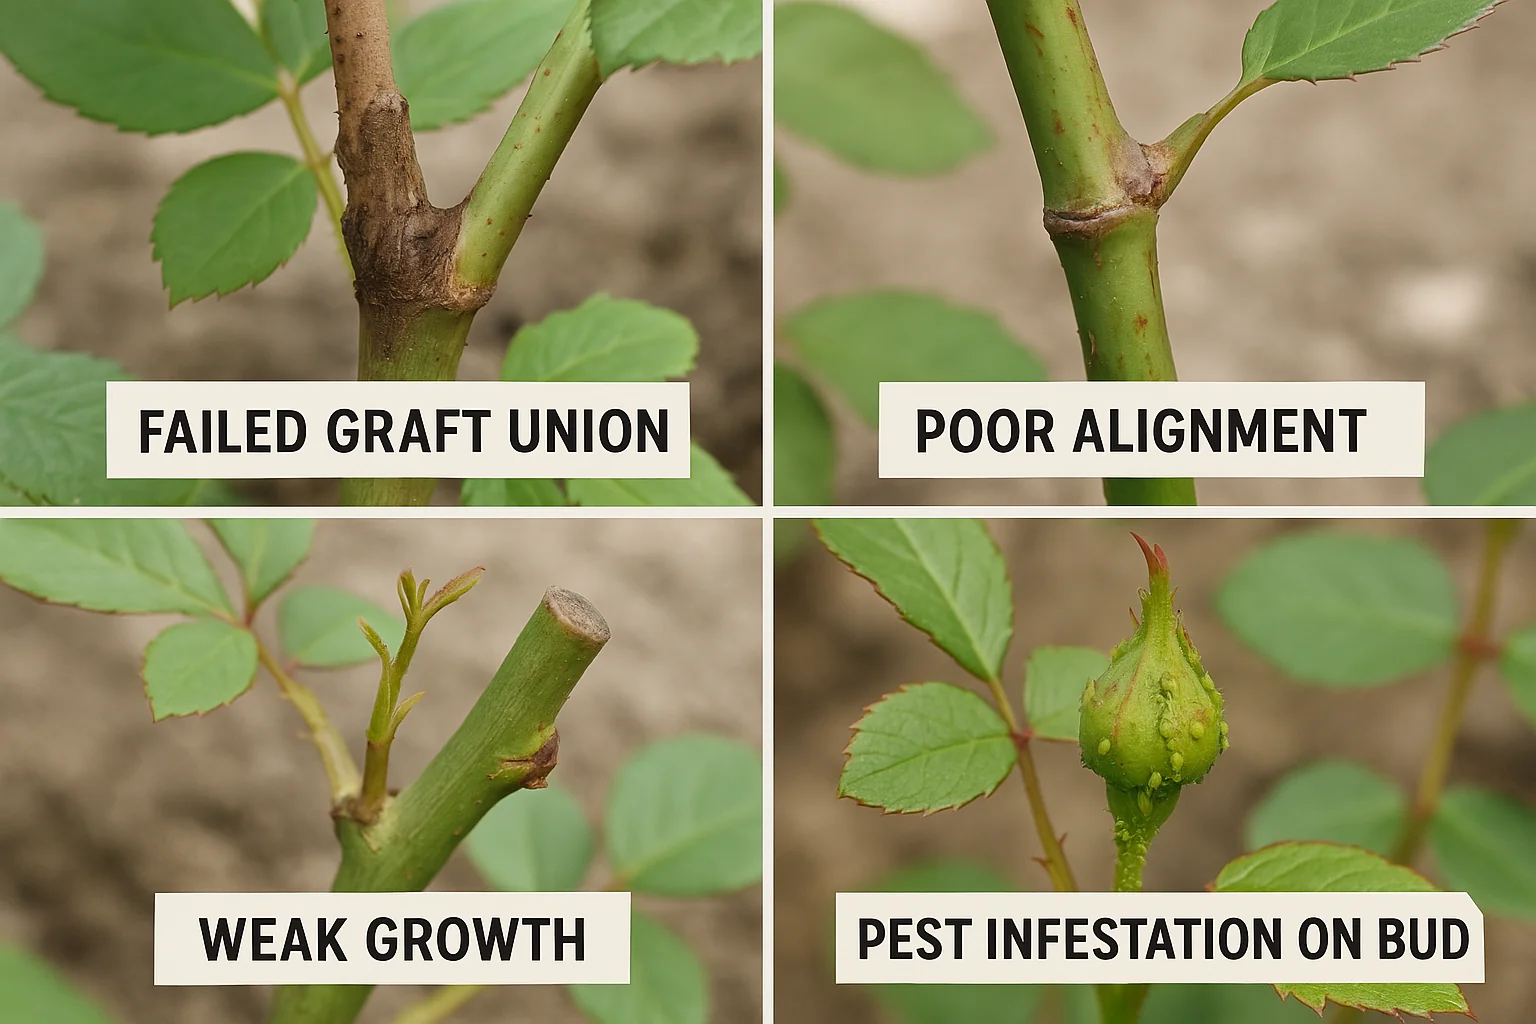
1. Graft Failure ❌
Cause: If the graft doesn’t take, it could be due to improper alignment, poor scion or rootstock selection, or unfavorable weather conditions.
Solution: Double-check your grafting technique. Make sure the cambium layers (the green layer under the bark) of both the scion and rootstock are aligned. If you notice failure, try again using healthy plant material and grafting at the right time of year.
2. Weak or Slow Growth 🌱
Cause: If your grafted rose is growing slowly or weakly, it might not be receiving enough nutrients or water.
Solution: Ensure the graft is getting adequate moisture and nutrients. Consider adding a gentle, balanced fertilizer. Also, avoid overwatering, as it can suffocate the roots. 🌿
3. Graft Union Not Healing 🌿
Cause: This can happen if the graft is too tight or not properly wrapped, cutting off the flow of nutrients to the bud.
Solution: Loosen the graft wrap slightly and check for any signs of infection or decay. If the union is still not healing, you may need to restart the grafting process on a different rootstock.
4. Incompatibility Between Rootstock and Scion 🔄
Cause: Not all rose varieties are compatible. If you notice the graft isn’t taking, it could be due to a mismatch between the rootstock and scion.
Solution: Research compatible rose varieties before grafting. Some types are naturally more compatible than others, so it’s important to choose wisely.
5. Graft Dislodging 🌬️
Cause: Strong winds or mishandling can cause the graft to become dislodged, affecting its success.
Solution: Use a sturdy grafting tape or parafilm to secure the graft well. Consider protecting the plant from wind by using a plant support or placing the grafted plant in a sheltered area until it has taken root.
By addressing these common grafting problems early, you’ll improve your chances of success and enjoy healthy, blooming roses in no time! 🌸🌿
Final Thought ☀️🌵
Grafting roses using techniques like chip budding and T-budding is a rewarding way to grow healthier, more vibrant plants while preserving your favorite rose varieties. By understanding the basics of grafting and following the steps carefully, you can create strong, disease-resistant roses that bloom beautifully year after year. 🌷

Remember, success in grafting requires practice, patience, and proper aftercare. By avoiding common mistakes, taking the time to care for your grafted plants, and troubleshooting issues as they arise, you’ll soon be able to enjoy the fruits of your labor—gorgeous, thriving roses! 🌸
Whether you’re a beginner or an experienced gardener, mastering these grafting techniques will elevate your rose-growing skills and bring new life to your garden. Happy grafting, and may your roses flourish! 🌹🌿