
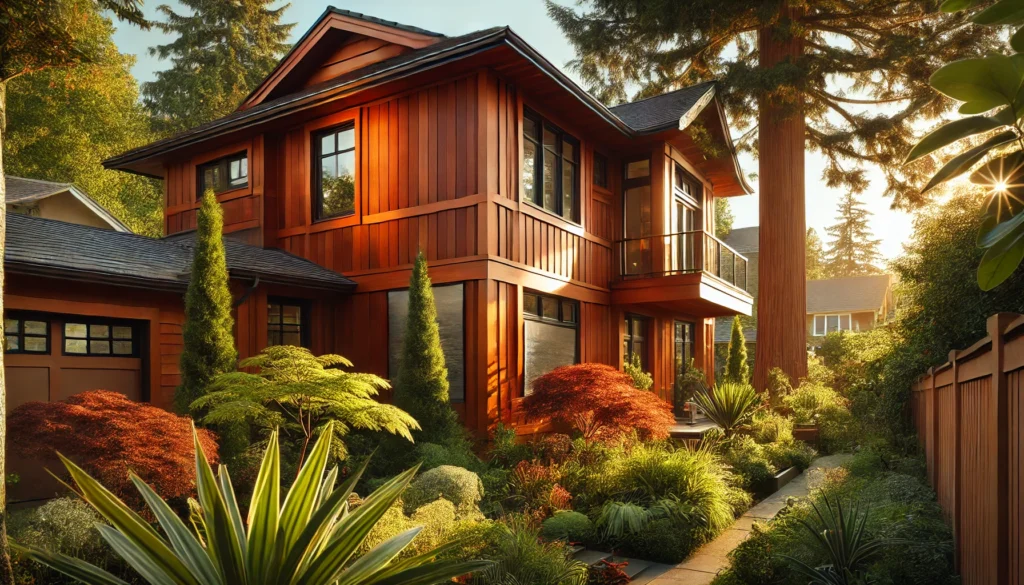
Looking to add a touch of natural elegance and durability to your home’s exterior?  Redwood siding is a timeless option that offers both beauty and functionality, making it a popular choice for homeowners. Not only does it create a warm, inviting aesthetic, but it also provides excellent protection against the elements when installed and maintained properly.
In this complete guide, we’ll walk you through everything you need to know about redwood siding—from installation tips to long-term maintenance and the unique benefits it offers. Whether you’re considering Redwood cladding
for a new build or a home renovation, this guide will help you make the best decision for your home. Let’s dive into how Redwood cladding can transform your exterior into something truly special! 
What is Redwood Siding?
Redwood siding is a popular and timeless choice for both residential and commercial buildings. It’s known for its natural beauty, durability, and eco-friendliness, making it a top contender for homeowners and builders alike. But what exactly is Redwood cladding, and why should you consider it for your next project?

Redwood siding refers to exterior cladding made from redwood trees, primarily found in California. This wood is highly prized for its rich, reddish-brown color and fine grain. Unlike other types of wood, redwood has natural properties that make it resistant to decay, moisture, and pests. 

Key Benefits of Redwood Siding
- Durability: Redwood is naturally resistant to weathering, rot, and insects, meaning it can last for decades with minimal maintenance.
- Aesthetic Appeal: Its deep, rich color adds warmth and sophistication to any building, whether rustic or modern.

- Eco-Friendly: As a renewable resource, redwood is an environmentally conscious choice, especially when sourced responsibly from certified forests.
- Insulation: Redwood has good thermal properties, helping to maintain a comfortable indoor climate.
Types of Redwood Siding
There are several types of Redwood cladding to choose from:
- Clapboard – Traditional horizontal boards, often used for a classic look.
- Shingle – Overlapping wood tiles for a more textured, rustic appearance.
- Board and Batten – Vertical boards with narrow strips (battens) covering seams for a clean, modern style.
Is Redwood Siding Right for You?
Redwood cladding might be the perfect choice if you’re looking for a sustainable, visually striking material that’s both durable and easy to maintain. However, keep in mind that it can be more expensive than other options like pine or vinyl. But for many, the investment is well worth the long-lasting beauty and performance it delivers. 
In the next sections, we’ll dive into the installation process, maintenance tips, and how to make the most of your Redwood cladding investment.
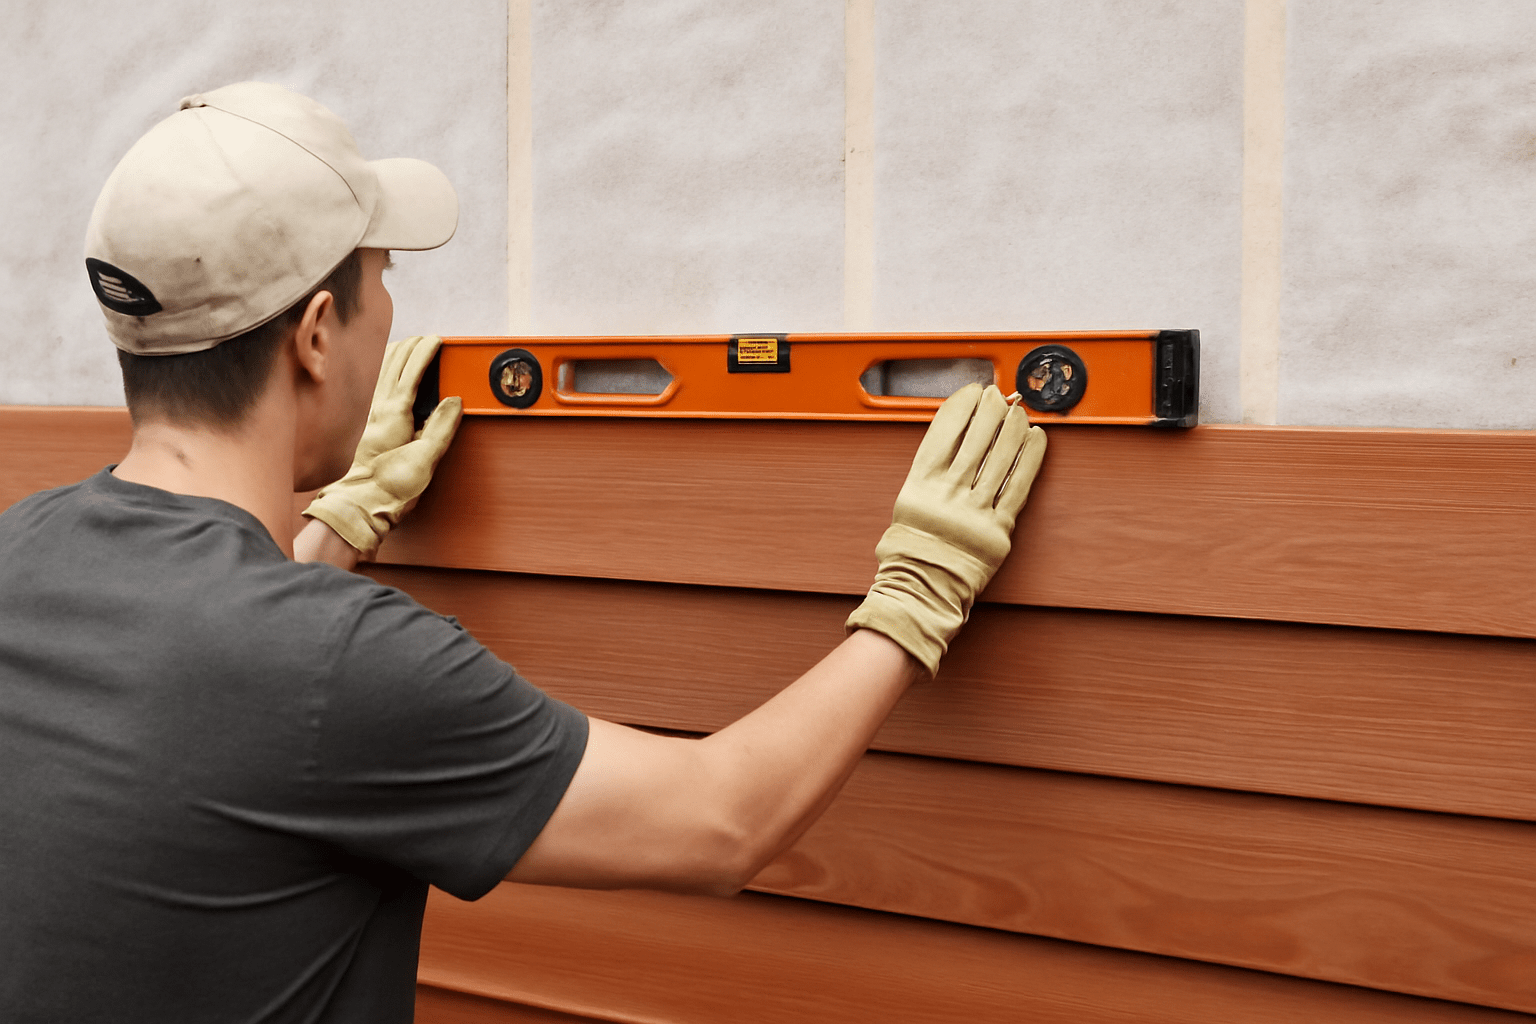
Installing Redwood Siding
Installing redwood siding can add a touch of elegance and durability to your home, transforming its exterior into something beautiful and long-lasting. While the process may seem intimidating, with the right tools and approach, you can achieve stunning results. Here’s a step-by-step guide to help you install redwood siding like a pro!
1. Prepare the Surface
Before you start, make sure your wall is clean, dry, and free of debris. If you’re installing over an old surface, remove any nails, screws, or leftover materials. If you’re replacing an old siding, inspect the underlying framework for any damage and make necessary repairs.
- Tip: Use a level to ensure the surface is even. Any inconsistencies in the wall may affect the siding’s alignment.
2. Gather Tools and Materials
You don’t need a massive tool kit, but there are some essential items you’ll need to complete the job successfully:
- Redwood cladding boards (pre-treated or natural)
- Nails or screws (preferably stainless steel for corrosion resistance)
- Hammer or power nailer
- Tape measure
- Saw (hand saw or power saw)
- Level
- Drill (for pilot holes, if necessary)
- Pencil or chalk line for marking
- Safety gear (gloves, goggles)
Having these tools on hand will streamline the process and ensure you’re prepared for each step.
3. Start with a Starter Course
The first row of siding is crucial for the rest of the installation. Begin at the bottom of the wall, making sure the first board is level. If it’s not, use shims to make adjustments. This first row should be nailed securely into place, as it serves as the foundation for the rest of the siding.
- Tip: Use a chalk line to mark a straight line along the base for easy alignment.
4. Install the Siding Boards
Once the starter course is in place, you can begin installing the Redwood cladding boards. Start at the left side and work your way across, ensuring each board overlaps the previous one slightly. This overlap is vital to prevent water from seeping behind the siding.
- Pro Tip: If you’re installing vertical siding, start at the bottom and work upward, always leaving a small gap between the bottom of the boards and the ground to prevent moisture damage.
5. Use Proper Spacing
Leave a small gap between each board to allow for expansion and contraction due to temperature changes. The ideal gap is typically around 1/8 to 1/4 inch. This is especially important in areas with high humidity or temperature fluctuations, ensuring your siding remains intact for years.
- Tip: Use siding spacers or small pieces of scrap wood to maintain consistent spacing as you go along.
6. Secure the Boards
When attaching the redwood boards, make sure to nail them securely, but avoid driving nails in too deep. The nail heads should be slightly below the surface to prevent splitting the wood, but not so deep that they affect the integrity of the boards.
- Tip: Use stainless steel nails or screws to avoid rusting, especially in areas with high moisture. Stainless steel is a great choice for redwood as it won’t stain or react with the wood.
7. Trim and Finish
Once you’ve installed all the siding, trim the edges of any excess material to create clean lines around windows, doors, and corners. You can use a saw or a specialized trim tool for precise cuts. Be sure to caulk around edges to keep out moisture and protect the wood.
8. Final Touches
After all the boards are installed and trimmed, apply a protective finish like a wood sealer or stain. This will help preserve the redwood’s natural beauty and extend its lifespan. Make sure to reapply the finish periodically to keep the siding looking fresh and protected from the elements.
- Tip: Redwood siding has natural oils that help with moisture resistance, but a sealer can add an extra layer of protection.
Conclusion
By following these simple steps, you can enjoy the stunning beauty and durability of Redwood cladding for years to come. With the right materials, a little patience, and careful attention to detail, your home will stand out with this timeless, eco-friendly option. 
Now that you know how to install redwood siding, it’s time to get started on your project. Happy building!
Benefits of Redwood Siding
Redwood cladding is not just a beautiful choice for your home; it also brings a variety of practical benefits that make it stand out in the world of exterior materials. Here’s why redwood is a top contender for your next siding project:
1. Durability and Longevity 
Redwood is naturally resistant to moisture, decay, and insects, which makes it a long-lasting siding option. When properly maintained, redwood can endure harsh weather conditions, from heavy rain to intense sun, without losing its structural integrity. With the right care, it can last for decades, saving you money on replacements in the long run.
2. Beautiful Aesthetic Appeal 
One of the most notable features of Redwood cladding is its striking appearance. With rich, warm tones ranging from deep reds to subtle browns, redwood creates a timeless, natural look that enhances the curb appeal of any home. Whether you’re aiming for a rustic or contemporary style, redwood fits effortlessly into any design.
3. Eco-Friendly Choice 
If sustainability is important to you, redwood is a great option. Redwood trees are typically grown in responsibly managed forests, making it a renewable and eco-friendly material. It’s also biodegradable, meaning it won’t contribute to environmental pollution at the end of its life cycle.
4. Energy Efficiency 
Redwood has natural insulating properties, which can help improve your home’s energy efficiency. By reducing heat transfer, it helps keep your home warmer in winter and cooler in summer. This can lead to lower energy bills and a more comfortable living space.
5. Low Maintenance Needs 
While all siding materials require some level of maintenance, redwood is relatively low maintenance compared to other options. With regular cleaning and occasional staining or sealing, you can keep your Redwood cladding looking fresh for years. Plus, its natural resistance to rot and insects means fewer repairs over time.
6. Versatility in Design 
Redwood siding is incredibly versatile. It can be used in various applications, from traditional horizontal and vertical installations to more unique designs, such as shiplap or board-and-batten styles. Whether you want a classic look or a more modern, custom design, redwood offers flexibility in creating the perfect exterior.
7. Adds Value to Your Home 
Investing in high-quality materials like redwood can increase your home’s value. Not only does it improve the aesthetic appeal of your property, but potential buyers will also appreciate its durability and low maintenance. If you’re looking to make a lasting impression, Redwood cladding is a smart choice that can yield returns when it’s time to sell.
With these benefits in mind, it’s easy to see why Redwood cladding is a top choice for homeowners looking to upgrade their exterior. Whether you’re drawn to its beauty, durability, or eco-friendliness, redwood is a reliable and attractive material that stands the test of time.
Maintaining Redwood Siding
Redwood siding is known for its stunning natural beauty, durability, and weather-resistant qualities. However, to keep it looking great and lasting for years, regular maintenance is key. Here’s a step-by-step guide to help you maintain your Redwood cladding with ease!
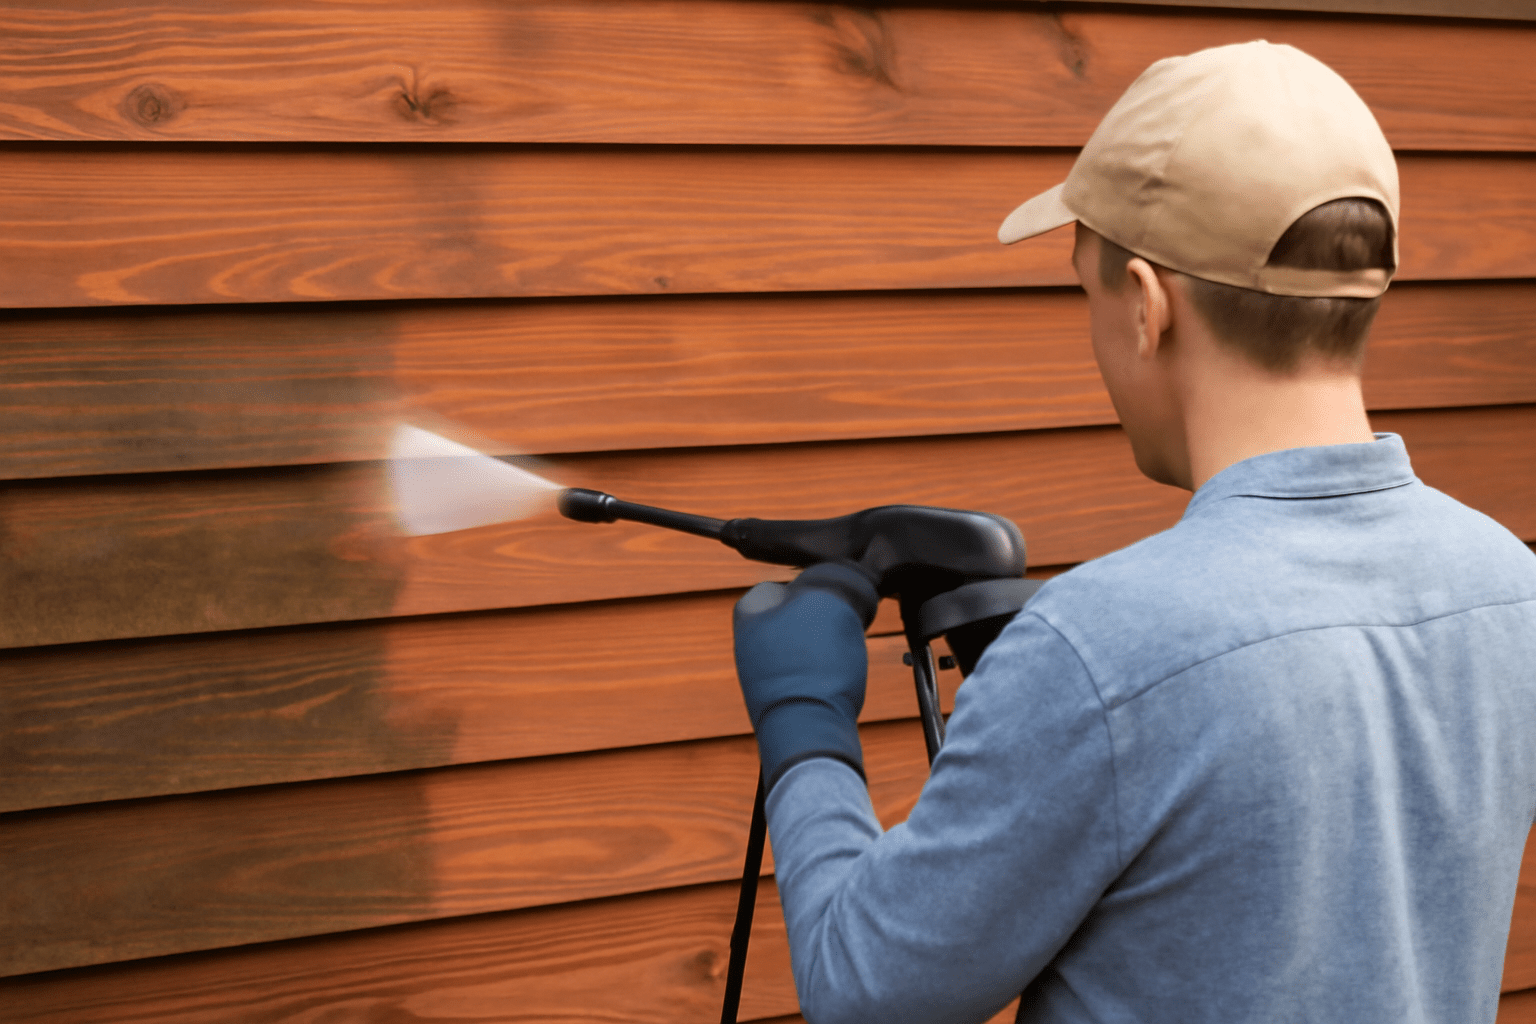
1. Regular Cleaning 
To keep your redwood siding looking fresh and vibrant, it’s essential to clean it at least once a year. Dirt, dust, and debris can accumulate over time, which can cause discoloration or even damage if left unchecked.
How to Clean:
- Use a soft brush or a pressure washer on a low setting to remove dirt and grime.
- For tough stains, mix a solution of mild soap and water or use a specialized wood cleaner. Avoid harsh chemicals that could strip the wood’s natural oils.
- Rinse thoroughly with clean water to remove all cleaning solutions.
2. Inspect for Damage 
Check your siding regularly for signs of wear and tear. Look for:
- Cracks or splits
- Signs of rot or mold
- Loose or missing boards
These issues can escalate quickly if not addressed. Catching small problems early can save you time and money on larger repairs down the road.
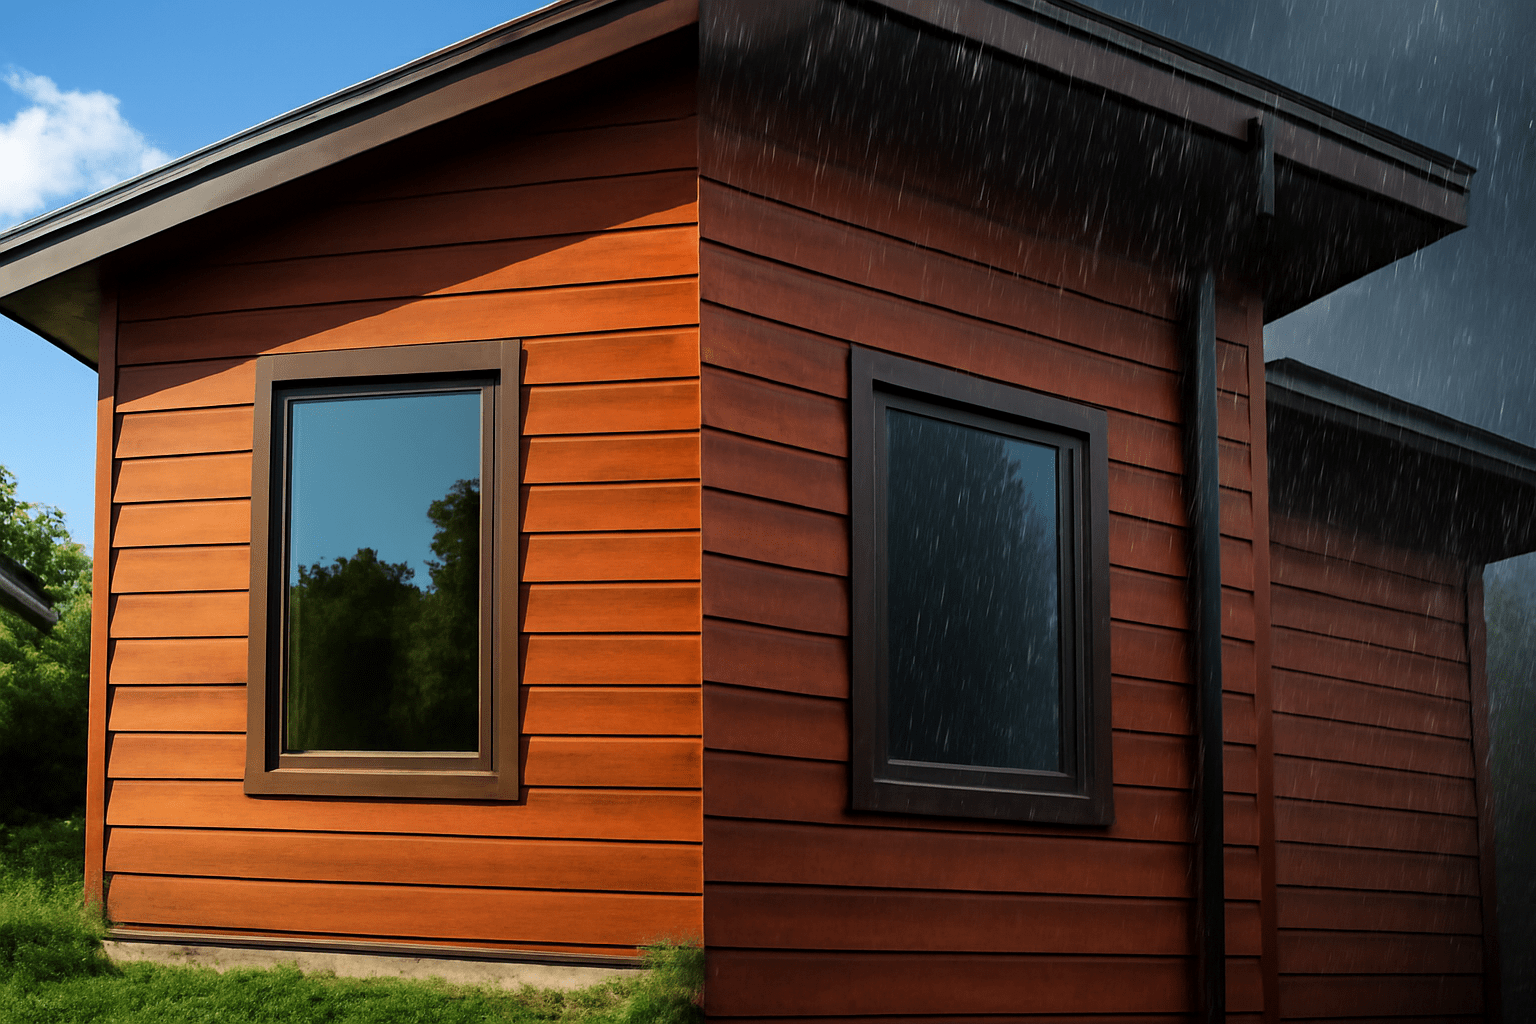
3. Prevent Moisture Build-Up 
Excess moisture is one of the biggest threats to Redwood cladding, leading to rot and mold growth. To prevent this:
- Ensure proper drainage around your home by keeping gutters clean and ensuring water flows away from the siding.
- Trim overhanging branches to keep the siding from staying damp for too long.
- If you live in a humid area, consider installing a moisture barrier to protect the siding from prolonged exposure to moisture.
4. Sand and Refinish as Needed
Over time, the wood may lose some of its luster or develop a weathered gray look. If you want to restore its beauty, sanding and refinishing is a great option.
How to Sand and Refinish:
- Lightly sand the surface to remove rough patches and worn areas. This will smooth out the texture and prepare it for refinishing.
- Apply a high-quality wood sealer or stain to protect against the elements and maintain the wood’s rich color. Choose a finish that suits your desired aesthetic, from clear to darker stains.
5. Seal and Protect 
A protective sealant is your best defense against the elements. Redwoods naturally contain oils that help repel moisture, but adding an extra layer of protection can prolong its life.
- Use a penetrating wood sealer designed for redwood. This will help maintain the wood’s natural beauty while providing an extra layer of defense against UV rays, moisture, and temperature fluctuations.
- Reapply the sealant every 2-3 years for optimal protection.
6. Address Termites and Pests 
While redwood is naturally resistant to termites and other pests, they can still cause damage under the right conditions. Regularly check for signs of infestation, such as:
- Small holes in the wood
- Powdery residue near the base of the siding
- Visible pests
If you notice any signs, act quickly to treat the affected area and prevent further damage.
7. Monitor for Sun Damage 
Exposure to the sun’s UV rays can cause Redwood cladding to fade or become discolored. While this can add character, it may not be the look you want.
- Use UV-resistant stains or sealants to help protect the wood from fading.
- Consider installing awnings or shutters to provide additional protection from direct sunlight.
8. Replacing Damaged Boards 
No matter how well you care for your redwood siding, eventually, individual boards may need to be replaced. If you notice a damaged board, replace it as soon as possible to prevent water infiltration and further damage to surrounding areas.
Steps for Replacement:
- Carefully remove the damaged board by loosening the fasteners.
- Measure and cut a new piece of Redwood cladding to fit the space.
- Install the new board using the same fasteners as the original, ensuring it’s securely in place.
By following these simple maintenance tips, your redwood siding can continue to enhance your home’s curb appeal and stand up to the elements for many years to come. Regular attention and care will not only preserve its beauty but also ensure its longevity!
Common Problems with Redwood Siding
Redwood cladding is a popular choice for homeowners looking for durability, beauty, and a natural aesthetic. However, like any material, Redwood cladding does have its challenges. Here are some of the most common problems you might encounter and how to deal with them.
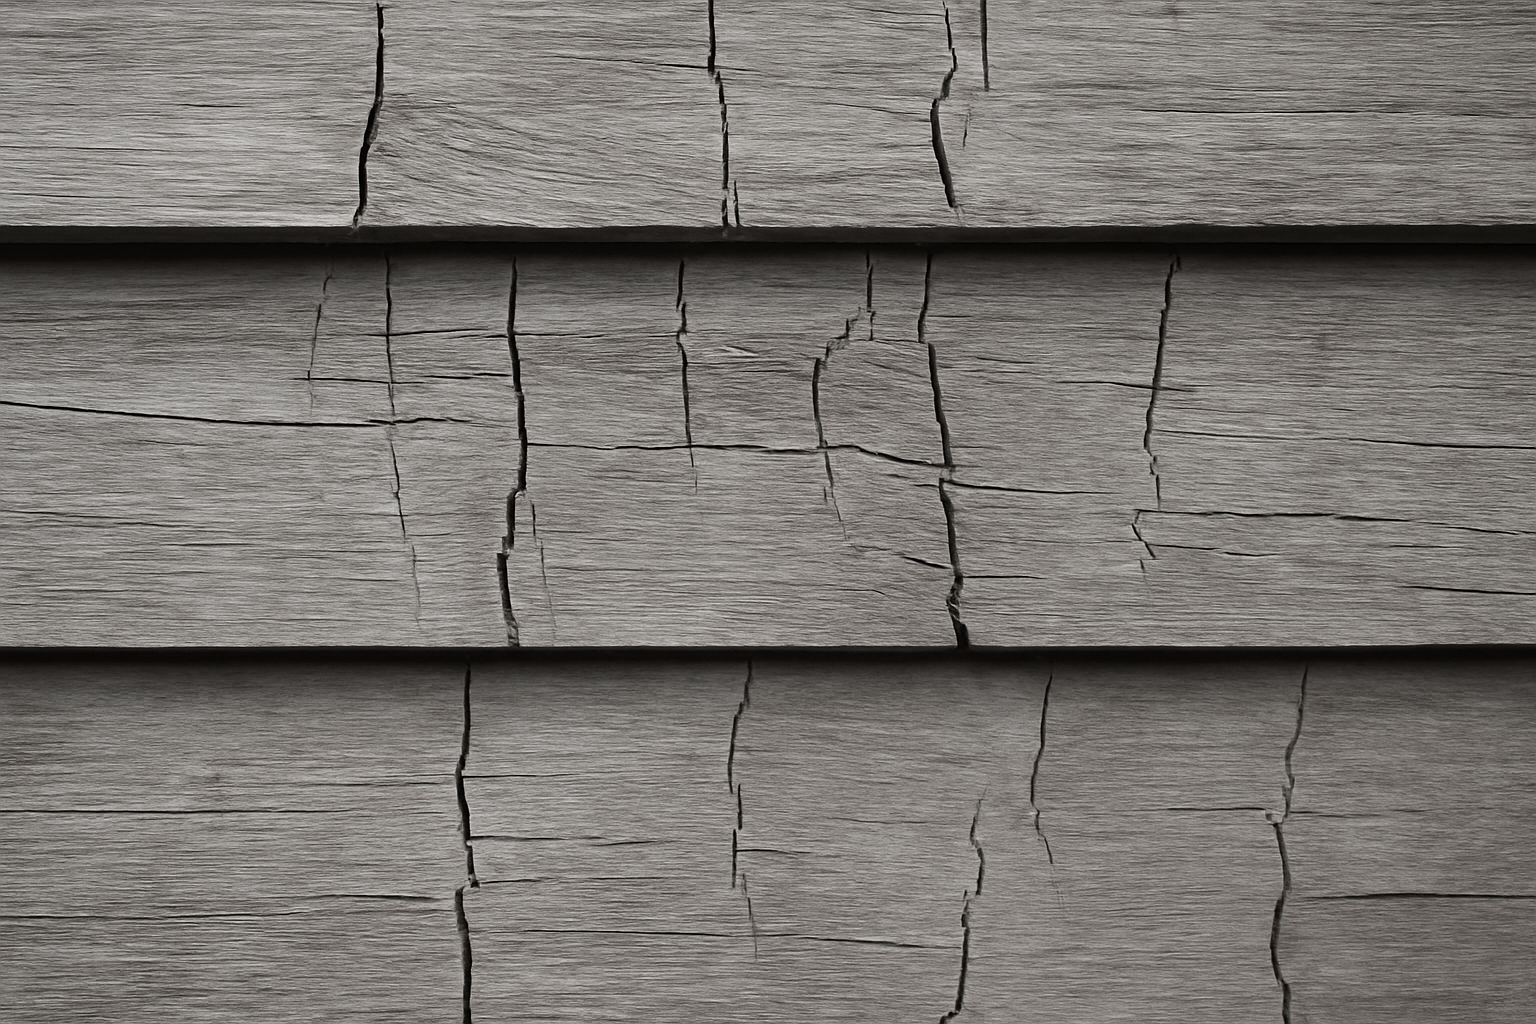
1. Wood Splitting and Cracking 
Over time, redwood can develop cracks or splits, especially if it’s exposed to extreme weather conditions like intense heat or freezing temperatures. This can make your siding look aged and less attractive.
Solution: To prevent this, make sure the siding is properly sealed with a protective finish. Regular maintenance, such as re-staining or re-finishing every few years, can help keep the wood flexible and less prone to splitting.
2. Fading Color
Redwood siding is known for its rich, reddish-brown hues. However, without proper care, it can fade over time due to exposure to UV rays.
Solution: Use a UV-resistant stain or sealant to protect the wood and preserve its color. If you notice fading, consider reapplying a protective finish to restore its original look.
3. Water Damage and Rot
Although redwood is naturally resistant to moisture, it is still susceptible to water damage over time, particularly if the wood is left untreated or the siding is poorly maintained. Water can cause the wood to rot, weaken, or even grow mold and mildew.
Solution: Ensure proper water drainage around your home, and regularly inspect the siding for signs of moisture buildup. Use a high-quality wood sealer to protect against moisture, and clean any buildup of dirt or debris from gutters to prevent water from pooling.
4. Insect Damage
While redwood is less prone to insect infestations than other woods, it’s still possible for pests like termites or carpenter ants to cause damage if they gain access to the siding.
Solution: Regularly check for signs of insect activity and treat the wood with an insect-repellent treatment. If you notice any holes or tunnels in the wood, consider calling in a professional to assess the damage and provide the necessary treatment.
5. Warping and Bending 
Extreme weather conditions can cause Redwood cladding to warp or bend. This can happen when the wood absorbs moisture unevenly or if the boards are not properly installed.
Solution: Ensure your Redwood cladding is installed with proper gaps between the boards to allow for expansion and contraction. Using a moisture-resistant backing board or vapor barrier can also help prevent uneven moisture absorption.
6. Cost and Maintenance 
Redwood siding can be more expensive than other types of siding, and the maintenance required to keep it looking great can add up over time.
Solution: While redwood requires more upkeep than other materials, investing in quality products (like durable stains and sealers) and following a regular maintenance schedule can extend the lifespan of your siding, making it a worthy investment.
7. Poor Installation 
Improper installation is one of the most common causes of problems with Redwood cladding. If not installed correctly, the boards may shift, warp, or even become prone to early damage.
Solution: Hire a skilled contractor with experience installing Redwood cladding. Proper installation techniques, such as leaving gaps between the boards and using corrosion-resistant fasteners, can ensure the longevity of your siding.
By staying on top of these common issues and addressing them early, you can keep your redwood siding looking beautiful and performing well for years to come. Regular maintenance and proper care are key to preventing many of these problems.
Conclusion
Redwood siding offers unmatched beauty, durability, and eco-friendliness, making it a top choice for homeowners looking to elevate their exterior. From its natural elegance to its long-lasting performance, Redwood cladding is an investment that will enhance your home for decades to come. By following the proper installation, care, and maintenance tips shared in this guide, you’ll ensure that your Redwood cladding continues to shine, providing timeless appeal and protection for your property.
Whether you’re renovating or building a new home, redwood siding offers the perfect blend of aesthetics and functionality. Start today, and enjoy the lasting beauty of Redwood cladding in your home!