
Have you ever noticed that your beautiful shade tree looks a little “sick” every rainy season? 🍂 Leaves stay wet for hours (sometimes days), black sooty mold appears on branches, fungal spots multiply, and small twigs keep dying back from the inside out. Many worried homeowners assume it’s a disease that needs spraying… but very often the real culprit is something much simpler: poor airflow inside the canopy.
Crown thinning to improve airflow is one of the single most powerful — yet surprisingly underused — techniques in modern tree care. When done correctly, it transforms dense, stuffy tree crowns into healthy, breathing structures that dry quickly, resist diseases far better, and handle strong winds with much less risk of branch failure. 🌬️✨
In this in-depth guide you’ll discover:
- Exactly what crown thinning really means (and how it’s different from other pruning types)
- Why airflow is often more important for long-term tree health than fertilizer or watering
- Which trees benefit dramatically from thinning (and which ones almost never need it)
- The golden rules professionals follow to avoid disastrous mistakes
- Step-by-step instructions even beginners can understand
- Real before-and-after examples from different climates
- When to call a pro instead of doing it yourself
Whether you’re caring for fruit trees in your backyard orchard 🍎, protecting a large heritage oak near your house 🏡🌳, or simply want your garden trees to thrive for decades — this complete guide will help you make smarter, safer decisions.
Let’s breathe new life into your trees — starting right now! 🌱
1. What Exactly Is Crown Thinning? 🧩
1.1 The Official Definition of Crown Thinning
According to the International Society of Arboriculture (ISA) and British Standards BS 3998:2010, crown thinning is defined as:
“The removal of a proportion of smaller, usually secondary branches throughout a tree’s crown to improve light penetration and air movement, while preserving the overall size and shape of the tree.”
The key words here are “throughout” and “proportion” — we’re not just trimming the edges, and we’re definitely not reducing the height or spread significantly.
1.2 Crown Thinning vs. Crown Reduction vs. Crown Lifting – Quick Comparison
| Technique | Main Purpose | Removes Live Wood? | Changes Overall Size/Shape? | Typical % of Canopy Removed | Best For |
|---|---|---|---|---|---|
| Crown Thinning | Improve airflow + light | Yes (mostly small) | Very little | 10–25% biomass | Disease prevention, health |
| Crown Reduction | Reduce height/spread | Yes (larger cuts) | Yes – noticeably | 20–40% | Clearance, safety |
| Crown Lifting | Raise canopy for clearance below | Yes (lower branches) | Yes – vertical space | Variable | Pedestrian/vehicle clearance |
| Deadwooding | Remove only dead/dying wood | Only dead | No | Minimal | Safety & aesthetics |
Understanding these differences prevents expensive mistakes — many “thinning” jobs accidentally become harmful reductions or topping.
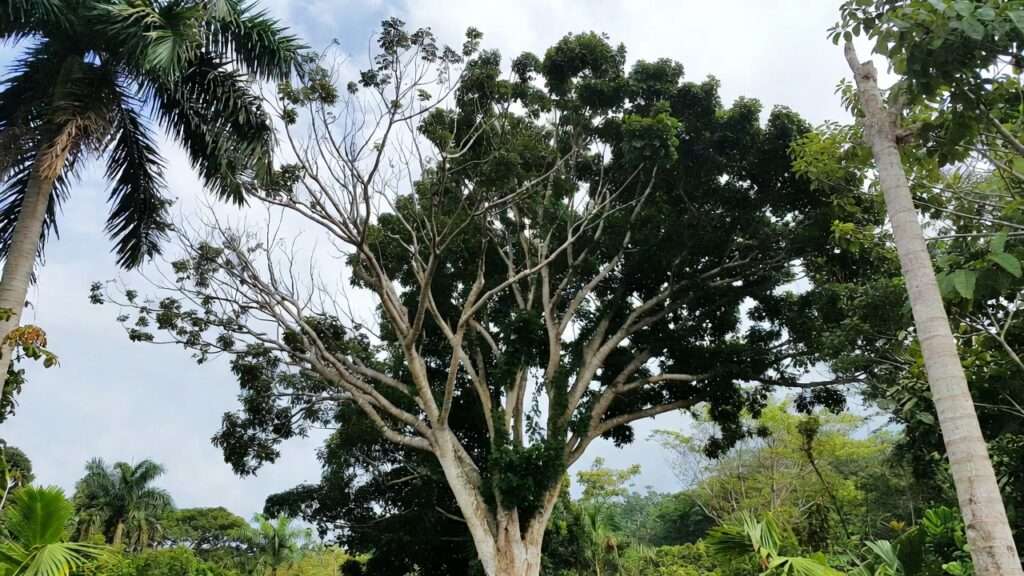
1.3 The #1 Goal: Improving Airflow (and Why It Matters More Than Most People Think) 🌬️
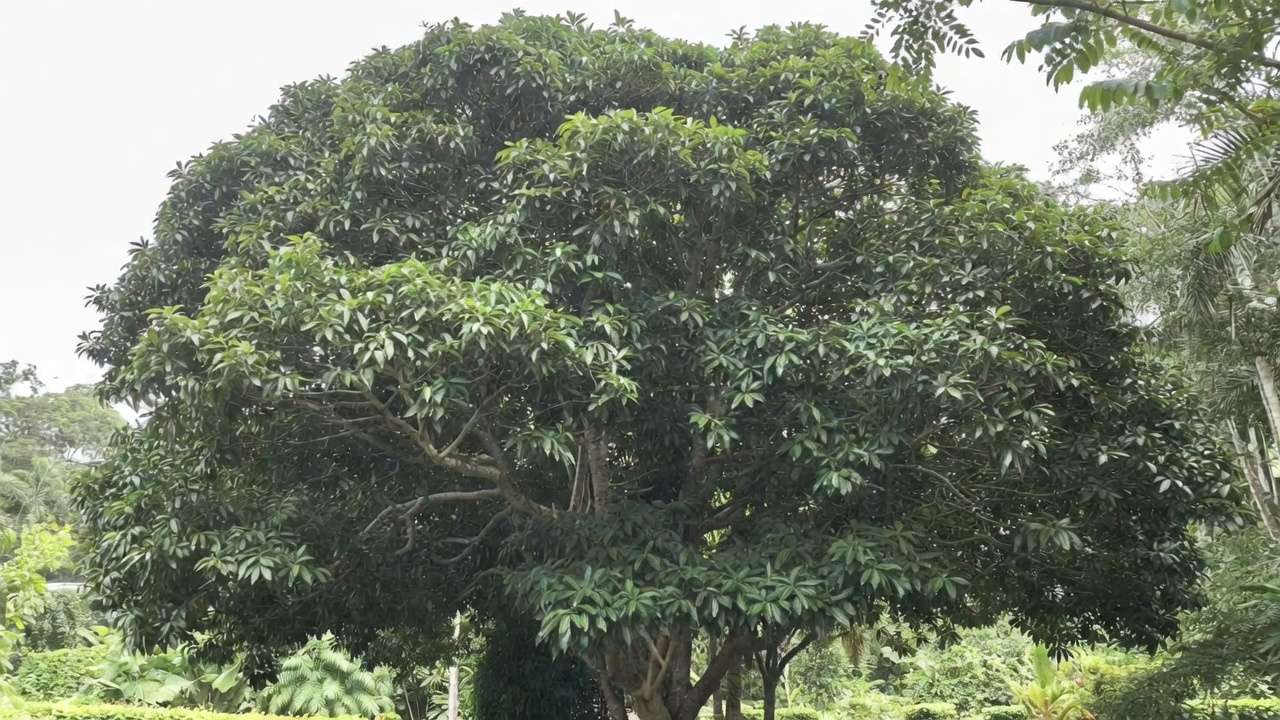
A dense canopy acts like a thick blanket after rain or morning dew. Moisture gets trapped for long periods, creating the perfect humid, still environment that fungal pathogens love. When we thin properly, we:
- Create dozens of small wind channels throughout the crown
- Reduce relative humidity inside the canopy by 15–40% (depending on species and density)
- Allow leaves to dry 2–6 hours faster after wetting events
This single change dramatically lowers the infection window for dozens of common diseases.
1.4 Secondary Benefits You’ll Also Get
- Much better light penetration → healthier inner leaves, better photosynthesis deep inside
- Reduced wind sail effect → lower chance of major branch failure in storms
- Less weight on limbs → fewer stress fractures over time
- Improved overall vigor → trees often respond with brighter foliage and stronger annual growth
Many clients are surprised to see their trees looking “greener” and more vibrant just one growing season after professional thinning! 🌟
2. Why Airflow Matters So Much for Tree Health 🌳❤️
Most people think about watering, fertilizing, or pest control when their tree starts looking unwell. But in reality, poor internal airflow is frequently the silent root cause that allows all those other problems to take hold and spread quickly.
2.1 How Poor Air Circulation Creates a “Tropical Greenhouse” Inside the Canopy
Imagine walking into a dense forest on a humid morning — the air feels thick, still, and damp even hours after sunrise. That’s exactly what happens inside an overly dense tree crown:
- Rain droplets and morning dew cling to leaves and twigs for extended periods (often 8–24+ hours in humid climates like many parts of Bangladesh 🇧🇩)
- Without wind movement, relative humidity stays very high (80–95%) deep inside the canopy
- Temperatures fluctuate less dramatically, creating stable, warm, moist pockets ideal for pathogen growth
This microclimate is basically a free five-star resort for fungi, bacteria, and certain pests. When we perform crown thinning to improve airflow, we break up those stagnant zones — turning the canopy into a breezy, fast-drying environment that makes life much harder for diseases.
2.2 Common Diseases That Thrive in Dense, Stagnant Canopies 🍄🦠
Here are the most frequent culprits that arborists see dramatically reduced (or even eliminated) after proper thinning:
- Apple scab (Venturia inaequalis) — especially devastating on crabapples, pears, and some ornamental apples
- Powdery mildew — attacks a huge range of species including crepe myrtle, dogwood, rose-of-Sharon, oaks, and many fruit trees
- Anthracnose — common on sycamore, London plane, ash, oak, and some maples
- Sooty mold — secondary problem caused by honeydew from aphids/scale thriving in humid shade
- Fire blight (Erwinia amylovora) — serious bacterial disease on pears, apples, cotoneaster, hawthorn
- Black spot on roses (when grown as small trees or standards)
- Needle cast fungi on pines, cedars, and some spruces
Studies and field observations consistently show that improving airflow through selective thinning can reduce foliar disease incidence by 30–70% depending on species, local climate, and initial density.
2.3 Real-World Examples: Before & After Airflow Improvement
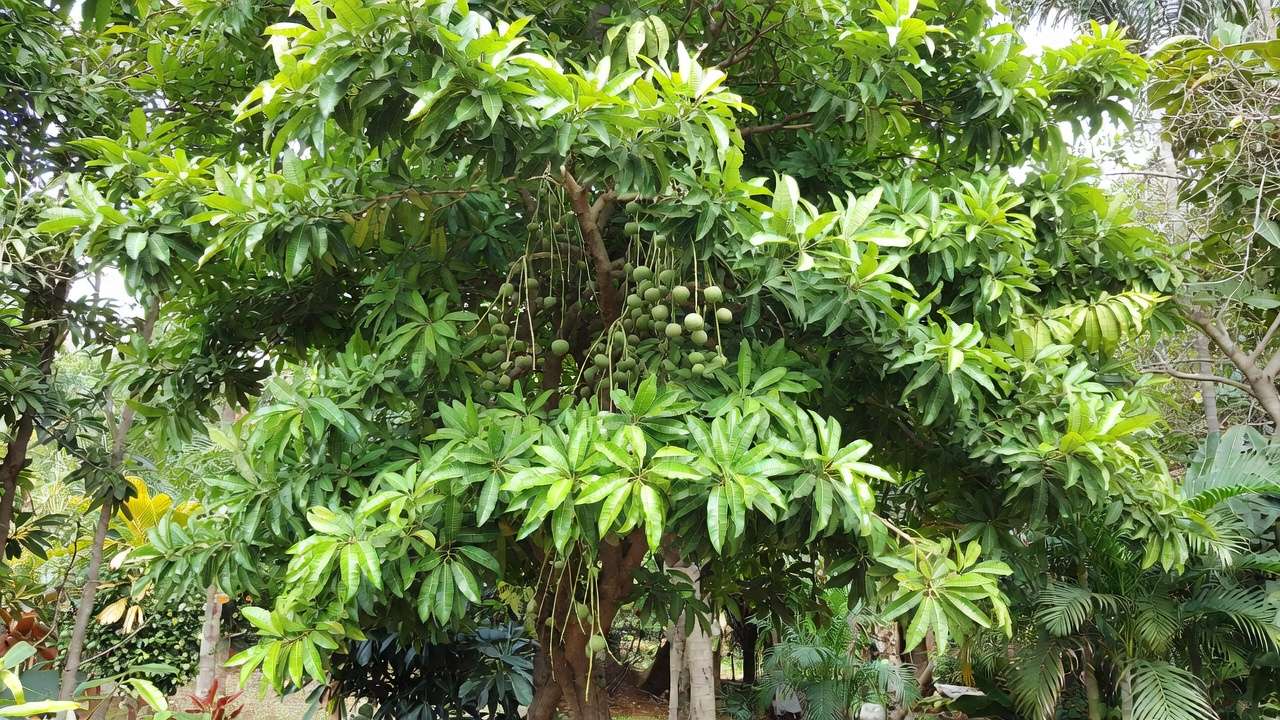
- Dhaka-area mango tree (10 years old) Before: Dense canopy, repeated anthracnose outbreaks, fruit drop, sooty mold every monsoon After moderate thinning (≈18% biomass removal): Fruit quality improved noticeably in year 2, almost no anthracnose lesions, leaves stayed dry after rain within 3–4 hours
- Crabapple in a Barisal garden Before: Severe apple scab every year, defoliation by July After professional thinning + good cultural care: Disease reduced by ~80%, tree retained leaves until late autumn
- Heritage jackfruit tree near a house Before: Heavy inner dieback, fungal brackets appearing on trunk, storm damage risk After conservative thinning over two seasons: Inner branches greened up, no new fungal brackets, much better storm resistance
These aren’t miracles — they’re the predictable result of removing the environmental conditions diseases need to thrive.
2.4 How Better Airflow Helps Trees Survive Storms Better
Dense, full crowns catch wind like a giant sail. Thinned crowns:
- Reduce wind loading by 20–40% (depending on how much was removed)
- Allow wind to pass through rather than push against the tree
- Lower the chance of large limb failure or whole-tree uprooting
In cyclone-prone regions like coastal Bangladesh, proper crown thinning is one of the most cost-effective ways to increase a mature tree’s storm resilience without making drastic size reductions. 🌪️→🌬️
3. Which Trees Benefit Most from Crown Thinning? 🌲🌴
Not every tree needs or even tolerates crown thinning the same way. Knowing which species and situations will respond best helps you prioritize and avoid wasting effort (or harming the wrong tree).
3.1 Best Tree Species & Situations
These trees usually show the most dramatic improvements in health, disease resistance, and storm resilience after proper crown thinning:
Fruit trees 🍎🍐🍊
- Mango, jackfruit, guava, litchi, citrus (lemon, orange, pomelo)
- Apple, pear, plum, peach (if grown in Bangladesh) → Fruit trees naturally develop dense crowns that trap humidity, leading to anthracnose, powdery mildew, and fruit rot. Thinning often doubles fruit quality and reduces disease sprays.
Ornamental & flowering trees 🌸
- Krishnachura (Delonix regia), radha-chura, gulmohar
- Cherry, crabapple, dogwood, crepe myrtle
- Jacaranda, amaltas (Cassia fistula) → These species suffer badly from powdery mildew and sooty mold when crowded.
Large shade trees 🌳
- Rain tree (Samanea saman), banyan (Ficus benghalensis), pipal (Ficus religiosa)
- Mahogany, teak, shisham, neem
- Oak, ash, plane, beech (in cooler regions) → Older specimens often become top-heavy and disease-prone; thinning improves longevity and safety.
Trees planted in small gardens or near houses 🏡
- When branches are close to roofs, windows, or power lines, light thinning improves airflow while keeping clearance.
3.2 Trees That Usually Do NOT Need Thinning (or Need Very Little)
- Conifers (pine, cedar, cypress, araucaria) — they naturally have open structure and removing live branches can cause permanent gaps
- Palms — they do not branch; thinning would remove fronds and weaken the tree
- Young trees (under 5–7 years) — they need all their foliage for fast growth
- Trees that are already open-canopied (e.g., some acacias, tamarind)
- Species with naturally sparse crowns (e.g., silver birch, certain willows)
3.3 Signs Your Tree Would Benefit from Thinning (Checklist) ✅
Tick these boxes to decide if it’s time:
- Leaves stay wet for more than 6–8 hours after rain or dew
- You see fungal spots, powdery white coating, or sooty mold on leaves/branches
- Inner branches are dying back or have very few leaves
- The canopy looks “solid” from a distance — you can’t see much sky through it
- Branches rub against each other or cross (creating wounds)
- You’ve had repeated disease outbreaks despite good watering/fertilizing
- The tree has survived a storm but lost large branches
- Fruit production or flower quality has declined in recent years
If you check 4 or more items, crown thinning to improve airflow will almost certainly help.
4. When Is the Best Time to Thin a Tree Crown? ⏰
Timing is almost as important as technique when performing crown thinning to improve airflow. Pruning at the wrong season can stress the tree, invite disease, or trigger excessive water-sprout growth.
4.1 Ideal Seasons by Climate Zone
Tropical & Subtropical climates (most of Bangladesh, coastal India, Southeast Asia)
- Best window: Late dry season → early wet season transition → December to early March (peak dry season in Barisal Division)
- Why this timing works best:
- Trees are dormant or semi-dormant → minimal sap flow, lower stress
- Wounds heal quickly once rains begin
- New flush of growth comes after the rainy season, helping the tree recover fast
- Avoid: Peak monsoon (June–October) — open wounds stay wet for weeks → very high risk of fungal & bacterial infection
Temperate climates (Europe, northern USA, parts of northern India)
- Best: Late winter to very early spring (dormant season) — February to early April
- Second choice: Midsummer (after full leaf-out, usually July–August) for light thinning only
Mediterranean / hot dry-summer climates
- Late winter (February–March) or very early autumn (late September–October)
Quick rule of thumb for Bangladesh & similar regions If your tree is deciduous → dry season (Nov–Mar) If your tree is evergreen (most fruit & shade trees in BD) → still dry season, but finish at least 4–6 weeks before the heavy monsoon arrives
4.2 Situations Where You Should Act Quickly (Emergency Thinning)
Sometimes waiting for the “perfect” season is riskier than pruning right away:
- Large dead, broken, or hanging branches after a storm — remove immediately for safety
- Severe rubbing/crossing branches creating open wounds → prune as soon as noticed
- Heavy disease outbreak (e.g., sudden fire blight or severe anthracnose) — remove affected parts promptly, then plan full thinning for next dry season
- Trees leaning dangerously or with major structural defects — professional emergency work needed regardless of season
Pro tip: Even in emergency cases, never remove more than 10–15% live canopy at once outside the ideal season. Better to do light corrective pruning now and full structural thinning later.
5. How to Perform Crown Thinning Correctly (Step-by-Step Guide) ✂️
This is the heart of the article — the practical “how-to” section that turns theory into real results. Crown thinning is a skill, not just random cutting. When done correctly, your tree looks almost the same from a distance… but dramatically healthier inside. When done poorly, you can seriously weaken or deform it.
Important safety note first: If the tree is taller than you can safely reach from a sturdy ladder, has branches >10 cm thick, is near power lines, or leans toward structures — hire a certified arborist. Never risk your safety or the tree’s long-term health.
5.1 Tools You Will Actually Need (and Which Ones to Avoid) 🛠️
Recommended tools:
- Sharp bypass secateurs (for branches up to ~2 cm)
- Loppers (for 2–5 cm branches)
- Folding pruning saw or Japanese pull-saw (for 5–10 cm branches)
- Sturdy step-ladder or pole pruner (for higher reaches)
- Thick gloves, safety glasses, long sleeves
- Disinfectant (alcohol 70% or bleach solution 1:9) — wipe blades between diseased/healthy trees
Avoid these common mistakes:
- Anvil-type secateurs (they crush instead of cut)
- Chainsaws for live thinning (too aggressive, create huge wounds)
- Hedge shears (they create unnatural flat cuts and lots of stubs)
Sharp tools = clean cuts = fast healing.
5.2 The 3 Golden Rules of Safe & Effective Crown Thinning
- Never remove more than 15–25% of the live canopy biomass in one session (Most homeowners should aim for 10–18% the first time. Professionals may go to 20–25% on healthy, vigorous trees.)
- Focus almost exclusively on smaller branches (≤ 5 cm diameter, preferably 1–3 cm). Removing large limbs creates big wounds and can shock the tree.
- Preserve the tree’s natural shape and branch distribution Never create “lion-tailing” (only leaves at branch ends) or remove all interior growth.
5.3 Step-by-Step Thinning Process
Step 1: Assess the whole tree from a distance (5–10 minutes) Stand back 10–20 meters. Look for:
- Dense pockets
- Dead/diseased branches
- Crossing/rubbing branches
- Very vertical water-sprouts
- Overly horizontal branches carrying too much weight
Step 2: Identify branches to remove (the 5 main types to target)
- Dead, dying, or diseased wood (priority #1)
- Crossing or rubbing branches (choose the weaker/less well-placed one to keep)
- Very vigorous upright water-sprouts/water shoots
- Branches growing straight toward the center of the tree (inward-growing)
- Weak, narrow-angled branches that look overcrowded
Rule of thirds: Try to remove branches from the lower, middle, and upper parts of the crown — not just the outside or just the inside.
Step 3: Make correct pruning cuts Always cut just outside the branch collar (the swollen area where branch meets trunk — it contains special healing cells). Never leave long stubs. Never cut flush against the trunk.
Basic cut technique (for branches >3 cm):
- Undercut 20–30 cm out from trunk (prevents bark tearing)
- Top-cut a few cm further out (removes most weight)
- Final cut just outside branch collar
Step 4: Work systematically Recommended order:
- Start at the top and work downward
- Work from the outside of the crown toward the center
- Step back every 10–15 cuts to check balance and shape
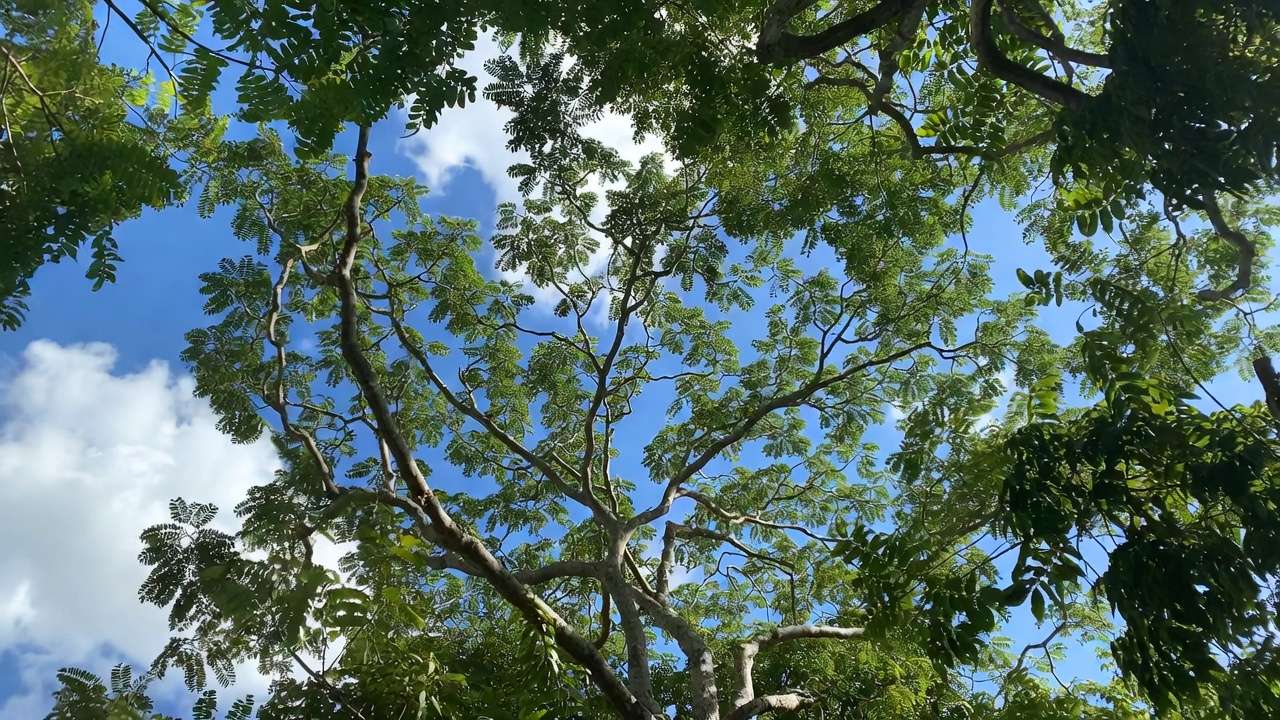
Step 5: Final “see-through” check After finishing, you should be able to see patches of sky through the canopy — roughly 40–60% open from most angles — without the tree looking sparse or gappy. It should still look full from 20+ meters away.

5.4 Common Mistakes That Do More Harm Than Good (and How to Avoid Them) ❌
- Lion-tailing — removing all inner branches → leaves only at tips → tree becomes weak & prone to breakage → Fix: Always leave some inner foliage
- Topping — cutting large branches back to stubs → massive water-sprout regrowth & decay → Never do this
- Over-thinning in one go (removing >25–30%) → shock, sunburn of inner bark, heavy dieback → Spread heavy thinning over 2–3 dry seasons
- Wrong cut placement — stubs or flush cuts → slow healing & decay entry → Always respect the branch collar
6. How Much Thinning Is Enough? (Visual Guides & Percentages) 📏
One of the most common questions homeowners ask is: “How will I know when I’ve thinned enough… but not too much?”
The answer lies in two practical guidelines professionals use every day: percentage of biomass removed + the “see-through” appearance test.
6.1 What “15–25% Biomass Removal” Actually Looks Like
Biomass percentage refers to the approximate volume/leaf area you remove — not the number of branches.
- 10–15% (light thinning – ideal for first-timers & slightly dense trees) → The tree looks almost unchanged from the street. → You mostly remove dead wood, crossing branches, and a few crowded pockets. → Perfect for fruit trees or ornamentals that aren’t severely overcrowded yet.
- 15–20% (moderate – most common professional level) → From a distance: still looks full and natural. → Up close: you clearly see sky patches through the canopy (about 30–50% open). → Inner branches start to receive good light and air — major disease reduction begins here.
- 20–25% (heavier thinning – only on very dense, healthy, vigorous trees) → Noticeably more open from underneath. → Sky visibility ≈ 50–60%. → Used mainly on large shade trees in high-humidity areas or after years of neglect.
Never exceed 25–30% in a single season unless a certified arborist determines the tree can handle it (very rare for homeowners).
6.2 The “50/50 Rule” for Seeing Through the Canopy
A very reliable visual rule used by many arborists:
After thinning, when you stand under the tree and look up, you should see roughly 50% sky and 50% leaves/branches across most of the canopy (not perfect checkerboard — just an overall impression).
- Too little open → still poor airflow
- Too much open → risk of sunburn, shock, and unnatural appearance
This 50/50 guideline works surprisingly well across many species and climates — including mango, jackfruit, rain tree, and krishnachura common in Barisal Division.
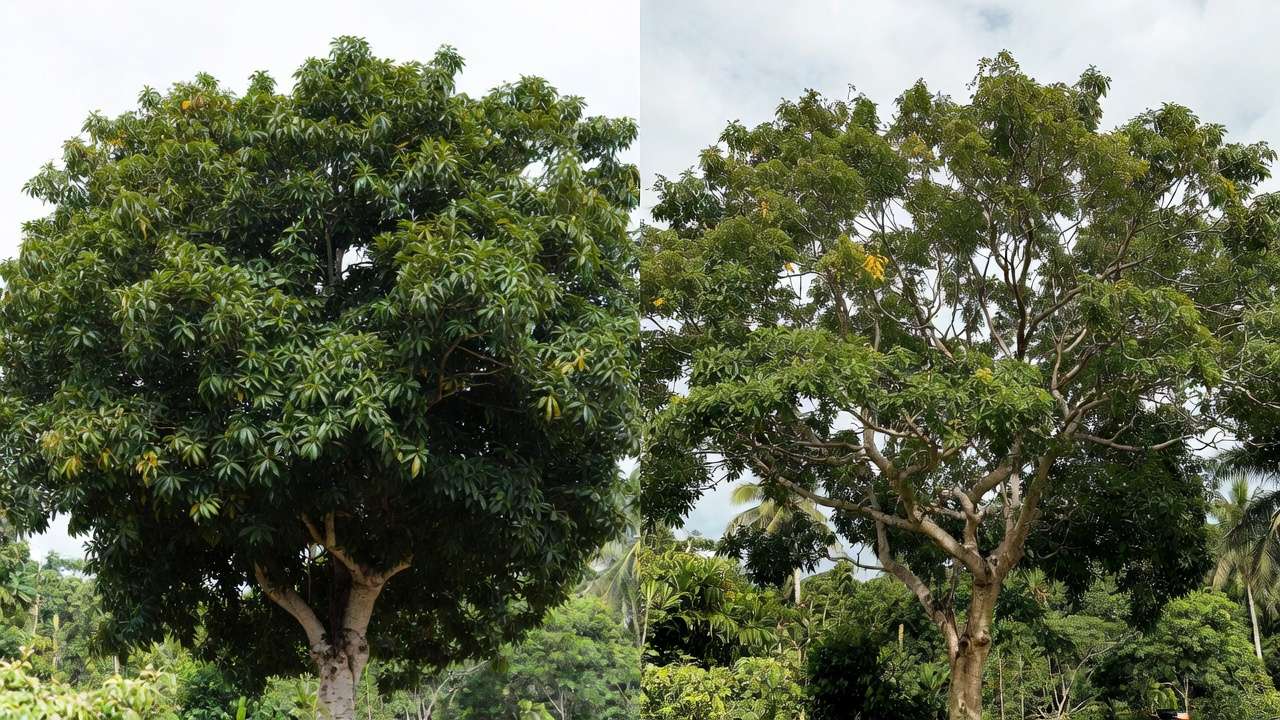
6.3 Before & After Comparison Examples (different tree types)
Example 1: Young mango tree (8–12 years old) Before: Solid green ball from below, almost no sky visible After 15–18% thinning: Clear sky patches, especially in the center and upper crown — leaves dry in 2–4 hours after rain instead of 12+
Example 2: Mature rain tree (Samanea saman) Before: Extremely dense umbrella shape, heavy inner dieback, lots of sooty mold After 20% thinning over two dry seasons: Air flows through freely, inner branches greening up again, much lower wind resistance
Example 3: Ornamental krishnachura Before: Powdery mildew every year, flowers hidden inside dense foliage After moderate thinning: Flowers more visible, much less disease, brighter overall color
7. Aftercare: Helping Your Tree Recover Quickly 🌱
After performing crown thinning to improve airflow, your tree has just experienced a significant change in its leaf area and exposure. Proper aftercare during the first 6–18 months makes the difference between a tree that bounces back beautifully and one that struggles with stress symptoms.
7.1 Watering & Mulching Recommendations
- First dry season after thinning (especially important in Barisal’s hot March–May period): Water deeply once every 7–10 days if there has been no significant rain (≈20–30 liters per mature tree, slowly applied at the drip line). Avoid frequent shallow watering — it encourages weak surface roots.
- Mulching — one of the best investments you can make: Apply 8–12 cm of organic mulch (dry leaves, rice straw, chopped coconut husk, or wood chips) in a wide ring around the tree (extend to the drip line if possible). Keep mulch 8–10 cm away from the trunk to prevent rot. → Benefits: Retains soil moisture, moderates soil temperature, slowly feeds the tree, and suppresses competing grass.
7.2 Fertilization – Yes or No?
General rule for the first year after moderate/heavy thinning: Usually NO heavy fertilization.
The tree is redirecting energy to wound closure and new root/shoot balance. Adding lots of nitrogen too soon can cause:
- Excessive soft water-sprout growth
- Increased susceptibility to pests/diseases during recovery
What to do instead:
- Apply a light, balanced slow-release organic fertilizer (e.g., well-rotted cow dung compost, vermicompost, or 10:10:10 NPK at half strength) only if the tree shows signs of nutrient deficiency (pale/yellow leaves, very poor growth) after the first new flush of leaves appears.
- Focus on micronutrients if needed (zinc, boron, magnesium — common deficiencies in fruit trees in Bangladesh soil).
Second year onward: Resume normal seasonal feeding based on species (e.g., fruit trees benefit from post-harvest feeding).
7.3 When to Expect Visible Results
- 1–3 months: Wound callusing begins, new buds may appear on previously shaded branches
- First growing season (usually next monsoon/post-monsoon): New leaves often greener and larger, better flowering/fruit set in many species
- 12–24 months: Full benefits become obvious — much lower disease pressure, stronger branch structure, improved overall canopy density (but now healthy density)
Patience is key — a well-thinned tree almost always looks better in year 2 than immediately after pruning.
7.4 Signs That Something Went Wrong (and What to Do)
Red flags during recovery:
- Extensive dieback of small twigs (possible over-thinning or drought stress) → Increase watering + mulch, avoid further pruning for at least 12 months
- Sunburn/scorch on previously shaded bark → Whitewash trunks with diluted lime paint, provide temporary shade cloth if severe
- Massive water-sprout explosion → Light pruning of excess sprouts next dry season
- Fungal brackets or oozing cankers → Consult a professional arborist immediately
Most minor issues resolve with good basic care — don’t panic and over-react with more cutting or chemicals.
8. Professional vs. DIY: When to Call an Arborist ⚠️
Crown thinning is one of the pruning techniques that some homeowners with good tools, basic knowledge, and a small-to-medium tree can safely perform themselves. However, there are many situations where attempting it yourself can lead to serious injury, tree death, or thousands of taka in future repair costs.
8.1 Jobs That Are Usually Safe for Homeowners (with proper preparation)
You can confidently do light-to-moderate crown thinning yourself if all of these are true:
- The tree is ≤ 6–7 meters tall overall
- You can reach most branches safely from a sturdy step-ladder or short extension pole pruner
- You’re only removing branches ≤ 5 cm thick
- You’re planning to remove ≤ 15% of the live canopy (very conservative first thinning)
- No power lines, nearby structures, or neighboring properties are at risk
- The tree has no major defects (large cavities, heavy lean, extensive decay)
- You have sharp, clean tools and understand the branch collar & 3-cut technique
Typical safe DIY candidates in Barisal Division:
- Young–middle-aged mango, guava, litchi, lemon, or krishnachura trees
- Ornamental trees under 5–6 m
- Small jackfruit or jamrul trees in the backyard
8.2 Red Flags – Situations That Require a Certified Arborist (Almost Always)
Call a qualified tree professional immediately if any of these apply:
- Tree height > 7–8 meters (especially if you need climbing or aerial lift work)
- Branches thicker than your wrist (≈7–8 cm) need removal
- Tree is very close to house, roof, power lines, or road
- You see large cavities, fungal brackets/conks, oozing, or extensive dead wood
- Tree has major lean, split crotches, or codominant stems with included bark
- Previous bad pruning (topping, lion-tailing) has already occurred
- You plan to remove >20% of live canopy or the tree is stressed/declining
- Tree is a heritage/old specimen (large rain tree, banyan, pipal, mahogany)
- You feel unsure or anxious at any point during assessment
In Bangladesh, look for professionals who:
- Have ISA Certified Arborist credentials (or equivalent international training)
- Use proper safety gear (harness, helmet, ropes)
- Carry liability insurance
- Provide written quotes with clear scope of work
- Don’t use topping as their default method
8.3 Questions to Ask Before Hiring a Tree Surgeon
- “What is your training/certification in arboriculture?”
- “How do you decide how much to thin? What percentage do you normally remove?”
- “Will you make proper branch collar cuts or do you use other techniques?”
- “Do you use climbing ropes or do you rely mostly on ladders/cherry pickers?”
- “Are you insured for damage to property or injury?”
- “Can you show me examples of your previous thinning work on similar trees?”
- “Will you clean up all debris and leave the site tidy?”
A good arborist will happily answer these questions and may even walk you through their reasoning before starting work.
Quick safety reminder: In Barisal Division’s humid climate, any large pruning wound left open during the monsoon can become an entry point for serious decay fungi. Professionals know how to time work and make clean cuts that heal fastest.
9. Frequently Asked Questions (FAQ) ❓
Here are the questions we hear most often from homeowners in Barisal Division and similar tropical/subtropical regions when they first consider crown thinning to improve airflow.
1. How often should I thin my tree? Most trees only need significant crown thinning every 3–7 years, depending on species, growth rate, and initial density. Fast-growing fruit trees (mango, jackfruit, guava) often benefit from light maintenance thinning every 3–5 years. Slower-growing shade trees (rain tree, mahogany, pipal) may only need it once every 5–10 years. After the first major thinning, many people find that annual removal of just a few problem branches (deadwood + light crossing) is enough to maintain good airflow.
2. Can crown thinning save a tree that is already quite diseased? Sometimes yes — but it depends. Thinning dramatically improves conditions so the tree can fight off existing infections better and prevents new ones. However, if the disease has already reached the trunk, major branches, or roots (e.g., advanced root rot, heartwood decay, large fungal brackets), thinning alone usually isn’t enough. In those cases, combine thinning with professional diagnosis, targeted treatment, and possibly structural support.
3. Will thinning make my tree grow faster or produce more fruit/flowers? Usually yes, but indirectly. Better light and air → healthier inner leaves → more photosynthesis → stronger overall energy reserves. Many fruit tree owners notice noticeably better fruit size, quality, and quantity starting in the second season after proper thinning. Flowering trees (krishnachura, amaltas, jacaranda) often produce more visible and abundant blooms because flowers aren’t hidden inside dense foliage.
4. Is it too late if my tree is already sick? It’s rarely “too late” to improve airflow — even older or stressed trees usually respond positively to careful thinning. Just be more conservative: remove only 10–15% maximum in the first session, focus mainly on dead/diseased wood, and give excellent aftercare (mulch + deep watering).
5. Can I do very light thinning every year instead of one heavier session? Yes — and many experts actually prefer this “little and often” approach for homeowners. Removing 5–10% of live canopy annually (mostly problem branches) causes almost no stress and keeps airflow excellent over time. This method is especially good for fruit trees that fruit heavily every year.
6. Does thinning stress the tree a lot? When done correctly (right time, right amount, proper cuts), stress is minimal and temporary. The tree quickly compensates by growing new leaves and redirecting energy. Serious stress usually comes from: over-thinning (>25–30%), wrong season, poor cuts, or lack of aftercare.
7. Will thinning make my tree look ugly or sparse? Only if done incorrectly (lion-tailing, topping, over-thinning). A properly thinned tree looks almost the same from the street — just a little more open and airy up close. Most people say their tree looks “healthier and fresher” rather than sparse.
8. Do I need to seal pruning cuts with paint or paste? No — modern arboriculture strongly advises against wound dressings in most cases. Healthy trees seal themselves best. Wound paints can actually trap moisture and encourage decay in our humid climate.
9. How much does professional crown thinning cost in Barisal Division? Prices vary widely (2025–2026 rates): Small–medium trees (up to 6–8 m): ৳3,000–8,000 Larger mature trees: ৳10,000–25,000+ depending on height, complexity, and debris removal. Always get 2–3 written quotes from different professionals.
10. My tree is next to my house — is thinning safe near buildings? Yes — in fact, it’s often safer long-term because a well-thinned tree has much less wind resistance and lower chance of large branch failure. Just make sure the professional evaluates branch structure near the house very carefully.
10. Final Thoughts & Quick Reference Checklist ✅
Congratulations — you’ve now read one of the most complete, practical guides available on crown thinning to improve airflow! 🌟
This simple but powerful technique is often the missing piece that turns struggling trees into thriving, long-lived garden assets. In our humid, monsoon-heavy climate here in Barisal Division, improving airflow through thoughtful crown thinning is frequently more important for long-term tree health than extra fertilizer, frequent spraying, or even heavy watering.
Key Takeaways – One Last Time
- Crown thinning ≠ crown reduction or topping — it’s selective removal of smaller branches to create breathing space
- The main goal is better airflow → dramatically lower disease pressure + improved storm resistance
- Most common fruit, ornamental, and shade trees in our region respond beautifully (mango, jackfruit, krishnachura, rain tree, etc.)
- Do it during the dry season (ideally December–early March)
- Follow the golden rules: ≤15–25% removal, proper cuts, preserve natural shape
- Aftercare (mulch + deep watering) is crucial for fast recovery
- When in doubt about size, safety, or tree condition — call a qualified arborist
Printable Quick Reference: 10-Point Crown Thinning Checklist Use this before, during, and after your next thinning session:
- Confirm the tree species actually benefits from thinning
- Choose the right season (dry season preferred)
- Assess from a distance: identify dense pockets & problem branches
- Gather sharp, clean tools + safety gear
- Remove only dead/diseased/crossing/weak/inward-growing branches first
- Never remove >15–20% live canopy (25% max for very healthy trees)
- Make every cut just outside the branch collar
- Work top-down, outside-in; step back frequently to check balance
- Finish with the “50/50 sky-to-leaf” visibility test from underneath
- Apply mulch, water deeply during the first dry season, and observe recovery
Print this list, keep it in your garden shed — it will save you years of trial and error! 📋
Your trees are living investments in shade, fruit, beauty, and property value. Treating them with knowledgeable care — including crown thinning to improve airflow when needed — is one of the most rewarding things you can do as a gardener or homeowner.
If you try thinning this dry season, we’d love to hear how it goes! Feel free to share your before/after photos or questions in the comments below — happy thinning! 🌳💚


