
Imagine waking up to the heart-stopping crack of a 60-foot oak splitting in half and crashing onto your roof — all because invisible rot had been eating away at the trunk for years. 😱 This nightmare happens to thousands of homeowners every year, yet almost every single case could have been prevented with one simple habit: identifying tree trunk rot early.
Tree trunk rot (also known as heart rot, butt rot, or central column decay) is the silent killer of mature trees. It starts deep inside the wood, often without any obvious symptoms on the outside until 50–70% of the trunk is already compromised. By the time the tree leans, drops huge limbs, or topples completely, it’s usually too late to save it — and the removal bill can easily exceed $5,000–$15,000 depending on size and location.
The great news? When you know the early warning signs and inspect regularly, you can catch trunk rot in its infancy and either save the tree or plan safe removal long before it becomes a hazard. This 2000+ word expert guide gives you everything arborists wish every homeowner knew. 🌿💚
What Is Tree Trunk Rot and Why Does It Matter?
Tree trunk rot is the structural breakdown of wood tissue caused primarily by wood-decay fungi that enter through wounds or root damage. These fungi fall into three main categories:
- Brown rot (crumbles wood into cubes, destroys cellulose)
- White rot (breaks down both cellulose and lignin, turns wood spongy and pale)
- Soft rot (surface degradation, common in wet conditions)
Once established, decay spreads through the heartwood and sapwood, creating hollow cavities or soft zones that dramatically weaken the tree’s ability to support its own weight against wind, snow, or ice.
According to the International Society of Arboriculture (ISA) and USDA Forest Service studies, a tree can lose up to 70% of its structural strength before showing obvious external symptoms. That’s why identifying tree trunk rot early is absolutely critical for safety and preservation.
Real-world consequences include:
- Fallen trees causing $150+ million in annual property damage in the U.S. alone (FEMA data)
- Personal injury and fatalities (hundreds recorded yearly)
- Sudden emergency removals costing 3–5× more than planned removal
Common Causes of Tree Trunk Rot
Understanding how decay fungi enter is the first step to prevention.
- Mechanical wounds – lawn mower damage, poor pruning cuts, storm breakage, construction injury 🪚
- Dead branch stubs – flush cuts or broken branches that don’t compartmentalize properly
- Root damage – trenching, soil compaction, grade changes, vehicle traffic
- Insect attack – carpenter ants, termites, and wood-boring beetles often colonize already-decayed wood but can create entry points
- Previous topping or lion-tailing – creates massive wounds and decay columns
- Fire damage – even light scorching can kill protective bark layers
- Species susceptibility – some trees are naturally more prone (see table below)
High-Risk Tree Species for Trunk Rot 🌳⚠️
- Silver maple, willow, poplar, birch (very prone)
- Oak, beech, ash, elm (moderately prone)
- Cherry, apple, mountain ash (highly prone)
- Pine, spruce (prone to root/butt rot more than trunk)
Early Signs of Tree Trunk Rot: What to Look For
The best time to inspect is late fall through early spring when leaves are off and fungal fruiting bodies are most visible.
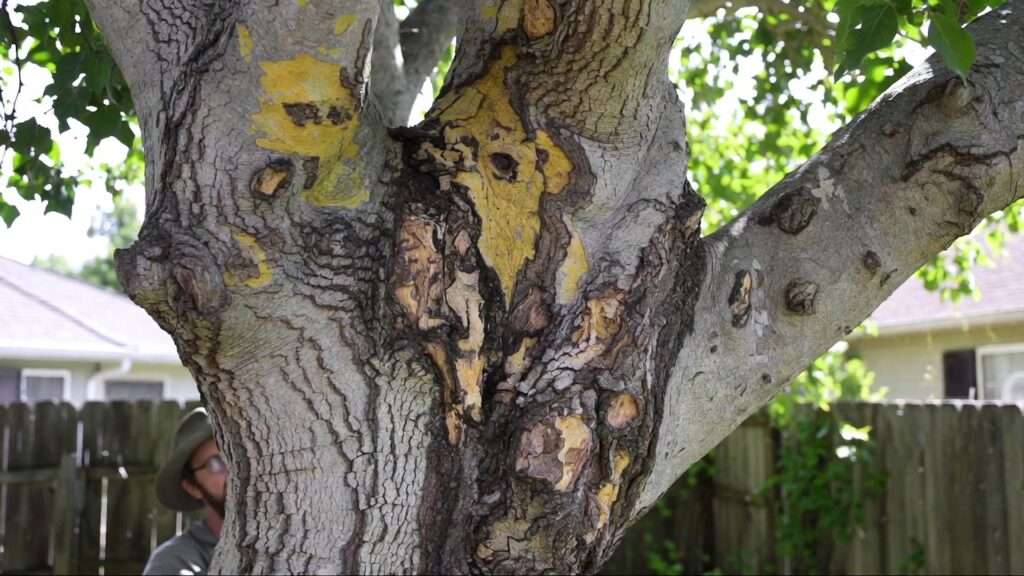
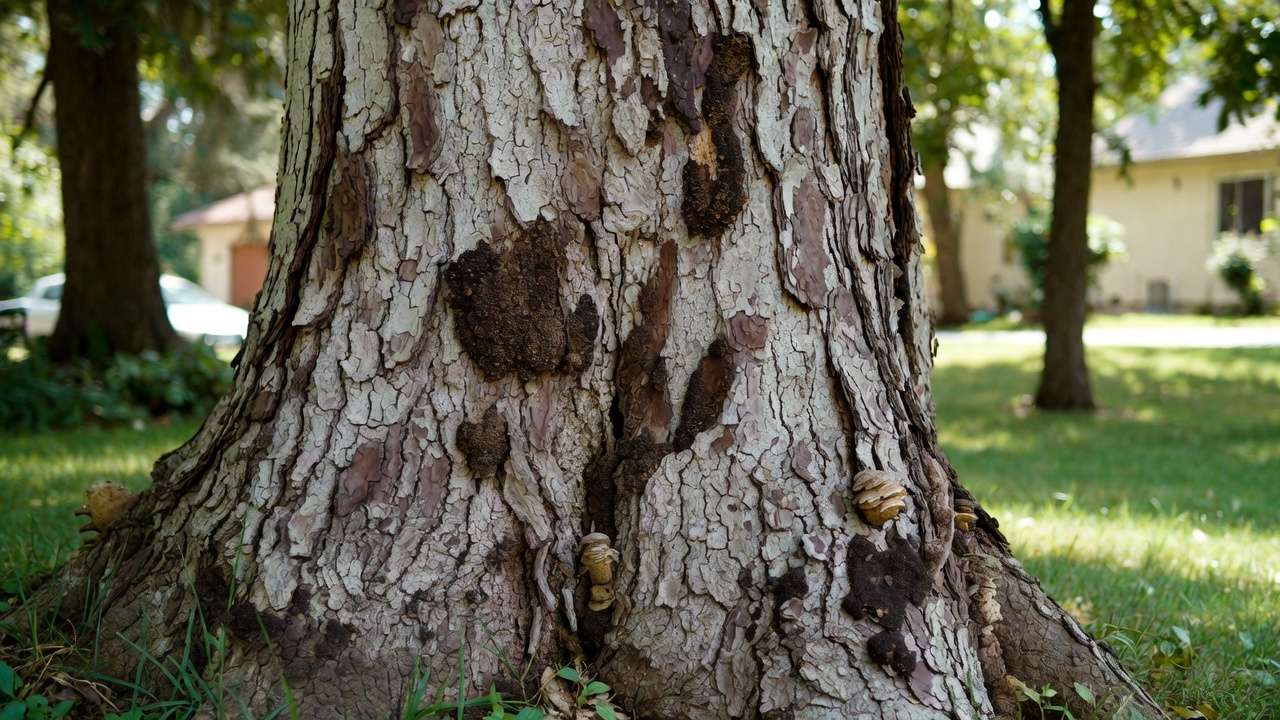
Visual External Signs on the Trunk and Base 👀
- Spongy or sunken areas – Gently press the bark with your thumb (wear gloves!). Healthy bark feels firm; decayed areas feel soft or springy.
- Cracks or seams – Vertical splits wider than 1/8 inch, especially if they ooze or have dark staining.
- Missing bark or cavities – Exposed wood that appears bleached, punky, or stringy.
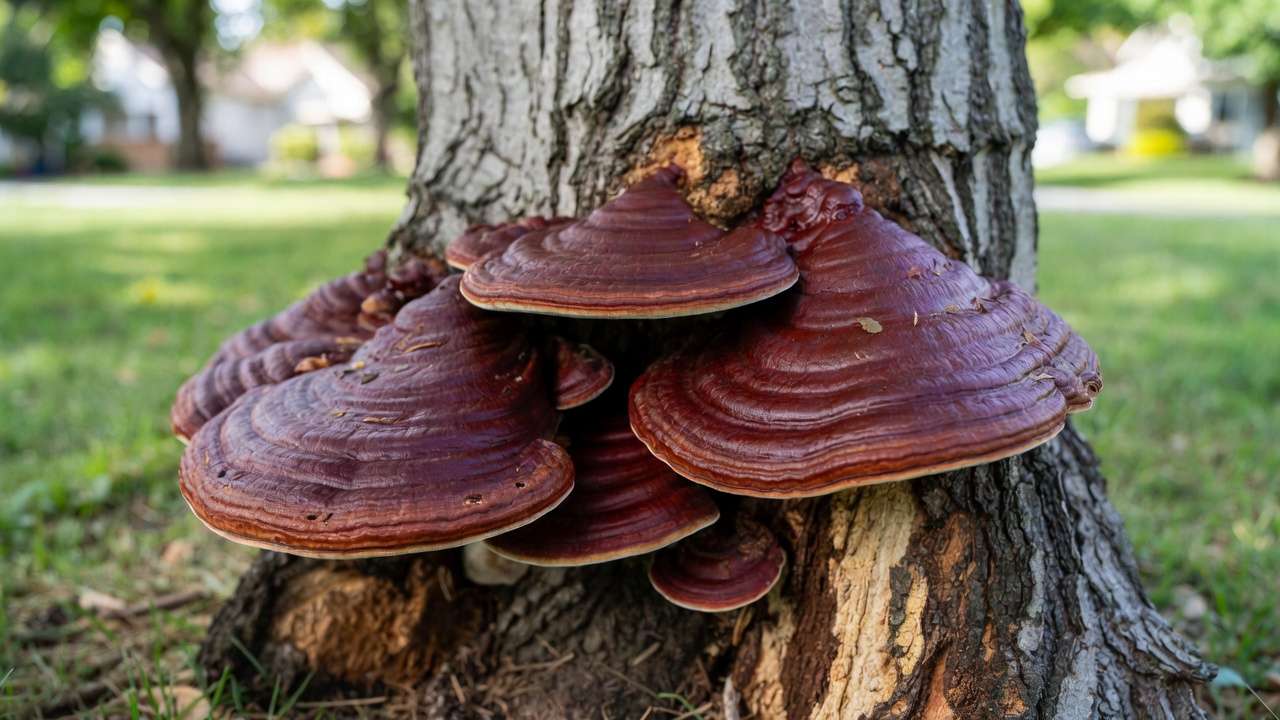
- Conks, mushrooms, or brackets – The #1 red flag. These are the fruiting bodies of decay fungi (more on this below).
- Bleeding or wet spots – Dark liquid seeping from cracks (bacterial wetwood or slime flux is different but often accompanies rot).
- Unnatural bulges or swelling – The tree tries to grow over wounds, creating “volcano” shapes hiding internal decay.
Fungal Fruiting Bodies: The Biggest Warning 🚩🍄
Seeing mushrooms or shelf-like conks growing directly from the trunk or root flare almost always means significant internal decay — sometimes decades old.
Common culprits you need to recognize instantly:
- Ganoderma spp. (Artist’s conk, varnish fungus) – Shiny red-brown shelves at base = advanced butt rot.
- Armillaria (Honey mushrooms) – Clusters of honey-colored mushrooms at base in fall, white fan-shaped mycelium under bark.
- Kretzschmaria deustata (Ustulina) – Gray-black crusty patches that turn into charcoal-like masses. Extremely aggressive.
- Laetiporus sulphureus (Chicken-of-the-woods) – Bright orange-yellow shelves; delicious to eat but deadly to trees.
- Meripilus giganteus (Black-staining polypore) – Large rosettes at base of beech and oak.
Pro tip from 20+ years in the field: If you see even a tiny fruiting body, assume at least 30–50% internal decay. Act immediately.
Crown and Foliage Clues (Indirect but Important) 🍃
- Progressive dieback starting in upper crown
- Smaller-than-normal leaves or early fall color
- Excessive epicormic shoots (water sprouts) along trunk
- Hanging, yellow, or wilted leaves in summer (drought stress mimic)
- Dead branches that don’t leaf out in spring
How to Inspect Your Tree for Trunk Rot: Step-by-Step Guide
Here’s the exact protocol I teach homeowners and new arborists:
Step 1: Walk completely around the tree at least 20 feet away. Look for lean, missing bark, or fungal bodies.
Step 2: Examine the root flare. The roots should flare outward like bell-bottom pants. Buried or missing flare = high risk.
Step 3: Gently press bark from ground level up as high as you can reach. Note any soft spots.
Step 4: Perform the “sound test” – use a rubber mallet or the butt of a screwdriver to tap the trunk from base upward in a spiral pattern.
- Healthy wood = clear, solid “tok” sound 🔨
- Decayed wood = dull “thud” or hollow drum sound
Step 5: Look for carpenter ants, sawdust (frass), or small exit holes.
Step 6: Take photos and measurements. Document everything — you’ll thank yourself later.
Safety note: Never climb or use ladders on suspect trees. If you’re unsure, call an ISA Certified Arborist immediately.
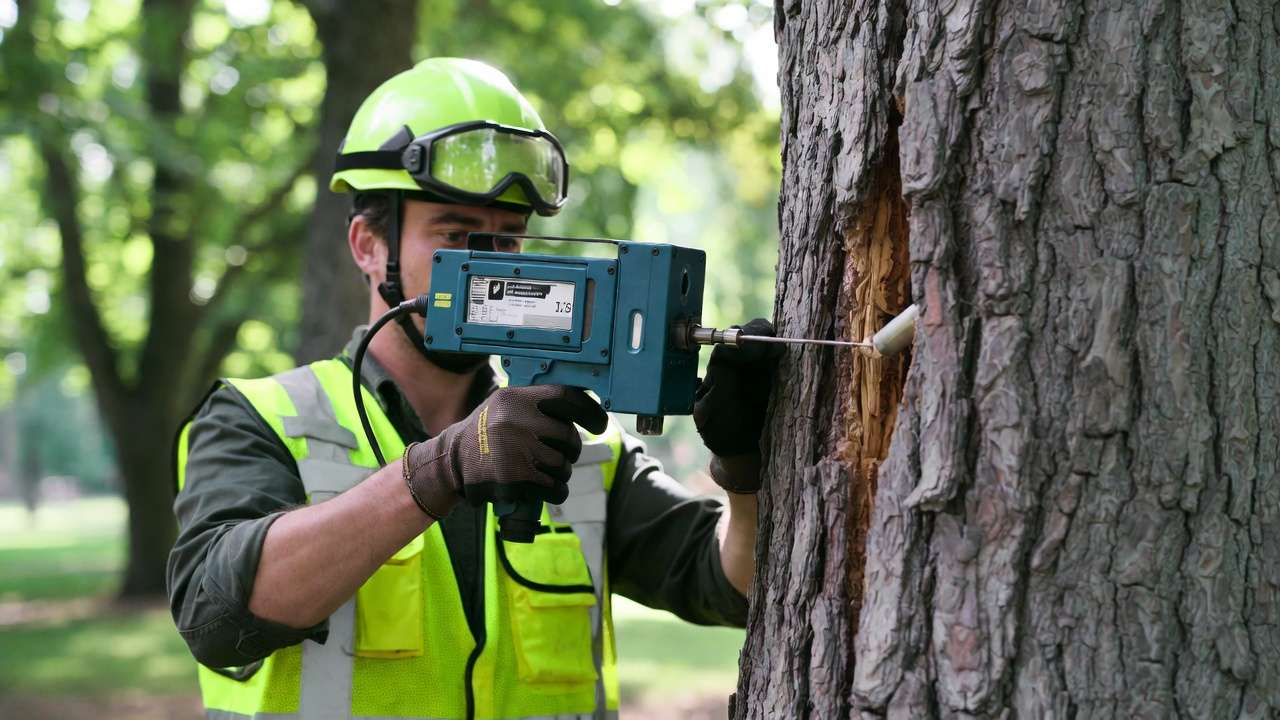
Advanced Detection Methods (For Serious Cases) 🛠️🔍
While the naked-eye inspection and sounding test catch many early cases, some trees hide decay very well — especially large, valuable, or high-risk specimens near homes, driveways, or playgrounds.
Here are the professional-grade tools certified arborists use when early signs appear ambiguous or the tree has high monetary/aesthetic value:
- Increment Borer Sampling A hand-cranked drill extracts a thin core of wood (usually 5–12 mm diameter).
- Look for: Discolored, soft, or punky wood inside the core.
- Benefit: Confirms decay depth and extent without major damage.
- Limitation: Only samples one small spot; multiple borings needed for accuracy.
- Resistograph / Micro-Drilling This device pushes a tiny drill bit (3 mm) into the wood and measures resistance in real time, producing a graph.
- Low resistance zones = decay pockets or cavities.
- Excellent for mapping decay columns vertically and horizontally.
- Minimally invasive — holes are pencil-lead thin and usually heal quickly.
- Acoustic Tomography & Sonic Tomography Sensors placed around the trunk send sound waves; software creates a 2D/3D map of sound velocity.
- Fast sound = healthy dense wood
- Slow sound = decayed, hollow, or wet zones
- Popular brands: PiCUS Sonic Tomograph, Arbotom
- Best for: Large heritage trees where owners want maximum preservation data.
- Thermal Imaging (Infrared Cameras) Decay fungi often generate heat or retain moisture differently than healthy wood.
- Useful in early summer or after rain when temperature contrasts are clearest.
- Not definitive alone — best combined with other methods.
When to invest in advanced testing
- Tree value > $5,000 (shade, fruit, historic significance)
- High target risk (near house, power lines, sidewalk)
- Early fungal conks but tree still looks vigorous
- Conflicting signs (e.g., lean but no obvious decay)
Most homeowners never need these tools — but knowing they exist helps you understand what a qualified arborist will recommend if you call one.
Prevention: Keep Trunk Rot Away for Good! 🛡️🌱
The absolute best “treatment” for trunk rot is prevention. Here’s your actionable checklist:
- Plant correctly from the start
- Keep root flare exposed (never plant too deep).
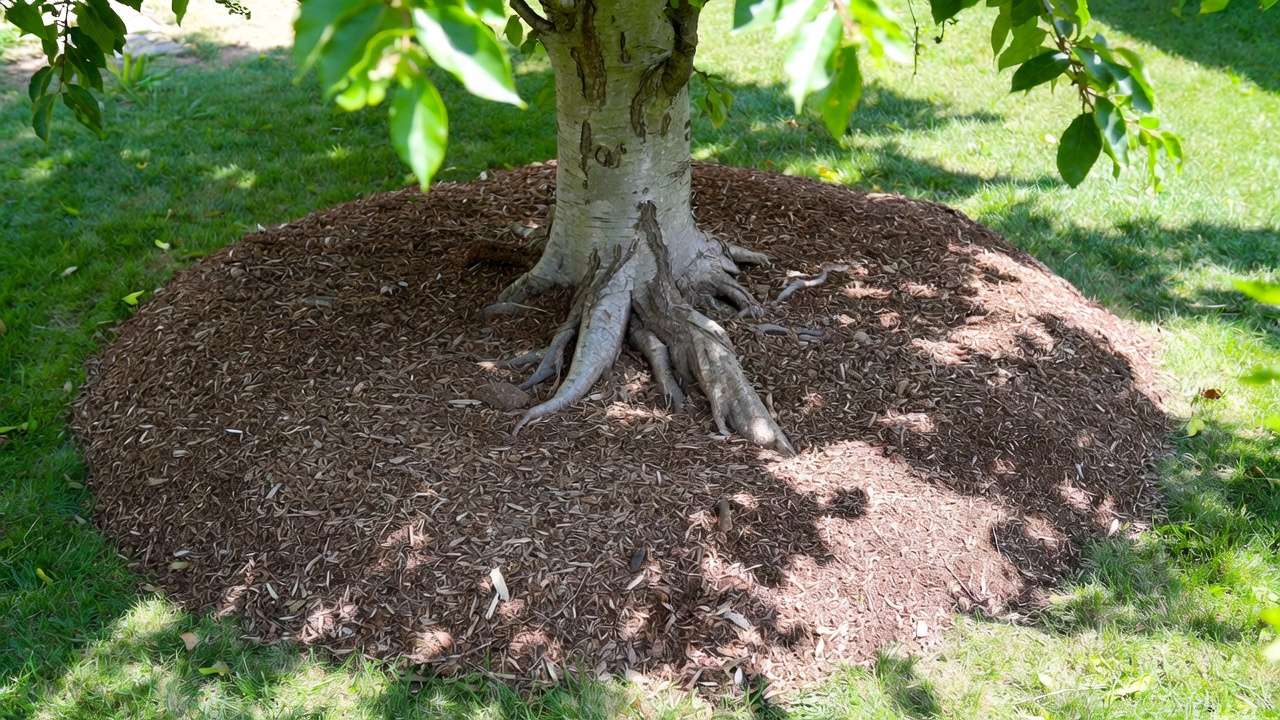
- Avoid “volcano mulching” — mulch should be 2–4 inches deep, pulled back 3–6 inches from trunk.
- Prune properly and sparingly
- Follow the “branch collar” rule — never flush-cut or leave long stubs.
- Best time: Late winter/early spring for most species (avoid heavy pruning in spring for oaks due to oak wilt risk).
- Limit pruning to <25% of canopy in any year.
- Protect against wounds
- Install tree guards around young trunks to prevent lawn mower/string trimmer damage.
- Avoid nailing signs, lights, or wires into trees.
- Maintain soil health
- Improve drainage in low spots (French drains, regrading).
- Avoid soil compaction — no heavy equipment or parking under canopy.
- Apply 2–4 inches of organic mulch annually (keep it away from trunk).
- Water wisely
- Deep, infrequent watering during establishment and drought.
- Avoid overwatering mature trees — soggy soil promotes root rot that moves upward.
- Choose resistant species When replanting, favor trees with good compartmentalization ability:
- Live oak, bur oak, white oak, ginkgo, hackberry, Kentucky coffeetree, honeylocust.
What to Do If You Spot Early Signs
Finding early rot doesn’t always mean immediate doom — but swift, smart action is essential.
Immediate steps (DIY-safe)
- Reduce stress: Stop fertilizing heavily, improve watering during drought, remove competing vegetation.
- Document everything: Date-stamped photos from multiple angles.
- Reduce wind sail: Light crown thinning (by a pro) if lean or heavy limbs are present.
Treatment realities Unfortunately, no magic fungicide spray or injection reliably stops established trunk decay once it’s in the heartwood. Systemic fungicides work better for root diseases than trunk rot.
Options that sometimes help salvage trees:
- Compartmentalization support — Healthy trees wall off decay naturally. Boost overall vigor with proper care.
- Cabling & bracing — Steel cables or rods installed by pros to reduce limb/tear risk.
- Targeted pruning — Remove deadwood and reduce leverage on decayed zones (done by certified climbers only).
When removal is the safest (and only) choice
- Decay extends >50–60% of trunk diameter (arborist assessment).
- Large conks present for multiple years.
- Significant lean + decay.
- Major cavity opening >30% of circumference.
- Tree is in high-risk location (power lines, structures, play areas).
A good arborist uses the TRAQ (Tree Risk Assessment Qualification) system to rate risk as low/moderate/high/extreme and guide decisions.
Real-Life Examples and Case Studies 📸🌳
Case 1: Suburban Red Oak Saved (Early Detection Win) A 45-year-old red oak showed one small Artist’s conk at the base. Homeowner noticed it during fall leaf cleanup. ISA arborist used resistograph — decay was only 25–30% at base. Action: Light crown reduction, cabling of codominant stems, mulching improvement. Result: Tree still standing strong 8 years later, no new conks, full canopy.
Case 2: Silver Maple Progression Disaster Homeowner ignored soft base and small mushrooms for 4 years. Tree leaned noticeably in year 5. Inspection revealed >70% hollow butt rot. Result: Emergency removal after large limb failure damaged fence and garage ($11,200 total cost). Lesson: Early small signs → fast action.
(Imagine side-by-side photos here: healthy trunk vs. conk-covered base vs. fallen tree — visuals make the difference!)

Frequently Asked Questions (FAQs) ❓
Can trunk rot be reversed once it starts? No — once wood is decayed, it’s gone forever. But you can stop further spread by improving tree health and removing stress factors.
Are fungal conks always bad news? Yes, when growing directly from the trunk or root flare — they indicate significant internal decay (often 10+ years old). Surface mushrooms on mulch or soil are usually harmless saprophytes.
How fast does tree trunk rot spread? Varies widely: 1–6 inches per year in aggressive species (e.g., Kretzschmaria), much slower in others. Environmental stress accelerates it.
Is it safe to keep a tree with minor decay? Possibly — if decay is <30%, tree is vigorous, and risk is low (open area). Regular monitoring and pro assessment required.
Best time of year to inspect for rot? Late fall to early spring — no leaves to hide conks, fungi fruit most visibly, easier to see bark issues.
Difference between heart rot vs. root rot vs. sap rot?
- Heart rot: Central column decay (most trunk rot).
- Root rot: Starts below ground, moves up (Armillaria common).
- Sap rot: Surface decay on dead wood or wounds (less structural threat).
Final Thoughts: Act Early, Save Lives (and Trees!) ❤️🌳
Identifying tree trunk rot early isn’t just tree care — it’s home safety, financial protection, and environmental stewardship all in one. A 10-minute seasonal walk-around with your eyes open can prevent a five-figure disaster or save a tree that’s been part of your yard for decades.
Start today: Grab gloves, a mallet, your phone camera, and inspect every mature tree on your property. If anything looks off — don’t guess. Reach out to a local ISA Certified Arborist for peace of mind.
Your trees (and your family) will thank you. 🌟 Have you spotted any early signs on your trees? Drop a comment below — I’d love to help you interpret what you’re seeing!


