
Tired of tossing kitchen scraps and yard trimmings straight into the trash while spending money on bags of store-bought compost for your plants and trees? Imagine transforming that everyday “waste” into free, nutrient-rich black gold that makes your garden soil healthier, your trees stronger, and your plants more vibrant—all without fancy gadgets or years of experience. Home composting is simpler than you think, and it solves a real problem: reducing household waste (which can be 20-30% organic material heading to landfills) while creating perfect natural fertilizer right in your backyard.
As a plant care and tree care specialist with over a decade of hands-on experience helping gardeners build thriving, sustainable systems, I’ve seen firsthand how starting a compost pile boosts soil health, improves water retention, and cuts down on chemical fertilizers. In this comprehensive beginner’s guide, you’ll learn exactly how to start a compost pile at home with clear, foolproof steps—no overwhelm, no bad smells, no pests. Whether you have a small yard in a suburban area or a larger garden, this method works. Let’s turn your scraps into garden magic! ♻️
Why Start Composting at Home? The Real Benefits for Your Plants and Trees 🌳
Composting isn’t just an eco-friendly habit—it’s a game-changer for plant and tree care. By recycling organic matter, you close the nutrient loop and create humus-rich compost that:
- Improves soil structure — loosens heavy clay soils for better root penetration and enhances drainage in sandy soils, helping young trees establish deep roots.
- Boosts nutrient availability — slowly releases essential elements like nitrogen, phosphorus, and potassium, plus micronutrients, reducing the need for synthetic fertilizers.
- Increases water retention — compost acts like a sponge, holding moisture so plants and trees need less frequent watering (up to 20-30% savings in some cases!).
- Supports beneficial microbes — fosters a living soil ecosystem that suppresses diseases, deters pests, and promotes stronger, more resilient growth in flowers, veggies, shrubs, and fruit trees.
- Reduces environmental impact — cuts methane emissions from landfills and lowers your carbon footprint while enriching your garden naturally.
Compared to chemical fertilizers, homemade compost builds long-term soil fertility without risking nutrient burn or runoff. For tree care especially, top-dressing with compost around the drip line encourages mycorrhizal fungi partnerships, leading to healthier, more drought-resistant trees. Ready to get started? 🌿
Choosing the Right Composting Method for Beginners 🗑️
Don’t overcomplicate it—beginners thrive with simple setups. Here’s a quick breakdown:
- Open pile — Free and easy; ideal for yards with space. Build directly on soil for natural microbe access.
- Compost bin — Neater for smaller spaces; affordable plastic or wire bins (under $50) keep things contained and speed decomposition.
- Tumbler — Great if you want faster results with less turning, but pricier.
- Hot composting — Recommended for beginners: Builds heat (130–160°F) to kill weeds/seeds/pathogens quickly (2–6 months).
- Cold composting — Low-effort but slower (6–12+ months); just pile and wait.
- Vermicomposting (with worms) 🪱 — Perfect for apartments or small patios; use a worm bin indoors.
For most beginners, start with a basic 3x3x3 ft open pile or simple bin in partial shade. It heats up well without much fuss.
Step-by-Step: How to Start Your Compost Pile Today (Core Guide) 🚀
Step 1: Pick the Perfect Spot in Your Yard
Choose a level, well-drained area with partial sun/shade (full sun dries it out faster; too much shade slows it). Ensure easy access for adding materials and turning—near your garden beds or kitchen door is ideal. Keep it 10–20 feet from your house to avoid any minor odors, but not so far it’s inconvenient. Avoid low spots where water pools. Pro tip: Position it downhill from a hose for easy moistening! 💧

(Example of a simple DIY compost bin setup for easy access and containment.)
Step 2: Gather Your Materials – Greens, Browns & More
Balance is key: Greens (nitrogen-rich) fuel microbes, browns (carbon-rich) provide structure and prevent smells.
- Greens 🌿: Kitchen scraps (veggie/fruit peels, coffee grounds ☕, tea bags), fresh grass clippings, plant trimmings.
- Browns 🍂: Dry leaves, shredded cardboard/paper (no glossy), straw, small twigs, wood chips.
- Ideal ratio: 2–3 parts browns to 1 part greens (think “mostly browns with greens mixed in”).
- What to avoid ❌: Meat, dairy, oils, bones, diseased plants, pet waste, weeds with seeds (unless hot composting kills them).
Chop larger items small for faster breakdown. Start collecting in a kitchen caddy!

(Visual guide to greens and browns—perfect balance for success!)
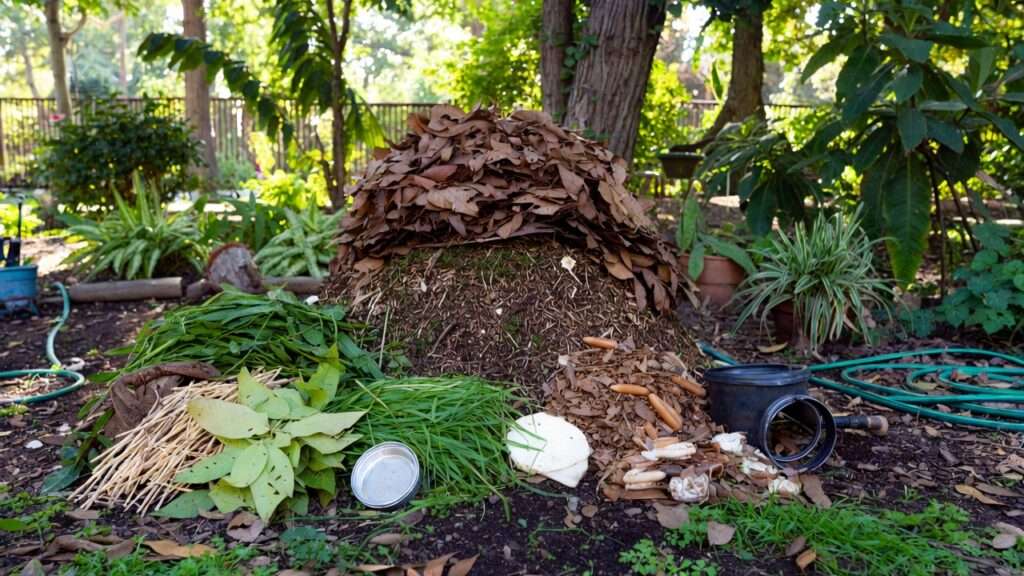
Step 3: Build Your Pile – The Lasagna Method (Layering Magic) 🥪
Aim for at least 3x3x3 ft to trap heat.
- Base layer: 4–6 inches coarse browns (twigs/straw) for airflow and drainage.
- Alternate: Add moist greens, then browns; moisten each layer (like a wrung-out sponge).
- Sprinkle garden soil or finished compost between layers to introduce microbes.
- Continue until pile reaches 3 ft high.
The “lasagna” layering creates even decomposition. Optional: Add a starter like manure or commercial activator.
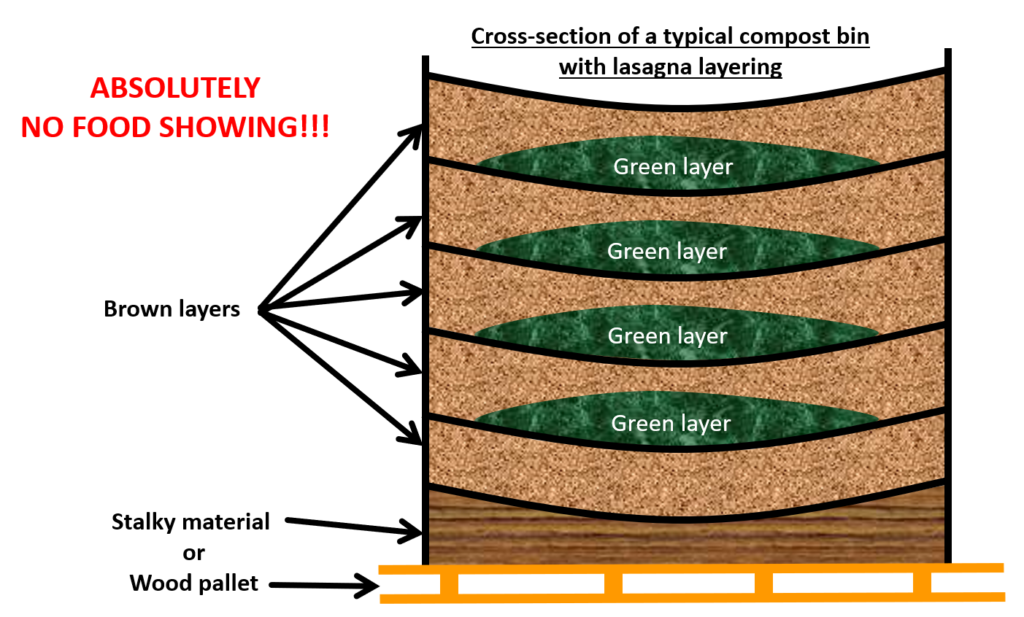
(Layered compost pile diagram—easy “lasagna” style for beginners.)
Step 4: Maintain Your Pile for Fast, Odor-Free Results
- Turn/aerate: Every 1–2 weeks with a pitchfork to add oxygen (prevents anaerobic smells).
- Monitor moisture: Squeeze a handful—if it drips, too wet (add browns); crumbles, too dry (add water).
- Temperature: Hot phase (130–160°F) means active decomposition—feel the heat!
- Weekly checks keep things humming.
This maintenance turns a slow pile into finished compost in months.
Common Beginner Mistakes & How to Fix Them (Avoid These!) ⚠️
- Too many greens → slimy, smelly pile. Fix: Bury greens in browns and turn more.
- Pile too small/dry → no heat. Fix: Build bigger, moisten, insulate with straw in winter.
- Adding forbidden items → pests. Fix: Strict list; bury food scraps deep.
- No turning → slow, stinky. Fix: Aerate regularly.
- Ignoring balance → endless pile. Fix: Track ratios weekly.
Most issues resolve quickly with adjustments—don’t give up!
How Long Until You Have Usable Compost? Timeline & Signs of Success ⏳
Patience is part of the composting journey, but with good management, you won’t be waiting forever.
- Cold composting (minimal turning, natural pace): 6–12 months or longer. Perfect if you want low-effort “set it and forget it.”
- Hot composting (regular turning, balanced materials, proper size): 2–6 months to finished compost, sometimes as fast as 8–12 weeks in ideal warm conditions.
Key stages you’ll observe:
- Week 1–2: Pile heats up noticeably (steam may rise on cool mornings 🔥).
- Month 1–3: Volume shrinks by 30–50%, materials darken and soften.
- Month 3–6: Pile cools, earthworm activity increases, texture becomes crumbly.
Signs your compost is ready to use:
- Dark brown to black color
- Crumbly, soil-like texture (no recognizable food scraps)
- Pleasant, rich earthy smell (like forest floor) – no ammonia, sour, or rotten odor
- Temperature back to ambient (no longer hot)
Harvesting tip: Use the “dig from the bottom” method for continuous piles—scoop finished compost from the base while adding fresh material to the top. Sift larger chunks back into the pile with a simple hardware-cloth screen. Store ready compost in breathable bags or bins under cover until you need it. 🌿
(Finished homemade compost – dark, crumbly, and ready to feed your plants and trees!)
Using Your Homemade Compost in Plant & Tree Care 🌿
This is where the magic happens for your garden! Homemade compost is one of the best soil amendments you can give your plants and trees.
- As a soil amendment: Mix 1–2 inches into the top 6–8 inches of garden beds before planting. For new trees, blend 20–30% compost into the backfill soil (never more than 30% to avoid settling issues).
- Top-dressing / mulch: Spread a 1–3 inch layer around established plants, shrubs, and trees (keep it 2–4 inches away from trunks and stems to prevent rot). This suppresses weeds, retains moisture, moderates soil temperature, and feeds roots slowly.
- Compost tea: Steep 1–2 shovels of finished compost in a 5-gallon bucket of water for 3–7 days (stir daily), then dilute 1:10 and use as a liquid fertilizer or foliar spray. Great for giving potted plants, seedlings, and stressed trees a quick nutrient boost.
- Specific applications in your niche:
- Fruit trees 🍎: Apply in early spring and late fall → better fruit set, size, and flavor.
- Acid-loving plants (azaleas, blueberries, rhododendrons): Use oak-leaf or pine-needle heavy compost for slightly lower pH.
- Vegetable gardens: Side-dress heavy feeders (tomatoes, peppers, squash) mid-season for bigger yields.
- Young trees & ornamentals: Helps establish strong root systems and improves transplant success.
One cubic yard of finished compost (about one large pile’s worth) can cover roughly 100 square feet at 3 inches deep—enough for several garden beds or a few mature trees. You’ll notice healthier foliage, fewer pest issues, and more vibrant blooms within the first season. 🌸
Advanced Tips & Variations for Faster/Better Results (Expert Level) ⭐
Once you’ve mastered the basics, try these tweaks to level up:
- Speed boosters:
- Chop or shred everything small (use a lawn mower over leaves or a garden shredder).
- Add natural activators: a shovelful of garden soil, aged manure, or even diluted urine (yes—nitrogen-rich and free!).
- Turn more frequently (every 4–7 days during peak season).
- Seasonal strategies:
- Fall: Stockpile dry leaves—they’re perfect browns for the whole year.
- Winter: Insulate the pile with straw bales or a tarp; decomposition slows but doesn’t stop.
- Summer: Turn more often and shade the pile to prevent drying out.
- Scaling up: Build two or three piles/bins in rotation—one active, one maturing, one finished—so you always have supply ready.
- Eco-upgrades:
- Collect rainwater for moistening.
- Add red wiggler worms once the pile cools for vermicompost superpowers.
- Use a compost thermometer ($10–15) to monitor hot-phase success.
These small upgrades can cut your wait time in half and produce even richer compost.
Frequently Asked Questions (FAQs) ❓
Can I compost in a small yard or apartment? Yes! Use a compact tumbler, enclosed bin, or worm bin (vermicomposting) on a balcony or patio. Even a 1x1x1 ft pile works if managed well.
Will composting attract pests or rats? Rarely—if you avoid meat, dairy, oils, and bury food scraps deep under browns. Keep the pile turned and moist. Enclosed bins add extra protection.
Is compost supposed to smell bad? How do I prevent it? No—healthy compost smells earthy. Bad smells (ammonia or rotten eggs) mean too wet or too many greens. Fix by adding browns and turning.
Can I add citrus peels, eggshells, onions, or coffee grounds? Yes—all are fine in moderation. Crush eggshells for faster breakdown; coffee grounds are excellent greens.
How much compost should I use per tree or plant? For trees: 1–2 inches deep in a ring extending to the drip line. For garden beds: 1–2 inches mixed in or as top-dress. Start light and observe plant response.
What’s the best beginner compost bin in 2026? Popular affordable options include the Geobin wire bin ($40), FCMP Outdoor tumbler ($150), or DIY pallet bins. Choose based on space and budget.
Conclusion: Start Small, Grow Big – Your Garden Will Thank You! 🌟
You now have everything you need to confidently start a compost pile at home: the perfect spot, balanced materials, simple layering, maintenance routine, troubleshooting fixes, and inspiring ways to use your finished “black gold” to nurture healthier plants and stronger trees.
The best part? You don’t need to be perfect from day one. Even a small, slightly imperfect pile will produce usable compost and make a meaningful difference—less waste in landfills, richer soil, happier plants, and a lighter environmental footprint.
Start today: Grab a bucket for kitchen scraps, rake up some leaves, and build that first layer. In a few months, you’ll be amazed at what nature (and a little help from you) can create.
Have questions or want to share your progress? Drop a comment below—I’d love to hear how your pile is doing! And if you enjoyed this guide, subscribe for more practical plant care, tree care, and sustainable gardening tips delivered straight to your inbox. 🌿
Happy composting—you’ve got this! ♻️🚀


