

Imagine turning everyday kitchen scraps and yard trimmings into “black gold” that revives tired garden beds, strengthens tree roots, and boosts vibrant plant growth—all without buying expensive fertilizers. But here’s the catch many gardeners face: your compost pile either turns into a smelly, slimy mess that attracts flies 😩 or sits there dry and unchanged for months with no heat or progress. The secret to transforming waste into thriving soil lies in mastering green vs. brown materials in compost—the perfect balance of nitrogen-rich “greens” and carbon-rich “browns.”
As plant and tree care experts with years of hands-on experience helping home gardeners create nutrient-dense soil, we’ve seen how getting this balance right accelerates decomposition, eliminates odors, prevents pests, and delivers compost that supercharges root health, disease resistance, and overall garden vitality. In this comprehensive guide, we’ll break down the science, provide detailed lists, share the ideal ratios, offer step-by-step layering techniques, troubleshoot common issues, and show exactly how to apply your finished compost for maximum benefits to plants and trees. Whether you’re a beginner or seasoned composter, this skyscraper-level resource will help you avoid pitfalls and achieve faster, richer results. Let’s dive in! 🚀
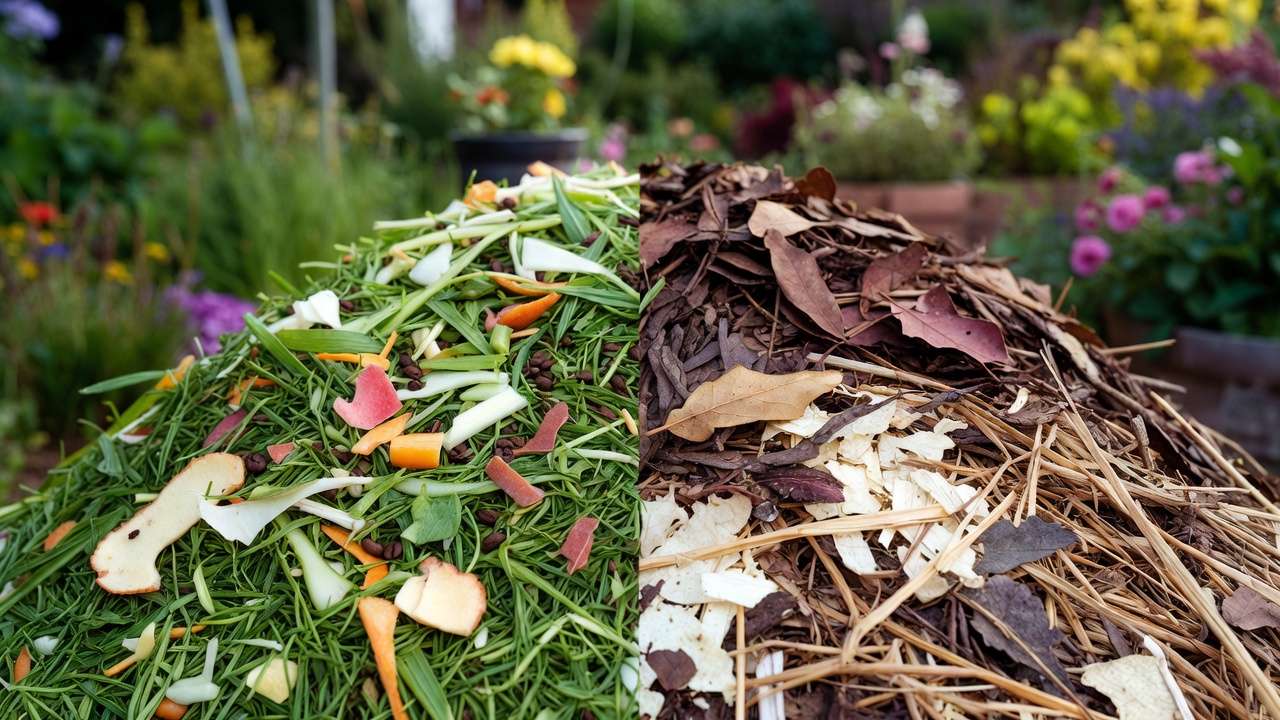
What Are Green and Brown Materials in Compost? The Basics Explained 🟢🟤
Defining Greens and Browns – Beyond Just Color
The terms “green” and “brown” refer not to literal colors but to the nutritional roles materials play in feeding the billions of microbes that drive composting.
- Greens (nitrogen-rich): These are typically fresh, moist, and quick to decompose. They provide proteins and nitrogen that fuel microbial growth and reproduction, generating the heat needed for fast breakdown. 🌿 Examples include kitchen scraps and fresh clippings—think of them as the “protein” in the microbes’ diet.
- Browns (carbon-rich): These are dry, woody, or fibrous materials that supply energy (carbon) for microbes to thrive long-term. They add structure, improve airflow, absorb excess moisture, and prevent the pile from becoming anaerobic. 🍂 Browns act like the “carbs” that keep the process balanced and odor-free.
Without both, composting stalls: too many greens lead to slimy, stinky conditions, while excess browns create a dry, slow-to-decompose pile.
The Science Behind It – Carbon-to-Nitrogen (C:N) Ratio
Composting is essentially microbial digestion. Bacteria and fungi need a balanced diet of carbon (C) for energy and nitrogen (N) for building proteins. The ideal overall pile ratio is around 25–30:1 C:N for hot, efficient composting (backed by research from Cornell University and EPA guidelines). Starting slightly higher (around 30:1) accounts for carbon loss as CO₂ during breakdown, ending closer to 20:1 in mature compost.
Why does this matter for your garden? A balanced C:N ratio ensures rapid heating (up to 140–160°F/60–71°C), kills weed seeds and pathogens, and produces nutrient-rich humus that improves soil structure and fertility.
Common Misconceptions
- Not all brown-colored items are “browns”—fresh manure (brown in appearance) is actually a high-nitrogen green (e.g., poultry manure ~7–10:1).
- Fresh green grass clippings are greens (~15–25:1), but dried ones shift toward browns.
- Materials like coffee grounds (~20:1) straddle the line but function as greens due to moisture and nitrogen content.
Best Examples of Green and Brown Materials for Your Compost Pile 📋
Top Green (Nitrogen-Rich) Materials – What to Add Freely
These provide the nitrogen punch for heat and speed. Aim to chop larger items for faster breakdown.
- Vegetable and fruit scraps (15–20:1) 🍎
- Grass clippings (fresh, 15–25:1) 🌾
- Coffee grounds (20:1) ☕
- Tea bags (no staples) and loose tea
- Fresh plant trimmings and weeds (non-seedy)
- Manure (cow/horse ~18–25:1, poultry ~7–10:1, rabbit ~8:1)
- Seaweed/kelp
- Hair and fur (pet or human, untreated)
- Fresh leaves from healthy trees/shrubs (prunings)
Tree/plant care tip: Use fresh, disease-free prunings from your garden—great nitrogen source without risking pathogens.
Top Brown (Carbon-Rich) Materials – Your Pile’s Backbone
These absorb moisture, add aeration, and prevent compaction.
- Dry leaves (30–80:1) 🍁
- Shredded cardboard/paper (150–200:1, non-glossy)
- Straw/hay (40–100:1)
- Wood chips/sawdust (100–500:1, untreated)
- Pine needles (higher acidity, use sparingly for acid-loving plants)
- Twigs/small branches (chipped)
- Corn stalks/cobs (50–100:1)
- Egg cartons/paper towels (plain)
Pro tip: Shred or chop browns for better integration—whole branches slow things down!
The Perfect Ratio: How Much Green vs. Brown Should You Use? ⚖️
Recommended Green to Brown Ratios for Home Composters
For most backyard setups, forget strict math—use volume as a beginner-friendly guide:
- Classic ratio: 1 part greens to 2–3 parts browns (by volume). This approximates the ideal 25–30:1 C:N for hot composting.
- For faster (hot) piles: Slightly more greens (1:2).
- For slower (cold) piles: More browns (1:3–4).
Why volume works: Most greens average ~15–25:1 C:N, browns 40+:1—mixing 1:3 by volume often hits the sweet spot.
Visual Cheat Sheet Table – Materials and Their Impact on Balance
| Material | Approx. C:N Ratio | Type | Add More/Less? |
|---|---|---|---|
| Grass clippings | 15–25:1 | Green | Balance with browns if slimy |
| Coffee grounds | 20:1 | Green | Great accelerator |
| Vegetable scraps | 15–20:1 | Green | Core nitrogen source |
| Dry leaves | 30–80:1 | Brown | Excellent for fall abundance |
| Cardboard (shredded) | 150–200:1 | Brown | Use to soak up excess moisture |
| Wood chips | 100–500:1 | Brown | Slow breakdown, good structure |
| Poultry manure | 7–10:1 | Green | Powerful—use sparingly! |
Seasonal Adjustments for Year-Round Success
- Spring/Summer: Greens abound (grass, weeds)—add extra browns to avoid sogginess.
- Fall: Browns dominate (leaves)—mix in stored greens or kitchen scraps for balance. 🍂
How to Layer and Build a Balanced Compost Pile Like a Pro 🏗️
Building a compost pile is more art than science once you understand the green-brown balance. The goal is to create conditions where oxygen, moisture, and temperature allow aerobic microbes to thrive—leading to fast decomposition and rich, crumbly compost in as little as 2–6 months (instead of years).
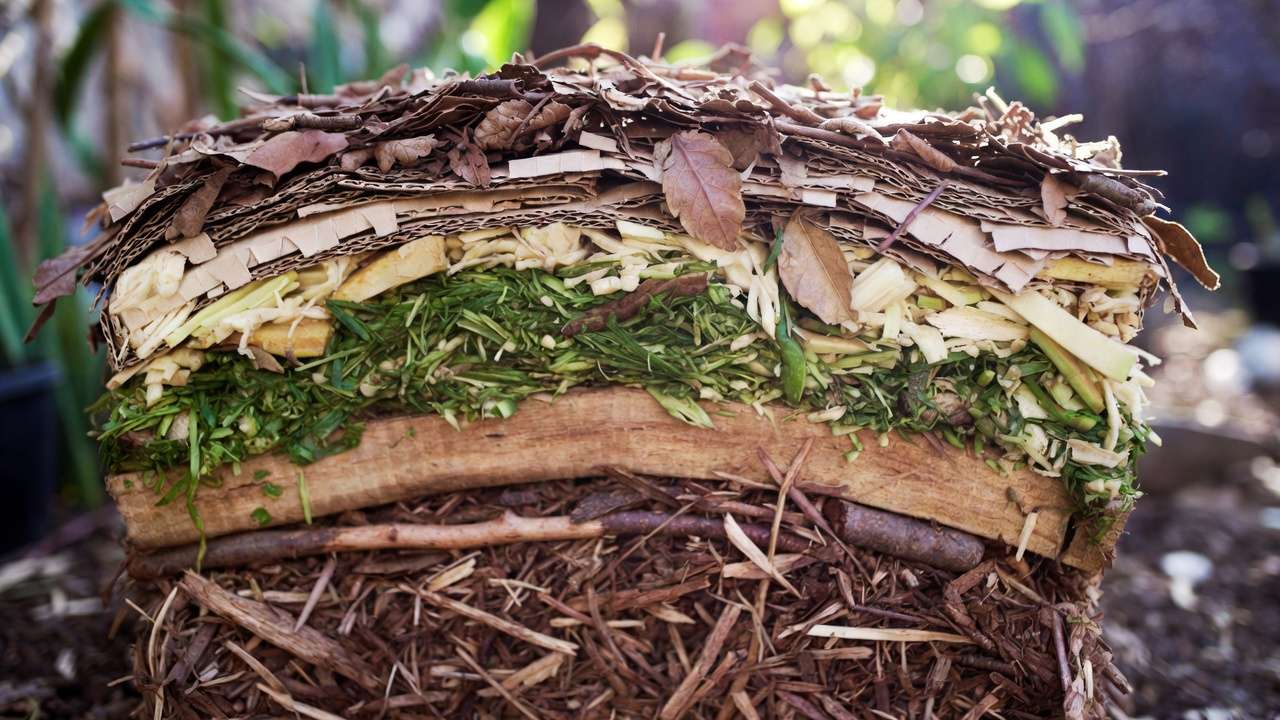
Step-by-Step Guide to Layering Greens and Browns
- Choose the right location and size Pick a spot with good drainage, partial shade (to prevent drying out), and easy access. Minimum recommended size for hot composting: 3 ft × 3 ft × 3 ft (1 m³). Smaller piles lose heat quickly; larger ones can be harder to turn.
- Start with a coarse brown base (4–6 inches / 10–15 cm) Use twigs, small branches, straw, or coarse wood chips. This creates airflow channels and prevents the pile from sitting in its own leachate (nutrient-rich liquid runoff).
- Add your first green layer (2–4 inches / 5–10 cm) Kitchen scraps, grass clippings, fresh trimmings—spread evenly.
- Cover with browns (4–6 inches again) Always top greens with browns to absorb moisture, reduce odors, and discourage flies.
- Repeat alternating layers Continue until the pile reaches 3–4 feet tall. Finish with a thick brown cap to keep smells in and rain out.
- Moisten as you go The pile should feel like a wrung-out sponge—damp but not dripping. Too dry? Add water (or more greens). Too wet? Add more browns and turn.
- Chop or shred materials Smaller pieces = faster breakdown. A lawn mower over leaves or a pair of garden shears on veggie scraps makes a huge difference.
Tree & plant gardener bonus: If you’re composting near fruit trees or veggie beds, build the pile close enough to use the finished product easily—but not so close that roots invade the pile.
Tools and Setup Tips for Plant & Tree Gardeners
- Bins & tumblers — Great for small spaces or faster turning. Tumblers heat up quickly when balanced properly.
- Three-bin system — Ideal for continuous composting: one active, one maturing, one finished.
- Trench composting — Dig a trench near hungry trees (e.g., fruit trees), layer greens and browns directly in the soil, cover, and let roots benefit immediately. Perfect for fall cleanup 🍎🌳
- Aeration tools — Compost aerator fork or long-handled pitchfork for turning without compacting.
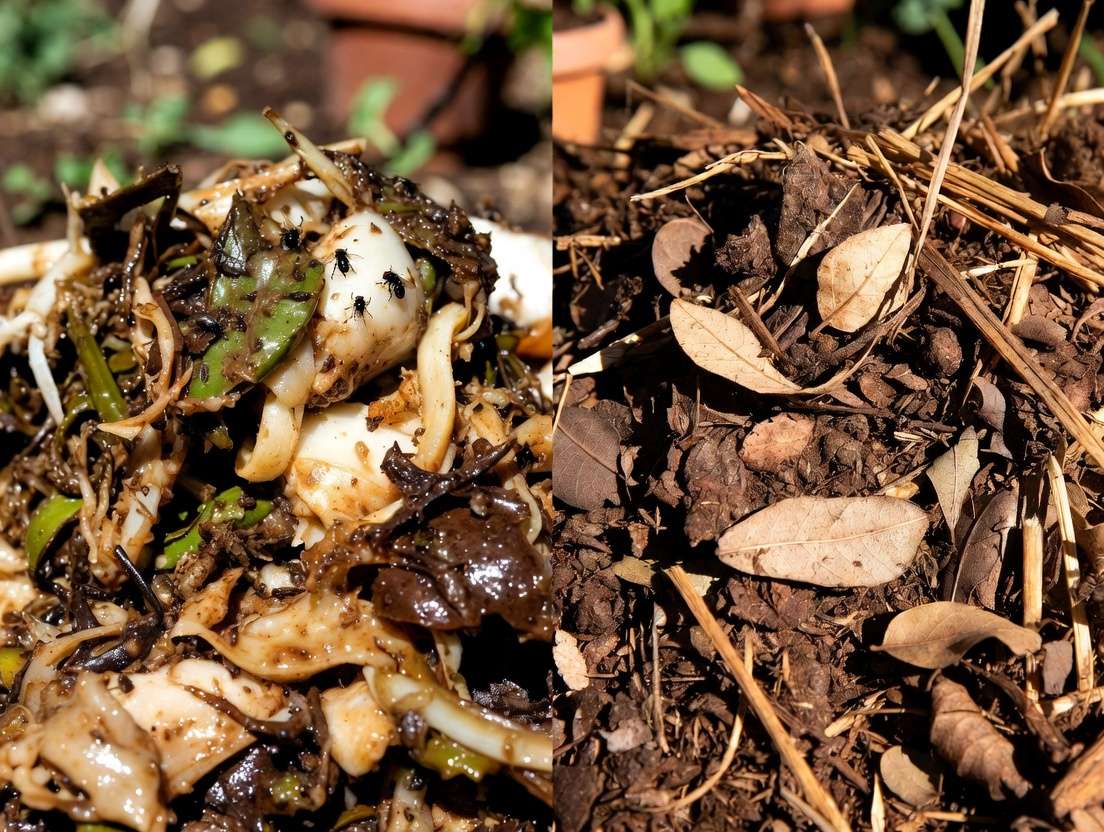
Troubleshooting Common Green vs. Brown Imbalances – Quick Fixes 🔧
Even experienced gardeners hit snags. Here’s how to diagnose and correct the most frequent issues.
Signs Your Pile Is Out of Balance (And How to Fix It Fast)
- Too many greens (common in spring/summer) Symptoms: Strong ammonia smell, slimy texture, black goo, lots of flies, low heat. Fix: Add a thick layer of browns (dry leaves, shredded paper, straw), turn thoroughly to mix, and wait 3–7 days. Turn every few days until smell fades.
- Too many browns (common in fall/winter) Symptoms: Dry, no heat, very slow or no decomposition, pile stays cool. Fix: Add greens (kitchen scraps, grass, coffee grounds, manure), water generously, and turn to incorporate. A handful of garden soil or finished compost introduces microbes to kickstart activity.
- No heat at all Possible causes: Pile too small, too dry, too wet, or materials too large. Fix: Check moisture (add water if needed), shred materials, turn to aerate, and ensure minimum size.
- Pests (rats, raccoons, ants) Usually from exposed food scraps. Fix: Bury greens deeper under browns, use a bin with a lid, avoid meat/dairy/breads.
- Leachate (dark liquid draining out) Too wet or too many greens. Fix: Add browns, elevate pile slightly for better drainage, collect leachate (dilute 10:1 with water) and use as liquid fertilizer.
Real-Life Examples from Gardens
One client had a beautiful pile of fresh grass clippings after mowing—within days it was a stinky swamp. We added several wheelbarrows of fall leaves and turned it twice. Within a week the smell was gone and heat returned. Another gardener with mostly woody prunings had a cold, unchanging pile for a year. Adding coffee grounds, veggie scraps, and regular watering transformed it into usable compost in just four months.
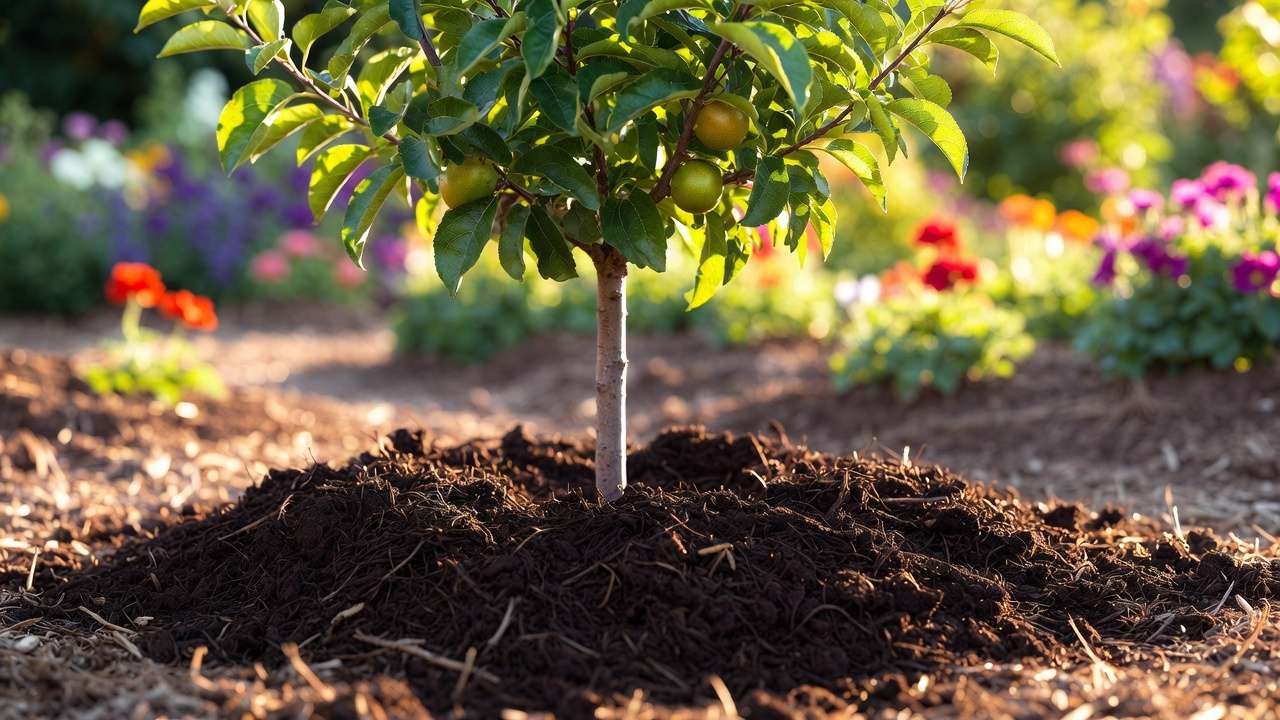
Using Your Balanced Compost: Benefits for Plants and Trees 🌳
Once your pile has cooled, darkened, and developed that wonderful earthy smell (no ammonia or rot), you’ve created true “black gold.” Properly balanced green and brown materials produce mature compost that’s rich in humus, beneficial microbes, and slow-release nutrients—exactly what your plants and trees crave.
How Nutrient-Rich Compost Supercharges Your Garden
Balanced compost improves your soil in multiple ways that synthetic fertilizers simply can’t match:
- Better soil structure — Humus acts like glue, binding clay particles into crumbs (improving drainage in heavy soils) and helping sandy soils hold water and nutrients longer.
- Enhanced water retention — Compost can increase water-holding capacity by 20–30%, reducing irrigation needs—especially valuable for young trees during dry seasons.
- Boosted microbial life — Introduces billions of beneficial bacteria, fungi (including mycorrhizae), and other organisms that help plants access nutrients they couldn’t reach otherwise.
- Natural disease suppression — Diverse microbial communities compete with pathogens; studies show compost-amended soils often reduce root rot, damping-off, and fungal issues.
- Slow-release nutrition — Provides a steady supply of nitrogen, phosphorus, potassium, calcium, magnesium, and micronutrients without the burn risk of chemical fertilizers.
Specific Benefits for Trees and Garden Plants
- Fruit trees & nut trees — Compost top-dressed in the drip line (not against the trunk) encourages strong feeder roots, better fruit set, and improved flavor. Balanced compost helps prevent nutrient deficiencies that cause yellowing leaves or poor fruit quality.
- Ornamental & shade trees — Regular applications improve drought tolerance, deepen root systems, and increase resistance to pests like borers or leaf-spot diseases.
- Vegetable & flower beds — Faster growth, brighter blooms, higher yields, and better flavor. Tomatoes, peppers, roses, and leafy greens respond dramatically.
- Acid-loving plants (blueberries, azaleas, rhododendrons) — Use compost with higher pine needle or oak leaf content for slightly lower pH.
Real-world result: Gardeners who maintain a 1:2–3 green-to-brown ratio consistently report 30–50% faster establishment of new trees and noticeably healthier foliage color within one growing season.
Application Tips – How, When, and How Much
- Top-dressing trees — Spread 1–3 inches (2.5–7.5 cm) of finished compost in a wide ring around the drip line (beyond the canopy edge) in early spring or late fall. Keep it 4–6 inches away from the trunk to prevent rot.
- Mixing into beds — Incorporate 2–4 inches into the top 6–12 inches of soil before planting veggies or annuals.
- As mulch — Apply 2–3 inches around perennials, shrubs, and trees—suppresses weeds, moderates soil temperature, and slowly feeds roots.
- Compost tea — Steep 1 part mature compost in 5–10 parts water for 3–7 days (stir daily), strain, and use as a foliar spray or soil drench for quick nutrient boost.
- How much? — Aim for ½–1 inch per year on garden beds; 1–2 inches every 1–2 years for established trees.
Pro tip: Screen your compost (½-inch mesh) for finer texture if using around delicate seedlings.
Advanced Tips and Expert Insights for Faster, Better Results ⭐
Pro Hacks to Accelerate Composting
- Shred everything — Smaller pieces increase surface area for microbes—can cut time in half.
- Turn regularly — Every 3–7 days for hot piles brings oxygen to the center and mixes materials evenly.
- Add activators — A shovelful of finished compost or garden soil jumpstarts microbial populations. Some gardeners add a handful of blood meal or alfalfa meal for extra nitrogen kick.
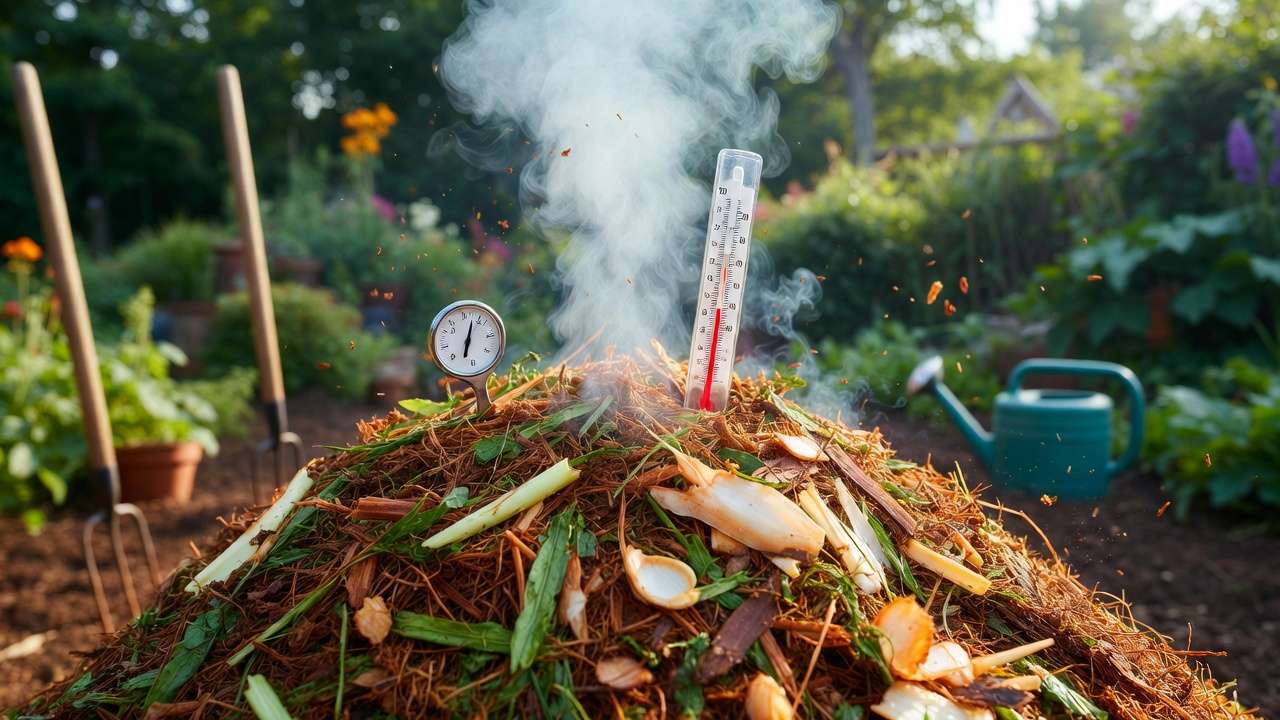
- Monitor temperature — Use a long compost thermometer. Ideal hot-compost range: 130–160°F (55–71°C). If it drops below 100°F, turn and check moisture/balance.
- Chop woody materials — Use a chipper or loppers; whole branches can take years.
- Cover the pile — Tarp or old carpet keeps rain out (prevents sogginess) and heat in.
What to Avoid (Even with Perfect Balance)
- Meat, dairy, oils, bones — attract pests and create odors
- Diseased or pesticide-treated plants — can spread pathogens or chemicals
- Invasive weeds with seeds — unless pile reaches sustained high heat
- Pet waste from carnivores (dogs/cats) — potential pathogens
- Glossy paper, treated wood, plastics — contaminants
Composting for Specific Trees/Plants
- Citrus & avocado trees — Love slightly acidic compost; include some pine needles or oak leaves.
- Nitrogen-hungry plants (corn, brassicas, roses) — Use compost with slightly higher green content.
- Mediterranean herbs & drought-tolerant plants — Lean toward more browns for lighter, better-draining mix.
Frequently Asked Questions (FAQ) – Quick Answers for Readers ❓
Here are the most common questions gardeners ask about green vs. brown materials in compost—answered clearly and practically.
1. Are coffee grounds green or brown in compost? Coffee grounds are considered greens (around 20:1 C:N ratio) because they’re moist and nitrogen-rich. They’re excellent accelerators and help balance piles heavy in dry browns. Just don’t add huge amounts at once—mix them in well to avoid clumping. ☕
2. What if I have way more browns than greens, like tons of fall leaves? This is super common in autumn! Save kitchen scraps, coffee grounds, and fresh grass clippings (if available) in a sealed bucket or bag. Mix small amounts of greens into the brown-heavy pile every week or two. You can also “pre-charge” the pile with a bit of finished compost or aged manure to introduce microbes. The pile will decompose more slowly (cold composting), but it will still break down over time. 🍂
3. How long does it take to get finished compost with a good green-brown balance? With a proper 1:2–3 ratio, regular turning, and good moisture:
- Hot composting method: 2–6 months
- Cold/slow method: 6–12+ months Shredding materials, turning frequently, and maintaining heat speed things up dramatically.
4. Can I compost diseased plants or weeds with seeds? Only if your pile reaches and sustains 140–160°F (60–71°C) for several days—hot enough to kill most pathogens and seeds. Otherwise, avoid diseased material and bag-seed weeds. Better safe than spreading problems!
5. Is animal manure always a “green”? Yes—most fresh manures are nitrogen-rich greens (cow/horse ~20:1, poultry ~8:1, rabbit ~8:1). They’re powerful additions, so use them sparingly (no more than 10–20% of the pile) and mix thoroughly with browns to avoid burning or odor.
6. My pile smells bad even though I added browns—what’s wrong? Usually still too wet or not enough aeration. Turn the pile to introduce oxygen, add more dry browns (shredded cardboard works fast), and make sure it’s not compacted. A quick fix is burying fresh greens deeper under a thick brown layer.
7. Can I use pine needles and oak leaves? Won’t they make my compost too acidic? They break down slowly and are more acidic, but in a mixed pile they rarely cause problems for most gardens. Use them in moderation (no more than 20–30% of browns) if you’re growing acid-sensitive plants. They’re perfect for blueberries, azaleas, or rhododendrons.
8. Do I really need to turn the pile? Turning isn’t mandatory for cold composting, but it dramatically speeds up hot composting and improves finished quality. Aim for every 3–7 days if you want fast results. If turning is hard, use a tumbler or aerator tool.
9. Is shredded office paper safe for compost? Yes—plain, non-glossy paper and cardboard are excellent carbon-rich browns. Avoid colored, heavily inked, or thermal receipt paper due to potential chemicals.
10. How do I know when my compost is ready to use? It’s dark brown to black, crumbly, earthy-smelling (like forest floor), and no original materials are recognizable (except maybe small woody bits). Temperature will be ambient, not hot.
Conclusion – Start Balancing Today for a Thriving Garden! 🎉
Mastering green vs. brown materials in compost is the single biggest step you can take toward faster decomposition, odor-free piles, fewer pests, and truly nutrient-rich soil that makes your plants and trees healthier and more resilient.
Remember the golden rule:
- Greens for nitrogen and heat 🌿
- Browns for carbon, structure, and balance 🍂
- Aim for roughly 1 part greens to 2–3 parts browns by volume
- Keep it moist like a wrung-out sponge, turn when you can, and watch the magic happen.
Your garden—whether it’s a small veggie patch, a row of fruit trees, or a lush ornamental landscape—will thank you with stronger roots, brighter leaves, better yields, and fewer problems. Grab a bucket for kitchen scraps, rake up those leaves, and build that balanced pile today. You’ve got this! 🌱
Have you tried adjusting your green-brown ratio before? What difference did you notice? Drop a comment below—I’d love to hear your compost wins (and war stories!). Happy composting! 😊🌳


