
Are your houseplants looking a bit lackluster despite regular watering and care? 🌿 Or maybe your fruit trees in the backyard aren’t producing as abundantly as you’d hoped, and those store-bought fertilizers feel expensive and unnatural? If you’re tired of kitchen scraps going to waste while your garden soil craves real nourishment, building a DIY vermicomposting system is the game-changing solution you’ve been searching for.
This simple, low-cost process uses red wiggler worms to transform everyday food waste into nutrient-packed worm castings—often called “black gold” for good reason. These castings are far superior to regular compost, delivering slow-release nutrients, beneficial microbes, and improved soil structure that helps plants and trees thrive with stronger roots, better drought resistance, and fewer diseases. Best of all, a DIY setup can cost under $30–50, fits on a balcony or indoors, and pays for itself quickly by slashing your fertilizer bills.
In this comprehensive guide, I’ll walk you through every detail—from choosing materials to harvesting your first batch of castings and applying them to boost your plants and trees. As someone who’s maintained vermicompost systems for years to nurture everything from indoor pothos and orchids to mango and guava trees in humid tropical conditions (like here in Bangladesh), I know what works reliably. Let’s turn your waste into wealth for your garden! ✨
Why Vermicomposting Is Perfect for Plant and Tree Lovers 🌿
Vermicomposting isn’t just recycling—it’s creating a living fertilizer factory right at home. Worm castings (the end product) outperform traditional compost because worms break down organic matter with powerful enzymes and gut microbes, resulting in a product that’s:
Nutrient Powerhouse – What Makes Worm Castings Superior Worm castings contain balanced N-P-K (nitrogen, phosphorus, potassium) levels—typically around 1-0.5-0.5—but in highly plant-available forms. They also boast higher concentrations of micronutrients like calcium, magnesium, and iron, plus humic and fulvic acids that enhance nutrient uptake. Studies from sources like NC State Extension show vermicompost can increase plant growth rates by 20–50% compared to untreated soil. For trees, this translates to faster canopy development and better fruit set. 🌳
Soil Health Boosters for Stronger Roots and Trees The real magic lies in biology: castings introduce billions of beneficial microbes per gram, improving soil aggregation, water retention (up to 20% more), and aeration. This means healthier root zones that resist compaction and root rot—common issues in potted plants or heavy clay soils. In humid climates, better drainage prevents waterlogging while retaining moisture during dry spells. Plants treated with vermicompost often show lower disease incidence, including fungal issues and nematode problems.
Eco-Friendly & Cost-Saving Wins By diverting kitchen scraps from landfills, you’re reducing methane emissions. Over time, one small bin can produce enough castings to fertilize dozens of plants and trees annually, cutting synthetic fertilizer costs by 50–80%. It’s especially rewarding for urban gardeners in places like Barisal Division, where sustainable soil building is key to thriving veggies and orchards.
Materials You’ll Need to Build Your DIY Vermicomposting System 🛠️
Keep it simple and budget-friendly—most items are household or easily sourced locally (plastic shops in Mathbaria or Barisal bazaars work great!).
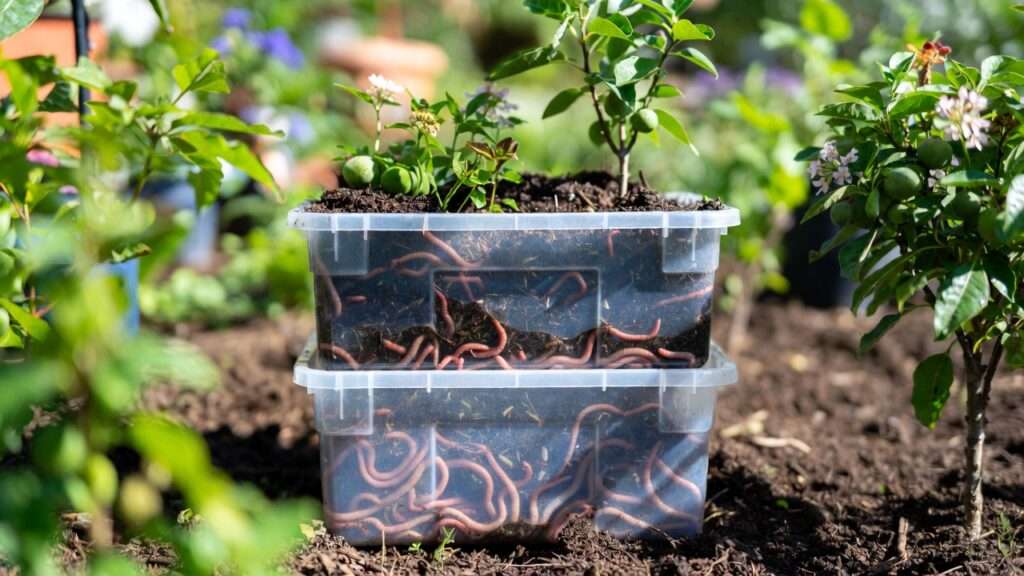
- Two stacking plastic totes (10–20 gallons each, dark/opaque to keep worms happy—clear bins stress them). One serves as the worm home, the other catches leachate (worm tea runoff). Cost: ~500–1000 BDT.
- Drill + 1/8″ to 1/4″ bits for ventilation and drainage holes.
- Bedding materials: Shredded newspaper, cardboard, or coconut coir (widely available and holds moisture well in humid areas).
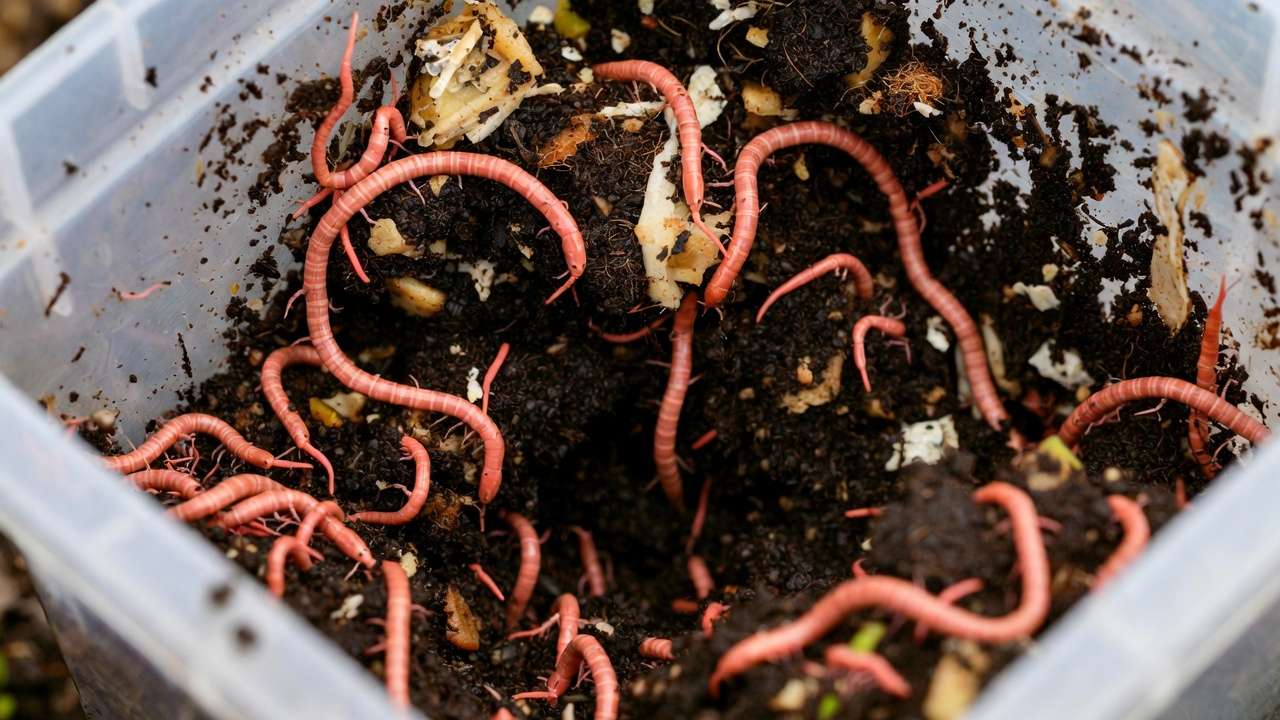
- Red wigglers (Eisenia fetida): Start with 500–1000 worms (~0.5–1 lb). Source from local gardeners, Facebook groups, or online suppliers—avoid nightcrawlers, as they’re not ideal for bins.
- Optional extras: Mesh screen for the bottom (prevents worms falling through), thermometer (monitor 15–25°C / 60–77°F), small tray for collecting liquid fertilizer.
Total startup cost: Often under 2000 BDT if you repurpose bins!

Step-by-Step: How to Build Your DIY Vermicomposting System 🔨
Follow these steps carefully for a thriving system in just 30–60 minutes of setup.
Step 1: Choose & Prepare Your Bins Select dark plastic totes (light-sensitive worms). For a basic flow-through design:
- Drill ~20–30 small holes in the bottom of the upper bin for drainage.
- Drill ventilation holes around the sides and lid (10–20 total) to prevent anaerobic conditions.
- Place the upper bin inside the lower one (or use a tray underneath). This collects nutrient-rich leachate!
Pro tip: In hot, humid Bangladesh weather, add extra ventilation holes to improve airflow and reduce heat buildup.
Step 2: Create the Perfect Bedding Layer Fill the upper bin 4–6 inches deep with moist bedding.
- Shred newspaper/cardboard into 1-inch strips and soak in water, then wring out until it feels like a wrung-out sponge (critical moisture test!).
- Mix in a handful of garden soil or finished compost for grit and microbes.
- Aim for pH around 6–7; coconut coir is naturally balanced and resists mold in tropics.
Fluff it up—worms love loose, airy bedding.
Step 3: Add Your Worms & Acclimate Them Gently place your red wigglers on top of the bedding.
- They’ll burrow in within hours if conditions are right.
- Start small: Don’t feed for 3–7 days while they settle and reproduce.
- Cover with a damp sheet of cardboard to retain moisture and block light.
Step 4: First Feeding & Setup Location Place the bin in a shaded, stable spot: under a sink, balcony corner, or shaded garden area (avoid direct sun—temps over 30°C stress worms).
- Ideal range: 15–25°C; in hot seasons, elevate or add ice bottles for cooling.
- Begin with small amounts of food buried in pockets to avoid smells.
What to Feed Your Worms – And What to Avoid 🍎🚫
Feeding is where most beginners make mistakes, but it’s straightforward once you get the rhythm. Red wigglers are voracious but picky eaters—they thrive on a balanced diet of greens (nitrogen-rich) and browns (carbon-rich).
Best Foods for Plant-Focused Gardeners
- Vegetable and fruit scraps: carrot tops, banana peels (great potassium source for fruit trees like mango or guava!), apple cores, lettuce, cucumber ends.
- Coffee grounds and filters (mildly acidic but worms love them; excellent for acid-loving plants like hibiscus).
- Tea bags (remove staples), crushed eggshells (for calcium—helps prevent blossom end rot in tomatoes or tip burn in trees).
- Small amounts of cooked veggies (no oils).
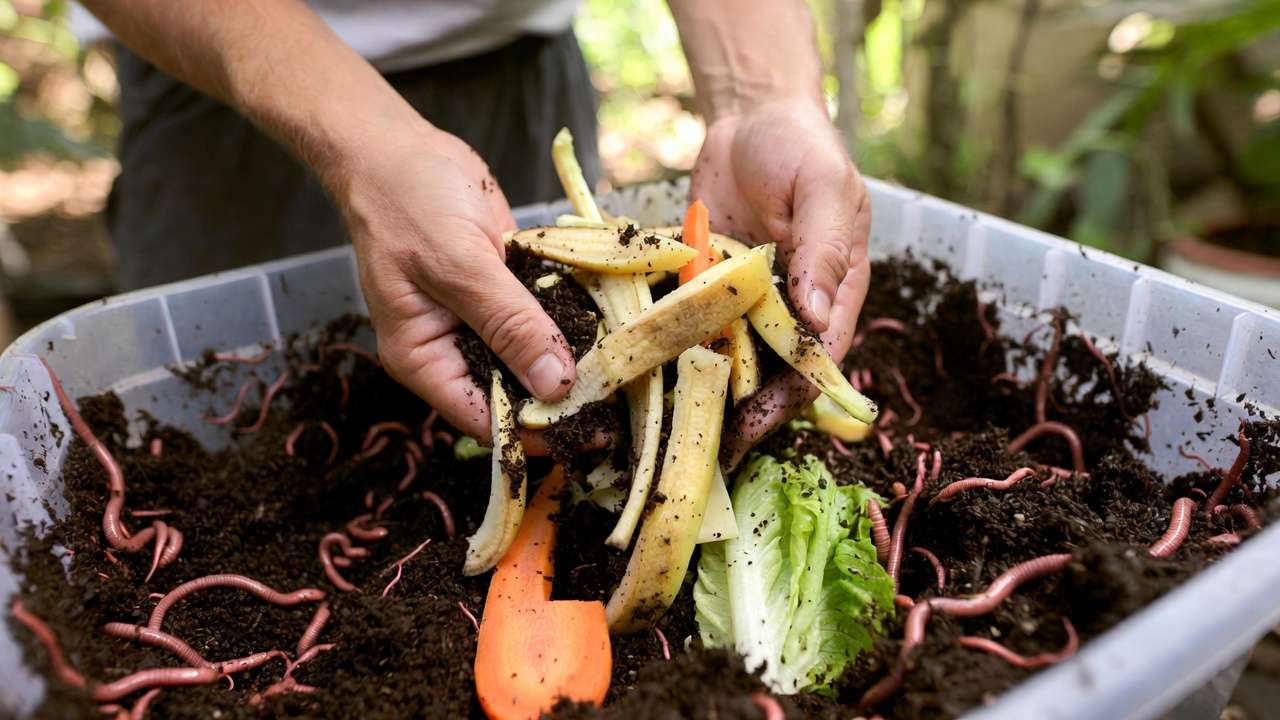
Rule of Thumb for Amount & Schedule A healthy pound of red wigglers can eat about ½ pound of food scraps per day under ideal conditions, but start conservatively: Feed ⅓–½ their body weight every 3–7 days. For a beginner bin with 0.5–1 lb worms, add 200–400 grams of scraps twice a week. Bury the food in different spots to encourage even processing and prevent hotspots.
Let the worms guide you—if most food is gone in a few days, increase slightly; if it lingers, cut back to avoid smells or flies.
Foods to Strictly Avoid
- Meat, dairy, oily/greasy foods (cause bad odors and attract pests).
- Citrus peels in large amounts (too acidic).
- Onions, garlic (strong odors; small amounts ok).
- Salty, spicy, or processed foods.
- Diseased plant material or weeds with seeds.
Pro tip for humid areas like Mathbaria, Barisal: Freeze scraps overnight before adding—this kills fruit fly eggs and slows decomposition to reduce heat buildup. 🧊
Maintaining Your Vermicomposting System for Success ⚖️
Once running, maintenance takes just 10–15 minutes weekly. Focus on the “Big Three”: moisture, temperature, and aeration.
Moisture, Temperature & Aeration Checks
- Moisture: Bedding should stay like a wrung-out sponge. In Bangladesh’s humid climate, check weekly—add dry shredded paper if soggy, mist lightly if dry. Excess water drains as leachate (save it!).
- Temperature: Red wigglers prefer 15–25°C. In hot months (often 30°C+ here), place bin in deepest shade, elevate on bricks for airflow, or bury frozen water bottles halfway in bedding for cooling.
- Aeration: Gently fluff bedding every 1–2 weeks with a hand fork to prevent compaction and anaerobic pockets.
Harvesting Worm Castings – When & How Harvest when 50–70% of bedding has turned into dark, crumbly castings (usually 3–6 months for first batch).
- Light separation method (easiest for beginners): Shine a bright light on one side—worms migrate away. Scoop castings from the lit side, then feed fresh bedding on the empty side to lure worms over.
- Screen method: Pour contents over a ⅛-inch mesh screen outdoors; worms fall through or crawl away.
- Migration trick: Add fresh food and bedding to a new bin stacked on top—worms move up over weeks.
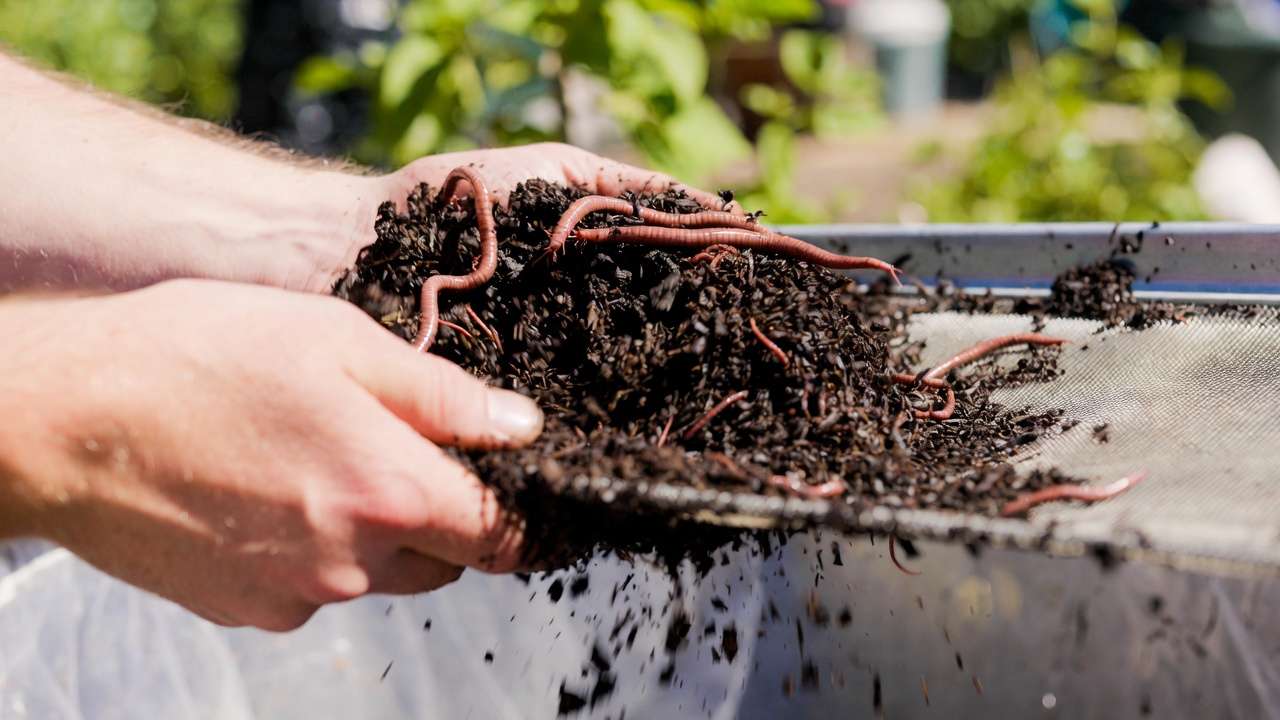
Collect 2–5 kg of castings per cycle from a standard bin—enough for dozens of plants!
Troubleshooting Common Issues
- Fruit flies: Cover food deeply with bedding, use apple cider vinegar traps nearby (bowl + dish soap + vinegar). Freeze scraps first.
- Bad smells (rotten/ammonia): Overfeeding or too wet—remove excess food, add dry bedding, leave lid cracked for air.
- Escaping worms: Usually due to extreme heat, cold, moisture imbalance, or overfeeding. Fix conditions; add escape-proof lip (tape or petroleum jelly around rim temporarily).
- Slow processing: Too cold/hot or low food—adjust environment and feed more consistently.
In tropical humidity, watch for overheating—many local gardeners add extra ventilation holes and shade cloth covers.
Using Your Worm Castings to Supercharge Plants & Trees 🌳✨
This is the rewarding part—watching your plants respond!
How to Apply Vermicompost to Houseplants
- Top-dressing: Sprinkle 1–2 cm layer on soil surface around the base (avoid touching stems). Water in gently. Great for pothos, monstera, or peace lilies—repeat every 2–3 months.
- Potting mix amendment: Mix 10–30% castings into soil for repotting (higher % for nutrient-hungry plants).
Benefits & Application for Garden Beds & Trees
- Side-dress trees: Spread 2–5 kg around the drip line (under canopy edge), lightly scratch in, then mulch. Boosts root growth, flowering, and fruit quality in mango, jackfruit, or coconut trees.
- General rate: 10–20% castings in garden soil mixes; 1–2 handfuls per plant monthly during growing season.
- Improves drought tolerance and disease resistance—perfect for Barisal’s variable rains.
Making Worm Tea – Liquid Gold for Foliar Feeding Worm tea is a fast-acting liquid fertilizer. Simple recipe:
- Fill a bucket ⅓ with finished castings.
- Add water (non-chlorinated—let tap water sit 24 hrs). Ratio: 1:10 castings to water.
- Add a spoonful of molasses or sugar (feeds microbes).
- Aerate with an aquarium pump for 24–48 hrs (or stir vigorously 2–3 times daily).
- Dilute 1:10–1:20 before use.
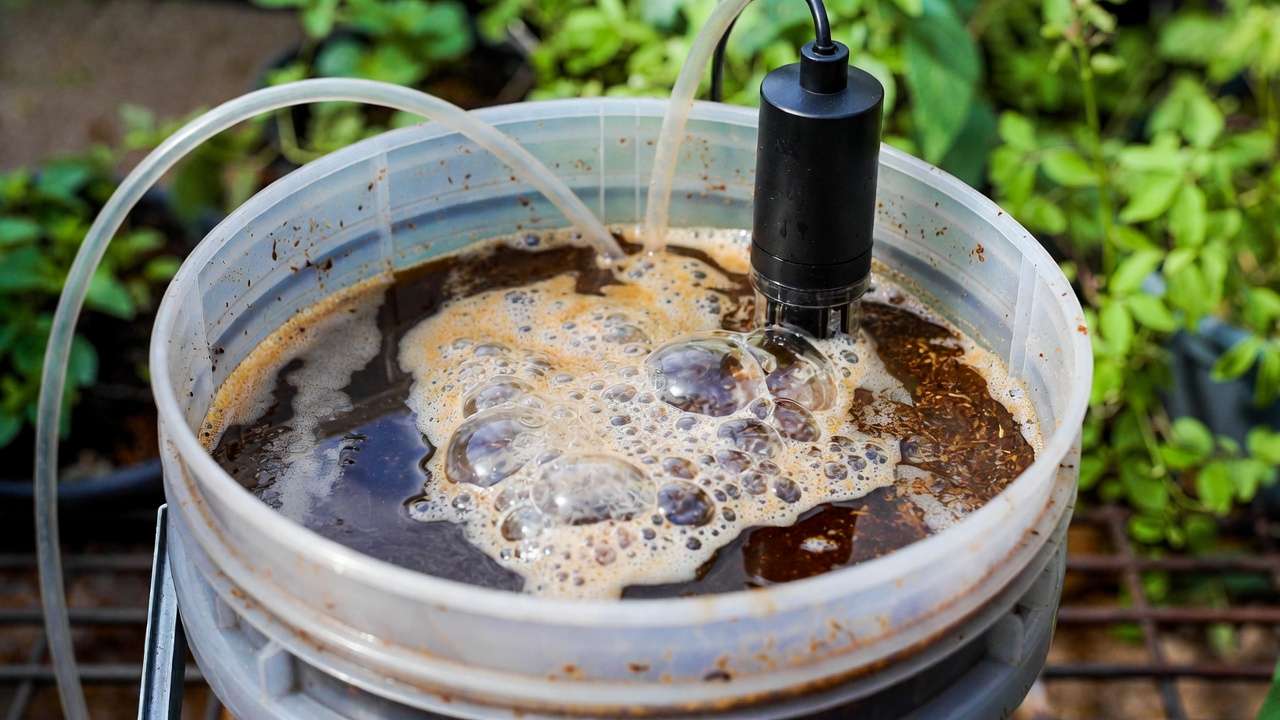
Apply as soil drench or foliar spray every 1–2 weeks. Foliar feeding helps nutrient absorption and can deter some pests.
Advanced Tips & Upgrades for Serious Gardeners 🚀
- Scale up: Build a multi-tier flow-through system or worm tower (stacked bins with holes).
- Integrate with gardens: Bury PVC pipe sections with holes in raised beds—worms migrate in/out naturally.
- Breed more worms: Keep a small “breeder” bin with ideal conditions—population doubles every 3–4 months.
- Seasonal tweaks: In monsoon, elevate bins to avoid flooding; in dry heat, add more moist coir and shade. For extreme heat, consider heat-tolerant species like African nightcrawlers if red wigglers struggle.
FAQs About Building & Using a DIY Vermicomposting System ❓
How long until I get my first castings? 3–6 months depending on worm count, feeding, and temperature—faster in warm, consistent conditions.
Are worms safe for indoor use? Yes! Red wigglers don’t burrow out unless unhappy. Keep bin covered and in a low-traffic spot—no odor if managed well.
Can I use vermicompost for fruit trees? Absolutely—excellent for mango, guava, papaya. Apply around base for bigger, healthier fruit.
What if I live in a hot/humid area like Bangladesh? Shade + ventilation are key. Freeze scraps, add ice bottles in summer, and monitor moisture closely—many locals succeed with simple tweaks.
Do worms multiply? Yes—under good conditions, population can double every 90 days!
Is leachate safe to use? Dilute 1:10 and use as fertilizer—rich in nutrients but can be strong.
My bin smells—what now? Add dry bedding, bury food deeper, reduce feeding—problem usually fixes in days.
Conclusion: Start Your Worm-Powered Garden Journey Today! 🎉
You now have everything needed to build a DIY vermicomposting system that turns kitchen waste into premium, organic fertilizer for healthier plants and more productive trees. It’s low-effort, budget-friendly, and incredibly rewarding—your pothos will perk up, your fruit trees will fruit better, and you’ll feel great reducing waste.
Grab those bins this weekend, order some red wigglers, and watch the magic happen. Once you see the difference worm castings make, you’ll wonder why you didn’t start sooner!
Share your progress in the comments—I’d love to hear how your system thrives in Barisal’s climate. Happy vermicomposting! 🪱🌿✨


