
Imagine transforming your cramped apartment balcony, unused closet, or even a sunny kitchen corner into a vibrant, year-round mini-farm. In just 7–21 days, you harvest fresh, intensely flavorful greens bursting with nutrition—without needing soil plots, heavy tools, or acres of land. That’s the real power of microgreens for urban farmers! 🌆🥬
As cities grow denser and fresh produce prices climb, many urban dwellers face the same challenges: limited space, unreliable access to organic veggies, high grocery bills, and a desire for sustainable, homegrown food. Microgreens solve these problems beautifully. These tiny, young seedlings of vegetables, herbs, and greens pack 4–40 times more vitamins, minerals, and antioxidants than their mature counterparts (think broccoli microgreens loaded with sulforaphane or red cabbage varieties rich in vitamin E). They’re fast, forgiving, and incredibly space-efficient—perfect for city life.
In this comprehensive guide, I’ll share expert insights drawn from years of hands-on urban growing, real yields from small setups, and proven techniques that outperform basic online tutorials. Whether you’re a complete beginner craving nutrient-dense salads, an eco-conscious city resident reducing food miles, or someone eyeing a profitable side hustle, you’ll discover everything needed to succeed. Let’s dive in and turn your small space into a green powerhouse! 💚
What Are Microgreens? A Quick Primer for City Growers 🥬
Microgreens are the young, edible seedlings of vegetables, herbs, beans, and grains—harvested just after the first true leaves appear, typically 7–21 days after sowing. Unlike sprouts (grown in water without medium) or mature plants, microgreens develop in soil or soilless media, gaining richer flavors and denser nutrition.
What sets them apart nutritionally? A landmark USDA study found microgreens often contain dramatically higher levels of key compounds: vitamin C, E, K, beta-carotene, lutein, and antioxidants like polyphenols. For example, broccoli microgreens can deliver concentrated glucoraphanin (a cancer-fighting precursor), while radish varieties offer bold, peppery zing with elevated vitamin content compared to full-grown plants.
For urban farmers, the appeal is unmatched: short cycles mean multiple harvests per month, minimal water and light needs suit indoor setups, and high-density planting maximizes tiny footprints. No wonder they’re booming in city apartments, rooftops, and vertical shelves! 🌿
Why Microgreens Are a Game-Changer for Urban Farmers 🌆💚
Urban living comes with hurdles—pollution, concrete landscapes, expensive imports—but microgreens flip the script.
Health Boost: These tiny greens act as superfoods. Studies show they deliver more bioavailable nutrients per bite than mature veggies, supporting immunity, reducing inflammation, and fighting oxidative stress. A handful tops salads, sandwiches, or smoothies with intense flavor and nutrition.
Cost Savings & Sustainability: Store-bought microgreens cost $20–50 per pound, but growing your own drops that to pennies per serving. You slash food miles, cut plastic packaging waste, and grow organically without chemicals—ideal for eco-aware city folks.
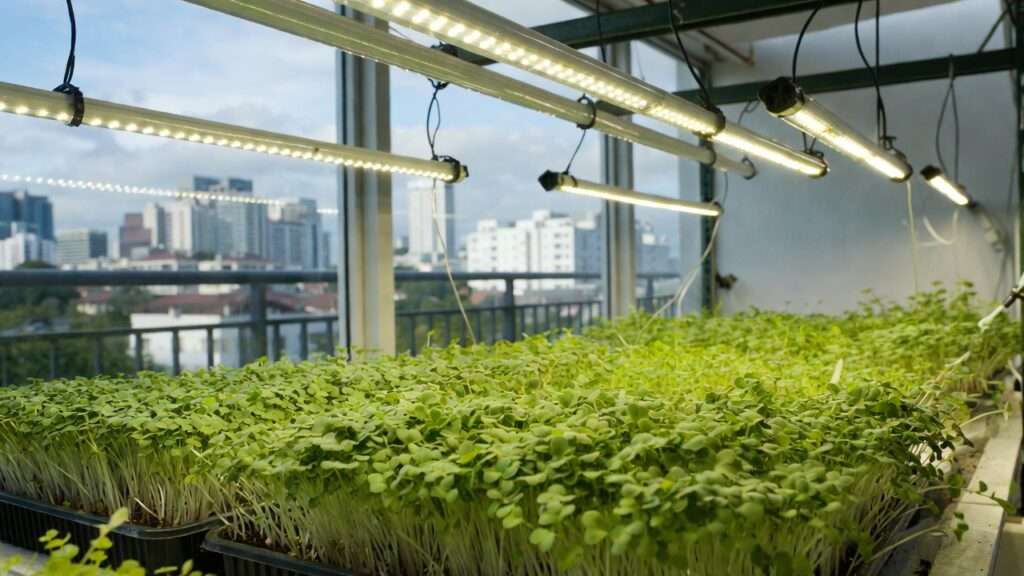
Year-Round Freshness: Indoor setups ignore seasons. With LED lights, harvest fresh greens even in rainy monsoons or winter gloom.
Mental & Lifestyle Perks: Tending trays is therapeutic—a mini escape in busy urban routines. Many start for fun and discover therapeutic benefits plus potential income.
In short, microgreens empower urban farmers to reclaim food independence in limited spaces. 🌍
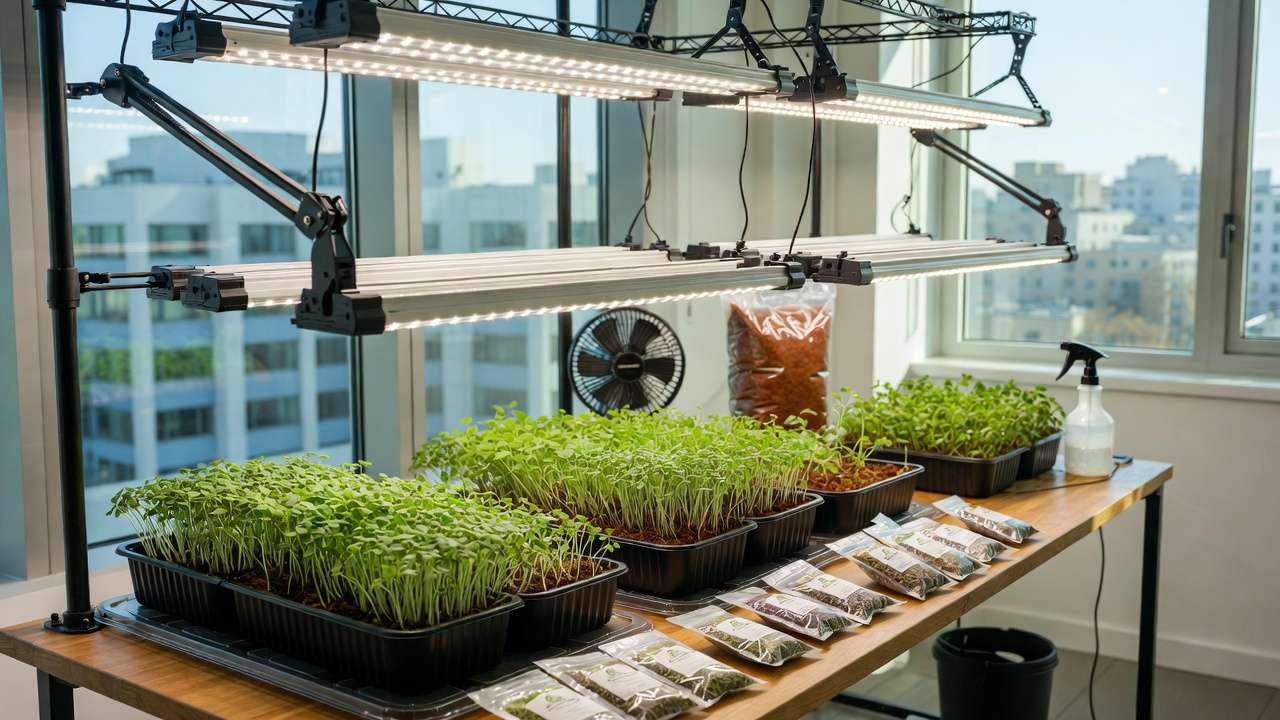
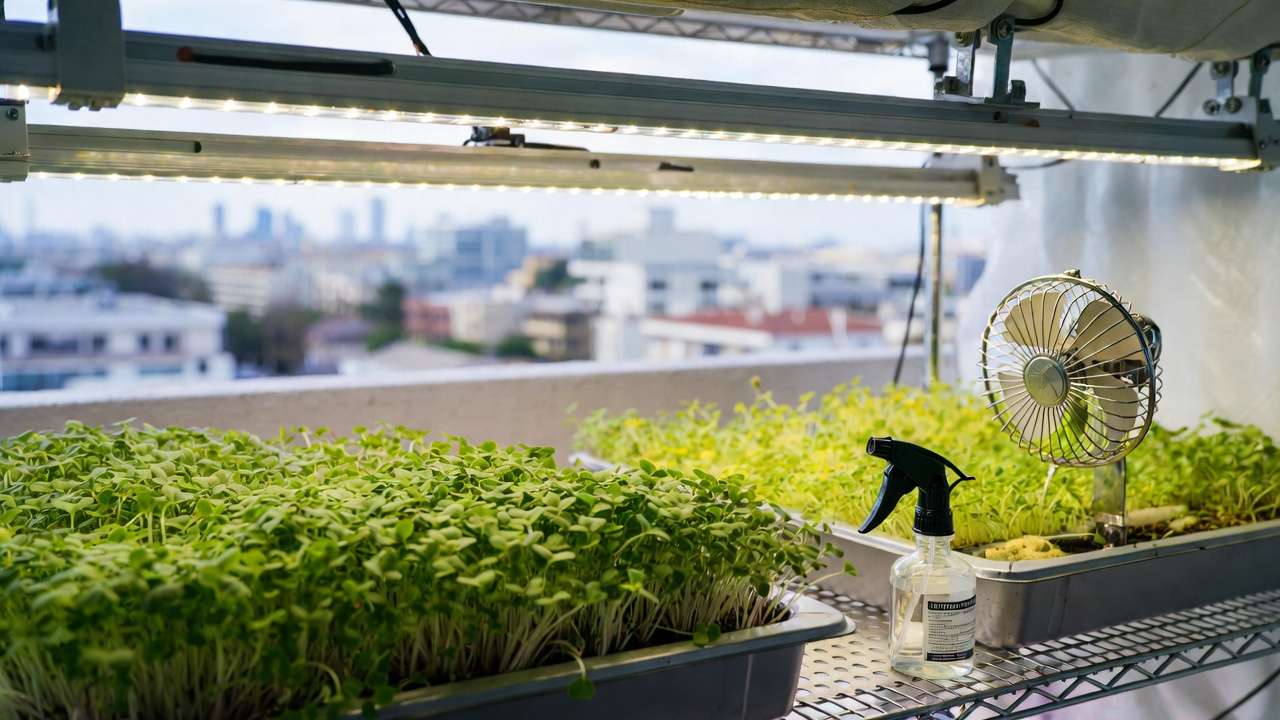
Essential Setup: What You Need to Start Growing Microgreens Indoors 🛠️
Starting is affordable and simple—most beginners launch under $100–200.
Core Supplies:
- Trays: Standard 10×20-inch plastic trays (with drainage holes) or reusable ones. Get bottom trays for watering from below.
- Growing Medium: Coco coir, peat-free seed-starting mix, or hydroponic mats (soilless for cleaner harvests).
- Seeds: High-quality, untreated varieties (organic preferred). Start with 1–2 oz packets.
- Lighting: Full-spectrum LED grow lights (20–40W per shelf). Affordable panels from brands like Spider Farmer work wonders.
- Extras: Small fan for airflow, spray bottle, scissors for harvesting, pH tester (optional).
Budget Breakdown:
- Starter kit (trays, medium, seeds, basic light): ~$80–150.
- Scaling (shelves, more lights): Add $100–300 for vertical efficiency.
Space Optimization Tips:
- Use wire shelving units (IKEA or similar) for 4–6 tiers.
- Windowsills for natural light starters.
- Closets or spare rooms with reflective mylar for max light capture.
Source seeds from reputable suppliers like True Leaf Market or Johnny’s Selected Seeds—freshness matters for germination rates! 📦
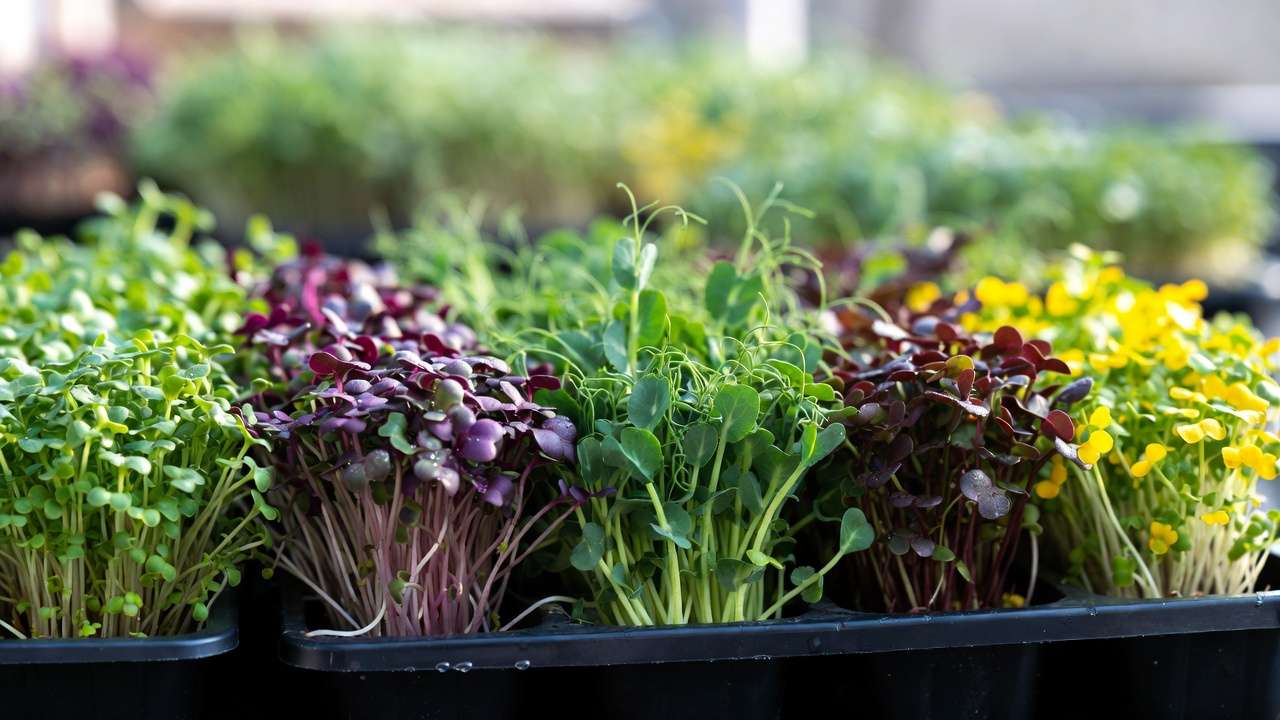
Best Microgreens Varieties for Urban Farmers (Beginner to Pro) 🌱🏆
Choosing the right varieties ensures success in small spaces. Here’s a curated selection based on ease, speed, yield, and urban appeal:
Beginner-Friendly (Fast & Forgiving):
- Radish (7–10 days): Spicy kick, high germination, resilient to errors.
- Broccoli (8–12 days): Mild, nutrient-dense (high sulforaphane), steady growth.
- Arugula (8–12 days): Peppery flavor, quick turnaround.
- Mustard (7–11 days): Bold taste, vibrant colors.
High-Value & Flavorful:
- Pea Shoots (10–14 days): Sweet, crunchy, excellent yield.
- Sunflower (10–14 days): Nutty, hearty—great for volume.
- Kale (10–14 days): Earthy, packed with vitamins.
- Basil or Cilantro (14–21 days): Aromatic, premium pricing potential.
Comparison Table (approximate for 10×20 tray):
| Variety | Growth Time | Difficulty | Yield (oz/tray) | Taste Profile | Market Value Potential |
|---|---|---|---|---|---|
| Radish | 7–10 days | Easy | 8–12 | Spicy | Medium-High |
| Broccoli | 8–12 days | Easy | 6–10 | Mild | High (nutrient hype) |
| Pea Shoots | 10–14 days | Easy-Med | 12–18 | Sweet | High |
| Sunflower | 10–14 days | Med | 10–15 | Nutty | Medium-High |
| Basil | 14–21 days | Med | 6–10 | Aromatic | Premium |
Start with radish or broccoli for quick wins—build confidence before experimenting! 🔥
Step-by-Step Growing Guide: From Seed to Harvest 📈🌱
Growing microgreens is delightfully straightforward once you follow a proven system. Below is the exact process I’ve refined through hundreds of trays in urban apartments—designed for maximum yield, minimal failures, and consistent quality.
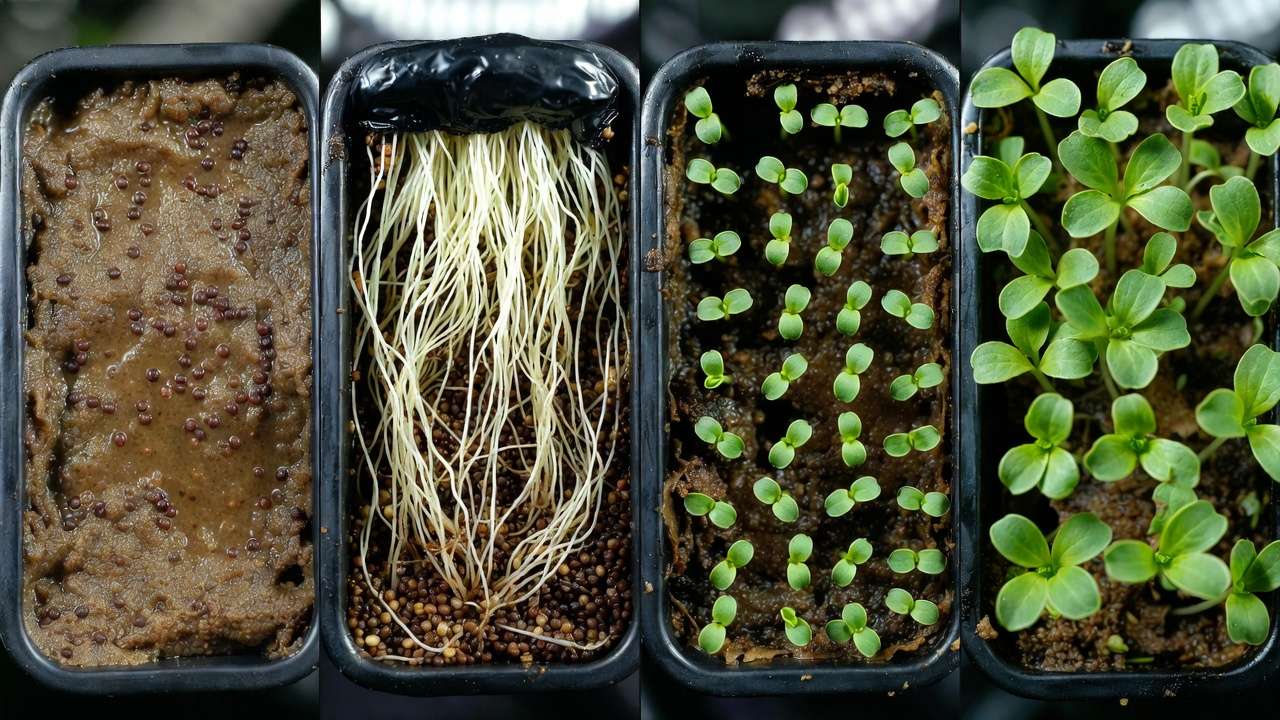
Preparing Your Trays and Seeds Start with clean 10×20 trays (sanitize with a mild bleach solution or hydrogen peroxide between uses to prevent mold).
-
Add your growing medium: Fill to about ½–¾ inch deep.
- Coco coir or peat-free mix → pre-moisten until damp but not soggy (squeeze test: no water drips).
- Hydroponic grow mats → simply lay flat and hydrate per instructions.
-
Seed selection & density: Use fresh, high-germination seeds. Different varieties need different sowing rates for optimal yield without overcrowding.
- Small seeds (broccoli, radish, arugula): 1–2 oz per 10×20 tray (about 2–3 tablespoons, spread evenly).
- Larger seeds (pea, sunflower): 4–8 oz per tray (cover surface in single layer, no heavy overlap).
Pro tip: Weigh seeds the first few times—eye-balling leads to thin or moldy patches.
-
Sowing technique: Scatter seeds as evenly as possible (use a small shaker bottle for tiny seeds). Gently press them into the medium with a flat board or your palm—good seed-to-medium contact is crucial for uniform germination. Do not bury them deeply.
Germination & Blackout Phase (Days 1–3/5) Stack trays or cover with another tray (blackout dome method) to create darkness and high humidity. This mimics soil burial and encourages strong root growth before light exposure.
- Keep at 68–78°F (20–26°C)—most urban apartments are fine; avoid cold windowsills.
- Mist lightly if medium dries on top.
- Check daily: Once you see tiny white roots or cotyledons lifting the seed hull (usually day 2–4), remove the cover and move to light.
Light & Temperature Requirements 🌞 Light is the #1 factor for leggy vs. stocky, vibrant microgreens.
- Best setup for apartments: Full-spectrum LED grow lights (4000–6500K color temperature) positioned 6–12 inches above trays.
- 20–40 watts per tray is sufficient; run 14–18 hours/day.
- Affordable options: Barrina T5/T8 shop lights or budget-friendly Amazon panels (many urban growers start with these).
- Natural light bonus: South-facing windows can work for slower varieties, but expect slower growth and paler color. Supplement with LEDs on cloudy days.
- Temperature: Day 65–75°F (18–24°C), night not below 60°F (16°C). Fans gently circulating air prevent mold and strengthen stems.
Watering & Humidity Tips 💧 Bottom watering is king for microgreens—it keeps foliage dry and reduces disease risk.
- Place trays in a larger bottom tray with ½–1 inch of water; let medium wick up moisture (5–15 minutes), then drain excess.
- Frequency: Every 1–2 days depending on humidity and light intensity. Medium should stay moist but never waterlogged.
- Early stages: Mist lightly from above during blackout. After light exposure, switch to bottom only.
- Humidity: 50–70% is ideal. In dry city apartments, a small humidifier or tray of water nearby helps during germination.
When & How to Harvest ✂️ Harvest at the perfect window for flavor, nutrition, and regrowth potential (some varieties allow a second cut).
- Timing: Just after the first true leaves fully open, before the second set appears (usually 7–21 days total).
- Radish, broccoli, mustard → 8–12 days
- Sunflower, pea shoots → 10–14 days
- Herbs (basil, cilantro) → 14–21 days
- Method: Use sharp, clean kitchen scissors to cut just above the medium line. Leave roots intact if planning a second harvest (many brassicas regrow once).
- Post-harvest: Rinse gently in cold water, spin dry (salad spinner works great), store in breathable containers in the fridge (up to 7–10 days).
Daily/Weekly Care Schedule Example (for a typical 10-tray urban setup):
- Day 1: Sow & blackout
- Day 3–4: Introduce light
- Daily: Check moisture, adjust lights/fans
- Every 2 days: Bottom water
- Harvest rotation: Sow new trays every 5–7 days for continuous supply
Follow this rhythm and you’ll have fresh microgreens on your plate almost every week! 🎉
Advanced Care Tips & Troubleshooting Common Urban Issues ⚠️🔧
Even the most reliable setups can hit bumps in urban environments—high humidity from cooking, dry air from AC, pests sneaking in through open windows, or inconsistent light from cloudy days. Here are the most common problems urban microgreen growers face and how to fix them like a pro.
Mold & Damping-Off Prevention (the #1 urban killer) Cities often have higher indoor humidity, especially in tropical or coastal areas like parts of Bangladesh.
- Solutions:
- Bottom water only after the blackout phase—never let water sit on leaves.
- Increase airflow: Run a small oscillating fan on low 24/7 (gentle breeze, not direct blast).
- Space trays 1–2 inches apart on shelves.
- Use hydrogen peroxide (1 tsp per liter of water) as a once-a-week light mist during early growth if mold appears.
- Choose faster-maturing varieties (radish, mustard) in very humid seasons—they spend less time vulnerable.
Leggy, Stretched, Pale Growth Usually caused by insufficient light intensity or being too far from the source.
- Fixes:
- Lower lights to 4–8 inches above the canopy once true leaves appear (adjust daily as they grow).
- Upgrade wattage if growth stays weak—aim for 20–30 µmol/m²/s PPFD minimum (cheap PAR meters help confirm).
- Rotate trays every 2 days for even exposure.
- Supplement with cooler (5000–6500K) LEDs if greens look yellowish.
Uneven Growth or Patchy Germination Common when seeds are clumped or medium dries unevenly.
- Prevention & Cure:
- Use a small sieve or shaker to distribute tiny seeds evenly.
- Pre-moisten medium thoroughly before sowing.
- During blackout, stack trays tightly and check moisture daily.
- For patchy trays: Thin dense spots with tweezers early; they’ll fill in.
Pest Issues in Small Spaces 🐛 Aphids, fungus gnats, or whiteflies can appear, especially if you bring in outdoor soil or open windows often.
- Urban-safe, organic controls:
- Yellow sticky traps near trays catch flying pests early.
- Neem oil foliar spray (diluted 1 tsp per liter + a drop of dish soap) once a week as prevention.
- Introduce beneficial insects like ladybugs if scaling up (available from some urban farming suppliers).
- Keep everything spotless—remove spent trays immediately after harvest.
Scaling Up Without Chaos Once comfortable with 5–10 trays, go vertical:
- Add stackable shelving with lights on timers.
- Stagger sowing every 4–7 days for steady harvest.
- Track varieties and dates in a simple notebook or app (many growers use Google Sheets).
Master these fixes and your failure rate drops below 5%—even in challenging city conditions! 💪
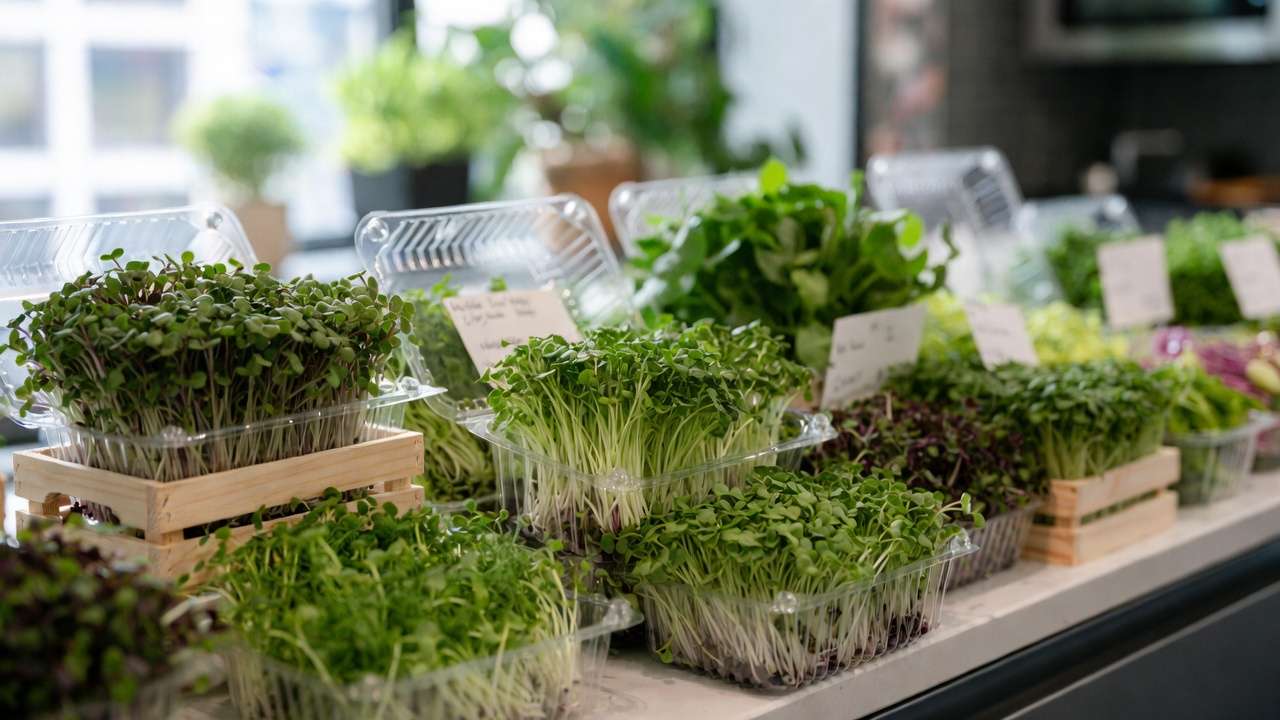
Making It Profitable: Turning Your Urban Microgreens into Income 💰🌿
Many urban farmers start for personal use… then realize friends, neighbors, and local restaurants will happily pay premium prices for fresh, local microgreens.
Realistic Market Demand
- High-end cafes, farm-to-table restaurants, and boutique grocers love local microgreens for garnishes, salads, and signature dishes.
- Direct sales: Farmers’ markets, community CSAs, Instagram/WhatsApp groups, or doorstep delivery in your neighborhood.
- In growing cities, demand often outstrips small producers.
Pricing & Profit Breakdown (based on 10×20 trays):
- Production cost per tray: $1.50–3.50 (seeds + medium + electricity).
- Average yield: 8–16 oz per tray.
- Selling price: $15–35 per pound (or $4–10 per clamshell/100g pack).
- Profit per tray: $10–30 after costs.
- 20 trays/week rotation → potential $800–2,000/month part-time.
Marketing Tips for City Growers
- Take beautiful photos under natural light—post daily stories on Instagram/Facebook with #UrbanFarming #MicrogreensBD hashtags.
- Offer sampler packs (mixed varieties) to restaurants for free first—build relationships.
- Use WhatsApp Business for local orders and subscriptions (weekly deliveries).
- Join urban farming groups or local food co-ops for visibility.
Inspiring Case Studies Small-apartment growers in Dhaka and Chittagong have scaled to supply 5–10 cafes consistently, earning solid side income while using just 2–3 shelves. Start small, prove consistency, and word spreads fast!
Sustainability & Eco-Friendly Hacks for Urban Microgreens 🌍♻️
Microgreens already have a tiny footprint—here’s how to make yours even greener:
- Reuse trays hundreds of times (scrub well between cycles).
- Compost spent growing medium (add worm bins for apartment composting).
- Choose peat-free or coco coir mediums—more sustainable than traditional peat.
- Use low-wattage LEDs on timers to cut electricity use.
- Collect rainwater (if you have access) or reuse rinse water for bottom watering.
- Grow your own seeds long-term from a few mature plants (arugula, mustard, radish bolt easily).
Every tray you grow cuts down on imported, plastic-wrapped produce—small actions add up in cities!
FAQs: Your Top Microgreens Questions Answered ❓
Can I grow microgreens without grow lights? Yes, but only in very bright, south-facing windows—and growth will be slower and less vibrant. LEDs give far better results in most urban apartments.
How much space do I really need to start? One shelf (about 2×3 feet) can hold 6–8 trays. Many begin on a kitchen counter or windowsill.
Are microgreens safe to eat raw? Absolutely—when grown cleanly at home with good practices. Buy seeds from reputable sources and follow hygiene steps.
How much can I realistically earn from a balcony or small room setup? With 15–30 trays rotating, many urban farmers make $500–1,500/month part-time after building customers. It scales with consistency.
Which seeds are easiest for beginners in hot, humid climates? Radish, mustard, broccoli, and sunflower handle heat and humidity well. Avoid slow herbs until you have airflow dialed in.
Do I need special soil or can I use garden dirt? Never use untreated garden soil (pest/disease risk). Stick to sterile seed-starting mix, coco coir, or hydro mats.
How long do harvested microgreens last? 7–14 days in the fridge in a sealed container with a paper towel to absorb moisture.
Can kids or families get involved? Yes! It’s a fantastic educational project—kids love seeing seeds sprout in days.
Conclusion & Next Steps 🚀🌿
You’ve now got the full roadmap to successfully grow microgreens for urban farmers—from understanding why these tiny powerhouses are perfect for city life, to setting up your first trays affordably, choosing the best beginner varieties, following a foolproof day-by-day growing process, troubleshooting the most common urban challenges, and even turning your small-space passion into a profitable side income.
The beauty of microgreens lies in their simplicity and speed: in less than three weeks, you can go from a handful of seeds to nutrient-packed greens on your plate, all while using just a few square feet of space. Whether your goal is fresher meals for your family, slashing grocery bills, living more sustainably in Mathba or any bustling Bangladeshi city, or starting a small local business supplying restaurants and neighbors, this method delivers real results with minimal risk.
My strongest advice after years of growing in apartments, balconies, and tiny rooftops: start small and start today. Buy one or two 10×20 trays, a bag of coco coir, and a packet of radish or broccoli seeds. Sow your first tray this week—even if it’s just on a windowsill with natural light to begin. Watch those first cotyledons push through the medium in a few days. That moment of seeing life sprout under your care is incredibly motivating, and it builds momentum fast.
Once you harvest your first batch, taste the difference—crisp, vibrant, alive—and you’ll be hooked. Share your progress in local gardening groups, on Facebook, or with friends; the urban farming community in Bangladesh is growing stronger every day, and people love seeing real home successes.
If you hit any snags along the way (mold in humid weather, leggy shoots from cloudy days, or questions about scaling), come back to this guide or drop a comment—I’m always happy to help fellow city growers troubleshoot.
Ready to get your hands dirty (in the best way)? Grab those seeds, set up your first tray, and join the thousands of urban farmers worldwide proving that you don’t need land to grow real food. Your small space is about to become a green oasis. 🌱💚
Happy growing, and enjoy every tiny, delicious harvest!


