
Tired of staring at a thirsty, brown lawn every summer while your water bill skyrockets and your weekends disappear into mowing sessions? 😩 You’re not alone—traditional turf grass can account for 30–60% of residential outdoor water use in many areas, guzzling resources in an era of increasing droughts and rising costs. 🌞
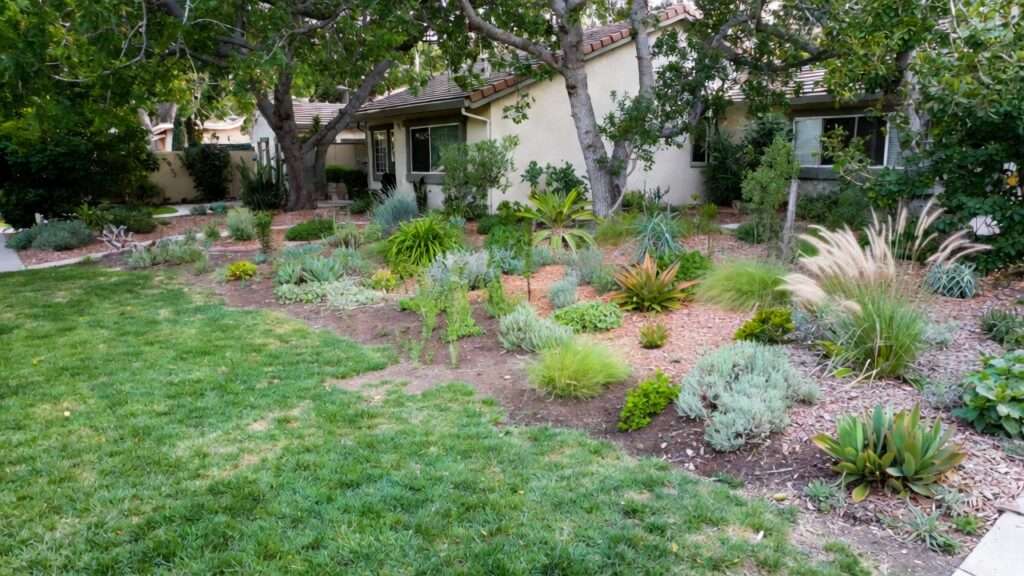
Converting a traditional lawn to xeriscape offers a beautiful, practical solution: a vibrant, drought-tolerant landscape that slashes water consumption, cuts maintenance dramatically, and creates a yard that works with nature instead of against it. 🌱 Xeriscaping isn’t about barren rocks or “zero-scape”—it’s smart, sustainable landscaping using proven principles to achieve lush, colorful results with minimal effort.
In this comprehensive guide, we’ll walk you through every step to transform your yard into a resilient, eco-friendly oasis. Homeowners who make the switch often save 50–75% (or even up to 80% in some cases) on outdoor water use, based on reports from water authorities and real-world implementations. 💰 You’ll reclaim your time, support local pollinators 🐝, reduce chemical use, and potentially boost your property value with a modern, low-maintenance design. Ready to ditch the endless watering and embrace a yard that thrives on less? Let’s dive in! 🚀
What Is Xeriscape? Busting the Myths 🧐
Xeriscape (from the Greek “xeros,” meaning dry) was coined in the 1980s by Denver Water to promote water-wise landscaping without sacrificing beauty. It’s built on seven core principles widely endorsed by experts like Colorado State University Extension and water utilities:
- Plan and design thoroughly — Create a thoughtful layout from the start.
- Improve soil — Build healthy, water-retaining soil.
- Irrigate efficiently — Use targeted systems like drip irrigation.
- Select appropriate plants — Choose native or adapted drought-tolerant varieties.
- Limit turf areas — Minimize or eliminate high-water grass.
- Use mulch — Retain moisture and suppress weeds.
- Practice proper maintenance — Focus on smart, infrequent care.
Common myths hold people back from trying it. Myth #1: “Xeriscape means only rocks and cacti.” 🌵 Nope—while rocks can add structure, true xeriscapes feature colorful perennials, grasses, shrubs, and even small trees for year-round interest. Myth #2: “It’s maintenance-free and needs zero water.” Not quite—it requires less water and effort than traditional lawns, but initial establishment and occasional pruning keep it thriving. Myth #3: “It looks boring or desert-only.” ❌ Well-designed xeriscapes burst with texture, color, and wildlife appeal, adapting beautifully to various climates—from arid Southwest to transitional zones.
Why Convert Your Lawn to Xeriscape Now? 📈
The urgency is real: Droughts are more frequent, water shortages loom in many regions (with forecasts showing over 75% of the world facing water stress by 2050), and residential landscapes consume massive amounts of freshwater. Xeriscaping directly tackles this by cutting outdoor water use by 50–75% on average, with some areas reporting up to 80% savings through efficient practices. 🌍
Financially, expect lower water bills (savings of hundreds annually in drought-prone spots), reduced mowing/fertilizing costs (up to 60% less maintenance), and fewer chemicals polluting waterways. Environmentally, it prevents soil erosion, supports biodiversity with pollinator-friendly plants, and eases strain on municipal supplies. Lifestyle-wise? More free time, a cooler yard (thanks to strategic shading), and stunning curb appeal that stands out in a sea of green lawns. In regions facing restrictions or incentives (like turf replacement rebates), converting now positions your home ahead of the curve. 🌟
Step-by-Step Guide to Converting Your Lawn (H2) 🛠️
Step 1: Assess Your Yard and Set Goals (H3) 🔍
Start with a site analysis. Walk your property and note sun exposure (full sun vs. shade), slopes (for drainage), soil type (clay holds water; sandy drains fast), existing features (trees, patios), and microclimates. Use a simple sketch or free apps like iScape to map it out.
Divide into hydrozones: oasis (higher water near house), transition (moderate), and arid (minimal). Ask: Full conversion or phased (e.g., front yard first)? Budget? Timeline (1–3 years for best results)? Set goals like “cut water use by 60%” or “create a pollinator haven.” This planning prevents costly mistakes. 📝
Step 2: Plan Your Design Like a Pro (H3) 📐
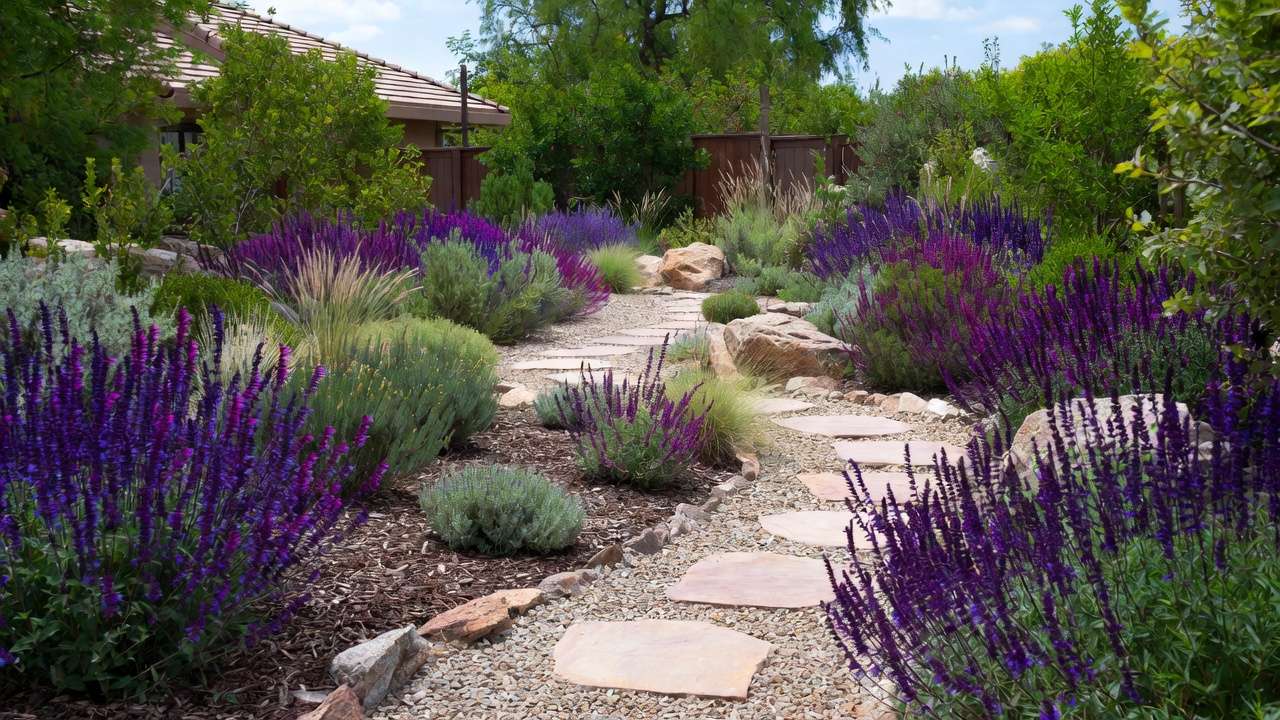
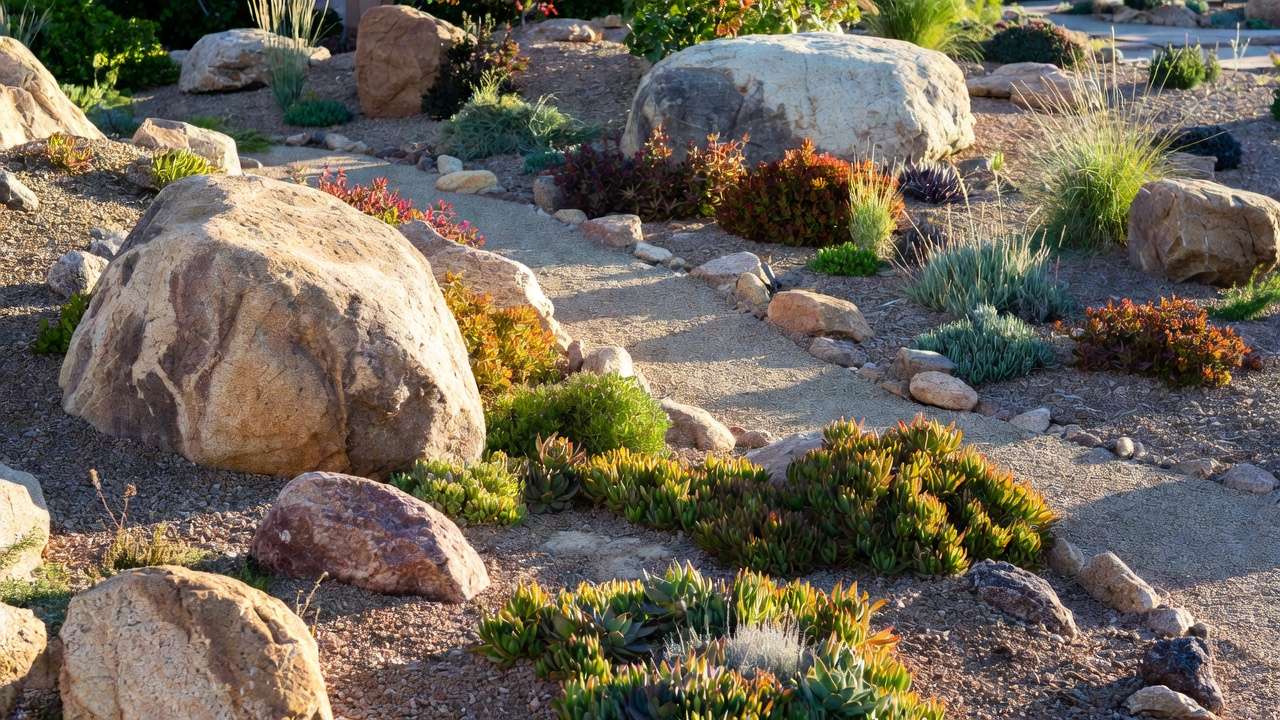
Sketch on graph paper or digitally. Incorporate hardscaping (paths, boulders, patios) for low-maintenance structure and visual interest. Apply hydrozoning: group plants by water needs to avoid overwatering. Consider native/adapted plant palettes for your region—check local extension services for recommendations. Aim for year-round appeal: spring blooms, summer color, fall texture, winter structure. Pro tip: Include rain harvesting elements like swales if possible. 🌧️
Step 3: Remove the Old Lawn (Without the Headache) (H3) ✂️
Options vary by eco-friendliness and speed:
- Sheet mulching (best eco-choice): Layer cardboard/newspaper, compost, mulch; solarize under plastic for 4–8 weeks to kill grass naturally.
- Sod cutter : Rent one for quick removal (great for large areas, but labor-intensive).
- Herbicide : Fast but least preferred—use only if necessary, follow safety guidelines.
Timeline: Start in fall or spring; allow 4–12 weeks for decomposition. Compost clippings or dispose responsibly. Wear gloves and protect nearby plants! 🧤
Step 4: Test and Amend Your Soil (H3) 🌱
Healthy soil is the foundation—test pH and texture (jar test: shake soil in water, observe layers). Amend with organic compost (2–4 inches worked in) to improve drainage in clay or water retention in sand. This boosts root health and reduces irrigation needs long-term. Even poor native soils thrive with amendments! 🧪
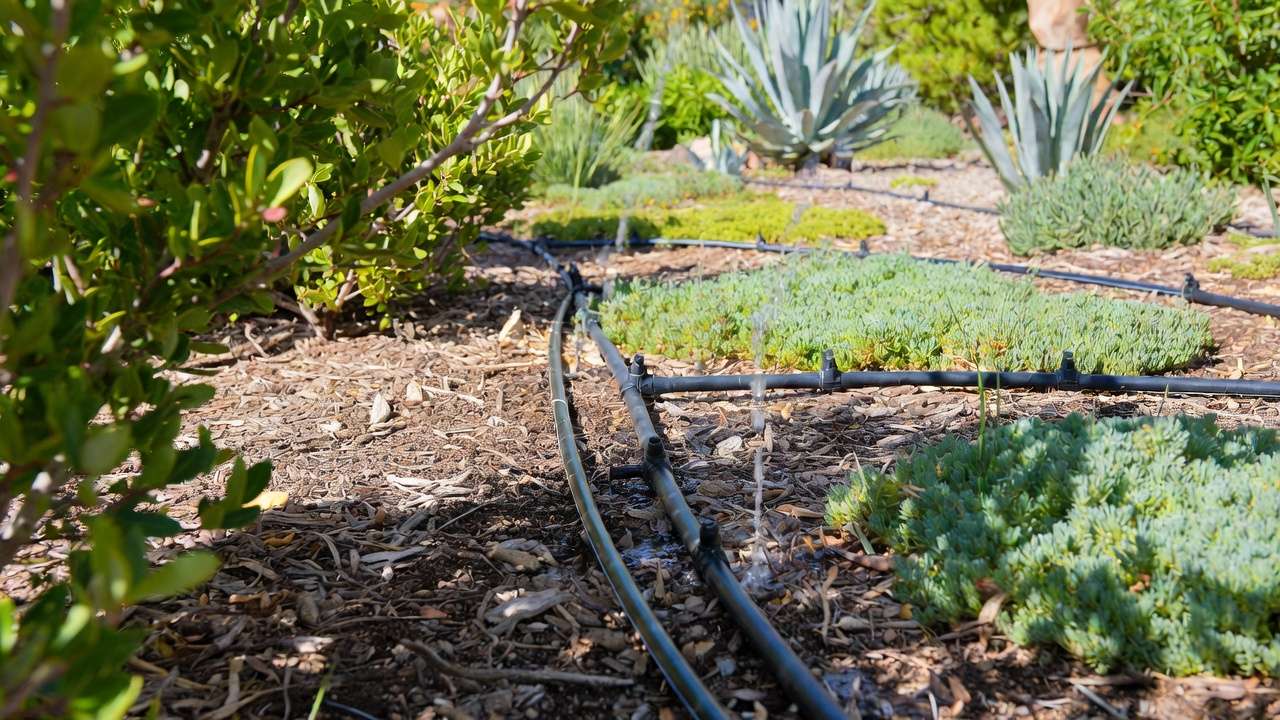
Step 5: Install Efficient Irrigation (H3) 💦
Ditch overhead sprinklers (up to 50% evaporation loss). Switch to drip irrigation or micro-sprayers for targeted delivery. Add smart controllers/rain sensors to automate based on weather. Zone by plant needs. Budget: DIY kits $200–$800; pro install $1,000–$3,500+. Start simple—hand watering works during establishment! 🚿
Step 6: Choose the Right Drought-Tolerant Plants 🌺
Prioritize native or well-adapted species—they need less water once established.
- Ground covers: Creeping thyme, sedum, ice plant.
- Perennials: Salvia, yarrow, penstemon, lavender, echinacea.
- Shrubs/small trees: Texas sage, red yucca, serviceberry, lantana (in warmer zones).
- Ornamental grasses: Blue fescue, buffalo grass alternatives, muhly grass.
Tailor to region: Southwest loves agave/prickly pear; transitional areas favor salvia/fountain grass. Plan for color, texture, bloom seasons—aim for pollinator magnets! 🐦
Step 7: Add Mulch & Hardscaping Elements (H3) 🪨
Apply 2–4 inches of mulch (organic like bark for moisture retention; inorganic gravel for arid looks). Use weed barriers judiciously. Add boulders, decomposed granite paths, or patios for structure and reduced weeding. Mulch suppresses weeds and moderates soil temperature. 🌡️
Step 8: Plant, Water, and Establish (H3) 🌿
Dig holes twice the root ball width. Plant at proper depth, water deeply but infrequently to encourage deep roots. Establishment phase (first 1–2 years): Weekly deep soaks tapering off. Monitor for stress—adjust as needed. Patience pays off! 🌱
Maintenance: What to Expect Long-Term 🧑🌾
One of the biggest misconceptions about xeriscape is that it’s completely hands-off. While it requires far less effort than a traditional lawn, thoughtful maintenance ensures long-term success and keeps your yard looking its best. Here’s a realistic breakdown:
Year 1 (Establishment Phase)
- Watering: Deep, infrequent sessions (1–2 times per week, 30–60 minutes depending on zone and weather) to encourage deep roots. Taper gradually as plants establish.
- Weeding: Hand-pull weeds regularly while mulch suppresses most.
- Monitoring: Check for stress (wilting, yellowing) and adjust irrigation. Prune lightly to shape young plants.
- Fertilizing: Minimal—use slow-release organic once in spring if soil tests show deficiency.
Year 2 and Beyond
- Watering: Often reduced to monthly or only during prolonged dry spells (many natives/adapted plants survive on rainfall once mature).
- Pruning: Annual light trimming in late winter/early spring to remove dead material and encourage bushiness.
- Weeding: Occasional spot checks—mulch renewal every 1–2 years keeps weeds minimal.
- Pest/Disease Management: Focus on prevention (healthy plants resist issues); use neem oil or beneficial insects if needed—avoid broad-spectrum chemicals.
- Seasonal Checklist:
- Spring: Prune, refresh mulch, check irrigation.
- Summer: Deep water only as needed, deadhead blooms.
- Fall: Plant new additions, clean up debris.
- Winter: Minimal—protect tender plants in colder zones.
With proper design and plant selection, many xeriscape yards need only 4–8 hours of maintenance per year after establishment—compared to 100+ hours for traditional turf! ⏰
Cost Breakdown: Budgeting Your Xeriscape Conversion 💸
Costs vary widely based on yard size, DIY vs. professional help, and region. Here’s a realistic range for a typical 1,000–2,000 sq ft conversion:
Low-Budget DIY Approach (~$1–$3 per sq ft)
- Remove lawn: $100–$400 (sheet mulching materials or rented sod cutter)
- Soil amendments: $200–$600 (compost, mulch)
- Plants: $300–$1,000 (buy small starters, propagate, shop sales)
- Irrigation: $200–$800 (basic drip kit)
- Hardscaping: $200–$800 (gravel, stepping stones) Total: $1,000–$3,600 — achievable over 1–2 years by phasing.
Mid-Range (Some Pro Help) (~$4–$8 per sq ft)
- Professional design/planting: $1,000–$3,000
- Full drip system install: $1,500–$4,000 Total: $4,000–$12,000
High-End Professional Install (~$8–$15+ per sq ft)
- Custom design, premium plants, extensive hardscaping: $15,000–$30,000+ for larger yards.
Cost-Saving Hacks
- Check local water utility rebates (many offer $0.50–$2 per sq ft removed turf).
- Shop native plant sales at botanical gardens or nurseries in spring/fall.
- Phase the project: Convert front yard Year 1, back Year 2.
- Reuse existing features (keep mature trees/shrubs).
- DIY where possible—many homeowners complete 70–80% themselves.
ROI Timeline Most see water bill savings of $200–$800/year (depending on local rates and previous usage). Break-even often occurs in 3–7 years, with lifelong savings and increased property value (studies show xeriscaped homes can sell faster and for 5–15% more in water-conscious markets).
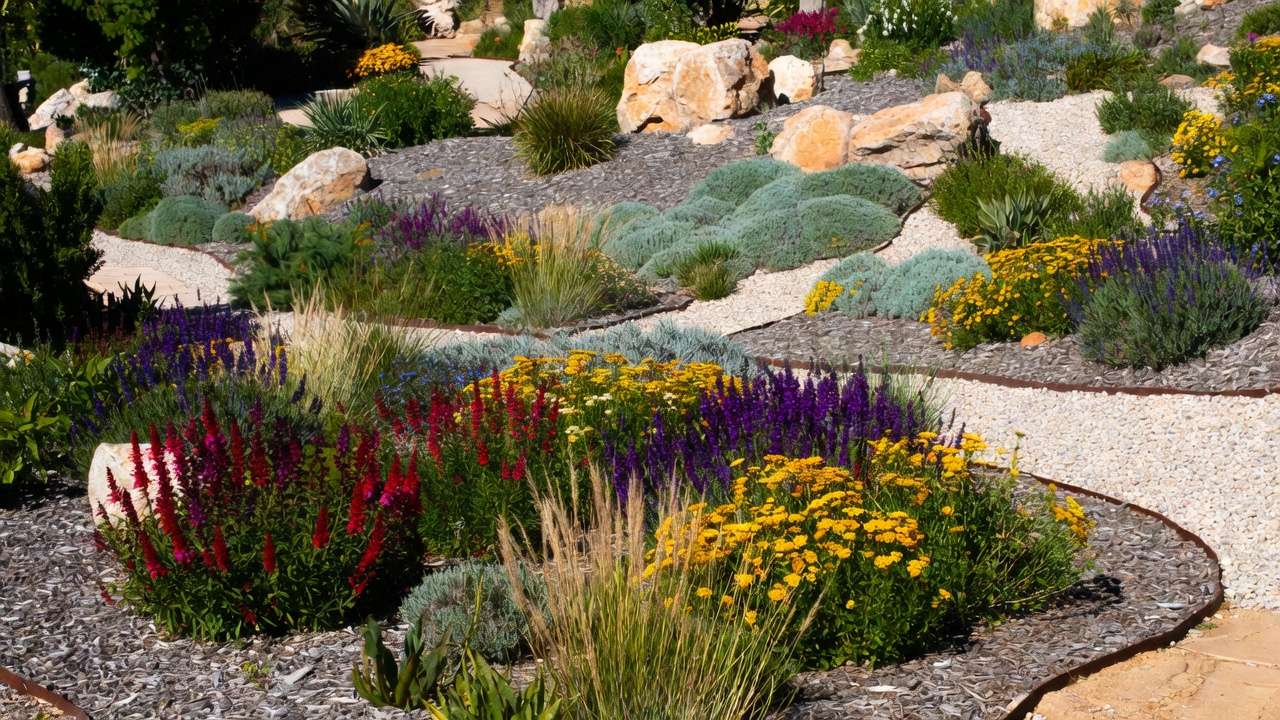
Inspiring Xeriscape Examples & Case Studies 📸
- Modern Minimalist Front Yard (Southwest style) Gravel base + agave, yucca, and blue fescue clumps create clean lines. Boulders and decomposed granite paths add texture. Low water, striking curb appeal.
- Colorful Pollinator Haven (Transitional climate) Salvia, lantana, echinacea, and butterfly bush in sweeping beds, mixed with ornamental grasses. Bees and hummingbirds flock year-round. Before: patchy lawn. After: vibrant rainbow that blooms spring–fall.
- Family-Friendly Edible Xeriscape Fruiting shrubs (serviceberry, currant), herbs (thyme, oregano), and drought-tolerant veggies in raised beds with drip lines. Kids love picking snacks; parents love low upkeep.
- Small-Space Courtyard Transformation Containerized succulents, creeping ground covers, and a small water feature on a patio. Proves xeriscape works even in tiny urban yards.
(These real-world examples show the versatility—xeriscape adapts to your style, climate, and space!)
FAQs About Converting to Xeriscape ❓
Q: Does xeriscape look good in non-desert areas? A: Absolutely! In humid or transitional zones, use lush natives like black-eyed Susan, coneflower, and little bluestem grass for a meadow-like feel.
Q: How long until it looks established and full? A: 1–3 years. Year 1 focuses on roots; Year 2 brings fuller growth; by Year 3, most plants reach mature size and need minimal water.
Q: Will it increase my property value? A: Yes—in water-restricted or eco-conscious markets, xeriscaped homes often sell faster and command higher prices due to lower maintenance and appeal to buyers.
Q: Can I keep some grass? A: Definitely! Many designs retain a small “turf island” of drought-tolerant buffalo grass or clover for play areas, while the rest goes xeriscape.
Q: Is it pet-friendly? A: Most native plants are non-toxic. Avoid sharp succulents near play zones; opt for soft grasses and rounded shrubs.
Q: What if I live in a very rainy area? A: Xeriscape still works—focus on excellent drainage, rain-tolerant natives, and mulch to prevent rot.
Final Thoughts: Your Path to a Sustainable, Stunning Yard 🌟
Converting a traditional lawn to xeriscape is one of the most rewarding home improvements you can make. You’ll save money and water 💧, gain precious free time ⏳, nurture wildlife 🐝, and enjoy a yard that looks effortlessly beautiful through every season.
Start small: Assess your yard this weekend, sketch a simple plan, and tackle one section first. The transformation doesn’t happen overnight, but every step brings you closer to a resilient, low-maintenance landscape that’s kind to the planet and your schedule.
As plant care and landscaping enthusiasts, we’ve guided countless homeowners through this journey—and the results are always worth it. Your drought-tolerant dream yard is waiting. 🌍✨
What’s your biggest motivation for considering xeriscape? Drop a comment below—we’d love to hear your story and answer any questions! 👇


