
Imagine gently coaxing a stubborn branch into that elegant, flowing curve you’ve envisioned for months—only to check back weeks later and find deep wire scars etched into the bark or, worse, a snapped limb hanging lifelessly. 😔 Heartbreaking, right? As someone who’s wired hundreds of bonsai over the past 15+ years (from fragile maples to tough junipers), I know this frustration all too well. The good news? Proper bonsai wiring methods make all the difference. When done correctly, wiring becomes your most powerful styling tool—allowing safe, precise shaping without harming your precious tree.
In this comprehensive guide, we’ll cover everything you need to master bonsai wiring: choosing the right wire type and gauge, perfect timing, foolproof step-by-step application techniques, advanced tricks, common pitfalls (with real fixes), and aftercare to preserve your hard work. Whether you’re a beginner terrified of damaging your first tree or an intermediate enthusiast looking to refine your technique, these proven methods will help you achieve professional-level results safely. Let’s turn potential disasters into graceful masterpieces! 🌱
Understanding Bonsai Wiring – The Foundation
What Is Bonsai Wiring and Why Do We Do It?
Bonsai wiring is the art of wrapping specialized wire around trunks and branches to bend and hold them in desired positions until the tree “sets” the new shape through natural growth and lignification. It’s one of the core techniques in bonsai styling, alongside pruning, defoliation, and root work.
Without wiring, many trees grow straight and rigid—missing the dynamic, aged look that defines great bonsai. Proper wiring lets you create movement, balance, and taper, mimicking mature trees in nature. But remember: the goal isn’t permanent restraint; it’s temporary training until the branches hold their position naturally.
When Wiring Is (and Isn’t) Necessary
Wire only when structural change is needed—such as correcting upward-growing branches, creating pads, or improving overall silhouette. Skip wiring if:
- The tree is already well-shaped
- Branches are too thick/hardened (risk of cracking)
- The tree is stressed, diseased, or newly repotted
Over-wiring exhausts the tree and invites pests/disease. Always prioritize health first! ⚠️
The Risks of Improper Wiring (Scars, Breakage, Slow Recovery)
The most common fears are real: wire cutting into bark (“wire bite”), branch snapping from sharp bends, or permanent scarring that takes years to heal. Poor technique can stunt growth or kill branches outright. But with the right methods, these risks drop dramatically.
Here’s a close-up example of what wire scars look like when left too long or applied too tightly:

See those raised, scarred areas? They heal over time with good aftercare, but prevention is always better.
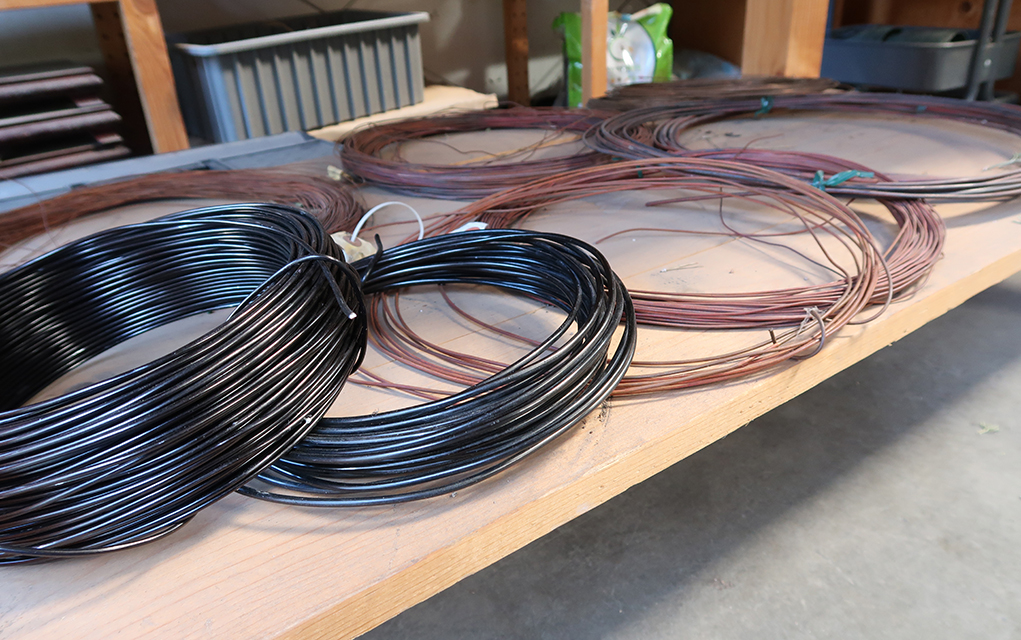
Choosing the Right Wire – Aluminum vs. Copper Compared
Wire selection is crucial—wrong type or size leads to failure or damage.
Aluminum Wire: Best for Beginners and Deciduous Trees
Anodized aluminum is soft, easy to bend/remove, and forgiving. It’s visible (shiny silver), so many remove it sooner for aesthetics. Ideal for maples, elms, ficus, and other broadleaf species.
Pros: Affordable, no annealing needed, reusable if careful Cons: Less holding power on strong conifers, can scar if left too long
Copper Wire: The Pro Choice for Conifers and Strong Hold
Annealed copper starts soft but hardens as you bend it—providing superior grip with thinner wire. It darkens beautifully over time, blending in on pines, junipers, and spruces.
Pros: Stronger hold, thinner gauges work better, natural look Cons: Harder to remove (can snap branches if not careful), more expensive
Here’s a side-by-side comparison of copper (darker) and aluminum wires:
Wire Gauge Guide: The 1/3 Rule + Species Adjustments
The golden rule: Wire thickness should be about 1/3 the diameter of the branch you’re bending. Too thin = no hold; too thick = hard to bend + risk of damage.
Quick reference table (approximate mm sizes):
- 1–3 mm branch → 1–1.5 mm wire
- 3–6 mm → 2–2.5 mm
- 6–10 mm → 3–4 mm
Adjust: Use slightly thinner for copper (stronger), thicker for aluminum. For brittle species like azaleas, go 1/4 rule and use raffia protection.
Where to Buy Quality Bonsai Wire (Avoid Cheap Alternatives) 🛒
Skip hardware store wire—it’s often too stiff or coated poorly. Trusted sources include specialized bonsai suppliers (e.g., Bonsai Boy, Eastern Leaf, or local nurseries). Invest in annealed copper for conifers—it’s worth it!
Now that you’ve chosen your wire, timing is next—get this wrong, and even perfect technique can cause stress or failure.
Best Time to Wire Your Bonsai – Timing Is Everything ⏰
Wiring at the wrong time is one of the biggest reasons trees get damaged or reject the shape.
Ideal Seasons by Tree Type (Spring for Deciduous, Fall/Winter for Conifers)
- Deciduous trees (maples, elms, hornbeams, beech): Early to mid-spring, just as buds swell but before full leaf-out. Sap flow makes branches more flexible.
- Conifers (pines, junipers, spruces): Late summer through fall/winter when growth slows and wood is semi-hard but still pliable.
- Tropicals (ficus, serissa): Year-round, but avoid peak heat or rainy seasons that stress the tree.
Pro tip: Always wire after major pruning when energy redirects to new growth—this helps set shapes faster.
Signs Your Tree Is Ready (Health, Vigour, Sap Flow)
Look for:
- Strong, vibrant foliage
- No signs of pests, disease, or nutrient deficiency
- Recent healthy push (new buds or extension)
- Branches that bend slightly without cracking when tested gently
If the tree looks weak or is recovering from repotting, wait 4–6 weeks minimum.
Times to NEVER Wire (Avoid Mid-Summer Stress, Weak Trees) 🚫
- Mid-summer heat waves (high transpiration + wire = fast bite-in)
- Immediately after repotting or heavy root pruning
- During dormancy for most species (branches too brittle)
- On very young, thin shoots (they’ll thicken and push wire off quickly anyway)
Expert Insight: Fast-growing species like Chinese elm or ficus can need re-wiring every 2–4 months because growth pushes wire loose quickly—patience and frequent checks are key!
Here’s a visual of proper branch positioning after wiring—notice the natural flow and no crossing wires:
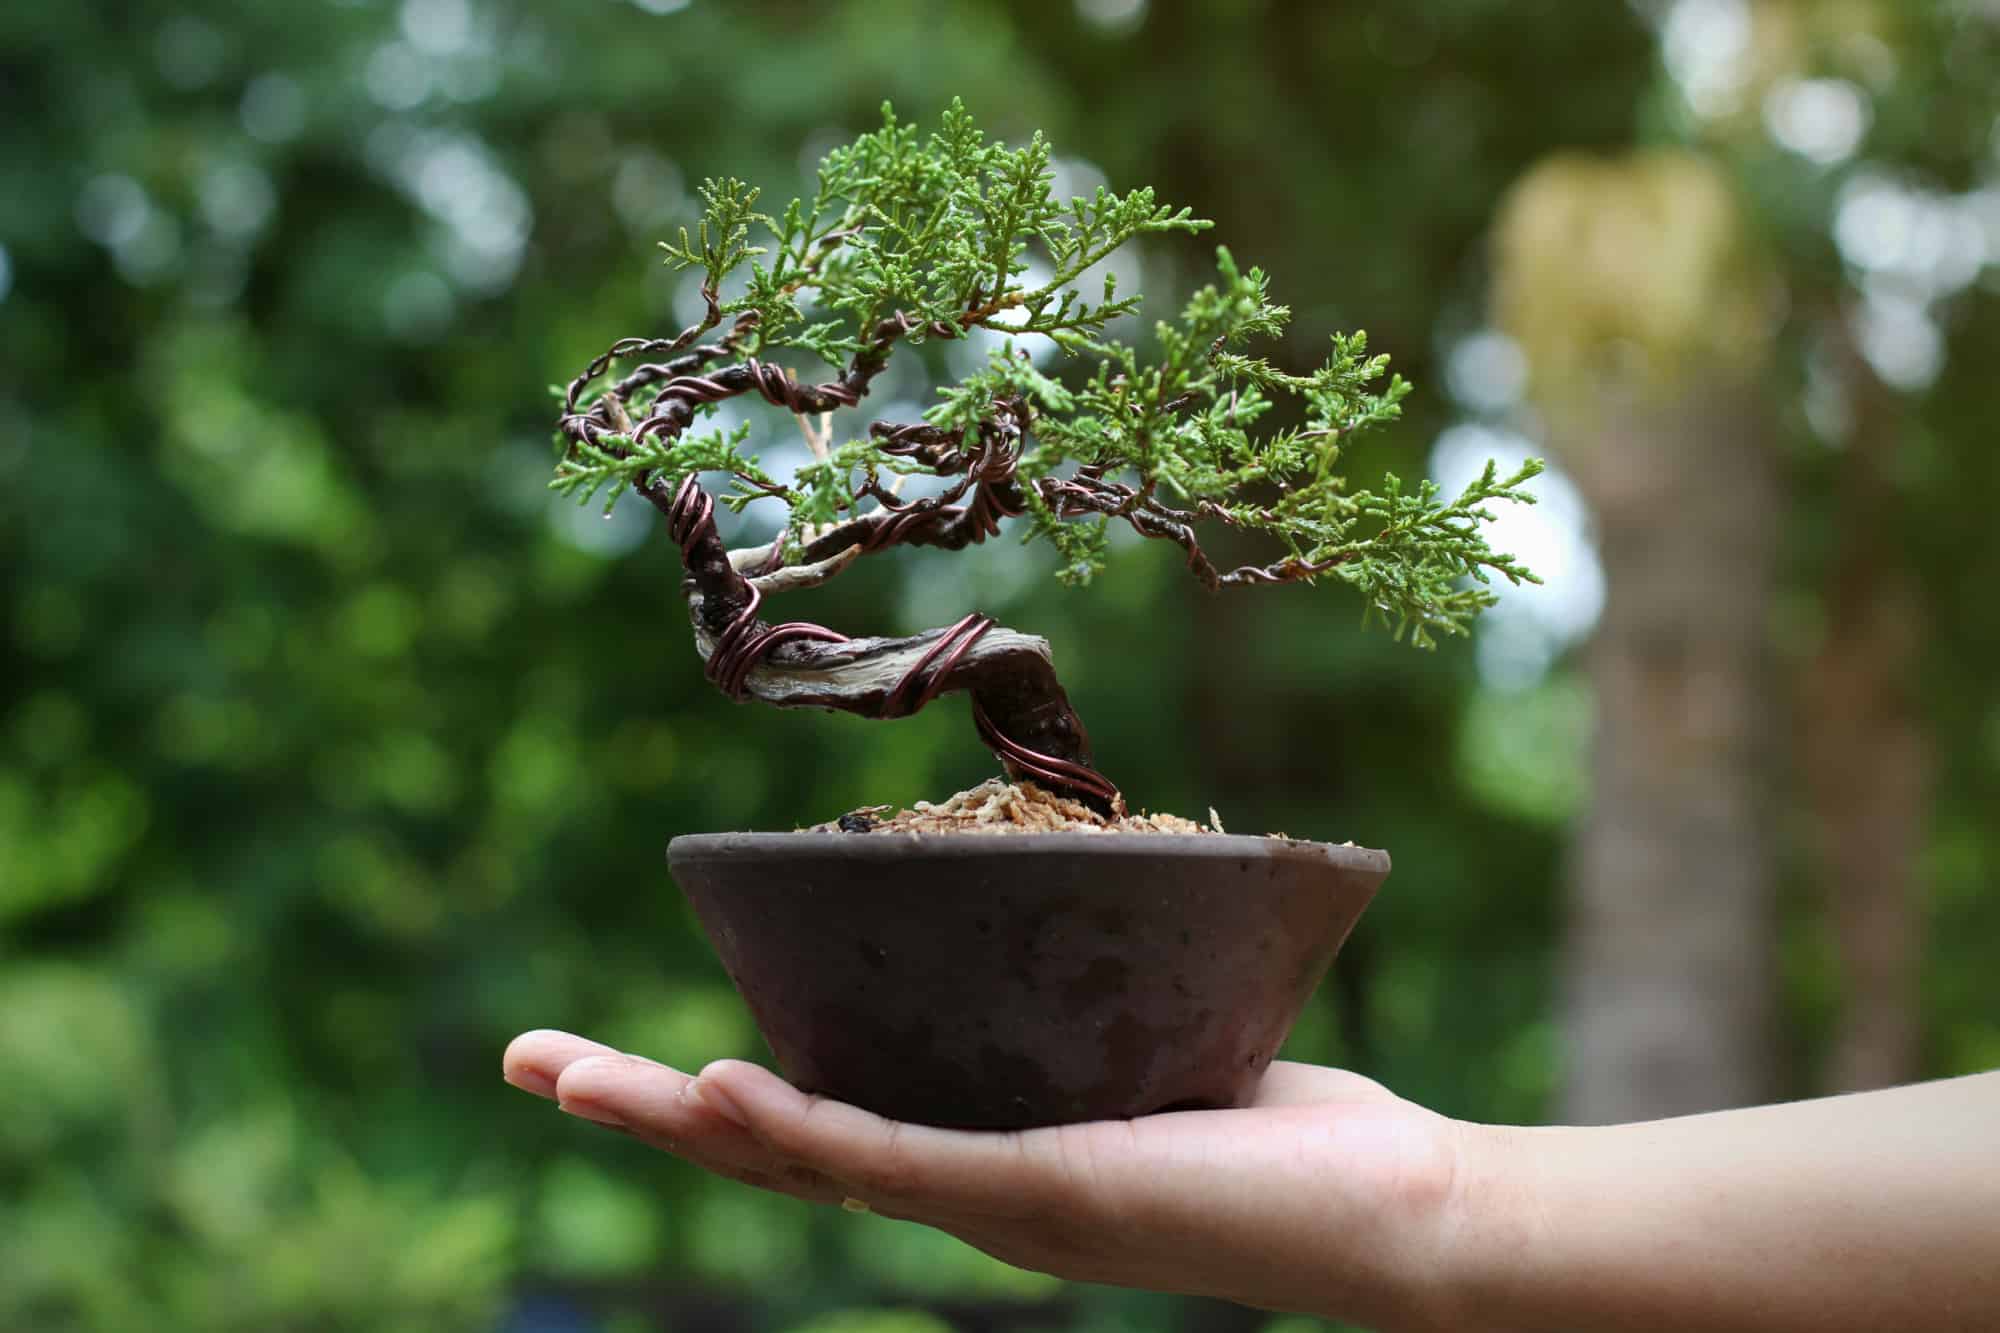
And a classic copper-wired juniper showing strong hold and aesthetic blend:
Step-by-Step Guide to Proper Bonsai Wiring Methods
This is the heart of the article—follow these steps exactly, and you’ll minimize damage while maximizing results. Practice on sacrifice branches first if you’re nervous! 📸
Preparation: Tools You’ll Need + Pre-Wiring Checklist
Essential tools:
- Concave branch cutters
- Wire cutters (flush type)
- Bonsai pliers or jin pliers
- Raffia or wet paper tape (for protection on brittle species)
- Gloves (optional but smart for copper)
- Turntable (makes access easier)
Checklist:
- Tree healthy and watered 1–2 days prior
- Plan your design (sketch or visualize)
- Have extra wire in multiple gauges ready
Step 1: Assess and Plan Your Design
Stand back—view from all angles, especially the front. Decide:
- Where to create movement
- Pad placement
- Balance (avoid one-sided heaviness)
- Avoid crossing future branches
Many pros mark branches with tags or mentally note “this one down 30°, that one out 45°.”
Step 2: Select and Cut the Correct Wire Length
Cut wire ~1.5× the length of the branch + trunk section. Too short = weak anchor; too long = wasteful.
For double-wiring (two parallel wires), cut two pieces.
Step 3: Anchor Securely (Trunk, Branch Forks, Double-Wiring Tricks)
Start at the thickest part:
- Anchor by looping around trunk or thick branch base
- For branches: Start from trunk/parent branch junction
- Double-wire parallel for extra strength on big bends (especially conifers)
Secure without gaps—first coil should be tight against bark.
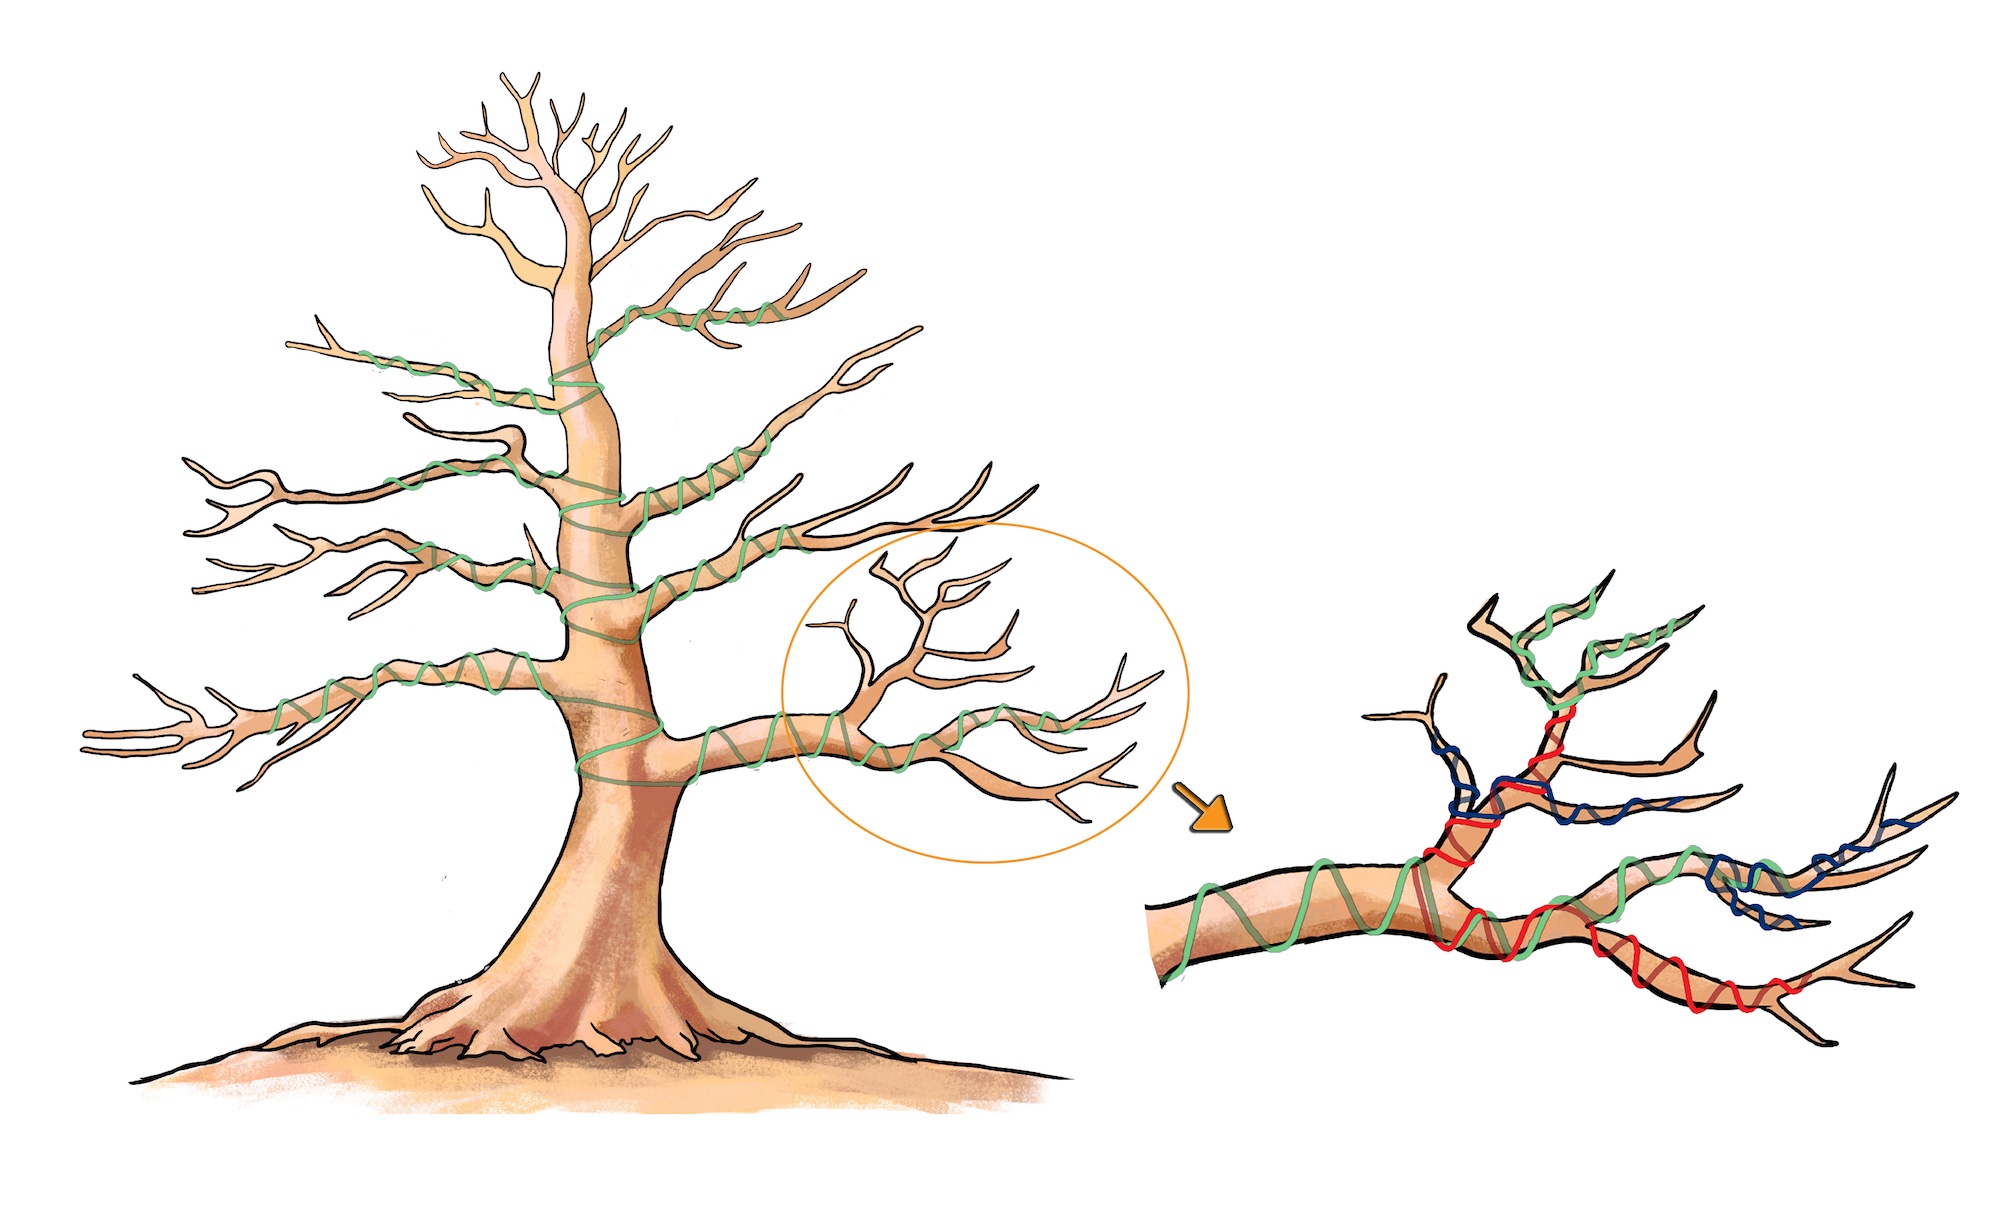
Step 4: Wrap at the Perfect Angle (45° Ideal + Variations)
The magic angle: 45° to the branch axis. This gives best leverage and even pressure.
- Coil evenly (no overlaps, no big gaps)
- Direction: Clockwise or counterclockwise—consistent per branch
- For opposite bends, alternate direction so wires don’t cross awkwardly
See this diagram for perfect 45° wrapping on trunk and branches:

And a hands-on example of wrapping a branch:

Step 5: Bend Branches Safely (Support + Gradual Pressure)
Never yank!
- Support the branch underneath with one hand (thumb as fulcrum)
- Apply slow, steady pressure with the other
- Bend in small increments if needed—over days
- Listen for tiny cracks (stop immediately if you hear any!)
For sharp bends, use leverage from farther out on the branch.
Step 6: Wire Secondary & Tertiary Branches (Single & Guy Wires)
Work from thick to thin, bottom to top.
- Secondary branches get thinner wire
- Use guy wires (anchored to pot or trunk) for big downward pulls
Wiring the Trunk (When & How)
Trunk wiring is advanced—only when young or flexible.
- Use thick wire, anchor at base
- Coil up the trunk
- Bend gradually over weeks
Visual of a beautifully wired conifer with pads forming:

Advanced Wiring Techniques for Stunning Results
Once you’ve mastered the basics, these pro-level methods will take your bonsai to the next level—creating dramatic movement, refined pads, and that aged, windswept look professionals achieve.
Double-Wiring for Extra Support
For thick or stubborn branches:
- Run two parallel wires side-by-side (same gauge or one slightly thicker)
- Wrap them in opposite directions so they “lock” each other in place
- This doubles holding power without needing much thicker (and riskier) single wire
Best for: Juniper deadwood styling, pine candle extensions, or major trunk bends on younger trees.
Guy Wires and Tie-Downs for Major Bends
When you need extreme downward or sideways movement:
- Use thinner wire or strong nylon fishing line as a “guy wire”
- Anchor one end to the branch tip, the other to the pot rim, trunk base, or a screw eye in the soil
- Tighten gradually over weeks—never all at once!
This method is gentler on bark than heavy trunk coiling and perfect for creating dramatic cascades or semi-cascade styles.
Here’s an excellent example of guy wires in action on a cascading juniper:
Wiring Deadwood & Jin (Special Cases)
Deadwood (jin/shari) requires extra care:
- Use annealed copper only—aluminum is too soft and visible
- Wire very loosely around jin to guide subtle curves without crushing fragile wood
- Protect with raffia or tape if the deadwood is brittle
Many artists wire jin first, then live wood around it for harmony.
Species-Specific Tips (Junipers, Maples, Pines, Ficus, etc.) 🌲🍁
- Junipers & other conifers: Copper wire, fall/winter timing, leave on 6–12 months. Raffia for protection on thin bark.
- Japanese maples: Aluminum only, spring wiring, remove after 3–6 months max—maples scar easily and heal slowly.
- Pines: Wire candles after needle extension, use copper, focus on creating whorled pads.
- Ficus & tropicals: Aluminum, year-round, re-wire every 2–4 months due to rapid growth.
- Azaleas & flowering species: Raffia wrapping first, then thin aluminum—very brittle wood!
Always adjust based on your local climate—Dhaka’s hot, humid conditions mean faster growth and earlier wire bite for most species, so check more frequently! ☀️
Common Bonsai Wiring Mistakes to Avoid (With Fixes)
Even experienced hobbyists make these—here are the top culprits I’ve seen (and made myself 😅):
- Wiring too loose → No shape hold Fix: Test bend after wrapping—if it springs back, re-wire tighter or add a second wire.
- Wrapping too tightly → Immediate bark damage Fix: You should be able to slide a fingernail under the wire. If not, loosen immediately.
- Crossing wires → Guaranteed scars where they intersect Fix: Plan direction so wires run parallel or diverge naturally.
- Wrong angle/spacing → Uneven pressure, weak hold Fix: Stick religiously to 45° and even coils (about 1–2 cm apart depending on gauge).
- Leaving wire on too long → Deep bite marks Fix: Check monthly; remove as soon as branch holds shape (usually 3–12 months).
- Wiring during wrong season → Excessive stress or breakage Fix: Follow species-specific timing above.
- Bending too sharply/too fast → Splits or cracks Fix: Use gradual pressure + support hand. For big moves, bend 10–20° every few days.
- Using steel or non-bonsai wire → Rusts, scars badly, hard to remove Fix: Only use annealed copper or anodized aluminum.
- Not checking periodically → Wire disappears into bark Fix: Set calendar reminders—check every 4–6 weeks in growing season.
- Removing wire incorrectly → Snapping branches when unwinding Fix: Always cut wire every 1–2 coils and gently unwind—never pull straight off.
Real example of healed wire scars after proper removal and care:
Avoid these, and 90% of wiring disasters disappear!
Aftercare: Monitoring, Removing Wire & Maintaining Shape
Wiring doesn’t end when you finish wrapping—good aftercare preserves your work.
How Often to Check Wired Branches
- Growing season: Every 3–4 weeks
- Dormant season: Every 6–8 weeks
- Fast growers (ficus, elm): Every 2–3 weeks
Look for: wire cutting in, branch thickening pushing wire loose, new cracks.
When & How to Safely Remove Wire (Cut, Unwind Direction)
- When branch holds position without support (test by gently pushing)
- Cut wire every 1–2 coils with flush cutters
- Unwind in the same direction you wrapped—never against
- If tight spots remain, leave small sections and remove later
What to Do If Wire Bites In (Healing Tips)
- Remove wire immediately
- Clean area gently with water
- Apply cut paste or wound sealant if deep
- Increase humidity + light fertilizer to speed callusing
- Scars usually fade in 1–3 years with good health
Long-Term Maintenance (Re-Wiring Cycles)
Most bonsai need 2–5 wiring cycles over their life to refine and maintain style. Each time the tree grows stronger and holds shape longer.
Expert Insights & Pro Tips from Years of Wiring
Here are some hard-earned lessons:
- Always wire from thick → thin, bottom → top—this follows natural energy flow 🌱
- Copper darkens beautifully on conifers—embrace the patina as part of the aged look ✨
- Use wet raffia wrapping on brittle species (azaleas, some maples) for 24 hours before wiring—it softens bark
- The time I rushed a major pine bend and heard that tiny “crack”… lesson learned: patience over force!
- Keep old wire pieces—reuse aluminum for guy wires or practice
- Photograph every major wiring session—great for tracking progress and sharing in bonsai communities
Frequently Asked Questions (FAQ)
How long should I leave wire on my bonsai? 3–12 months depending on species and growth rate. Check frequently and remove as soon as the branch sets.
Can I wire a young bonsai tree? Yes—young, flexible trees are actually the best candidates! Just use thinner wire and gentler bends.
What’s the difference between anodized and regular aluminum wire? Anodized is colored (usually silver/grey) and slightly harder—most bonsai suppliers sell anodized for better grip.
Is it okay to wire during summer? Avoid peak summer heat for most species—high transpiration makes bark extra sensitive to bite-in.
How do I fix wire scars? Remove wire ASAP, keep tree vigorous, apply wound sealant if needed. Most fade significantly in 1–3 years.
What’s a good beginner tree to practice wiring on? Juniper procumbens ‘nana’, Chinese elm, or ficus—they forgive mistakes and grow back quickly.
Can I re-use wire? Aluminum yes (straighten carefully). Copper no—once work-hardened, it becomes brittle.
Conclusion
Proper bonsai wiring methods are about respect—for the tree’s natural growth, for its limits, and for the time it takes to develop character. When you wire safely and thoughtfully, you’re not forcing a shape; you’re guiding the tree toward its most beautiful expression.
With the step-by-step techniques, timing advice, species tips, and mistake-avoidance strategies in this guide, you’re now equipped to shape your bonsai confidently—without the heartbreak of scars or snapped branches. 💚
Keep practicing, stay patient, and enjoy the journey. Every master bonsai you admire started with someone’s careful first wire.
Have you tried wiring your tree yet? Drop your questions, experiences, or before/after photos in the comments—I’d love to help you refine your technique! 🌳
Happy wiring, and may your bonsai grow graceful and strong.


