
Imagine this: You’ve nurtured your bonsai for years, carefully wiring branches into elegant curves, watching leaves unfurl in perfect miniature harmony. Then — crack — a sudden gust of wind, an overzealous wiring adjustment, or even an accidental bump sends a precious branch splintering. Your heart drops. 😔 That branch, so integral to your tree’s design, now dangles precariously, threatening to ruin the balance you’ve worked so hard to achieve.
But here’s the empowering truth: repairing cracked branches in bonsai is not only possible — it’s often highly successful when you act quickly and use the right techniques. Many experienced bonsai enthusiasts report saving partial cracks with simple methods like superglue and supportive wrapping, preserving irreplaceable structure instead of resorting to drastic pruning. 🌱 The key lies in understanding the tree’s remarkable ability to mend through its cambium layer — that thin green living tissue just beneath the bark that transports vital nutrients and water.
In this comprehensive guide, I’ll walk you through proven, expert-backed steps to repair cracked branches, drawing from real bonsai community successes (like those shared on forums and sites such as Bonsai4me and Bonsai Nut). Whether your crack came from wiring mishaps, environmental stress, or natural weakness, you’ll learn how to assess damage, choose the best repair method, provide aftercare, and prevent future issues. By the end, you’ll have the confidence to turn a potential disaster into a triumph for your tree. Let’s save that branch! ❤️
Understanding Cracked Branches in Bonsai: Causes & Anatomy 🧐🌳
Common Causes of Cracked or Broken Branches
Cracks in bonsai branches rarely happen randomly. The most frequent culprits include:
- Wiring accidents — The top offender, especially for beginners. Over-bending or leaving wire on too long during brittle seasons causes splits. ⚡
- Over-styling bends — Pushing a branch beyond its natural flexibility, particularly in older, less pliable wood.
- External forces — Wind gusts, accidental knocks while moving the pot, or even pets/kids brushing against it.
- Natural structural stress — Heavy foliage pads on weak joints, poor branch unions from past pruning, or seasonal dryness making wood brittle.
Recognizing the cause helps prevent recurrence while guiding your repair approach.
Why Some Cracks Can Heal (The Science Bit) 🔬
Bonsai trees don’t “heal” like human skin; they compartmentalize and mend wounds through callus formation. The hero here is the cambium layer — a thin, green, living ring under the bark responsible for new cell growth, nutrient transport, and wound closure.
If even a thin strip of cambium remains connected across the crack (a “cambium bridge”), vascular flow can continue, keeping foliage above the break alive. Over time (often 3–12 months depending on species and season), the cambium rolls over the wound edges, forming callus tissue that eventually fuses the break.
Key differences:
- Clean cracks/partial snaps — High salvage potential if cambium connects on at least one side.
- Full breaks — Usually fatal unless grafted (advanced technique).
- Signs of hope: Leaves stay turgid and green 24–48 hours post-injury; no immediate wilting or blackening.
- Red flags: Complete detachment, rapid dieback, or dry, blackened tissue inside the crack.
Act within hours for best results — desiccation sets in fast! ⏰

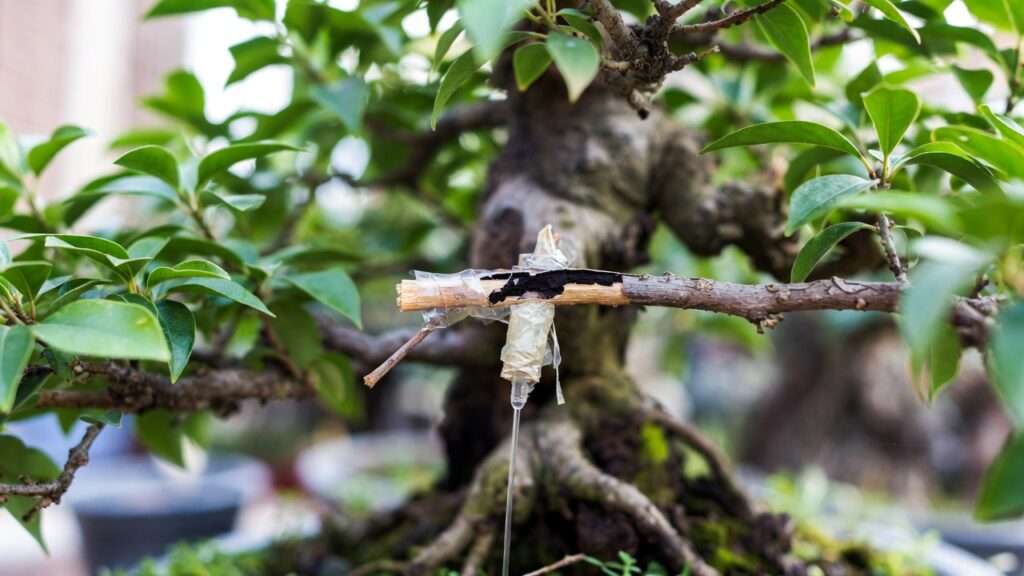
(Example of a partial branch crack on a maple bonsai — note the remaining connected tissue that offers hope for repair.)
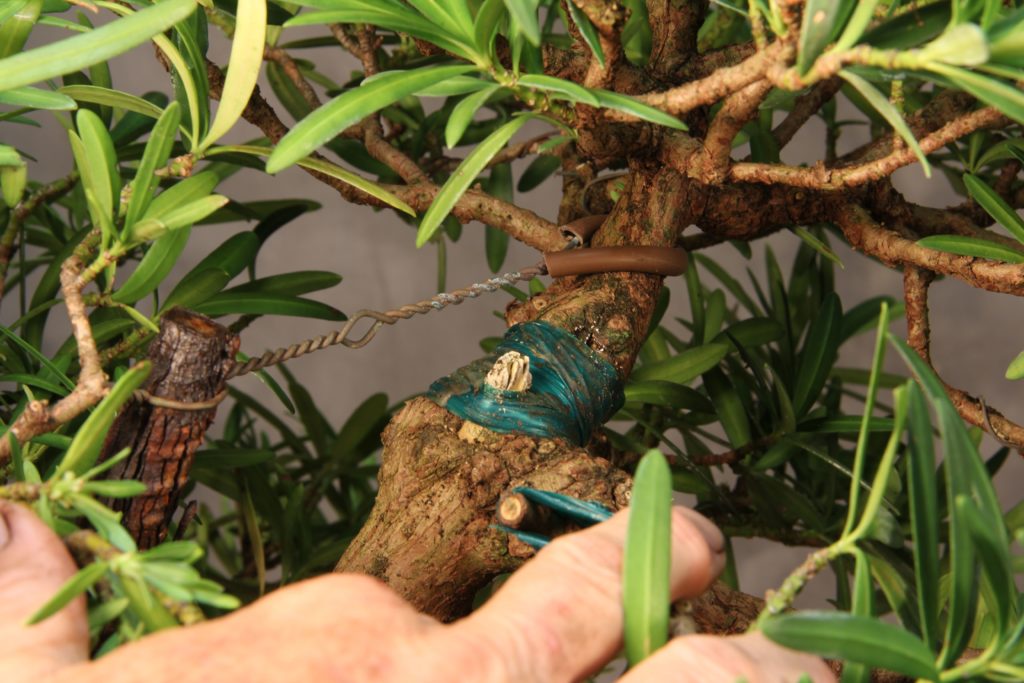
(A supported repair site on a bonsai branch after 2 years — showing successful callus formation around the original crack.)
When to Repair vs. When to Prune: Making the Tough Call ⚖️
Not every crack is worth saving. Here’s a quick decision framework:
Repair if:
- Cambium bridge intact on at least one side
- Foliage above remains viable after 24 hours
- Crack is partial (not ring-barked or fully severed)
- Branch is structurally important (e.g., major pad or apex)
Prune if:
- Complete separation or no cambium connection
- Wilting/dieback starts quickly
- Infection risk high (e.g., dirty break)
- Tree vigorous enough to back-bud and regrow
Pros/Cons quick comparison:
| Option | Pros | Cons |
|---|---|---|
| Repair | Preserves original design & age | Risk of failure; possible scarring |
| Prune & Regrow | Cleaner look long-term; stimulates growth | Loses years of development; redesign needed |
Expert insight: In my years working with bonsai (and seeing countless forum successes), it’s worth attempting repair 70–90% of the time on partial cracks — many hobbyists achieve full recovery with superglue methods. Better to try and potentially save irreplaceable structure! 🌟
Tools & Materials You’ll Need 🛠️
Having the right supplies on hand makes all the difference — repairs often succeed or fail based on speed and precision. Here’s a curated list of essentials used by experienced bonsai artists:
- Cyanoacrylate superglue (thin viscosity preferred) 🧴 — Any brand works (e.g., Zap-A-Gap, Loctite), but avoid gel types that are too thick. Superglue bonds wood surfaces almost instantly and is widely praised in bonsai communities for partial crack repairs.
- Grafting tape, parafilm, or stretchy electrical tape — Breathable options like Buddy Tape or parafilm are ideal; they seal moisture while allowing slight expansion. Black electrical tape works in a pinch but remove sooner to avoid girdling.
- Raffia or natural fiber wrapping material — Traditional choice for support; softens when wet and provides gentle compression.
- Small splints — Bamboo skewers, thin aluminum wire pieces, popsicle sticks, or even toothpicks cut to size. These act as external braces.
- Wound sealant or cut paste (optional) — Japanese cut paste (e.g., T-cut) or tree wound dressing for exposed cambium edges after stabilization.
- Sharp tools — Concave branch cutters (for clean trimming if needed), wire cutters, and a small magnifying loupe to inspect the cambium closely.
- Miscellaneous helpers — Clean cloth, isopropyl alcohol (for disinfecting), zip ties or soft wire for temporary splint securing, and sphagnum moss (for humidity wrapping in some methods).
Pro tip: Keep a small “bonsai emergency kit” with these items ready — cracks don’t wait! ⏰
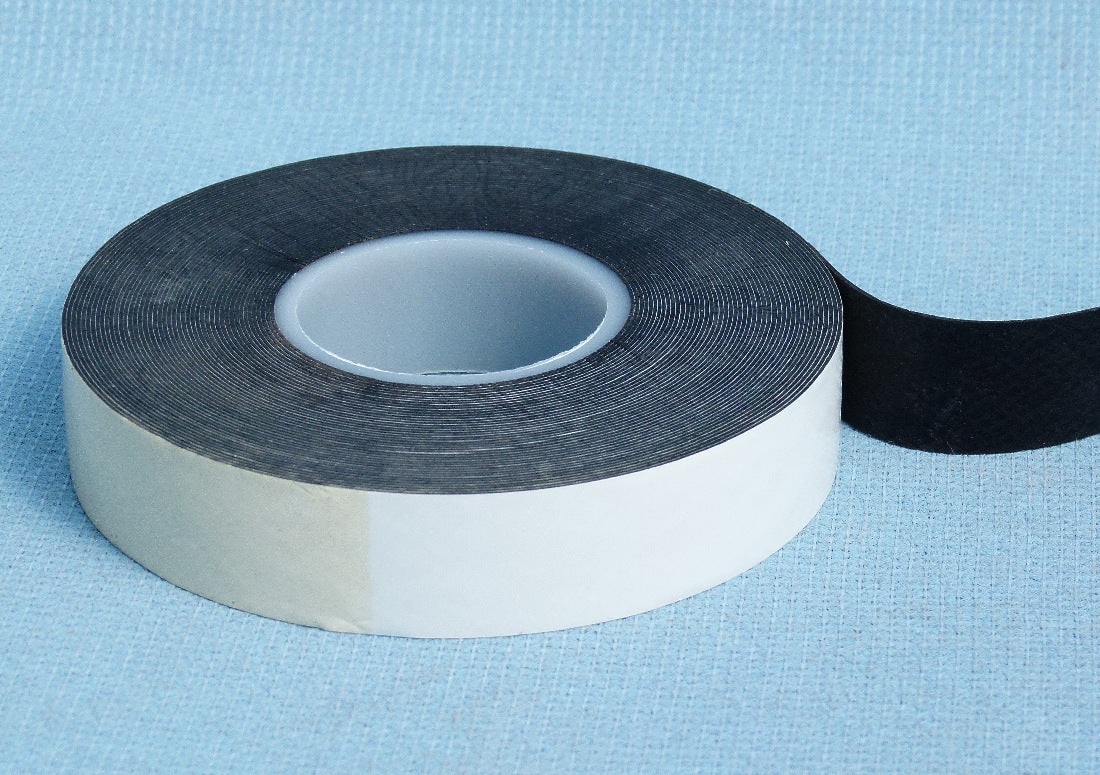
(Bonsai bark protection tape — a stretchy, breathable option perfect for wrapping repaired cracks.)
(Close-up of a maple bonsai branch crack showing the type of partial split that responds well to glue + support.)
Step-by-Step Repair Guide: Proven Methods That Work 🛠️🌿
Act fast — the sooner you stabilize the crack, the better the cambium stays viable.
Method 1: The Superglue Classic (Most Popular & Effective for Partial Cracks)
This technique, frequently shared on Bonsai Nut and international forums, boasts high success rates on cracks where cambium remains connected on at least one side.
- Gently realign — Carefully bring the cracked surfaces together without forcing. If it’s misaligned, slight pressure may be needed, but never twist.
- Apply superglue sparingly — Dab a thin layer on both exposed wood surfaces inside the crack. Avoid flooding — excess glue can create white residue or block cambium contact.
- Hold firmly — Press and hold for 30–60 seconds until the bond sets (cyanoacrylate cures with moisture in the air/wood).
- Wrap tightly — Use grafting tape or parafilm in overlapping layers to maintain alignment and prevent drying out. Stretch slightly for compression.
- Add support if needed — For larger or wobbly branches, attach a small splint across the crack with soft wire or zip ties.
(Example of a supported crack repair on a Japanese maple — note the wrapped area protecting the bond.)
Method 2: Splint & Tape Support (For Larger or Unstable Cracks)
Ideal when glue alone won’t hold due to branch weight or angle.
- Position 2–3 small splints (bamboo or wood) along the crack (opposite sides if possible).
- Secure with soft wire loops or zip ties — tight but not crushing.
- Wrap the entire area with grafting tape or damp sphagnum moss under parafilm for extra humidity and protection.
- This method relies more on mechanical support than adhesive bonding.
Method 3: Plastic Wrap / Parafilm Moisture-Locking Technique
A favorite for delicate species (e.g., maples, elms):
- After aligning (with or without glue), wrap tightly with parafilm strips like cling film.
- Combine with Method 1 for maximum success — glue for bond, wrap for moisture retention.
- Parafilm self-seals and degrades slowly, ideal for 4–8 week healing periods.
After Immediate Repair: Ongoing Support & Monitoring
- Reduce stress — Partially defoliate the branch tip or remove new buds above the break to lower transpiration demand.
- Placement — Move to a shaded, wind-protected spot (70–80% shade) for at least 4–6 weeks.
- Water & humidity — Keep soil evenly moist; mist foliage daily or use a humidity tray if indoors.
Aftercare & Long-Term Healing Timeline 📅
Healing is gradual — patience is key!
- Week 1–2 — Daily checks for wilting or loosening. Keep wrap intact; re-moisten if using moss.
- Month 1–3 — Cambium begins callus formation (small white/cream ridges at edges). Gently test stability; loosen outer wrap if secure.
- 6–12 months — Full wood union often occurs. Remove all tape/wrapping carefully — use a blade to slit if stuck. Scarring may remain but often rolls over with time.
- Success signs — New buds/push, no dieback, callus bridging the crack.
- Troubleshooting — If wilting persists after 48 hours, prune above the break. Rare infection? Clean with alcohol and apply sealant.

(Example of a bonsai wound/calluses forming over time — showing how cracks can close and heal naturally with support.)
Common Mistakes to Avoid & Pro Tips from Experienced Bonsai Artists 💡
Even the best-intentioned repairs can fail if common pitfalls are ignored. Here are the most frequent mistakes — and how seasoned bonsai practitioners sidestep them:
- Using too much superglue — Excess adhesive oozes out, dries white, blocks cambium contact, and looks unsightly. Pro tip: Apply the thinnest possible film with a toothpick or the bottle’s precision nozzle — less is more.
- Wrapping too tightly or using non-breathable tape — Causes girdling (strangling the branch) or traps moisture leading to rot. Pro tip: Use stretchy grafting tape or parafilm; apply firm but not crushing pressure. Check weekly for signs of constriction.
- Delaying action — Waiting days lets the cambium dry out and die. Pro tip: Keep your emergency kit handy and act within the first 1–4 hours for highest success.
- Forcing misaligned pieces — Twisting or over-bending during realignment tears more cambium. Pro tip: If alignment feels impossible without force, accept partial realignment and rely more on splint support.
- Ignoring aftercare stress reduction — Leaving full foliage above the break overworks the damaged vascular system. Pro tip: Remove 30–50% of leaves or pinch new buds on the affected branch for the first 4–6 weeks.
- Removing supports too early — Enthusiastic unwrapping before callus forms can re-open the crack. Pro tip: Wait at least 3 months before loosening; 6–12 months before full removal.
Additional wisdom from long-time bonsai artists (echoed across forums like Bonsai Nut, IBC, and Reddit’s r/Bonsai):
- “Prioritize cambium continuity over cosmetics — even a visible scar is better than a missing branch.”
- “Species matters: Maples, elms, and junipers respond exceptionally well to glue repairs; pines and spruces are trickier due to resin and slower callusing.”
- “Always disinfect tools and hands — a tiny infection can turn a repair into dieback.”
Follow these, and your success rate climbs dramatically. 🌟
Real-Life Examples & Case Studies 📸
Let’s look at actual scenarios that illustrate both triumph and lessons learned:
Success Story 1: Japanese Maple Wiring Mishap A hobbyist over-bent a major branch pad during spring wiring. The branch cracked along 60% of its circumference but retained a 5 mm cambium bridge on the underside. Immediate superglue application + parafilm wrap + small bamboo splint support. After 8 months, full callus rolled over the crack; only a faint seam remained. The branch stayed structurally sound and continued thickening normally.
Success Story 2: Trident Maple Wind Damage A strong storm partially snapped a secondary branch. Quick realignment, thin superglue layer, raffia wrapping, and guy-wire support for 4 months. New buds appeared at month 3; by year 1 the repair was nearly invisible except under close inspection.
Failure Example & Lesson A beginner ignored a hairline crack on a juniper branch for 3 days, thinking “it’s small, it’ll heal itself.” By day 4 the foliage above wilted irreversibly. Lesson: Even tiny cracks deserve attention — desiccation happens fast in warm/dry conditions.
These real outcomes show that while not every repair succeeds, prompt and proper technique gives your bonsai an excellent fighting chance.
(Before-and-after style: freshly repaired crack on left, healed callus growth on right after ~10 months – typical progression for maple species.)
Prevention: How to Avoid Cracking Branches in the First Place 🛡️
The best repair is the one you never need. Incorporate these habits:
- Master wiring technique — Always use annealed aluminum wire (softer and more forgiving than copper). Size wire ~1/3 the branch thickness. Apply at 45° angle and never cross over itself tightly.
- Bend gradually — Make adjustments over multiple sessions rather than one big move.
- Use guy wires & clamps — For heavy bends or old wood, supplement wiring with padded guy wires anchored to the pot or trunk.
- Time your work wisely — Spring and early summer are best for most deciduous species (more flexible wood, faster healing). Avoid brittle winter or peak summer heat.
- Build strong branch unions — Prune strategically early in life to create wide-angled, strong crotches instead of weak V-shaped joints.
- Protect from elements — Use windbreaks, stake pots during storms, and keep trees out of high-traffic areas.
Prevention turns a reactive hobby into a proactive art. 🌳
Frequently Asked Questions (FAQs) ❓
Can I use regular wood glue or epoxy instead of superglue? No — wood glues and epoxies are too thick, slow-setting, and often fail to bond live cambium properly. Thin cyanoacrylate remains the community gold standard for quick, strong wood-to-wood bonds.
Will the repair leave a permanent scar? Usually a faint line or slight bulge remains, but skilled callus growth often rolls over it within 1–3 years, especially on vigorous species like maples and elms.
What if the crack is on the trunk itself? Trunk cracks are riskier (can girdle the tree). Use the same glue + wrap method but add extra support (e.g., wooden braces against the pot rim). Monitor closely — if cambium bridge is lost, partial trunk dieback is likely.
Is superglue toxic to bonsai long-term? Once cured, cyanoacrylate is inert and non-toxic to plants. Thousands of documented repairs show no systemic harm when used sparingly.
How soon can I re-wire or bend the repaired branch? Wait at least 12 months — ideally 18–24 months — until full wood union and thickening resume. Test gently; if it flexes without creaking, you’re likely safe.
Conclusion: Turn Disaster into Triumph 🌟
A cracked branch doesn’t have to spell the end of your bonsai’s story. With quick thinking, the right materials, and careful technique, many partial cracks can be repaired so effectively that — over time — only the most trained eye can spot where the damage once occurred.
The bonsai world is full of stories just like yours: a heartbreaking snap followed by patient care, supportive wrapping, and eventually new callus tissue knitting everything back together. Your tree is resilient. The cambium wants to heal. You’ve now got the complete toolkit — from immediate superglue bonding and moisture-locking wraps to long-term monitoring and prevention strategies — to give it the best possible chance.
Key takeaways to carry forward:
- Act fast — within hours is ideal
- Protect the cambium bridge at all costs
- Support mechanically and reduce stress on the branch
- Be patient — full healing often takes 6–24 months
- Prevent repeats with better wiring habits and seasonal timing
Your bonsai has already survived years of styling, repotting, defoliation, and seasonal changes. A crack is just another chapter — and with the steps in this guide, you can help it write a happy ending.
Don’t give up on that branch too soon. Give it — and yourself — the gift of time and care. 🌱❤️
If you’ve tried repairing a cracked branch (success or learning experience), I’d love to hear your story in the comments below! Share what worked, what didn’t, or which species you were working with. Your experience could help another bonsai lover save their tree.
For more in-depth bonsai care guides — wiring mastery, seasonal maintenance, species-specific tips, and emergency troubleshooting — subscribe to the newsletter or bookmark the site. New articles drop regularly to help you keep your miniature trees thriving.
Happy bonsai-ing, and here’s to many more years of beautiful branches! 🌳✨


