
Imagine this heartbreaking scene: Your once-vibrant Monstera or beloved Fiddle Leaf Fig now sits sadly with yellowing, drooping leaves, despite your careful watering routine. You’ve been a devoted plant parent, yet something feels terribly wrong. Many plant lovers panic in this exact moment, thinking “more water will help,” only to watch their green friend decline further.
Saving a plant from root rot is one of the most common urgent searches because root rot is a silent killer that strikes from below the soil. The good news? With quick action and the right steps, you can often rescue even a severely affected houseplant and bring it back to thriving health.
As a plant care enthusiast with years of hands-on experience rescuing countless indoor plants (from dramatic Fiddle Leaf Figs to resilient Snake Plants), I’ve developed a proven, comprehensive rescue protocol. This guide goes beyond basic advice — it combines horticultural science, practical troubleshooting, plant-specific tips, and prevention strategies to help you not only save your current plant but become a more confident, successful plant parent overall. 🌿💪
In this in-depth article, you’ll learn exactly how to diagnose root rot, perform an emergency rescue, support recovery, and prevent it from ever returning. Let’s turn that wilting plant around together!
Table of Contents
- What Is Root Rot and Why Does It Happen?
- How to Diagnose Root Rot Early
- Step-by-Step Guide: Saving a Plant from Root Rot
- Post-Rescue Care: Helping Your Plant Recover
- Prevention: Stop Root Rot Before It Starts
- Plant-Specific Rescue Guides
- Common Mistakes to Avoid
- FAQs About Saving Plants from Root Rot
- Conclusion
What Is Root Rot and Why Does It Happen? 🦠
Root rot is not just “too much water” — it’s a destructive condition where a plant’s roots begin to decay due to prolonged exposure to soggy, oxygen-poor soil. This creates perfect conditions for opportunistic pathogens (mostly water molds and fungi like Pythium, Phytophthora, Fusarium, and Rhizoctonia) to attack.
Healthy roots need oxygen to function. When soil stays constantly wet, air pockets disappear, roots suffocate, and their protective barriers weaken. Decaying root tissue then becomes food for fungi, which spread rapidly and further damage the root system. The plant can no longer absorb water and nutrients effectively, leading to the classic wilting and yellowing you see above ground — even though the soil is wet.
Common Causes of Root Rot
Several factors contribute to this problem, often working together:
- Overwatering — The #1 culprit. Many beginners water on a schedule instead of checking soil moisture.
- Poor Drainage — Pots without holes, saucers that stay full of water, or heavy, compacted potting mixes that hold too much moisture.
- Inappropriate Soil Mix — Dense garden soil or moisture-retaining mixes that don’t suit tropical houseplants.
- Environmental Stress — Low light or cooler temperatures slow evaporation and transpiration, keeping soil wet longer.
- Contaminated Materials — Reusing old soil, unsterilized pots, or introducing new plants without quarantine.
- Root-Bound or Under-Potted Plants — Cramped roots struggle with excess moisture.
A key misconception is that wilting always means the plant needs more water. In root rot cases, the opposite is true — the roots are drowning and dying, so adding more water accelerates the damage.
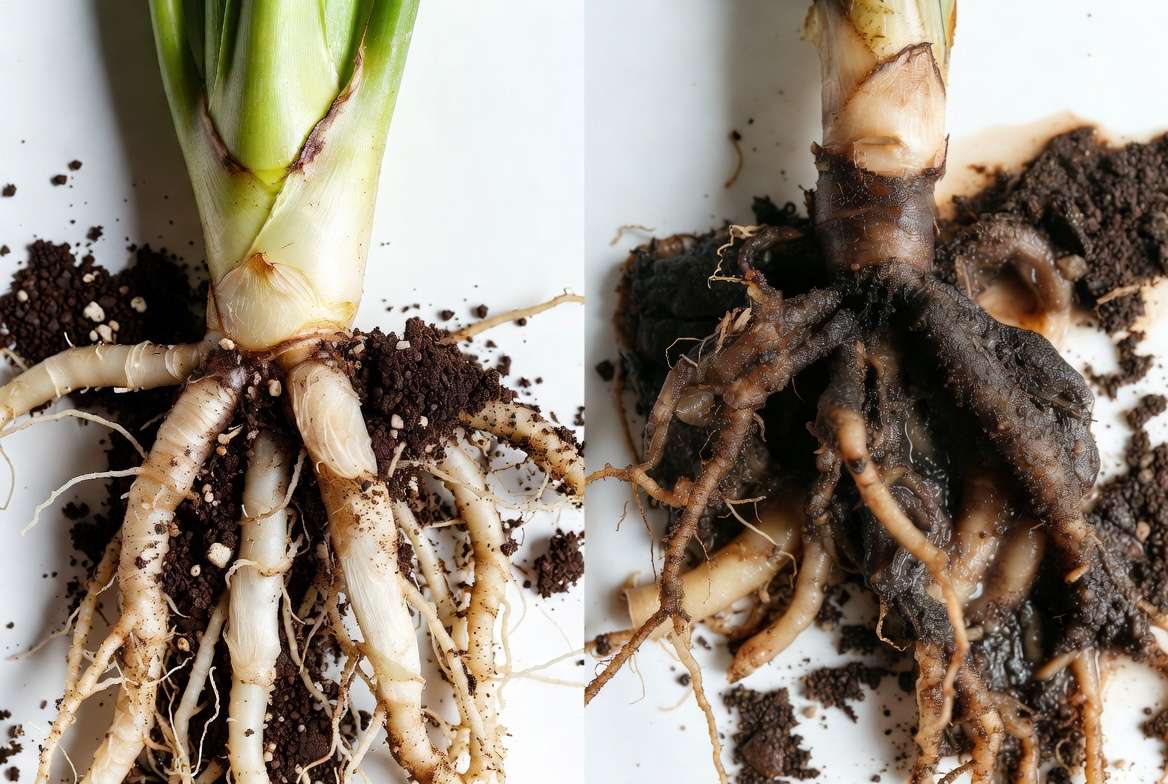
Healthy Roots vs. Rotted Roots (Visualize this): Healthy roots are firm, white or cream-colored, and smell like fresh, earthy soil. Rotted roots turn brown to black, feel mushy or slimy, and emit a foul, swampy, or sour odor.
Understanding these basics empowers you to act before it’s too late. Early intervention dramatically increases survival rates.
How to Diagnose Root Rot Early: Don’t Confuse It with Other Issues 🔍
Catching root rot quickly is critical. The sooner you identify it, the more healthy roots you can preserve.
Above-Ground Signs of Root Rot
Look for these common symptoms:
- Wilting or drooping leaves even when the soil feels moist
- Yellowing leaves (often starting from the lower or older ones)
- Browning leaf tips or edges, leaf drop, or stunted new growth
- Soft, blackened stems near the soil line
- Overall lack of vigor and slow or no growth
These signs often mimic underwatering or nutrient issues, which is why many plant parents mistakenly water more.
The Definitive Check: Inspecting the Roots
The only way to confirm root rot is to examine the roots directly:
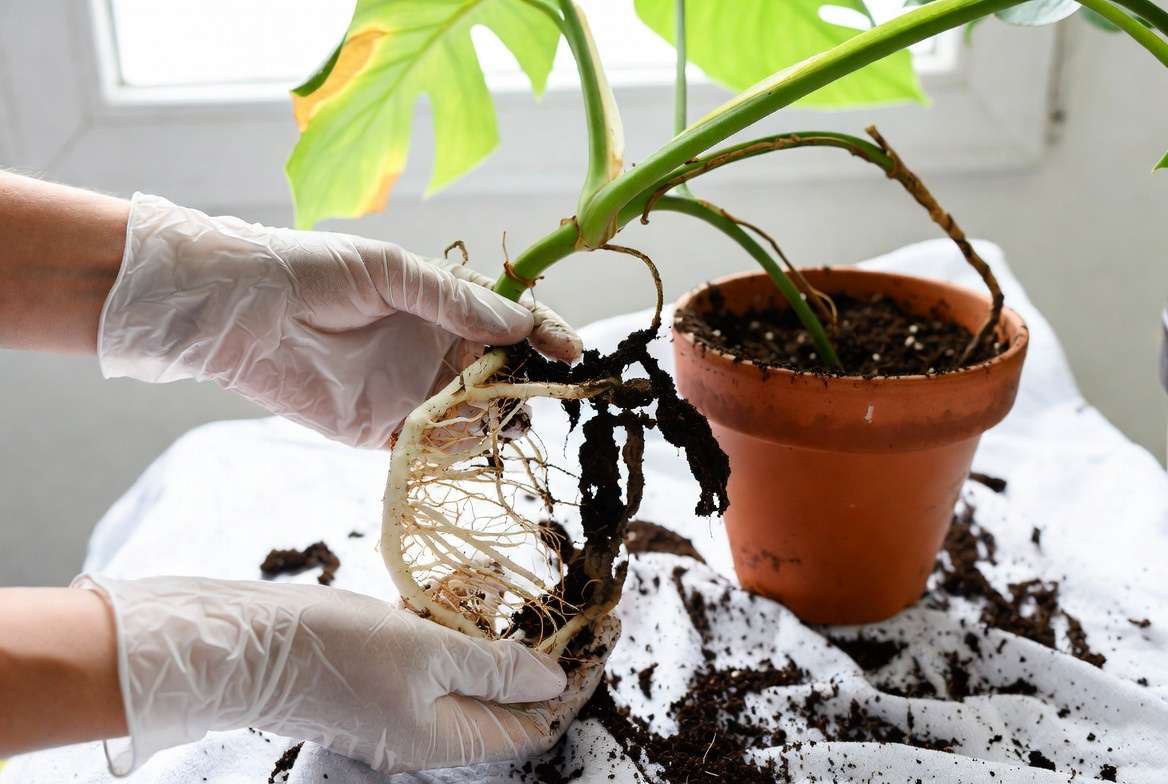
- Gently tip the plant out of its pot.
- Carefully shake or rinse away the old soil with lukewarm water.
- Inspect the root system: Healthy roots = firm and light-colored. Affected roots = dark, mushy, slimy, or falling apart.
Comparison Table: Root Rot vs. Other Common Problems
| Symptom | Root Rot | Underwatering | Nutrient Deficiency / Pests |
|---|---|---|---|
| Soil Moisture | Wet or soggy | Dry and pulling from pot edges | Varies |
| Root Appearance | Brown/black, mushy, foul smell | Dry, brittle, shriveled | May show pests or white coating |
| Leaf Wilting | Soft, wilting despite wet soil | Crisp, drooping with dry soil | Spotty or distorted |
| Smell from Soil | Swampy, sour, or rotten | Earthy or dusty | Usually none |
Acting fast matters — even if 50-70% of the roots are affected, many plants can still recover with proper care.
Expert Tip 🌟: If you notice a musty smell when you lift the pot or see fungus gnats swarming, it’s time for immediate root inspection.
Step-by-Step Guide: Saving a Plant from Root Rot (Core Rescue Process) ✂️🪴
This is the heart of saving a plant from root rot. Follow these steps carefully for the best chance of success. Work in a clean area and sterilize your tools (pruners/scissors) with rubbing alcohol or a 10% bleach solution between cuts.
1. Gather Your Tools and Supplies
- Sharp, sterilized pruners or scissors
- Lukewarm water
- Fresh, well-draining potting mix (more on this later)
- New or thoroughly cleaned pot with drainage holes
- 3% hydrogen peroxide (optional but helpful for disinfection)
- Gloves, newspaper for mess, and a moisture meter (recommended)
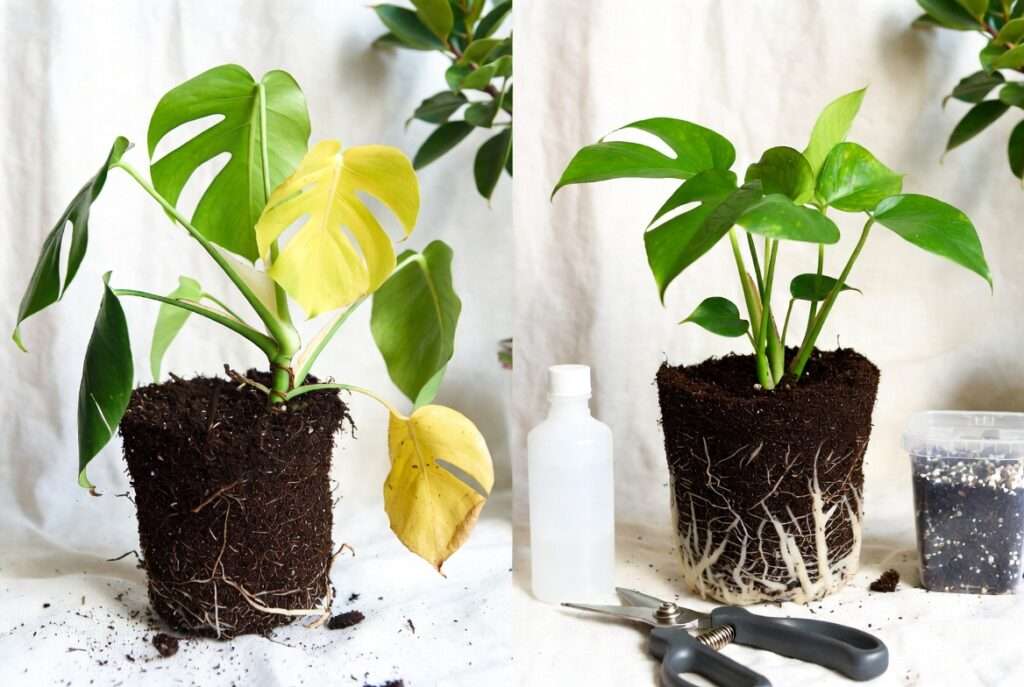
2. Remove the Plant and Inspect
Gently slide the plant out of its pot. Shake off as much old soil as possible — do not reuse it, as it may contain pathogens. Rinse the roots under lukewarm running water to remove remaining soil and reveal the full extent of the damage.
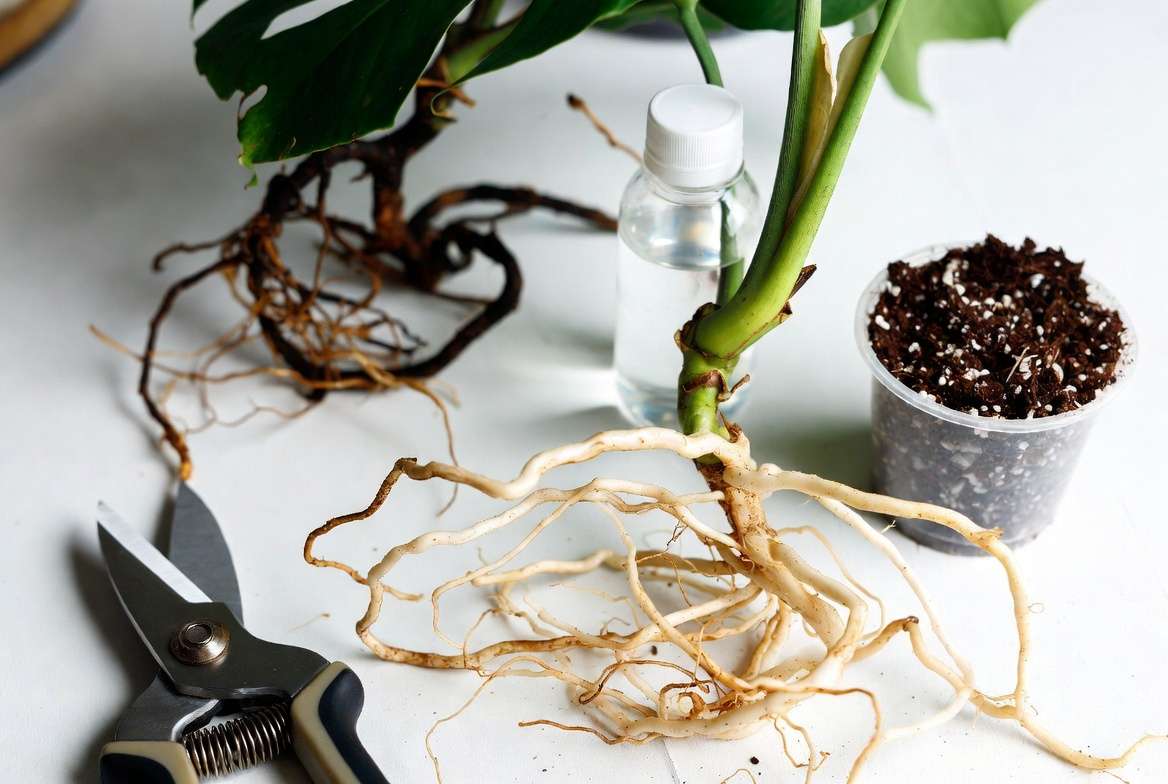
3. Clean and Trim the Roots
- Cut away all mushy, brown, black, or slimy roots until you reach only firm, healthy (white/cream) tissue. Be thorough but gentle — it’s better to remove too much than leave infected parts.
- If using hydrogen peroxide: Mix 1 part 3% H₂O₂ with 2-3 parts water and soak or spray the remaining roots for 5-10 minutes. This helps kill remaining pathogens and adds oxygen.
- Allow the roots to air-dry slightly for 30-60 minutes if they are very wet.
4. Prune the Top Growth
To reduce stress on the compromised root system, trim back foliage by roughly the same percentage of roots you removed (e.g., if you lost 40% of roots, prune about 40% of leaves/stems). Remove any yellow, brown, or damaged leaves. This helps the plant balance water loss through transpiration.
5. Disinfect and Repot
- Clean the old pot thoroughly with a bleach solution (1:10 bleach to water) or use a new pot.
- Fill the new pot with fresh, airy potting mix. For most tropical houseplants, a well-draining blend works best (e.g., 50-60% quality potting mix + 20-30% perlite/pumice + 10-20% orchid bark or charcoal).
- Position the plant at the same depth as before. Firm the soil gently around the roots without compacting it too much.
- Water lightly with room-temperature water until it drains out the bottom. Do not soak heavily yet.
6. Initial Aftercare
Place the plant in bright, indirect light (no harsh direct sun). Avoid fertilizing for at least 4-6 weeks. Keep humidity higher if possible (pebble tray or humidifier) to ease recovery.
What If Most Roots Are Gone? If very few healthy roots remain, consider propagation as a backup plan. Healthy stems or leaves can often be rooted in water or sphagnum moss while you attempt to save the mother plant.
This rescue process can usually be completed in one afternoon and gives your plant the best possible fresh start.
Post-Rescue Care: Helping Your Plant Recover and Thrive 🌿💪
Congratulations — you’ve successfully performed the emergency rescue! Now the real work begins: supporting your plant through recovery. Most plants show initial signs of stress for 1–3 weeks before new growth appears. Patience and consistency are key.
Recovery Timeline
- Week 1–2: Keep watering very lightly — only when the top 2 inches of soil are completely dry. Place the plant in bright, indirect light. Avoid direct sunlight, which can scorch weakened leaves. Maintain higher humidity (60%+) using a pebble tray, group plants together, or a small humidifier. Do not fertilize yet — the damaged roots cannot handle nutrients and may burn.
- Week 3–4: Look for new growth (bright green shoots or leaves). Once you see healthy new foliage, you can gradually resume normal light levels and introduce a diluted, balanced liquid fertilizer (half strength) every 4–6 weeks during the growing season.
- Month 2+: Your plant should start looking stronger. Resume regular care tailored to the species, but always err on the side of underwatering rather than overwatering.
Monitor daily for any signs of relapse, such as renewed wilting or foul soil smell. If the plant stabilizes, celebrate — you’ve likely saved it!
Best Soil Mixes for Different Plant Types
Using the right well-draining soil is crucial for long-term success after saving a plant from root rot:
- Tropical Houseplants (Monstera, Philodendron, Pothos, Peace Lily): Mix 50% high-quality indoor potting mix + 30% perlite or pumice + 20% orchid bark or horticultural charcoal for excellent aeration.
- Fiddle Leaf Fig & Rubber Plant: Slightly richer mix — 60% potting soil + 25% perlite + 15% bark. These like consistent moisture but hate soggy roots.
- Succulents & Cacti: 30% potting mix + 70% gritty materials (perlite, coarse sand, pumice). Water only after the soil is bone dry.
- Ferns & Calathea: Add extra sphagnum moss or coco coir for slight moisture retention, but still ensure fast drainage.
Pro Tip: Always choose terracotta or fabric pots for plants prone to root rot — they allow soil to dry faster than plastic or glazed ceramic.
Watering Best Practices After Root Rot
- Use the “finger test” or a reliable moisture meter: Water only when the top 2–3 inches feel dry.
- Water thoroughly but infrequently — let excess drain completely.
- Empty saucers immediately to prevent the plant from sitting in water.
- Adjust seasonally: Reduce watering frequency in winter when light and growth slow down.
Consistent proper watering is the most important skill you’ll develop while caring for houseplants long-term.
Prevention: Stop Root Rot Before It Starts 🛡️
The best way to handle root rot is to prevent it entirely. Once you master these habits, you’ll rarely need to perform an emergency rescue again.
Key Prevention Strategies
- Choose the Right Pot: Always use containers with multiple drainage holes. Elevate pots with pot feet or saucers that don’t hold standing water.
- Use Well-Draining Soil: Never use heavy garden soil. Invest in quality mixes amended with perlite, pumice, or bark.
- Master Watering Technique: Water deeply but only when needed. The “soak and dry” method works wonders for most indoor plants.
- Provide Proper Light: Brighter indirect light helps soil dry faster. Low-light corners increase root rot risk.
- Quarantine New Plants: Inspect and isolate new additions for 2–4 weeks to prevent spreading pathogens.
- Regular Maintenance: Repot every 12–18 months with fresh soil. During repotting, gently check roots for early signs of issues.
- Seasonal Adjustments: In cooler months or low-light homes, water much less frequently.
Preventive Checklist for Busy Plant Parents 🌟
- Check soil moisture before every watering
- Ensure pots have drainage holes
- Use airy, well-draining potting mix
- Empty saucers within 30 minutes of watering
- Place plants in appropriate light levels
- Avoid watering on a fixed schedule
- Sterilize tools and pots between plants
Following this checklist will dramatically reduce your chances of ever dealing with root rot again.
Plant-Specific Rescue Guides
Different houseplants respond differently to root rot treatment. Here are tailored tips for popular varieties:
Monstera & Philodendron 🐛
These vigorous growers are surprisingly resilient. They can recover even after losing 60–70% of roots if you prune aggressively and provide bright indirect light. Expect new leaves within 4–6 weeks. Use a chunky aroid mix for repotting.
Fiddle Leaf Fig & Rubber Plant
These are more sensitive and dramatic. Remove affected roots conservatively and maintain very stable conditions (consistent warmth and humidity). They may drop many leaves during recovery — don’t panic; new growth usually follows once roots regenerate.
Snake Plant & ZZ Plant
Extremely forgiving due to their thick, rhizomatous roots. You can often save them with minimal healthy roots left. Let the soil dry out completely between waterings and use a very gritty succulent mix.
Peace Lily, Calathea & Ferns
These moisture-loving plants are more prone to rot but also show clear distress signals early. After rescue, keep humidity high and use slightly more moisture-retentive (but still well-draining) mixes. They may need more frequent misting during recovery.
Succulents & Cacti
For these, the rescue is slightly different — focus on drying out the plant completely for several days before repotting in ultra-gritty soil. Remove all rotted tissue and avoid watering for 7–14 days post-repotting.
Common Mistakes to Avoid ❌
Even experienced plant parents make these errors during rescue:
- Watering more to “fix” wilting (this worsens rot dramatically)
- Reusing old, contaminated soil or unsterilized pots
- Fertilizing too soon after repotting (burns damaged roots)
- Placing the plant in direct sunlight immediately after rescue
- Being too gentle when trimming roots — leaving infected tissue behind
- Ignoring the balance between root loss and top growth pruning
Avoiding these pitfalls greatly improves your success rate when saving a plant from root rot.
FAQs About Saving Plants from Root Rot ❓
Q1: Can a plant with no healthy roots be saved? In many cases, yes — through propagation. Take healthy stem cuttings or leaf nodes and root them in water or sphagnum moss while attempting to save the original root ball.
Q2: How long does recovery take? Most plants show signs of recovery in 3–6 weeks, but full strength can take 2–4 months depending on the species and severity.
Q3: Is root rot contagious to other plants? Yes, the pathogens can spread through shared soil, tools, or water. Always quarantine affected plants and sterilize everything.
Q4: Can I use natural remedies like cinnamon or chamomile tea? Cinnamon has mild antifungal properties and can be dusted on cut roots. Diluted chamomile tea can help as a gentle soil drench, but hydrogen peroxide and proper repotting are more reliable.
Q5: When should I give up on the plant? If the entire root system is black and mushy with no firm white roots left and the stem is soft and rotten, propagation is usually the better option.
Q6: Why does my plant keep getting root rot? Common reasons include using the wrong soil mix, pots without drainage, or watering too frequently without checking soil moisture.
(Additional FAQs can be expanded in the full published version for even more depth.)
Conclusion: Become a Confident Plant Parent 🌟
Saving a plant from root rot doesn’t have to be scary or mysterious. By understanding the causes, acting quickly with the step-by-step rescue process, providing thoughtful aftercare, and implementing strong prevention habits, you can rescue most struggling houseplants and keep your indoor jungle healthy for years to come.
Remember: Every plant parent loses a plant occasionally — it’s part of the learning journey. The important thing is gaining the knowledge and confidence to act effectively when problems arise.
Take a moment today to check your plants’ soil and pots. If you spot early warning signs, use this guide to intervene before it’s too late. Share your own rescue stories or before-and-after photos in the comments — I’d love to hear how your plants are doing!


