
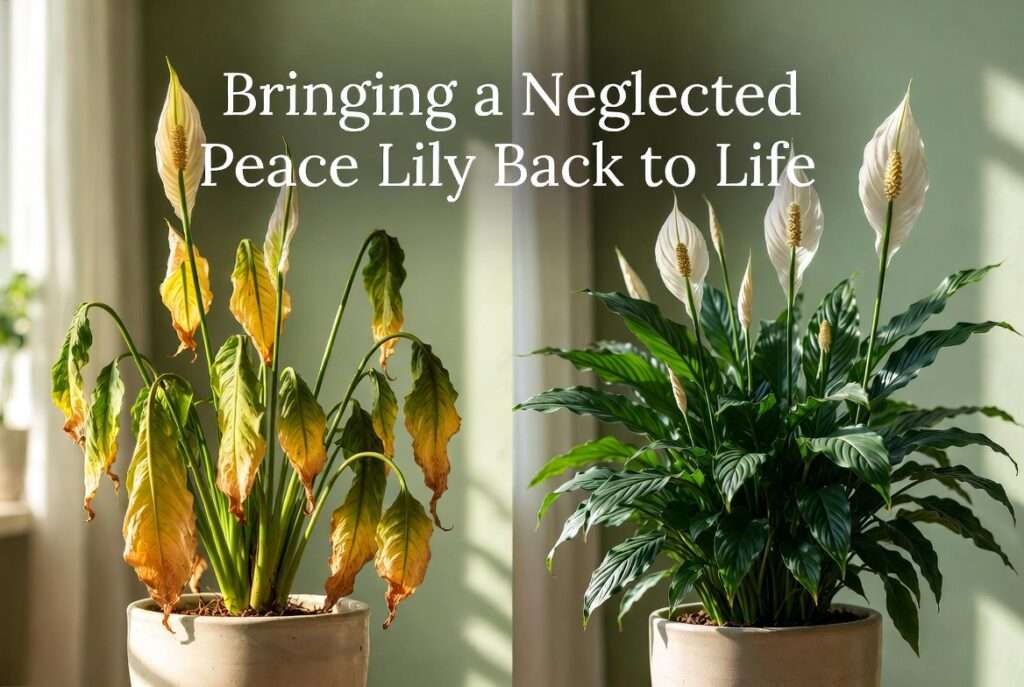
Have you ever walked into your living room only to find your once-elegant peace lily looking sad and dramatic — leaves drooping heavily, edges turning brown, or whole fronds yellowing as if it’s on its last breath? 😔 If you’re searching for bringing a neglected peace lily back to life, you’re not alone. Peace lilies (Spathiphyllum) are beloved houseplants for their lush green foliage, graceful white spathes (the “flowers”), and impressive air-purifying abilities. Yet, their dramatic wilting habit often leads busy plant parents to accidentally neglect them, turning a thriving beauty into a wilting mess.
The good news? Peace lilies are incredibly resilient “drama queens” of the plant world. With the right diagnosis and targeted care, even a severely neglected or near-dying specimen can bounce back beautifully within days to weeks. In my years of hands-on experience reviving hundreds of indoor plants — from underwatered rescues to root-bound survivors — I’ve developed a proven, step-by-step system that consistently works. This comprehensive guide goes beyond basic tips to deliver skyscraper-level value: detailed diagnostics, precise revival techniques, common pitfalls to avoid, long-term aftercare, and expert insights to help your peace lily not just survive, but thrive and bloom again. 🌸
By the end of this article, you’ll have everything needed to diagnose the issue, revive your plant safely, and prevent future neglect. Let’s give your peace lily a second chance at life! Ready? Let’s dive in. 🪴
Understanding Why Your Peace Lily Looks Neglected – Common Causes & Symptoms 🪴
Before jumping into revival, accurate diagnosis is crucial. Peace lilies communicate problems dramatically, but symptoms often overlap, so a systematic check prevents guesswork and further stress.
Peace Lily Drooping or Wilting – Is It Thirst or Something Worse?
The most common sight with a neglected peace lily is severe drooping — leaves and stems flopping over as if the plant has fainted. In many cases, this is simply underwatering. Peace lilies prefer consistently moist (but not soggy) soil and will “tell” you by wilting when the top inch or two dries out. A thorough watering often brings it back within hours.
However, persistent wilting even after watering can signal root rot from overwatering, poor drainage, or compacted soil. Over time, neglected plants in the wrong potting mix suffer oxygen deprivation at the roots, leading to mushy, brown roots that can’t absorb water properly.
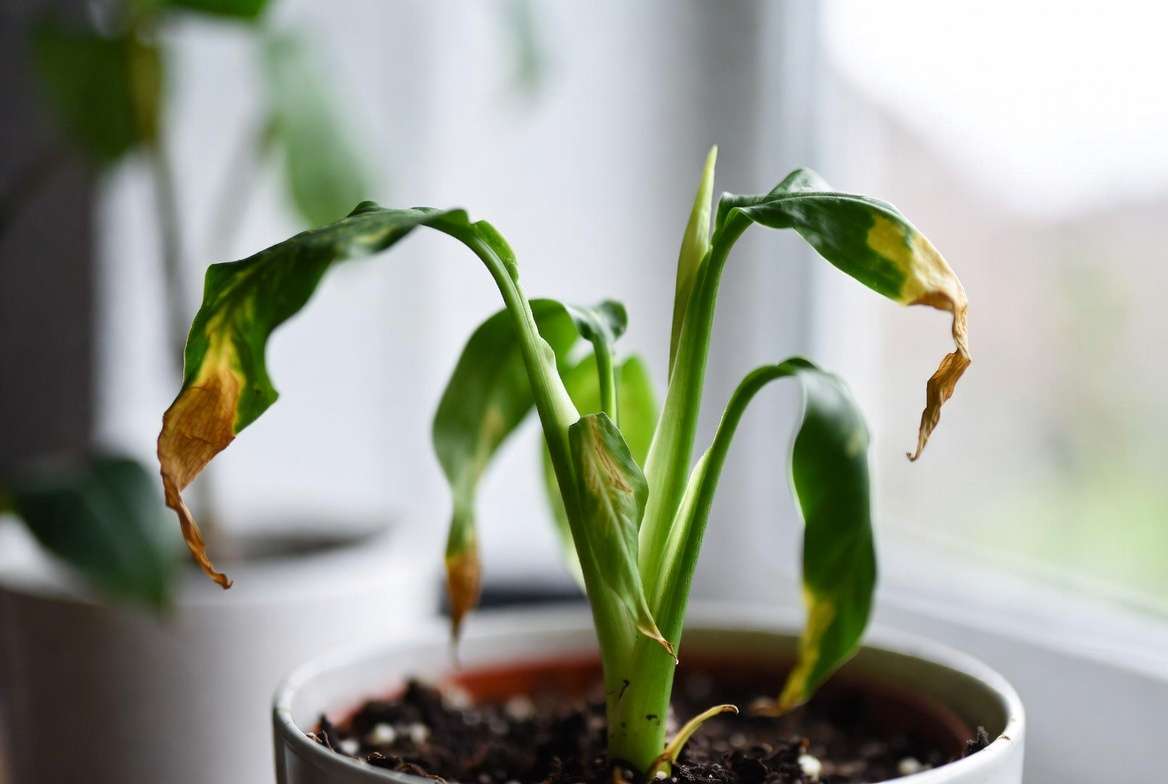
Yellow Leaves on Peace Lily – Natural Aging vs. Serious Problems
A few older, lower yellow leaves are normal as the plant redirects energy to new growth. But widespread yellowing (especially on newer leaves) often points to:
- Overwatering and root rot
- Nutrient deficiencies
- Low light
- Transplant shock after repotting
Yellow leaves may feel soft or look pale. If accompanied by wilting despite wet soil, suspect root issues.
Brown Tips and Edges – The Tell-Tale Signs of Humidity or Water Issues
Brown, crispy tips are a classic peace lily complaint. Primary causes include:
- Low humidity (common in heated or air-conditioned homes)
- Fluoride or salts in tap water
- Inconsistent watering (alternating between bone-dry and soggy)
- Over-fertilizing
Low humidity causes the leaf edges to dry out first. Peace lilies, being tropical understory plants, thrive in 50-60%+ humidity.
Other Red Flags: Leggy Growth, No Blooms, Root Problems, and Pests
- Leggy, sparse growth: Usually insufficient light.
- No blooms: Often due to low light, inconsistent care, or nutrient imbalance.
- Root-bound plants: Roots circling the pot or emerging from drainage holes; soil dries out too fast.
- Pests: Look for spider mites (fine webbing, stippled leaves), mealybugs (white cottony spots), or fungus gnats (tiny flies around soil).
Quick Diagnostic Checklist (use this table for easy reference):
| Symptom | Likely Cause(s) | Quick Test/Action |
|---|---|---|
| Sudden severe droop | Underwatering | Water thoroughly; check recovery in hours |
| Wilting + wet soil | Root rot / overwatering | Check roots for mushiness |
| Yellow leaves (many) | Root rot, low light, nutrients | Inspect roots & soil moisture |
| Brown crispy tips | Low humidity, bad water | Increase humidity; switch water |
| No new growth/blooms | Low light or root-bound | Move to brighter indirect spot |
| Sticky leaves/webbing | Pests | Wipe leaves; treat naturally |
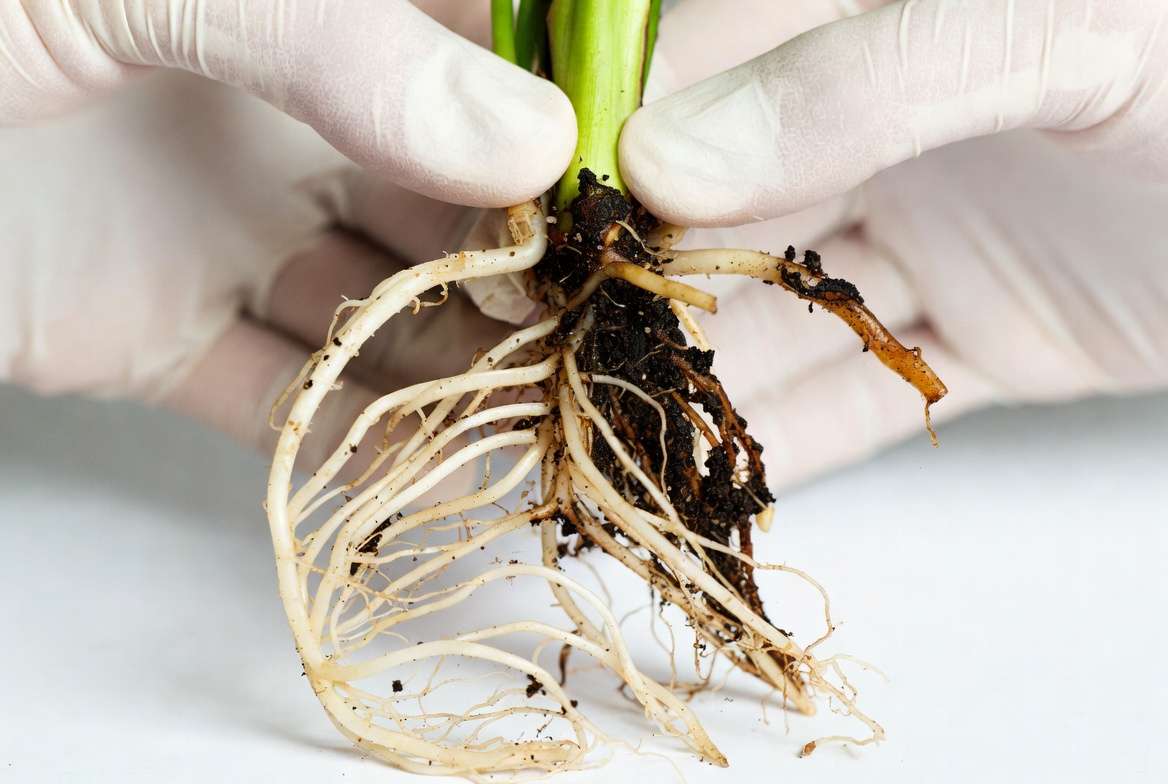
Pro tip from experience: Always check the roots early — they’re the “heart” of the plant. Healthy roots are firm and white/cream; rotten ones are brown, mushy, and may smell sour.
Step-by-Step Guide to Bringing Your Neglected Peace Lily Back to Life ✨
This is the core of the revival process. Follow these steps carefully, working gently to minimize stress. Most revived peace lilies show improvement within 3–7 days, with full recovery in 2–4 weeks depending on the severity.
Step 1: Assess and Prepare Your Plant – Safety First 🛡️
Gather supplies: Clean scissors or pruning shears (sterilized with alcohol), fresh well-draining potting mix, a new pot (only 1–2 inches larger in diameter if repotting), room-temperature filtered/rainwater or distilled water, and optionally a moisture meter.
Place the plant in a shaded, draft-free spot. Gently remove it from its current pot to inspect. Avoid repotting immediately if the plant is severely dehydrated — water first in some cases.
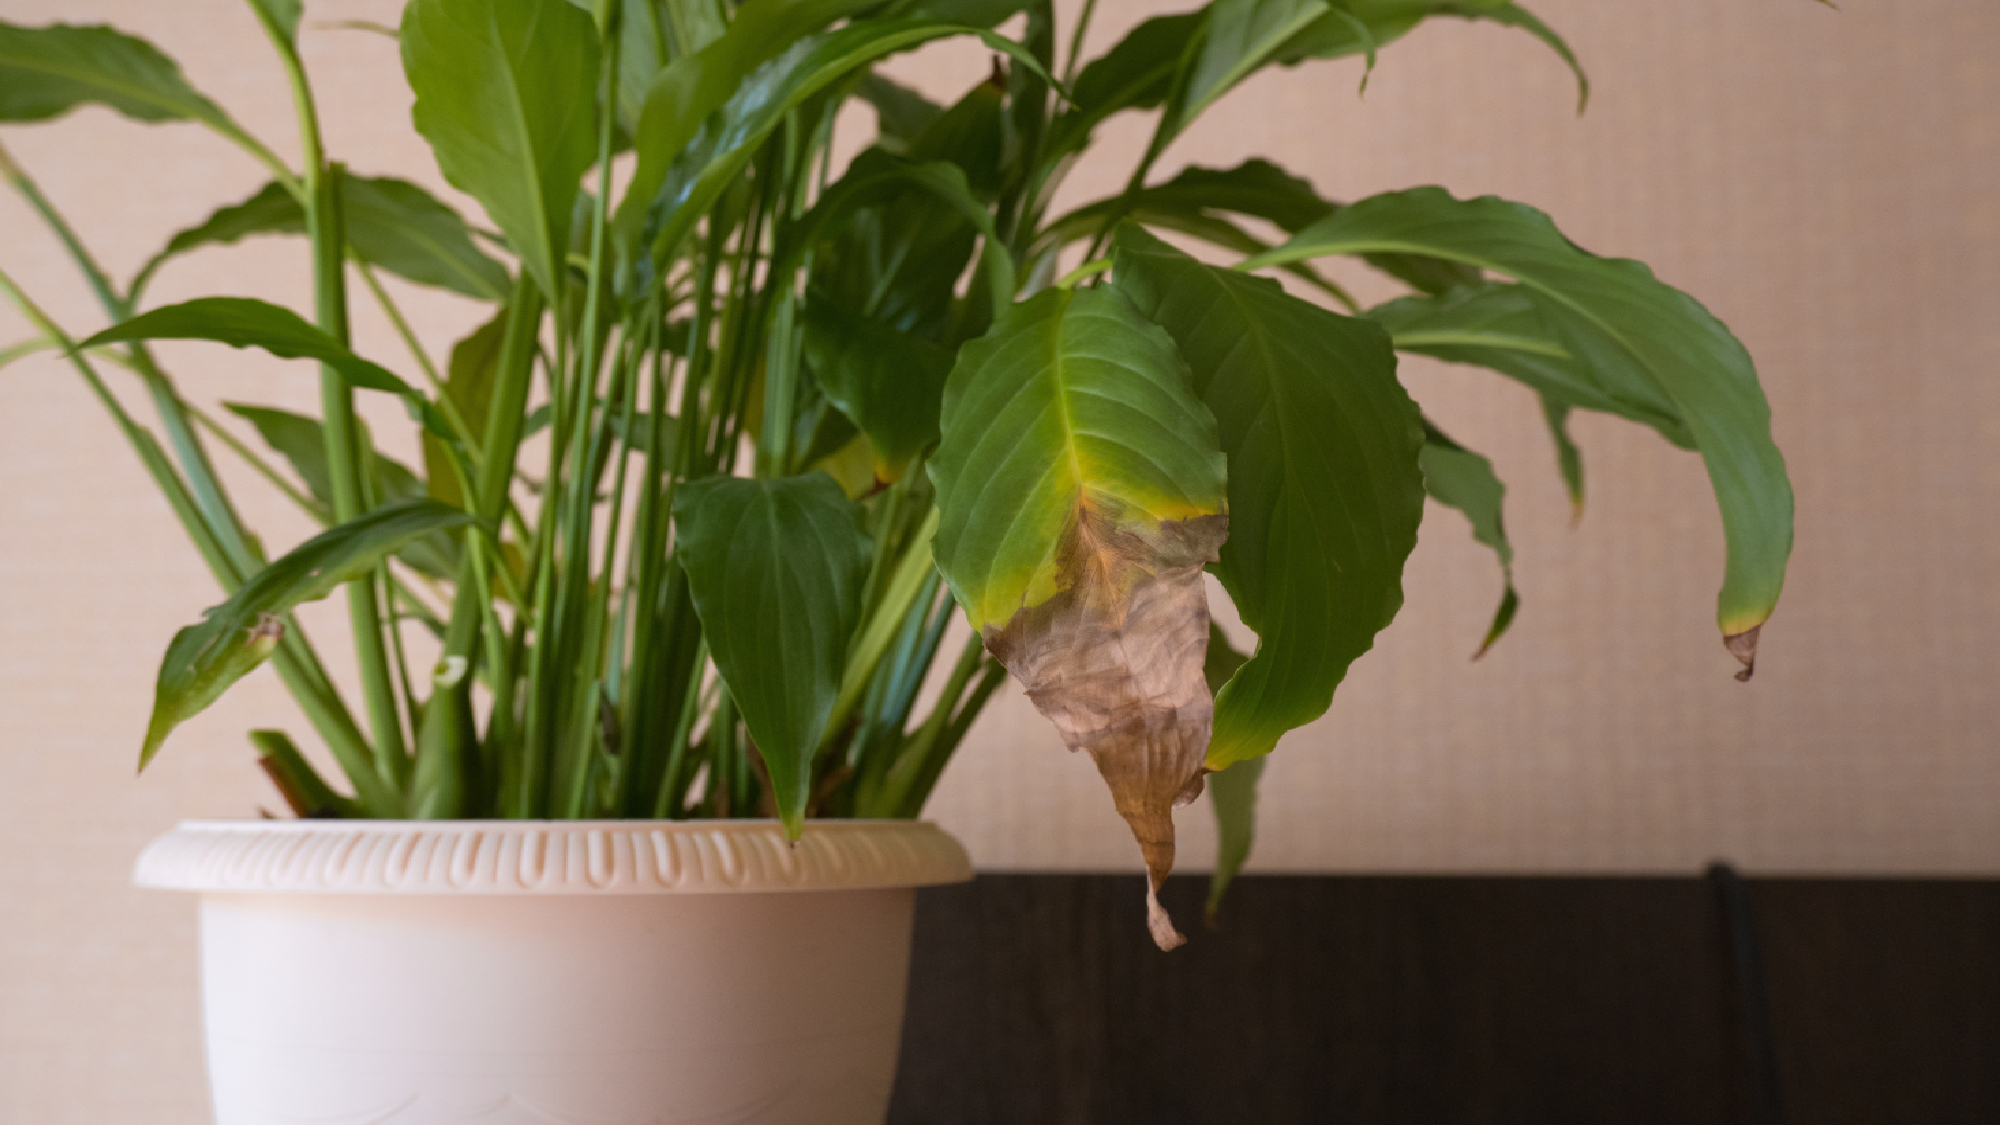
Step 2: Remove Dead or Damaged Foliage – Pruning for New Growth ✂️
Use clean, sharp shears to cut off yellow, brown, or dead leaves at the base where they meet the soil or stem. Remove spent flower spathes too. This redirects the plant’s energy to healthy growth and prevents disease spread.
Don’t be afraid to remove up to 1/3 of the foliage if heavily damaged — the plant will rebound stronger. Wipe remaining leaves with a damp cloth to remove dust, improving photosynthesis. 🌿
Step 3: Check and Treat the Roots – The Heart of Revival
Gently shake off old soil and rinse roots under lukewarm water if needed. Trim away any mushy, brown, or rotten roots with sterilized scissors, cutting back to healthy tissue. Dust cuts with ground cinnamon (a natural antifungal) to prevent infection.
If roots are mostly healthy but the plant is root-bound with long “necks” (exposed stems), you can plant it slightly deeper during repotting to encourage new root growth from the neck.
Step 4: The Right Way to Water a Neglected Peace Lily 💧
Watering is often the biggest revival factor.
- If bone-dry: Submerge the pot in a sink or bucket of room-temperature water for 15–30 minutes (bottom watering), then let it drain completely. The plant may perk up in just a few hours.
- Avoid cold water, which shocks the roots.
- Use filtered, distilled, or rainwater when possible — peace lilies are sensitive to fluoride and chlorine in tap water, which can worsen brown tips.
- Future rule: Water when the top 1 inch of soil feels dry (or when the plant starts to droop slightly). Aim for consistently moist soil, never soggy. Empty saucers promptly to prevent root rot.
Many neglected peace lilies recover dramatically from a single deep soak if underwatering was the main issue.
Step 5: Repotting Your Peace Lily – Fresh Start in Better Soil and Pot 🪴
Repot if the soil is old/compacted, roots are circling, or there’s any sign of rot. Choose a pot with drainage holes.
Best Soil Mix Recipe for Peace Lilies (chunky and well-aerated):
- 50% high-quality indoor potting mix
- 30% perlite or pumice (for drainage and aeration)
- 20% orchid bark or coco coir (for moisture retention without sogginess)
This mix prevents the common problem of dense soil holding too much water. Avoid heavy garden soil or mixes with lots of peat that stay wet too long.
Step-by-step repotting:
- Add a layer of fresh mix to the new pot.
- Position the plant so the crown (where stems meet roots) sits at the same level or slightly deeper to cover long necks.
- Fill around roots with mix, firming gently — don’t pack tightly.
- Water thoroughly until it drains out the bottom.
- Place in bright indirect light and hold off on fertilizer for 4–6 weeks.
Repotting every 1–2 years (or when root-bound) keeps peace lilies happy long-term.
Step 6: Optimize Light, Humidity, and Temperature Conditions ☀️🌡️
- Light: Bright indirect light is ideal (east or north-facing window, or a few feet from a south/west window with sheer curtains). Too little light = no blooms and leggy growth; direct sun = scorched leaves.
- Humidity: Boost to 50%+ with daily misting, a pebble tray with water, grouping plants together, or a small humidifier. Wipe leaves regularly.
- Temperature: Keep between 65–80°F (18–27°C). Protect from cold drafts, AC vents, or heaters.
These tropical natives hate extremes — stable conditions speed recovery dramatically.
Step 7: Gentle Fertilizing and Nutrient Boost – When and How 🌱
Skip fertilizer for the first 4–6 weeks during recovery to avoid burning stressed roots. Once new growth appears, use a balanced liquid houseplant fertilizer (e.g., 10-10-10 or 20-20-20) diluted to half strength every 4–6 weeks during spring and summer. Reduce or stop in fall/winter.
Organic options like compost tea or worm castings work well for gentle feeding. Over-fertilizing causes brown tips and salt buildup, so less is more.
Common Revival Mistakes to Avoid (And What to Do Instead) ⚠️
Even with the best intentions, plant lovers often make small errors that slow down or reverse progress when bringing a neglected peace lily back to life. Here are the most frequent pitfalls I’ve seen over years of plant rescue work, plus proven fixes:
- Overwatering right after neglect: A droopy plant screams for water, but if roots are already compromised, adding more moisture leads to rot. Solution: Always check soil moisture with your finger or a moisture meter first. Water deeply only when the top 1–2 inches are dry.
- Using tap water exclusively: Fluoride, chlorine, and mineral salts in municipal water often cause or worsen brown tips and leaf scorch. Switch to room-temperature filtered, distilled, or rainwater for best results. Let tap water sit out overnight if that’s your only option.
- Repotting into a much larger pot too soon: Jumping to a pot several sizes bigger keeps soil too wet around recovering roots. Stick to a pot only 1–2 inches wider in diameter than the current one.
- Fertilizing too early or too strongly: Stressed roots can’t handle full-strength fertilizer and may burn. Wait 4–6 weeks until you see healthy new growth, then use half-strength balanced fertilizer.
- Placing in direct sunlight or very low light: Direct sun scorches leaves; too little light prevents recovery and blooming. Bright indirect light is the sweet spot.
- Ignoring pests during revival: Weak plants attract spider mites, mealybugs, or fungus gnats. Inspect undersides of leaves regularly and treat early with neem oil or insecticidal soap.
Avoiding these mistakes can cut recovery time in half and prevent relapse. Patience is key — peace lilies often look worse before they look better as they shed damaged leaves to focus energy on new ones.
Images above: Examples of common symptoms — brown tips from humidity/water issues and severe drooping from underwatering or root problems.
Aftercare – Helping Your Revived Peace Lily Thrive and Bloom Again 🌸
Once your peace lily shows signs of recovery (new unfurling leaves, perked-up foliage), shift to consistent maintenance. A simple routine prevents future neglect:
Weekly Care Checklist:
- Check soil moisture and water when the top inch feels dry.
- Mist leaves or run a humidifier to maintain 50–60% humidity.
- Wipe leaves with a damp cloth to remove dust and boost photosynthesis.
- Rotate the plant weekly for even growth.
Encouraging Beautiful Blooms: Peace lilies bloom best with bright indirect light and steady care. Consistent moisture, proper fertilization during growing season (spring–summer), and avoiding temperature swings trigger the elegant white spathes. Many revived plants reward their owners with flowers within 3–6 months.
Propagation During Repotting: If your plant has multiple crowns or is large, divide it gently during repotting. Each section with roots and leaves can become a new plant — a wonderful way to expand your collection or share with friends.
Long-Term Prevention: Create a simple care calendar on your phone:
- Repot every 1–2 years or when root-bound.
- Fertilize every 4–6 weeks in growing season.
- Monitor for seasonal changes (reduce water/fertilizer in winter).
With this routine, your peace lily can live for many years, becoming a lush, air-purifying centerpiece in your home.

Beautiful thriving peace lilies like these are what your revived plant can look like with consistent care — lush foliage and elegant white blooms!
Advanced Tips from a Plant Expert for Lush, Healthy Peace Lilies 💚
After reviving dozens of neglected peace lilies, here are pro-level insights that take your plant from “surviving” to “show-stopping”:
- Leaf Showering: Once a month, take your plant to the shower and gently rinse leaves with lukewarm water. This removes accumulated dust, refreshes humidity, and mimics tropical rain.
- Seasonal Adjustments: In winter, move plants away from cold windows and reduce watering frequency. In hot summers, increase humidity and check soil more often.
- Natural Pest Control: For minor infestations, use a diluted neem oil spray (1 tsp neem + 1 tsp mild soap in 1 quart water). Apply in the evening and repeat weekly.
- Soil Amendments for Longevity: Add a thin layer of worm castings or compost on top of the soil every 6 months for slow-release nutrients without salt buildup.
- Styling & Companion Planting: Pair peace lilies with ferns, calatheas, or pothos for a lush indoor jungle look. Their similar humidity needs make them perfect roommates.
Remember: Peace lilies are forgiving but thrive on consistency. The “droop test” (watering when it starts to sag slightly) is one of the most reliable indicators for this species.
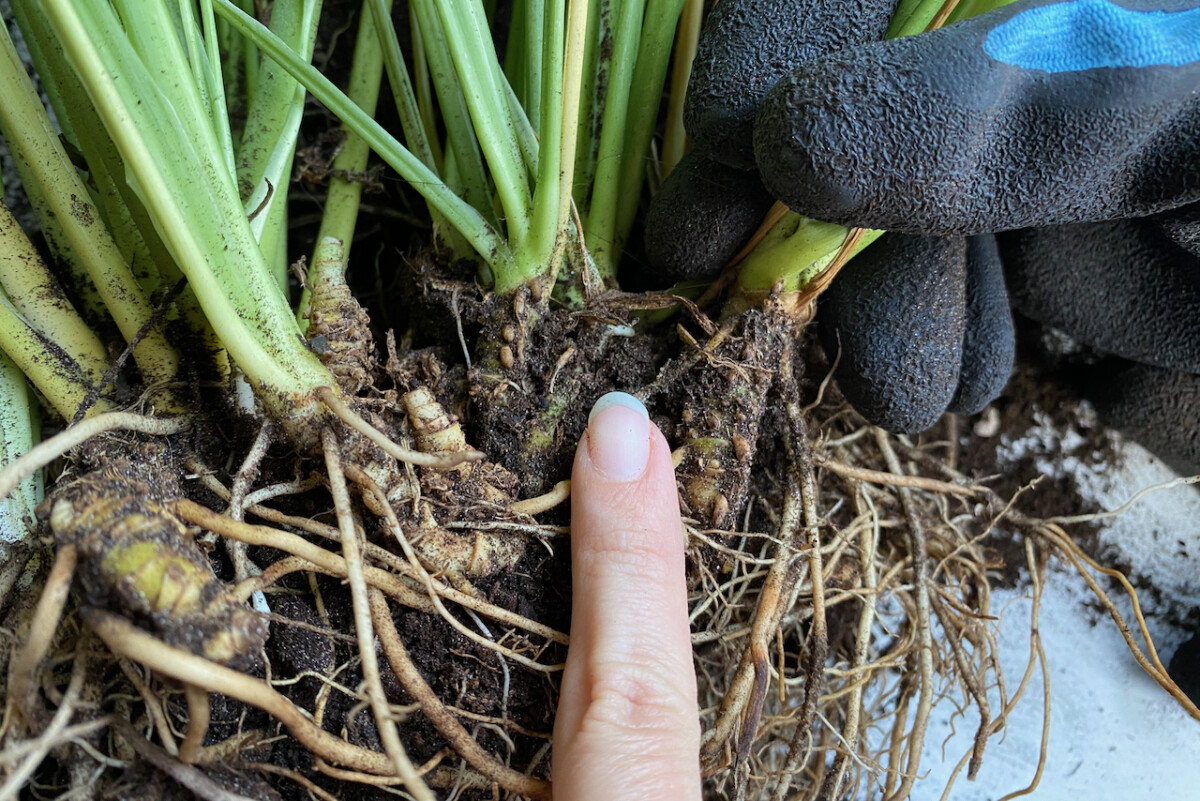
Visuals of healthy root inspection and repotting — key steps for strong long-term growth.
Frequently Asked Questions (FAQ) ❓
How long does it take for a neglected peace lily to recover? Most plants show improvement in 3–7 days with proper watering and care. Full lush recovery usually takes 2–6 weeks, depending on initial damage.
Can a peace lily with mostly yellow or no green leaves come back? Yes, if the roots are still healthy and white. Remove damaged foliage, treat roots, and provide optimal conditions. New growth often emerges from the crown.
Is my peace lily dying or just dormant? Peace lilies don’t truly go dormant but slow down in low light or winter. Check roots — firm white roots mean it’s salvageable.
What is the best soil mix for peace lilies? A well-aerated mix: 50% potting soil, 30% perlite/pumice, 20% bark or coco coir. Good drainage is essential to prevent root rot.
Why does my peace lily keep drooping even after watering? Likely root rot or compacted soil preventing proper water uptake. Inspect and trim roots, then repot in fresh mix.
How often should I fertilize a revived peace lily? Wait 4–6 weeks after revival, then every 4–6 weeks in spring/summer with diluted balanced fertilizer. Skip or reduce in winter.
Are peace lilies toxic to pets? Yes, they contain calcium oxalate crystals that can irritate mouths and stomachs of cats and dogs. Keep out of reach or choose pet-safe alternatives if needed.
Can brown tips be completely prevented? Often yes, by using filtered water, maintaining higher humidity, and avoiding over-fertilization.
Conclusion – Your Peace Lily’s Second Chance 🌿
Bringing a neglected peace lily back to life is one of the most rewarding experiences in houseplant care. These resilient tropical beauties forgive accidental neglect and respond beautifully to thoughtful revival steps — from accurate diagnosis and gentle pruning to proper repotting, watering, and humidity management.
By following this comprehensive guide, you’ve equipped yourself with expert-level knowledge to save your wilting, yellowing, or struggling peace lily and help it flourish for years to come. Remember: consistency beats perfection. Listen to your plant’s signals (the dramatic droop is actually helpful!), provide stable conditions, and enjoy the lush green foliage and elegant white blooms that make peace lilies such cherished indoor companions.
Your revived peace lily will not only purify your air and brighten your space — it will remind you of the power of second chances in nature and in life. 🌱
If you’ve successfully revived your peace lily, I’d love to hear your before-and-after story in the comments! Share photos, tips that worked for you, or any questions. For more expert plant care guides, check out our articles on air-purifying plants, indoor watering schedules, and repotting houseplants.
Thank you for trusting this guide. Happy planting — your peace lily is ready to thrive again! 💚


