
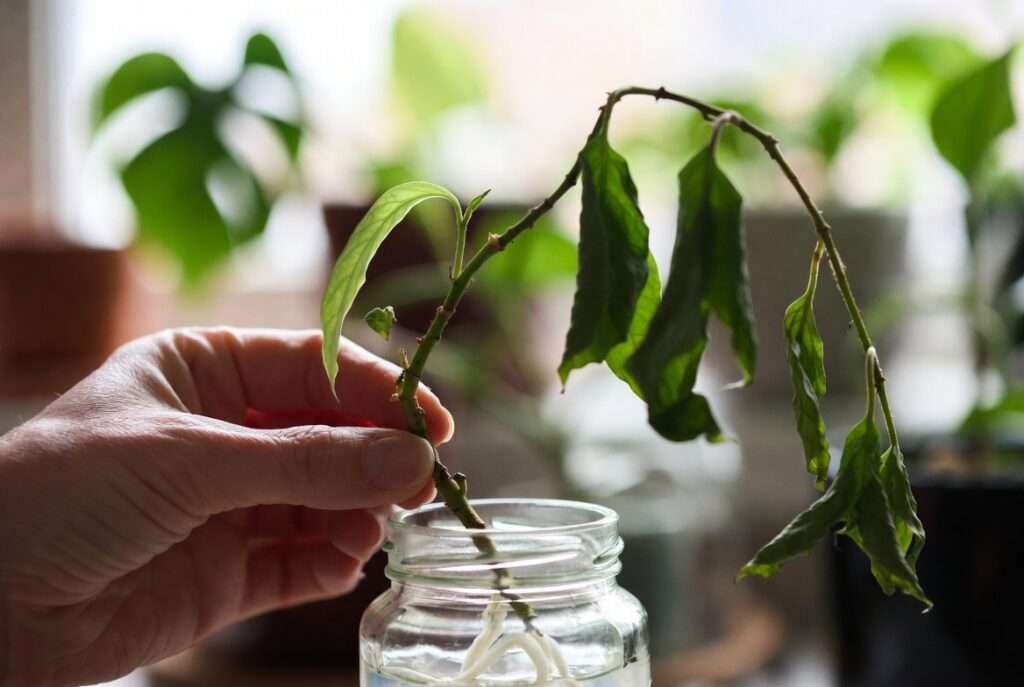
Imagine walking into your living room one morning, only to find your once-vibrant monstera or beloved pothos looking sad and wilted—yellow leaves drooping, stems softening, and that sinking feeling that you might be losing a cherished green companion. 😔 Many plant parents have been there, hearts breaking over a favorite houseplant that seems beyond saving despite careful watering, light adjustments, and love.
The good news? You don’t have to say goodbye entirely. Propagating healthy stems from a dying plant offers a powerful, rewarding way to rescue the genetics you adore and turn one struggling plant into several thriving new ones. This technique works because even when the main root system or lower parts fail due to root rot, overwatering, pests, or stress, upper stems often remain firm and viable with healthy nodes capable of growing fresh roots. 🌿
In this comprehensive guide, you’ll discover exactly how to identify salvageable stems, take clean cuttings, choose the best propagation method (water or soil), provide optimal care, troubleshoot common issues, and successfully transplant your new plant babies. Whether you’re a beginner or seasoned plant enthusiast, these proven steps—drawn from years of hands-on horticultural experience with everything from easy pothos to more challenging figs—will empower you to multiply your indoor jungle for free while practicing sustainable plant care. By the end, you’ll feel confident turning potential loss into abundant new growth. Let’s dive in and bring those plants back to life, one healthy stem at a time! ✨
Why Propagating Healthy Stems Can Save Your Dying Plant 🧪
When a houseplant starts declining, the entire plant often struggles because of issues like compromised roots, poor drainage, or environmental stress. However, propagation bypasses the failing parts entirely. By taking healthy stem cuttings from the upper portions, you remove the material from the diseased or stressed root zone and encourage it to develop an entirely new, independent root system.
This approach frequently boasts a higher success rate than trying to nurse a severely compromised mother plant back to full health. The cutting focuses all its energy on root regeneration rather than supporting damaged foliage or fighting infection. Plus, the new plants are genetic clones, preserving the exact variegation, leaf shape, or growth habit you fell in love with.
Key benefits include:
- Free plant multiplication — Expand your collection without spending money.
- Preservation of sentimental or rare varieties — Save that special monstera cutting passed down from a friend.
- Sustainability win — Reduce waste and promote a thriving indoor ecosystem. ♻️
- Boosted confidence — Mastering propagation turns you into a more resilient plant parent.
Realistically, not every cutting will succeed, but taking 4–6 healthy stems from one plant dramatically increases your odds. Many common houseplants, such as pothos and philodendrons, can show visible roots in just 2–4 weeks under ideal conditions. In my experience propagating hundreds of specimens, early intervention while some stems still have turgid, green tissue makes all the difference.
Signs Your Plant Is Dying (and When to Propagate) 🍂
Recognizing the difference between a plant that can bounce back with basic care and one where propagation is the smarter move is crucial.
Common signs of a dying or stressed houseplant:
- Yellowing or browning leaves (especially lower ones)
- Wilting or drooping despite proper watering
- Leggy, sparse growth
- Soft, mushy stems near the base
- Visible root rot (dark, slimy roots when gently checked)
- Pest infestations (mealybugs, spider mites) that have weakened the plant
- Sudden leaf drop or black spots
When to propagate instead of full revival:
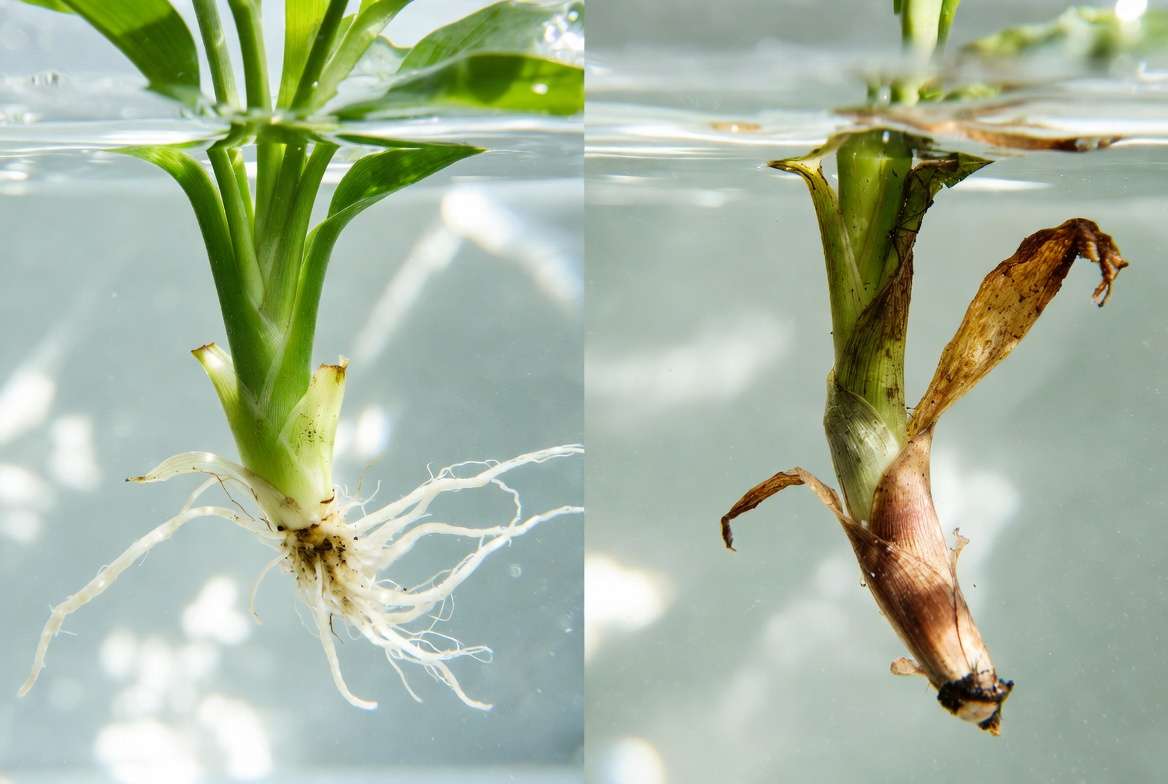
- If the lower roots or base show advanced rot or mushiness, but upper stems remain firm with vibrant leaves and nodes.
- When more than 50% of the plant looks compromised, but several healthy-looking stems persist.
- Early enough that the stems still have good turgor (they snap back when gently bent) and green cambium under the surface.
Golden rule for success: Only propagate from healthy-looking stems. Avoid fully brown, mushy, or heavily diseased sections, as these can harbor pathogens that spread to your cuttings. A quick scratch test on the stem (revealing green tissue underneath) is a reliable indicator of viability. If the plant still has some salvageable parts, propagation lets you honor the original while creating fresh starts. ✅
Best Plants for Propagating Healthy Stems from a Dying Mother Plant 🌿
Not all plants propagate equally well, but many popular houseplants respond beautifully to stem cuttings. Here’s a curated list based on ease and success rates:
- Pothos (Epipremnum aureum) & Heartleaf Philodendrons 🌱 — Almost foolproof in water. They root quickly (often in 1–3 weeks) and tolerate a wide range of conditions. Perfect for beginners.
- Monstera & Swiss Cheese Plant 🪴 — Excellent via stem cuttings with nodes. They love humidity and can take slightly longer (3–6 weeks) but reward patience with dramatic new growth.
- Tradescantia (Wandering Jew), Spider Plant, & Coleus — Fast rooters with high success. Great for creating cascading displays.
- Begonias & African Violets — Stem or leaf-stem combos work well; they enjoy moist but not soggy conditions.
- Herbs like Mint, Basil, or Rosemary — Ideal for kitchen propagation. Mint roots especially vigorously.
- Fiddle Leaf Fig & Rubber Plant — More challenging due to woody stems, but possible with rooting hormone and patience. These tie nicely into broader tree care techniques for larger specimens.
Water vs. Soil Preference Tip: Vining plants like pothos and philodendrons excel in water propagation for easy monitoring. Woody or fussier types often do better directly in a light, airy medium like perlite or sphagnum moss.
For tree-care enthusiasts, similar principles apply to softwood cuttings from certain ornamental trees, though indoor houseplants remain the focus here.
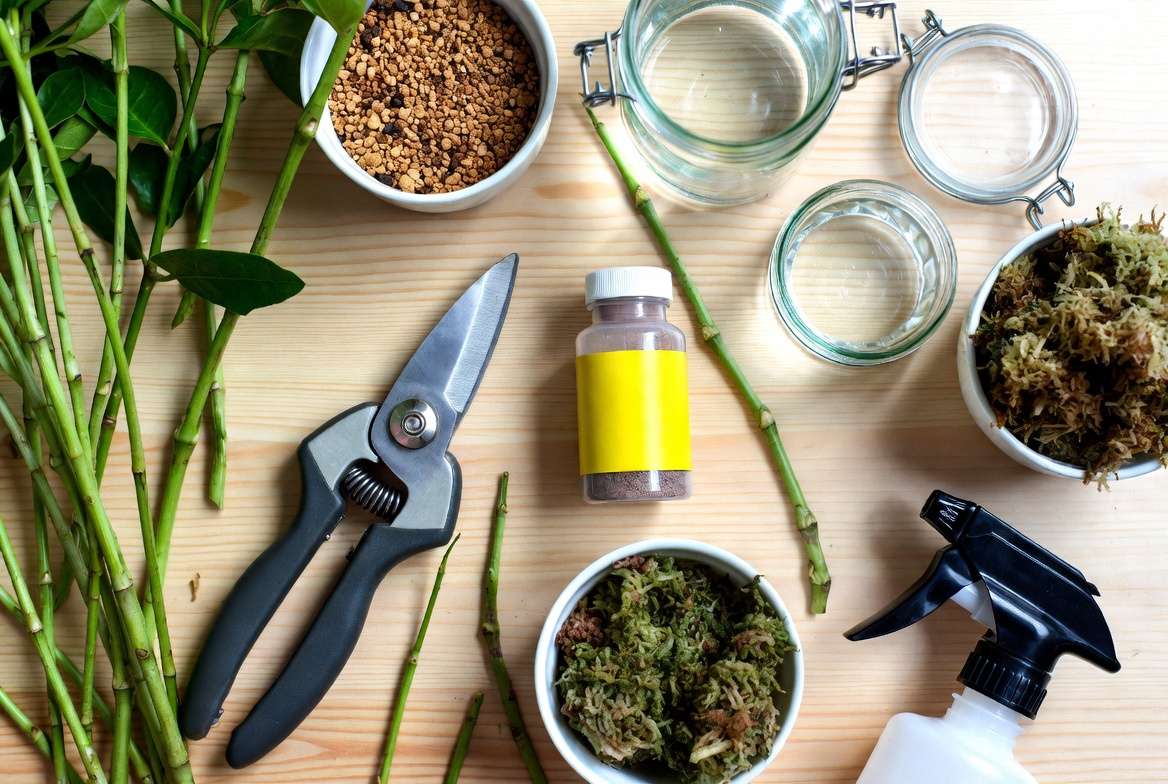
Essential Tools and Materials You’ll Need 🛠️
Successful propagating healthy stems from a dying plant starts with clean, proper equipment to minimize infection risk.
- Sharp, sterilized pruning shears or a clean knife (wipe with rubbing alcohol or a 10% bleach solution between cuts).
- Clean glass jars, vases, or a dedicated propagation station for water method.
- Rooting medium: Perlite, vermiculite, sphagnum moss, or a well-draining seedling mix.
- Rooting hormone (powder, gel, or natural options like willow water or honey).
- Clear plastic bags or a humidity dome to maintain moisture.
- Optional: Heat mat for consistent warmth (especially in cooler months), filtered or room-temperature water, and small nursery pots for transplanting.
Sterilization is non-negotiable—dirty tools are a top cause of rotting cuttings.
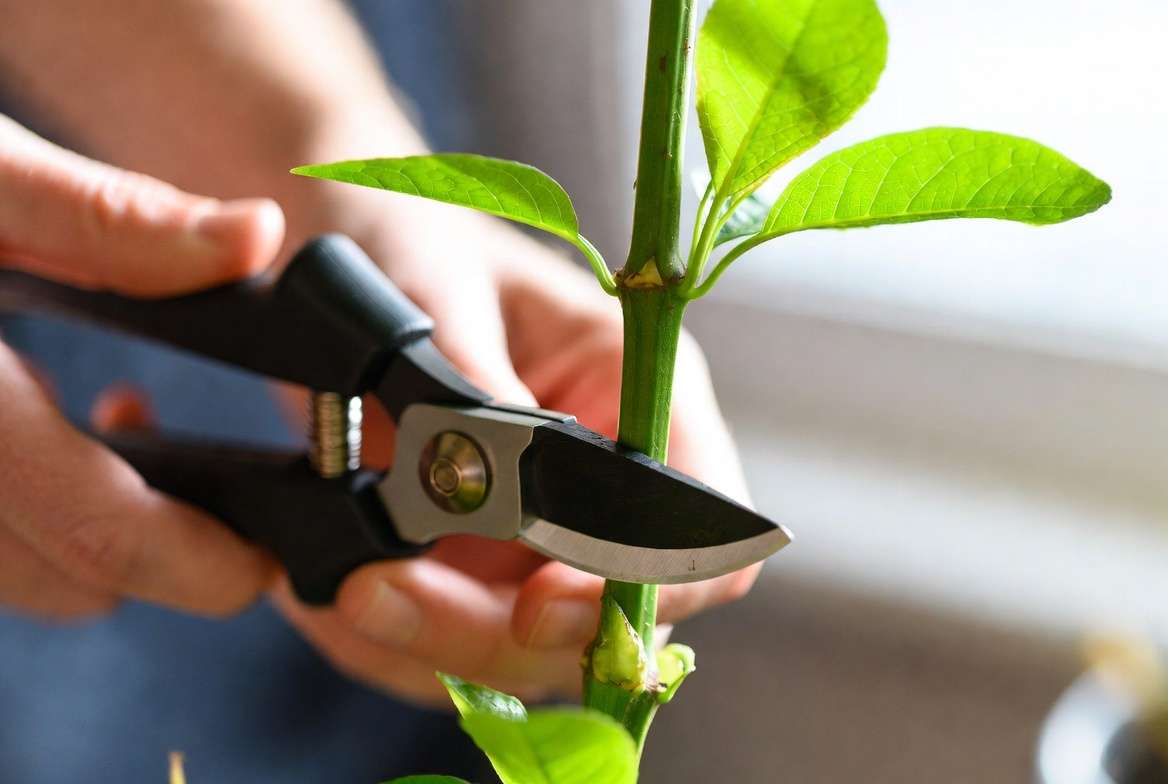
(Suggested image: Close-up of sharp sterilized shears cutting a healthy pothos stem just below a node, with healthy green leaves visible. Alt text: “Taking healthy stem cutting from houseplant for propagation”)
Step-by-Step Guide: How to Take and Prepare Healthy Stem Cuttings ✂️
Follow these detailed steps carefully for the best results.
Step 1: Assess and Select Healthy Stems Examine your dying plant in bright light. Choose firm, green stems with at least 2–4 nodes (the bumps where leaves attach—these are where roots will emerge). Aim for 4–6 inch lengths. Perform cuttings in the morning when the plant is most hydrated. 🌅 Avoid flowering stems, as they divert energy from rooting.
Step 2: Make the Perfect Cut Use your sterilized tool to cut at a 45-degree angle just below a node. This increases surface area for root development. Remove the lower leaves, leaving 2–4 healthy top leaves for photosynthesis. If leaves are large (like monstera), trim them in half to reduce water loss without shocking the cutting.
Step 3: Optional – Apply Rooting Hormone Dip the cut end in rooting hormone powder or gel. This contains auxins that stimulate faster root growth, particularly helpful for woodier stems or stressed plants. Tap off excess to avoid burning the tissue. Natural alternatives include fresh aloe vera gel (soothing and antimicrobial) or willow water (soak willow twigs in water for 24–48 hours to extract natural hormones). Honey offers mild antibacterial benefits but is less potent than commercial options.
Step 4: Choose Your Propagation Method (H3)
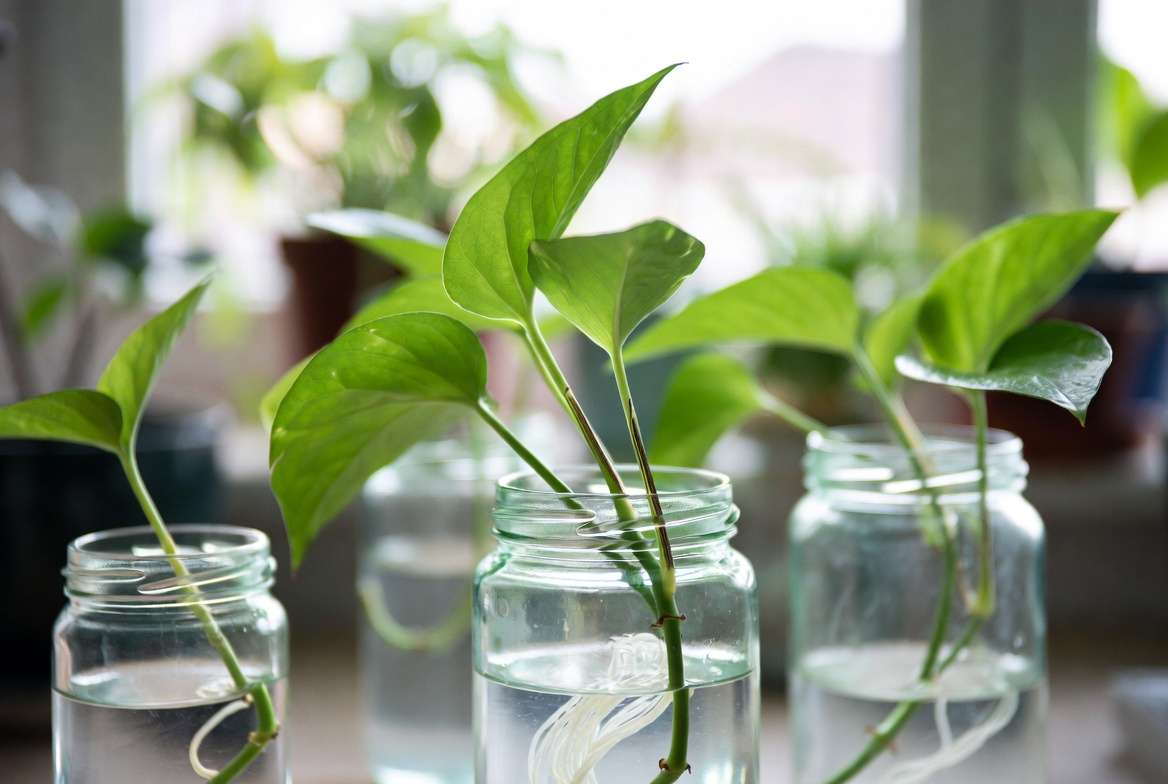
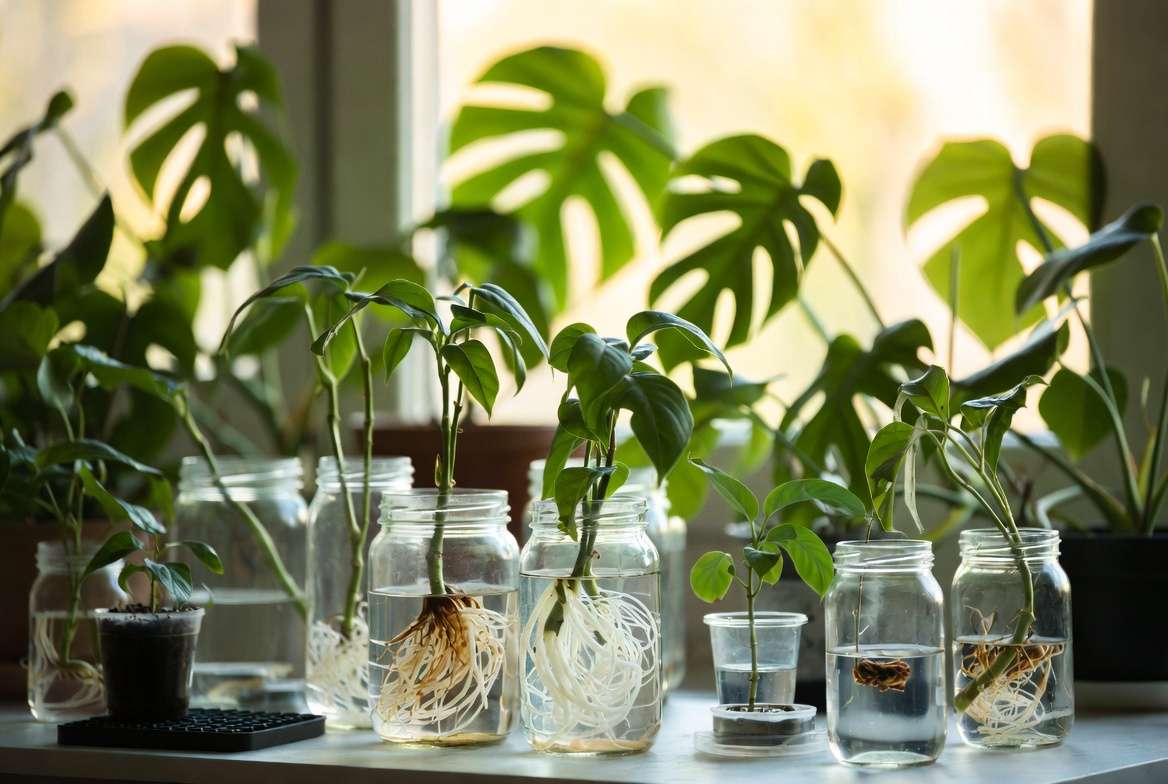
- Water Propagation (easiest for beginners 🥛): Place the cutting in a clean jar with room-temperature filtered water, ensuring nodes are submerged but leaves stay dry. Change the water every 3–7 days to prevent bacterial buildup and algae. Position in bright, indirect light. Monitor for white, firm roots—usually ready when 1–2 inches long (2–6 weeks depending on species and season).
- Soil/Medium Propagation: Insert the cutting into a moist (not wet) mix of perlite and potting soil or pure sphagnum moss. Maintain high humidity by covering with a plastic bag (vent daily). This method can produce stronger roots adapted to soil from the start, though it requires more attention to moisture levels.
- Advanced Option – Air Layering: For larger stems on plants like rubber plants, wrap a node with moist sphagnum moss and plastic, encouraging roots while still attached to the mother plant.
In my experience, water propagation offers the joy of watching roots develop in real time, making it ideal for learning.
(Suggested image: Side-by-side comparison of water propagation jars with pothos cuttings showing root growth at different stages. Alt text: “Water propagation of healthy stems showing new root development”)
Caring for Your Cuttings: Light, Water, Humidity & Temperature 💧
Cuttings are vulnerable, so consistent conditions are key:
- Light: Bright indirect light (east or north-facing window, or grow lights). Avoid direct sun, which can overheat water or scorch leaves.
- Temperature: Ideal range 65–75°F (18–24°C). A heat mat can speed rooting in cooler climates.
- Humidity: Aim for 60%+ by using a dome or bag. Mist occasionally if leaves look dry.
- Watering/Monitoring: In water, change regularly and rinse gently. In soil, keep medium evenly moist but never soggy—overwatering causes rot.
Watch for progress: New white roots signal success, followed by fresh leaf growth. Be patient—cuttings from stressed plants may take longer as they recover from the parent’s challenges.
Troubleshooting Common Problems When Propagating from Stressed Plants ⚠️
Even experts encounter setbacks. Here’s how to diagnose and fix:
- Rotting stems or cuttings: Usually from poor sanitation, too-wet conditions, or leaves submerged in water. Fix: Cut away rotted parts with sterile tools, move to fresh medium, and improve air circulation. Prevent with regular water changes and hydrogen peroxide (a few drops) for oxygenation.
- No roots after several weeks: Check temperature, light, and hormone use. Some plants simply need more time. Try switching methods or adding bottom heat.
- Wilting cuttings: Increase humidity or reduce light intensity temporarily. Ensure the cutting isn’t losing too much water through large leaves.
- Yellowing new leaves: Often transplant shock later or nutrient deficiency—wait until roots are established before fertilizing lightly.
- Pest transfer: Thoroughly inspect and quarantine cuttings. Treat parent plant separately if pests remain.
Expert Insight: Cuttings from mildly stressed plants sometimes root faster due to a natural “survival mode” response, but heavily diseased ones have lower odds. Always take multiples!
Transplanting Your New Plants: From Cutting to Thriving Houseplant 🪴
Once roots reach 1–2 inches and look healthy:
- Gently remove from water or medium.
- Plant in small pots with well-draining indoor potting mix.
- Water sparingly at first to avoid shock—keep soil lightly moist.
- Acclimate gradually by removing any humidity cover over several days.
- Place in the same bright indirect light the cutting enjoyed.
Monitor for transplant shock (temporary wilting). Most new plants settle within 1–2 weeks. Repot as they grow, and provide balanced fertilizer during active seasons (spring/summer).
The original mother plant? If any viable roots or stems remain, try repotting in fresh soil after trimming damaged parts and adjusting care.
Bonus Tips & Expert Insights for Higher Success Rates 🌟
- Take multiple cuttings to hedge your bets.
- Best timing: Spring or early summer during active growth.
- Create a beautiful propagation station with glass vases on a windowsill for daily inspiration.
- Sustainability angle: Propagation reduces the need for store-bought plants and minimizes waste.
- DIY propagation stations or shared pots with the mother plant can create stunning displays.
- For tree care crossover: Softwood stem techniques apply to certain woody indoor plants or outdoor ornamentals.
Natural Rooting Boosters: Willow water and aloe vera gel are gentle, effective options many enthusiasts swear by.
Can You Still Save the Original Dying Plant?
Before fully committing to propagation-only, perform a quick revival checklist:
- Gently remove from pot and inspect roots—trim rotten ones, repot in fresh, sterile mix.
- Adjust watering (let soil dry appropriately between waterings), light, and humidity.
- Treat pests if present.
If the crown and some roots remain firm, revival is possible. Otherwise, focus energy on your new cuttings—it’s a beautiful way to continue the plant’s legacy.
Frequently Asked Questions (FAQs) ❓
Can I propagate from a completely dead-looking plant? Rarely with success. Focus on any remaining firm, green stems with nodes. If nothing viable remains, it may be time to compost and start fresh.
How long does it take for stems to root? Typically 2–6 weeks, varying by plant type, season, and conditions. Pothos is often fastest; figs slower.
Is rooting hormone necessary? No, many plants root well without it, especially easy ones like pothos. It can speed and improve success for trickier species.
What if my cuttings develop root rot? Trim affected parts, sanitize, and restart in fresh, oxygenated water or medium. Improve drainage and air flow.
Can I propagate tree branches the same way? Similar principles apply for softwood cuttings, but woody trees often need different timing and higher hormone concentrations—check specific tree care guides.
Best practices for winter propagation? Use grow lights and heat mats to compensate for lower light and cooler temperatures. Expect slower results.
(Additional FAQs can expand on seasonal care, variegated varieties, etc.)
Conclusion
Propagating healthy stems from a dying plant transforms anxiety into empowerment. Instead of mourning a loss, you gain multiple new plants that carry forward the beauty and memories of the original. This process teaches patience, observation, and the resilience of nature—core joys of plant parenthood. 🌱💚
Don’t give up on your green friends. Grab those healthy stems today, follow these steps, and watch new life emerge. Your indoor jungle (and confidence) will thank you!
Share your propagation success stories or photos in the comments below—I’d love to see how your cuttings are doing. For more plant care tips, explore our guides on identifying root rot, choosing the best potting mixes, or troubleshooting common houseplant pests.
Happy propagating! You’ve got this. 🌿✨🪴


