
That heartbreaking moment hits every plant lover eventually: you’ve just given your favorite houseplant or young tree a fresh new pot with nutrient-rich soil, feeling proud of your care… only to watch it wilt, yellow, or drop leaves dramatically within days. 😔 You panic, wondering if you’ve killed it. Don’t worry — this is repotting shock (also known as transplant shock), a common but manageable stress response that affects countless houseplants, garden perennials, and trees every year.
Repotting shock: how to minimize and fix it is one of the most searched questions among plant parents because the fear of losing a beloved green companion is real. The good news? With the right knowledge and techniques, you can dramatically reduce the risk before repotting and help your plant recover quickly if symptoms appear. In this comprehensive guide, I’ll share science-backed strategies, step-by-step prevention methods, proven recovery steps, and expert insights drawn from years of hands-on experience with thousands of plants — from delicate indoor ferns to sturdy outdoor trees. 🌿
By the end, you’ll feel confident repotting without the usual drama, helping your plants bounce back stronger and thrive in their new homes. Let’s turn that stress into success!
What Is Repotting Shock and Why Does It Happen? 🧐
Understanding Repotting Shock in Houseplants and Trees
Repotting shock occurs when a plant experiences sudden stress from root disturbance, environmental changes, or disrupted water and nutrient uptake. Essentially, the plant’s delicate root system — its lifeline for absorbing water, oxygen, and minerals — gets temporarily overwhelmed during the move to a new pot or planting site.
The Science Behind Transplant Shock
Plants rely on fine root hairs and symbiotic relationships (like mycorrhizal fungi) to pull resources from the soil. When you repot, these roots can tear, dry out briefly, or lose contact with their familiar soil environment. The plant reacts by closing its stomata (tiny leaf pores) to conserve water, slowing photosynthesis, and redirecting energy from growth to repair. This protective response manifests as visible stress symptoms.
In trees and larger shrubs, the impact can be even more pronounced because of their extensive root systems and longer establishment periods. University extension resources, such as those from Purdue and Cornell, emphasize that proper handling during transplanting directly influences survival rates and long-term health.
Common Causes of Repotting Shock
Several factors trigger or worsen transplant shock:
- Root disturbance or damage — Rough handling, excessive root pruning, or shaking off too much old soil.
- Sudden environmental shifts — Moving from one light level, temperature, or humidity to another without acclimation.
- Incorrect timing — Repotting during dormancy (winter) or extreme heat stresses the plant when it’s least able to recover.
- Pot size mismatch — Jumping to a much larger pot can leave roots surrounded by too much wet soil, leading to rot or poor oxygen access.
- Poor soil or drainage — Using heavy, compacted mixes that don’t match the plant’s needs.
Other contributors include fertilizing too soon (which burns sensitive new roots) or exposing the root ball to air for too long.
Repotting Shock vs. Other Plant Problems
It’s easy to confuse repotting shock with overwatering, underwatering, pests, or nutrient deficiencies. Key difference: transplant shock usually appears suddenly right after repotting, with multiple symptoms appearing together, while other issues develop more gradually. If your plant was healthy before the move and declines quickly afterward, repotting shock is the likely culprit.
Recognizing the Symptoms of Repotting Shock Early 👀
Signs Your Plant Is Suffering from Repotting Shock
Catching symptoms early gives your plant the best chance of quick recovery. Here’s what to watch for:
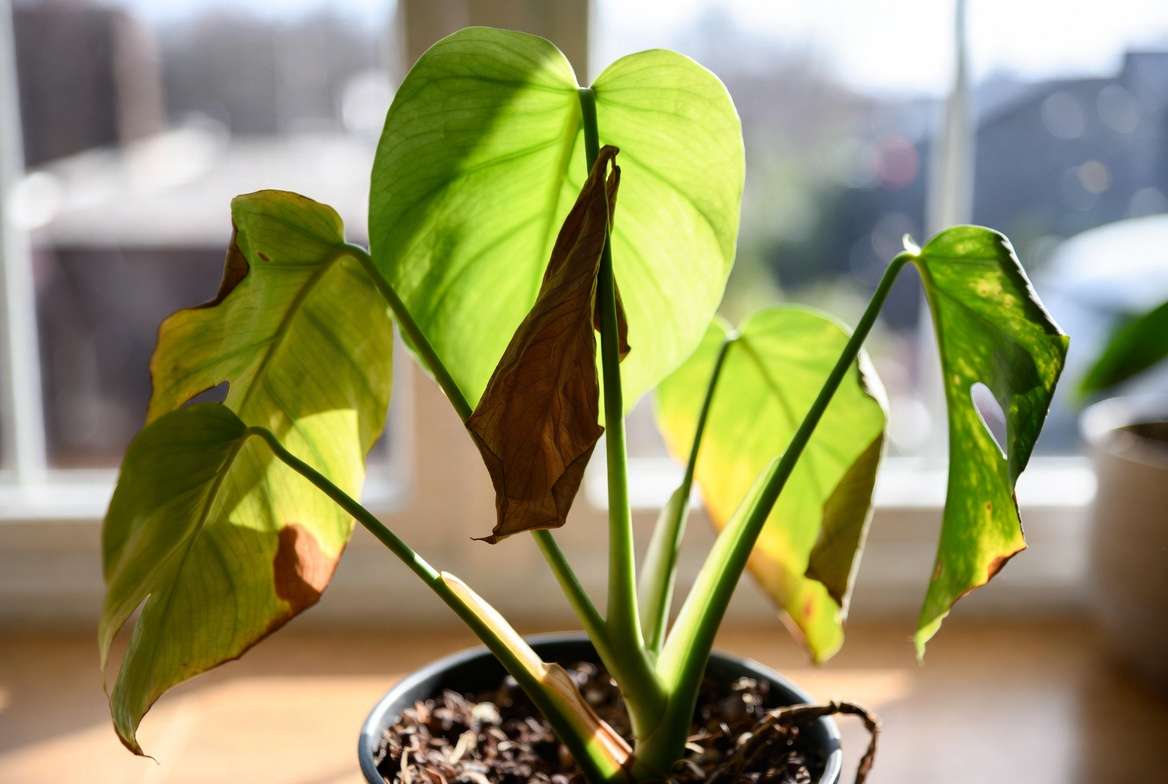
Visual Symptoms in Houseplants
- Wilting or drooping leaves, even when the soil feels moist 🌿
- Yellowing leaves (chlorosis), especially lower or older ones
- Browning leaf edges or tips (leaf scorch)
- Leaf curling, rolling, or premature dropping
- Stunted new growth or no growth at all
These signs often appear within 24–72 hours after repotting but can show up over a week.
Symptoms in Trees and Outdoor Plants
- Sparse canopy or branch dieback
- Delayed budding or leafing out in spring
- Reduced flowering or fruiting
- Overall lack of vigor and slower growth
How Long Does Repotting Shock Last?
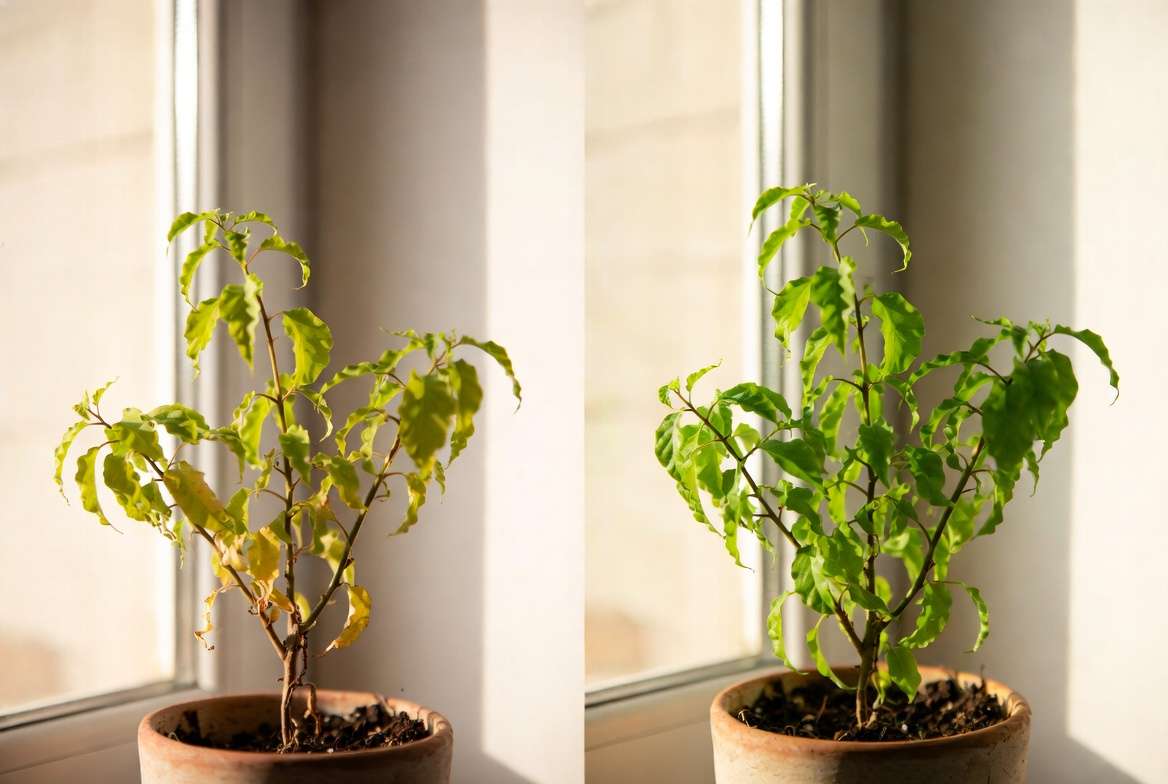
Mild cases in houseplants often resolve in 1–3 weeks with proper care. Moderate shock can take 4–8 weeks. For trees and woody plants, recovery may stretch to several months, as they invest more energy in rebuilding extensive root systems. Patience is key — new healthy growth is the clearest sign your plant is recovering. If symptoms worsen after 2–3 weeks or the plant continues declining, investigate other issues like root rot.
Early recognition prevents panic and allows targeted intervention before the stress becomes severe.
How to Minimize Repotting Shock: Prevention Is Better Than Cure 🛡️
The best way to handle repotting shock is to stop it before it starts. These proven techniques, supported by horticultural best practices, can significantly reduce stress.
Choose the Right Time to Repot
Timing is everything. The ideal window for most houseplants and trees is spring or early summer, when plants enter active growth and can quickly produce new roots. Early fall works well in milder climates as temperatures cool but before true dormancy sets in. Avoid repotting in deep winter (when growth is minimal) or during peak summer heat and drought stress.
Prepare Your Plant and Materials in Advance
- Water the plant thoroughly 1–2 days before repotting so the root ball holds together better.
- Choose a new pot only 1–2 inches larger in diameter than the old one — this prevents overwatering issues.
- Use fresh, well-draining potting mix tailored to the plant (e.g., airy mixes for monsteras or succulents, richer blends for foliage plants).
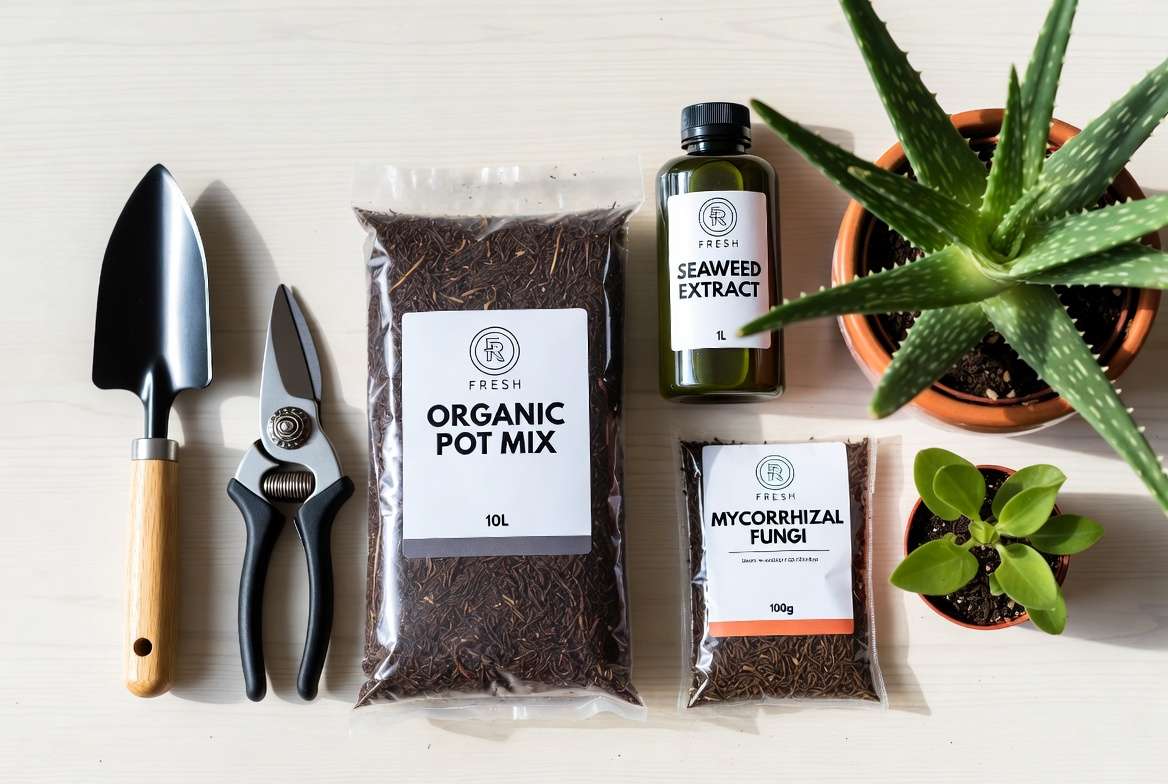
- Gather clean tools: sharp shears, gloves, and a diluted seaweed or kelp solution for root support.
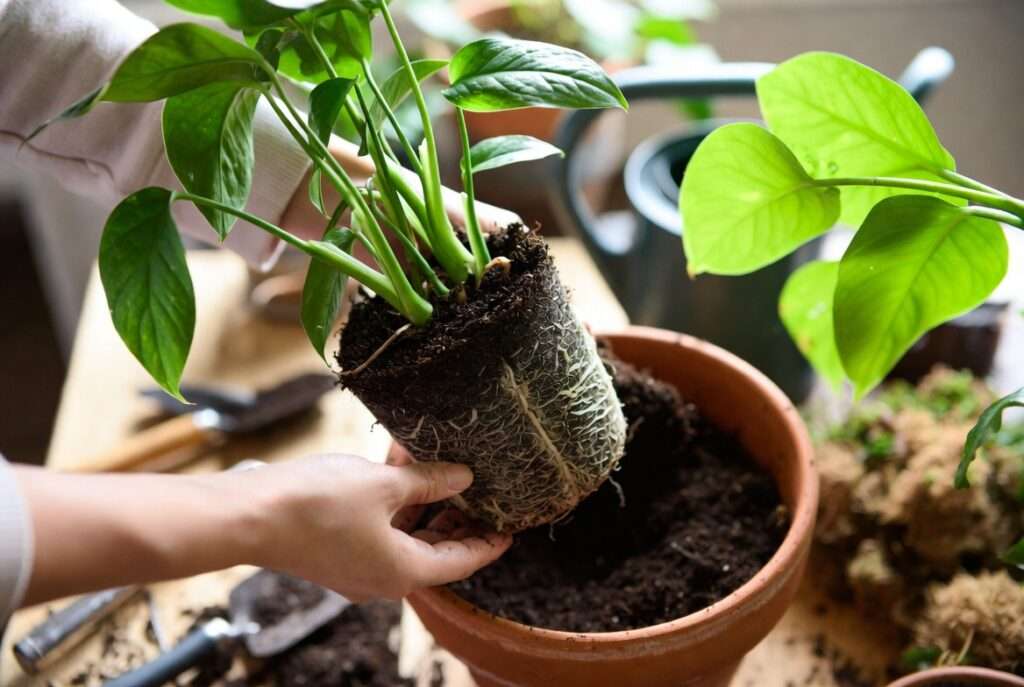
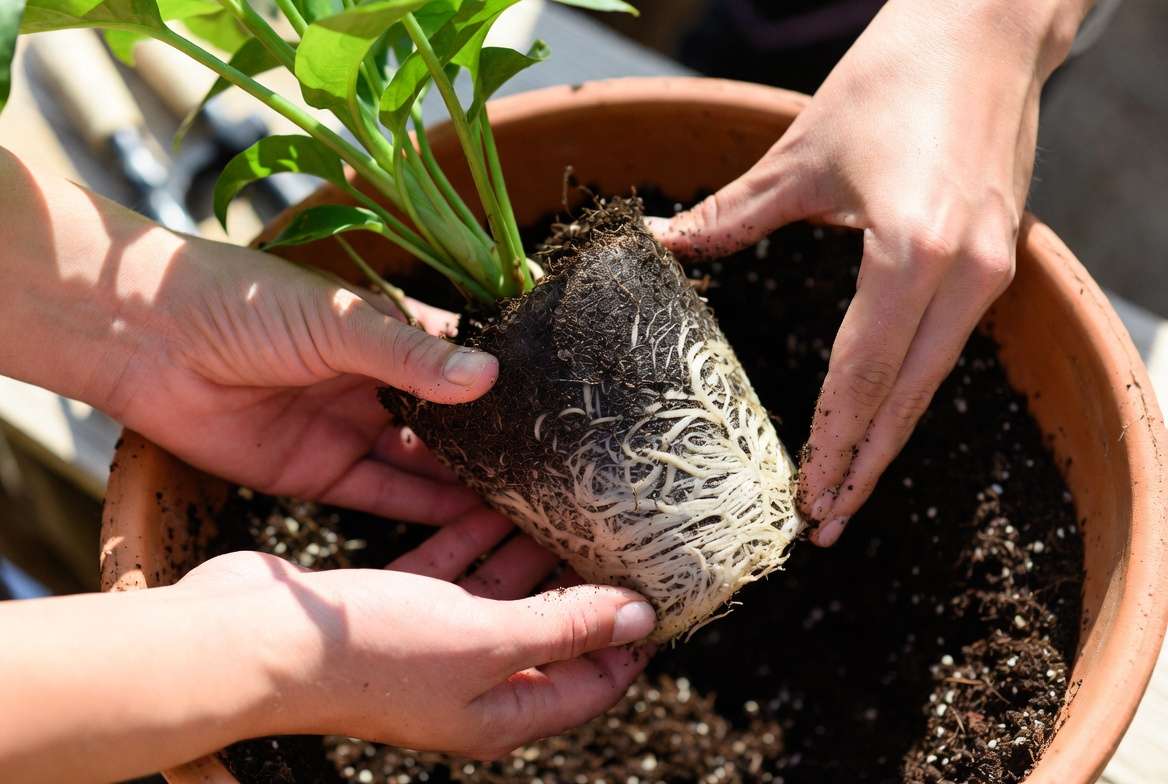
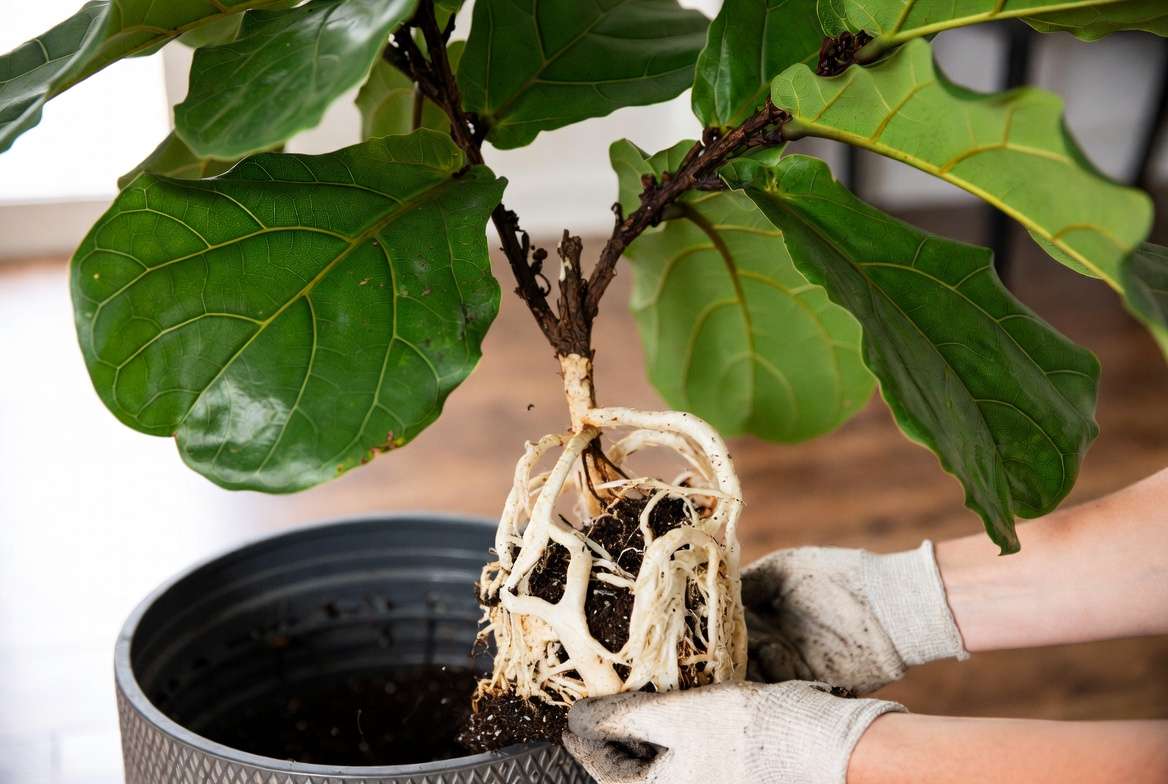
Gentle Repotting Step-by-Step Guide
- Gently remove the plant by tipping the pot and supporting the root ball — never pull by the stems.
- Tease apart circling or matted roots carefully with your fingers. Trim only dead, mushy, or damaged roots with sterilized shears.
- Minimize air exposure — work quickly and keep the root ball moist with a damp cloth if needed.
- Place the plant at the same soil depth as before (root flare slightly above soil for trees).
- Fill with fresh mix, firming gently around the roots to eliminate air pockets without compacting too tightly.
- Water thoroughly until it drains out the bottom to settle the soil.
Expert Prevention Tips
- Acclimate gradually to new light conditions over several days.
- Apply biostimulants at transplant time: diluted seaweed extract, aloe vera gel, or mycorrhizal fungi inoculants help roots establish faster and improve water/nutrient uptake. Studies and grower experiences show these can shorten the stress period.
- Repot in the cool morning or evening to avoid midday heat stress.
- Provide temporary shade or bright indirect light for the first 1–2 weeks.
- For outdoor trees, dig a wide planting hole (2–3 times the root ball width) and mulch properly while keeping mulch away from the trunk.
Special Considerations for Different Plants
Sensitive houseplants like calatheas, ferns, and fiddle leaf figs need extra humidity and minimal root disturbance. Root-bound plants benefit from gentle root teasing to encourage outward growth. Young seedlings and trees require even more care with larger root ball preservation.
How to Fix Repotting Shock: Recovery Strategies That Work 🌿
Even with perfect prevention, mild shock can still occur. Here’s how to nurse your plant back to health effectively.
Immediate Aftercare
- Water deeply but infrequently — keep soil consistently moist (not soggy) to support recovering roots. Good drainage is essential to prevent rot.
- Move the plant to bright, indirect light. Avoid direct sun, drafts, or heaters that exacerbate water loss.
Support Root Recovery
- Boost humidity with a pebble tray, mister, or humidifier, especially for tropical houseplants.
- Hold off on fertilizer for at least 2–4 weeks — fresh soil usually provides enough nutrients initially.
- Consider gentle root stimulants like vitamin B1 solutions or seaweed extracts, which many growers use successfully to ease stress (use according to product instructions).
Long-Term Recovery Care
- Monitor soil moisture daily at first, then adjust to the plant’s normal needs.
- Prune away severely damaged or yellow leaves to redirect energy to new growth — but don’t over-prune.
- Be patient. Consistent, stable conditions (temperature, light, humidity) speed recovery more than anything else.
Advanced Recovery Techniques
- Try bottom watering to encourage roots to grow downward without disturbing the surface.
- Some plant parents swear by diluted aloe vera juice in watering water for its natural soothing properties.
- In severe cases, if the plant continues declining, consider propagating healthy cuttings as a backup while continuing to support the mother plant.
With these steps, most plants recover fully and often grow more vigorously once established.
Common Mistakes to Avoid When Repotting 🛑
Even the most caring plant parents can unintentionally worsen repotting shock by making a few common errors. Recognizing and avoiding these pitfalls will save your plants unnecessary stress and speed up their transition.
- Overwatering or Underwater Immediately After Repotting Many people panic when they see wilting and drown the plant with too much water, leading to root rot. Others let the soil dry out completely. The sweet spot is keeping the soil consistently moist but never soggy — check the top inch of soil with your finger before watering. Good drainage is non-negotiable.
- Choosing the Wrong Pot Size Jumping to a pot that’s way too large leaves roots swimming in excess soil that stays wet too long. Stick to a new pot only 1–2 inches larger in diameter than the previous one for most houseplants. For trees, ensure the planting hole is wide (2–3 times the root ball width) but not excessively deep.
- Rough Handling of Roots Pulling the plant by the stems, shaking off all old soil aggressively, or cutting away too many healthy roots can cause major damage. Always support the root ball and tease roots gently. Only trim clearly dead, mushy, or circling roots.
- Repotting at the Wrong Time Attempting a repot during winter dormancy or in scorching summer heat adds extra stress when the plant is least equipped to recover. Spring and early fall remain the safest windows for most species.
- Fertilizing Too Soon Fresh potting mix already contains nutrients. Adding fertilizer right away can burn sensitive new root hairs. Wait at least 2–4 weeks (or until you see strong new growth) before resuming a normal feeding schedule.
- Skipping Acclimation Moving a plant from low light indoors straight into bright sun or vice versa shocks its system. Gradually introduce changes in light, temperature, and humidity over several days.
- Using Poor-Quality or Incorrect Soil Heavy garden soil in pots or mismatched mixes (e.g., cactus mix for a moisture-loving fern) leads to poor aeration, drainage issues, or nutrient imbalances that compound transplant stress.
Avoiding these mistakes alone can cut repotting shock incidents dramatically. Prevention truly is the kindest form of plant care. 🌱
Plant-Specific Advice and Real-World Examples 🌳
Repotting Shock in Popular Plants: Case Studies & Tips
Different plants react differently to repotting. Here are practical insights for some of the most common ones in home gardens and indoor collections:
Fiddle Leaf Fig (Ficus lyrata) These dramatic beauties are notoriously sensitive. Symptoms often include dramatic leaf drop or browning edges. Prevention tip: Repot only when clearly root-bound, in spring. Use a well-aerated mix with perlite or orchid bark. Provide high humidity and bright indirect light during recovery. Many owners report success with mycorrhizal inoculants at transplant time.
Snake Plant (Sansevieria) Tough and forgiving, but still susceptible if roots are heavily disturbed. They may show yellowing or soft leaves. Recovery strategy: They tolerate drier conditions, so err on the side of underwatering slightly. Bright light helps them rebound faster.
Monstera and Pothos Fast growers that usually recover well but can wilt dramatically if roots dry out during the process. Pro tip: Keep the root ball moist during repotting and maintain consistent moisture afterward. They love humidity boosts like pebble trays.
Calatheas and Ferns These humidity lovers suffer the most from dry air and root disturbance. Expect curling or browning if conditions aren’t ideal post-repot. Expert advice: Use a humidifier or closed terrarium-like setup for the first 1–2 weeks. Minimal root teasing is essential.
Young Trees and Outdoor Shrubs Transplant shock in trees can last months to years because of their size. Key practice: Preserve as much of the root ball as possible, plant at the correct depth (root flare visible), water deeply but infrequently, and apply a 2–3 inch layer of mulch (kept away from the trunk). Purdue Extension notes that proper site selection and aftercare are critical for woody plants.
Real-World Example 1: A reader’s monstera dropped several leaves after repotting into a much larger pot. By switching to consistent moisture, indirect light, and a seaweed drench, new fenestrated leaves emerged within three weeks.
Real-World Example 2: A young citrus tree showed sparse foliage and dieback after planting. Deep weekly watering, temporary shade cloth, and avoiding fertilizer for six weeks helped it push strong spring growth the following season.
These examples show that while every plant is unique, the core principles of gentle handling, proper timing, and stable aftercare apply universally.
Additional Expert Insights and Pro Tips 💡
Expert Insights for Healthier Repotting
Over years of working with plants, certain techniques consistently deliver better outcomes:
- Incorporate Mycorrhizal Fungi — These beneficial fungi form symbiotic relationships with roots, dramatically improving water and nutrient uptake while reducing stress. Many studies and grower reports show shorter recovery times and higher survival rates when used at transplant. Mix granular inoculants into the planting hole or soil.
- Seaweed or Kelp Extracts — Diluted seaweed solutions provide natural hormones and trace minerals that stimulate root growth and help plants cope with stress. Apply as a soil drench or foliar spray (diluted properly).
- Aloe Vera Gel — A popular natural remedy: blend fresh aloe and dilute in water for watering or dipping roots. Many plant enthusiasts report it soothes damaged roots and speeds recovery, though results vary.
- Bottom Watering — This method encourages roots to grow downward and avoids disturbing the soil surface.
- Temporary Shade and Wind Protection — Especially important for outdoor transplants or sensitive houseplants moved to brighter spots.
- Patience as a Strategy — Rushing to “fix” the plant with more interventions often causes more harm. Stable conditions + time frequently yield the best results.
10 Actionable Pro Tips 🌟
- Always sterilize tools to prevent disease spread.
- Repot on cloudy days or in the evening when possible.
- Take before-and-after photos to track progress (and reduce anxiety!).
- Use room-temperature water for watering.
- Group plants together temporarily to raise local humidity.
- Monitor for pests — stressed plants are more vulnerable.
- Consider propagation as insurance for very valuable or struggling specimens.
- Improve soil biology with compost teas or beneficial microbes.
- Match pot material to plant needs (terracotta for succulents, plastic/glazed for moisture lovers).
- Celebrate small wins — even one new leaf means recovery is underway! 🎉
Frequently Asked Questions (FAQ) ❓
Repotting Shock FAQ
Can repotting shock kill my plant? In severe cases with extensive root damage or poor aftercare, yes — but most healthy plants recover fully with proper support. Early intervention dramatically improves outcomes.
How long does it take for a plant to recover from repotting shock? Mild cases in houseplants often improve within 1–3 weeks. Moderate shock may take 4–8 weeks. Trees and large shrubs can need several months to a couple of years for full establishment. New growth is the best indicator of success.
Should I fertilize after repotting? Wait at least 2–4 weeks or until you see healthy new growth. Fresh soil provides initial nutrients, and early fertilizing can burn recovering roots.
Is it normal for leaves to turn yellow after repotting? Yes, especially older lower leaves. The plant may shed them to conserve energy for root repair. Remove severely damaged ones to redirect resources.
What’s the best remedy for severe transplant shock? Provide consistent moisture (not soggy), bright indirect light, higher humidity, and stable temperatures. Use gentle root stimulants like diluted seaweed if desired, and be patient. Avoid moving the plant around frequently.
Are there differences in handling repotting shock for houseplants vs. trees? Yes. Houseplants recover faster due to smaller size and controlled environments. Trees need wider planting holes, deep infrequent watering, mulching, and long-term patience as they rebuild extensive root systems.
Should I prune a lot after repotting? Light pruning of damaged or dead leaves is okay to reduce stress, but avoid heavy pruning that removes too much foliage — the plant needs leaves for photosynthesis to support root recovery.
Can I repot a plant that’s already in shock? Generally no — wait until it stabilizes. Repotting again would add more stress. Focus on optimal care first.
Conclusion: Grow Confidently with Better Repotting Practices 🌟
Repotting shock doesn’t have to be a scary or inevitable part of plant parenthood. By understanding the causes, recognizing symptoms early, using gentle prevention techniques, and providing thoughtful recovery care, you can minimize stress and help your plants thrive after every move.
The keys are simple yet powerful: choose the right timing, handle roots with care, maintain stable conditions afterward, and above all — be patient. Whether you’re caring for a delicate calathea on your windowsill or establishing a young tree in your garden, these strategies will serve you well for years to come.
Your plants are resilient. With the tools in this guide, you’re now equipped to repot with confidence instead of fear. The next time you give a plant a fresh home, you’ll watch it settle in and reward you with lush new growth.
Have you experienced repotting shock with a particular plant? Share your story or questions in the comments — I love hearing from fellow plant lovers and learning together! 💚
For more helpful plant care guidance, explore these related articles:
- Best Potting Mixes for Different Houseplants
- How to Water Plants Correctly (The Ultimate Guide)
- Signs of Healthy vs. Unhealthy Roots
Happy repotting and happy growing! 🌿✨


