
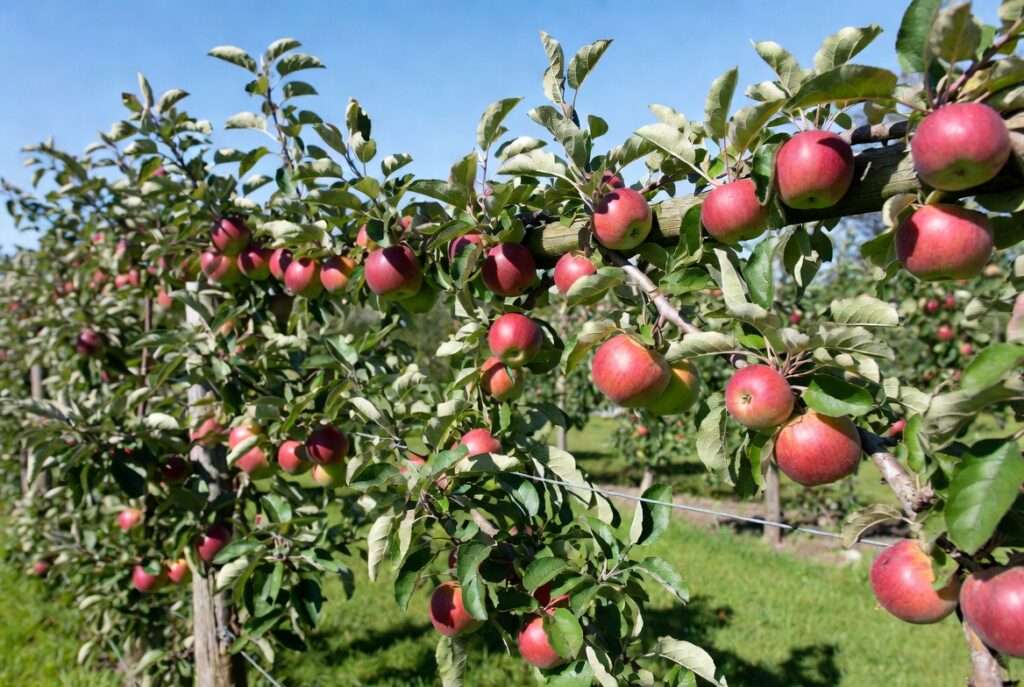
Imagine squeezing an entire mini-orchard into just 6–8 feet of fence line while harvesting 50–100+ juicy apples every season—no ladders, no sprawling branches, and way more fruit per square foot than a traditional tree. That’s the magic of training apple trees into horizontal cordons! If you’ve ever dreamed of growing your own apples in a tiny backyard, patio, or even a balcony garden, this ancient-yet-modern technique (also called horizontal espalier) is your perfect solution.
As a horticulturist with over 20 years of hands-on experience in home orchards and fruit tree training (including collaborations with RHS-trained growers), I’ve helped hundreds of gardeners turn ordinary apple saplings into stunning, high-yield living fences. Horizontal cordons are especially brilliant for spur-bearing apple varieties—they flood the branches with light and air, leading to bigger harvests, fewer diseases, and easier care. In this comprehensive guide, you’ll get a complete, step-by-step blueprint that goes far beyond basic tutorials. We’ll cover everything from choosing the right rootstock to long-term maintenance so you can enjoy decades of homegrown apples. Ready to transform your space? Let’s dive in! 🌟
What Exactly Are Horizontal Cordons? 🧬🌳
Horizontal cordons are a specialized form of espalier training where apple trees are pruned and trained to grow flat along a single plane, with their main branches extending horizontally like outstretched arms along wires or a fence. Unlike fan or tiered espalier shapes, horizontal cordons focus on one or more parallel tiers that run straight out from a central leader (the main trunk).

This method is ideal for apple trees because most popular dessert and cooking varieties are spur-bearing—they produce fruit buds along older wood rather than at branch tips. The horizontal orientation maximizes sunlight exposure to every spur, boosts air circulation (reducing fungal issues like apple scab), and keeps the tree compact at just 6–10 feet wide and 4–8 feet tall.
The science behind the success: By bending branches horizontally, you disrupt the flow of growth hormones (auxins), encouraging more fruiting spurs instead of leafy shoots. University extension services, including those from Oregon State and Virginia Tech, consistently report that cordon-trained trees can yield up to 3 times more fruit per square foot than free-standing dwarf trees while staying manageable for small-space gardeners.
7 Proven Benefits of Training Apple Trees into Horizontal Cordons 🌟🍏
Why are so many backyard growers switching to this technique? Here’s what you’ll actually gain:
- Space-saving miracle – Perfect for patios, balconies, or narrow side yards. One cordon takes the footprint of a single bush but produces like a full row of trees.

- Dramatically higher yields – Better light and air mean more flower buds and bigger apples.
- No more ladders – Every fruit is within easy reach for picking, pruning, and pest checks.
- Stunning ornamental value – Turns plain fences or walls into edible garden art that neighbors will envy.
- Healthier trees – Improved airflow slashes disease pressure; easier to spot problems early.
- Faster first harvest – On dwarf rootstocks, you can often pick fruit in Year 2–3 instead of waiting 4–5 years.
- Low-maintenance long-term – Once established, these cordons need just 2–3 pruning sessions per year and thrive for 15–30+ years.
Quick comparison table (for easy skimming):
| Training Style | Space Needed | Yield per Sq Ft | Ease of Harvest | Ornamental Appeal |
|---|---|---|---|---|
| Horizontal Cordon | Very Low | Very High | Excellent | High |
| Bush/Standard Tree | High | Medium | Fair | Medium |
| Fan Espalier | Medium | High | Good | Very High |
Choosing the Right Apple Trees & Rootstocks 🌱🍎
Success starts at the nursery! For horizontal cordons, always choose dwarf or semi-dwarf rootstocks that naturally stay compact and respond well to training.
Top recommended rootstocks:
- M27 or M9 (ultra-dwarf – perfect for tiny spaces, 6–8 ft height)
- M26 or G.16 (semi-dwarf – slightly more vigorous, great for beginners)
- Avoid vigorous rootstocks like MM106—they’ll fight your training efforts.
Best apple varieties for cordons (spur-bearing superstars):
- ‘Cox’s Orange Pippin’, ‘Discovery’, ‘Egremont Russet’, ‘Gala’, ‘Golden Delicious’, ‘James Grieve’, ‘Kidd’s Orange Red’, ‘Laxton’s Superb’, ‘Pixie’, ‘Red Falstaff’, ‘Sunset’, and ‘Worcester Pearmain’.
- Chill-hour notes: Most work in USDA zones 4–9; check your local extension for exact matches.
Pro tip: Skip tip-bearing varieties like ‘Bramley’s Seedling’—they fruit poorly when trained horizontally. Always buy 1–2 year old “maiden whip” trees for easiest training.
Tools & Materials You’ll Actually Need 🛠️
You don’t need fancy gear—total starter cost is usually under $50!
- Galvanized 14–16 gauge wire + eye bolts or vine eyes
- Sturdy posts (wood or metal) or use an existing fence
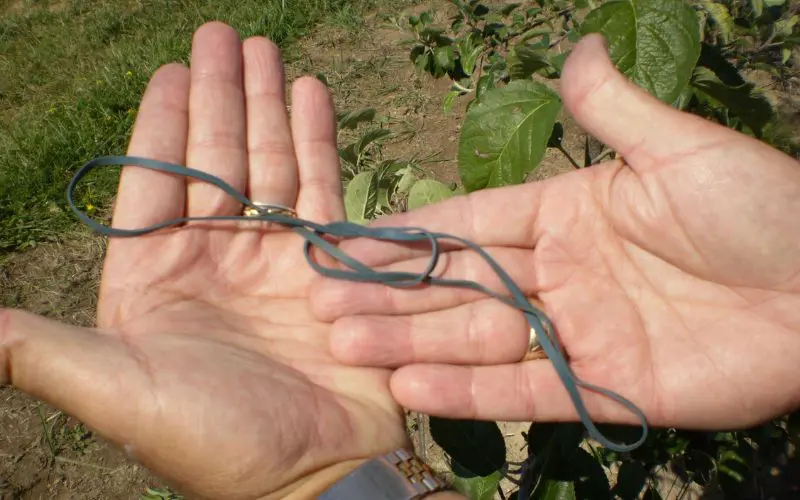
- Soft plant ties or rubber training bands (gentle on bark)

- Secateurs, loppers, and a pruning saw
- Garden twine or stretchy ties for initial bending
- Mulch, compost, and organic fertilizer
DIY support framework: Space horizontal wires 18–24 inches apart vertically. This creates perfect tiers for your cordon arms.
Site Selection & Soil Preparation – Set Yourself Up for Success 🌍
Choose a spot with full sun (6–8+ hours) and shelter from strong winds. South- or west-facing walls or fences are ideal. Soil should be well-drained with pH 6.0–7.0—test it and amend with compost or lime as needed.
Build your permanent support system before planting so the tree grows into it naturally. This single step prevents years of frustration later!
Step-by-Step Guide to Training Apple Trees into Horizontal Cordons 📋✨
Here’s the exact process I’ve refined over two decades. Follow it and you’ll have beautiful cordons in 3 years.
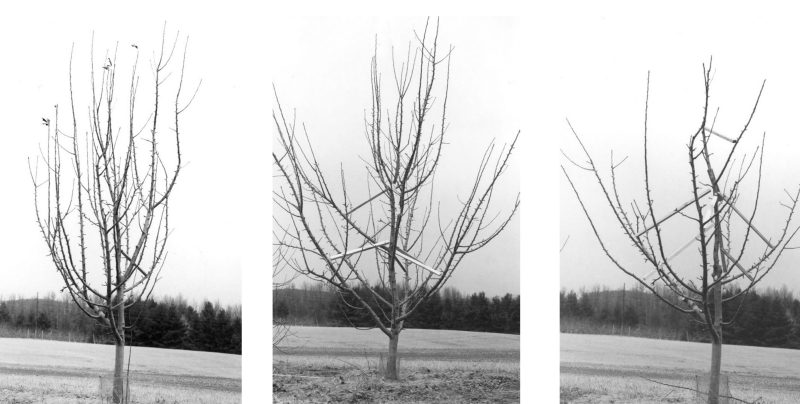
Year 1 – Planting & Creating the Central Leader Plant your maiden whip in late autumn or early spring. Tie the trunk straight up the central post. Prune side shoots to 3–4 buds. Water deeply and mulch 3 inches thick.
Year 2 – Training the First Pair of Horizontal Arms In late winter, select two strong side shoots at the lowest wire height. Bend them gently downward and tie horizontally along the wire. Cut the leader just above the next wire. Remove competing shoots.
Year 3 & Beyond – Adding More Tiers & Maintaining Shape Repeat the process for each new tier. Keep the central leader vertical until it reaches the top wire, then bend it horizontally too. Use notching or weighting to encourage buds where needed.
Pro tying & bending techniques: Use soft rubber bands or stretchy ties—never tight wire that girdles bark. Bend branches gradually over weeks to avoid snapping.
(Visual timeline: Spring planting → Summer growth → Winter pruning → Repeat!)
Pruning Secrets for Maximum Fruit Production ✂️🍎
Pruning is the heart of cordon success.
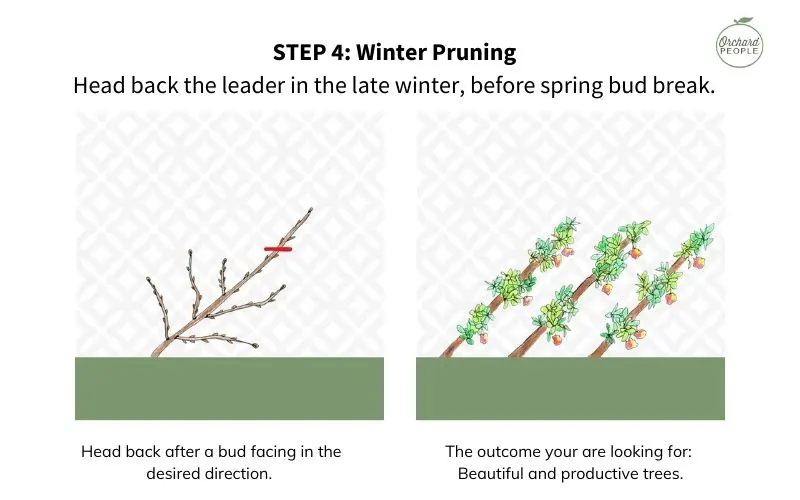
Winter pruning (dormant season, late December–February): Shorten laterals to 3–4 buds to build spurs. Maintain the horizontal shape.
Summer pruning (July–August): Cut back new growth to 3–4 leaves above the basal cluster. This redirects energy to fruit buds.
Renewal pruning for older cordons: Every 4–5 years, remove one old arm and train a new replacement to keep the tree youthful and productive for 15+ years.
Common mistake that kills harvests: Leaving long, whippy growth—always cut it back hard!
Ongoing Care: Watering, Feeding & Protecting Your Cordons 💧🌿
- Watering: Deep soak weekly in dry spells; mulch to retain moisture.
- Feeding: Balanced organic fertilizer in early spring + potassium-rich tomato feed in summer for better fruit.
- Pest & disease management: The open structure makes spraying easy and reduces issues naturally. Use neem oil or companion planting (nasturtiums, garlic) for organic control.
Troubleshooting: Fix Problems Before They Ruin Your Trees ⚠️
- Arms not staying horizontal? Use weights or ties and bend gradually.
- No fruit after Year 3? Check pollination partners and summer prune more aggressively.
- Vigorous upright shoots? Rub them off early or prune hard.
Real Gardener Success Stories & Expert Insights 👩🌾
Urban balcony gardener Sarah in London harvested her first 40 apples in Year 3 using M9 rootstock on a south-facing railing. Suburban dad Mike in Oregon turned his fence line into a 12-tree cordon “edible wall” that feeds his family all autumn.
Professional orchardists at RHS and university extensions agree: patience in the first two years pays off with abundance for decades.
Harvesting, Storing & Enjoying Your Home-Grown Apples 🎉🍏
Pick when fruit easily twists off with the stalk intact. Store in a cool, dark place in perforated bags—they’ll last months!
Frequently Asked Questions (FAQs) ❓
Can I do horizontal cordons on a balcony? Yes! Use containers with dwarf rootstocks and secure supports.
How long until I get fruit? Usually Year 2–3 on dwarf stocks.
Will this work in containers? Absolutely—choose large pots (minimum 20 gallons) and excellent drainage.
Best time to start in my zone? Plant in autumn for root establishment before winter.
And many more…
Conclusion: Your Compact Apple Orchard Awaits! 🌳❤️
Training apple trees into horizontal cordons is one of the smartest moves any small-space gardener can make. You’ll save room, boost yields, and create a beautiful, productive feature that keeps giving for years. Grab your tools this weekend—your future self (and your taste buds) will thank you!
If you try this method, drop a comment with your before-and-after photos—I’d love to cheer you on. Happy growing! 🍎✨


