
Picture this: it is the peak of summer, you have just returned home from a long day, and your prized tomato plants are drooping, desperately thirsty in the afternoon heat. Vegetable plants are notoriously heavy drinkers, and trying to keep up with their hydration needs during the hottest months can feel like a full-time job. If you are tired of being chained to your garden hose, building DIY self-watering planters for vegetables is the ultimate game-changer for your garden.
Erratic and inconsistent watering does not just waste your time; it actively harms your harvest, leading to frustrating issues like blossom end rot, split tomatoes, and stunted growth. The solution lies in a system that feeds your plants exactly what they need, right when they need it.
Over years of testing different urban container gardening methods, I have found that building your own sub-irrigated planters (often called SIPs) using standard 5-gallon buckets is the most reliable, affordable, and beginner-friendly way to grow thriving vegetables. In this comprehensive guide, we will dive into the science of how these planters work, exactly what you need to build them, and the expert secrets to keeping your container garden lush and productive all season long.
💧 How Do Self-Watering Planters Actually Work? (The Science)
Before diving into the build, it is important to understand the mechanics. Despite the name, these containers do not feature robotic arms or automated pumps. Instead, they rely on a brilliant natural phenomenon.
The Magic of Capillary Action 🧪
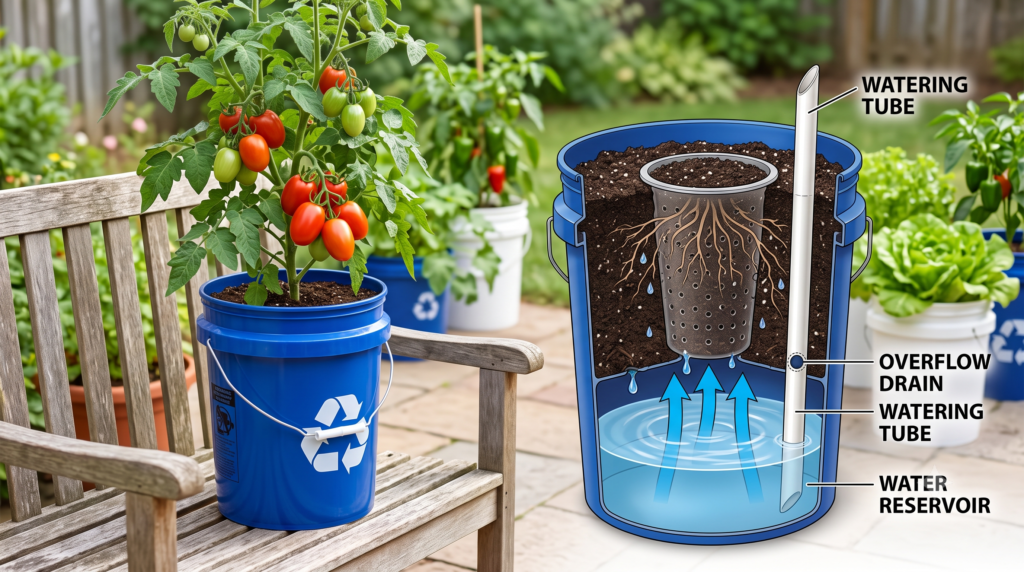
A self-watering planter is essentially a container with two distinct zones: a water reservoir at the bottom and a soil chamber at the top. Connecting these two zones is a “wicking chamber.”
When you pack the wicking chamber tightly with a high-quality potting mix, the soil acts like a sponge. Through capillary action, the soil pulls water up from the bottom reservoir against gravity, delivering consistent, even moisture directly to the root zone. As the roots drink, the soil dries slightly, which automatically pulls up more water to replace it. It is nature’s perfect self-regulating system.

Sub-Irrigated Planters (SIPs) vs. Traditional Pots 🪴
In a traditional garden pot, you water from the top down. While this seems logical, it presents several problems. Top-watering compacts the soil over time and flushes valuable water-soluble nutrients straight out of the drainage holes. Furthermore, the top layer of soil evaporates quickly in the sun, deceiving you into thinking the plant is dry when the bottom might still be soaked.
Sub-irrigated planters flip this logic. Because the water wicks from the bottom up, the nutrients remain trapped within the soil profile where the roots can access them. The top layer of soil stays relatively dry, which dramatically reduces evaporation and leads to far healthier root systems.
🌱 Why Vegetable Gardeners Swear By Self-Watering Systems
Switching to a sub-irrigated system offers incredible benefits that go far beyond simply skipping a few days of watering chores.
-
Consistent Moisture: Vegetables like tomatoes and cucumbers require steady hydration to develop properly. Fluctuating between bone-dry and soaking-wet soil causes fruit to split and become bitter. SIPs provide a continuous, even supply of moisture.
-
Water Conservation: Traditional top-watering loses a massive amount of water to surface evaporation and immediate runoff. A self-watering system is enclosed, meaning it can reduce your garden’s water consumption by up to 50%.
-
Massive Time Savings: Depending on the weather and the size of your plant, a fully stocked reservoir can keep your vegetables hydrated for several days to over a week, freeing you up to enjoy your garden rather than just working in it.
-
Weed & Disease Reduction: Because the top two inches of soil remain completely dry in a functioning self-watering planter, weed seeds landing on the surface cannot germinate. Additionally, keeping the surface dry eliminates the humid microclimate that fosters soil-borne fungal diseases like blight.
🛠️ Tools & Materials: What You Will Need for Your DIY Build
Building your own planter is highly cost-effective compared to buying commercial versions. Below is everything you need to construct a single, highly efficient 5-gallon planter.
| Item | Quantity | Purpose | Estimated Cost |
|---|---|---|---|
| 5-Gallon Food-Grade Buckets | 2 per planter | Serves as the main body and the water reservoir. | $6 – $10 |
| Sturdy Plastic Cup or Net Pot | 1 per planter | Acts as the wicking chamber to pull water up. | $1 – $3 |
| 1-inch PVC Pipe (24 inches long) | 1 per planter | The watering tube used to fill the bottom reservoir. | $2 – $4 |
| Power Drill (1/4-inch & 3-inch bits) | 1 | Necessary to create aeration and overflow drainage holes. | N/A (Tool) |
| High-Quality Potting Mix | 1 large bag | The growing medium (must contain peat or coir for wicking). | $10 – $15 |

💡 Expert Tip: Never use random buckets you find in the garage if they previously held chemicals or paint. Always check the bottom of the bucket for the recycling triangle. Look for codes 1 (PETE), 2 (HDPE), 4 (LDPE), or 5 (PP). These are considered food-safe and will not leach harmful plastics into your vegetable’s soil.
🪣 Step-by-Step Guide: Building Your DIY Self-Watering Planters for Vegetables
Ready to build? Follow these precise steps to ensure your planter has the correct aeration, wicking capability, and drainage to keep your vegetables thriving.
Step 1: Crafting the Water Reservoir (The Bottom Bucket) 🌊
Your bottom bucket requires absolutely no drilling or cutting. Its sole purpose is to act as a watertight basin holding the water reserve. Set one of your 5-gallon buckets aside; this will be your base.
Step 2: Creating the Wicking Chamber (The Engine of the Planter) ⚙️
Take your second bucket (the top bucket). This bucket will nest inside the first one. Because 5-gallon buckets taper, there will naturally be a few inches of empty space at the very bottom when you stack them. That empty space is your water reservoir.
To connect the soil to the water, we need a wicking chamber.
-
Take your sturdy plastic cup or net pot (a 16-ounce plastic deli cup works wonderfully).
-
Trace the outline of the cup exactly in the center of the bottom of your top bucket.
-
Using a utility knife or a 3-inch hole saw drill bit, carefully cut out this center circle.
-
Drop the plastic cup into the hole so it hangs down.
-
Crucial Step: Drill several large holes into the sides and bottom of the plastic cup so water can enter it.
Step 3: Drilling Aeration and Overflow Holes (Crucial for Root Health) 🕳️
Roots need oxygen just as much as they need water. Without proper airflow, your planter will turn into a swamp.
-
Aeration Holes: On the bottom of the top bucket (around the wicking cup you just installed), drill multiple 1/4-inch holes. This allows oxygen to flow from the empty reservoir gap up into the soil.
-
The Overflow Hole: This is the most critical step that many DIYers miss. Nest the top bucket inside the bottom bucket. Look at exactly where the bottom of the top bucket rests. Drill a 1/4-inch hole through the side of the bottom bucket, positioned roughly half an inch below the bottom of the top bucket.
-
Why this matters: If a heavy rainstorm hits, excess water will drain out of this overflow hole rather than flooding up into the soil chamber and drowning your plants.
-
Step 4: Installing the Watering Tube 🚰
You need a way to pour water directly into the bottom reservoir without soaking the topsoil.
-
Take your 24-inch piece of PVC pipe.
-
Cut the bottom end of the pipe at a sharp 45-degree angle. If you leave it flat, it can suction against the floor of the bottom bucket and block the water from flowing out.
-
Cut a small notch or hole at the outer edge of the top bucket’s floor, just wide enough to slide the PVC pipe through.
-
Slide the pipe down so the angled tip touches the very bottom of the reservoir. The top of the pipe should stick out above the rim of your bucket.
Step 5: The Soil Assembly (Why Standard Soil Fails) 🍂
You cannot use garden dirt or heavy “potting soil” in a sub-irrigated planter. Heavy dirt will compact into brick-like density, suffocating the roots and failing to wick water. You must use a lightweight, fluffy potting mix.
-
Ensure your mix contains a high ratio of peat moss or coco coir (for wicking) and perlite (the little white rocks, for aeration and drainage).
-
Begin by tightly packing the wicking cup with moist potting mix. You must pack it firmly so the capillary action can begin.
-
Fill the rest of the bucket loosely with your potting mix.
-
Once you reach the top few inches, mix in a generous handful of slow-release organic granular fertilizer.
🌶️ The Best Vegetables to Grow in Self-Watering Planters
While self-watering planters are a miracle for many plants, they are not a one-size-fits-all solution for every single crop. Because these systems provide a constant supply of moisture, you want to choose plants that love having their “feet” slightly wet.
Heavy Drinkers That Thrive (The Winners) 🏆
Fruiting summer vegetables are the absolute best candidates for DIY self-watering planters for vegetables.
-
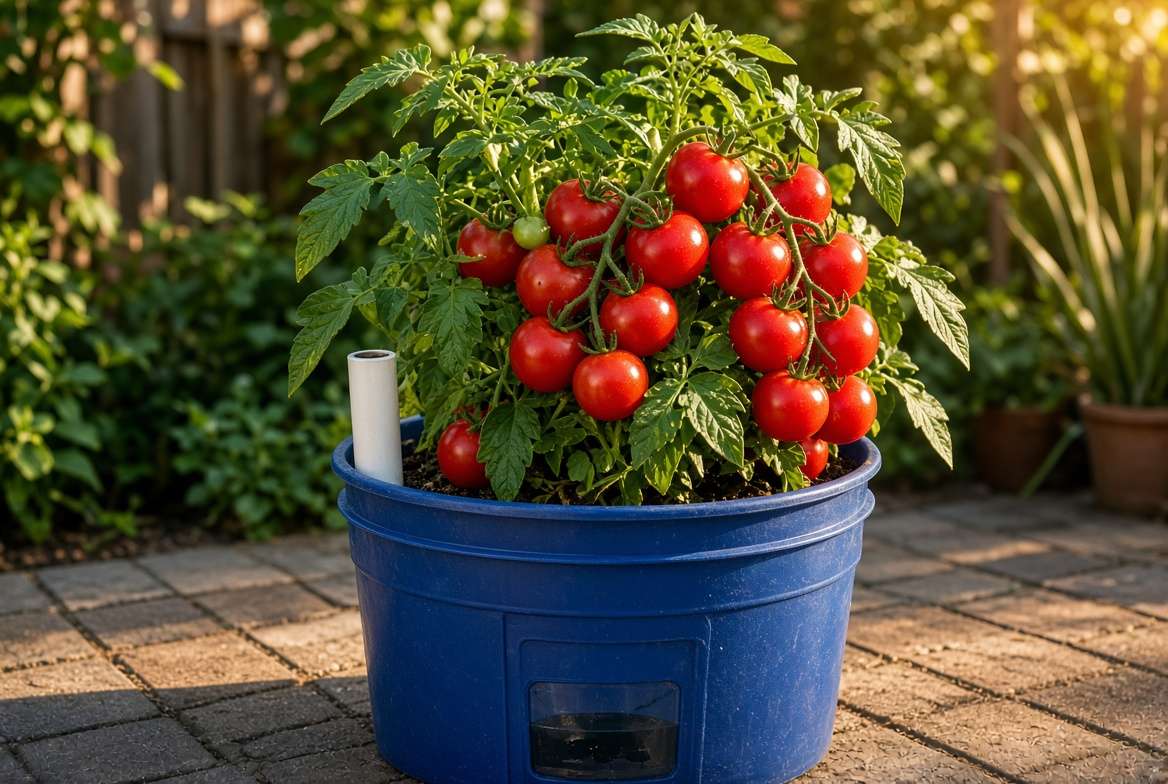
Tomatoes: Both determinate (bush) and indeterminate (vining) varieties perform beautifully. The consistent watering is the number one defense against blossom end rot (a calcium deficiency caused by uneven watering). For 5-gallon buckets, smaller determinate or patio varieties like “Roma” or “Tiny Tim” are exceptionally easy to manage.
-
Cucumbers: These climbing vines are composed of over 95% water. A sub-irrigated planter ensures your cucumbers grow crisp and sweet rather than bitter and stunted.
-
Bell Peppers and Jalapeños: Peppers love heat but despise drying out. A constant moisture supply leads to thicker-walled, juicier peppers.
-
Eggplants: Similar to peppers, eggplants are heavy feeders and drinkers that thrive in a stable environment.
Leafy Greens That Stay Crisp 🥬
If you love salads, self-watering systems are your best friend. Greens like lettuce, spinach, and Swiss chard have shallow root systems that dry out rapidly in standard pots. Consistent moisture keeps them crisp, encourages rapid leaf production, and dramatically delays the “bolting” process (when the plant prematurely goes to seed due to heat or drought stress).
What to Avoid Growing in SIPs 🚫
Not every plant wants a constant drink. Avoid planting these in your self-watering buckets:
-
Root Vegetables: Carrots, potatoes, and radishes need loose, somewhat dry soil to expand. In a self-watering planter, the constant moisture often causes them to rot before they are ready to harvest.
-
Drought-Loving Herbs: Mediterranean herbs like rosemary, thyme, oregano, and lavender actively prefer their soil to dry out completely between waterings. Putting them in a self-watering system will quickly lead to root rot.
🪴 Expert Maintenance Tips for Long-Term Success
Your planter is built, and your vegetables are planted. Now, how do you manage the system to ensure a massive harvest?
How and When to Refill the Reservoir 🚿
The beauty of this system is that you cannot overwater your plants from the reservoir. To check the water level, simply look at the overflow hole on the side of the bottom bucket. Alternatively, you can create a simple “dipstick” using a wooden dowel. Drop the dowel down the PVC watering tube; when you pull it out, the water mark will tell you exactly how much is left. During peak summer heat, a mature tomato plant might empty the reservoir every 3 to 4 days, whereas young plants might only need a refill every 10 to 14 days.
The Secret to Fertilizing SIPs 🌿
Never pour liquid fertilizer down the PVC watering tube into the reservoir. Doing so turns the dark, damp water chamber into a breeding ground for algae and anaerobic bacteria, which will sour the water and harm your plants. Instead, utilize the “fertilizer strip” method. Before planting your seedling, dig a shallow trench in the top two inches of the potting mix. Pour a strip of dry, granular organic fertilizer into the trench and cover it with soil. As the roots grow, they will seek out this nutrient strip, absorbing exactly what they need at their own pace.
Mulching the Top 🪵
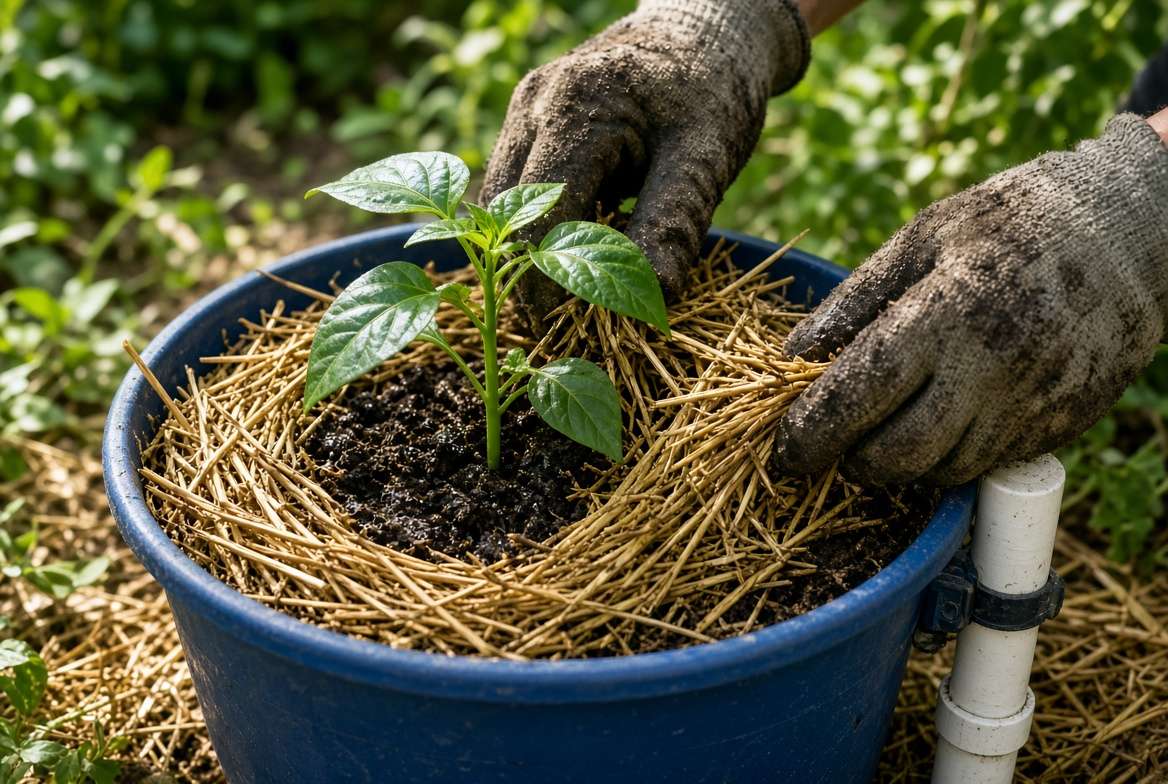
To maximize the efficiency of your planter, you want to eliminate surface evaporation completely. Cover the top of the soil with a layer of organic mulch (like straw or wood chips) or a tailored plastic cover (often called a mulch cover). A simple black plastic garbage bag cut to fit over the rim of the bucket with a slit for the plant works perfectly. This traps the moisture, reflects heat, and stops rain from washing out your fertilizer strip.
🛑 Common Mistakes & Troubleshooting
Even with the best DIY setups, nature can throw a curveball. Here is how an expert troubleshoots common container gardening issues.
-
Problem: Mosquitoes are breeding in the water tube. 🦟
-
Fix: Standing water is a magnet for mosquitoes. Cut a small square of leftover window screen, mesh, or even pantyhose, place it over the top of the PVC watering tube, and secure it with a rubber band. You can still water right through the mesh, but insects cannot get in.
-
-
Problem: The soil smells swampy, or the plant leaves are turning yellow and dropping. 🍂
-
Fix: Yellowing leaves are the classic sign of drowning roots. Check your overflow hole immediately—it is likely clogged with a bit of soil or a stray root. Clear it out with a skewer. If the hole is clear, your potting mix is likely too dense. Next season, ensure you mix in at least 30% perlite to guarantee proper drainage and aeration.
-
-
Problem: The soil on top is bone dry, and I am worried the plant is dying. 🏜️
-
Fix: Do not panic! This is exactly how the system is supposed to work. The magic happens below the surface. Before reaching for the watering can, dig your finger about two inches down into the soil. You will likely find perfectly moist, cool earth. Trust the system.
-
❓ Frequently Asked Questions (FAQs)
1. Can I use large plastic storage bins instead of 5-gallon buckets? Absolutely! The concept remains exactly the same. Using an 18-gallon or 30-gallon plastic storage tote allows you to grow multiple plants in one container (similar to the famous EarthBox design). You will just need a larger wicking container (like a plastic colander) and to ensure you drill plenty of aeration holes in whatever you use to separate the soil from the water reservoir.
2. How long can self-watering planters go without watering? This depends heavily on the size of the plant, the size of the reservoir, and the local climate. A newly planted seedling in a 5-gallon bucket might not need a reservoir refill for 2 to 3 weeks. However, a massive, 6-foot-tall tomato plant bearing fruit in 90-degree Fahrenheit weather will drink heavily, requiring a refill every 3 to 4 days.
3. Do self-watering planters cause root rot? No, as long as they are built correctly! Root rot is caused by a lack of oxygen in the root zone. Because your DIY self-watering planters for vegetables feature an overflow hole (preventing the soil from flooding) and utilize a light, perlite-heavy potting mix, the roots receive plenty of oxygen alongside their moisture.
4. Should I ever water from the top? Yes, but only once! When you first transplant your vegetable seedling into the planter, you should give it a generous top-watering. This settles the soil around the delicate roots, removes large air pockets, and most importantly, “primes the wick” by establishing the initial column of moisture needed for capillary action to begin. After that first day, all watering should be done exclusively via the PVC tube.
✨ Conclusion
Gardening should be a source of joy and relaxation, not a stressful daily chore that ties you to a watering can. By investing just an afternoon and a few dollars into building your own DIY self-watering planters for vegetables, you are setting yourself up for the easiest, most productive growing season of your life.
With consistent moisture delivered straight to the root zone, your tomatoes will grow plumper, your peppers will grow sweeter, and your daily watering routine will be a thing of the past. Gather your buckets, mix up a high-quality potting mix, and watch your urban garden explode with growth!
What is the first vegetable you are going to plant in your new self-watering system? Drop a comment below or share a photo of your DIY build! And if you are looking to maximize your container garden even further, be sure to check out our ultimate guide on The Best High-Yield Tomato Varieties for Container Gardening. Happy growing! 🌱











