
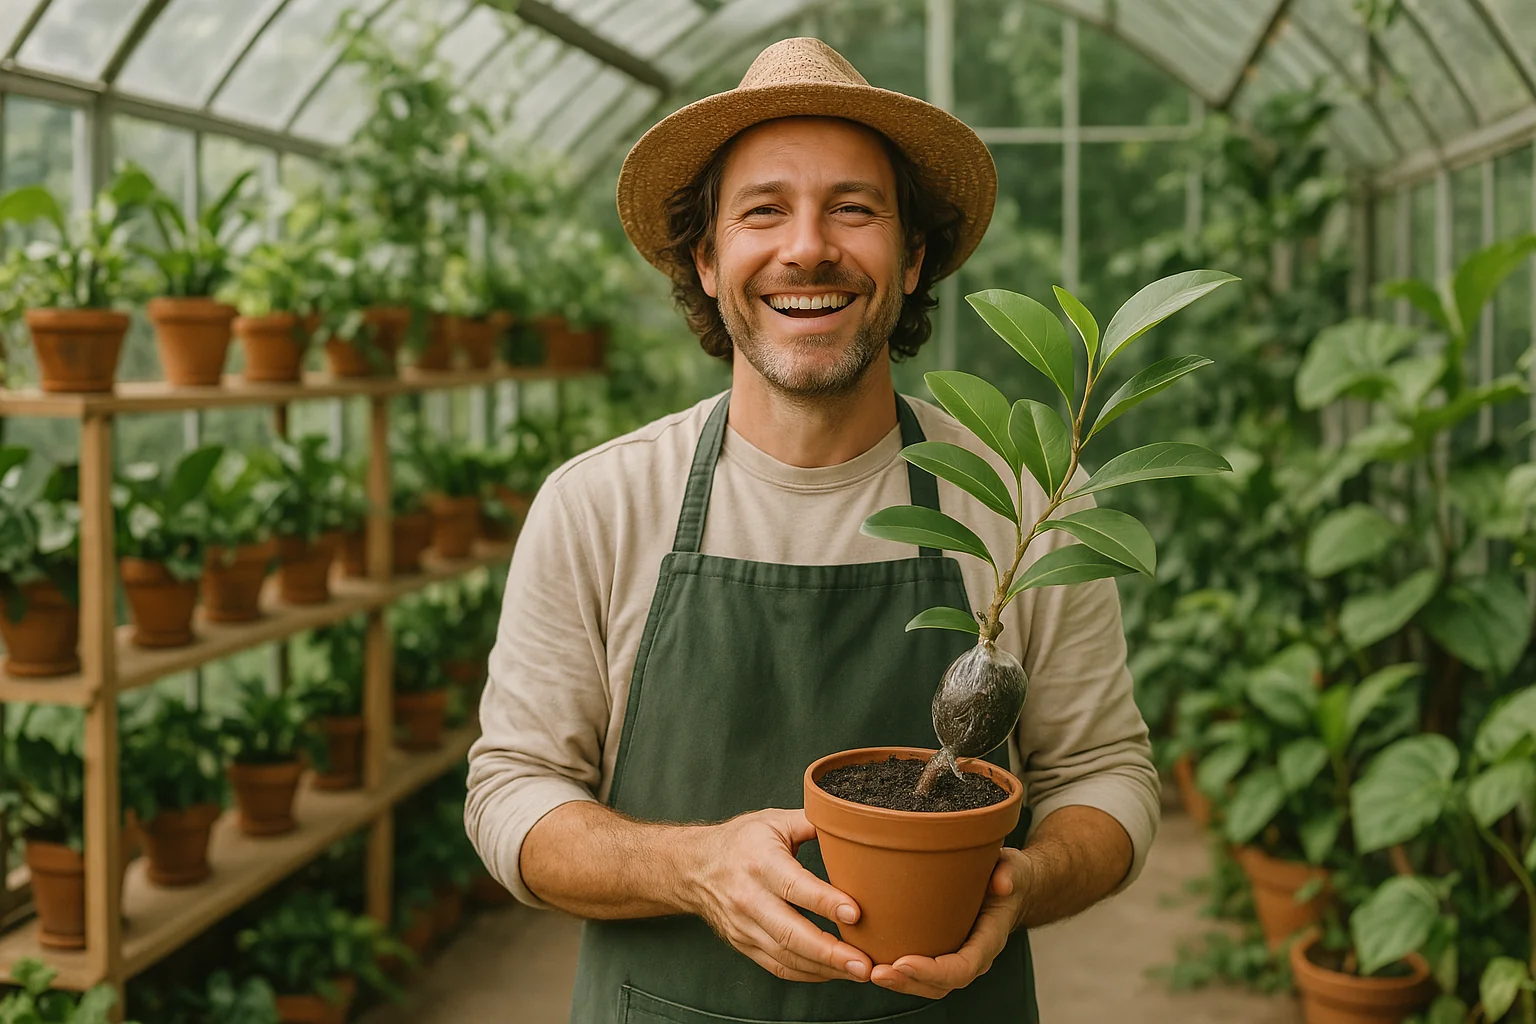
Have you ever wished you could create new plants from your favorite tree or shrub—without digging it up or relying on tricky cuttings? That’s where air layering techniques for woody stems come in. This simple yet powerful method lets you grow new roots right on a living branch, making propagation easier and more reliable, especially for plants with tougher stems. In this step-by-step guide, you’ll learn exactly how to master air layering, what materials you need, and how to care for your plant as it transitions from branch to pot—stronger, healthier, and ready to thrive.
What Is Air Layering? 🌿✨
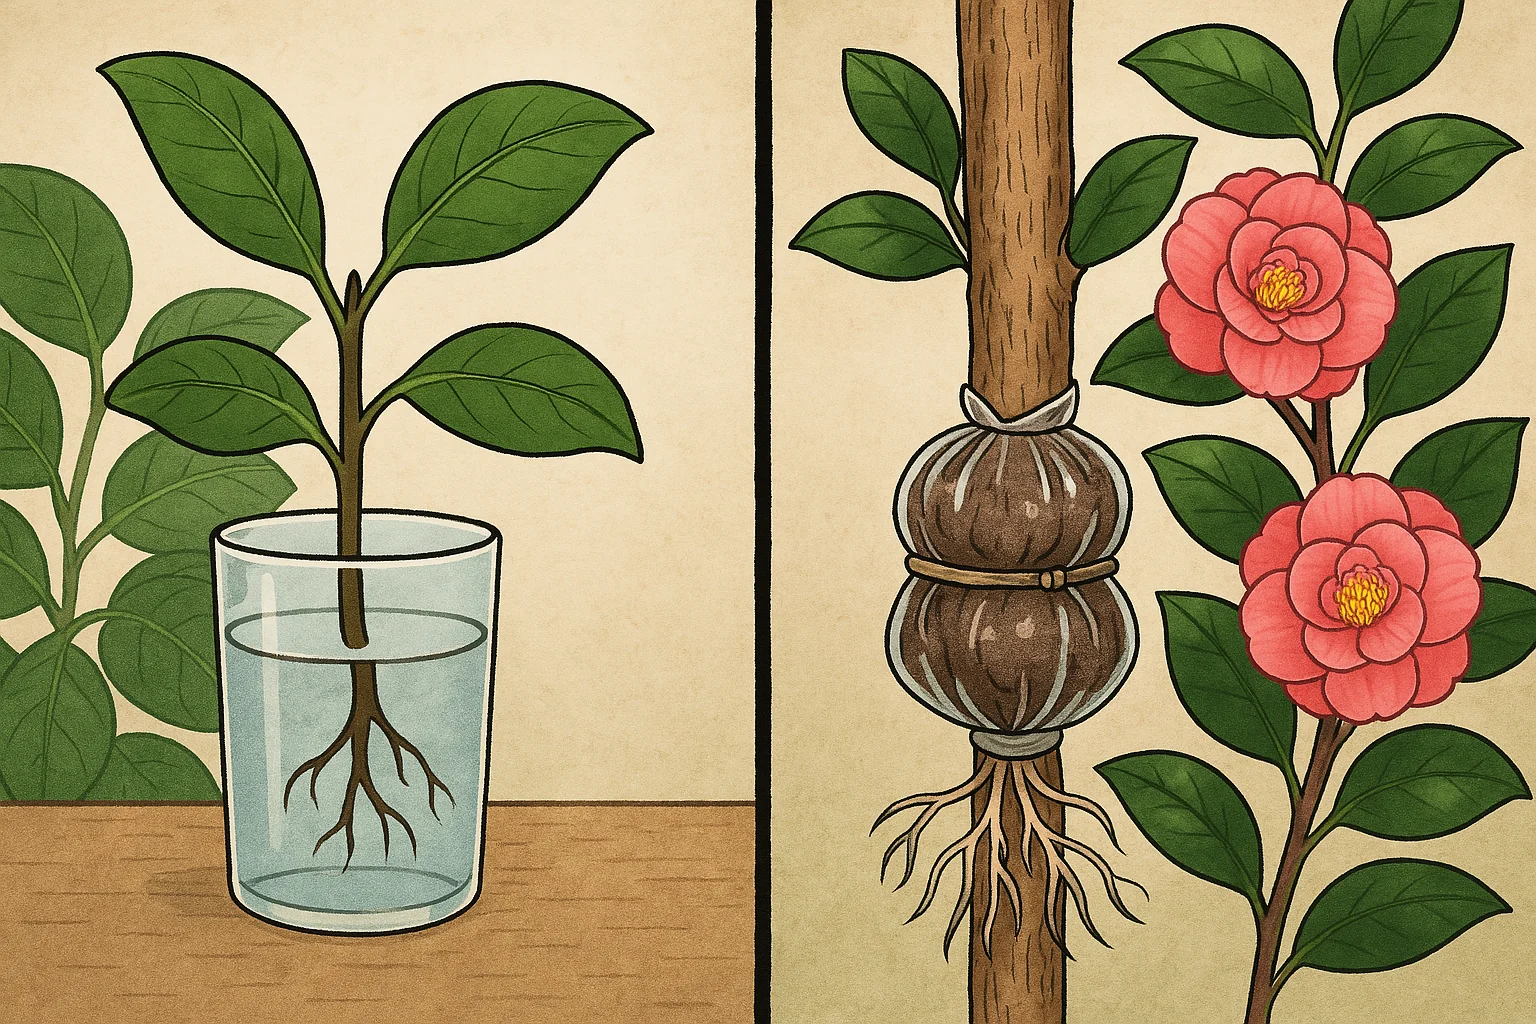
Air layering is a plant propagation technique that encourages a stem to grow roots while it’s still attached to the parent plant. 🌱 Instead of cutting a branch and hoping it roots in water or soil, air layering gives it a head start by developing roots in place.
This method is especially helpful for woody-stemmed plants, which can be harder to root from simple cuttings. 🌳 By wrapping a moist material like sphagnum moss around a small wounded section of the stem, you create a humid environment that stimulates root growth.
What makes air layering so special? 💡
- ✅ Higher success rate than regular cuttings
- ✅ Less shock to the plant since it stays attached
- ✅ Perfect for larger or older plants you want to clone
In short, air layering is like rooting your plant in the air—no digging, no drama, just healthy new growth! 🌸✂️🪴
Why Choose Air Layering for Woody Stems? 🌲💚
Woody stems are strong and beautiful—but tough to propagate with cuttings alone. That’s where air layering techniques for woody stems shine! 🌟
Unlike soft green stems, woody branches take longer to root and often fail in water or soil. Air layering gives them the moist, protected environment they need to grow roots safely while still attached to the mother plant. 🌿✨
🌱 Perfect for These Plants:
- Rubber Plant (Ficus elastica)
- Rose bushes 🌹
- Camellias
- Magnolia trees 🌸
- Croton, Schefflera, and even some fruit trees 🍊
💡 Why It Works So Well:
- ✅ Roots grow faster and stronger
- ✅ Plant keeps getting nutrients while rooting
- ✅ Great for reviving leggy or overgrown woody plants
- ✅ Less risk of losing a valuable or rare plant
Air layering is a gentle, effective way to multiply your favorite woody plants—no stress, just success! 🪴💕
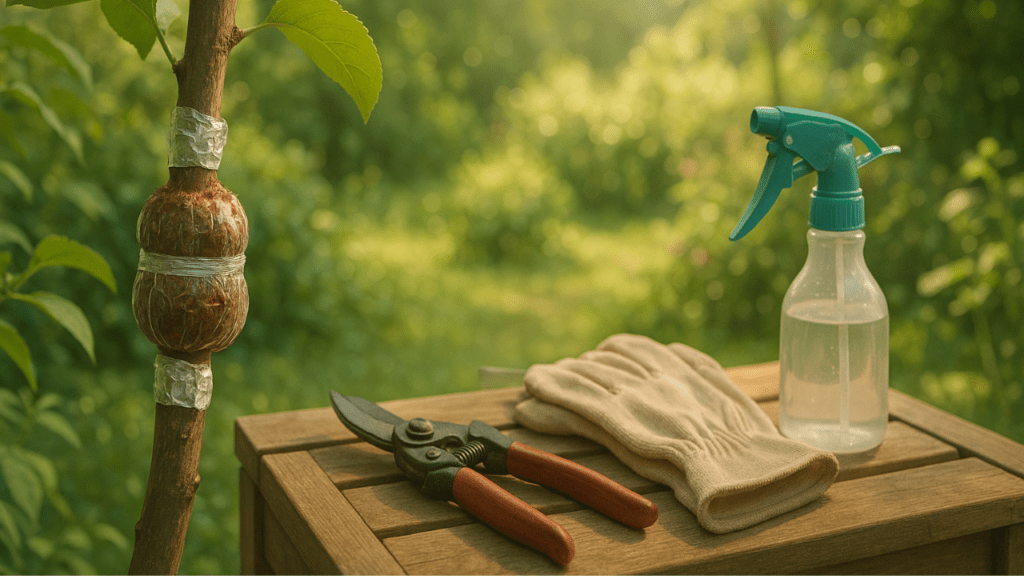
Tools and Materials Needed 🧰🌿
To successfully try air layering techniques for woody stems, you’ll need the right tools and materials to create a moist, protected space for roots to form. Preparing everything ahead of time makes the process smooth and increases your chances of success. Here’s a detailed look at what you’ll need:
✂️ Sharp Knife or Pruning Shears
You’ll need a clean, sharp blade to carefully remove the bark from the selected stem. A dull tool can damage the plant and cause uneven wounds, which might slow down root development. Always sanitize your blade before and after use to prevent disease.
🌱 Rooting Hormone (Optional, but Helpful)
Although not required, applying rooting hormone to the exposed area can speed up root development—especially in woody plants that are slow to root. It encourages faster and stronger root growth. Choose a gel or powder form and apply it lightly.
🧽 Sphagnum Moss or Coco Coir
This is the heart of the process! Moss or coco coir retains moisture and creates a humid environment around the wound, encouraging roots to grow. Soak it in water for 30–60 minutes before use. It should be moist but not dripping.
🛍️ Plastic Wrap or Clear Plastic Bag
Once the moss is wrapped around the cut, you’ll need to cover it with plastic to lock in the moisture. A clear wrap allows you to monitor root growth, but any flexible plastic that holds well will do.
🧵 Twist Ties, String, or Zip Ties
Use these to tightly secure the top and bottom ends of the plastic wrap. This prevents moisture from escaping and keeps the moss firmly in place. Make sure they’re snug but not too tight to avoid damaging the stem.
🌙 Aluminum Foil or Dark Covering
Roots don’t like light! Wrapping a layer of foil around the plastic wrap keeps light out and protects the developing roots. It also helps prevent algae growth inside the wrap.
💧 Water Spray Bottle
Having a misting bottle nearby helps you keep the moss moist during the rooting period. Check every week or so—if it’s drying out, give it a gentle spritz.
🧤 Gloves and Disinfectant
Wear gloves for safety, especially when using a knife or handling rooting hormone. Disinfect your tools with rubbing alcohol or diluted bleach to prevent bacteria or fungal infections on the plant.
💡 Bonus Tip:
Label your layered branches if you’re propagating more than one! It helps you track progress and remember when you started each one. 🏷️✨
With these tools and materials ready, you’re all set to try air layering the smart, easy way. Let’s move on to the exciting part—getting your hands dirty (just a little!) and starting the process. 🌱🪴
Step-by-Step Guide to Air Layering 🌿✂️
Now that you’ve gathered your tools and materials, it’s time to start the air layering process! Follow these steps carefully, and you’ll be on your way to growing new plants from your favorite woody stems. 🌱 These Air Layering Techniques for Woody Stems can help ensure a higher success rate and healthier root development.
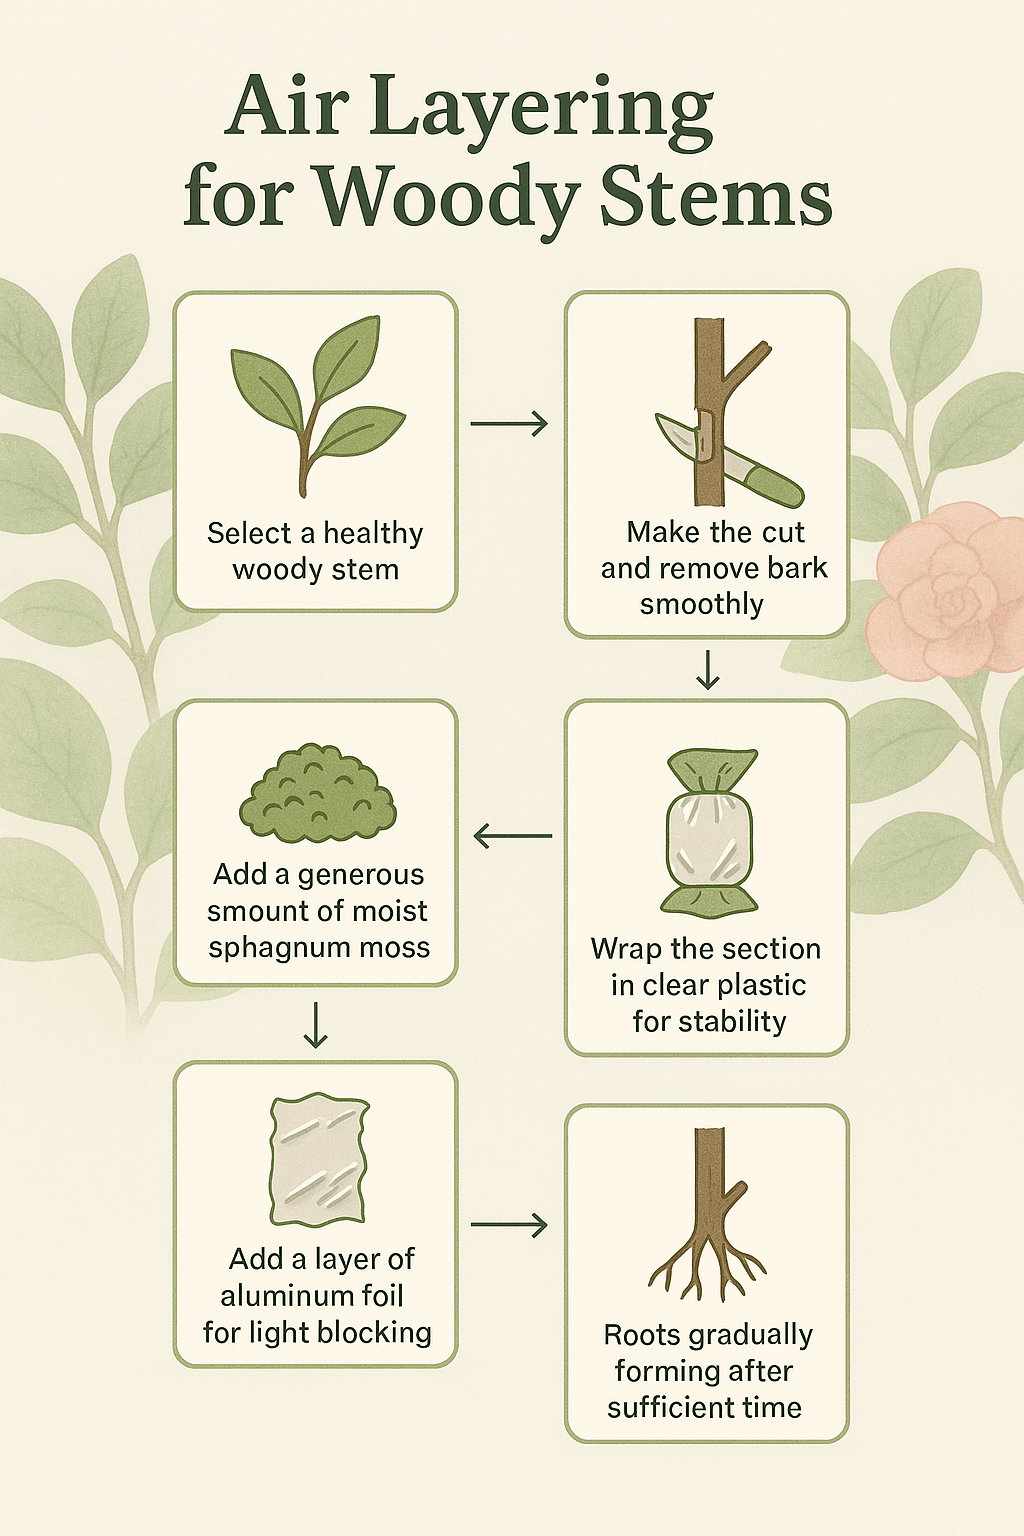
Choose the Right Stem 🌳
Select a healthy, mature stem that’s about the thickness of a pencil. Avoid stems that are too young (they won’t root well) or too old (they may be too tough). Look for a branch with plenty of healthy leaves and no signs of disease. It’s best to choose a section that’s about 12–18 inches from the tip.
Tip: The stem should be flexible enough to bend but strong enough to support the air layering process.
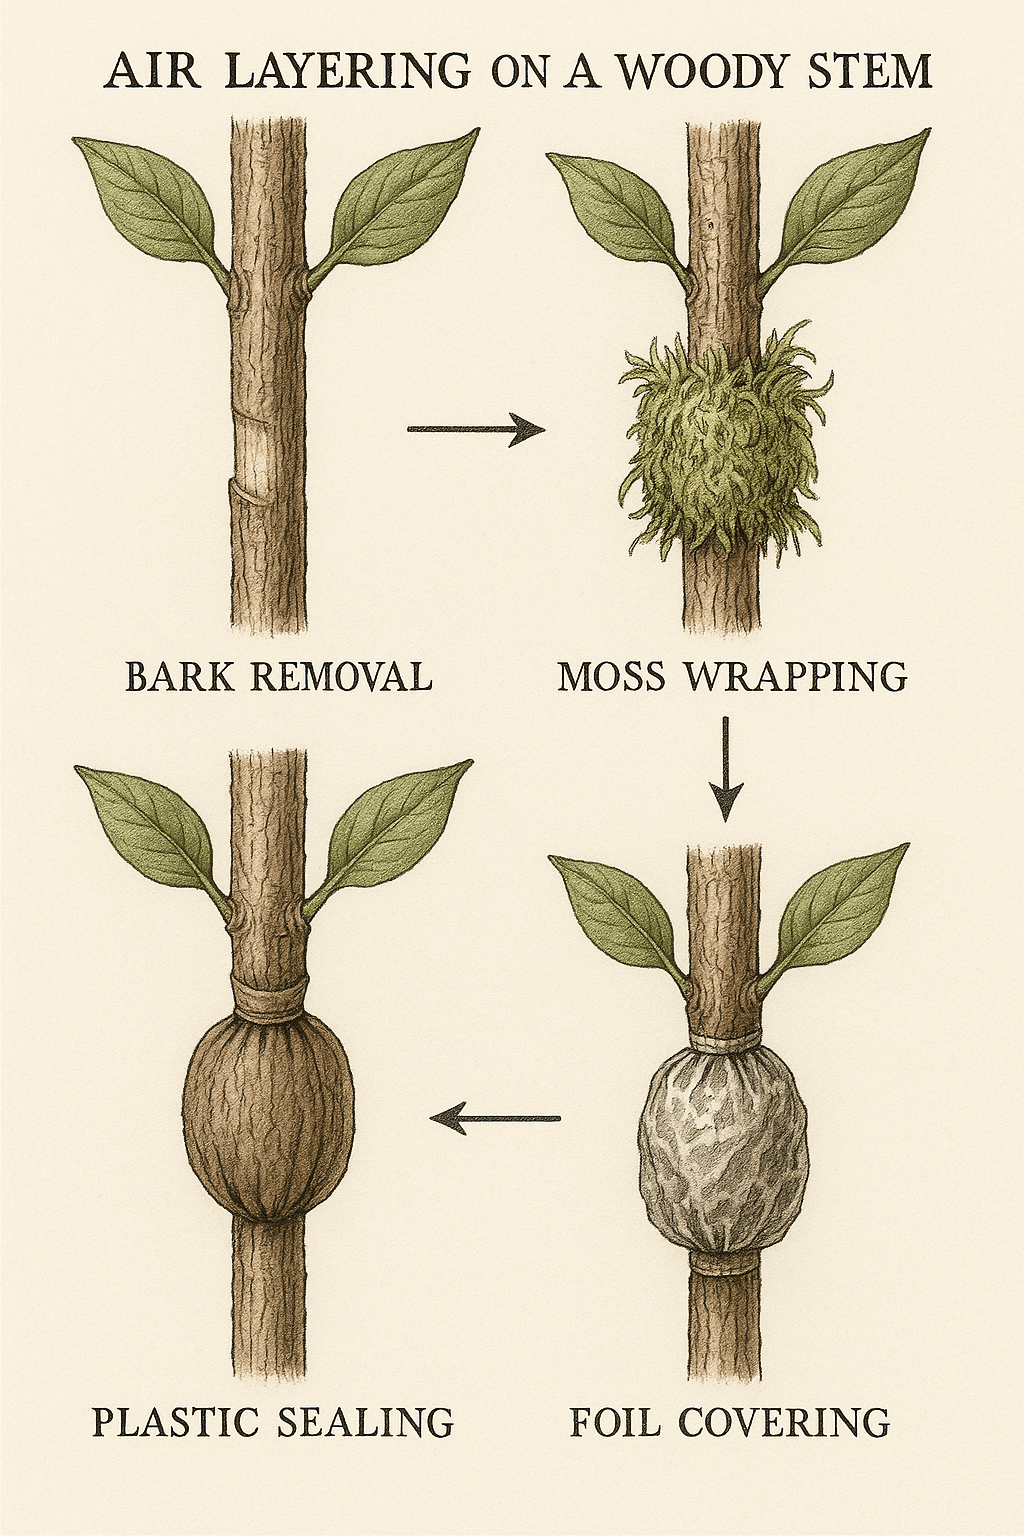
Make a Clean Cut or Remove the Bark ✂️
Using your sharp knife or pruning shears, carefully make a shallow, horizontal cut about 1/3 of the way through the stem. The cut should be right around where you want the roots to form.
Next, remove a ring of bark around the stem (about 1–2 inches wide). This step is crucial—by stripping away the bark, you interrupt the plant’s nutrient flow and encourage it to produce roots at the cut site. Make sure the phloem (the tissue beneath the bark) is exposed, as this is where roots will grow.
Tip: Be gentle to avoid damaging the cambium layer beneath the bark, which is essential for the plant’s overall health.
Apply Rooting Hormone (Optional) 🌱
While this step isn’t mandatory, applying a small amount of rooting hormone to the exposed area can help encourage faster and more robust root growth. Use a cotton swab or your finger to lightly apply the hormone to the wound.
Tip: If you’re propagating a woody plant that’s particularly slow to root, this can be a game-changer!
Wrap with Moist Sphagnum Moss 🧽
Soak your sphagnum moss (or coco coir) in water for 30–60 minutes to ensure it’s damp but not soaking. Squeeze out any excess water and then wrap it around the cut area, making sure the entire exposed section is covered.
The moss will retain moisture, providing the perfect environment for the roots to form. Be sure to pack it tightly but gently around the stem, ensuring full contact with the bark.
Tip: Add a bit more moss if you see any gaps, as the plant needs to stay moist for root development.
Secure with Plastic Wrap or a Clear Plastic Bag 🛍️
Now, cover the moss with clear plastic wrap, making sure the ends are sealed tightly with twist ties or string. This keeps moisture in and creates a mini-greenhouse effect. You should be able to see the moss and monitor root growth, thanks to the transparency.
If you prefer, you can use a small clear plastic bag instead. Simply tie it around the moss, making sure it’s snug but not too tight.
Tip: Ensure the plastic wrap isn’t too tight—your stem still needs room to breathe!
Protect from Light with Aluminum Foil 🌙
Wrap the plastic-covered moss with aluminum foil or some other dark covering to block out light. This will help prevent the growth of algae and ensure that the roots develop in a healthy, shaded environment.
Tip: Aluminum foil is great because it’s lightweight, easy to work with, and helps regulate moisture levels inside the wrap.
Wait and Monitor 🌿⏳
Now comes the hardest part—waiting! 🕰️ It usually takes anywhere from 3 to 8 weeks for roots to form, depending on the plant and the time of year. Check on the moss every 7–10 days to ensure it’s staying moist. If it looks dry, use a water spray bottle to lightly mist it.
Tip: Be patient! Some plants take longer than others to root, and the process may be slower during cooler months.
Detach and Plant the New Cutting 🌱🪴
Once you see a healthy root ball forming, it’s time to detach the new plant from the parent stem. Gently cut the stem just below the root zone and plant it in a pot with fresh soil. Water it well, and place it in a spot with bright, indirect light while it acclimates.
Tip: Let the new plant rest for a few weeks before exposing it to direct sunlight or repotting into a larger container.
And that’s it! You’ve successfully propagated your woody-stemmed plant through air layering. With a little patience, you’ll have a new plant ready to thrive and grow. 🌿🌞
When and How to Detach and Plant 🌱🪴
After weeks of waiting and monitoring, you might be wondering, “When is the right time to cut my new plant free?” Don’t worry—this section will guide you through the process, ensuring that your new plant is healthy and ready to thrive in its own pot.
Check for Healthy Root Development 🌿
Before cutting the stem from the parent plant, make sure a strong root system has developed. Gently press the moss and plastic wrap to check for firm, white roots. If you see roots growing well (about 1–2 inches long), it’s time to detach!
Tip: If the roots are still small or not visible yet, give it a little more time. Patience is key to success!
The Right Time for Detaching ⏰
The ideal time to remove your new plant is when the roots are strong but before they become too crowded in the moss. Typically, this happens between 3 and 8 weeks after starting the air layering process. Try to do this during early morning hours when your plant is least stressed.
Tip: If you wait too long, the roots might get tangled or dried out, which could harm the plant’s transition to soil.
- Cut Carefully to Remove the New Plant ✂️
Once you’ve confirmed the roots are ready, it’s time to make the cut. Use clean, sharp pruning shears or a knife to cut the stem below the root ball. Be careful not to damage the roots while cutting.
Tip: If the roots are dense, you can trim a few of them slightly to make the plant fit more comfortably in its new pot.
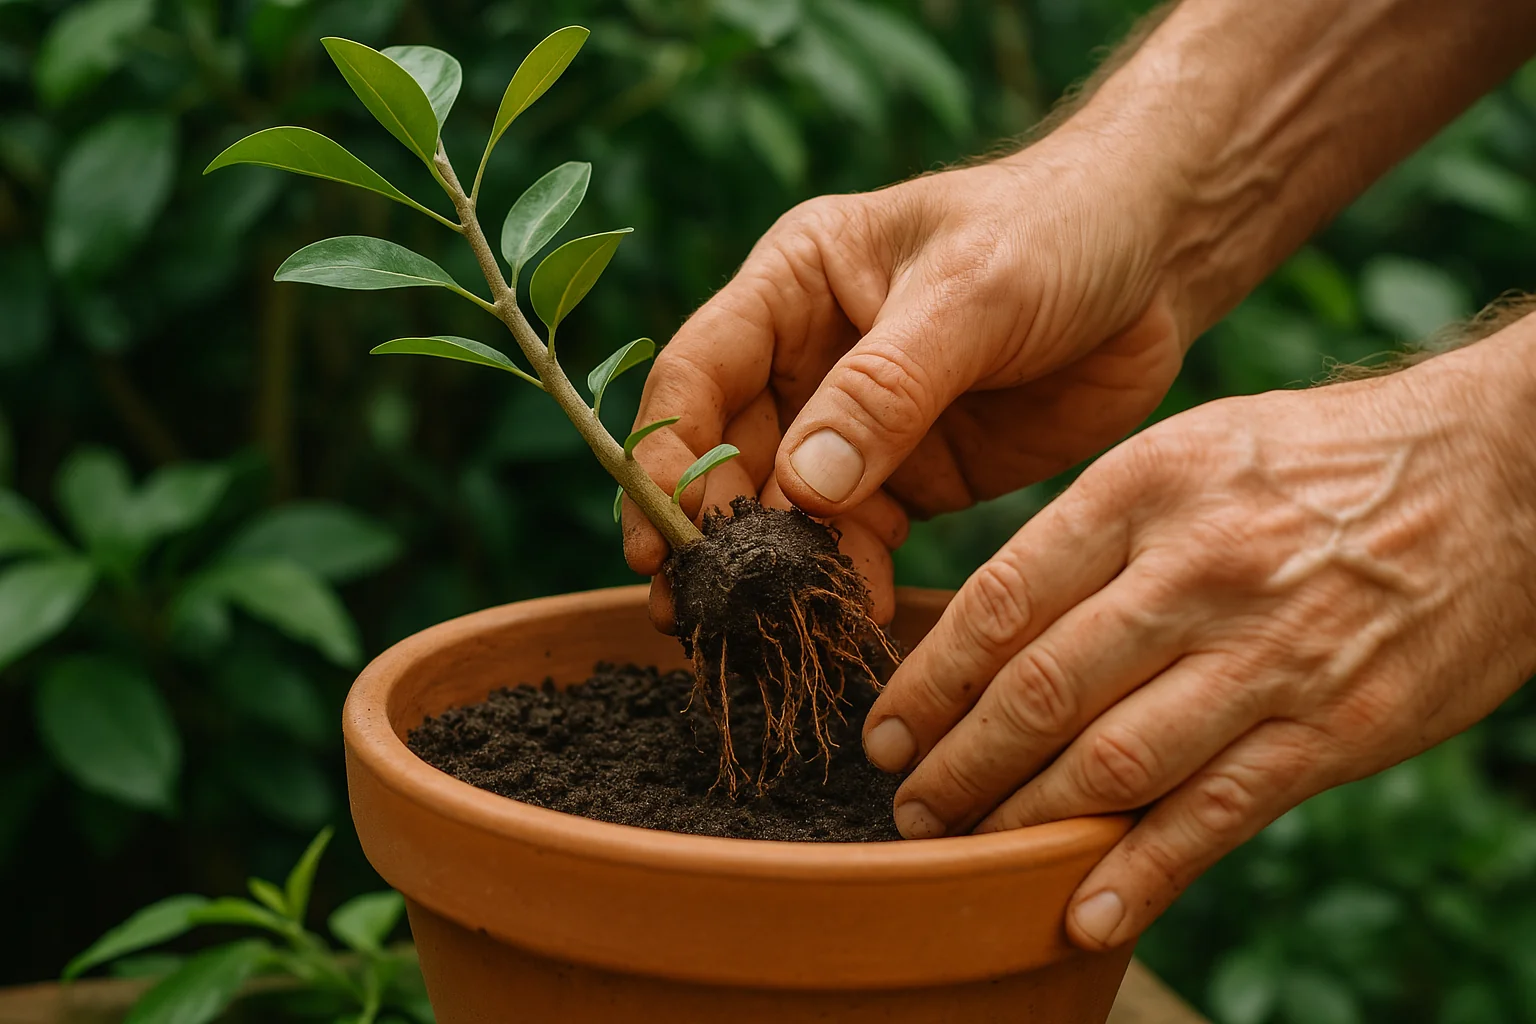
Potting the New Plant 🪴
After detaching the rooted stem, it’s time to pot it up. Select a pot that’s slightly larger than the root ball, and fill it with fresh, well-draining potting soil. Gently place the plant into the pot, making sure the roots are spread out evenly.
Tip: If your plant was layered with sphagnum moss, you can leave some of it around the roots to help them transition to the new soil environment. Just make sure the moss isn’t too soggy.
Water and Acclimate 🌞💧
Water the new plant thoroughly after potting, and then place it in a spot with bright, indirect light. Keep the plant in a shaded location for a week or two to allow it to acclimate to its new home without the stress of direct sunlight.
Tip: Don’t overwater—let the soil dry out slightly between waterings. This encourages the roots to settle into their new pot.
Aftercare for the New Plant 🌿🌱
Once your new plant has acclimated, it’s time to care for it as you would any other healthy plant! Keep an eye on its growth, water it regularly, and provide it with proper light. Over the next few months, you’ll see it grow stronger and more vibrant.
Tip: If you’re air layering a woody plant that needs pruning, feel free to trim any dead or leggy growth to encourage fuller growth.
And that’s how you transition your air-layered plant into its own pot and environment! By following these steps, your new plant will have a strong foundation to grow into a healthy, thriving addition to your collection. 🌱💚
Common Problems and Troubleshooting 🛠️🌿
While air layering is a relatively straightforward method, sometimes things don’t go as planned. Don’t worry—problems can be easily addressed! When practicing Air Layering Techniques for Woody Stems, here are a few common issues you might face during the process, along with expert tips on how to fix them.
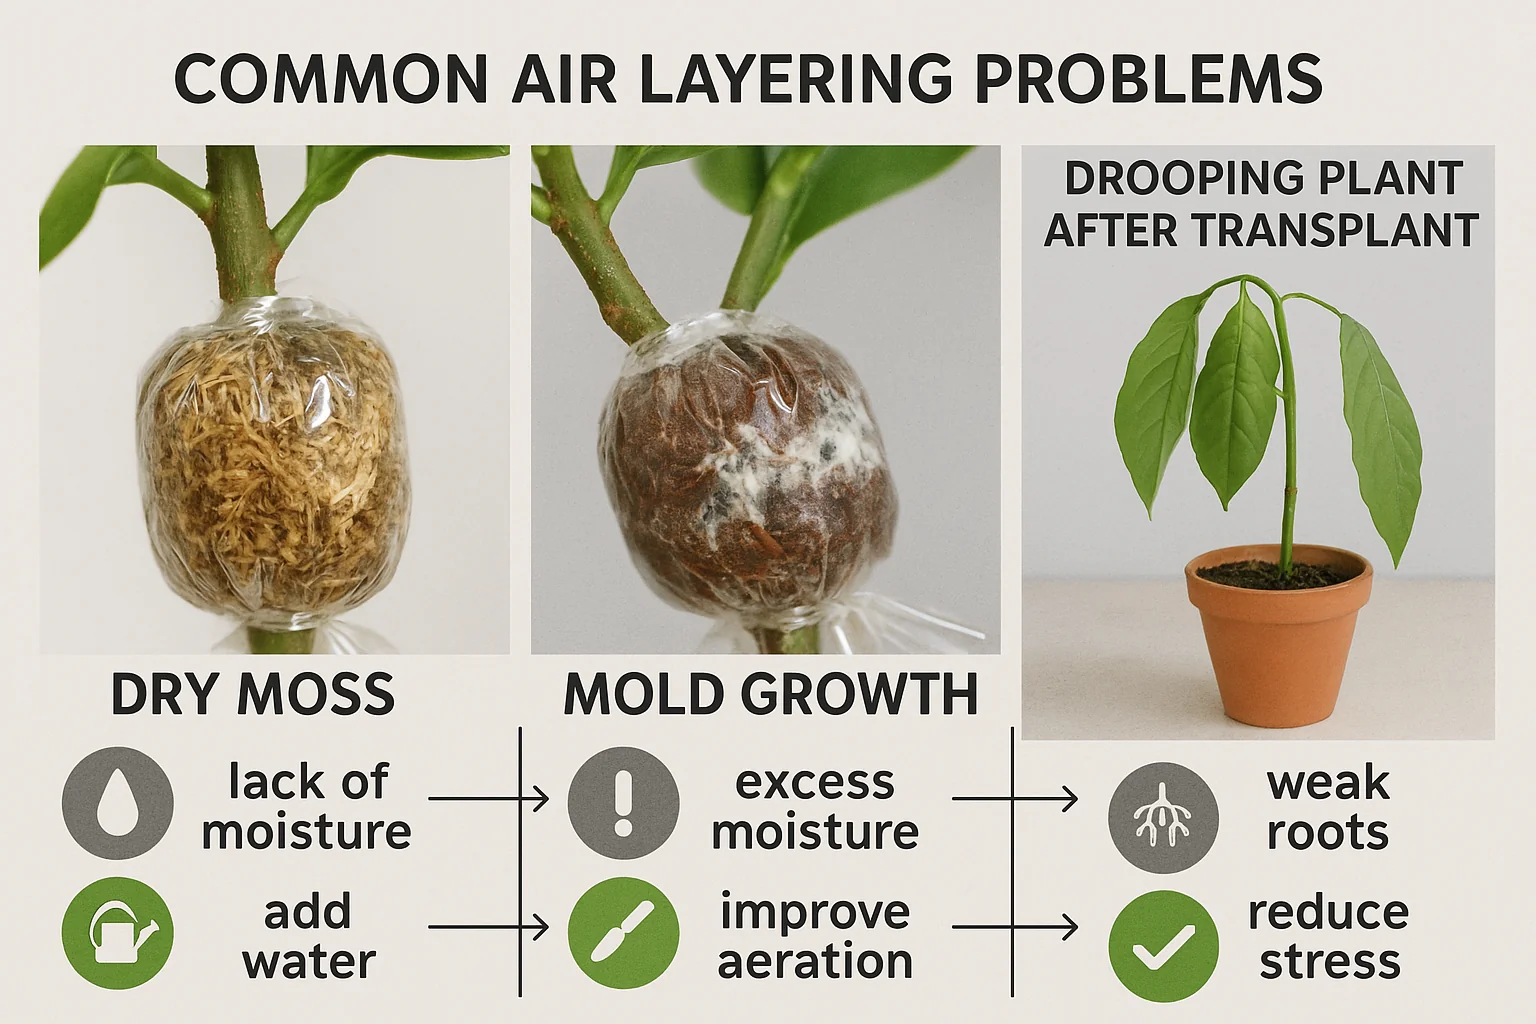
No Root Growth After Weeks ⏳
It’s frustrating when you check the moss and see no roots forming after weeks of waiting. But don’t panic—there are a few reasons this might happen.
Possible Causes:
- Temperature is too low: Air layering works best in warm conditions (65–75°F or 18–24°C). If it’s too cold, the roots won’t develop properly.
- Moss isn’t moist enough: If the moss dries out, the plant can’t develop roots. Always check moisture levels regularly.
Solution: Move the plant to a warmer spot with indirect sunlight. Make sure the moss stays damp and not soggy. Consider adding a small humidifier to the area if it’s particularly dry.
Mold or Fungal Growth 🦠
Mold or fungus can sometimes develop on the moss if it’s too moist or not getting enough air circulation. This can damage the plant and prevent root growth.
Possible Causes:
- Too much moisture: While the moss needs to stay moist, it shouldn’t be soaking wet.
- Lack of ventilation: The plastic wrap or bag might be too tightly sealed, restricting airflow.
Solution: Gently remove the plastic and allow the moss to dry out a bit. If mold is visible, carefully remove the affected areas and treat the plant with a natural antifungal solution, like diluted neem oil. Be sure to loosen the plastic wrap to allow better airflow.
The Plant Isn’t Getting Enough Light 🌞
Light is important for stimulating root growth and overall plant health. If your air-layered plant is too shaded, it might struggle to develop roots.
Possible Causes:
- Insufficient light: The plant may not be getting enough indirect sunlight to trigger rooting.
Solution: While the plastic wrap helps protect the plant, make sure it’s still receiving enough light. Place it in a bright, indirect light spot and monitor it regularly. You can also use a grow light if necessary.
Damaged Roots When Detaching 🪴
It’s a letdown if your new plant has weak or damaged roots when you try to detach it. This often happens when the roots are overhandled or the plastic wrap is removed too roughly.
Possible Causes:
- Rough handling: If you tug too hard on the plastic or moss, you might damage the roots.
- Too much waiting: If you leave the plant for too long, the roots can become tangled or dried out.
Solution: Be gentle when handling your air-layered plant. If the roots appear weak, trim any damaged ones carefully and plant the new cutting in soil, ensuring it’s well-watered and placed in a safe, low-light area to recover.
The Plant Looks Droopy or Stressed 🌱
After potting your new plant, it might look a little stressed or droopy. This is completely normal as it adjusts to its new environment.
Possible Causes:
- Transplant shock: Moving a plant to a new pot can cause stress, especially if the roots were disturbed during detaching.
- Watering issues: Overwatering or underwatering can lead to drooping leaves.
Solution: Place the plant in a shaded, calm area to help it recover. Water it lightly but don’t overdo it, as soggy soil can cause root rot. Monitor its condition closely over the next few weeks.
No Visible Roots After Using Rooting Hormone 🌱
Sometimes, despite using rooting hormone, you may not see roots developing. This can happen due to a few factors.
Possible Causes:
- Incorrect hormone application: Applying too much or too little rooting hormone can affect root growth.
- Inconsistent moisture: If the moss dries out even a little, it can halt root development.
Solution: Ensure consistent moisture levels and recheck the hormone application. If necessary, try a different rooting hormone or skip it altogether and just focus on keeping the moss moist and the plant in a warm environment.
General Troubleshooting Tips 🧑🔬
- Keep it Clean: Always sterilize your tools before using them to prevent plant infections.
- Monitor Temperature and Humidity: Consistent warmth (65–75°F or 18–24°C) and humidity are key for success.
- Be Patient: Air layering can take time—don’t rush the process. Some plants take longer to root than others.
With these troubleshooting tips in your arsenal, you’ll be ready to handle any bumps along the way. Remember, air layering is a natural process, and with a little patience and care, your new plant will thrive! 🌿💚
Tips for Success and Best Plants for Air Layering 🌟🌿
Now that you’ve learned how to successfully air-layer woody stems, it’s time to refine your technique and ensure the best results. Mastering Air Layering Techniques for Woody Stems not only increases your success rate but also builds confidence as you work with different plant types. Plus, we’ll take a look at some of the best plants for air layering so you can start practicing on species that are particularly suited for this method.
Tips for Success 🌱💡
- Choose the Right Time of Year
Air layering is best done during the growing season, typically in spring or early summer. This is when the plant is actively producing new growth, which means it’s more likely to develop roots successfully. 🌷 - Be Gentle with Your Plant
The process can be stressful for the plant, so handle it with care! Always use sharp, clean tools, and avoid over-tightening the plastic wrap. Too much pressure can damage the stem and hinder root development. - Keep an Eye on Moisture Levels
The key to success in air layering is maintaining the right moisture levels in the moss. Check it regularly and mist it if it feels dry. However, avoid soaking it too much, as this can lead to mold or root rot. 💧 - Use a Humidity Dome
If you live in a dry climate, consider using a humidity dome or a small greenhouse setup to create an ideal environment for root growth. This helps maintain the right moisture and temperature levels. 🌬️ - Patience is Key
Some plants may take longer to develop roots than others, so be patient. Avoid rushing the process or removing the plastic too early. Trust the process, and you’ll be rewarded with new plants! ⏳
Best Plants for Air Layering 🌿✨
While most woody-stemmed plants can be propagated using air layering, some species are especially well-suited for the method. Here are a few of the best plants to try air layering with:
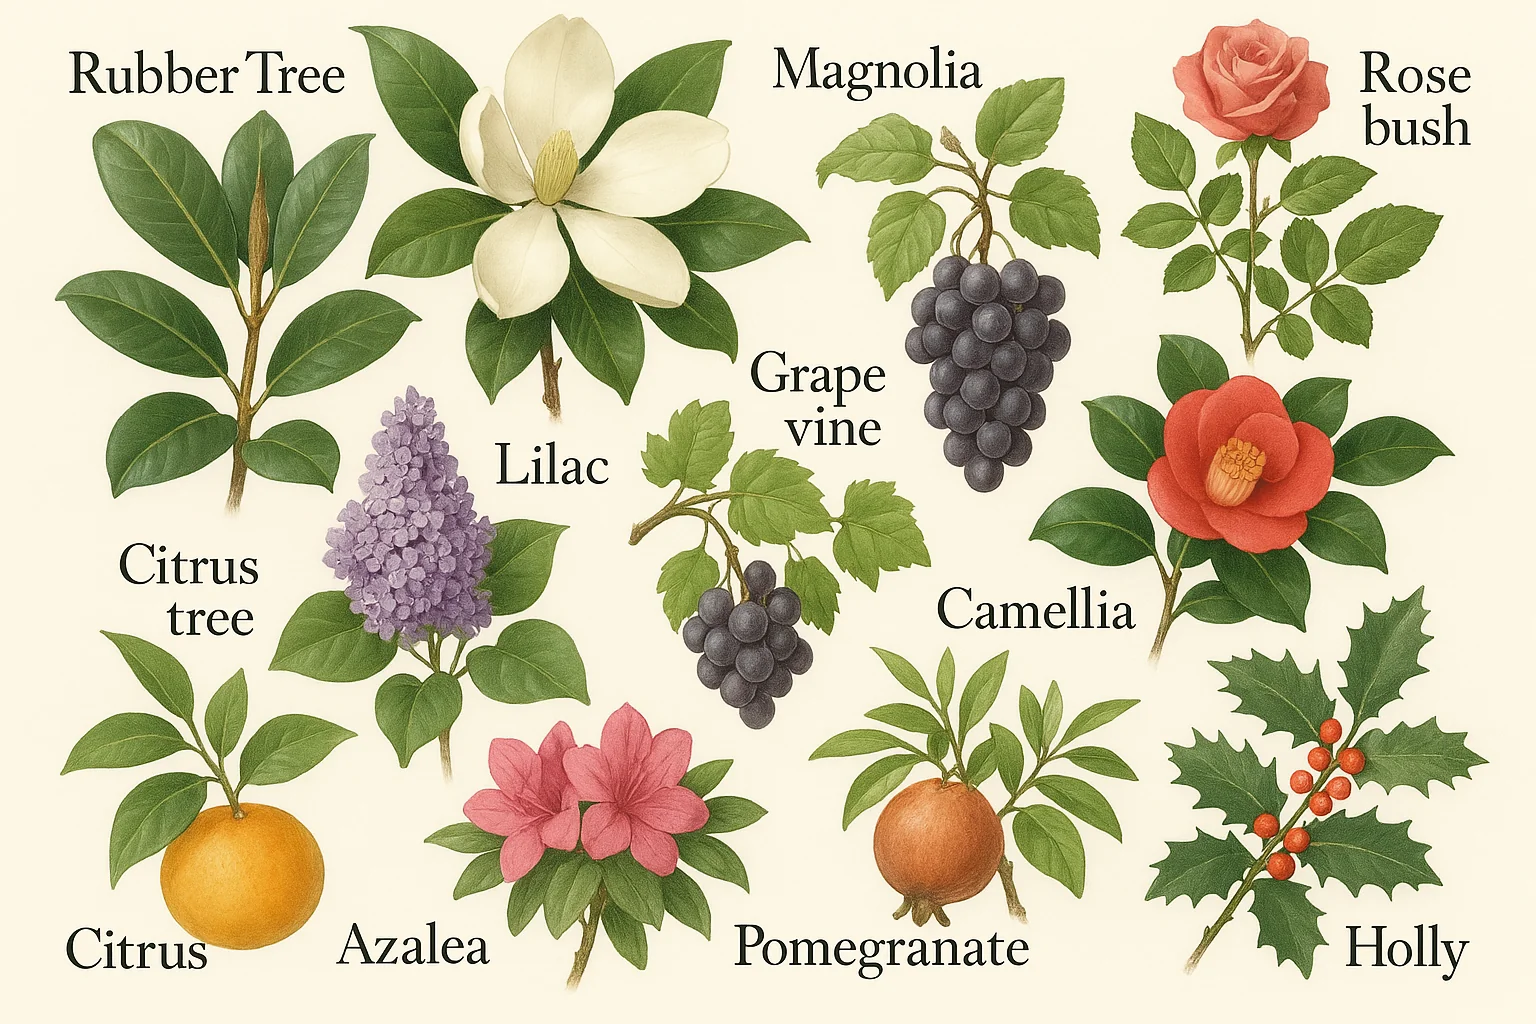
- Ficus (Fiddle Leaf Fig, Rubber Tree)
Ficus species are fantastic for air layering because they have thick stems and strong growth. With a little care, you’ll have a new plant in no time! 🌳 - Magnolia Trees
Magnolia trees are perfect candidates for air layering due to their large, woody stems. This method works well for both ornamental and fruiting varieties. 🌸 - Camellia
Camellias are commonly propagated through air layering because they respond well to the method, especially when done in early spring. 🌺 - Azalea
Azaleas thrive with air layering, particularly if you want to propagate new plants from mature, established shrubs. 🌸 - Citrus Trees (Lemon, Orange, Lime)
Air layering works wonders for citrus trees, helping you produce new plants with strong root systems. 🍊🍋 - Lilac
Lilacs have dense, woody stems, making them perfect for air layering. They often form roots quickly and are great for gardeners looking to propagate their shrubs. 🌷 - Grape Vines
Grape vines benefit from air layering, especially if you’re looking to expand your vineyard or propagate a particular variety. 🍇 - Rose Bushes
Air layering can be an effective way to propagate rose bushes, especially those with thicker stems, like climbers or shrub varieties. 🌹 - Pomegranate Trees
Pomegranate trees respond well to air layering, allowing you to grow more of these beautiful, fruit-bearing plants. 🍎 - Holly
Hollies, with their dense foliage and woody stems, also do well with air layering, especially during the growing season. 🌿
By following the tips above and selecting the right plants, you’ll maximize your success with air layering. Whether you’re propagating for personal enjoyment or expanding your garden, this technique is a rewarding and effective way to create new plants. 🌱💚
Final Thought
With that, you’re all set to master air layering techniques for woody stems! We hope these insights help you grow more plants and enjoy the beauty of propagation. 🌿🌞
Air layering techniques for woody stems offer a fantastic and rewarding way to propagate your favorite plants. By following the steps outlined in this guide, you now have the knowledge to successfully create new plants from established ones, ensuring they grow healthy and strong. 🌟
Whether you’re a seasoned gardener or a beginner, air layering provides a simple yet effective method to expand your garden, conserve valuable plant varieties, or even share the joy of growing with others. Remember, patience and attention to detail are key. With the right timing, tools, and care, you’ll soon enjoy new plants flourishing in your garden or home.
So go ahead—experiment with air layering and watch your plant collection grow, one successful propagation at a time! 🌿💚