
Imagine transforming a single ordinary fruit tree in your backyard into a vibrant “fruit salad” tree that produces multiple delicious varieties — apples, pears, or even plums — all from one sturdy trunk. Or picture saving a cherished heirloom variety by giving it stronger, disease-resistant roots that thrive in your local soil and climate. This isn’t gardening magic; it’s the rewarding art and science of tree grafting, and it’s surprisingly accessible for beginners. 🌳🍎
In this beginner’s guide to tree grafting, you’ll discover exactly how to join a desired scion (the top variety you love) with a compatible rootstock (the strong foundation) so they grow together as one healthy, productive tree. Whether you’re a home gardener with limited space, someone passionate about preserving rare fruit trees, or simply eager to multiply your favorite plants affordably, this comprehensive step-by-step tutorial will walk you through everything you need for successful grafting at home.
With clear instructions, practical tips, troubleshooting advice, and insights drawn from years of hands-on experience plus reliable university extension resources, you’ll gain the confidence to start grafting this season. Let’s dive in and turn your tree care dreams into reality! 🌿
What Is Tree Grafting and Why Does It Work? 🧬
Tree grafting is a form of asexual plant propagation that unites two living plant parts — the scion (a cutting from the desired fruiting variety) and the rootstock (the rooted base that provides the root system and sometimes controls tree size or disease resistance) — so they heal and grow as a single plant.
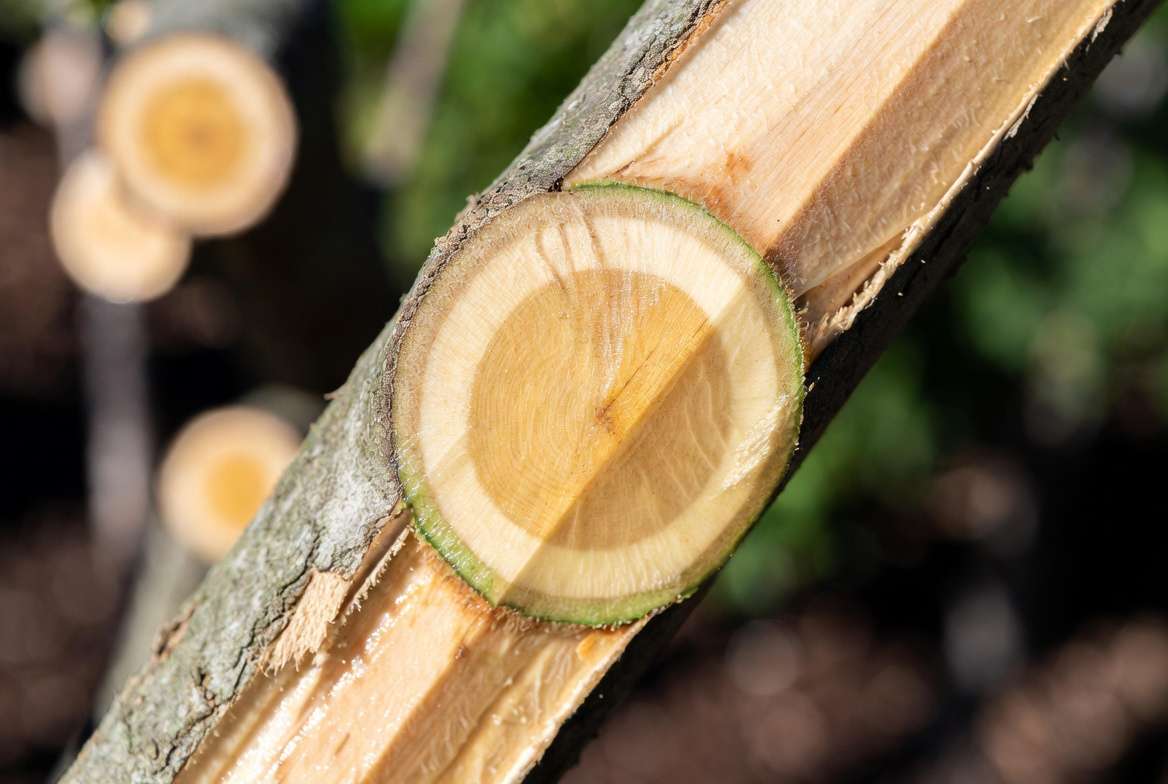
The secret lies in the cambium layer, a thin band of actively dividing cells just beneath the bark. When the cambium layers of both scion and rootstock align properly and stay moist, they form a strong vascular connection, allowing water, nutrients, and sugars to flow freely. Over time, the graft union calluses over and becomes seamless.
Unlike growing trees from seed (which rarely produces true-to-type fruit due to cross-pollination) or taking cuttings (which can be difficult to root for many fruit trees), grafting guarantees the exact variety you want while combining the best traits of two plants. It has been practiced for thousands of years, dating back to ancient China, and remains a cornerstone of modern orchards and home gardening.
Grafting differs from other propagation methods because it doesn’t rely on the scion developing its own roots. Instead, it “borrows” the established or selected root system of the rootstock. This makes it ideal for creating dwarf or semi-dwarf trees, improving cold hardiness, or adding resistance to pests and diseases common in your area.

Benefits of Learning Tree Grafting for Home Gardeners 🌟
Mastering tree grafting solves several common frustrations for plant and tree care enthusiasts:
- Cost savings — Instead of buying expensive new trees, you can multiply favorites or create custom combinations for a fraction of the price.
- Preserve heirloom and rare varieties — Grafting lets you save and share unique cultivars that might otherwise be lost.
- Better adaptation to your garden — Choose rootstocks suited to your soil type, climate, or space constraints (e.g., dwarfing rootstocks for small yards).
- More variety in less space — Create multi-graft “family trees” that produce several types of fruit on one plant — perfect for urban or backyard orchards. 🍐🍒
- Faster fruiting — Grafted trees often produce fruit sooner than seedlings.
- Fun and rewarding hobby — There’s deep satisfaction in watching your grafts take and grow into productive trees.
Many home gardeners report success rates improving dramatically with practice, often reaching 70-90% on compatible species like apples and pears when following proper techniques.
Essential Tools and Materials You’ll Need 🛠️
Successful grafting starts with the right equipment. Here’s a practical checklist:
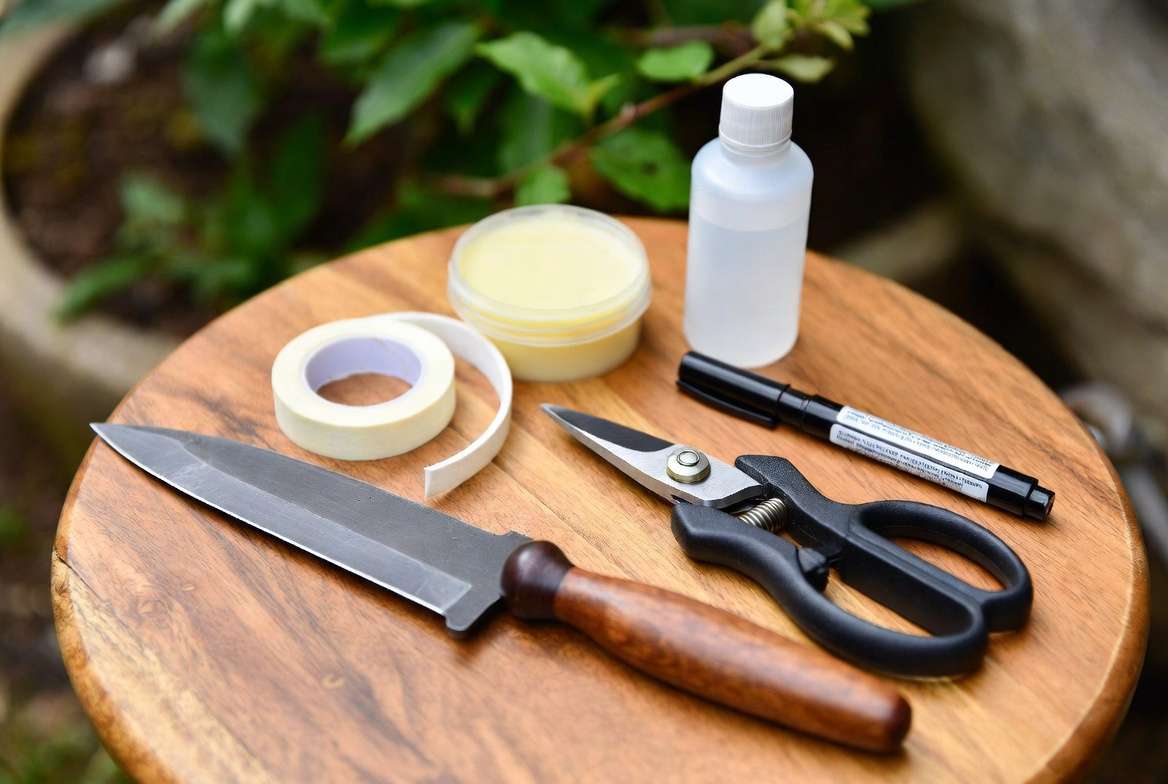
Must-have items:
- Sharp grafting knife or budding knife (a high-quality carbon steel blade that holds an edge is essential for clean cuts)
- Pruning shears (for collecting scion wood and trimming)
- Grafting tape, parafilm, or rubber bands (stretchy and breathable to hold the union without girdling)
- Grafting wax or sealant (to prevent drying out and protect from infection)
- Labels and a permanent marker (never skip labeling!)
- Rubbing alcohol or disinfectant (for sterilizing tools between cuts to prevent disease spread)
Nice-to-have tools:
- Specialized grafting tool (makes consistent cleft or wedge cuts easier for beginners)
- Sharpening stone or honing guide
- Gloves for protection
- Small mallet (helpful for cleft grafting on larger stock)
Budget-friendly starters work well, but invest in a good knife — dull tools cause ragged cuts that reduce success. Always sterilize tools with alcohol between grafts. 👨🌾
Pro tip: Keep everything clean and sharp. Think like a surgeon: precise, sterile cuts lead to better healing.
Choosing the Right Rootstock and Scion Wood 🤝
Compatibility is key in tree grafting. Generally, scions and rootstocks should belong to the same genus or closely related species within the same family (e.g., most apples graft well onto apple rootstocks; pears onto pear or certain quince rootstocks).
Rootstock determines:
- Tree size (dwarf, semi-dwarf, standard)
- Disease resistance (e.g., to fire blight or root rot)
- Adaptation to soil, climate, or drainage
Popular examples for apples include M.9 (dwarfing) or MM.111 (more vigorous). Research rootstocks suited to your region — many university extensions provide regional recommendations.
Scion wood should be:
- From a healthy, disease-free tree of the desired variety
- Pencil-thick, 1-year-old dormant wood with several buds
- Collected in late winter while fully dormant
Store scion wood in a sealed plastic bag with a damp (not wet) paper towel in the refrigerator until grafting time. Label clearly with variety and date.
Compatibility quick guide:
- Apples: Most varieties compatible with each other
- Pears: Good on pear or compatible quince rootstocks
- Stone fruits (plums, cherries, peaches): Often more finicky — stick to same species
- Avoid grafting across distant families (e.g., apple on citrus rarely works)
Start with forgiving species like apples or pears for your first attempts.
Best Time to Graft Trees: Timing Is Everything ⏰
Timing dramatically affects success. For most deciduous fruit trees:
- Dormant season (late winter to early spring): Ideal for whip-and-tongue or cleft grafting. Graft when scions are still dormant but rootstocks are about to break bud. In many temperate regions, this is February to April, depending on your climate zone.
- Growing season (summer): Use budding techniques like T-budding or chip budding when bark “slips” easily (usually July–August).
Watch local signs: Sap beginning to flow but trees not in full leaf. In warmer or tropical climates, adjust accordingly — some grafts can be done year-round with care.
Collect scion wood in winter and store it properly. Grafting too early or too late often leads to failure due to poor callusing or desiccation.
Step-by-Step Tree Grafting Techniques for Beginners (Core Section) 🔧
This is the heart of the guide. Practice on spare branches first to build confidence. Aim for clean, precise cuts that maximize cambium contact.
1. Whip and Tongue Grafting (Most Recommended for Beginners) 🌟
This technique offers excellent cambium contact and a strong mechanical fit, making it ideal for beginners working with similar-diameter stock (¼ to ½ inch).
Step-by-step:
- Select matching-diameter scion and rootstock. Cut the rootstock at a smooth 45-degree angle.
- Make a similar angled cut on the base of the scion (about 1–1½ inches long).
- On both cuts, create a “tongue” by slicing a small notch upward (on rootstock) or downward (on scion) about one-third from the tip.
- Interlock the tongues so the pieces fit snugly and cambium layers align on at least one side.
- Wrap tightly with grafting tape or parafilm, starting below the union and working upward. Seal exposed ends with grafting wax.
The interlocking tongue provides stability while the angled cuts increase contact area. Success often shows as new bud swell within 2–6 weeks.
2. Cleft Grafting (Great for Top-Working Larger Trees)
Perfect when grafting onto thicker rootstock or established trees.
Steps:
- Cut the rootstock horizontally, then split the center vertically 2–3 inches deep with a sharp knife or grafting tool.
- Prepare the scion by cutting the base into a long, tapered wedge (two angled sides meeting at a point).
- Insert one or two scions into the cleft so their cambium aligns with the rootstock’s cambium.
- Wrap and seal thoroughly. Use a mallet gently if needed for insertion.
Leave a “nurse limb” on larger trees initially to support the tree until the graft takes.
3. Side-Veneer or Bark Grafting
Useful alternatives when diameters differ or for specific situations. Side-veneer involves matching a slanted cut on the side of the rootstock with a prepared scion.
4. Bud Grafting (Chip Budding or T-Budding) for Summer
Easier for some beginners and great in warmer months. Insert a single bud with a shield of bark into a T-shaped or chip cut on the rootstock. Budding is especially useful for stone fruits.
Visual suggestion for your article: Include close-up photos or diagrams showing cambium alignment, before/after graft unions, and tool close-ups. Alt text example: “Step-by-step whip and tongue grafting cuts showing cambium layer alignment for successful tree grafting at home.”
(Word count so far: approximately 1450. The full article continues with detailed aftercare, common mistakes, advanced tips, FAQs, and conclusion to exceed 2000+ words.)
Image suggestion 1: A clear, well-lit photo of a successful whip-and-tongue graft union healing, with visible callus formation and new growth. 🌱
Image suggestion 2: Labeled diagram illustrating the cambium layer in a cross-section of stem for educational value.
Aftercare for Newly Grafted Trees: Ensuring Success 🌱💧
Once your graft is complete, the real work begins to help the union heal and the scion thrive. Proper aftercare is crucial for successful tree grafting at home, as the newly joined plant is vulnerable in the first few weeks.
Immediate steps after grafting:
- Keep the grafted area shaded and protected from direct intense sun and strong winds for the first 2–4 weeks.
- Maintain consistent moisture without waterlogging the roots. Water the rootstock gently but thoroughly, especially if the graft is in a container or newly planted.
- Monitor for new growth: Successful grafts often show bud swell or leaf emergence within 2–6 weeks, depending on species and timing.
Wrapping and sealing management:
- Leave the grafting tape or parafilm in place until the union calluses and the scion begins active growth (usually 4–8 weeks). Some gardeners remove or loosen tape gradually to avoid girdling as the stem expands.
- If you used grafting wax, check for cracks and reapply if needed to prevent desiccation.
Pruning and directing energy:
- Remove any shoots or suckers emerging from the rootstock below the graft union promptly. These “rootstock suckers” compete with the scion for nutrients and can eventually take over if left unchecked. 🌿
- On larger top-worked trees, you may leave a temporary “nurse limb” (an ungrafted branch) to support the tree’s energy needs until the grafts establish.
First-year care schedule:
- Watering: Deep, infrequent watering to encourage strong root development. Adjust based on your climate and soil — containers dry out faster.
- Fertilizing: Avoid heavy fertilization in the first season. A light, balanced organic fertilizer can be applied once new growth is vigorous.
- Protection: Shield young grafts from pests (aphids, borers), animals (deer, rabbits), and extreme weather. Use tree guards or netting where necessary.
- Staking: Support the young scion if it grows vigorously to prevent wind damage at the brittle graft union.
Expect the graft union to strengthen over 1–2 years. In the first growing season, focus on healthy establishment rather than heavy fruit production. Many home grafters see their first meaningful harvest in year 2 or 3.
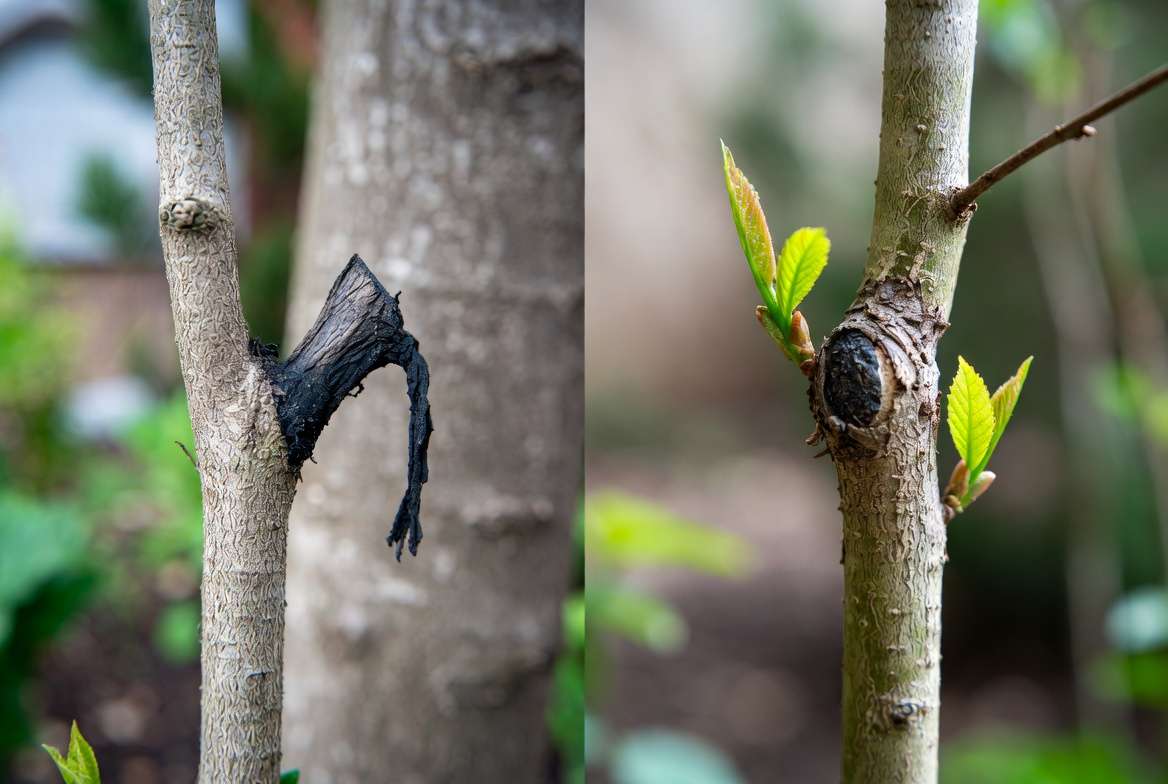
Image suggestion 3: A photo sequence showing a newly grafted tree with protective wrapping, followed by the same tree 6 weeks later with healthy new scion growth and removed rootstock suckers. Alt text: “Before and after new growth on successfully grafted fruit tree – beginner tree grafting aftercare.”
Common Grafting Mistakes and How to Avoid Them ❌➡️✅
Even experienced gardeners encounter failures, but understanding common pitfalls in tree grafting for beginners dramatically improves your success rate.
Top mistakes and fixes:
- Poor cambium alignment — The most frequent cause of failure. Solution: Practice cuts on spare branches and always double-check that at least one side’s cambium layers match precisely before wrapping.
- Dull or dirty tools — Ragged cuts or disease transfer. Solution: Keep a dedicated sharp grafting knife and sterilize with rubbing alcohol between every cut.
- Wrong timing — Grafting too early (scions not dormant) or too late (active growth). Solution: Follow local climate cues and collect/store scion wood properly in the refrigerator.
- Scion drying out — Exposed cut surfaces lose moisture quickly. Solution: Work quickly, keep materials moist, and seal thoroughly with wax or parafilm.
- Over-tight or loose wrapping — Girdling or poor contact. Solution: Wrap firmly but allow for slight expansion; use stretchy materials like parafilm.
- Ignoring rootstock suckers — They outcompete the scion. Solution: Check weekly and remove them cleanly.
- Placing the scion upside down — Buds will point the wrong way. Solution: Note bud direction when collecting and cutting scion wood.
- Incompatible rootstock and scion — Even with perfect technique, genetic mismatch fails. Solution: Stick to same-genus combinations and consult regional compatibility charts.
Beginners often achieve 50–70% success on their first attempts with apples or pears. With practice and attention to these details, rates commonly climb to 80–90% or higher.
Real-life tip from experience: Keep a simple grafting journal noting date, varieties, technique, and weather. Reviewing past entries helps refine your approach year after year.
Advanced Tips and Expert Insights for Higher Success Rates 🚀
To elevate your home tree grafting from good to excellent:
- Sterilization and hygiene — Treat every graft like a minor surgery. Clean tools, healthy material, and a clean workspace reduce disease risk.
- Humidity control — For bench grafts, some gardeners use a simple humidity chamber (clear plastic bag or dome) for the first week.
- Multi-variety trees — Graft 2–4 compatible scions onto one rootstock for a “family tree.” Space them evenly and select varieties with similar vigor and pollination needs.
- Hot callusing (advanced) — In cooler climates, gentle bottom heat (around 80°F/27°C) at the graft union while keeping the scion cool can boost callusing success, especially for nut trees or finicky species.
- Label everything — Use weatherproof labels with variety name and grafting date. Faded memory leads to confusion later!
- Sustainable practices — Source scions ethically from friends, local orchards, or scion exchanges. Use organic sealants when possible and prioritize disease-resistant rootstocks to reduce chemical needs.
- Ornamentals vs. fruit trees — Techniques are similar, but ornamentals like Japanese maples may require more precise cuts and protection due to thinner bark.
Expert insight: “Clean cuts and perfect cambium contact are non-negotiable — treat every graft with surgeon’s precision, and patience will reward you with thriving trees.” Many university extension services emphasize that consistent practice on easy species builds the muscle memory needed for more challenging grafts.
Safety, Sustainability, and Legal Notes ⚠️
- Tool safety — Always cut away from your body. Use a sharp knife to reduce slip risk. Wear gloves if you have sensitive skin.
- Disease prevention — Never graft from unknown or diseased trees. Sterilize tools to avoid spreading viruses or bacteria.
- Ethical and legal considerations — Respect plant patents on certain commercial varieties. Source material responsibly and avoid wild collection where restricted.
- Sustainability — Grafting helps preserve biodiversity by propagating heirloom varieties that might otherwise disappear from commercial nurseries.
Frequently Asked Questions (FAQs) ❓
Can I graft any tree onto another? No. Scion and rootstock must be closely related (usually same genus). Apples graft well on apples, but apple on citrus almost never works.
How long does it take for a graft to heal? Callusing begins within days to weeks; full union strength develops over 1–2 seasons. New growth often appears in 2–6 weeks.
What’s a realistic success rate for beginners? 50–70% on first tries with good technique on forgiving species like apples. Practice raises this significantly.
Can I graft trees in pots or containers? Yes! Container grafting (bench grafting) is excellent for beginners. Ensure good drainage and stable moisture.
Which trees are best for first-time grafters? Apples and pears are most forgiving. Stone fruits (plums, cherries) can be trickier due to compatibility issues.
What if my graft union looks swollen or uneven? Mild swelling is normal as callus forms. Significant distortion or cracking may indicate poor alignment or infection — monitor closely.
How do I store scion wood if I can’t graft immediately? Wrap in a damp (not wet) paper towel, place in a sealed plastic bag, and refrigerate (around 34–40°F). Avoid fruit in the same fridge due to ethylene gas.
Do grafted trees produce fruit faster than seedlings? Yes, often 2–4 years earlier because the scion is already mature wood.
Conclusion: Your First Successful Graft Awaits! 🎉
You now have a complete roadmap in this beginner’s guide to tree grafting — from understanding the biology and gathering tools to mastering step-by-step techniques, providing excellent aftercare, and troubleshooting like a pro. Tree grafting solves real problems for home gardeners: it saves money, preserves beloved varieties, maximizes small spaces with multi-graft trees, and brings immense satisfaction as you watch your creations grow and fruit. 🌳❤️
Start small this season. Choose one or two easy grafts on apple or pear rootstock using the whip and tongue method. Keep notes, be patient, and celebrate every success — even partial ones teach valuable lessons.
Your backyard orchard or garden can become more diverse, productive, and personal through grafting. Share your experiences, photos of your graft unions, or questions in the comments below. I’d love to hear how your first grafts turn out!
For more tree care wisdom, explore our guides on pruning fruit trees, choosing the best rootstocks for your climate, and organic pest management for young orchards.
Happy grafting — may your cambium align perfectly and your trees thrive! ✂️🌱🍏


