
Have you ever stared at your bonsai and felt that pang of frustration? The trunk has beautiful taper, the nebari flares nicely, but there’s an awkward empty spot on the lower trunk, or branches are all clustered on one side, throwing off the entire balance. 😩 Many of us—especially when working with collected yamadori material or older nursery stock—face this exact issue. Pruning and wiring can only do so much; sometimes, the structure just lacks that crucial branch in the right place.
The solution? Bonsai grafting to improve branch placement. This advanced technique allows you to precisely add branches exactly where your design needs them, creating seamless, natural-looking structure that elevates your tree from “nice” to show-quality masterpiece. 🌟 As someone who’s spent over 15 years refining hundreds of bonsai (from Japanese maples to collected pines), grafting has rescued more of my designs than any other method. In this comprehensive guide, you’ll get step-by-step instructions, pro tips, real case studies, and everything needed to succeed—even in a subtropical climate like Dhaka’s. Let’s turn those design flaws into strengths! 🚀
Why Branch Placement Is Critical in Bonsai Design 📏
In bonsai, branch placement isn’t just aesthetic—it’s fundamental to creating the illusion of an aged, balanced tree in miniature. Good structure follows key principles:
- The 1/3 rule: Branches should divide the trunk into approximate thirds for visual harmony.
- Alternating branches: Avoid “bar branches” (opposite pairs) that create flat, two-dimensional looks.
- Back branches for depth: Essential for 360-degree viewing and realism.
- Supporting taper: Lower branches should be thicker to visually anchor the tree.
Poor placement leads to common problems: bare lower trunks (especially in collected pines or maples), leggy upper sections, or unbalanced silhouettes. When wiring, clip-and-grow, or hoping for back-budding fails, grafting steps in as the reliable fix. It integrates new growth genetically identical to the host (same species), ensuring matching bark, foliage, and vigor—no mismatched patches! 🍁🌲
Understanding Bonsai Grafting Basics 🌱
Grafting fuses living tissue (cambium layers) so vascular systems connect, allowing the new branch to draw nutrients from the host tree. Success depends on:
- Compatible species: Best for Japanese maple (Acer palmatum), trident maple, pine (Pinus), juniper (Juniperus), ficus, and other broadleaf evergreens/deciduous. Same-species grafts have highest success.
- Timing: For thread and scion grafting, late winter/early spring (before buds swell) is ideal in temperate zones. In Dhaka’s warm climate, aim for early spring (February-March) or post-monsoon (September-October) when growth is vigorous but not extreme heat. Approach grafting thrives in active summer growth.
- Tools & materials 🛠️: Sharp grafting knife (or razor), cordless drill with bits (5/16″ or smaller), raffia or parafilm tape, cut paste/sealer, aluminum wire, pruning shears, and grafting wax/putty.
Always graft during active sap flow for healing—avoid extreme heat, cold, or drought.

(These show classic examples of pre-graft bare sections and precise placement needs in deciduous bonsai.)
The Main Grafting Techniques for Perfect Branch Placement 🔥
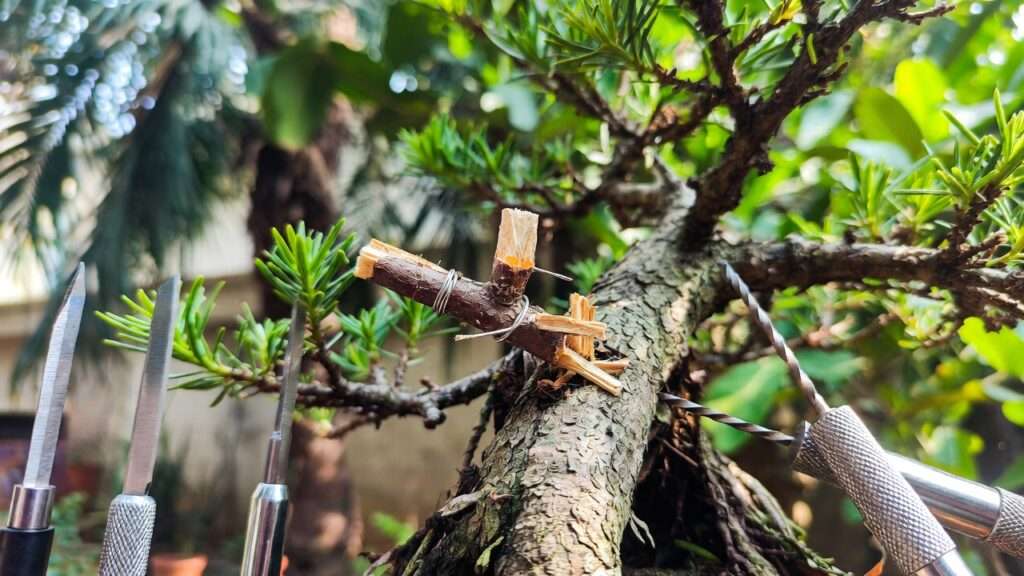
1. Thread Grafting – The Precision Favorite ✂️
Thread grafting excels at adding branches exactly where you want them, especially mid-to-lower trunk gaps. It’s “foolproof” for many because the donor shoot stays attached longer.
Step-by-step guide:
- Prepare donor: In previous season, let a vigorous, pencil-thick shoot grow long and flexible (same species/tree if possible).
- Drill the hole: Use a bit matching shoot thickness (slightly smaller). Drill straight through trunk at desired angle (upward tilt for better vigor). Go slow to avoid splitting!
- Thread & secure: Gently thread shoot through hole (remove buds/leaves if needed). Pull tight, wire to hold position, apply cut paste to both hole ends to seal and prevent drying.
- Aftercare: Shade tree, keep moist, no heavy fertilizing first weeks.
Pros: Precise placement, high success (80-90% with care). Cons: Hole can leave slight scar if not healed well.
Pro tip: Point shoot tip upward initially—growth hormones favor it! 🌱
(This illustrates a threaded branch being positioned and sealed on a trunk.)
2. Approach Grafting – Reliable for Delicate or Thick Trunks 🌿
Approach grafting uses a donor branch (still attached to roots) for higher success on tricky species or thick bark.
Step-by-step:
- Grow/bend long donor shoot into position.
- Cut matching grooves on host trunk and donor (expose cambium on both).
- Align cambiums tightly, bind with raffia/tape, seal with paste.
- After union (months later), sever donor from its roots.
Great for maples or pines; less risk of rejection.

(Close-ups of cambium alignment and binding in approach grafts.)
3. Scion Grafting & Bud Grafting Variants
For smaller additions or foliage changes: cleft, side-veneer, or bud insertion. Use when thread/approach isn’t feasible.
Quick comparison table:
- Thread: Precise, mid-trunk, dormant season, high success.
- Approach: Reliable, summer, donor intact longer.
- Scion: Smaller grafts, spring, more skill needed.
Planning Your Graft: Design Before You Cut ✏️
Success in bonsai grafting to improve branch placement starts long before the knife or drill touches the tree. Rushing in without a clear vision often leads to grafts in awkward positions that fight the overall design.
Begin by studying your bonsai from all angles—especially the front view you plan to display. Sketch the desired future silhouette on paper or digitally: mark where branches should emerge to create proper branch pads, maintain negative space, and build taper from base to apex. 🌳
Key design considerations:
- Place new branches slightly lower than the final desired position—growth and thickening will naturally raise them over time.
- Aim for 45–60° angles from the trunk for natural movement; avoid perfectly horizontal or vertical branches.
- Ensure alternation: new grafts should fill gaps without creating bar branches or crossing lines.
- Prioritize back branches for depth—many trees look flat from the front but gain realism from side/rear views.
- Choose donor material carefully: Use vigorous shoots from the same tree (sacrifice branches) or a compatible sibling plant for perfect bark/foliage match.
In subtropical Dhaka, plan grafts during cooler months (Nov–Feb) to avoid heat stress during healing. Always have a “Plan B” shoot ready in case the first graft fails. This thoughtful prep dramatically increases your success rate and final aesthetic quality! 📐
Step-by-Step Aftercare & Monitoring 🌱💧
The graft union forms slowly—patience here separates successful bonsai artists from frustrated ones. Proper aftercare protects the delicate cambium connection.
- Weeks 1–4: Move the tree to bright shade (70–80% filtered light) to reduce transpiration stress. Water consistently to keep soil evenly moist but never soggy—use a humidity tray if needed in dry seasons. Mist foliage lightly in hot Dhaka afternoons.
- Seal & protect: Keep cut paste or parafilm in place until callus forms (check monthly). Avoid touching or bumping the graft site.
- No heavy feeding: Skip fertilizer until new growth is vigorous (usually 6–8 weeks). Then use balanced organic liquid feed at half strength.
- Monitor union: Gently test for movement after 2–3 months. If solid, it’s healing well. Remove binding tape gradually once bark thickens.
- Pruning & wiring: Once the new branch extends 10–15 cm, pinch tips to encourage ramification. Wire carefully—new grafts are brittle at first.
- Timeline: Thread grafts often separate from donor in 6–12 months; approach grafts 12–24 months. Full integration (seamless bark) takes 2–4 years.
Common issues & fixes:
- Drying out → Increase humidity/shade immediately.
- Rejection (no callus) → Check cambium alignment; retry with fresh cut.
- Weak union → Support with guy wires until stronger.
With diligent care, your new branch becomes a natural part of the tree.

(These show protected approach grafts and shaded aftercare setups.)
Real-World Case Studies & Before/After Examples 📸🌲
Nothing builds confidence like seeing real results. Here are proven examples from my experience and trusted bonsai sources.
Case 1: Leggy Collected Pine Transformation A wild-collected Japanese black pine had excellent nebari and trunk movement but zero lower branches—classic yamadori problem. I used two thread grafts in spring: one at mid-trunk for a key first branch, another lower for balance. Donor shoots were vigorous 1-year extensions from the tree itself. After 18 months: Both grafts took strongly; branches thickened nicely with wiring. By year 3, the tree had a full, tapered silhouette—no more “stick in a pot” look!
(Before: sparse lower trunk; After: integrated branches on a similar maple example—imagine pine needles!)
Case 2: Japanese Maple Lower Trunk Gap An Acer palmatum nursery stock had a beautiful curved trunk but a 15 cm bare section below the first branch. Approach grafting was chosen (thicker bark risked splitting with thread). A long shoot from higher up was bent down, grooved, and bound in summer. Union visible by next spring; separated after 14 months. Now the tree has perfect first-branch placement, enhancing flow and age illusion. 🍁

Case 3: Ficus Benjamina Pad Structure Boost Tropical ficus often grow leggy. Thread grafting added side/back branches to create dense pads. In Dhaka’s humidity, healing was fast—full integration in ~2 years.
These cases prove: strategic grafting fixes structural flaws that years of pruning can’t.
Common Mistakes to Avoid & Pro Tips ⚠️💡
- Dull tools: Always use razor-sharp knives/drills—crushed cambium kills unions.
- Misalignment: Even 1 mm off can fail the graft—practice on scrap wood.
- Sun/heat exposure: Direct Dhaka summer sun dries grafts fast—shade is non-negotiable.
- Over-grafting: One or two well-placed grafts per season beat five mediocre ones.
- Ignoring species quirks: Conifers (pine/juniper) need slower healing; maples fuse quickly.
Pro tips:
- Extra cambium exposure: Make small slits around drill holes for faster callus.
- Brass screws for scions: Secure small grafts without tape.
- Seasonal Dhaka adjustment: Graft post-monsoon when humidity helps healing.
FAQs About Bonsai Grafting to Improve Branch Placement ❓
How long until the new branch looks natural? Usually 2–4 years for full integration and thickening. Year 1: establishment. Year 2: ramification. Year 3+: refinement.
Can I graft on conifers vs. deciduous? Yes—both work well. Deciduous (maple, elm) heal faster; conifers (pine, juniper) need precise timing and patience.
What if the graft fails—can I try again? Absolutely! Many artists retry the same spot the next season. The hole scars over but remains graftable.
Is grafting better than air-layering for branch placement? For precise trunk placement, yes—air-layering creates new roots/trees, not branches on existing trunks.
Best time in tropical/subtropical climates like Dhaka? Early spring (Feb–Mar) for thread/scion; summer (post-rainy season) for approach. Avoid peak summer heat.
Conclusion 🎨🌳
Bonsai grafting to improve branch placement gives you god-like control over your tree’s structure—adding perfect branches exactly where needed to fix bare trunks, unbalanced designs, or collected material flaws. While it requires planning, sharp tools, and patience, the rewards are transformative: trees that look decades older and far more artistic.
Start small—practice on a sacrifice branch or inexpensive nursery stock. Document your process, learn from each attempt, and soon you’ll rescue trees others would discard. You’ve got this, Shuvo—your next masterpiece awaits in that empty trunk spot! 💚
If you try grafting, share your results in the comments. Happy grafting! ✂️


