
If you’ve ever watched a beloved tree struggle after a storm or pest damage, you know how heartbreaking it can be. The good news is, there’s hope for healing. Bridge grafting for damaged trees is a powerful technique that can restore damaged trees to health, even in cases of severe injury like bark girdling or large wounds. Whether your tree has been wounded by a vehicle, animal, or storm, this method can help reconnect its vascular system, giving it a chance to thrive again. In this guide, we’ll walk you through the step-by-step process of bridge grafting to save your tree’s health and give it a fresh start.
What is Bridge Grafting?
Bridge grafting for damaged trees is a technique used to repair trees that have suffered severe damage, like bark loss or girdling, which disrupts their nutrient flow. The process involves grafting healthy scions (branches or stems) across the damaged area to restore the tree’s vascular system. 🌳✨
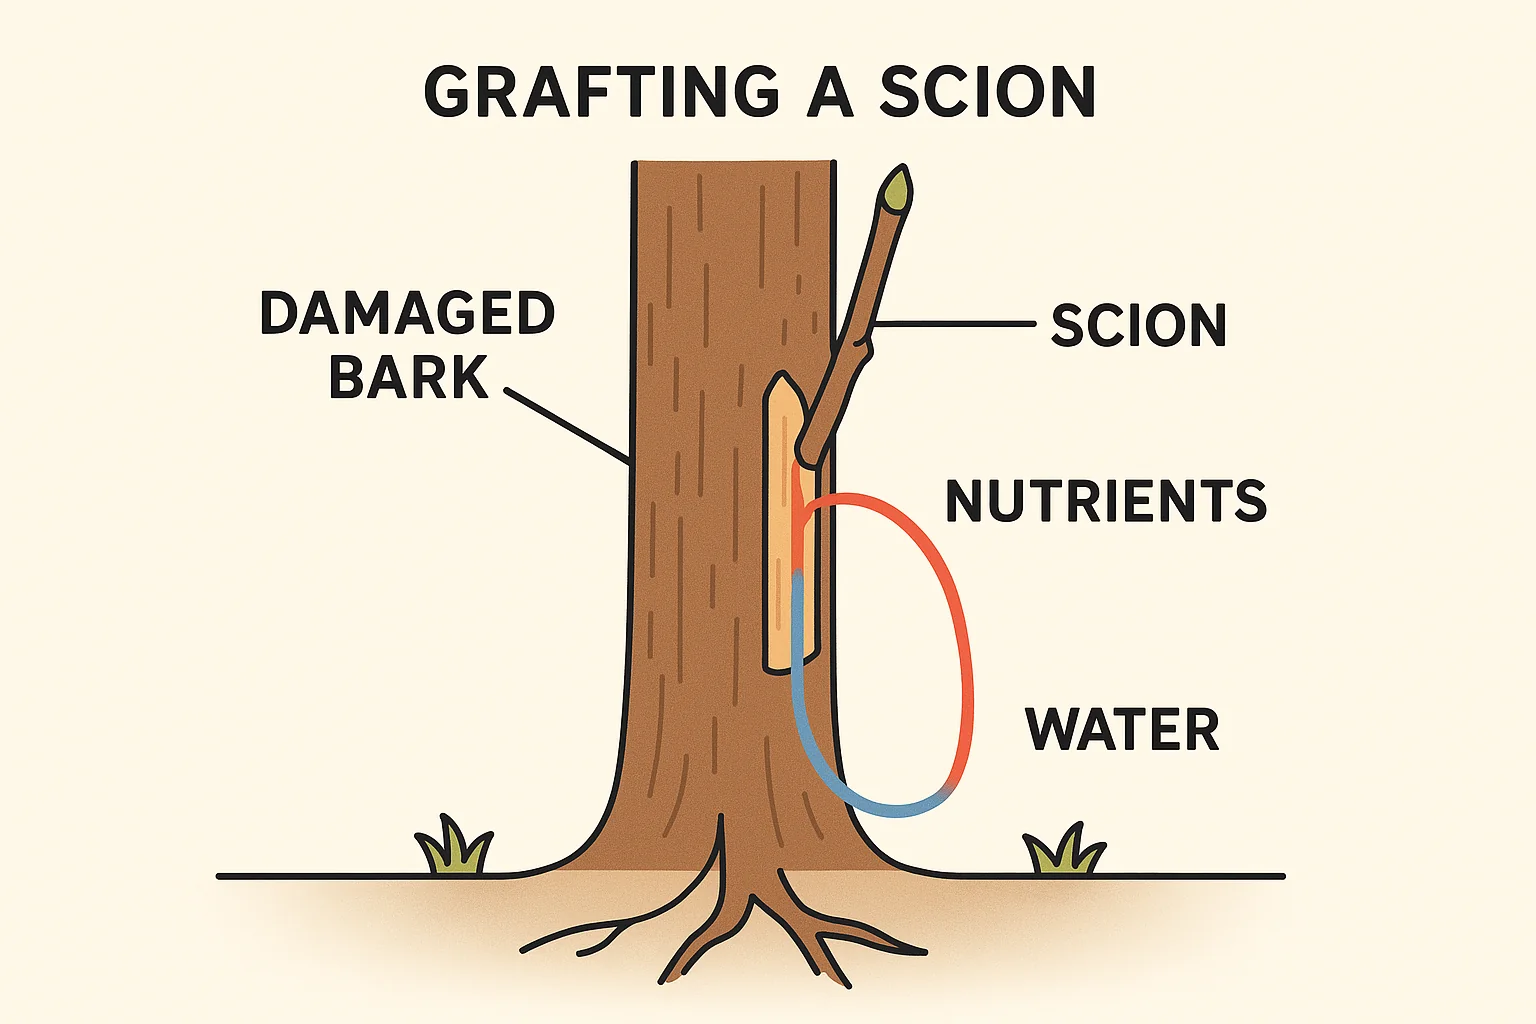
When a tree’s bark or cambium layer (the part responsible for nutrient transport) is damaged, the flow of water and nutrients is interrupted. Bridge grafting helps bypass the damaged section, re-establishing a pathway for nutrients to travel and supporting the tree’s recovery. 🌱💪 This method is most effective when the damage is extensive but the tree’s core structure remains intact. It’s a way of ‘bridging’ the gap in the damaged bark, giving the tree a second chance to grow healthy and strong again! 🌿🦋
Why Use Bridge Grafting?
- Restores nutrient flow: Helps trees heal by reestablishing nutrient pathways.
• Prevents tree death: In cases of severe damage, this technique can save the tree from declining further.
• Simple but effective: It’s an accessible solution that many tree owners can try with some basic tools! 🔧🌳
Bridge grafting is a vital tool for anyone looking to restore the health of a tree after significant damage—without cutting it down!
Materials Needed for Bridge Grafting
Before you start bridge grafting for damaged trees, make sure you have all the necessary tools and materials. Gathering the right supplies is key to a successful graft. Here’s what you’ll need: 🛠️🌿
1. Sharp Pruning Shears ✂️
These are essential for cutting the tree’s damaged area and the healthy scions. A clean, sharp cut ensures better healing and grafting success.
2. Grafting Knife 🔪
A grafting knife helps make precise cuts on both the tree and the scion. It’s important for ensuring a smooth, tight fit that encourages successful graft bonding.
3. Healthy Scions 🌱
Scions are healthy branches or stems taken from the same tree species. They should be disease-free and the same diameter as the damaged tree area. Choose young, fresh growth for best results.
4. Grafting Tape 🎀
Grafting tape is used to hold the scion in place and protect the graft from pests and weather. Make sure the tape is stretchy to allow for growth and easy removal once the graft has healed.
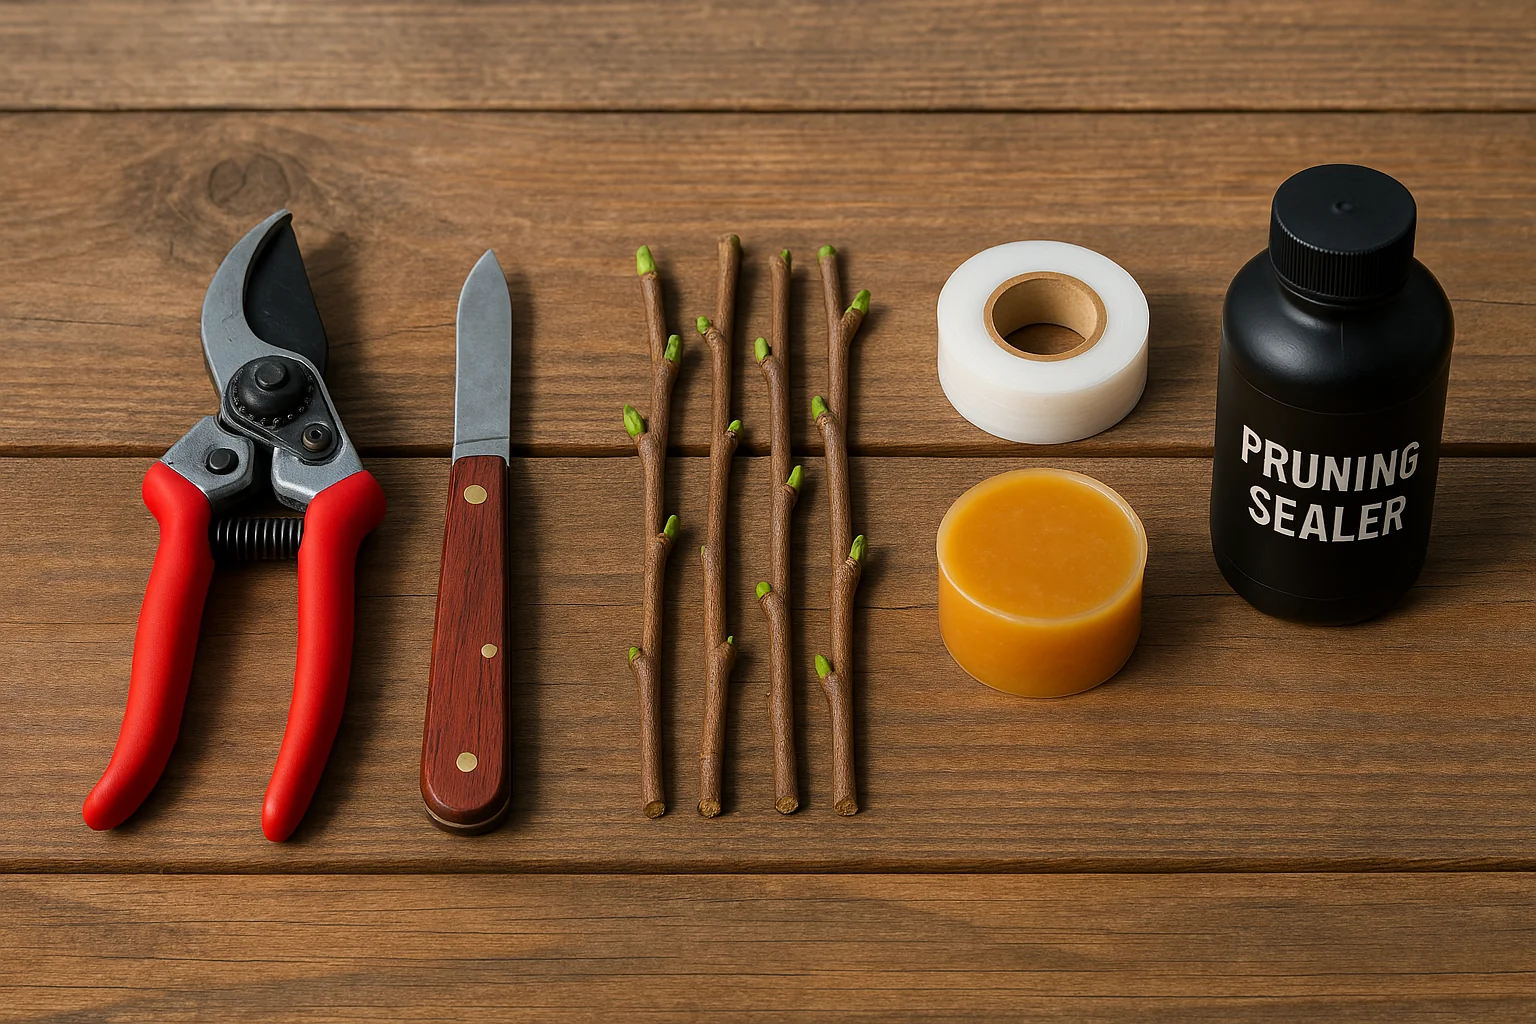
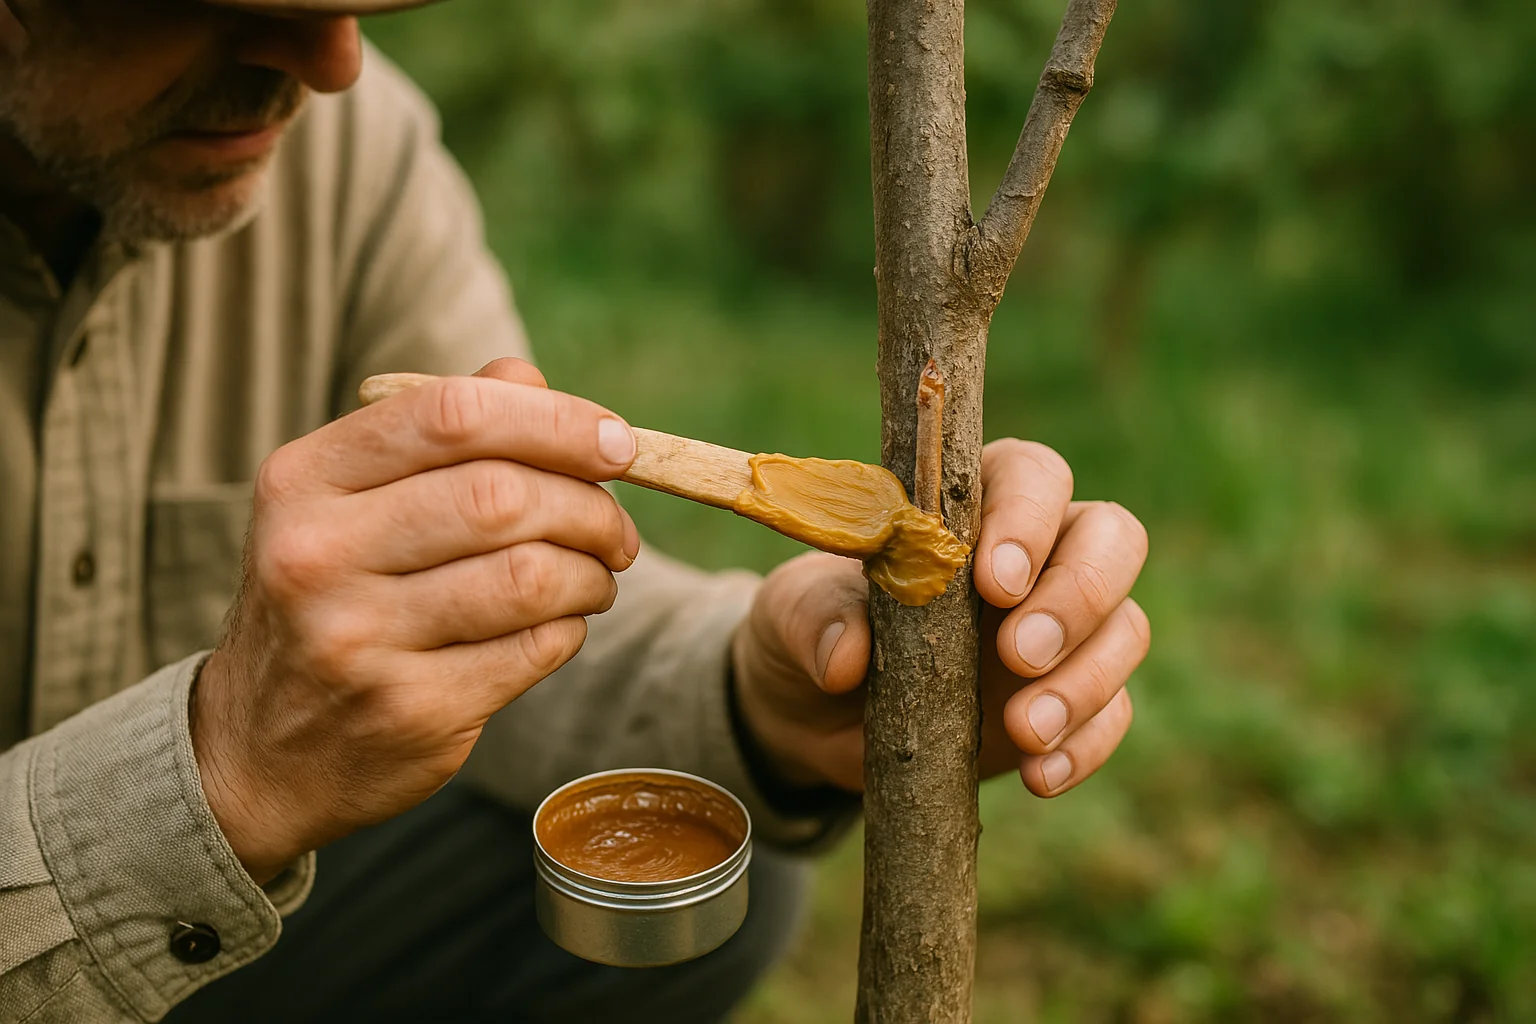
5. Grafting Wax or Sealing Compound 🧴
Grafting wax or sealing compound helps seal the graft and prevents moisture loss. It also protects the graft from harmful pathogens and keeps it secure during recovery.
6. Pruning Sealer (Optional) 🩹
If you’re worried about infection, a pruning sealer can be applied to the cut edges to help reduce the risk of disease entering the wound.
7. Clean Cloth or Paper Towels 🧼
You’ll need these to clean and sterilize your tools, as well as wipe any excess sap or moisture from the grafting area to ensure a clean process.
Having these materials ready will set you up for success when performing bridge grafting. With everything in place, you’ll be prepared to restore your tree’s health and help it thrive once again! 🌳💚
Step-by-Step Guide to Bridge Grafting
Now that you have all your materials ready, let’s dive into the step-by-step process of bridge grafting for damaged trees! Follow these instructions carefully, and you’ll be on your way to helping your tree heal. 🌿✨
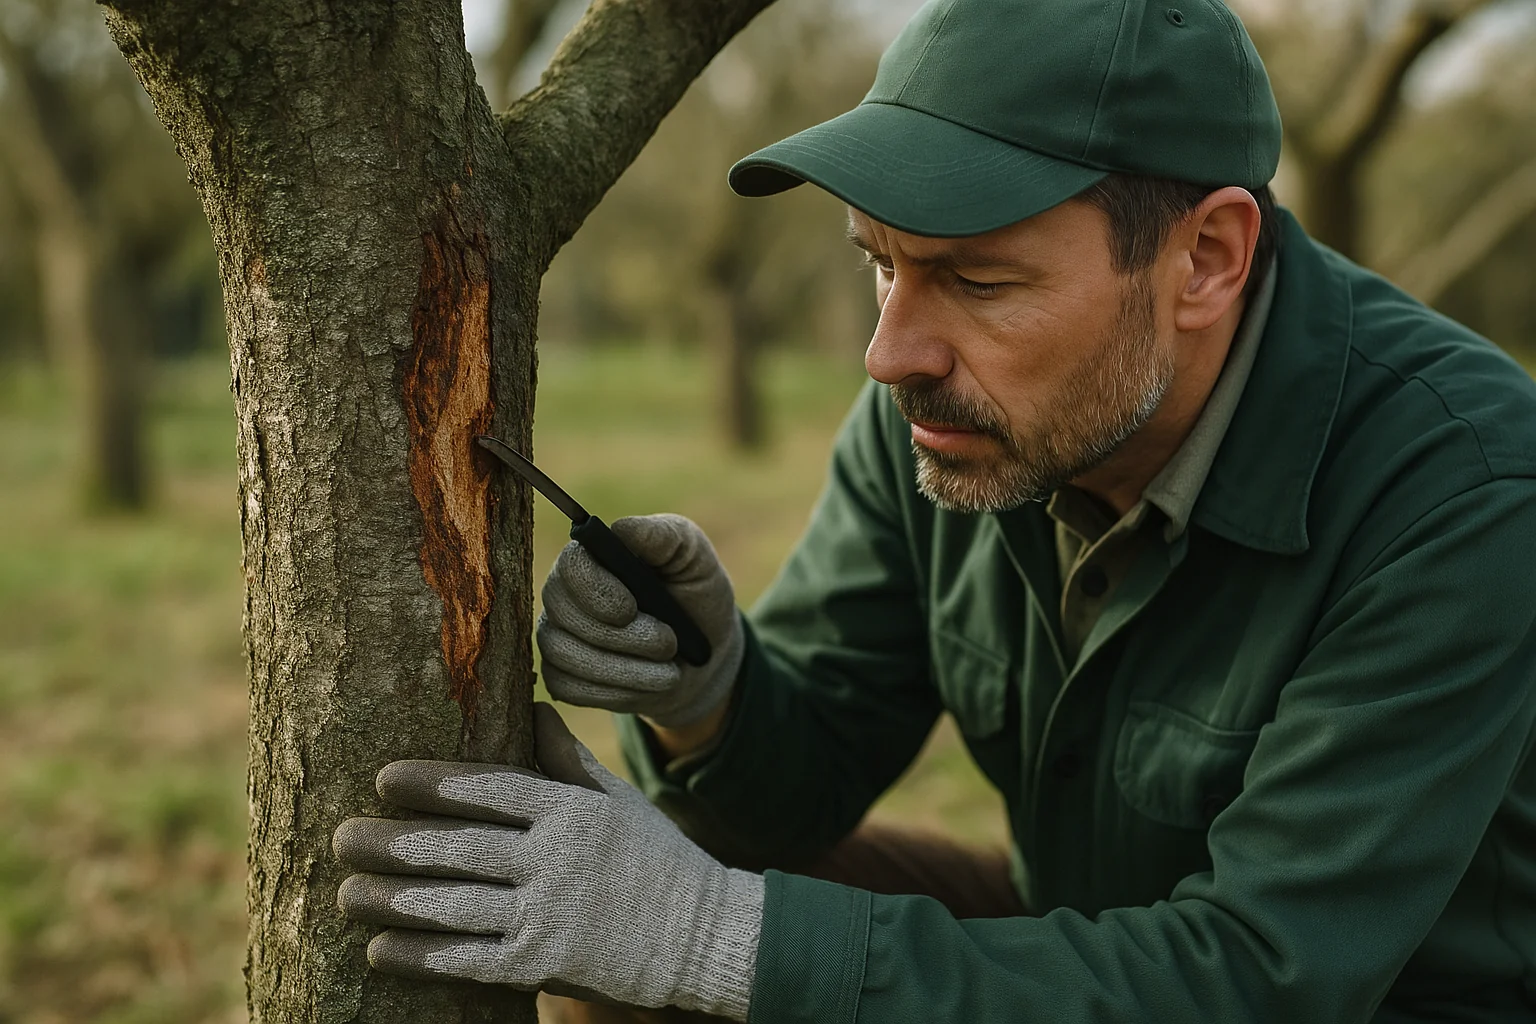
Step 1: Assessing the Damage 🔍
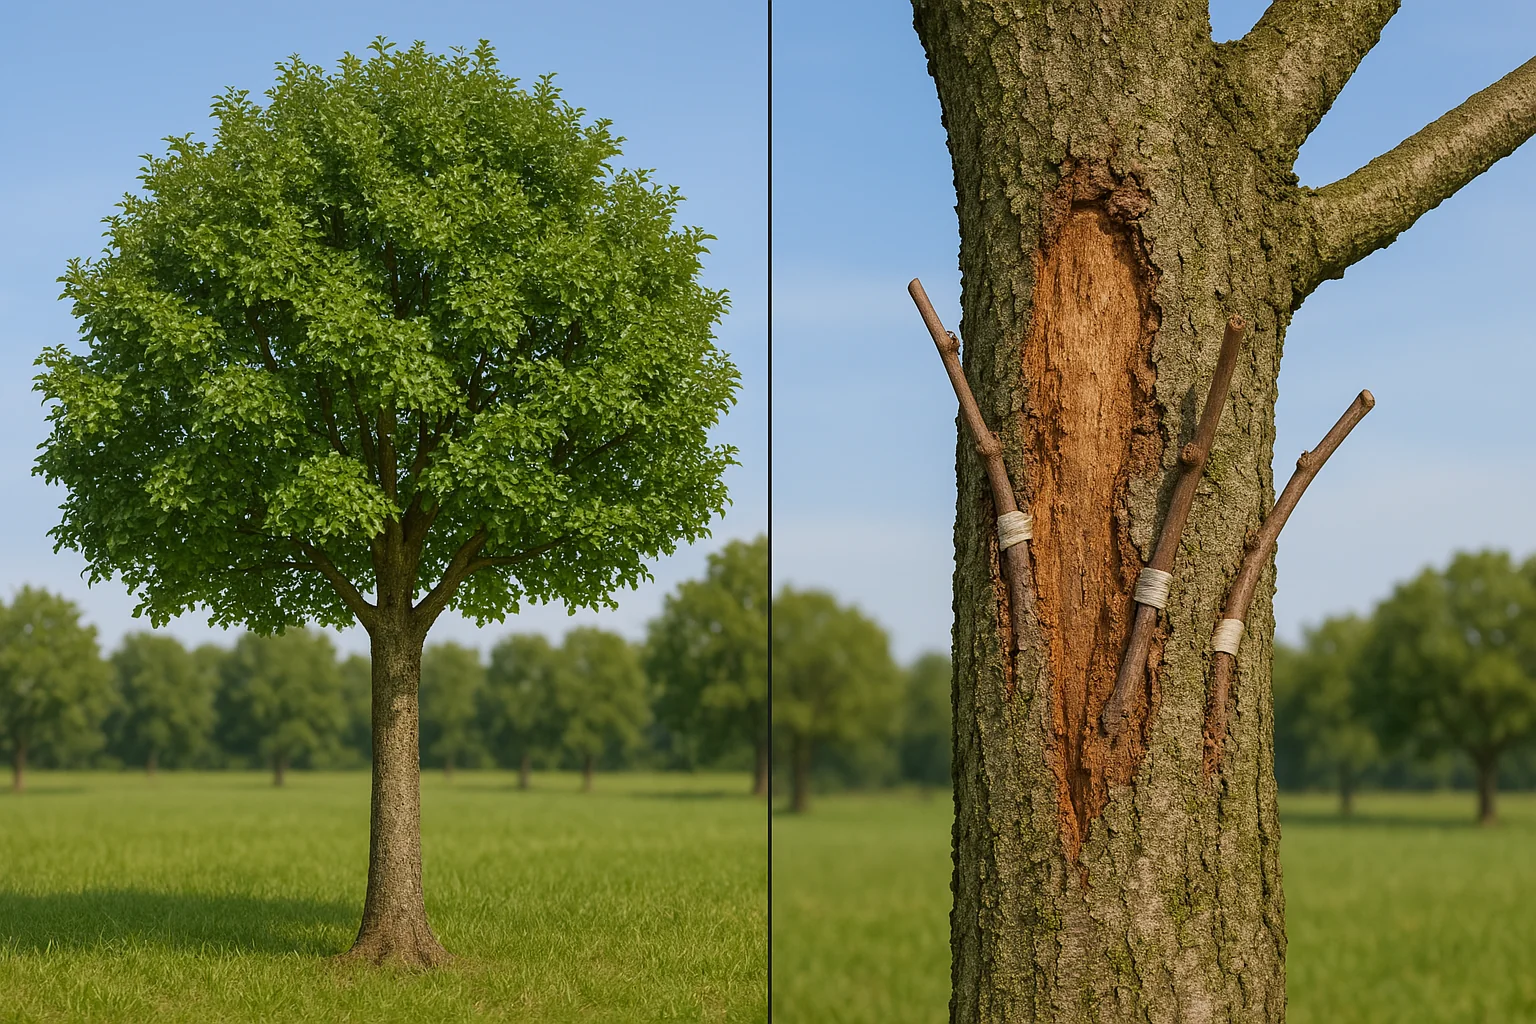
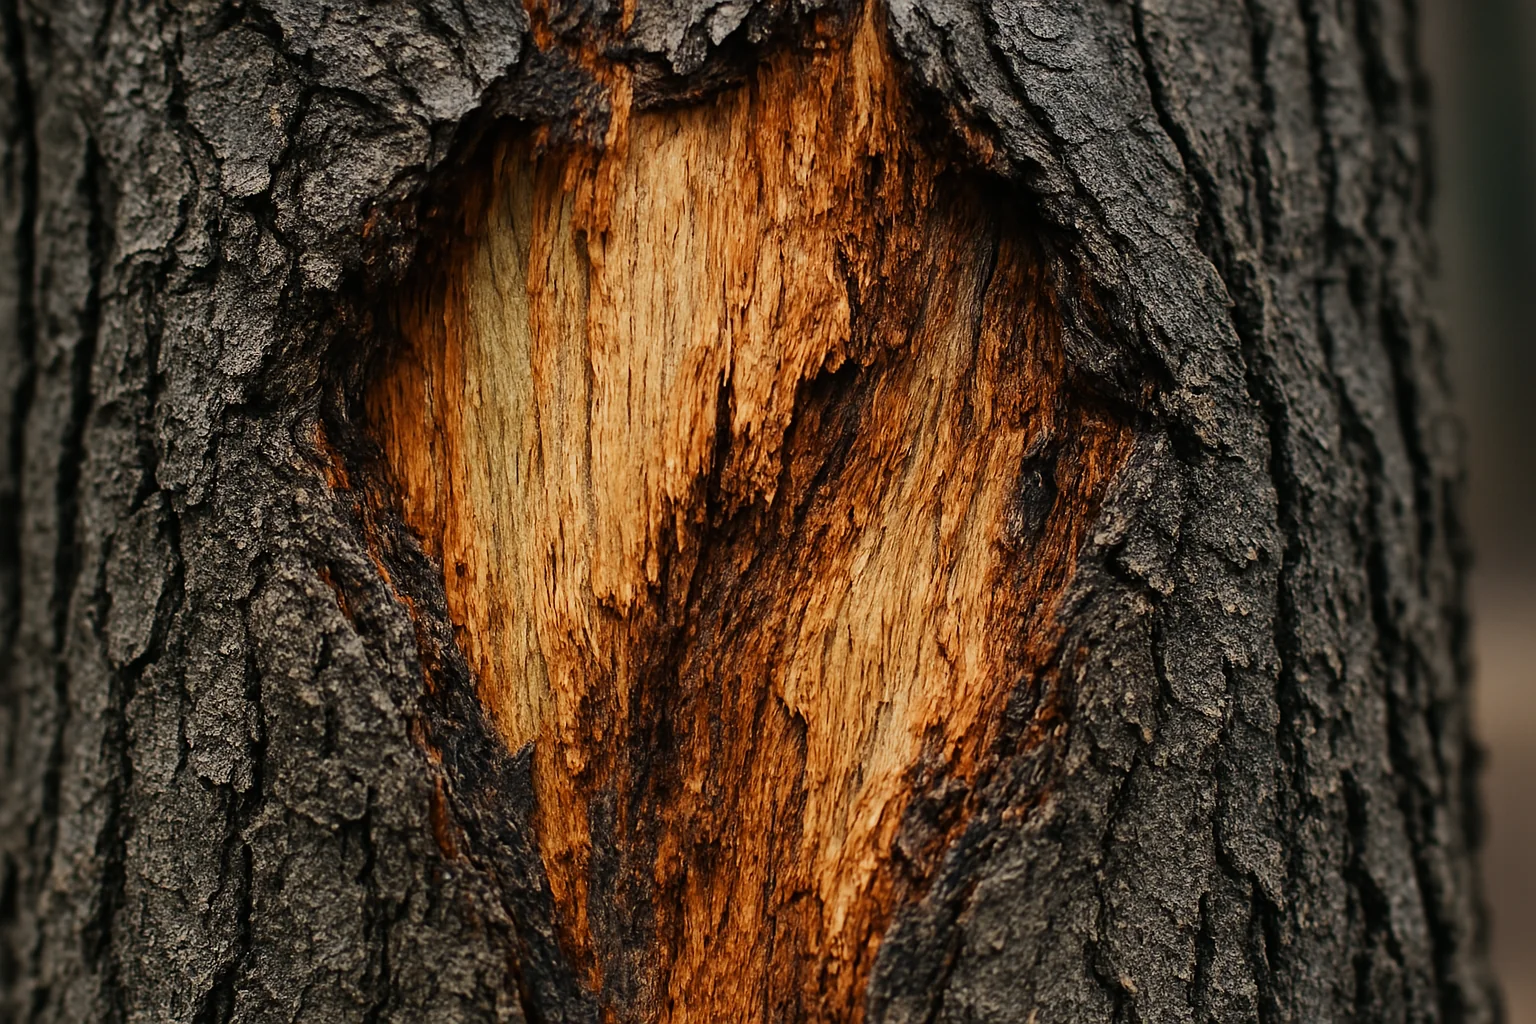
First, examine the damaged area of your tree. Look for bark loss, girdling, or other wounds that have interrupted the nutrient flow. Ensure the tree is still alive and has healthy tissue below the bark. If the damage is too severe, the tree might not survive, but bridge grafting can help in many cases.
Step 2: Selecting the Right Scion 🌱
Choose a healthy scion (a branch or shoot) that is similar in diameter to the damaged area of the tree. The scion should come from the same tree species and be free of disease or pests. Ideally, it should be fresh, green growth, as this will root and graft better than older wood.
Step 3: Preparing the Graft Area 🧹
Clean the damaged area by removing any loose bark, dirt, or debris. Use a clean cloth to wipe the area and ensure it’s free from moisture. This step helps prevent infection and ensures the graft will bond well.
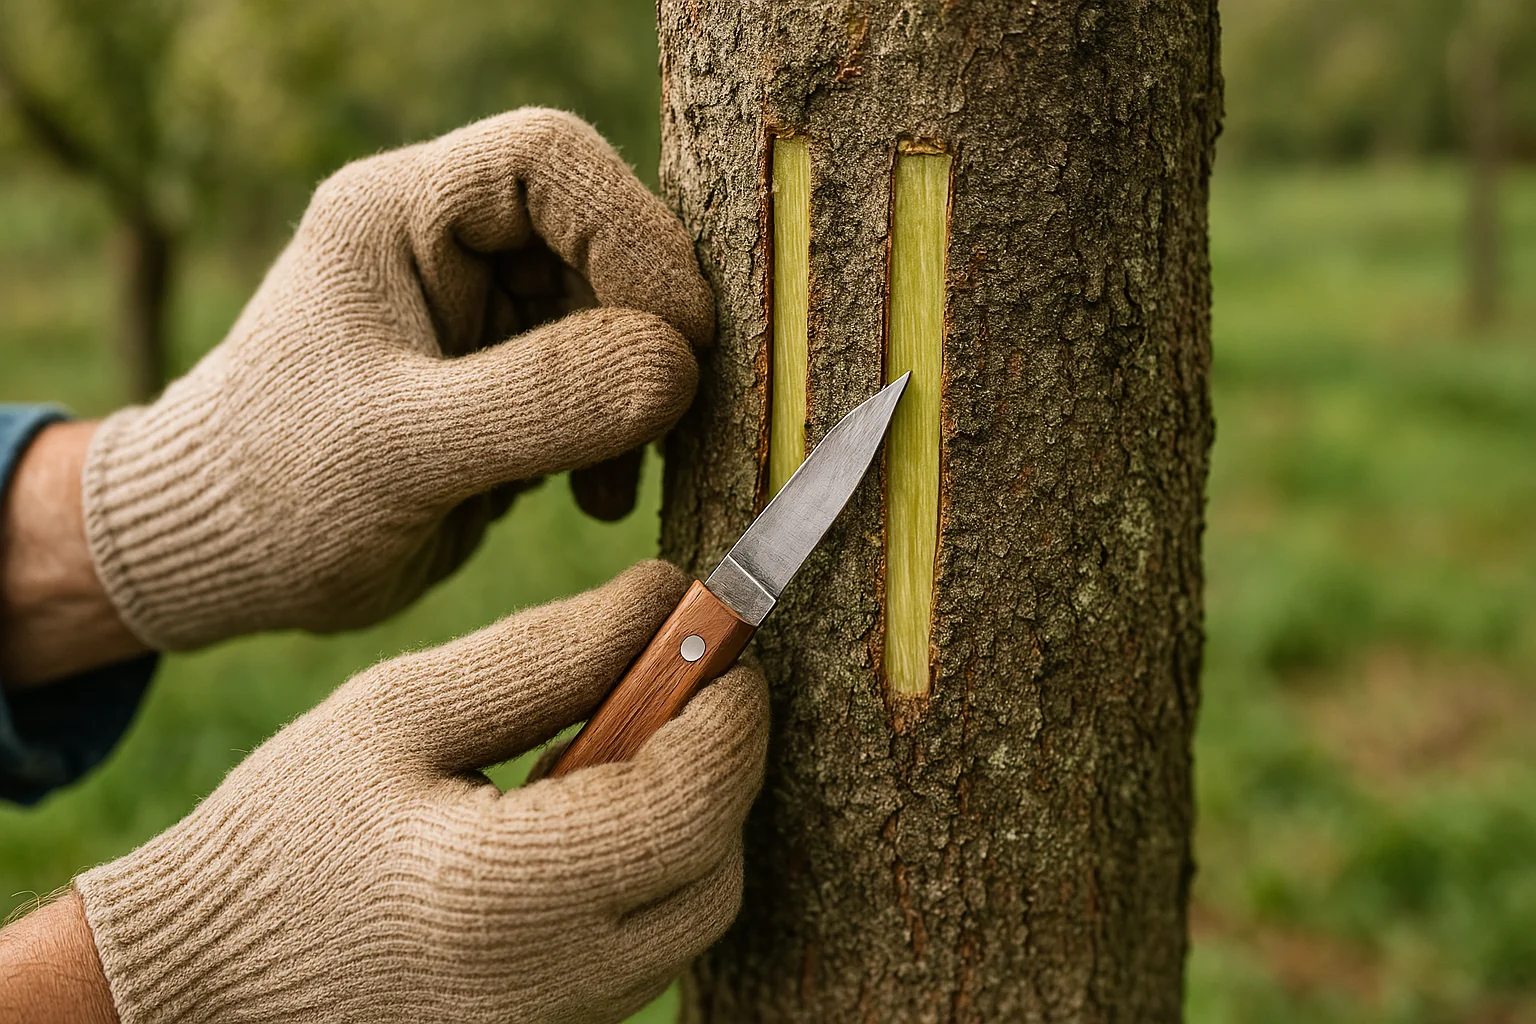
Step 4: Making the Grafting Cut 🔪
Using your grafting knife, make vertical cuts into the bark of the tree just above and below the damaged area. These cuts should be deep enough to expose the cambium layer (the green layer just under the bark) but not so deep that they damage the tree further. You’ll also need to make similar cuts on the scion.
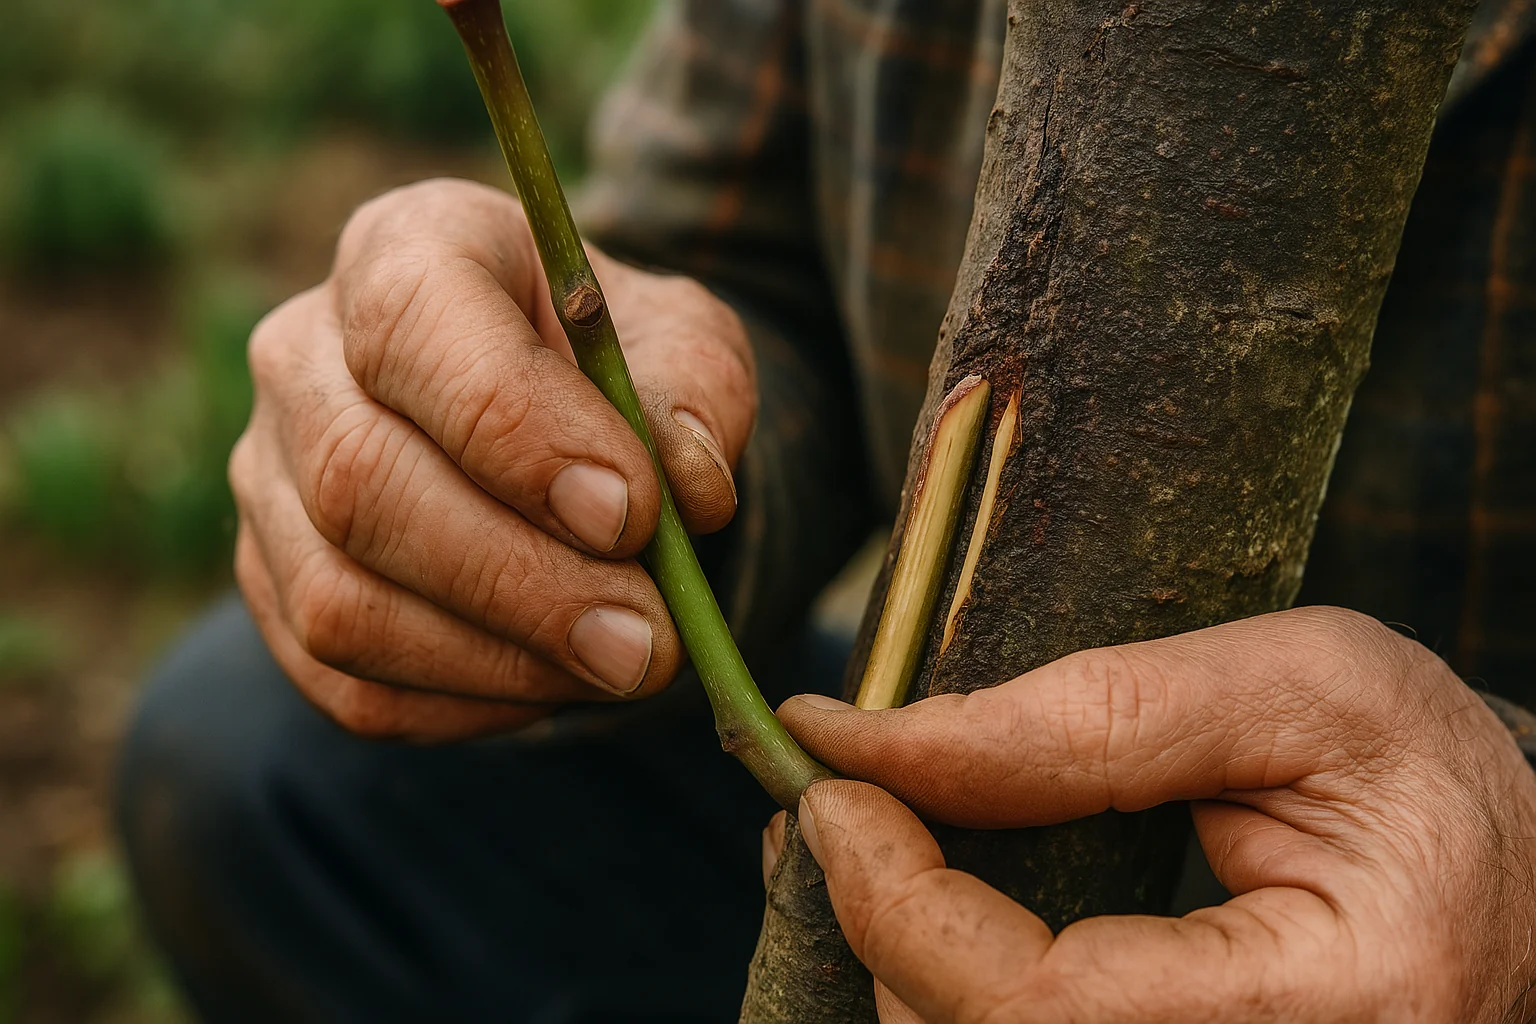
Step 5: Inserting the Scion 🌿
Carefully insert the scion into the cuts made on the tree. The cut surfaces of the tree and the scion should align closely, allowing the cambium layers to connect. This connection is critical for nutrient flow, so be sure the fit is tight.
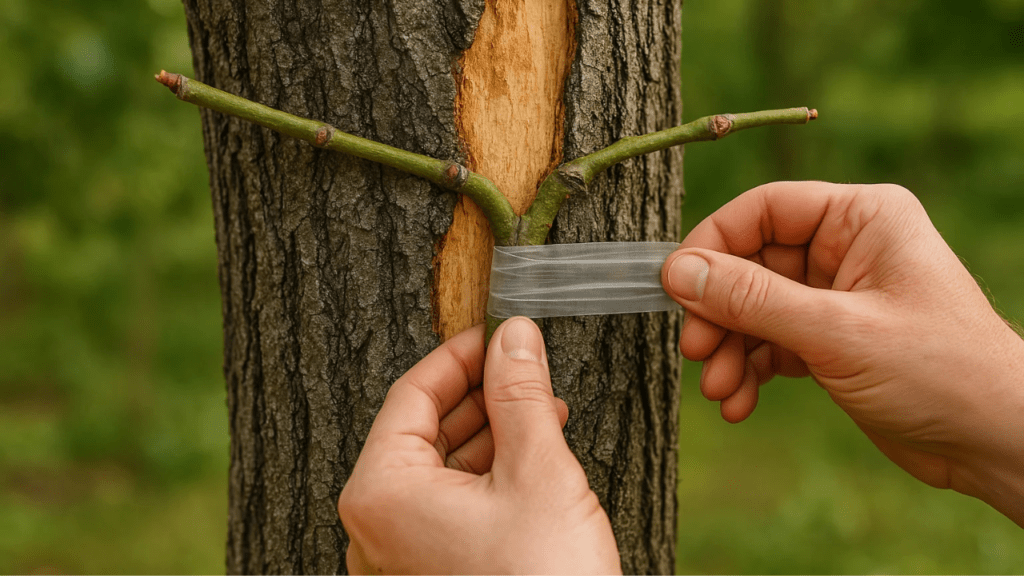
Step 6: Securing the Graft 🎀
Wrap the grafting tape around the grafted area to hold the scion in place. Make sure it’s firm, but not too tight, as the scion needs room to grow. The tape should cover both the scion and the tree’s damaged area to protect it from environmental stress and pests.
Step 7: Sealing the Graft 🧴
Apply grafting wax or sealing compound around the graft area to keep moisture in and pathogens out. This step helps prevent drying and keeps the graft secure during the healing process. Be sure to cover any exposed areas of the graft.
Step 8: Monitoring the Graft 👀
After the graft is complete, monitor it regularly to check for signs of success. Look for new growth on the scion and check the grafted area for any signs of infection or failure. If needed, gently remove the tape after a few months, once the graft has bonded.
By following these steps carefully, you’ll give your tree the best chance at recovery. Patience is key as the tree heals, but with consistent care, you can help restore its health and vitality! 🌳💚
Aftercare for Bridge Grafting
Once you’ve successfully completed the bridge grafting for damaged trees, the real work begins! Proper aftercare is crucial for ensuring the graft takes and the tree heals well. Here’s how you can care for your grafted tree to support its recovery. 🌱💚
1. Watering and Fertilizing 💧🌿
- Watering: Keep the tree well-watered, but avoid overwatering. The soil should remain moist, not soggy. Proper hydration helps the graft establish and promotes healthy growth.
• Fertilizing: After a few weeks, you can start applying a balanced, slow-release fertilizer to give the tree nutrients it needs for recovery. Don’t fertilize too soon, as it might stress the tree.

2. Pruning and Maintenance ✂️
- Light Pruning: Once the graft has taken, you can prune any dead or damaged branches to encourage new growth. Make sure to leave the grafted scion untouched until it has fully established itself.
• Regular Check-ups: Inspect the graft site regularly for signs of growth or trouble. Remove any dead tissue around the graft, but avoid disturbing the graft itself.
3. Protecting the Graft Site 🛡️
- Pest Protection: Trees can be vulnerable to pests like ants, beetles, and other insects after grafting. Use organic pest control methods if needed and check the area for pests regularly.
• Sun Protection: If the grafted tree is exposed to harsh sunlight, consider adding some temporary shading to prevent sunburn on the graft area, especially during the first few weeks.
• Animal Protection: If you have animals that might nibble on your tree, consider wrapping the base or using tree guards to protect it from gnawing.
4. Monitoring Growth 🌳
- Watch for New Growth: Successful grafts will show signs of new growth within a few months. You should see the scion begin to sprout leaves or branches.
• Remove Grafting Tape: After a few months, once you see healthy growth, carefully remove the grafting tape. Be gentle to avoid damaging the tree or scion.
5. Be Patient ⏳
Healing takes time, so be patient and avoid rushing the process. Some grafts may take longer than others to establish. Keep up with watering, monitoring, and occasional light pruning, and give your tree the time it needs to recover fully.
Proper aftercare is essential for the success of your bridge graft. With the right attention, your tree will thrive, and the graft will become a natural part of its healing process. 🌿🌟
Common Challenges and Troubleshooting
While bridge grafting for damaged trees can be a highly effective way to restore a tree’s health, it’s not always without challenges. Understanding the common issues that might arise and how to handle them can make a huge difference in the success of your graft. Here’s what you need to watch out for, along with practical troubleshooting tips. 🛠️🌳
1. Failed Grafts 🚫
Sometimes, despite your best efforts, the graft may not take. Here’s how to identify and address a failed graft: • Signs of failure: The grafted scion may turn brown or wilt, and you might notice no new growth.
• Possible causes: Poor alignment of cambium layers, improper sealing, or lack of moisture.
• Troubleshooting: If a graft fails, remove it gently and try again. Make sure the cuts are clean and well-aligned, and ensure the grafting area is properly sealed and protected from pests.
2. Drying or Dying Graft 🌞
If the graft appears to be drying out or the scion is dying, the problem might be lack of moisture or excessive heat. • Signs of drying: The scion becomes brittle or discolored, and new growth is stunted.
• Possible causes: Insufficient watering, sun exposure, or lack of grafting wax.
• Troubleshooting: Keep the tree watered, especially in hot weather. You can also apply more grafting wax to seal any exposed areas and protect it from drying out.
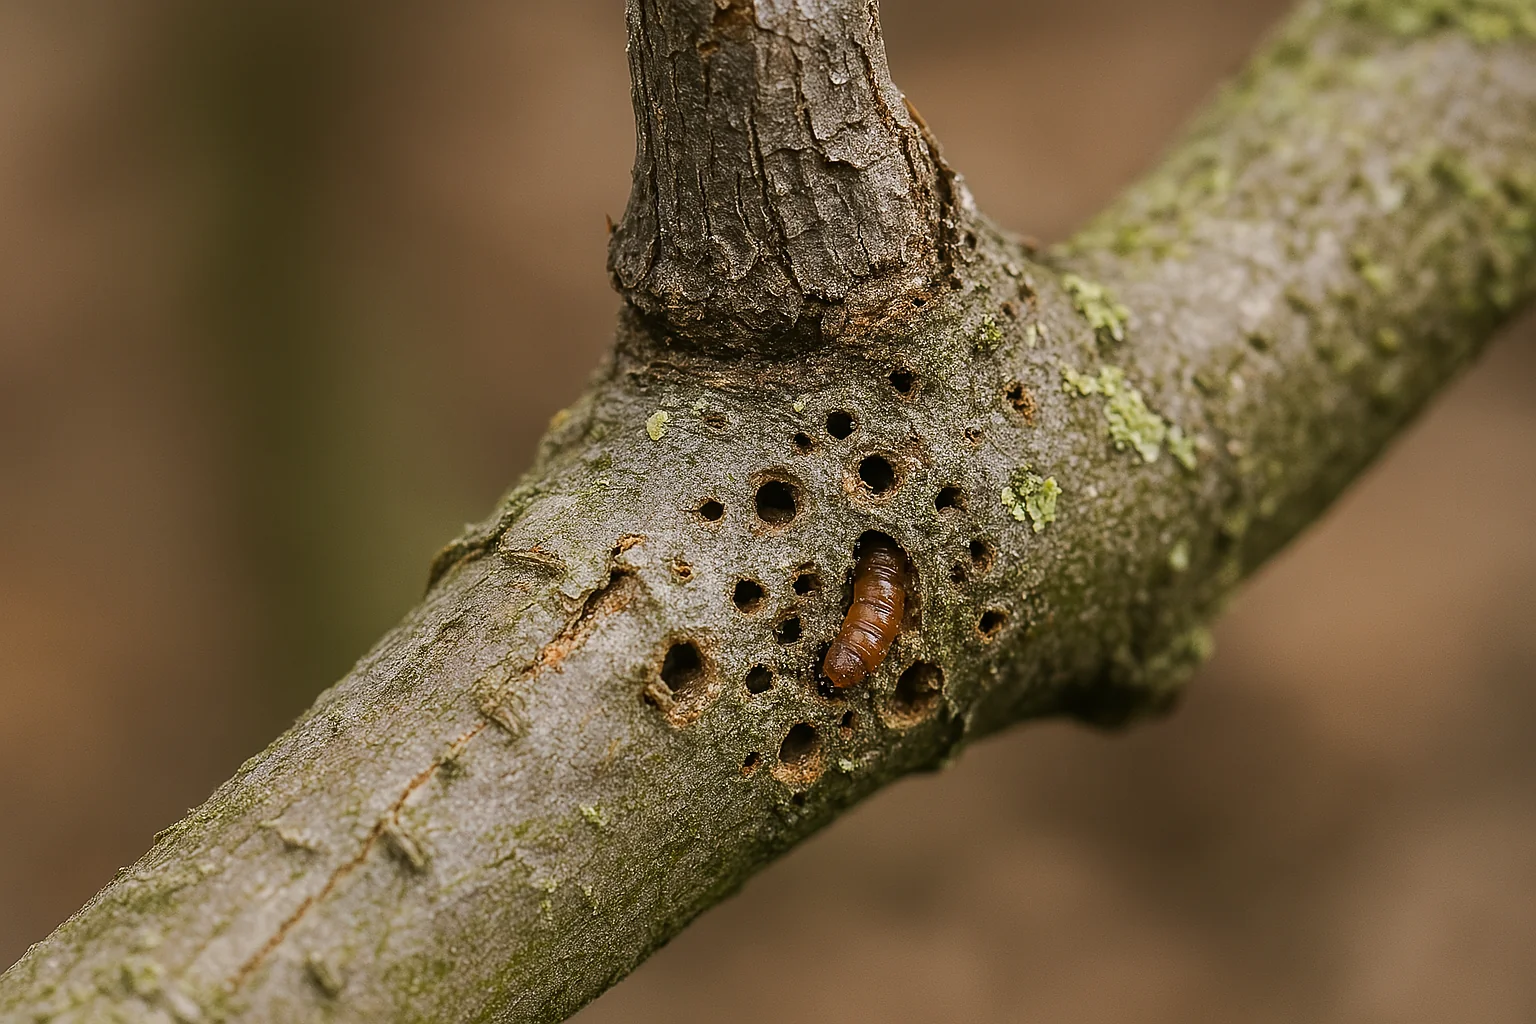
3. Pests and Diseases 🐜🦠
Pests and diseases can harm the graft and prevent it from healing properly. • Signs of infestation: Yellowing leaves, unusual holes in the bark, or a sticky residue around the graft.
• Possible causes: Aphids, beetles, or fungal infections.
• Troubleshooting: Keep the graft area clean and use organic pest control methods like neem oil. If you notice signs of infection, treat it with a safe fungicide or consult an expert.
4. Graft Not Growing 🌱
Sometimes, you might see no growth from the scion, even though the graft appears to be healing. • Signs of no growth: No new leaves or shoots after a few months.
• Possible causes: The cambium layers may not have connected properly, or the scion could be too old or weak.
• Troubleshooting: Gently check the graft for signs of a successful connection. If the scion is dead or the connection didn’t form properly, remove the failed scion and try again with a healthier one.
5. Overgrafting or Damage to the Tree ⚠️
In rare cases, grafting may cause additional stress to the tree, especially if multiple grafts are applied or if the tree is already weakened. • Signs of overgrafting: The tree shows signs of stress, such as wilting, yellowing leaves, or stunted growth.
• Possible causes: Too many grafts or excessive cutting of healthy tissue.
• Troubleshooting: Always make sure not to overgraft, and leave enough healthy tissue for the tree to thrive. If you notice stress, give the tree time to heal before attempting further grafts.
By staying vigilant and troubleshooting these common challenges, you’ll improve your chances of success with bridge grafting. Remember, patience is key, and with a bit of care, your tree can bounce back stronger than ever! 🌳💪
Final Thought
In summary, bridge grafting for damaged trees is an effective and rewarding technique that can restore a tree’s health and vitality after serious damage. By carefully following the steps outlined in this guide—from assessing the damage to providing proper aftercare—you can give your tree the best chance at recovery. 🌳💚
While challenges may arise, understanding common issues and knowing how to troubleshoot them ensures that you’re well-prepared to handle any setbacks. With patience, attention to detail, and the right materials, your tree can heal and continue to thrive for years to come. 🌿✨

Remember, bridge grafting is not just about repairing damage; it’s about giving your tree a second chance at life. By taking the time to nurture your tree back to health, you’re helping it grow stronger and more resilient, contributing to the beauty and ecosystem of your landscape. 🌍🌱
So, whether you’re a seasoned gardener or a first-time tree caretaker, don’t hesitate to try bridge grafting to save your damaged trees. With care and the right approach, your tree will be on the road to recovery in no time! 🌳💪