

Have you ever dreamt of growing your own cedar tree from scratch?  Whether you’re looking to add a touch of natural beauty to your landscape or start a long-term project, growing cedar tree seeds can be incredibly rewarding. But, as with any tree-planting endeavor, it comes with its challenges—cedar seeds require the right care, environment, and patience to thrive.
In this guide, we’ll walk you through everything you need to know to successfully plant and grow cedar trees from seeds. From prepping your seeds to ensuring they get the right conditions for germination, we’ll provide you with expert tips and practical advice to make the process easier and more successful. Let’s get started on your cedar tree-growing journey! 
Why Grow Cedar Trees from Seeds?
Growing cedar trees from seeds offers a unique and rewarding experience for gardeners and nature enthusiasts alike . While it may require a bit of patience, the process is highly rewarding, as you get to witness the entire life cycle of these majestic trees. Here’s why you should consider growing cedar trees from seeds:
1. Cost-Effective and Accessible 
Cedar tree seeds are relatively inexpensive and easy to obtain, making them a budget-friendly option compared to purchasing mature trees or saplings. Whether you’re a beginner gardener or a seasoned pro, starting from seeds can save you money, especially if you’re looking to grow several trees.
2. Control Over Growth Conditions 
When you grow cedar trees from seeds, you have full control over the growing environment. You can choose the best soil, location, and conditions for your seeds to thrive, ensuring healthy growth. This level of control is especially important if you’re aiming for specific traits in your cedar trees, like size or form.
3. Educational Experience 
Starting from seed is a great way to learn more about plant biology and the growth process. You’ll gain insight into seed germination, root development, and tree care. This hands-on approach is educational and helps you develop a deeper connection with nature.
4. Long-Term Investment 
Cedar trees can live for decades, and they will grow steadily over time, adding beauty and value to your landscape. By planting from seed, you’re investing in the future of your property. Over the years, your cedar trees will provide shade, shelter, and even wildlife habitat.
5. Environmentally Friendly 
Growing your own cedar trees contributes to environmental sustainability. You’re helping to increase green cover, improve air quality, and reduce your carbon footprint by nurturing more trees. Plus, cedar trees are known for being hardy and drought-resistant, making them an excellent choice for environmentally conscious gardeners.
6. Satisfaction of Growing from Scratch 
There’s a unique satisfaction that comes with watching a tree grow from a tiny seed into a towering cedar. This journey brings a sense of accomplishment and pride, as you’ve played a key role in the life of a beautiful, long-lived tree.
By growing cedar trees from seeds, you not only save money and gain control over the process but also enjoy an enriching and fulfilling gardening experience  . Ready to dive in? Keep reading our step-by-step guide on how to plant and grow cedar tree seeds for success!
Understanding Cedar Tree Seeds
Cedar trees are among the most majestic and long-lasting trees, known for their beautiful wood and aromatic scent. If you’ve ever wondered how to plant and grow a cedar tree from seed, you’re in the right place! In this section, we’ll break down the basics of cedar tree seeds—how they work, what they need to thrive, and how you can successfully grow your own tree from seed.
What Are Cedar Tree Seeds?
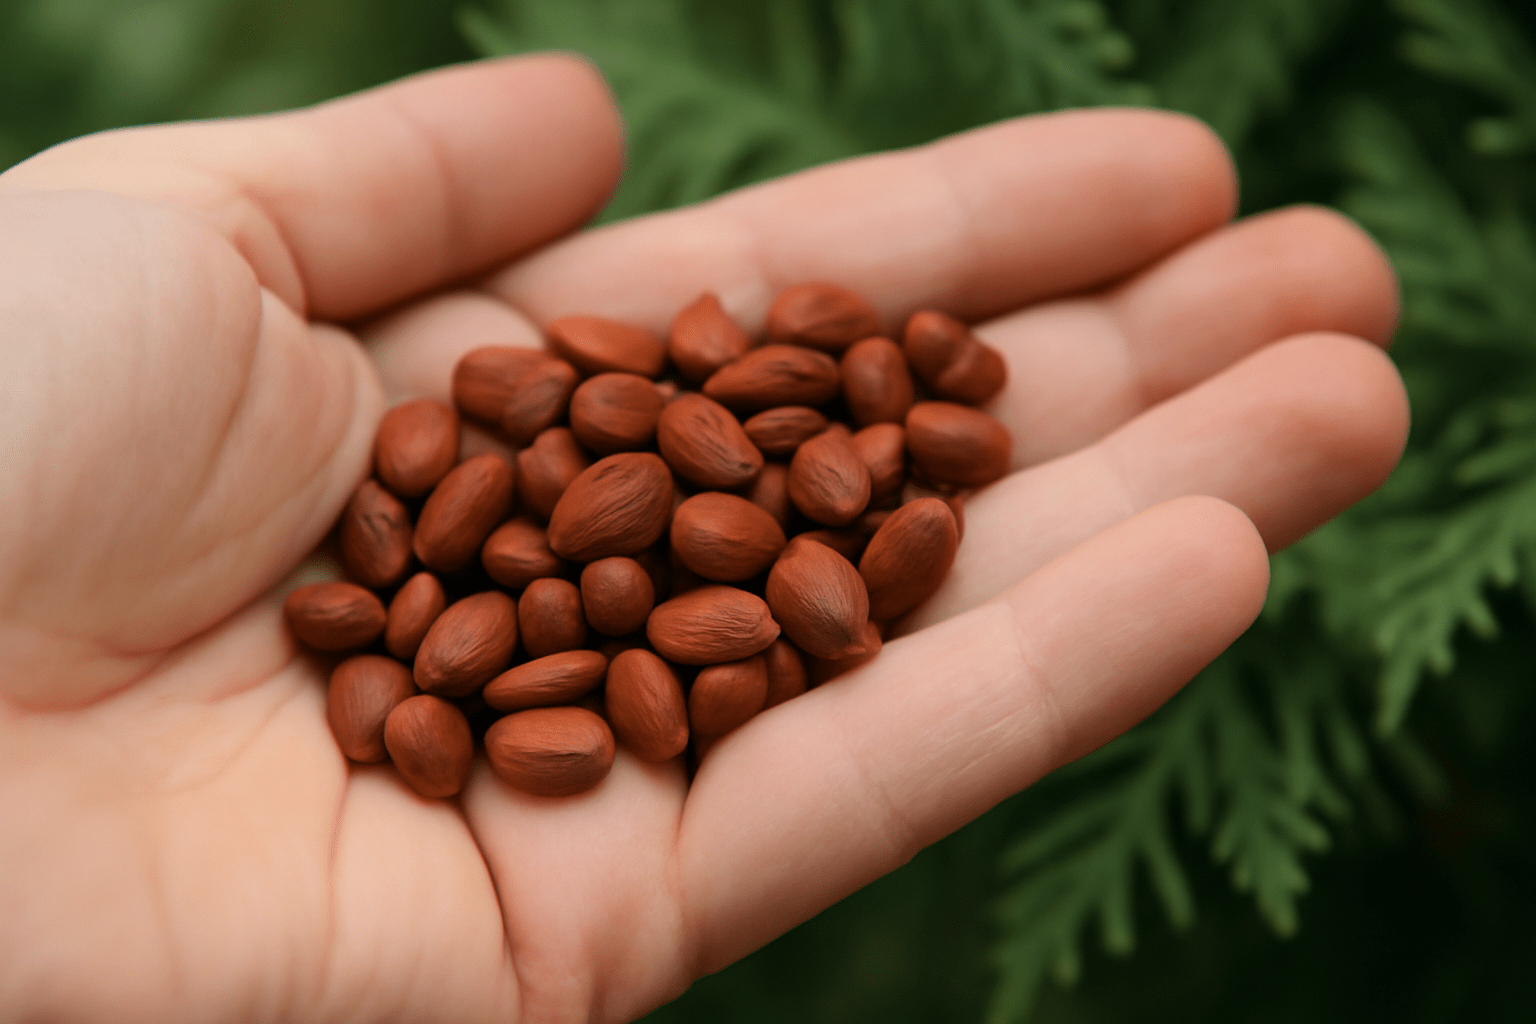
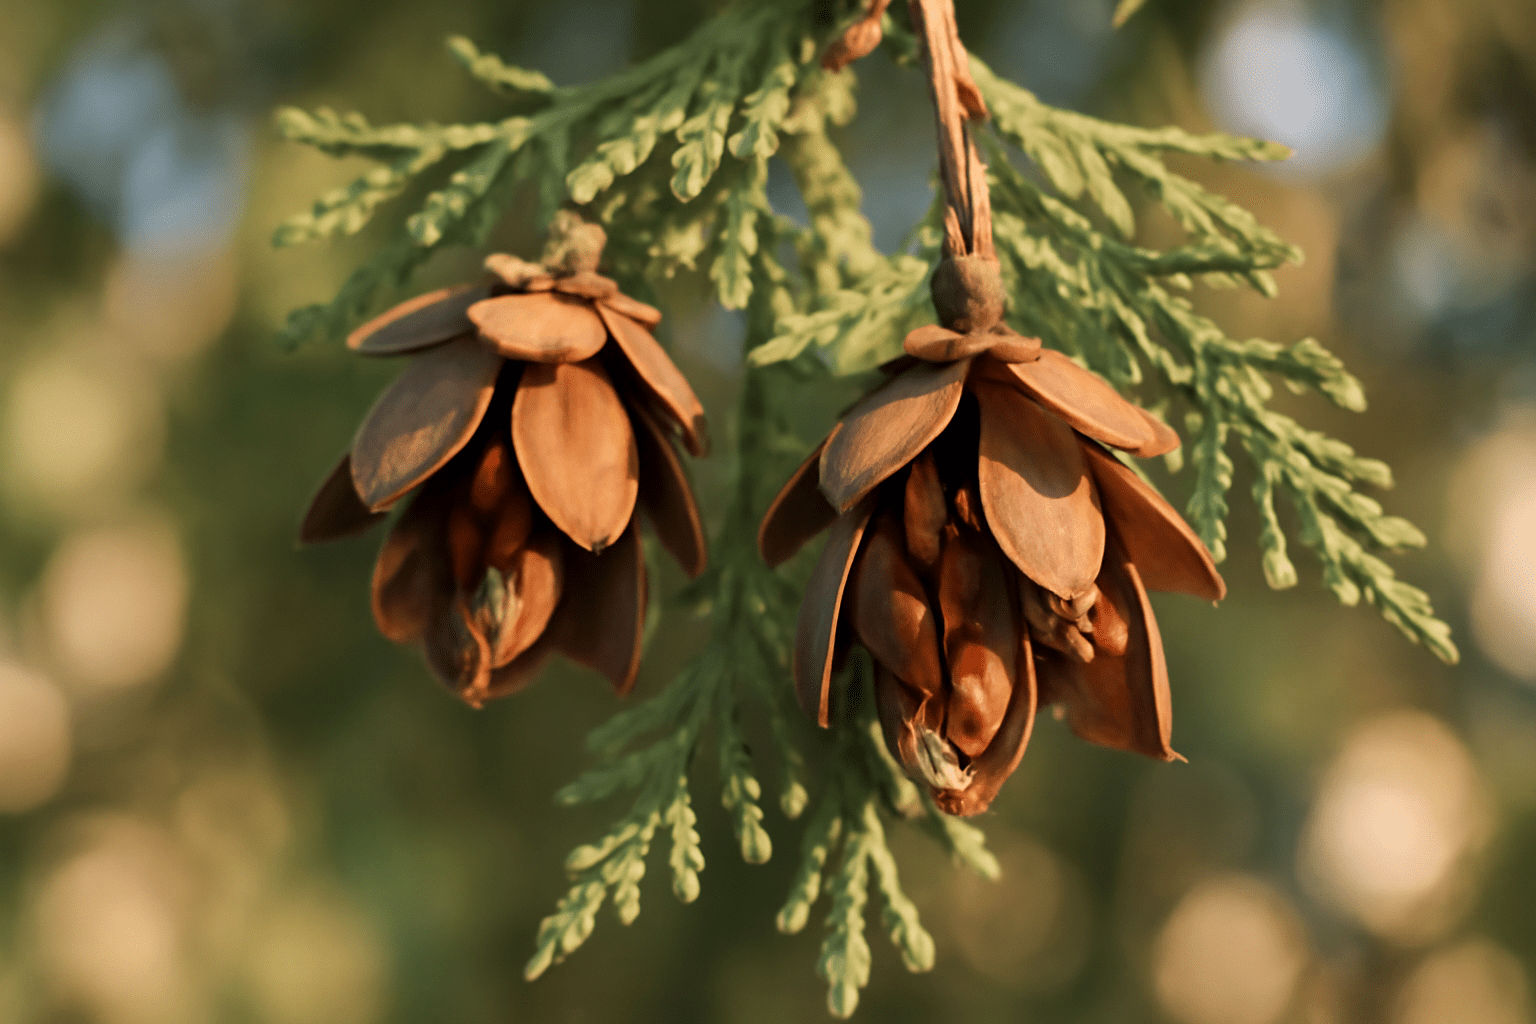
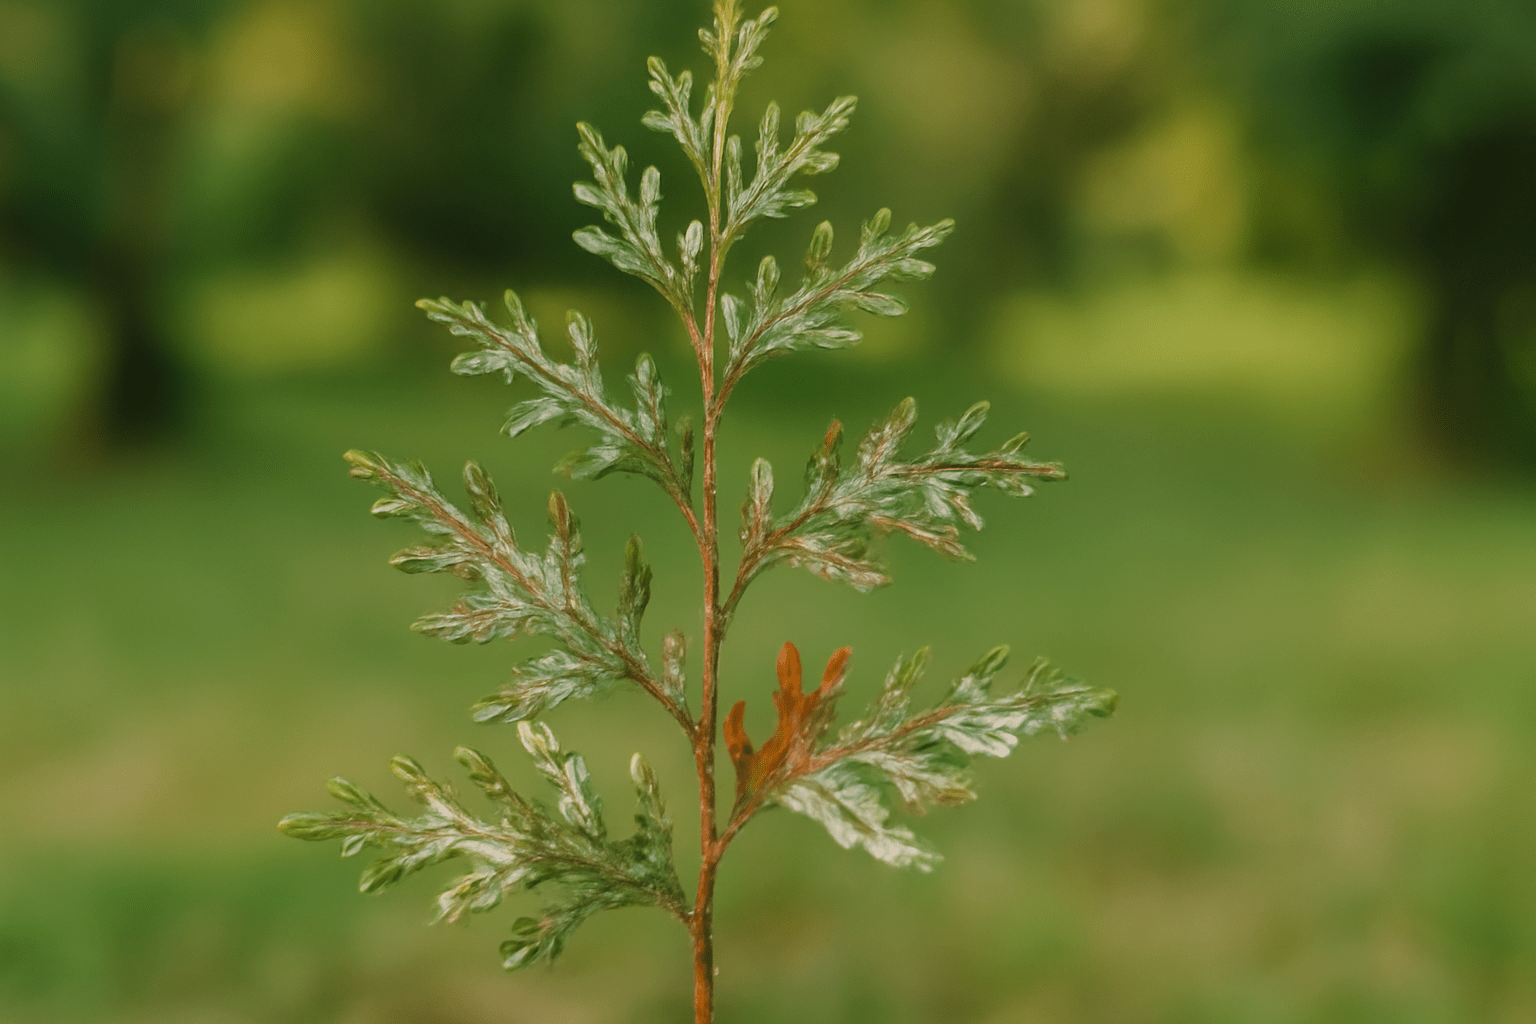
Cedar tree seeds are the starting point for growing a cedar tree. These seeds come from the cone-like structures produced by the tree, often referred to as “seed cones.” They contain the genetic material that will eventually grow into a full-sized cedar tree. These seeds are small, typically reddish-brown in color, and surrounded by a hard, protective outer shell.
Why Grow Cedar Trees from Seed?
Growing cedar trees from seed can be a rewarding experience. While it takes time and patience, it allows you to cultivate a tree that is perfectly suited to your climate and soil. Plus, it’s an affordable way to start a cedar tree garden or forest. You’ll also get to witness the entire growth process, from seedling to towering cedar!
When to Harvest Cedar Tree Seeds
Cedar seeds are typically harvested in late fall to early winter, after the cones have fully matured. At this time, the cones start to open up, releasing the seeds inside. You can collect these seeds by gently shaking the cones or allowing them to naturally fall to the ground.
Cedar Seed Dormancy and Stratification 
Cedar seeds have a natural dormancy period, meaning they won’t start growing immediately after being harvested. To break this dormancy, you need to use a process called cold stratification.
- Cold Stratification: This mimics the winter conditions that seeds would naturally experience in the wild. To do this, place your cedar seeds in a damp paper towel, seal them in a plastic bag, and refrigerate them for 30-60 days. This helps soften the seed coat, preparing it for germination.
Germinating Cedar Seeds
After stratification, it’s time to germinate your cedar seeds. Here’s how you can do it:
- Prepare a Pot: Fill a small pot with well-draining potting soil. Cedar trees prefer soil that allows water to drain easily, so ensure the pot has drainage holes.
- Plant the Seeds: Gently place the seeds about 1/4 inch deep into the soil. Cover them lightly with soil, then water them gently to keep the soil moist, not soggy.
- Provide Warmth and Light: Cedar seeds need warmth and light to germinate. Place the pot in a sunny spot or under grow lights, ensuring the temperature remains between 60-70°F (15-21°C).
- Maintain Humidity: Cover the pot with a plastic bag or clear plastic dome to maintain humidity. Open it occasionally to allow air circulation and prevent mold.
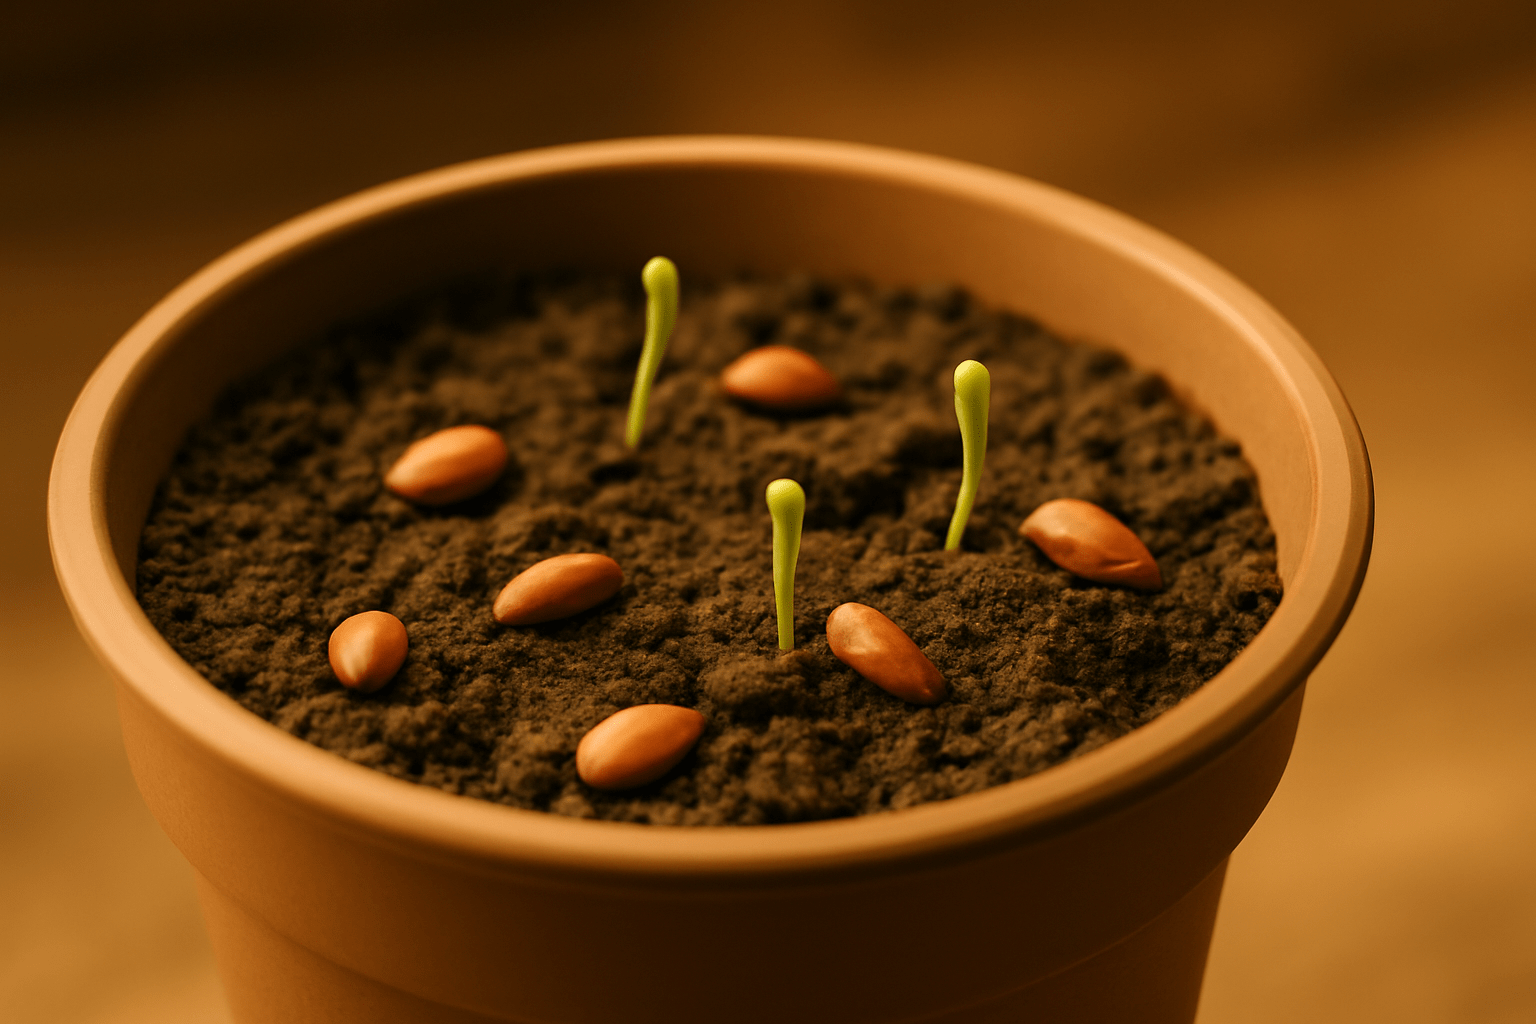
What to Expect During Germination
Cedar seeds typically take anywhere from 2 to 6 weeks to germinate. Be patient! During this time, you’ll start to see tiny seedlings emerging from the soil. Once the seedlings are big enough to handle, it’s time to start preparing them for transplanting outdoors.
Tips for Success with Cedar Seeds 
- Avoid Overwatering: Cedar trees prefer slightly dry conditions, so only water when the soil feels dry to the touch.
- Use Fresh Seeds: Fresh seeds tend to have higher germination rates than older seeds. If you’re unsure how old your seeds are, it’s better to harvest new ones.
- Be Patient: Growing cedar trees from seed can take time, sometimes several years before they mature. But with patience and care, you’ll have a stunning tree for decades to come.
Conclusion
Growing cedar trees from seed is a rewarding challenge for gardeners of all skill levels. With a little preparation, patience, and proper care, you can successfully plant and nurture your cedar tree into a towering symbol of nature’s beauty. By understanding the seed’s needs, such as stratification, proper germination techniques, and ongoing care, you’ll be on your way to cultivating your own forest of these magnificent trees. 
Ready to plant your cedar seeds? Let’s get started!
How to Prepare Cedar Tree Seeds for Planting
Cedar trees are a beautiful addition to any landscape, but successfully growing them from seed requires some care and patience. Here’s a simple guide to help you prepare cedar tree seeds for planting, ensuring they have the best chance of thriving in your garden.
1. Collecting Cedar Tree Seeds
First things first: you’ll need to collect your cedar seeds. Cedar trees produce seeds within their cones, which are typically ready to harvest in late summer to early fall. Gently pull the cones from the tree, and place them in a dry, cool location. Over the next few weeks, the cones will open up, releasing the seeds inside.
2. Cleaning the Seeds 
Once you’ve collected your cedar seeds, it’s essential to clean them before planting. Gently remove any debris, such as bits of cone or pine needles. You can do this by shaking the seeds in a mesh sieve or gently rubbing them between your hands. Clean seeds will have a better chance of germinating.
3. Stratification: The Cold Treatment
Cedar seeds need a period of cold stratification (a fancy word for simulating winter conditions) to break their dormancy. This process is crucial for the seeds to sprout successfully. To do this:
- Place your cleaned seeds in a damp paper towel or a plastic bag filled with moist sand.
- Store the bag in the fridge for 30 to 60 days. Make sure the seeds are kept at a temperature between 34°F and 40°F (1°C–4°C).
- Check periodically to ensure the seeds remain moist but not soggy.
4. Pre-soaking for Extra Boost 
After the cold stratification period, consider soaking your cedar seeds in water for 24 hours before planting. This step can further improve germination rates by softening the seed coat, making it easier for the seed to sprout. Just be sure to not soak them for too long—24 hours is sufficient.
5. Check the Seeds for Viability 
Before planting, you can check the viability of your cedar seeds. Place the seeds in a cup of water and wait for 10-15 minutes. The seeds that float may not be viable, while the ones that sink are more likely to germinate.
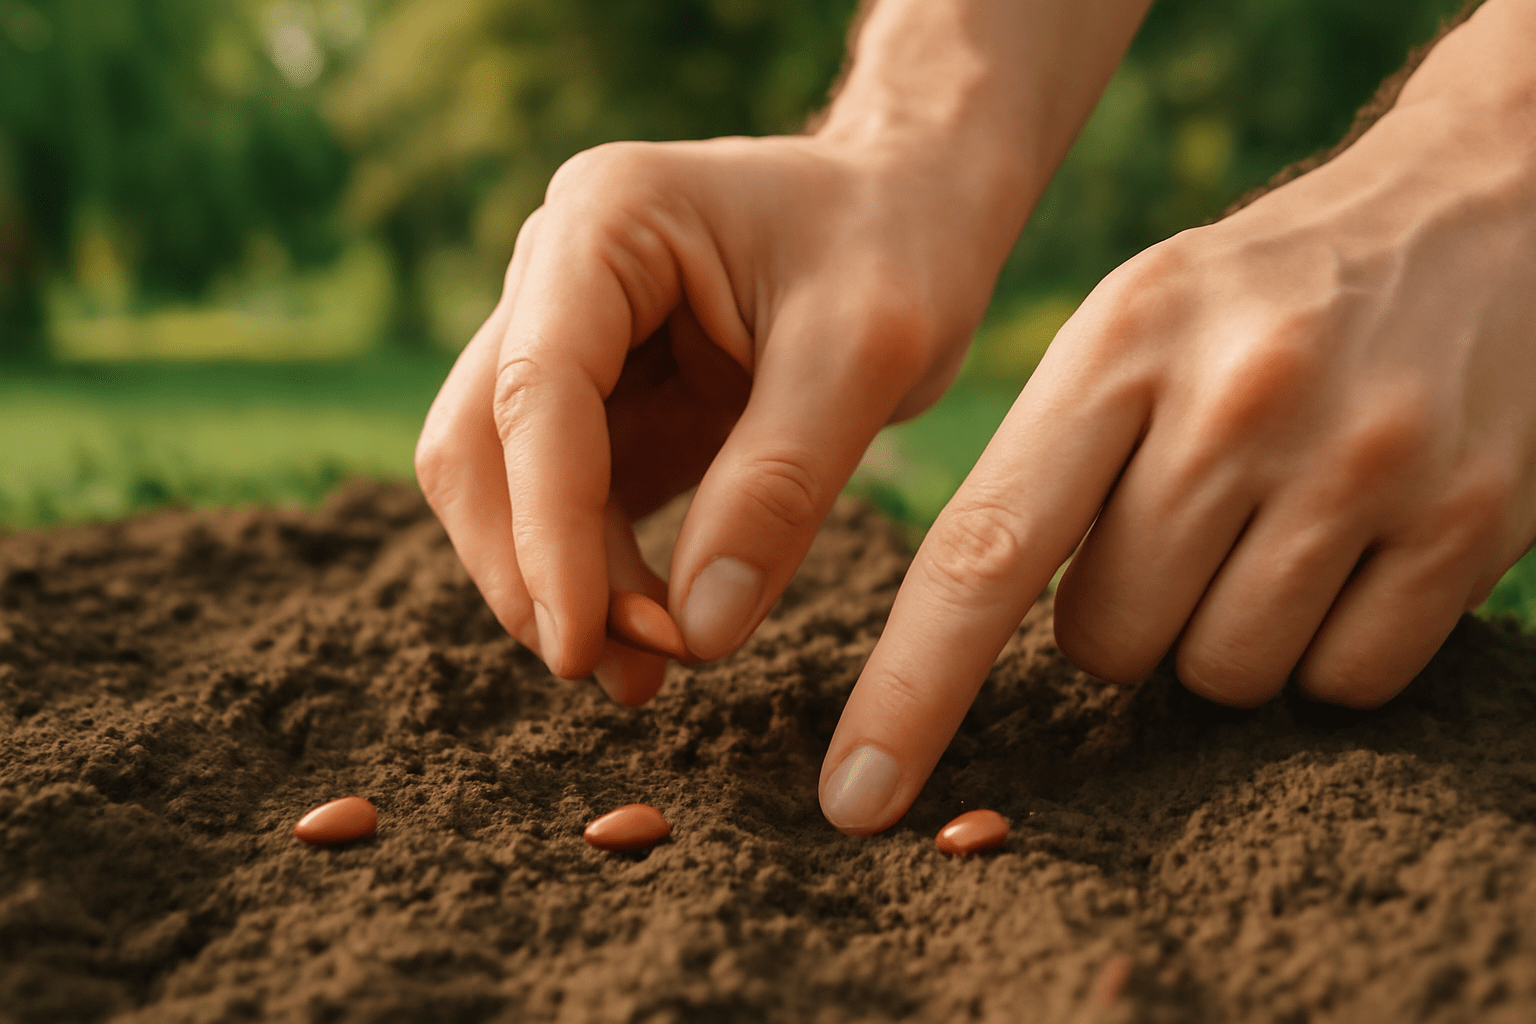
6. Planting the Seeds
Once your seeds have been stratified, soaked, and tested for viability, it’s time to plant them. Here’s how:
- Choose a location with well-drained soil and plenty of sunlight. Cedar trees thrive in full sun.
- Plant the seeds about ¼ inch deep into the soil. If you’re starting them indoors, use small pots filled with a light, well-draining potting mix.
- Water gently, keeping the soil moist but not soaked.
7. Patience is Key
Germination for cedar tree seeds can take some time, anywhere from 1 to 3 months. Be patient, and continue to keep the soil moist and warm. Once the seeds sprout, you can gradually start acclimatizing them to outdoor conditions.
By following these simple steps, you can prepare your cedar tree seeds for successful planting and watch them grow into beautiful, majestic trees! 
This section provides easy-to-follow, expert advice on preparing cedar tree seeds for planting. With clear instructions and helpful tips, you’ll be ready to grow your very own cedar trees in no time.
Planting Cedar Tree Seeds: Step-by-Step Guide
Planting cedar tree seeds is a rewarding process that can lead to a beautiful, long-lasting tree in your garden or landscape. Whether you’re a beginner or have some gardening experience, this step-by-step guide will walk you through everything you need to know to successfully plant and grow cedar tree seeds. Let’s get started!
1. Choose the Right Cedar Tree Seed
Before you begin, make sure you have the right type of cedar tree seed. There are different species, such as Eastern Red Cedar and Western Red Cedar, so pick one that suits your climate and soil. Cedar seeds are tiny, so handling them with care is essential for the best results.
2. Stratify the Seeds (Cold Treatment)
Cedar seeds need a period of cold to break their dormancy, known as stratification. Here’s how to do it:
- Place your seeds in a zip-lock bag with some moist sand or peat moss.
- Put the bag in the fridge for about 30 to 60 days. This mimics winter conditions and encourages germination.
- Check regularly to ensure the seeds remain moist, but not soaking wet.
3. Prepare the Planting Area
Cedar trees love well-drained, slightly acidic soil. Choose a sunny spot where the soil is rich in nutrients and drains well. Cedar trees thrive in both sandy and loamy soils, so make sure the area is clear of weeds or debris.
- Tip: If you have heavy clay soil, amend it with organic matter like compost to improve drainage.
4. Planting the Seeds
Once the seeds have been stratified and you’re ready to plant them, follow these simple steps:
- Plant Depth: Sow the seeds about ¼ inch (0.6 cm) deep into the soil. Cedar seeds are tiny, so shallow planting works best.
- Spacing: Space the seeds 2 to 3 inches apart to allow for growth and avoid overcrowding.
- Watering: Lightly water the area to keep the soil moist but not waterlogged. Over-watering can cause the seeds to rot.
5. Germination and Care
Cedar seeds usually take 2 to 3 weeks to germinate after planting. During this time, it’s important to:
- Maintain Moisture: Keep the soil consistently moist, but not soggy. Water lightly every few days.
- Monitor Temperature: Cedar seeds thrive at temperatures between 65-75°F (18-24°C). If you’re planting indoors, make sure the area is warm enough.
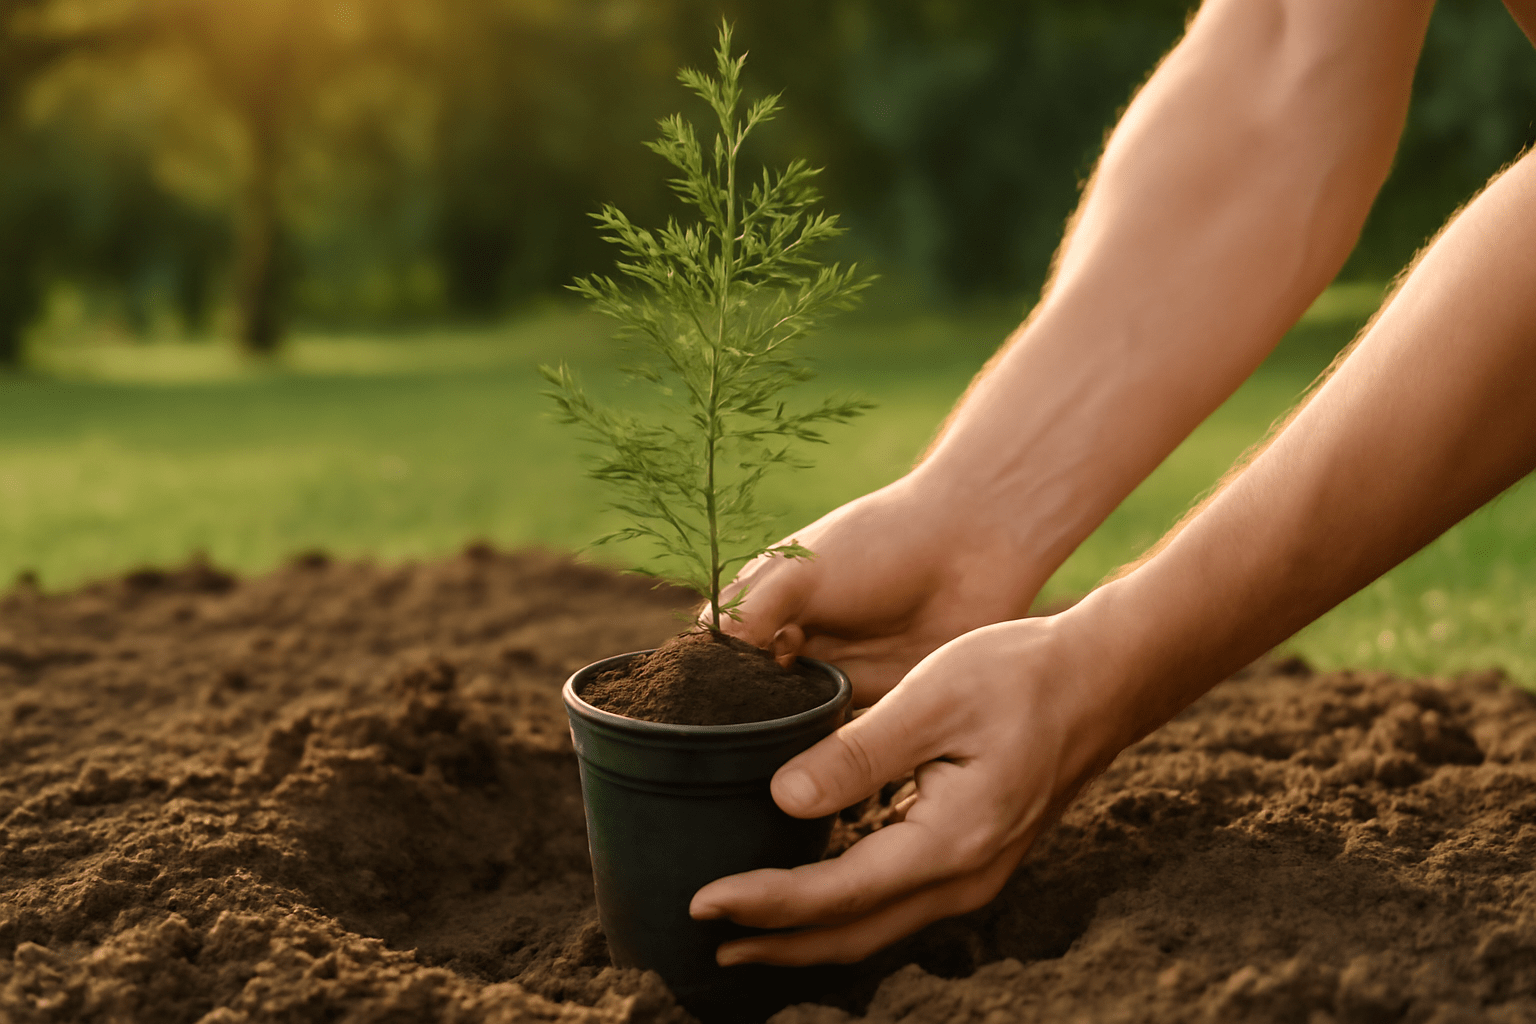
6. Transplanting Seedlings
Once your cedar seedlings have grown strong enough, it’s time to transplant them into larger pots or directly into the ground. When the seedlings are about 4-6 inches tall and have several sets of leaves, they’re ready for the next phase.
- Transplanting Tip: Be gentle when handling the young seedlings, as they have delicate roots. Dig a hole large enough to accommodate the root ball, and place the seedling in the hole. Water thoroughly to help them settle in.
7. Ongoing Care for Young Cedars
As your cedar trees grow, continue to provide them with the right care:
- Watering: Young trees need consistent watering during the first couple of years, especially during dry spells.
- Mulching: Apply mulch around the base of the tree to retain moisture and keep the soil temperature stable.
- Pruning: Cedar trees don’t require much pruning, but if you notice any dead or damaged branches, trim them carefully.
By following these simple steps, you’ll be on your way to growing healthy, strong cedar trees that will thrive for years to come. Happy planting! 
Care and Maintenance During Germination
Germinating cedar tree seeds is an exciting process, but it requires careful attention to ensure successful growth. Follow these simple yet essential tips to give your cedar seeds the best chance at thriving during the early stages.
1. Ensure Proper Soil Moisture
Cedar seeds need consistently moist soil to germinate. Keep the soil damp but not soggy. You can use a spray bottle to mist the surface, ensuring the moisture is evenly distributed. Avoid overwatering, as this can lead to mold growth or seed rot.
2. Provide the Right Temperature 
Cedar seeds germinate best at temperatures between 65°F and 75°F (18°C to 24°C). If your growing area is too cold, consider using a heat mat to maintain the ideal temperature. Too hot, and the seeds may dry out or fail to sprout.
3. Maintain Light Levels 
While cedar seeds don’t require direct sunlight during germination, they do need some light to encourage healthy growth once they sprout. Place them in a location with indirect light or under grow lights. Keep in mind that direct sunlight at this stage can dry out the seeds, hindering their development.
4. Protect from Pests 
During the germination process, seeds are particularly vulnerable to pests like fungus gnats or soil mites. Make sure to cover the planting container with a fine mesh or a lid with ventilation holes. This not only protects the seeds but also helps retain moisture and maintain the right humidity level.
5. Thin Seedlings as They Grow 
Once your cedar seeds begin to sprout, you might notice multiple seedlings emerging from the same spot. If the seedlings are crowded, thin them out by gently removing the weaker ones. This will give the stronger plants room to grow and develop healthy roots.
6. Watch for Mold or Mildew 
Mold can easily form in damp conditions, especially in high-humidity environments. If you notice any mold on the surface of the soil, remove it immediately and allow the soil to dry slightly. You can also use a gentle fungicide, but always opt for natural, plant-safe options to avoid harming your young cedar trees.
7. Air Circulation Is Key 
Good air circulation is essential to avoid fungal issues and help the seedlings thrive. If you’re using a humidity dome or plastic cover, make sure to occasionally remove it for air exchange. You can also gently fan the seedlings once a day to encourage healthy airflow.
8. Be Patient 
Germination can take time. Cedar seeds may take anywhere from 2 to 4 weeks to sprout, and during this period, patience is key. If you don’t see immediate results, don’t get discouraged. Keep up with the proper care, and soon you’ll see those tiny seedlings push through the soil.
By keeping these care and maintenance tips in mind, you’ll be setting your cedar tree seeds up for success. Happy growing!
Transplanting Cedar Tree Seedlings
Transplanting cedar tree seedlings can be a rewarding experience when done correctly. Whether you’re moving them to a new spot in your garden or planting them outdoors, proper transplanting techniques will ensure they thrive. Here’s a simple, step-by-step guide to help you succeed:
1. Timing is Key 
The best time to transplant cedar tree seedlings is during early spring or fall, when the weather is mild. Avoid transplanting in the middle of hot summer months or during winter, as extreme temperatures can stress the young plants.
2. Prepare the New Location
Before you remove the seedlings from their original pots, make sure the new planting site is ready. Cedar trees prefer well-drained, slightly acidic soil with good sunlight. Choose a spot with plenty of natural light and enough space for the tree to grow tall and wide.
- Soil Tip: If your soil isn’t naturally acidic, you can amend it with peat moss or compost to create the ideal environment for your cedar seedling.
3. Water Before Transplanting
Water your seedlings thoroughly a few hours before transplanting. This helps to reduce shock and makes it easier to remove the seedlings from their containers without damaging the roots.
4. Gently Remove the Seedling
When you’re ready to transplant, gently slide the cedar tree seedling out of its pot. Take extra care not to disturb the roots too much. If it’s in a small plastic pot, squeeze the sides to loosen the soil, then tip the pot upside down and gently pull the plant out.
- Root Care: If the roots are tangled or circling around the pot, gently tease them apart to encourage them to grow outward once planted.
5. Dig a Proper Hole 
Dig a hole at least twice as wide and just as deep as the root ball of the seedling. This ensures that the roots have plenty of room to spread out and establish themselves in their new home.
- Pro Tip: The top of the root ball should be level with or slightly above the surrounding soil to prevent water from pooling around the base of the seedling.
6. Place the Seedling in the Hole
Place the cedar seedling into the hole, making sure it sits straight and centered. Fill in the hole with the soil you dug up, gently pressing it down around the roots to eliminate air pockets. Avoid packing the soil too tightly.
7. Water Generously 
After transplanting, water the cedar seedling thoroughly to help settle the soil around the roots. Keep the soil moist (but not soggy) for the first few weeks as the seedling establishes itself.
8. Mulch for Moisture Retention 
Add a layer of mulch around the base of the seedling, about 2-3 inches deep. This helps to retain moisture, regulate temperature, and keep weeds at bay. Be sure to leave a small gap around the trunk to avoid rot.
9. Monitor and Care 
Keep an eye on your transplanted cedar for the first few months. If the weather is particularly hot or dry, you may need to water more frequently. Watch for signs of transplant shock like yellowing leaves or wilting, and be patient—it may take some time for your seedling to adjust.
Transplanting cedar tree seedlings doesn’t have to be intimidating. With a little preparation and care, you’ll set your trees up for healthy growth. Happy planting!
Common Issues and Troubleshooting
While planting and growing cedar tree seeds is rewarding, it’s not without its challenges. Here’s a guide to help you troubleshoot common issues that may arise during your cedar tree growing journey. With these practical solutions, you’ll be on your way to healthy, thriving trees in no time!
1. Poor Germination Rates
One of the most common issues is low seed germination. Cedar seeds can be tricky to get started, but here’s what you can do to improve your chances:
- Stratify the Seeds: Cedar seeds require cold stratification (a period of cold treatment) to break dormancy. Soak your seeds for 24 hours and place them in the fridge for 30 to 60 days before planting. This simulates the winter conditions they need to sprout.
- Ensure Fresh Seeds: Old or improperly stored seeds may lose their viability. Always use fresh seeds from a reliable source for the best results.
2. Seeds Rotting or Mold Growth
If your cedar seeds are sitting in damp soil for too long, they may rot or develop mold. Here’s how to prevent this:
- Use Well-Draining Soil: Ensure that your seed-starting mix drains well. Excess moisture can lead to mold and rot. A mix of peat, perlite, and sand works well for cedar seeds.
- Avoid Overwatering: Keep the soil lightly moist, not soaking wet. Cedar seeds are sensitive to standing water, so let the soil dry out slightly between waterings.
3. Slow or Stunted Growth
If your cedar trees seem to be growing too slowly or stunting, it could be due to several factors:
- Insufficient Light: Cedar seeds need a lot of light to germinate and grow. If you’re starting them indoors, make sure they get 12-16 hours of light a day. Use grow lights if necessary to supplement natural sunlight.
- Nutrient Deficiency: Cedar trees, especially when young, need nutrients to grow. Use a balanced, slow-release fertilizer to provide essential nutrients. However, don’t over-fertilize, as this can lead to root burn.
4. Pests and Diseases
Like all plants, cedar seedlings are vulnerable to pests and diseases. Here’s how to protect them:
- Check for Insects: Common pests such as aphids, spider mites, and caterpillars can damage young seedlings. Inspect your plants regularly and use an organic pesticide or neem oil to keep pests at bay.
- Improve Air Circulation: Poor air circulation can encourage fungal diseases. Make sure your seedlings are spaced out enough to allow airflow, especially in a greenhouse or indoors.
- Avoid Overcrowding: Too many seedlings in one space can increase the risk of disease transmission. Thin out the seedlings to allow each one enough room to grow.
5. Root Rot or Transplant Shock
When transplanting cedar seedlings, it’s common to face root rot or transplant shock. This can happen if the young tree is disturbed too much during planting. To avoid this:
- Handle with Care: Be gentle when transplanting cedar trees to prevent disturbing the roots. Make sure the root ball stays intact.
- Hardening Off: Before transplanting your cedar seedlings outdoors, gradually expose them to outdoor conditions over the course of 7-10 days. This process, called “hardening off,” helps them acclimate to the new environment without shock.
6. Poor Soil Quality
Cedar trees prefer well-drained, slightly acidic to neutral soil. If your soil is too heavy or lacks the right nutrients, your trees might struggle. Here’s how to improve it:
- Test Your Soil: Test the soil’s pH and adjust it as needed. Add lime to increase alkalinity or sulfur to lower it if necessary.
- Improve Drainage: If your soil tends to retain too much moisture, amend it with organic matter like compost to improve its drainage.
7. Temperature Fluctuations
Cedar trees are hardy, but extreme temperature changes can cause stress, especially in the early stages of growth. To combat this:
- Monitor Temperature: Keep your seedlings in a location where the temperature is stable. Avoid placing them in areas where they’ll experience cold drafts or hot, direct sunlight for extended periods.
- Cover During Frost: If you’re growing your cedars outdoors and there’s a risk of frost, cover them with a frost cloth to protect them from cold damage.
By staying vigilant and following these troubleshooting tips, you can tackle most issues with cedar tree seed growth and give your seedlings the best chance to thrive. Happy planting!
Conclusion
Growing cedar trees from seeds is a fulfilling and sustainable way to bring the beauty of nature into your space, whether for landscaping or reforestation efforts. By following the step-by-step guide outlined in this article, you’re now well-equipped to navigate the challenges of seed preparation, planting, and nurturing your cedar seedlings. Remember, patience and attention to detail are key—cedar trees take time to grow, but with proper care, they will reward you with long-lasting beauty and shade for years to come.
Whether you’re a first-time gardener or an experienced plant lover, growing cedar tree seeds offers both environmental benefits and a sense of personal accomplishment. So, take the plunge and start your cedar-growing journey today—you’ll be amazed at the transformation as your tiny seeds grow into majestic trees. Happy planting!