
Have you ever stepped back after pruning your favorite tree or shrub, only to notice ugly black spots, oozing sap, or branches that look stunted and diseased months later? 😔 You’re not alone. Many well-meaning gardeners make one small mistake—the wrong angle on their pruning cuts—that invites rot, fungal infections, and long-term decay. The good news? There’s a simple, time-tested technique that dramatically reduces these risks: the correct angle for pruning cuts, commonly known as the 45-degree rule.
This angled cut isn’t just a random recommendation from old gardening books—it’s backed by decades of research from university extension services (like NC State, Texas A&M, and Colorado State), the International Society of Arboriculture (ISA), and certified arborists worldwide. By sloping your cut at about 45 degrees downward and away from the trunk or parent branch, you help water shed quickly 💧, minimize wound exposure, protect the tree’s natural defense zones, and encourage faster, healthier healing. 🌱 In this comprehensive guide, we’ll dive deep into why this matters, how to do it perfectly every time, common pitfalls to avoid, and species-specific tweaks—so your trees stay strong, beautiful, and disease-resistant for years to come.
Whether you’re a beginner homeowner tackling backyard fruit trees 🍎 or an experienced gardener maintaining mature shade trees 🌳, mastering the correct angle for pruning cuts is one of the easiest ways to boost plant health and prevent costly problems down the road.
Why the Correct Angle Matters for Tree & Plant Health 🌳❤️
Pruning isn’t just about shaping your plants—it’s a surgical procedure that affects a tree’s long-term survival. When you make a cut, you create a wound that the tree must seal through compartmentalization (a process called CODIT: Compartmentalization Of Decay In Trees). Poor cuts disrupt this natural defense, allowing pathogens like fungi, bacteria, and insects easy entry.
Improper angles—such as flat (horizontal) cuts or stubs left too long—trap rainwater and moisture on the wound surface. Over time, this leads to:
- Water pooling → ideal environment for decay organisms 🦠
- Slow callus formation → the tree’s healing tissue struggles to roll over the wound
- Increased decay spread → potentially reaching the trunk or main branches
- Structural weakness → dead zones weaken limbs, raising fall risks in storms
The branch collar—that swollen, wrinkled area where the branch meets the trunk or parent limb—contains specialized protective tissues full of chemical defenses. The branch bark ridge (a raised line of bark in the crotch) helps guide the ideal cut angle. Cutting into or flush with the collar removes this protection, while leaving stubs beyond it leaves dead tissue that invites pests.
A proper 45-degree angled cut solves these issues by:
- Directing water away from the wound
- Reducing exposed surface area
- Preserving the branch collar fully
- Promoting rapid woundwood formation for a neat, donut-shaped callus
Modern arboriculture confirms: angled cuts heal faster and with less decay than flat or stubby ones. Your trees reward you with vigorous growth, better fruiting or flowering, and resilience against stress like drought or pests. 🌟
Understanding the 45-Degree Rule: What It Really Means 🔍
The “45-degree rule” means making your final pruning cut at approximately 45 degrees to the branch or trunk, sloping downward from the side closest to the bud/collar to the opposite side. This isn’t a rigid 45° in every situation—it’s a guideline that mirrors the natural angle of the branch bark ridge for optimal healing.
Key points:
- For removal cuts (taking off an entire branch): Cut just outside the branch collar, with the slope directing water away from the trunk.
- For heading cuts (shortening a branch to a bud): Angle 45° above an outward-facing bud, lowest point on the opposite side, about ¼–½ inch above the bud.
- The angle ensures the wound is oval-shaped (smaller surface) rather than round/flat (larger, moisture-trapping).
Variations exist:
- On branches without obvious collars, align the cut opposite the branch bark ridge angle.
- For near-vertical branches, tilt slightly more outward to minimize wound size.
- Some sources suggest 30–60° range, but 45° is the sweet spot recommended by most extensions for balancing drainage and collar protection.
This technique stems from research showing faster compartmentalization and lower infection rates compared to flush cuts (now largely debunked) or stubs.
Step-by-Step Guide: How to Make Perfect Pruning Cuts at the Right Angle ✂️📋
Ready to put theory into practice? Follow these steps for clean, health-promoting cuts.
Tools You’ll Need 🛠️:
- Sharp bypass pruners (for stems up to ¾ inch)
- Loppers (for ¾–1½ inch branches)
- Pruning saw (for larger limbs)
- Gloves, safety glasses, and disinfectant (alcohol wipe tools between cuts to prevent disease spread ⚠️)
Safety First:
- Wear protective gear.
- Use stable ladders or platforms.
- For branches >2 inches or overhead work, call a certified arborist.
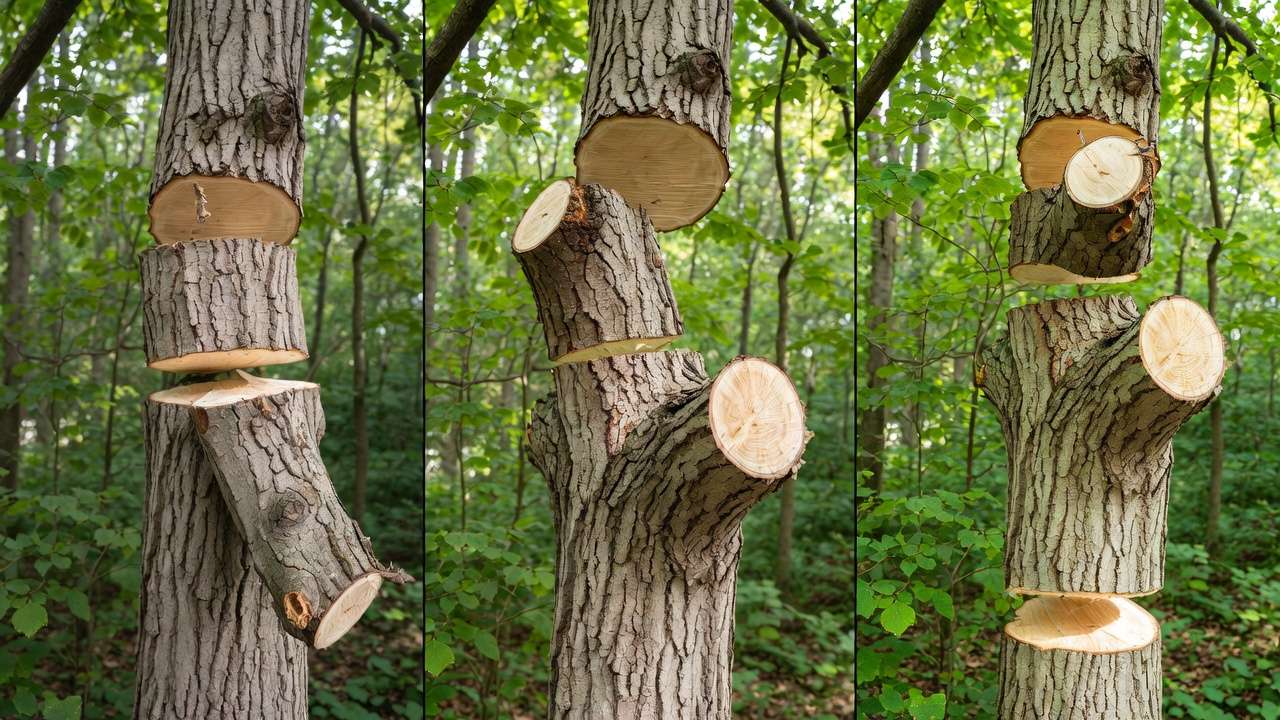
The 3-Cut Method for Large Branches (prevents bark tearing):
- Undercut: 6–12 inches out from the trunk, cut upward ⅓–½ through the branch.
- Top cut: Slightly farther out, cut downward until the branch falls cleanly.
- Final angled cut: Just outside the branch collar, at ~45° downward slope.
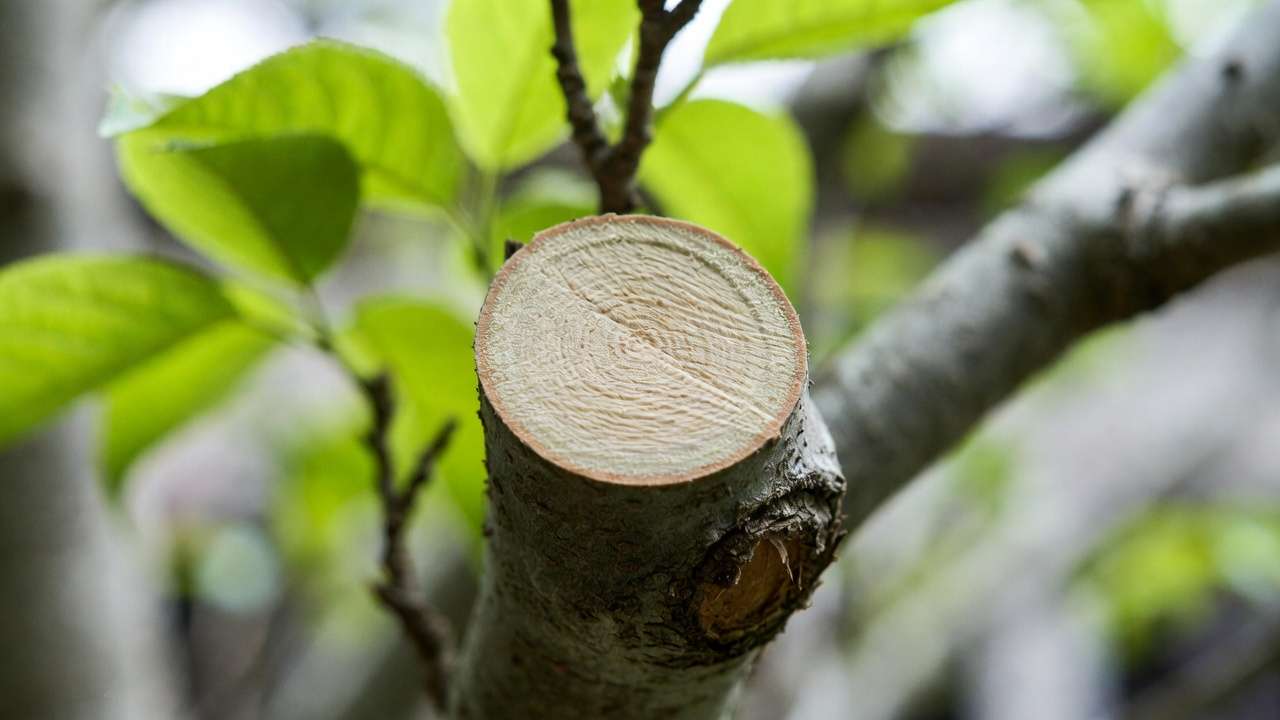
For Small Twigs/Heading Cuts:
- Identify an outward-facing bud.
- Position pruners so the cut slopes 45° downward, ending ¼–½ inch above the bud (lowest point opposite the bud).
- Cut in one clean motion—never crush!
For Medium Thinning Cuts:
- Select a lateral branch with good angle (45–60° crotch preferred).
- Cut back to it at 45°, preserving the collar.
Pro Tips:
- Always cut on the side that directs new growth outward.
- Keep tools razor-sharp for smooth cuts—dull blades tear tissue.
- Step back frequently to check balance and shape.
With practice, these cuts become second nature, and your plants will show their gratitude with lush, healthy regrowth! 🌱
Visual Examples & Common Mistakes to Avoid 🚫
Seeing is believing—let’s look at what good and bad cuts actually look like. (In a live article, you’d embed clear diagrams and photos here for maximum impact.)
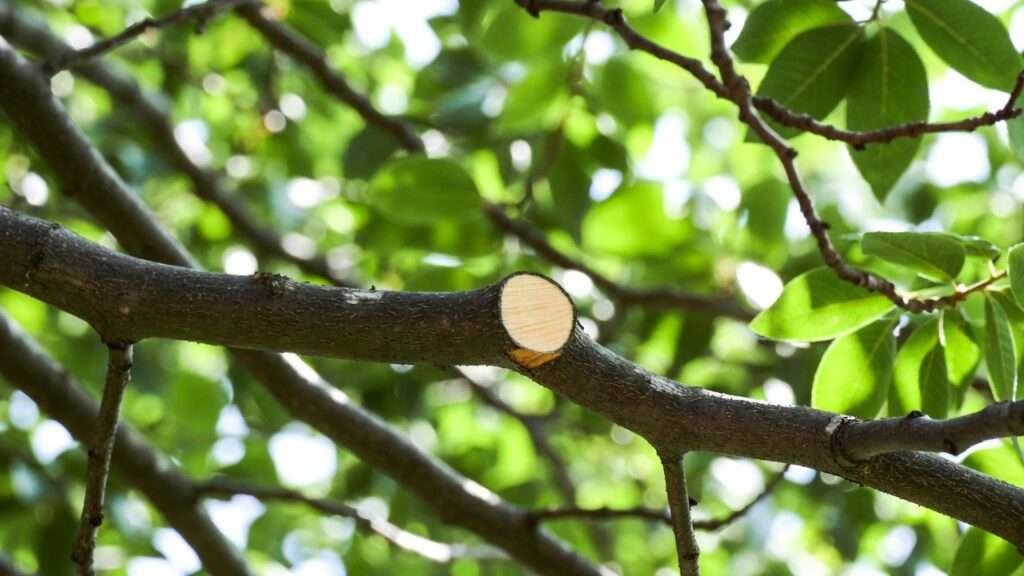
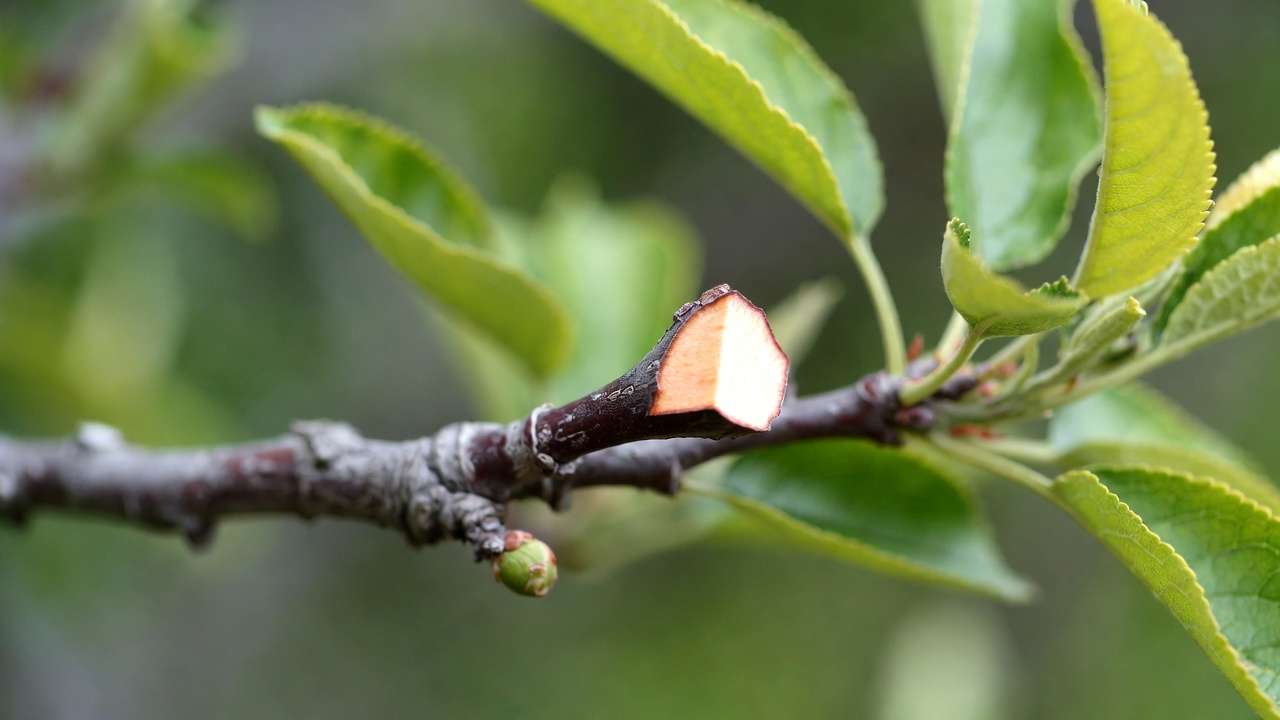
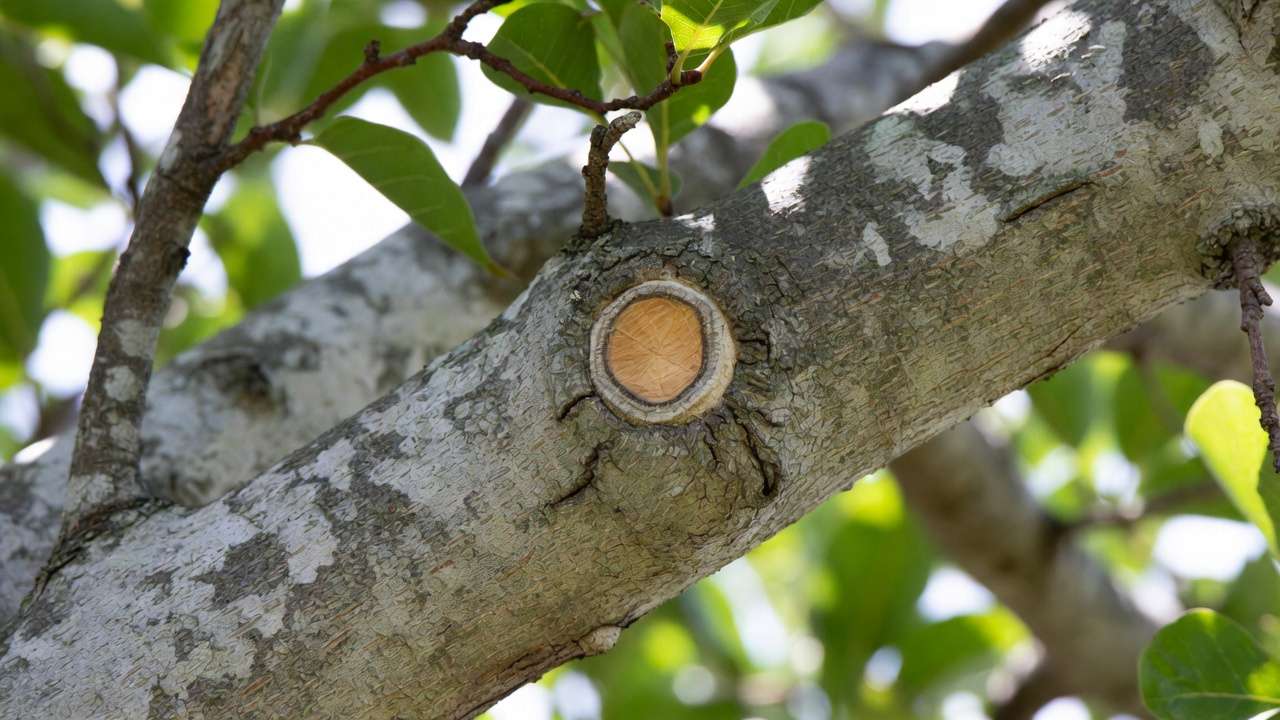
Ideal Cut Example 🌟: A proper 45-degree angled cut just outside the branch collar creates an oval-shaped wound that sheds water efficiently. The slope runs downward away from the trunk or parent branch, preserving the protective branch collar and branch bark ridge. This promotes quick callus roll-over in a neat ring, often within 1–3 years depending on tree species and health.
These illustrations show the branch collar (swollen area) and bark ridge clearly, with the cut angled to direct moisture away while staying outside the collar.
Common Mistakes & Why They Harm Trees ⚠️:
- Flush Cuts (cutting into or flat against the trunk/parent branch): Removes the branch collar entirely, destroying the tree’s natural protective zone. This creates a large, round wound that heals slowly (or not at all), allowing decay fungi and bacteria to enter deeply. Modern arborists strongly advise against flush cuts—research from NC State Extension and ISA confirms they increase compartmentalization failure.
- Stub Cuts (leaving a protruding stub): Dead wood beyond the collar decays backward, inviting insects (borers, ants) and pathogens. New sprouts from stubs are weakly attached and prone to breaking in wind.
- Horizontal/Flat Cuts: Trap water like a tiny pond 💦, accelerating rot—especially bad on horizontal or downward-leaning branches.
- Too Steep Angles (>60°): Can expose more cambium or create pockets where water collects anyway.
- Tearing or Jagged Cuts (from dull tools or single heavy cuts on large branches): Rips bark, exposing inner tissues and slowing healing.
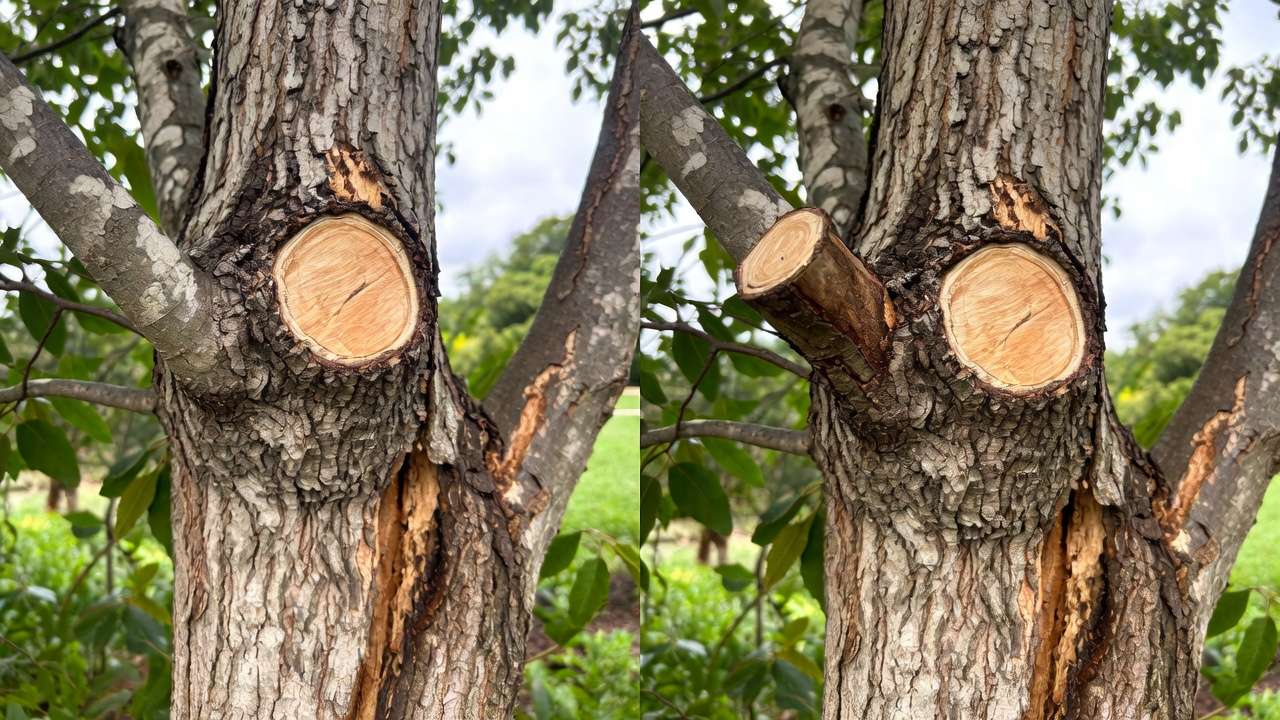
Avoid these by always identifying the branch collar first, using sharp tools, and employing the 3-cut method for anything over 1–2 inches in diameter. Fixing old bad cuts? You can’t undo them, but prune out decayed areas later and support tree health with proper watering, mulching, and avoiding further stress.
Species-Specific Considerations & Exceptions 🌲🍃
Not every plant follows the exact same playbook—the 45-degree rule is a strong general guideline, but adaptations help based on growth habits.
- Deciduous Shade Trees (maple, oak, elm): Stick closely to 45° on removal cuts to preserve collars. These trees compartmentalize well but are prone to fungal issues like oak wilt if cuts are poor.
- Fruit Trees (apple, pear, peach, citrus) 🍎: Emphasize 45° heading cuts above outward-facing buds to direct growth and improve light/airflow (vital for fruit quality and disease prevention like fire blight). Avoid heavy cuts in one season—follow the 20–25% removal rule.
- Shrubs & Roses 🌹: Heading cuts at 45° above buds encourage bushier growth. For roses, cut to outward buds to open the center and reduce black spot risk.
- Conifers & Evergreens (pine, spruce, fir): Different rules—no heading cuts on old wood (won’t regrow), and avoid removing >30% live foliage. When pruning candles (new growth), pinch or cut back to lateral buds at a slight angle, but never into old wood.
- Exceptions & Adjustments: On very vertical branches, a slightly steeper angle (50–55°) may minimize wound size. For trees without clear collars (some young or fastigiate varieties), align cuts parallel to the branch bark ridge. Always observe natural branch angles—mimic them for best results.
Tailoring the angle slightly based on species and structure ensures faster recovery and maintains natural form.
Best Time to Prune + Bonus Tips for Success ⏰
Timing your pruning is almost as important as the angle itself—prune at the wrong season and even a perfect 45-degree cut can stress the tree or invite disease.
General Best Time for Most Trees & Shrubs:
- Late winter to very early spring (dormant season, before buds swell) — This is the gold standard for the majority of deciduous trees (maples, oaks, fruit trees, roses, etc.). Sap flow is minimal, wounds heal quickly as growth resumes, and you can clearly see branch structure without leaves blocking the view. In most temperate climates, aim for February to early April (adjust for your local last frost date).
When to Prune Specific Types:
- Spring-flowering shrubs & trees (lilac, forsythia, azalea, flowering cherry): Prune immediately after flowering (late spring/early summer). Cutting in late winter removes next year’s flower buds.
- Summer-flowering shrubs (crape myrtle, butterfly bush, potentilla): Prune in late winter or early spring—flowers form on new growth.
- Conifers & evergreens: Light pruning of new “candles” in late spring (May–June). Avoid heavy cuts in fall or winter when wounds heal slowly.
- Wound-sensitive species (birch, walnut, maple): Prune in midsummer (June–August) when sap flow is high and compartmentalization is strongest—avoids excessive “bleeding.”
Bonus Tips for Maximum Success 🌱:
- Never prune when wood is frozen—cuts can split.
- Limit removal to 25% or less of the canopy in one season (the 1/3 rule is a maximum, not a goal). Over-pruning stresses trees and encourages weak water sprouts.
- Aftercare is simple: No wound dressings, paints, or sealants needed—modern research (ISA, university extensions) shows they trap moisture and can worsen decay. Just keep the tree healthy with proper watering, mulching (2–4 inches, kept away from trunk), and avoiding lawnmower/root damage.
- Clean tools between every tree with 70% alcohol or disinfectant to prevent spreading diseases like Dutch elm disease or fire blight ⚠️.
- Observe your tree after pruning: Vigorous new growth in spring and smooth callus formation by the second year mean you did it right!
Expert Insights & Pro Recommendations from Arborists 👨🌾
The 45-degree angled cut isn’t folklore—it’s evidence-based best practice endorsed by leading authorities:
- International Society of Arboriculture (ISA): Recommends cutting just outside the branch collar with a downward slope to promote shedding of water and rapid wound closure. Flush cuts and stubs are explicitly discouraged in their Best Management Practices for Tree Pruning.
- University Extension Services:
- NC State: “Make pruning cuts at a 45-degree angle just above a bud or lateral branch to direct water away from the cut surface.”
- Texas A&M AgriLife: Emphasizes preserving the branch collar and using angled cuts to reduce decay entry points.
- Colorado State University: “The ideal cut is angled approximately 45 degrees, sloping away from the trunk or remaining branch.”
- Certified Arborists’ Consensus: Many pros add that the exact angle is less critical than preserving the branch collar and avoiding pockets where water can collect. If you can only remember one rule: “Slope it down and out—never flat or into the collar.”
When should you call a pro? For any branch >4 inches diameter, work near power lines, or trees showing signs of structural weakness/disease—safety and tree longevity come first.
Frequently Asked Questions (FAQs) ❓
What is the correct angle for pruning cuts? Approximately 45 degrees, sloping downward away from the trunk or parent branch. This directs water off the wound and protects the branch collar.
Is 45 degrees always perfect, or can it vary? It’s the most widely recommended angle, but slight adjustments (30–60°) are fine depending on branch orientation and species. The key is downward slope + collar preservation, not a perfect 45° ruler measurement.
Should I use pruning paint, sealant, or wound dressing? No—current science shows they often trap moisture and encourage fungal growth. Healthy trees compartmentalize naturally. Skip it unless treating oak wilt in high-risk areas (and even then, only use approved products per extension guidelines).
Why do my pruning cuts look flat or horizontal? Likely from using anvil pruners (they crush instead of cut cleanly) or not angling the tool properly. Switch to sharp bypass pruners and consciously tilt your wrist for the slope.
Can wrong pruning angles actually kill my tree? Rarely outright, but repeated bad cuts (flush, stubs, flat) significantly increase decay, canker, structural failure, and dieback—especially in stress-prone species like oaks, maples, and fruit trees. Over years, it shortens lifespan.
What are the best tools for making precise angled cuts? Sharp bypass pruners or loppers for small–medium branches; a curved-blade pruning saw for larger ones. Keep blades honed and disinfected.
Do roses and fruit trees need a different angle? Same principle—45° above an outward-facing bud for heading cuts. Fruit trees especially benefit from good airflow and light penetration, so precise angled cuts help prevent fungal diseases like apple scab or peach leaf curl.
I made a bad cut last year—can I fix it now? You can’t undo it, but you can remove dead/decaying stubs back to healthy tissue (following proper technique this time) and support overall tree vigor. Most trees are resilient if cared for.
Conclusion: Master the 45-Degree Rule & Watch Your Trees Thrive 🎉
The correct angle for pruning cuts—that simple 45-degree downward slope—is one of the most powerful, low-effort ways to protect your trees and shrubs from disease, decay, and decline. By respecting the branch collar, shedding water efficiently, and giving your plants the best chance to heal quickly, you’re investing in decades of beauty, strength, and health. 🌳💚
Next time you pick up your pruners, take a moment to identify the collar, angle that blade at 45 degrees, and make the cut with confidence. Your trees will respond with vigorous new growth, fewer problems, and that satisfying “donut” of callus tissue that proves you did it right.
Ready to put this into action? Grab your tools this dormant season, try the technique on a small branch first, and share your results (before-and-after photos are always welcome in the comments!). Subscribe for more expert tree care guides, seasonal checklists, and problem-solving tips so your garden stays thriving year after year.
Happy pruning—and here’s to healthier, happier trees! 🌱✨


