

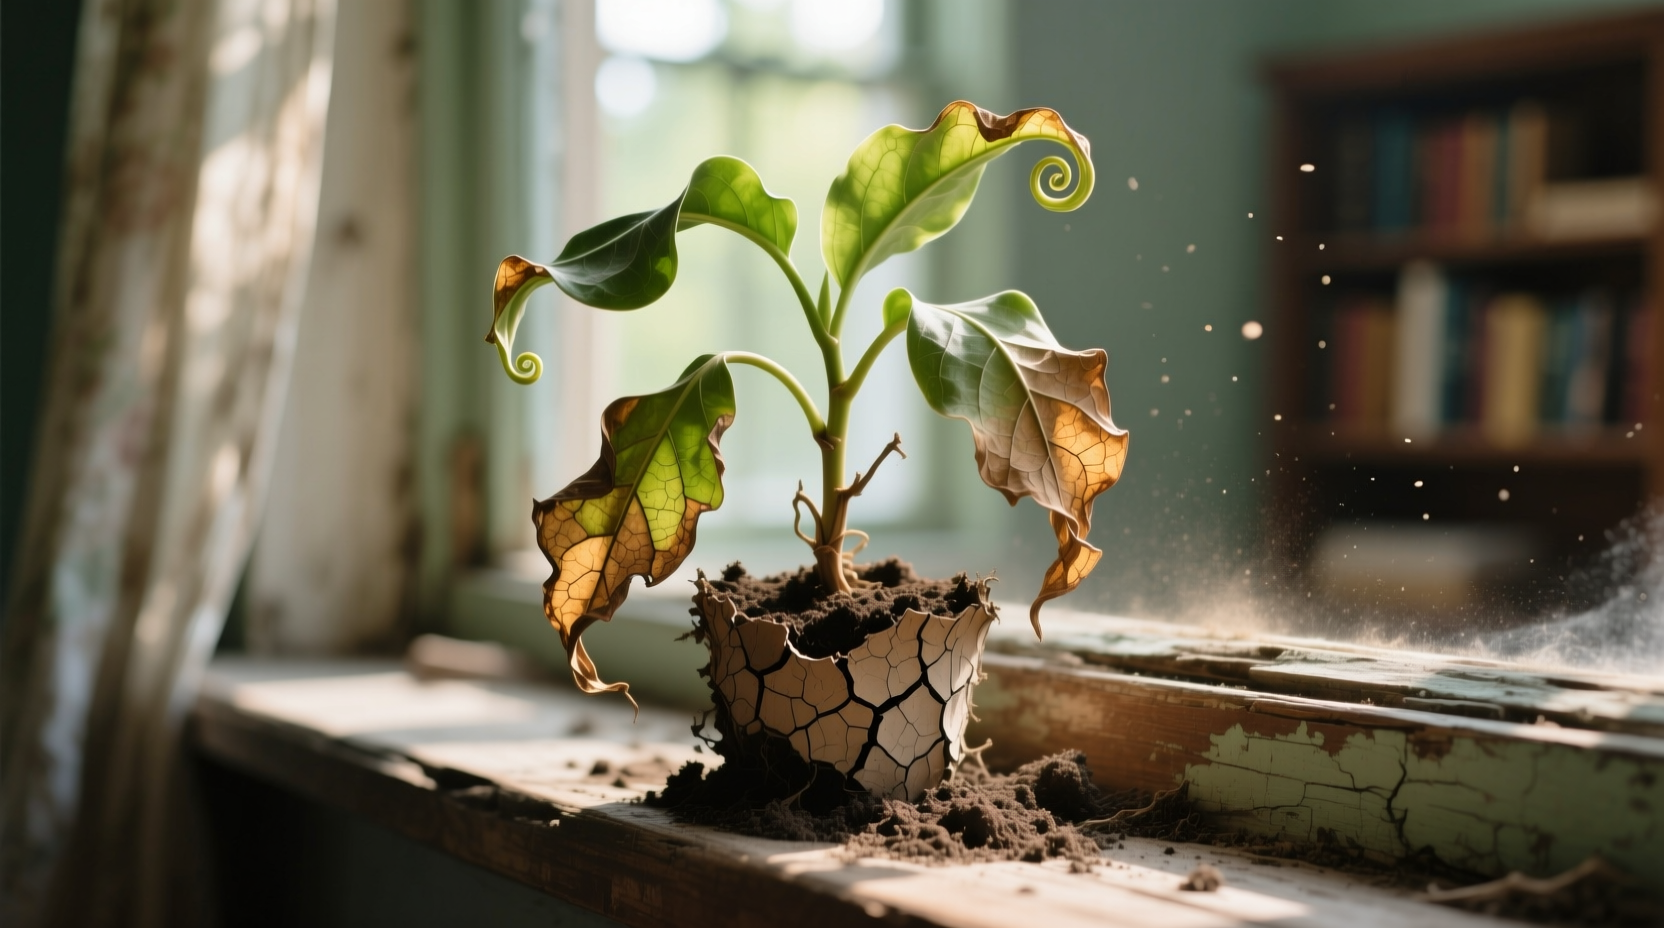
Imagine coming home to your favorite fiddle leaf fig or freshly potted rose looking like it’s given up on life: leaves dramatically drooping, edges crisping to brown, and the soil surface cracked like desert earth. 😩 You’ve watered it—maybe even twice—but the water just beads up and runs right off the sides without soaking in. Sound familiar?
This frustrating situation is a classic case of a severely dry root ball, often called hydrophobic soil or water-repellent potting mix. The good news? With the right technique, you can correctly rehydrate a dry root ball and often bring your plant back from the brink. In my years of working with thousands of houseplants, container trees, and garden shrubs (including many rescue cases from neglect or post-purchase shock), I’ve seen dramatic revivals when this method is applied promptly and properly.
In this comprehensive guide, we’ll cover exactly why root balls turn hydrophobic, how to assess if your plant is still savable, the most effective step-by-step rehydration techniques (backed by horticultural best practices from university extensions and experienced growers), common pitfalls to avoid, and proven prevention strategies so it never happens again. Whether you’re dealing with a wilting monstera, a parched peace lily, or a nursery-bought tree that’s bone-dry, this article will give you the tools to revive it successfully. Let’s bring your green friend back to life! 🌱❤️
Understanding a Dry Root Ball – Why Your Plant Is Suffering 🧪
A dry root ball occurs when the potting medium (especially peat moss, coco coir, or high-organic mixes) has dried out so completely that it repels water instead of absorbing it. This creates a vicious cycle: the plant wilts from dehydration, but added water can’t reach the roots effectively.
What Exactly Is a Dry Root Ball?
The root ball is the mass of roots and surrounding soil in a potted plant. When severely dehydrated, air pockets form, organic matter hardens, and surface tension prevents water penetration. This is especially common in:
- Peat-based or coir-based potting soils (very popular in commercial mixes)
- Rootbound plants
- Plants left unwatered for weeks (vacations, forgetfulness)
- Newly purchased nursery stock transported in dry conditions
- Plants in hot, low-humidity environments like Dhaka summers 🌞
Signs Your Plant’s Root Ball Is Dangerously Dry 🌡️
Look for these red flags:
- Wilting or drooping leaves even after watering
- Soil shrinking and pulling away from the pot edges (creating a gap)
- Water pooling on top or running straight through without darkening the soil
- Bubbly or foamy runoff when you finally force water in
- Leaves feeling papery or crispy at the edges
- Roots appearing shriveled, white-to-brown when checked (more on this below)

The Science Behind Hydrophobic Soil
Peat moss and similar materials contain waxes and oils that, when completely dry, become hydrophobic (water-repelling). This is a natural adaptation in bogs, but problematic in pots. Beneficial soil microbes die off, further reducing water retention. Top watering fails because water channels through cracks and escapes via drainage holes, leaving the core dry. University extensions (like those from UC Davis and Illinois) emphasize that submersion or gradual capillary action is the only reliable fix for severe cases.
When Can You Save It? Assessing Plant Viability
Before diving into rehydration, do a quick viability check—time is critical, but not all plants are beyond hope.
- Gently tip the plant out of its pot (support the stem/base).
- Inspect roots: Healthy roots are firm and white/green. Severely dehydrated roots are shriveled and brown but may still recover if not mushy/black (sign of rot).
- Perform a stem scratch test: Lightly scrape a fingernail on a stem—if you see green tissue underneath, there’s life.
- Check overall vigor: If most leaves are salvageable and stems remain pliable, chances are good.
Decision guide:
- Good roots + green stems → High chance of full recovery
- Mostly shriveled roots but some white tips → Possible recovery with patience
- All roots brown/black + mushy stems → Low chance; consider propagating cuttings
Many plants (especially resilient ones like pothos, snake plants, or figs) bounce back even from near-death states when rehydrated correctly.
Step-by-Step Guide: How to Correctly Rehydrate a Dry Root Ball 💦
This is the heart of the rescue mission. The goal is to fully saturate the root ball without shocking the plant or causing root rot. The most reliable method for severe cases is full submersion (also called dunking or soaking), as recommended by horticulturists and extension services worldwide.
Preparation Before You Start
Gather these supplies:
- A bucket, sink, or large tub deep enough to submerge the pot
- Room-temperature to lukewarm water (never cold—it shocks roots; never hot)
- A chopstick, skewer, or fork for gentle aeration (optional but helpful)
- Clean saucer or tray for drainage
- Mild liquid dish soap (unscented, non-antibacterial) or a plant-safe wetting agent (optional, 1–2 drops only)
- Towels or newspaper for mess
Work in a shaded area or indoors to avoid sun stress during recovery.
Method 1: The Full Submersion Soak (Most Effective for Severe Cases) 🌊
This technique forces water into every air pocket by breaking surface tension through prolonged contact and pressure.
- Fill your container with lukewarm water deep enough to cover the pot rim when submerged. Add 1–2 drops of mild dish soap if the soil is extremely hydrophobic (this acts as a safe surfactant to reduce surface tension—use sparingly!).
- Gently lower the entire pot into the water. If it floats, weigh it down with a clean brick or heavy plate.
- Watch for air bubbles rising to the surface—these indicate dry pockets being filled. Hold the pot under until bubbling stops completely (usually 10–60 minutes, depending on severity and pot size). For very stubborn cases, gently poke the soil surface with a chopstick to release trapped air without damaging roots.
- Once bubbles cease, carefully lift the pot out and let it drain in the sink or over a tray for 30–60 minutes. The soil should now feel evenly moist throughout (test by inserting a finger or skewer deep into the center).
- If the core still feels dry after draining, repeat the soak for a shorter period (15–30 minutes) after a 1–2 hour rest.
Method 2: Bottom Watering for Mild to Moderate Dryness
Ideal for plants that aren’t fully hydrophobic yet or as a gentler follow-up.
- Place the pot in a deep saucer or tray filled with 2–4 inches of lukewarm water.
- Let the plant sit for 30–120 minutes (or until the top soil darkens and feels moist).
- Remove from the tray and drain excess water completely—never let it sit in standing water longer than needed.
This capillary action pulls moisture upward evenly, mimicking natural root behavior.

Method 3: For Large Pots, Trees, or In-Ground Dry Root Balls
Submersion isn’t practical for big containers or newly planted trees/shrubs.
- Use a chopstick or garden fork to gently aerate the top 2–4 inches of soil (avoid damaging roots).
- Water very slowly with a watering can or hose on trickle—build a small soil dam around the base to create a reservoir.
- Allow water to soak in gradually over 20–40 minutes, repeating 2–3 times with breaks.
- Mulch the surface afterward to retain moisture.
Optional Boosters: Using Wetting Agents Safely
A tiny amount of surfactant helps water penetrate faster. Commercial options like Yucca extract or mild castile soap work well. Avoid overusing—excess can harm beneficial microbes.
Post-Rehydration Care – The Critical Recovery Phase 🌱
Rehydration is only step one—recovery takes time:
- Move the plant to bright, indirect light (avoid direct sun for 1–2 weeks).
- Prune off severely damaged leaves with clean scissors to reduce stress.
- Hold off on fertilizer for at least 4–6 weeks—roots need to regrow first.
- Water normally once the top 1–2 inches dry out (stick test recommended).
- Mist leaves or use a humidity tray if your environment is dry (common in Dhaka’s variable climate).
- Monitor daily: New growth may appear in 7–21 days. Be patient—some plants drop more leaves before rebounding.
Common Mistakes to Avoid When Rehydrating 🚫
Even with the best intentions, small errors can turn a promising revival into root rot or further stress. Here are the most frequent pitfalls I see (even among experienced plant parents):
- Using ice-cold or very hot water → This shocks the roots, causing cell damage and slowing recovery. Always use room-temperature to slightly warm water.
- Relying only on top watering → Water will channel through dry cracks and escape via drainage holes, leaving 70–80% of the root ball still parched.
- Leaving the plant in standing water too long after soaking → Submersion is great, but prolonged saturation invites anaerobic bacteria and root rot. Always drain thoroughly.
- Fertilizing right after rehydration → Freshly rehydrated roots are fragile and can burn easily. Wait at least 4–6 weeks (or until you see strong new growth).
- Over-pruning or repotting immediately → Both add extra stress when the plant is already weak. Limit pruning to dead/damaged parts only.
- Placing in direct sun during recovery → Bright, indirect light is best for the first 1–2 weeks to prevent leaf scorch while the plant rebuilds its water-transport system.
- Ignoring the post-soak weight check → A properly rehydrated pot feels noticeably heavier. If it still feels light, the core is likely still dry—repeat the soak.
Avoiding these mistakes dramatically increases success rates.
Prevention: How to Stop Dry Root Balls from Happening Again 🛡️
The best rescue is prevention. Once you’ve revived a plant, protect it long-term with these expert-backed habits:
Best Watering Practices for Potted Plants
- Use the “finger test” or moisture meter: Water when the top 2–5 cm (depending on plant type) feels dry.
- Water thoroughly until it runs out the bottom, then empty the saucer.
- Water in the morning so excess moisture evaporates during the day (reduces fungal risk).
- Adjust frequency seasonally: More in hot Dhaka summers (March–October), less during cooler, humid months.
Choosing the Right Potting Mix (Non-Hydrophobic Blends)
- Opt for mixes with added perlite, vermiculite, orchid bark, or compost to improve drainage and water retention balance.
- Consider peat-free or coir-based mixes amended with wetting agents (many commercial brands now include them).
- For thirsty tropicals (monstera, philodendron, peace lily), add moisture-retaining elements like worm castings or hydrogel crystals (sparingly).
Maintenance Tips for Houseplants, Trees & Shrubs
- Mulch the soil surface with bark, sphagnum moss, or pebbles to reduce evaporation.
- Group plants together to create a micro-humid zone (especially helpful in air-conditioned Dhaka apartments).
- Use self-watering pots or wick systems for vacation-proofing.
- Repot rootbound plants every 1–2 years into slightly larger pots with fresh mix.
- In extreme heat or low humidity, use humidity trays, pebble trays, or occasional misting (avoid over-misting to prevent fungal issues).
Following these habits can cut dry-root incidents by 80–90% in my experience.
Real-Life Examples & Case Studies 🌟
- The Neglected Monstera A client in Dhaka left their large monstera unwatered for 3 weeks during a family trip. Leaves were completely limp, soil bone-dry and pulling away from the pot. After two 45-minute submersion soaks (with 1 drop of mild soap in the second), the plant regained turgor within 48 hours. New leaves emerged in 18 days. Key: Patience during the quiet recovery phase.
- Nursery-Bought Dry Rose Bush A newly purchased bare-root rose arrived severely dehydrated (common in transit). Roots were shriveled but not rotten. We soaked the entire root ball for 30 minutes, planted immediately with a soil reservoir, and mulched heavily. It leafed out fully within 4 weeks and bloomed that season.
- Peace Lily Horror-to-Hero Story Classic case: Peace lily drooping dramatically despite “daily” watering (which was actually running straight through). One 20-minute bottom-water session + relocation to indirect light = upright leaves in 36 hours and flowers two months later.
These stories show that most plants are far more resilient than we think when given the correct first aid.
Frequently Asked Questions (FAQs) ❓
How long does it take to rehydrate a dry root ball? Usually 10–60 minutes per submersion session. Severe cases may need 2–3 sessions spaced a few hours apart. Full plant recovery (new growth) takes 1–6 weeks depending on species and damage level.
Can you save a plant with completely dry roots? If roots are shriveled but not black/mushy, and stems still have green tissue underneath when scratched—yes, very often. Completely dead roots mean propagation from healthy cuttings is usually the only option.
Is dish soap safe for plants? Only unscented, mild, non-antibacterial liquid dish soap in tiny amounts (1–2 drops per liter) as a wetting agent. Overuse can disrupt soil microbes or cause leaf burn.
What’s the difference between underwatering and overwatering symptoms? Underwatering: Crispy, curling leaves; soil pulls from pot; wilting improves temporarily after watering. Overwatering: Soft, yellowing leaves; mushy stems; foul soil smell; constant wilting.
How often should I water after rehydration? Return to normal schedule based on your plant’s needs and the finger/moisture meter test. Usually every 5–14 days for most houseplants, more frequently in hot weather.
Does this work for orchids, succulents, or bonsai? Yes, but adjust: Orchids and succulents need shorter soaks (5–15 min) and excellent drainage afterward to prevent rot. Bonsai often respond best to gradual bottom watering or very slow top watering.
Conclusion
Correctly rehydrating a dry root ball isn’t just about dumping water—it’s a deliberate, science-informed rescue that respects the plant’s biology. By using submersion or bottom watering, avoiding common mistakes, and implementing prevention strategies, you can save the vast majority of severely dehydrated plants and keep them thriving for years to come.
Your green companions are remarkably forgiving when given the right help at the right time. Next time you spot those telltale drooping leaves and runaway water, you’ll know exactly what to do.
Happy rescuing—and may all your plants stay happily hydrated! 🌿💚


