
When it comes to propagating delicate plant cuttings, creating the perfect environment for them to thrive can make all the difference between success and failure. That’s where a humidity tent for delicate cuttings comes into play. This simple yet effective tool helps mimic the ideal conditions for root development, ensuring your cuttings stay hydrated and healthy while they grow. Whether you’re a seasoned gardener or just starting out, understanding how to use a humidity tent properly can significantly increase your success rate in propagation. In this guide, we’ll walk you through everything you need to know about setting up and maintaining a humidity tent to give your plants the best possible start.
What is a Humidity Tent? 🌱🌧️
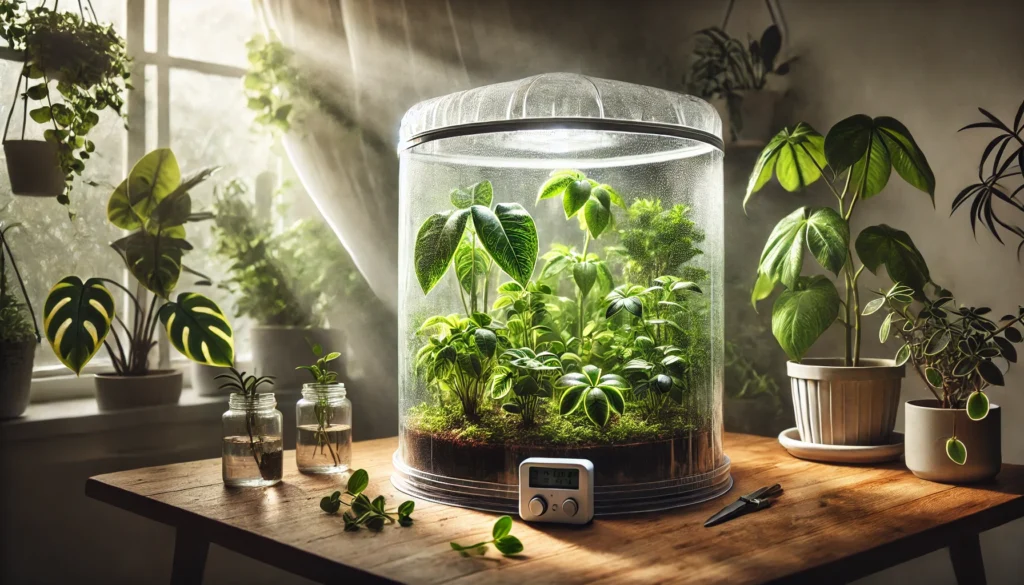
A humidity tent is a simple, enclosed structure designed to maintain high humidity levels around your delicate plant cuttings. Think of it as a mini greenhouse! 🌿 It traps moisture and warmth, creating the perfect microenvironment for your cuttings to root and grow strong.
Usually made from clear plastic or mesh, a humidity tent allows light to reach your plants while keeping moisture in. This helps prevent the cuttings from drying out and encourages healthy root development. 🪴
You can easily create a humidity tent at home using plastic bags, clear containers, or even buy a pre-made one. It’s a must-have tool for anyone serious about plant propagation! 🌸
Why Use a Humidity Tent for Delicate Cuttings? 💧🌿
A humidity tent for delicate cuttings provides the ideal environment for new plants to thrive. Here’s why it’s so effective:
1. Keeps Cuttings Moist 💦
Delicate cuttings need consistent moisture to avoid drying out. A humidity tent creates a humid atmosphere that helps retain water, keeping your cuttings hydrated.
2. Promotes Root Growth 🌱
High humidity encourages root formation by reducing stress on the cutting, making it easier for roots to establish.
3. Protects from Environmental Stress 🌬️
A humidity tent shields your cuttings from temperature fluctuations, pests, and drafts, helping them stay healthy and strong.
4. Increases Success Rate 🌸
With the right conditions, a humidity tent boosts the chances of successful propagation, ensuring more of your cuttings develop into thriving plants.
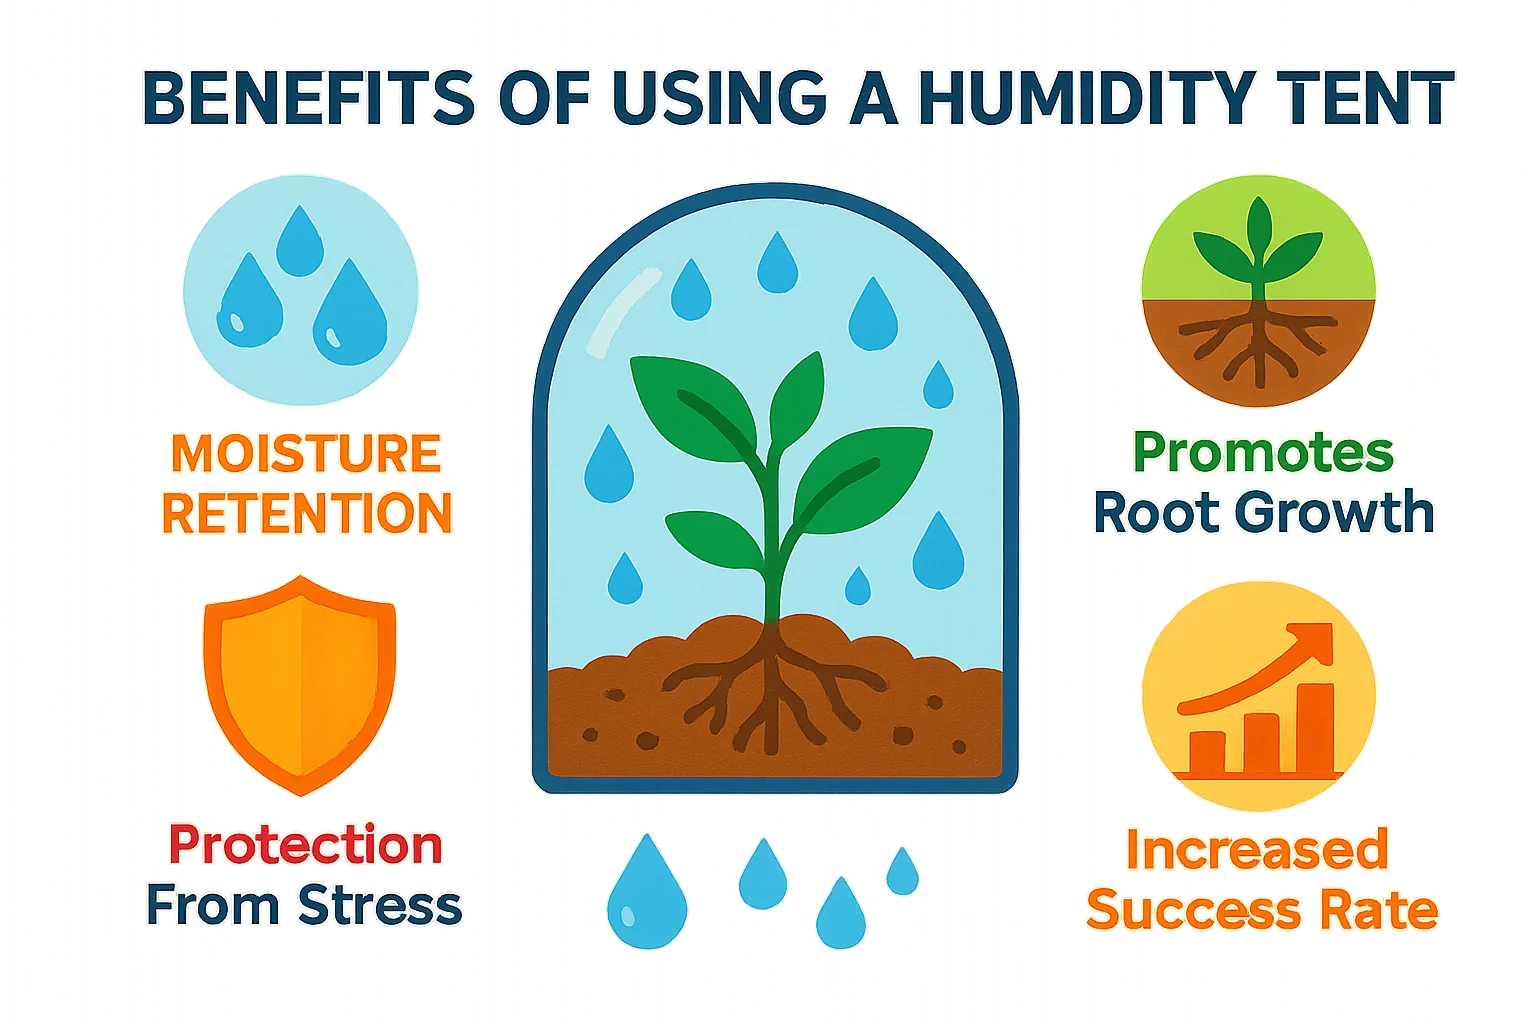
In short, a humidity tent is an essential tool for nurturing delicate cuttings and giving them the best start in life!
Choosing the Right Humidity Tent for Your Cuttings 🌱🏡
When selecting a humidity tent for delicate cuttings, it’s important to choose one that meets your needs and space. Here’s what to consider:
1. Size and Space 📏
Choose a humidity tent that fits your cuttings and available space. If you’re propagating a few cuttings, a smaller tent will work fine, but for larger projects, go for a bigger one to avoid overcrowding. Make sure there’s enough room for air circulation.
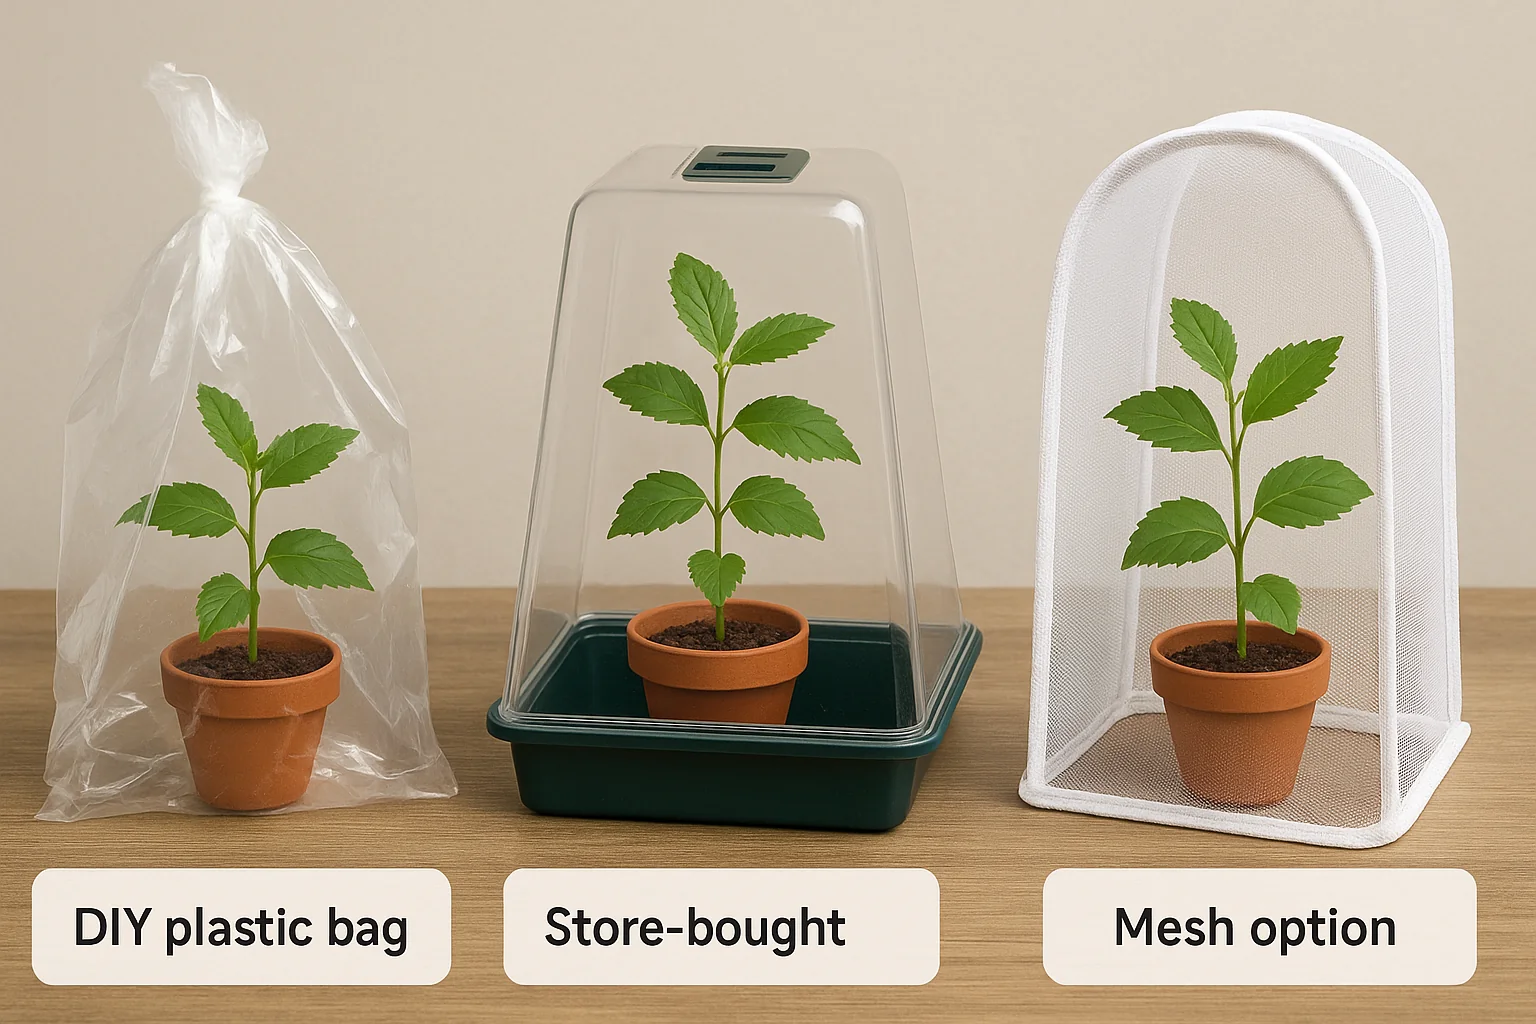
2. Material Choice 🧴
Humidity tents are usually made from clear plastic or mesh. Clear plastic traps more moisture and provides more humidity, while mesh options allow for better airflow. Consider your plants’ needs—plastic works best for plants that need constant moisture, while mesh is better for those needing a bit more ventilation.
3. Ventilation and Temperature Control 🌬️🌡️
A good humidity tent should have proper ventilation to prevent mold or fungus. Look for tents with adjustable vents or zippered openings to control airflow. Also, ensure the material allows light through but doesn’t overheat the cuttings.
4. DIY vs. Store-Bought 🛠️🛒
You don’t need to buy an expensive tent! A DIY setup using plastic bags or containers can be just as effective. However, if you want convenience, store-bought humidity tents come in various sizes and designs. Just make sure they offer adequate space, ventilation, and material that suits your cuttings.
By considering these factors, you’ll be able to select the perfect humidity tent to promote healthy, thriving cuttings! 🌸
How to Set Up a Humidity Tent for Delicate Cuttings 🌿🛠️
Setting up a humidity tent for delicate cuttings is simple and straightforward. Follow these easy steps to create the perfect environment for your plant babies! 💚
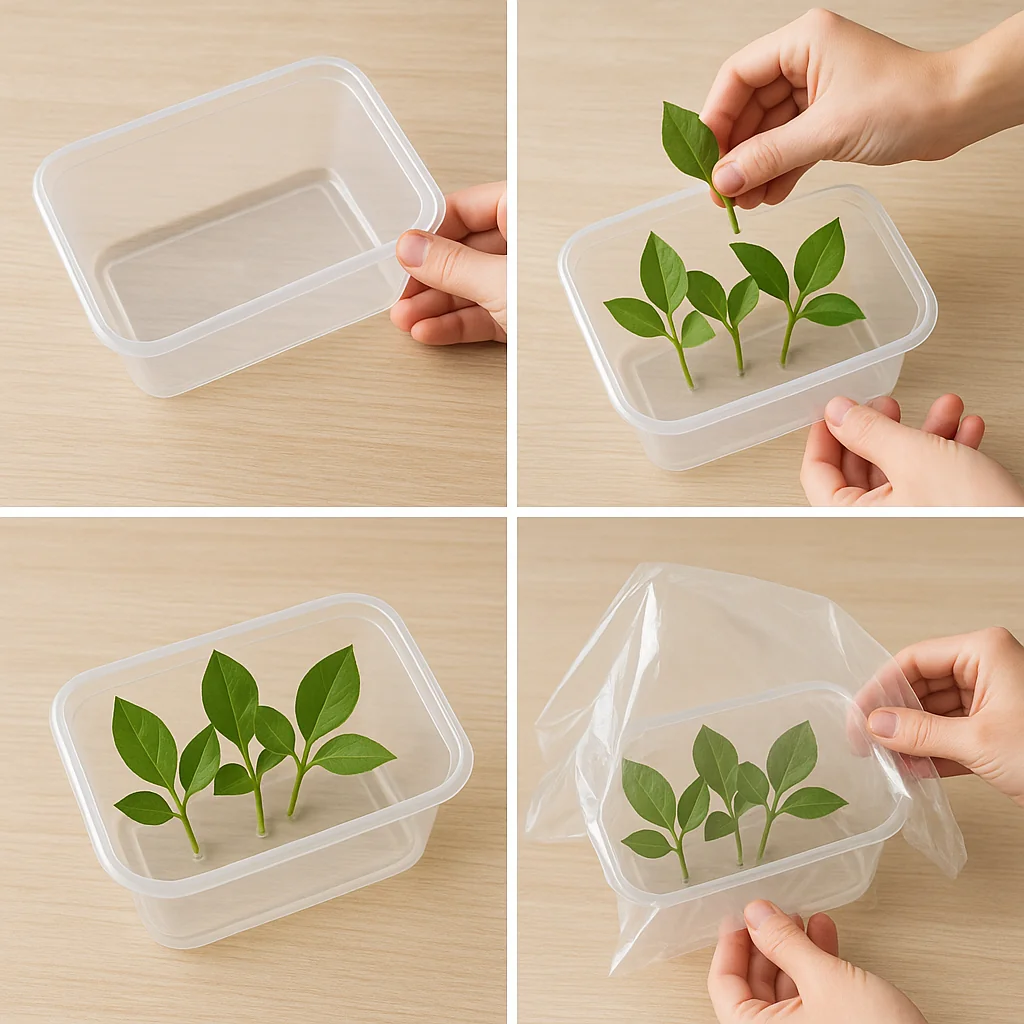
1. Prepare the Container 🥄
Start by choosing a shallow container or tray to hold your cuttings. You can use a plastic tray, shallow plastic box, or even a seedling flat. Make sure it’s clean to avoid any potential diseases.
2. Select the Right Cuttings ✂️
Choose healthy, mature cuttings from plants that propagate well in high humidity, such as herbs, succulents, or houseplants like pothos or spider plants. Cut just below a leaf node, ensuring the cutting has at least one or two leaves.
3. Arrange the Cuttings 🌸
Place the cuttings in the container, ensuring they don’t touch each other. This allows air to circulate and prevents mold growth. For best results, stick the cuttings in a damp potting mix or rooting medium.
4. Create the Humid Environment 💧
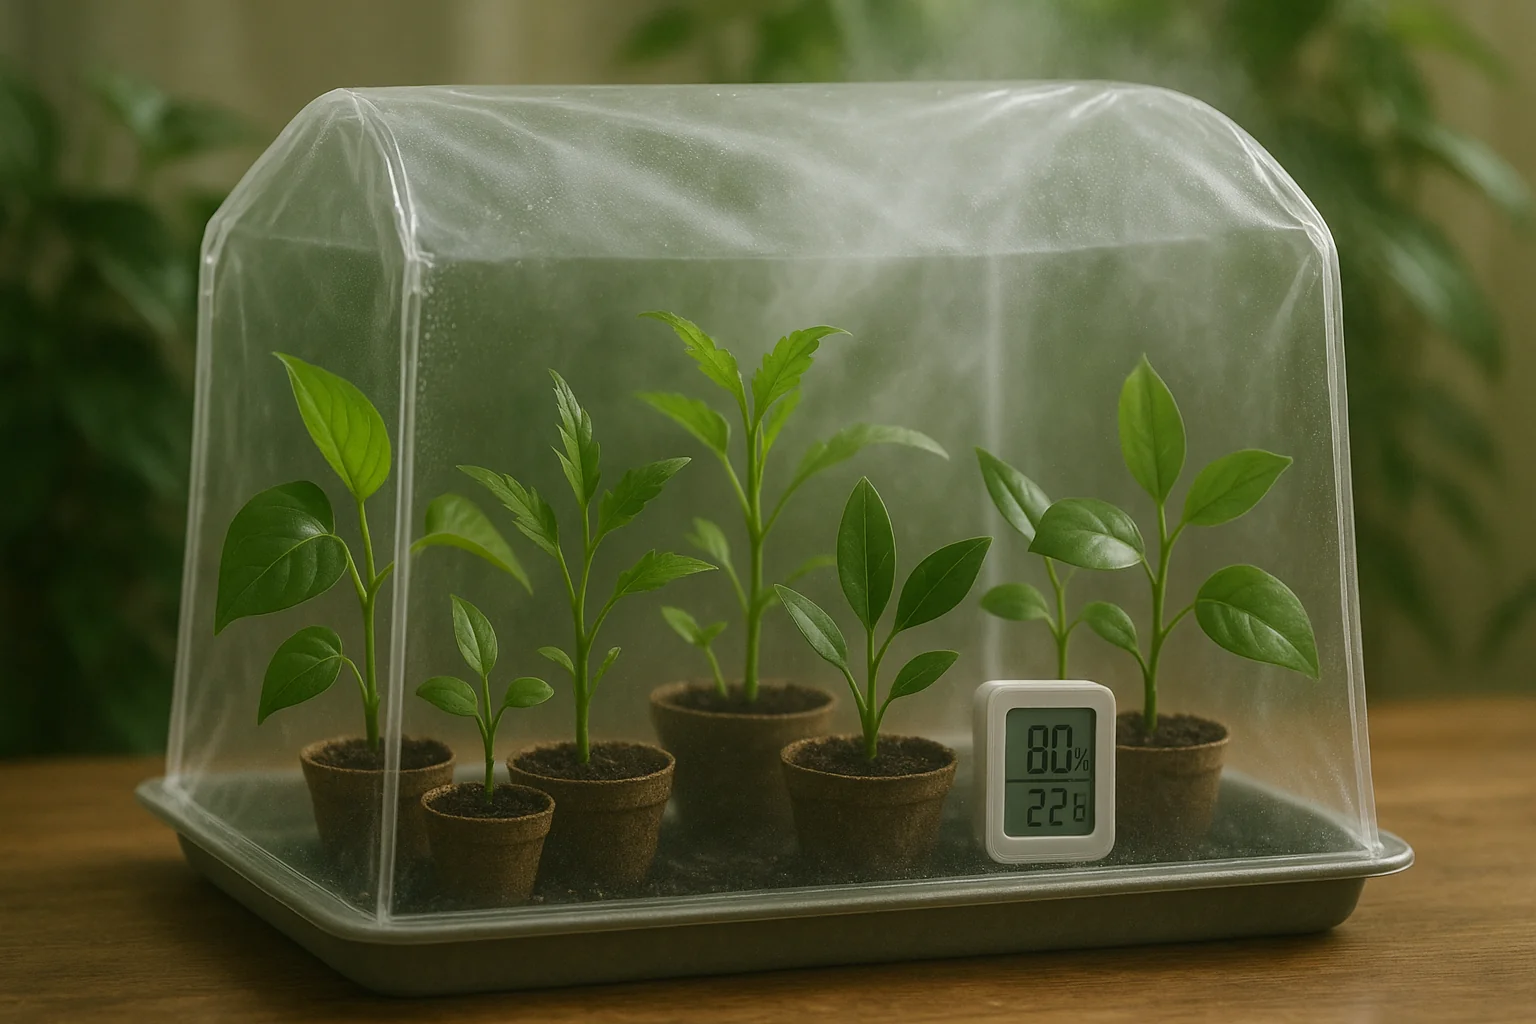
Cover the container with your humidity tent. If using plastic, a simple clear plastic bag or plastic dome works well. If using mesh, ensure it traps moisture but still allows airflow. Make sure the tent completely covers the cuttings but doesn’t press down on them.
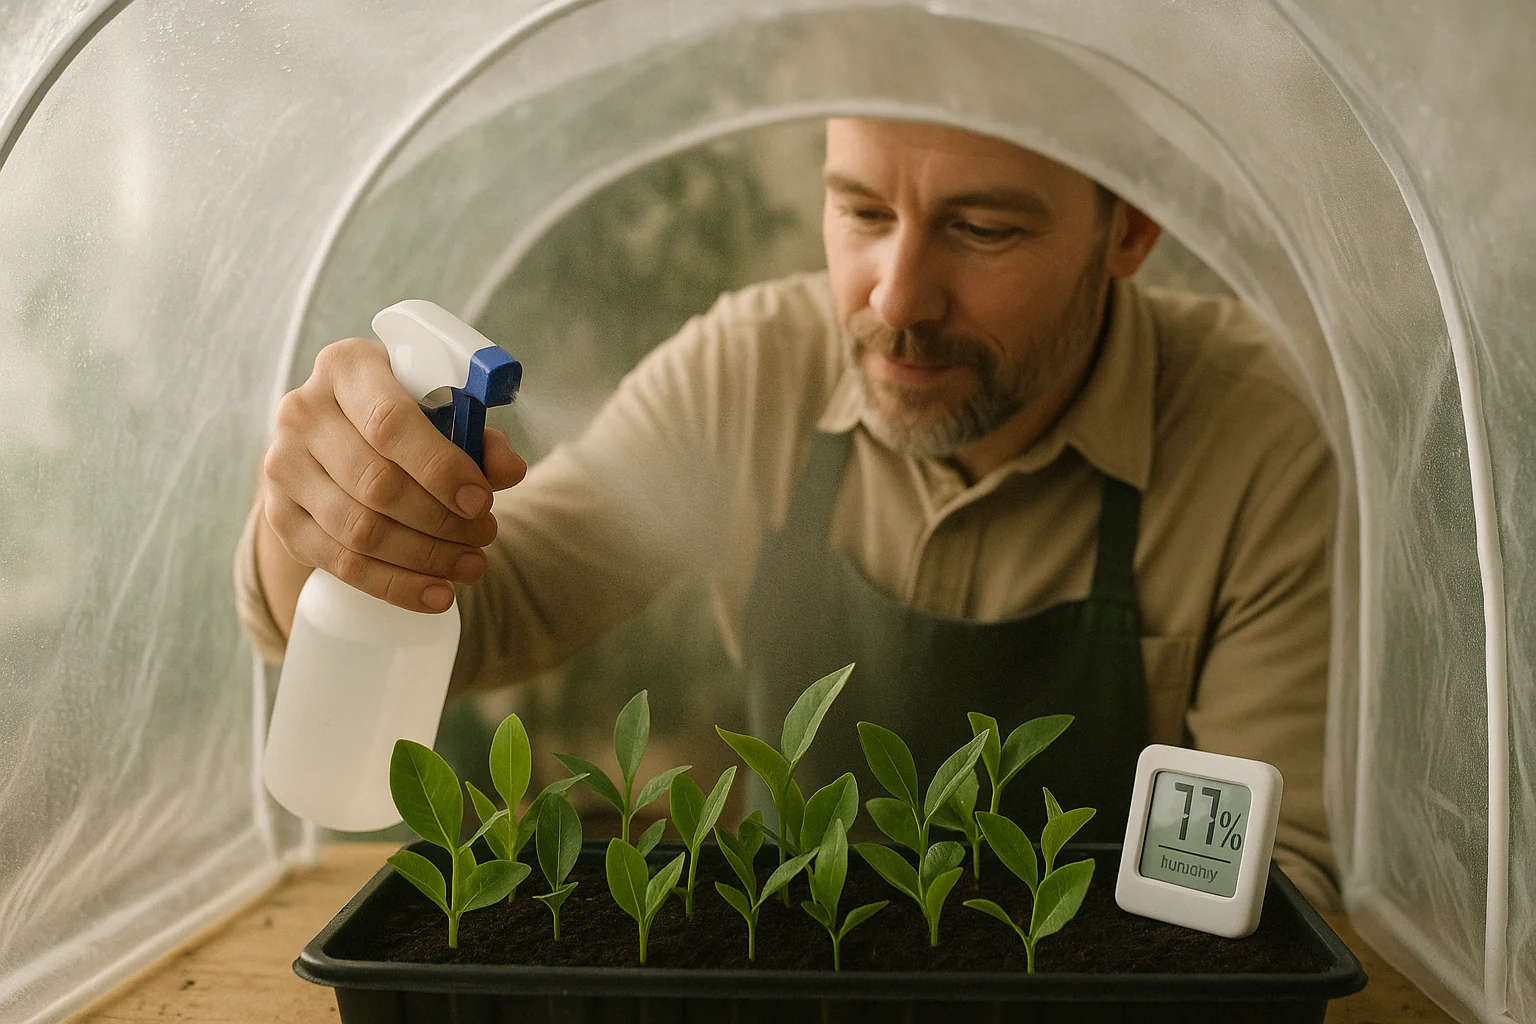
5. Monitor Temperature & Humidity 🌡️
The ideal temperature for most cuttings is between 65-75°F (18-24°C). Humidity should be around 80-90%. You can mist the cuttings occasionally to maintain humidity. Use a small hygrometer to monitor levels. If needed, open vents for fresh air, but keep the humidity high.
By following these steps, you’re creating the perfect conditions for your cuttings to root and thrive! 🌱
Caring for Your Cuttings Inside the Humidity Tent 🌱💧
Once your humidity tent for delicate cuttings is set up, proper care is essential to help your cuttings thrive. Here’s how to keep them healthy and happy:
1. Watering Tips 💦
Keep the soil or medium damp, but not soaking wet. Overwatering can lead to rot. Mist the inside of the tent to maintain humidity, but don’t drown the cuttings. If using a tray, ensure there’s no standing water at the bottom.
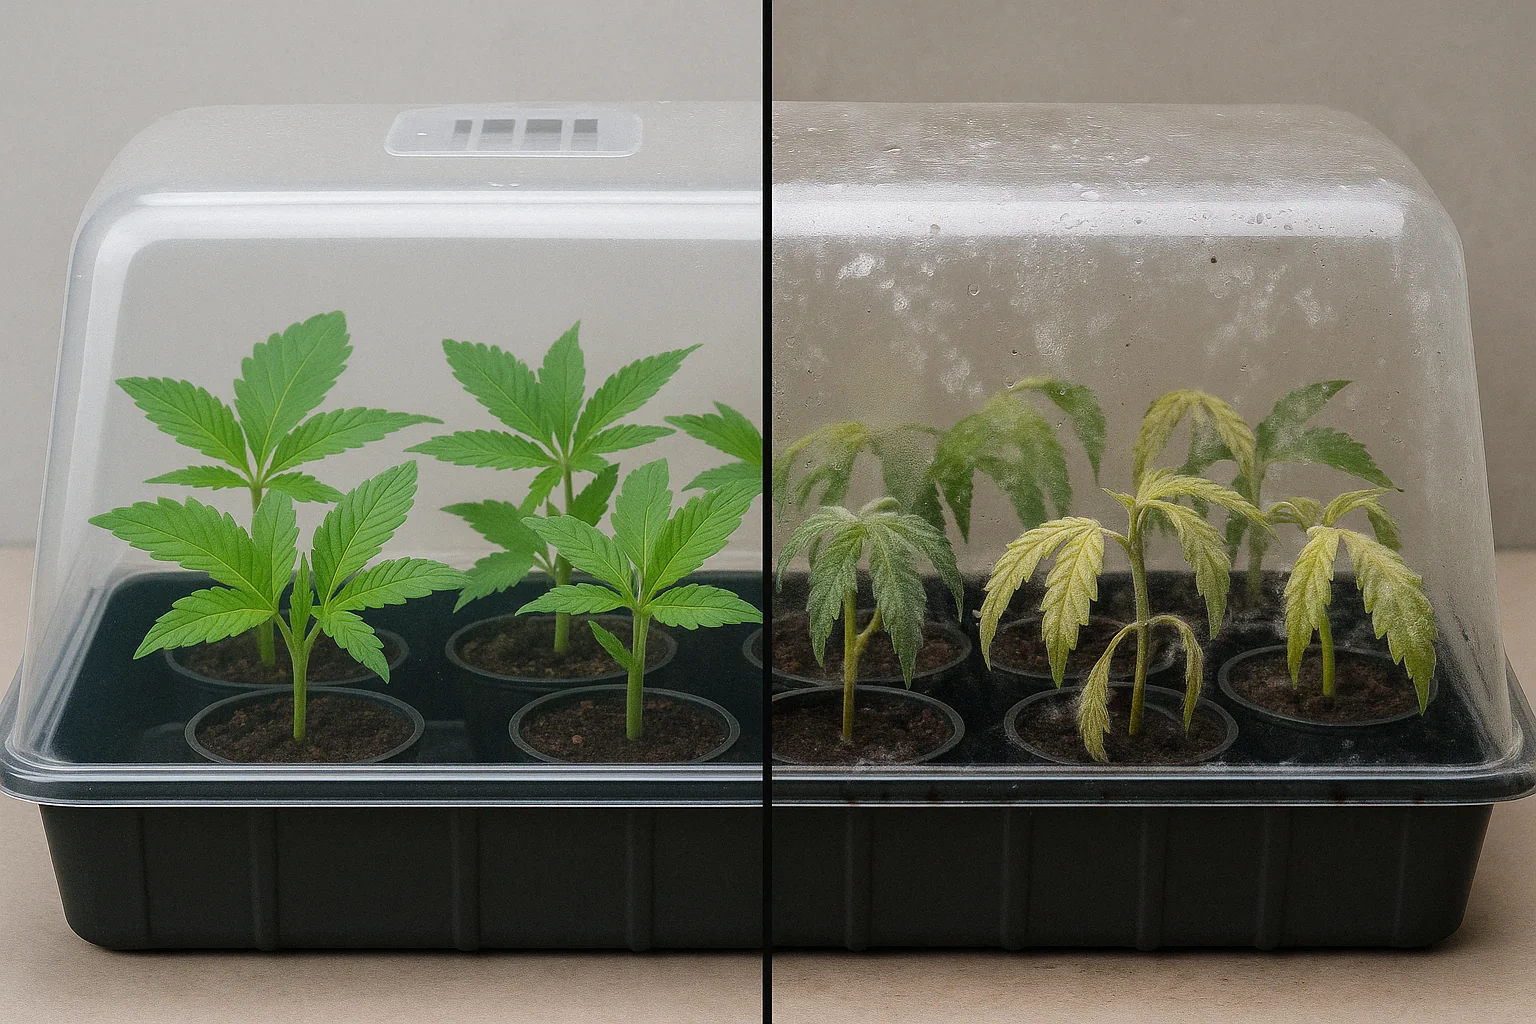
2. Ensure Proper Air Circulation 🌬️
While high humidity is key, stagnant air can encourage mold and fungus. Open the vents of the tent or occasionally lift the cover to allow fresh air to circulate. This helps prevent mold growth and keeps the environment balanced.
3. Light Requirements ☀️
Place the humidity tent in a location with bright, indirect light. Direct sunlight can cause the temperature inside the tent to rise too high. The cuttings don’t need full sun but a warm, well-lit area helps them develop roots faster.
4. Maintain Cleanliness 🧼
Regularly clean the inside of the tent and the cuttings to prevent the buildup of mold or pests. Gently wipe the sides of the tent and remove any decaying leaves or debris. This ensures a healthy environment for your cuttings to grow.
5. Check for Root Development 🌱
Check the cuttings every few days for signs of rooting. Be careful not to disturb them too much. Once roots begin to form, you can gradually reduce the humidity and prepare to transplant them into pots or soil.
With consistent care, your cuttings will soon grow into healthy, strong plants ready for the next stage! 🌸
Common Mistakes to Avoid When Using a Humidity Tent 🚫🌱
Using a humidity tent for delicate cuttings can be a game-changer, but there are a few common mistakes you’ll want to avoid to ensure success:
1. Overwatering 💧
While it’s important to keep your cuttings moist, overwatering can lead to root rot and mold. Always check the soil moisture before adding more water. The soil should be damp, not soaked.
2. Poor Airflow 🌬️
Stagnant air inside the humidity tent can lead to mold, fungus, and poor root growth. Make sure your tent has proper ventilation or occasionally lift the cover to let fresh air in. A little airflow goes a long way!
3. Too Much Direct Sunlight 🌞
Placing your humidity tent in direct sunlight can raise the temperature too high, stressing out the cuttings. Opt for bright, indirect light to keep the environment stable and comfortable.
4. Not Monitoring Humidity Levels 📊
Humidity is key, but it can fluctuate inside a tent. Use a hygrometer to track the moisture levels and keep them within the ideal range (80-90%). Without proper humidity, the cuttings may dry out or fail to root.
5. Neglecting to Clean the Tent 🧼
Dirt, mold, and pests can quickly build up in a closed environment. Clean the tent regularly and remove any decaying material or leaves. A clean environment prevents disease and helps your cuttings thrive.
6. Rushing the Process ⏳
Patience is essential! Don’t rush the rooting process. Give your cuttings enough time to establish roots before moving them to pots or soil. Premature transplanting can shock the plant and stunt growth.
Avoiding these common mistakes will set you up for a successful propagation journey with healthy, thriving cuttings! 🌿
When to Remove Cuttings from the Humidity Tent 🌱🚪
Knowing when to remove your cuttings from the humidity tent for delicate cuttings is crucial to their continued growth. Here’s how to tell when they’re ready:
1. Look for Root Development 🌿
The main sign that your cuttings are ready to be moved is the formation of roots. Gently check the base of the cutting to see if roots have started to grow. If you can see small, healthy roots, it’s time to transition them.
2. New Growth 🌸
In addition to roots, look for new growth on the cutting. Tiny leaves or stems emerging from the cutting are signs that the plant is becoming strong enough to handle a more stable environment outside the tent.
3. Gradual Acclimation 🌤️
Before completely removing the cuttings, begin the process of acclimating them to normal room conditions. Start by opening the tent or reducing the humidity slightly each day. This helps prevent shock when they’re fully transitioned to soil or pots.
4. Duration ⏳
Most cuttings take about 2-4 weeks to root. However, this can vary depending on the plant type and environmental conditions. Be patient, and wait until the cuttings are showing solid signs of growth.
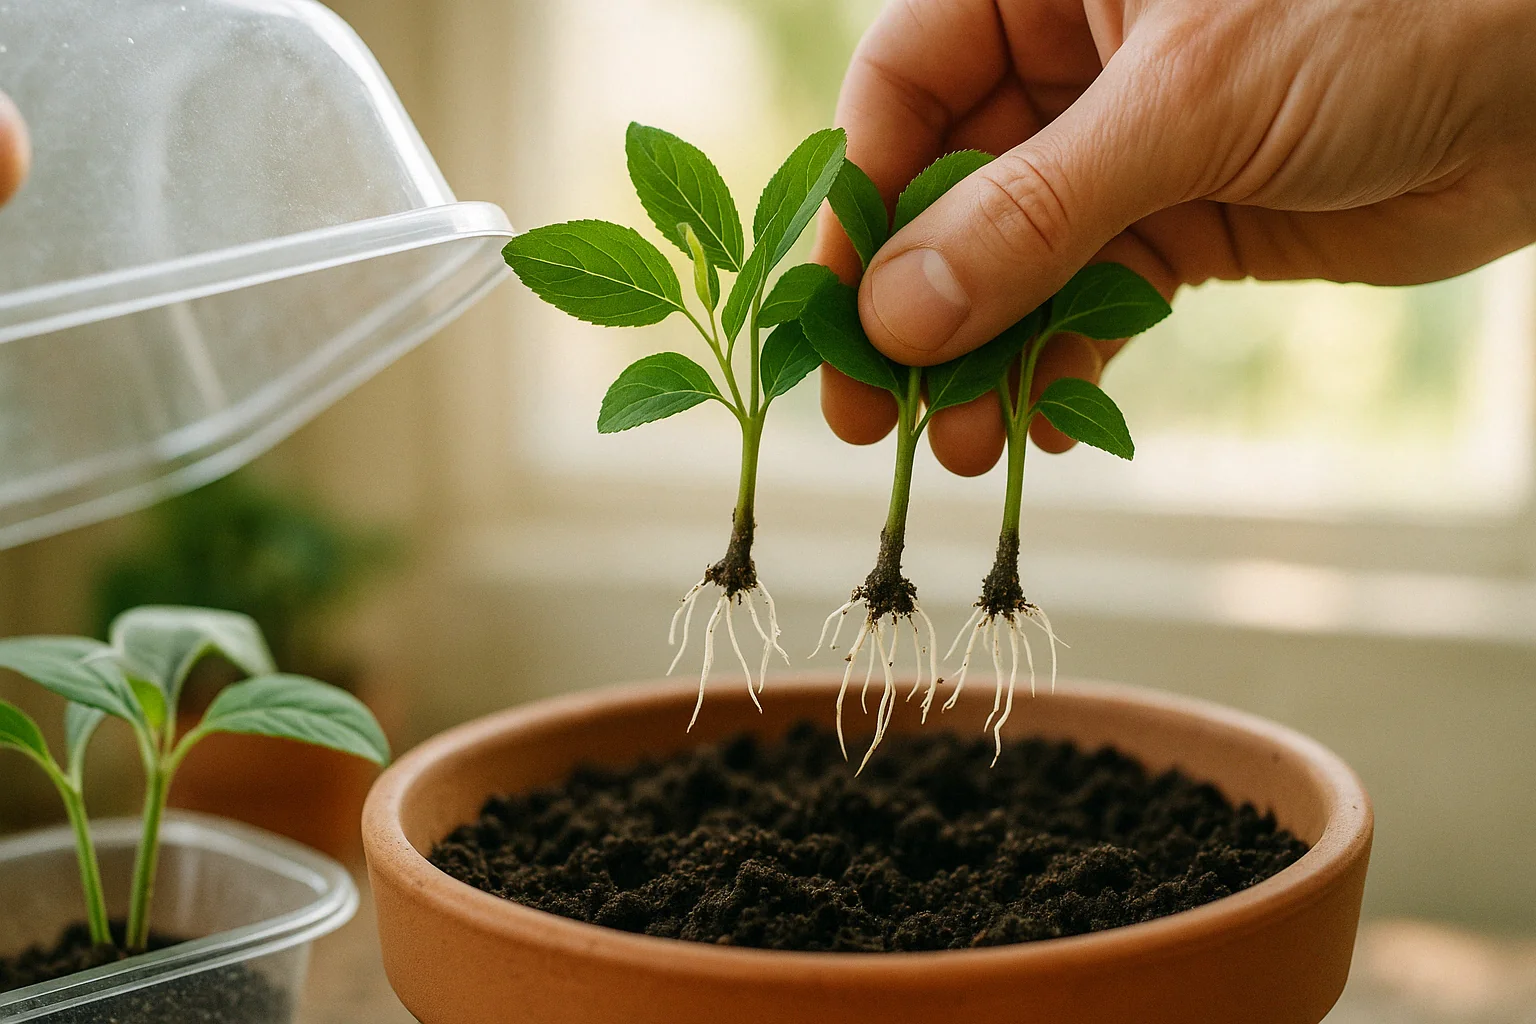
Once your cuttings have rooted and acclimated, they’ll be ready to move into larger pots or their permanent home in the garden! 🌻
Troubleshooting Tips for Humidity Tent Propagation 🛠️🌱
Even with the best care, things don’t always go as planned. Here are some troubleshooting tips to help you address common issues with your humidity tent for delicate cuttings:
1. Yellowing or Wilting Leaves 🍂
- Cause: Overwatering or lack of airflow.
- Solution: Check the soil moisture—ensure it’s damp but not soggy. Increase ventilation by opening vents or occasionally lifting the cover. Remove any decaying leaves.
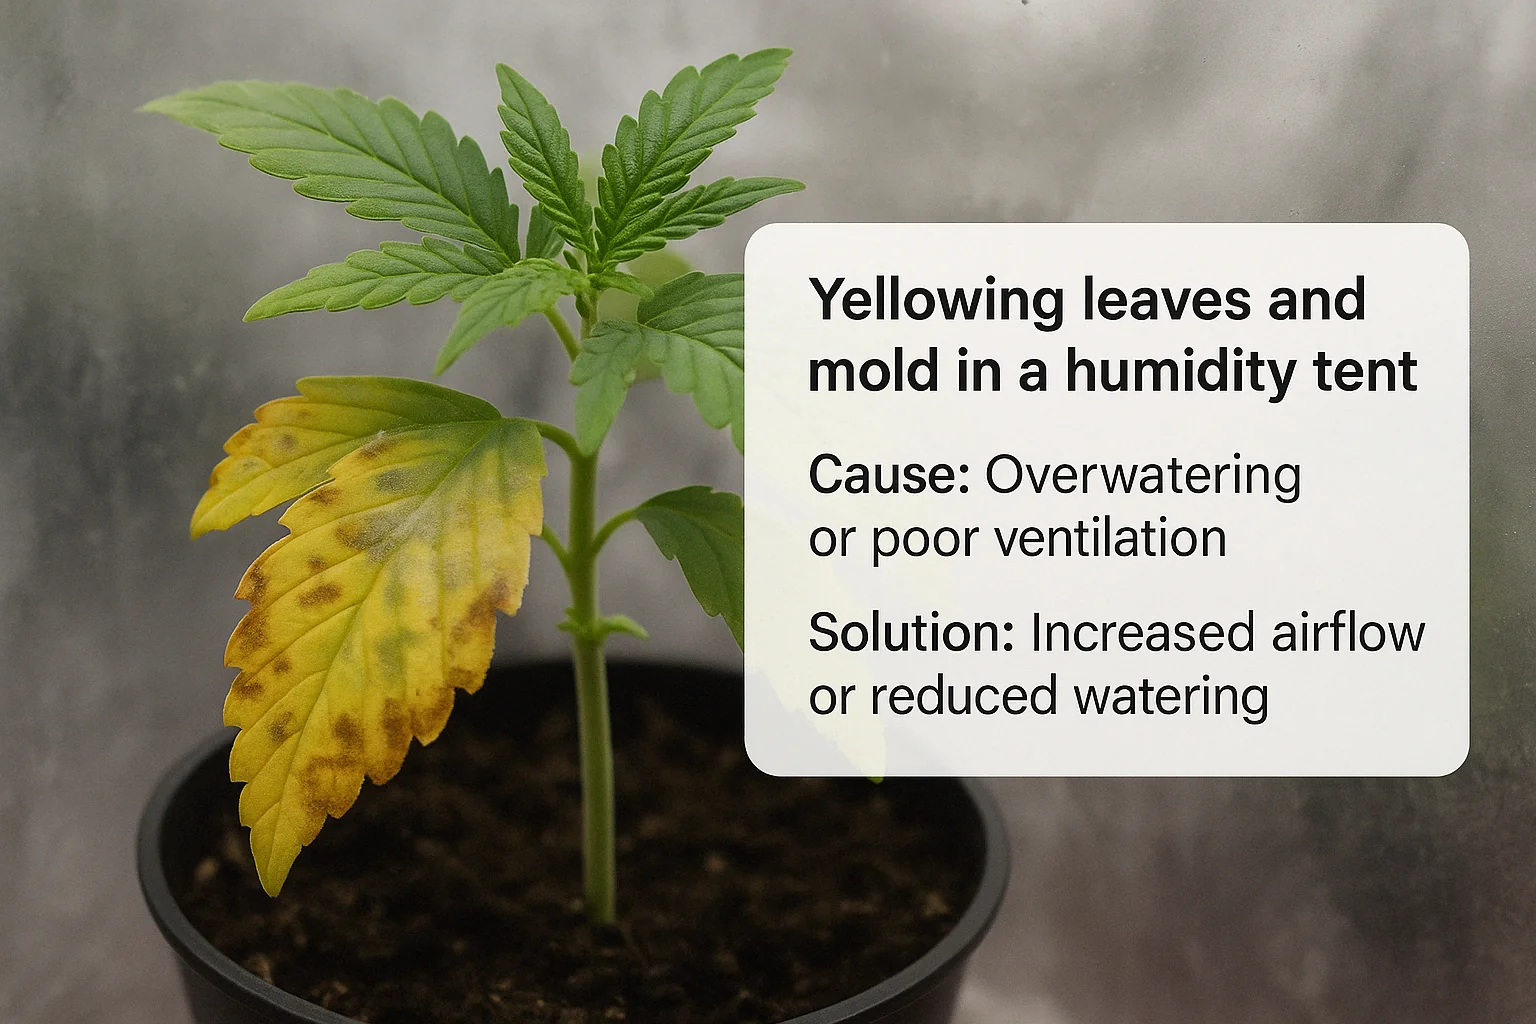
2. Mold or Fungal Growth 🦠
- Cause: Excess moisture and poor ventilation.
- Solution: Clean the humidity tent and cuttings. Reduce humidity slightly and improve airflow. You can also add a small fan to the room to keep air circulating.
3. Slow or No Root Development 🐢
- Cause: Incorrect humidity or temperature.
- Solution: Check that the humidity levels are between 80-90%. Make sure the temperature is between 65-75°F (18-24°C). You may need to adjust the placement of the tent or mist the cuttings more frequently.
4. Cuttings Turning Brown or Soft 🥀
- Cause: Too much direct sunlight or overheating.
- Solution: Move the tent to a spot with bright, indirect light. Avoid placing it directly under a grow light or in a sunny window that might cause overheating.
5. Cuttings Not Rooting 🌱
- Cause: Poor cutting quality or inappropriate plant type.
- Solution: Ensure you’re using healthy, mature cuttings. Some plants are harder to propagate and may require specific conditions. Try different cuttings or rooting mediums if necessary.
By addressing these common issues promptly, you’ll give your cuttings the best chance to thrive and root successfully! 🌸
Final Thoughts 🌿🌱
A humidity tent for delicate cuttings is an incredibly effective tool for boosting your plant propagation success. By creating the right environment—moisture, warmth, and ventilation—you give your cuttings the best possible start in life. From choosing the right tent to caring for your cuttings and troubleshooting common issues, this guide has covered everything you need to ensure your propagation efforts flourish.
Remember, patience is key. With the proper care and attention, your cuttings will grow into healthy, thriving plants. So, set up your humidity tent, monitor your cuttings closely, and enjoy the rewarding process of watching your plants take root and thrive! 🌱💚