

Growing a Japanese Maple Tree from seeds is a rewarding yet delicate process that many gardeners find fascinating.  These beautiful trees are admired for their stunning foliage, graceful shape, and vibrant fall colors, but starting them from Japanese Maple Tree seeds can be a challenge for beginners. If you’re wondering how to successfully grow these trees from seeds, you’re in the right place!
In this step-by-step guide, we’ll walk you through everything you need to know—from collecting and preparing the seeds to ensuring they germinate and thrive. Whether you’re a seasoned gardener or just starting out, this article will provide you with the knowledge and confidence to grow your own Japanese Maple Tree from seeds, turning your dream of adding one to your garden into a reality. Keep reading to unlock the secrets of nurturing these stunning trees from the ground up! 
Understanding Japanese Maple Tree Seeds
Japanese Maple trees (Acer palmatum) are known for their beautiful, delicate leaves and vibrant fall colors. If you’re looking to grow a Japanese Maple from seed, it’s important to understand the basics of their seeds and how they behave. Here’s what you need to know to get started on the right foot!
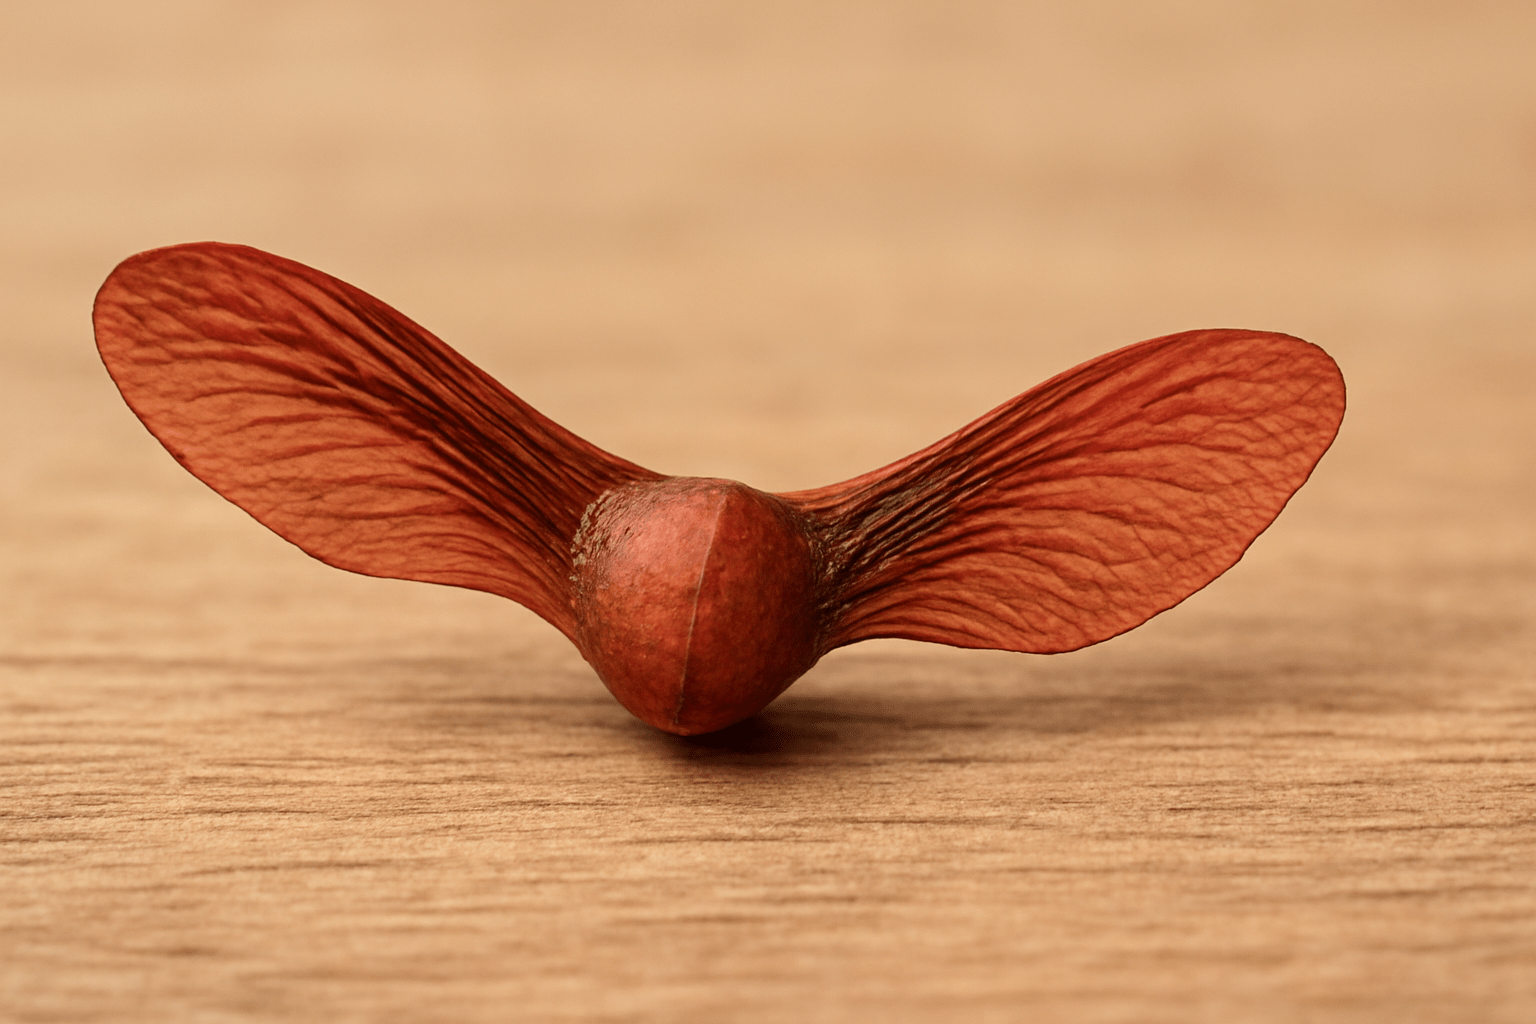
What Do Japanese Maple Seeds Look Like?
The seeds of the Japanese Maple are small, winged structures, often called “samaras.” These samaras are typically reddish, green, or brown, depending on the tree’s variety and the season. Each samara consists of two wings that spread out like a propeller, helping the seed travel by wind over long distances. This is why you may see Japanese Maple trees growing in random spots, especially in windy areas!
How Do Japanese Maple Seeds Propagate?
Japanese Maple seeds are naturally dispersed in the wild by the wind. However, if you’re growing your own, you’ll need to manually collect them when they ripen. The best time to harvest the seeds is in late fall to early winter, when the samaras turn brown and begin to drop from the tree. 
The Seed Dormancy Challenge
Japanese Maple seeds go through a period of dormancy, which means they need to be cold-stratified before they can sprout. This mimics the natural winter conditions they would experience in the wild. Without this cold period, the seeds will not germinate.
Cold-stratification typically lasts for about 2 to 3 months. This process helps break the seed’s dormancy, preparing it for growth.  Don’t worry! It’s not as complicated as it sounds. We’ll cover the step-by-step cold-stratification process later in the guide. Stay tuned!
Why Are Japanese Maple Seeds So Special?
What makes Japanese Maple seeds unique is their variety. Some varieties of Japanese Maples produce seeds that are easier to germinate, while others can be more challenging. This diversity gives gardeners plenty of options to experiment with different tree forms and leaf colors.
Also, Japanese Maples are known for their adaptability. Whether you’re in a mild climate or a more temperate zone, they can thrive with the right care—starting from the very seed you plant. 
By understanding the unique nature of Japanese Maple seeds, you’re already on your way to a successful growing experience. So, get ready to dive into the next steps of cold-stratification and planting!
How to Collect and Prepare Japanese Maple Tree Seeds
Collecting and preparing seeds from your Japanese Maple tree is an essential step in growing a new tree from scratch. The process may seem tricky, but with a bit of patience and the right technique, you can successfully harvest seeds and get them ready for planting. Here’s how:
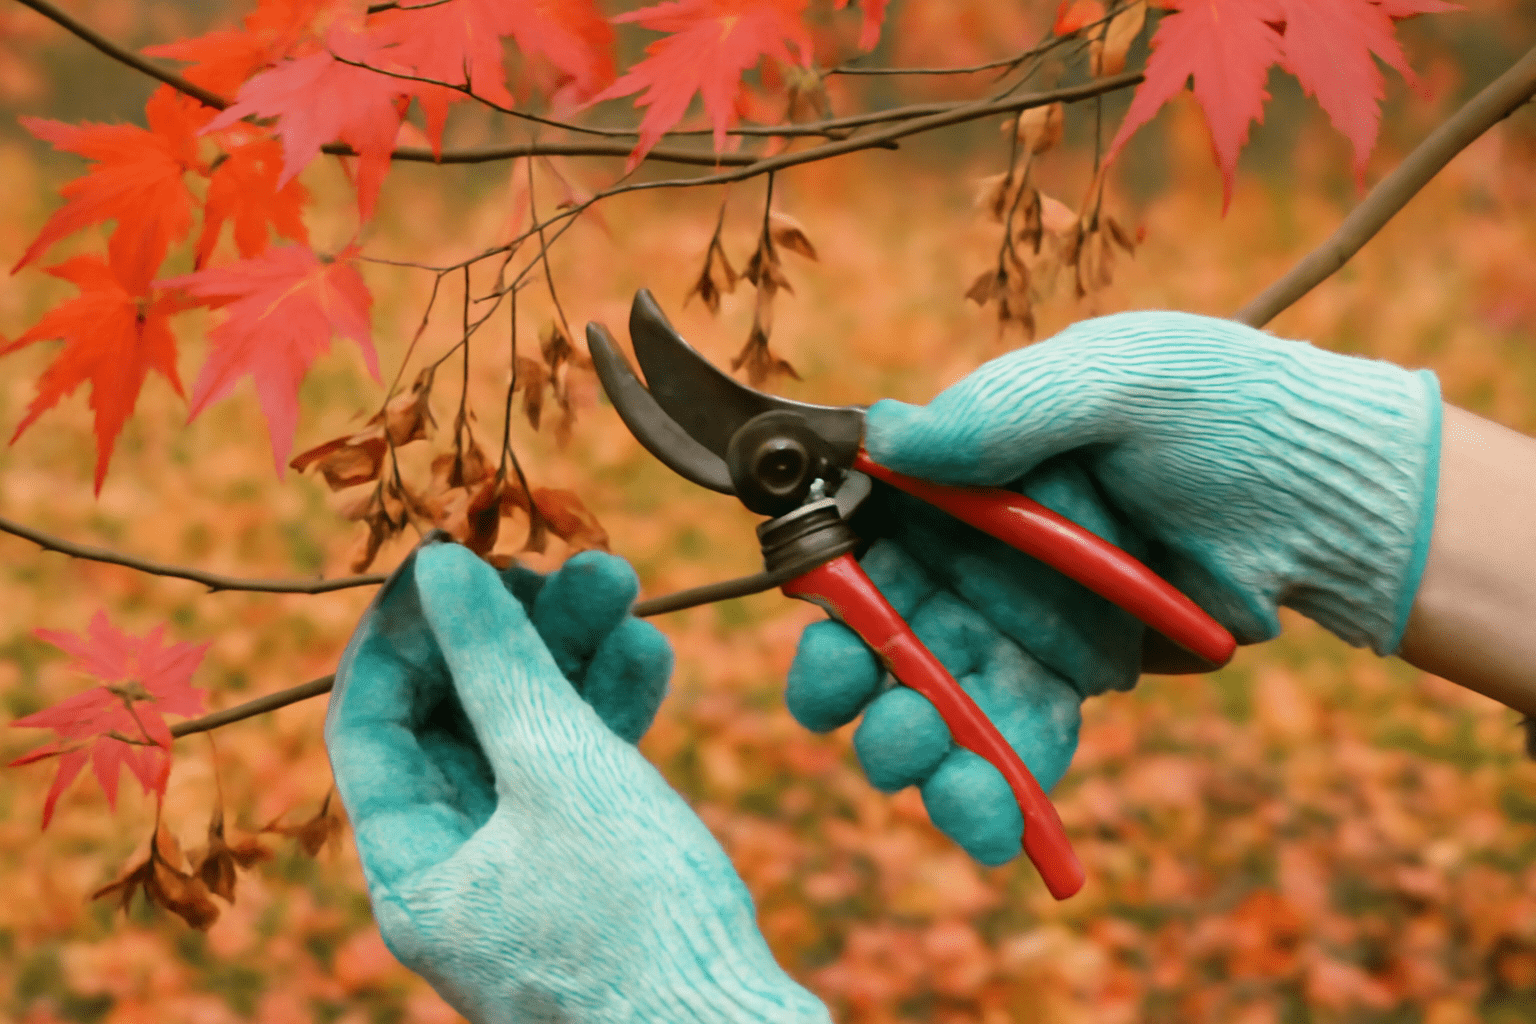
1. Know When to Collect the Seeds
The best time to collect Japanese Maple seeds is in late summer to early fall, when the seeds have fully matured. Look for samara—the winged seeds—hanging from the tree. These seeds should be brown and dry, not green or immature.
- Ideal Time: Late summer to early fall
- Signs of Maturity: Brown, dry samaras
2. Harvesting the Seeds 
Gently pull the samaras from the tree, making sure to avoid damaging the seeds. You can use pruning shears or scissors to snip off the clusters of seeds, or simply pinch them off with your fingers.
- Handle with care to avoid bruising or crushing the seeds.
- Collect a variety of seeds to ensure healthy germination.
3. Cleaning the Seeds 
Once you’ve gathered the samaras, it’s time to clean them. The seeds are usually wrapped in a papery outer casing. Carefully remove the seed from its winged shell to ensure you’re left with just the seed.
- Tip: If the seeds are still stuck in their casings, soak them in water for a few hours to help loosen the outer layer.
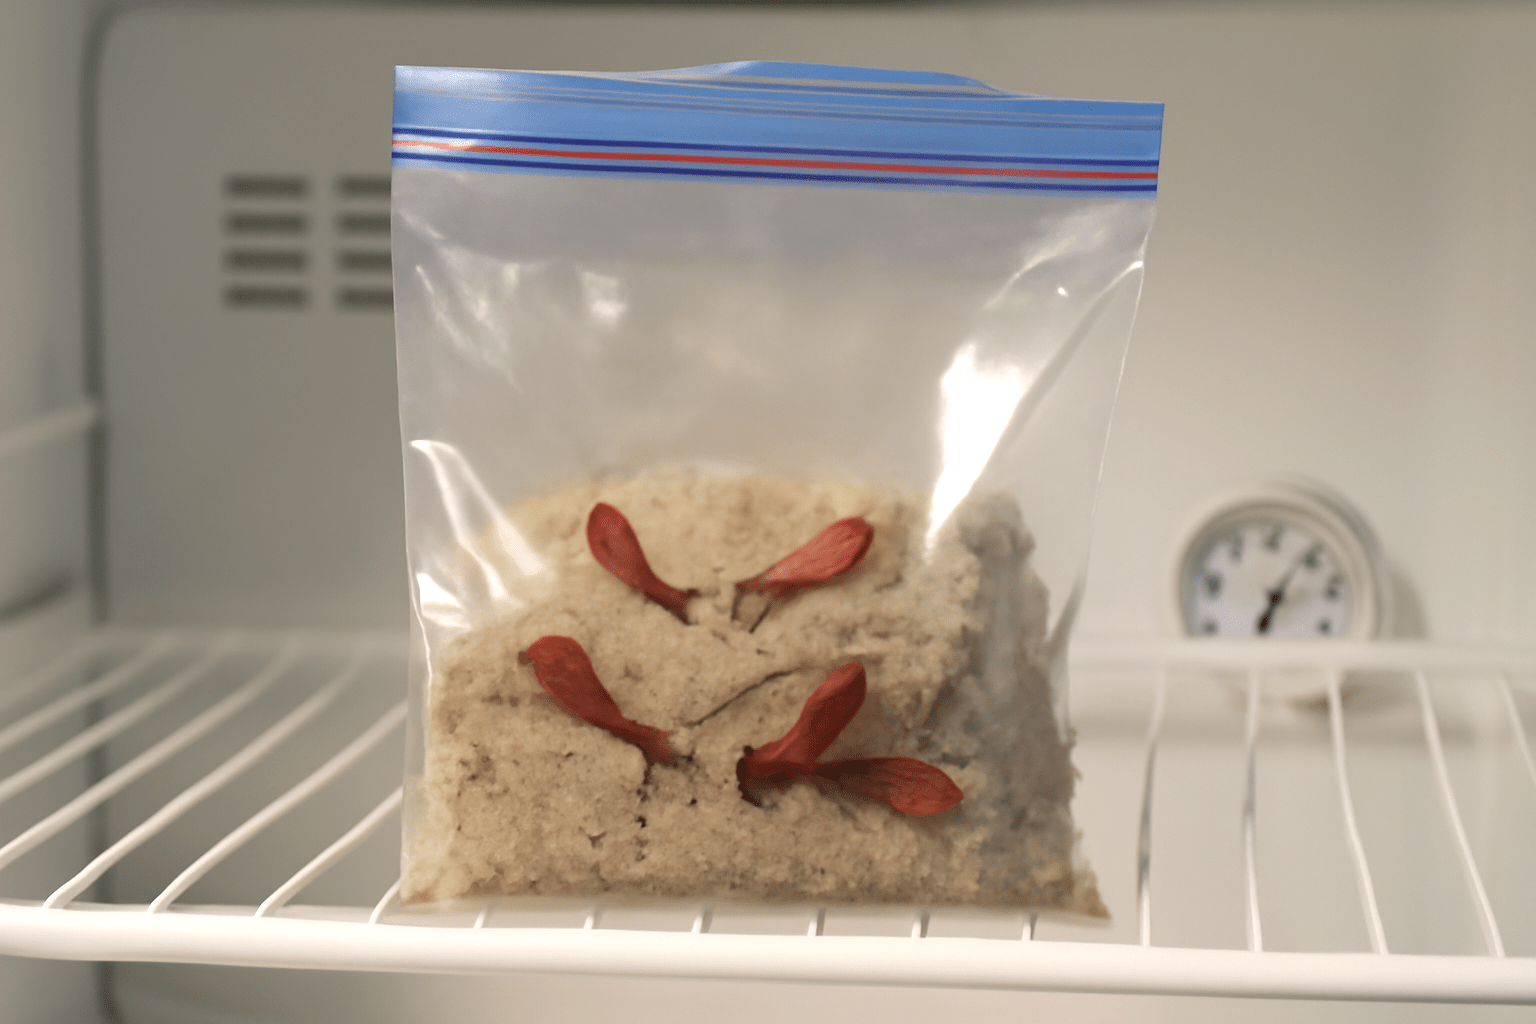
4. Stratification: Cold Treatment for Germination 
Japanese Maple seeds need a cold stratification process to break their dormancy and trigger germination. This process mimics winter conditions and is crucial for success.
- How to Stratify: Place the cleaned seeds in a plastic bag with a moist medium like sand or peat moss.
- Refrigerate: Keep the bag in the refrigerator at 35-40°F (1-4°C) for 60-90 days.
- Monitor Moisture: Make sure the medium stays slightly damp, not soaking wet, to avoid mold.
5. Prepare for Planting
After the stratification period, your seeds should be ready to plant. Remove them from the fridge and allow them to warm up for a day or two at room temperature.
- Planting Tip: Once the seeds have warmed, plant them in a well-draining potting mix, about 1/4 inch deep.
- Germination Time: Expect germination to take anywhere from 2 weeks to a few months, depending on the conditions.
By following these simple steps, you’ll be on your way to successfully growing your own Japanese Maple trees from seed!
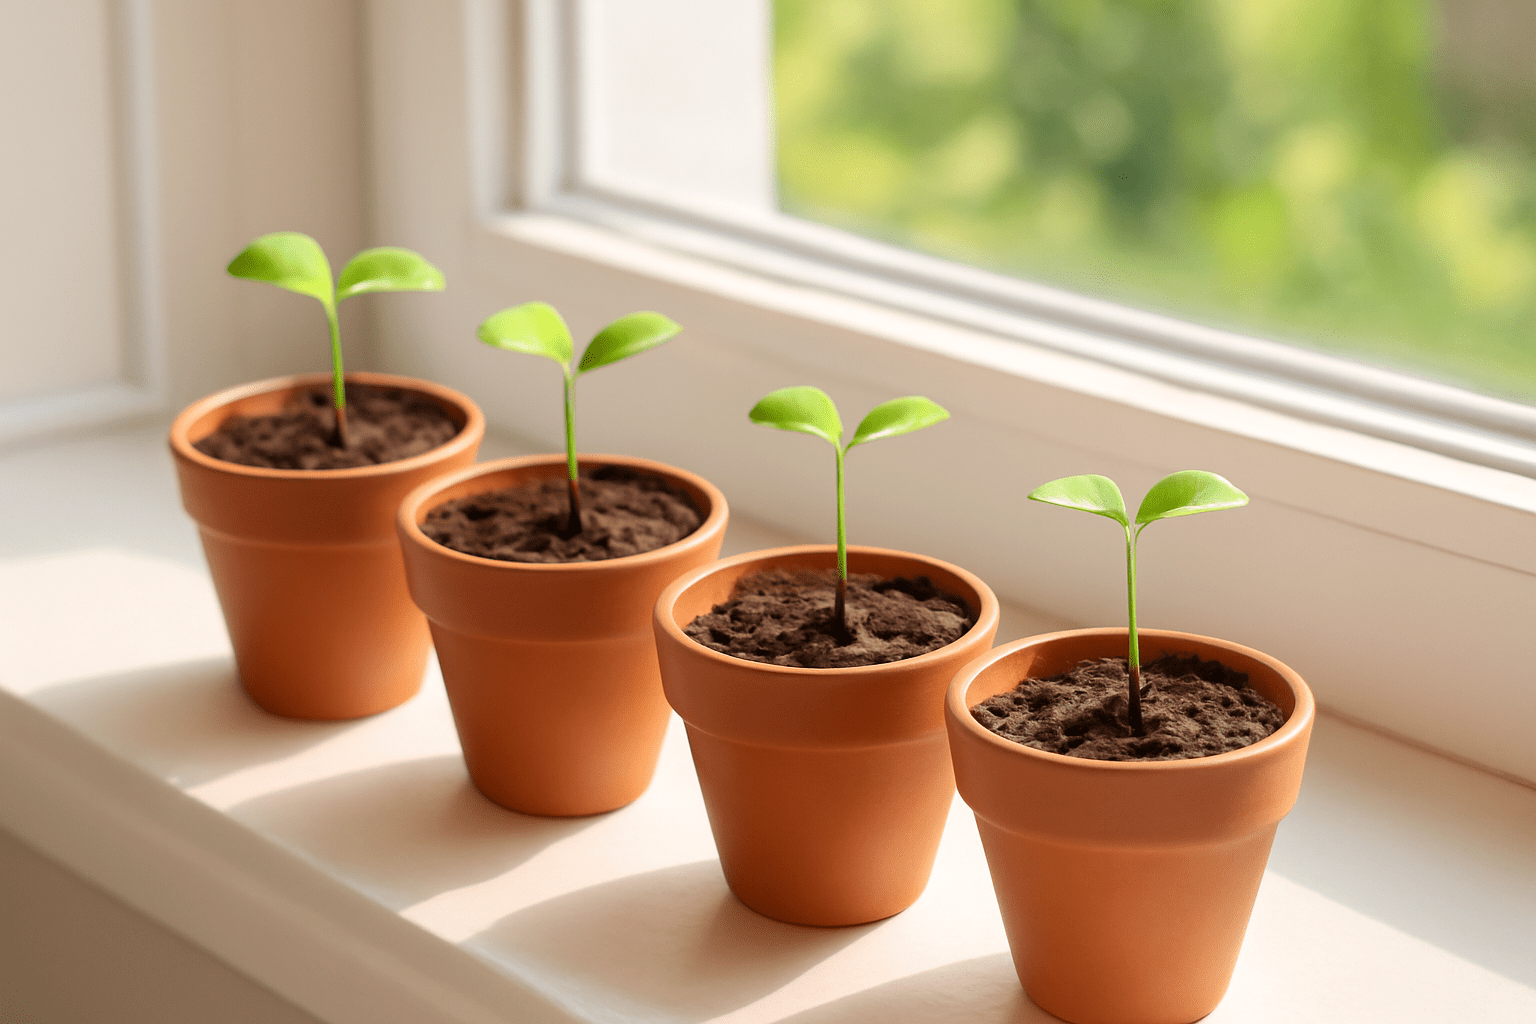
Planting Japanese Maple Tree Seeds
Planting Japanese maple tree seeds can be a rewarding experience when done correctly. These stunning trees are known for their vibrant foliage and graceful shape, making them a popular choice for many gardens. If you’re ready to grow one from seed, follow these steps to increase your chances of success.
1. Choose Fresh Seeds
Start with fresh Japanese maple seeds. These seeds are often collected in late fall when the tree produces them, typically around September to October. Look for seeds that are mature and have been properly stored. Fresh seeds are more likely to germinate successfully.
2. Stratify the Seeds
Japanese maple seeds require cold stratification to break dormancy and encourage germination. This process mimics the natural winter conditions that the seeds would experience in the wild. Here’s how to do it:
- Step 1: Place the seeds in a small plastic bag with a bit of moist sand or peat moss. Make sure the medium is damp, not soaking wet.
- Step 2: Seal the bag and store it in the refrigerator for 30 to 60 days. This cold treatment is essential for the seeds to sprout in the spring.

3. Prepare the Planting Area
While your seeds are stratifying, get your planting area ready. Japanese maples thrive in well-draining soil with a slightly acidic pH (around 5.5 to 6.5). Choose a location that gets indirect sunlight to avoid scorching the delicate seedlings.
4. Plant the Seeds
Once the stratification period is over, it’s time to plant. Here’s what you need to do:
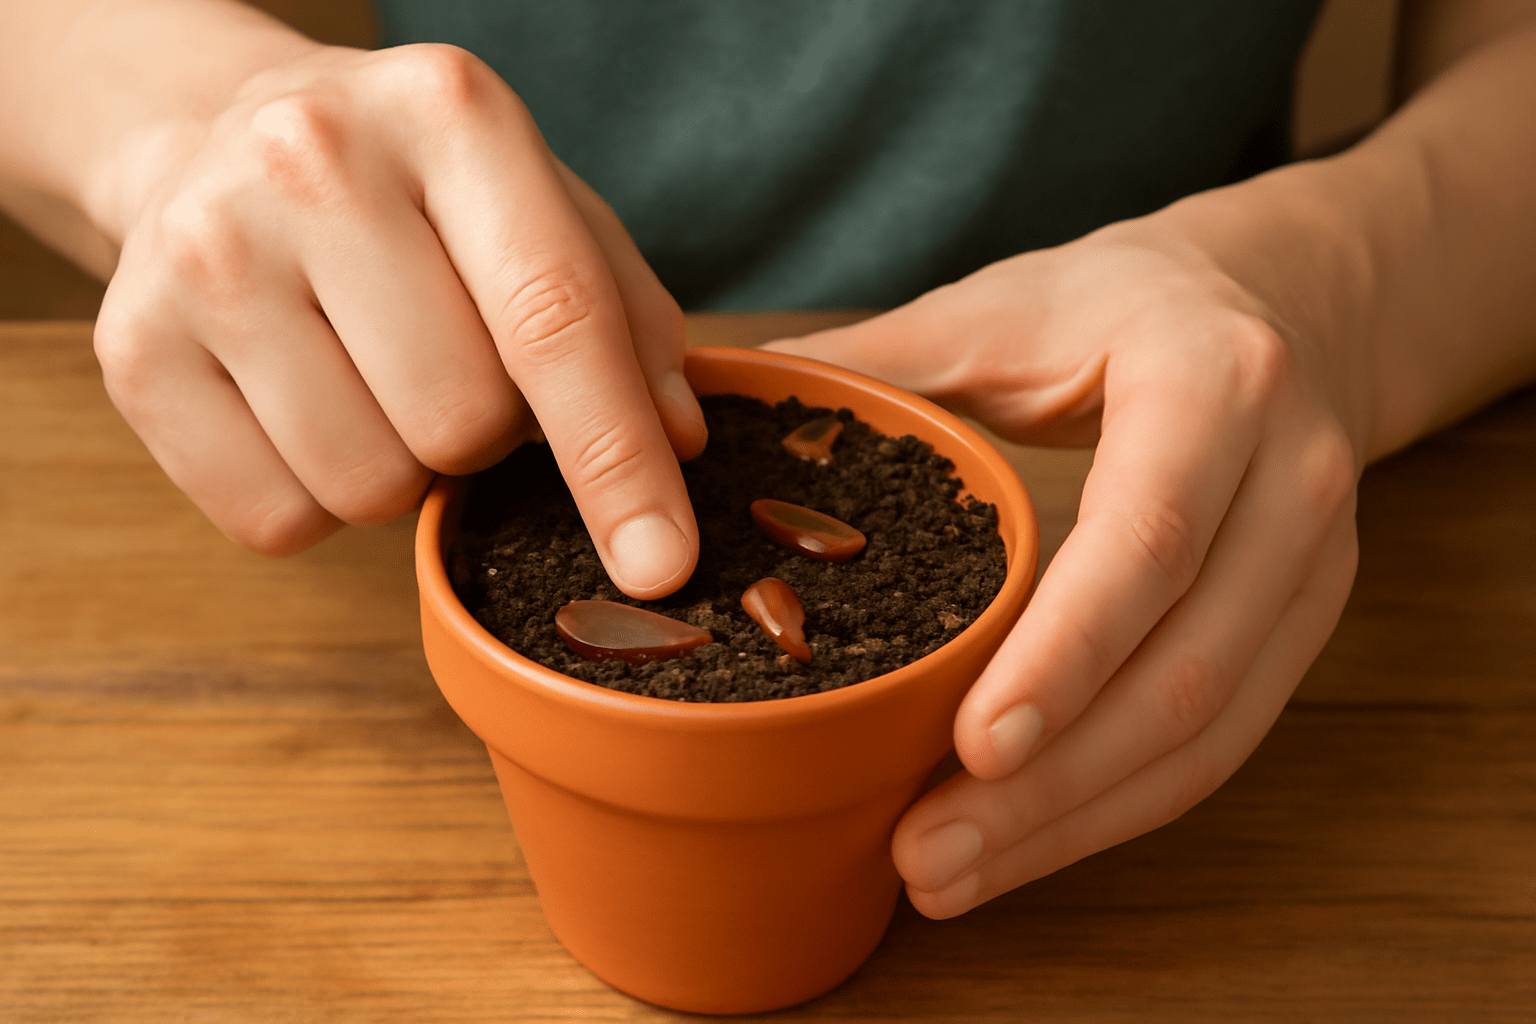
- Step 1: Fill a seed tray or small pots with a lightweight potting mix that drains well.
- Step 2: Sprinkle the seeds on top of the soil, and lightly press them down. Don’t bury them too deep, as they need light to germinate.
- Step 3: Lightly water the soil to keep it moist, but not soggy. Consistent moisture is key for successful germination.
5. Provide Ideal Growing Conditions
To encourage growth, create a warm and humid environment for your seeds. You can cover the seed tray or pots with a plastic dome or clear plastic wrap to retain moisture. Keep the temperature between 65°F and 75°F (18°C to 24°C) for the best results. 
6. Be Patient
Germination can take anywhere from 2 to 4 weeks, so be patient! Keep an eye on the seeds and ensure they stay moist, but not waterlogged. Once the seeds begin to sprout, remove the plastic cover and allow the seedlings to grow.
7. Transplant When Ready
Once the seedlings develop their first true leaves, they are ready to be transplanted into larger pots or directly into your garden. Make sure the new location offers partial shade and well-draining soil. Keep the seedlings well-watered as they adjust to their new environment.
Pro Tip: Japanese maple trees are slow growers, so don’t be discouraged if the seedlings take their time to establish themselves.
By following these steps, you’ll set yourself up for a successful start in growing your very own Japanese maple tree from seed. With a little patience and care, you’ll soon be rewarded with a beautiful, elegant tree that will thrive for years to come! 
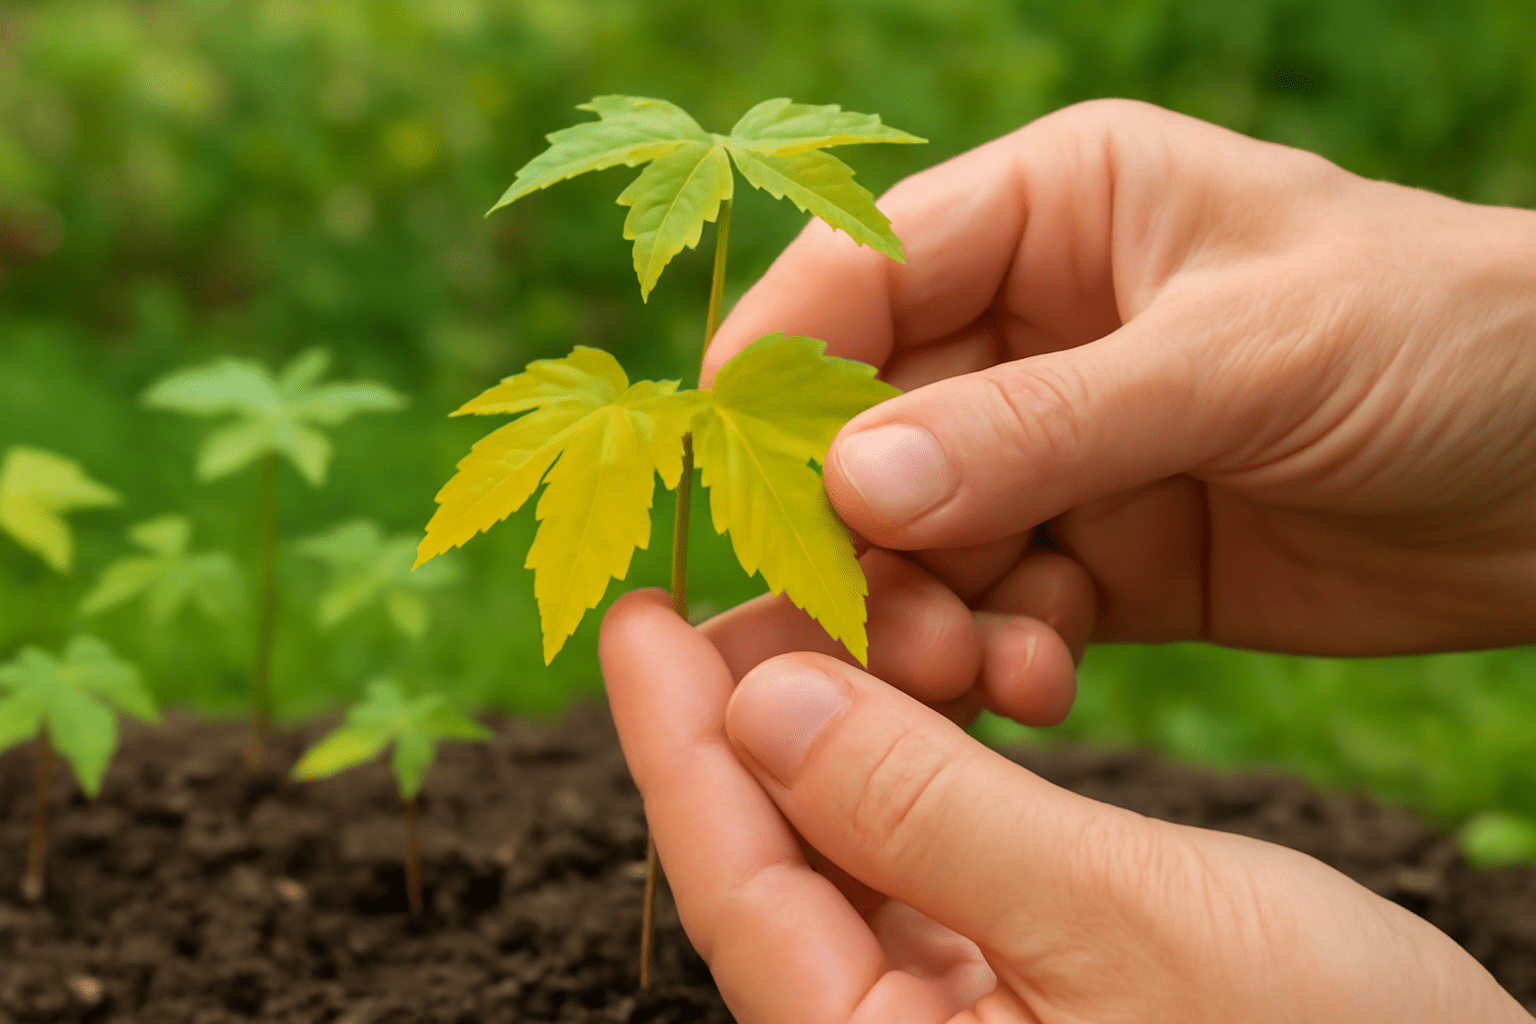
Caring for Your Germinating Japanese Maple Tree Seeds
Once your Japanese maple tree seeds have germinated, it’s essential to provide the right care to help them grow strong and healthy. With the right environment and attention, these tiny seedlings can grow into beautiful, mature trees. Here’s how to care for them at this crucial stage:
1. Provide Plenty of Light 
Your germinating seeds need bright, indirect light to thrive. Place them near a window with good natural light but avoid direct sunlight, which can scorch their delicate leaves. A spot with filtered light, such as a shaded patio or under a mesh screen, is ideal.
2. Maintain Consistent Temperature
Japanese maple seedlings prefer a consistent, moderate temperature. Keep them in a space where the temperature stays between 65°F to 75°F (18°C to 24°C). Avoid placing them in drafty areas or near heat sources, as temperature fluctuations can stress the seedlings.
3. Water Gently 
Watering is critical at this stage. Keep the soil consistently moist but not waterlogged. Use a gentle watering can or spray bottle to avoid disturbing the fragile seedlings. Always check the soil with your finger before watering—if it feels dry about an inch below the surface, it’s time to water.
4. Improve Air Circulation 
Good air circulation is vital to prevent mold and fungal growth. Ensure your seedlings have enough space to breathe by not overcrowding them. If they are in a small container or tray, consider using a small fan on low speed to gently circulate the air, but keep it away from the seedlings to avoid drying them out.
5. Feed with a Balanced Fertilizer
As the seedlings begin to grow, they’ll need nutrients to support their development. Use a diluted, balanced liquid fertilizer (like 10-10-10) once every 4-6 weeks. Avoid over-fertilizing, as this can lead to weak growth. A little goes a long way!
6. Transplant When Ready 
When the seedlings develop their first true leaves (the second set of leaves), it’s time to think about transplanting them into larger pots or directly into the ground. Handle them gently, as the roots are still delicate. Gradually harden them off by placing them outside for a few hours a day, increasing the time each day, before transplanting them permanently.
By following these simple care steps, your Japanese maple tree seedlings will have the best chance to grow into beautiful, resilient trees. Remember, patience is key—these trees can take time to establish, but the reward is well worth the effort. 
Common Problems and Troubleshooting
Growing Japanese maple tree seeds can be a rewarding experience, but it’s not without its challenges. Don’t worry—many common issues have simple fixes. Here’s how to troubleshoot the most frequent problems you might encounter while growing these beautiful trees.
1. Seeds Not Germinating?
Problem: Your seeds may not be sprouting after weeks of waiting.
Solution:
- Stratification: Japanese maple seeds require a cold stratification period (a simulated winter). If you haven’t placed them in the fridge for 30–60 days before planting, they may not germinate.
- Temperature: Seeds need a steady temperature of about 65–75°F (18–24°C) to sprout. Too cold or too hot will delay germination.
- Moisture: Ensure the soil is kept moist, but not soaking wet. Too much water can cause mold, while too little will dry out the seeds.
2. Weak or Leggy Seedlings
Problem: Your seedlings are growing tall and spindly, not sturdy like they should be.
Solution:
- Light: Seedlings need plenty of light to grow strong. If they’re not getting enough natural sunlight, move them to a brighter location or consider using grow lights.
- Spacing: If your seeds are overcrowded, they may stretch for light. Thin out the weaker seedlings to give the others more room to grow.
- Watering: Keep the soil consistently moist, but avoid overwatering. This can lead to weak roots and leggy growth.
3. Yellowing Leaves
Problem: The leaves on your Japanese maple seedlings are turning yellow.
Solution:
- Watering: Both overwatering and underwatering can cause yellowing leaves. Make sure the soil drains well and isn’t soggy. On the flip side, let the soil dry out a bit before watering again.
- Nutrient Deficiency: Yellowing can also be a sign of a lack of nutrients. Fertilize your seedlings with a balanced, slow-release fertilizer every 4-6 weeks.
- pH Levels: Japanese maples prefer slightly acidic soil (pH 5.5-6.5). Test the soil and adjust if necessary.
4. Damping Off (Fungal Disease) 
Problem: Your seedlings suddenly wilt and die, often after a period of healthy growth.
Solution:
- Air Circulation: Make sure your growing area is well-ventilated. Lack of airflow encourages fungal growth. Avoid overcrowding seedlings.
- Watering Technique: Water the soil, not the seedlings themselves, to prevent fungal spores from spreading. Allow the top of the soil to dry before watering again.
- Sterilize Tools and Containers: Always use clean tools and containers to prevent disease transmission.
5. Pests 
Problem: Tiny bugs or insects are attacking your seedlings.
Solution:
- Inspect Regularly: Check your seedlings frequently for aphids, spider mites, or other pests. Catching them early makes control easier.
- Natural Remedies: Use a gentle solution of water and mild soap to spray on the affected areas. Neem oil is also a great natural pesticide for Japanese maples.
- Prevention: Keep the surrounding area clean and free of weeds to minimize the risk of pests.
6. Transplant Shock 
Problem: Seedlings don’t thrive after being moved outdoors.
Solution:
- Acclimate Gradually: When moving your seedlings outdoors, slowly acclimate them to the outdoor conditions over a week or two. Start with a few hours of sunlight per day and gradually increase exposure.
- Plant at the Right Time: Transplant your seedlings in early spring or late fall when the weather is mild, avoiding extreme temperatures.
7. Stunted Growth
Problem: Your seedlings seem to be growing very slowly or have stopped growing altogether.
Solution:
- Soil Quality: Ensure you’re using well-draining, nutrient-rich soil. Japanese maples don’t like heavy, compacted soil.
- Fertilizing: While young seedlings don’t need a lot of fertilizer, too little can stunt their growth. Use a balanced, diluted fertilizer designed for young plants.
- Root Health: Gently check the roots if growth is stunted. If they’re cramped or circling the pot, it’s time to transplant into a larger container.
Final Thoughts
Growing Japanese maple seeds takes patience and attention to detail. By understanding and addressing common problems early, you can set yourself up for success. With proper care and troubleshooting, you’ll be rewarded with beautiful, healthy Japanese maples that will thrive for years to come!
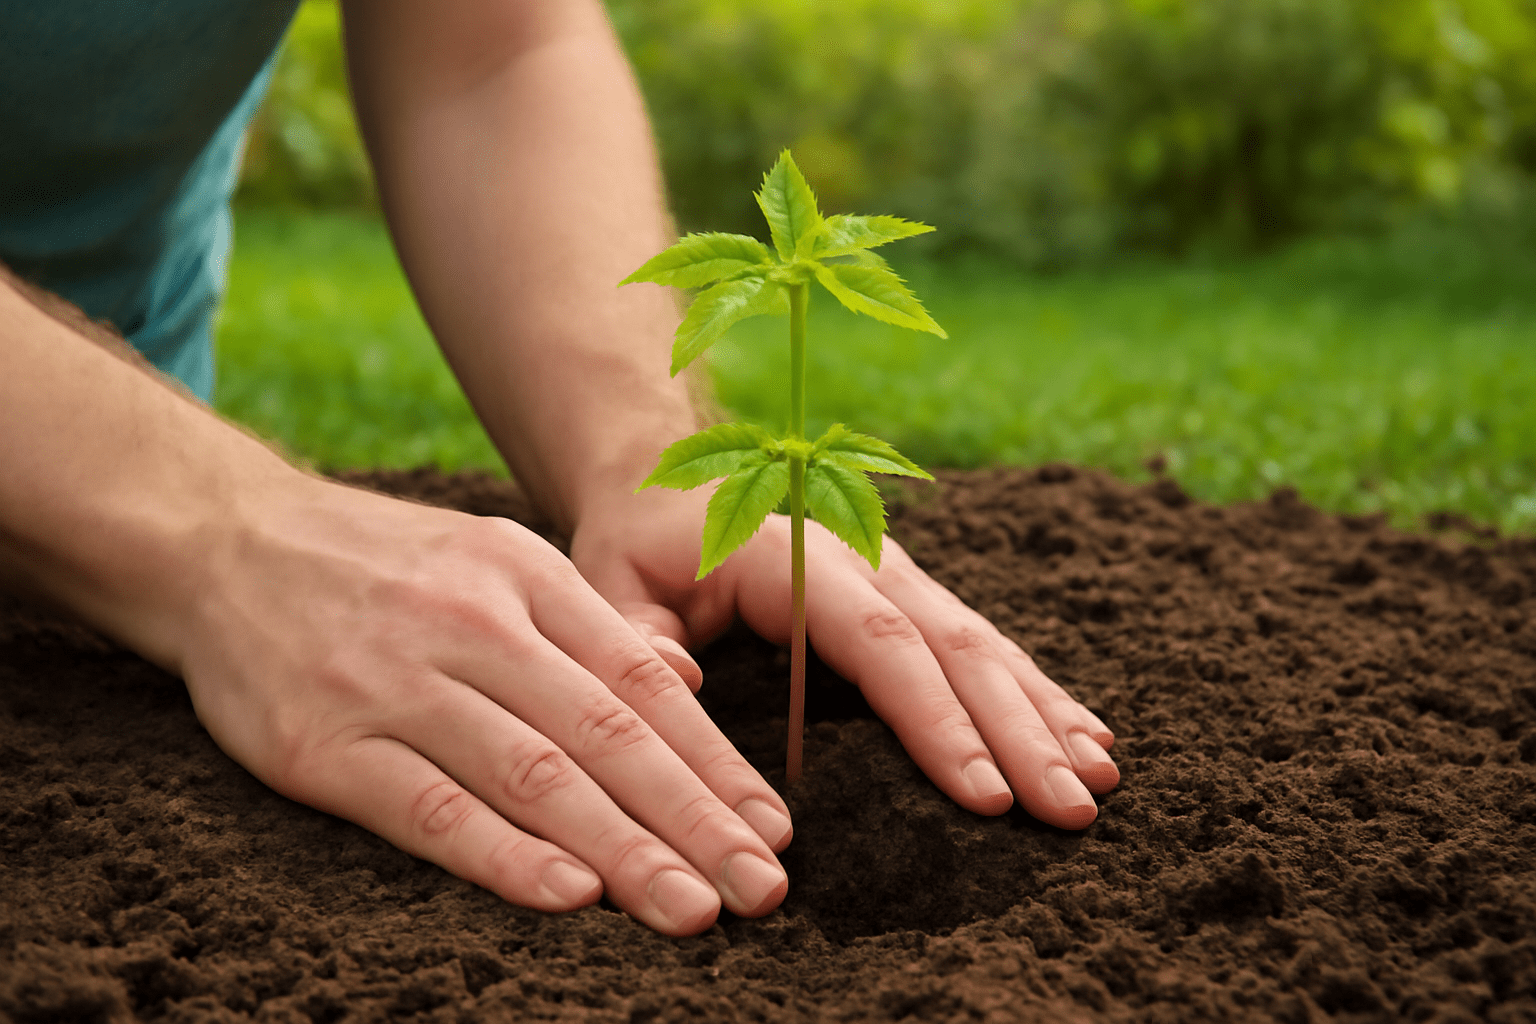
Moving Your Japanese Maple Tree Seedlings Outdoors
Transplanting your Japanese maple tree seedlings outdoors is a crucial step in their growth journey. This process needs to be done carefully to ensure your seedlings thrive in their new environment. Here’s a simple, step-by-step guide to help you make the move with confidence!
1. Wait for the Right Time 
Before moving your seedlings outside, wait until the risk of frost has passed. Typically, you should transplant them in early spring when the weather is consistently above freezing but not too hot. This will give your seedlings the best chance to adapt to their new outdoor environment.
2. Choose the Right Location
Japanese maples need a location with filtered sunlight. Too much direct sun can scorch their delicate leaves, while too little light can slow their growth. Find a spot that gets dappled shade or morning sun with afternoon shade. This is the sweet spot for these beautiful trees.
3. Prepare the Soil 
Ensure that the soil is well-draining and rich in organic matter. Japanese maples thrive in slightly acidic to neutral soil. If your soil is heavy clay, consider mixing in some compost or perlite to improve drainage. Dig a hole twice as wide as the root ball but no deeper. You want the top of the root ball to be level with the surrounding soil.
4. Acclimate the Seedlings
Gradually acclimate your seedlings to outdoor conditions by hardening them off. Start by placing them outside for a few hours each day in a sheltered spot. Increase the time outdoors over the course of a week or two. This helps prevent shock from sudden exposure to wind, rain, or direct sunlight.
5. Plant with Care 
When you’re ready to plant, gently remove the seedling from its container or pot. If the roots are tangled, gently loosen them before planting. Place the seedling in the hole, fill it with soil, and water thoroughly. Make sure the soil around the roots is firm but not compacted.
6. Water and Mulch
After planting, give your seedling a deep watering. Japanese maples like consistent moisture, but avoid overwatering. Apply a layer of mulch around the base of the tree to retain moisture and regulate temperature. Keep the mulch a few inches away from the trunk to prevent rot.
7. Monitor for Pests and Diseases 
As your seedlings establish themselves outdoors, keep an eye out for pests like aphids or fungal issues. If you notice any signs of trouble, act quickly to address the issue. A simple organic insecticidal soap or neem oil can help protect your young tree.
8. Patience and Care 
Transplant shock is common when moving seedlings outdoors, but don’t worry! Your Japanese maple will need time to adjust. Be patient, continue watering when needed, and avoid disturbing the roots too much. Over time, your tree will begin to grow stronger and more resilient.
By following these simple steps, your Japanese maple tree seedlings will soon thrive in their outdoor home. With the right care and attention, you’ll be rewarded with a beautiful, healthy tree for years to come!
Pro Tip: Remember to check the weather forecast before planting—avoid transplanting on windy or excessively rainy days for the best results. 
Conclusion
Growing a Japanese Maple Tree from seeds may require patience and attention, but the rewards are well worth the effort. By following the step-by-step guide, you’ll be equipped with all the tools and knowledge needed to successfully germinate, nurture, and transplant your own beautiful Japanese Maple Tree. From collecting seeds and stratification to caring for seedlings and eventually planting them outdoors, every step contributes to the development of a stunning tree that will grace your garden with vibrant foliage for years to come.
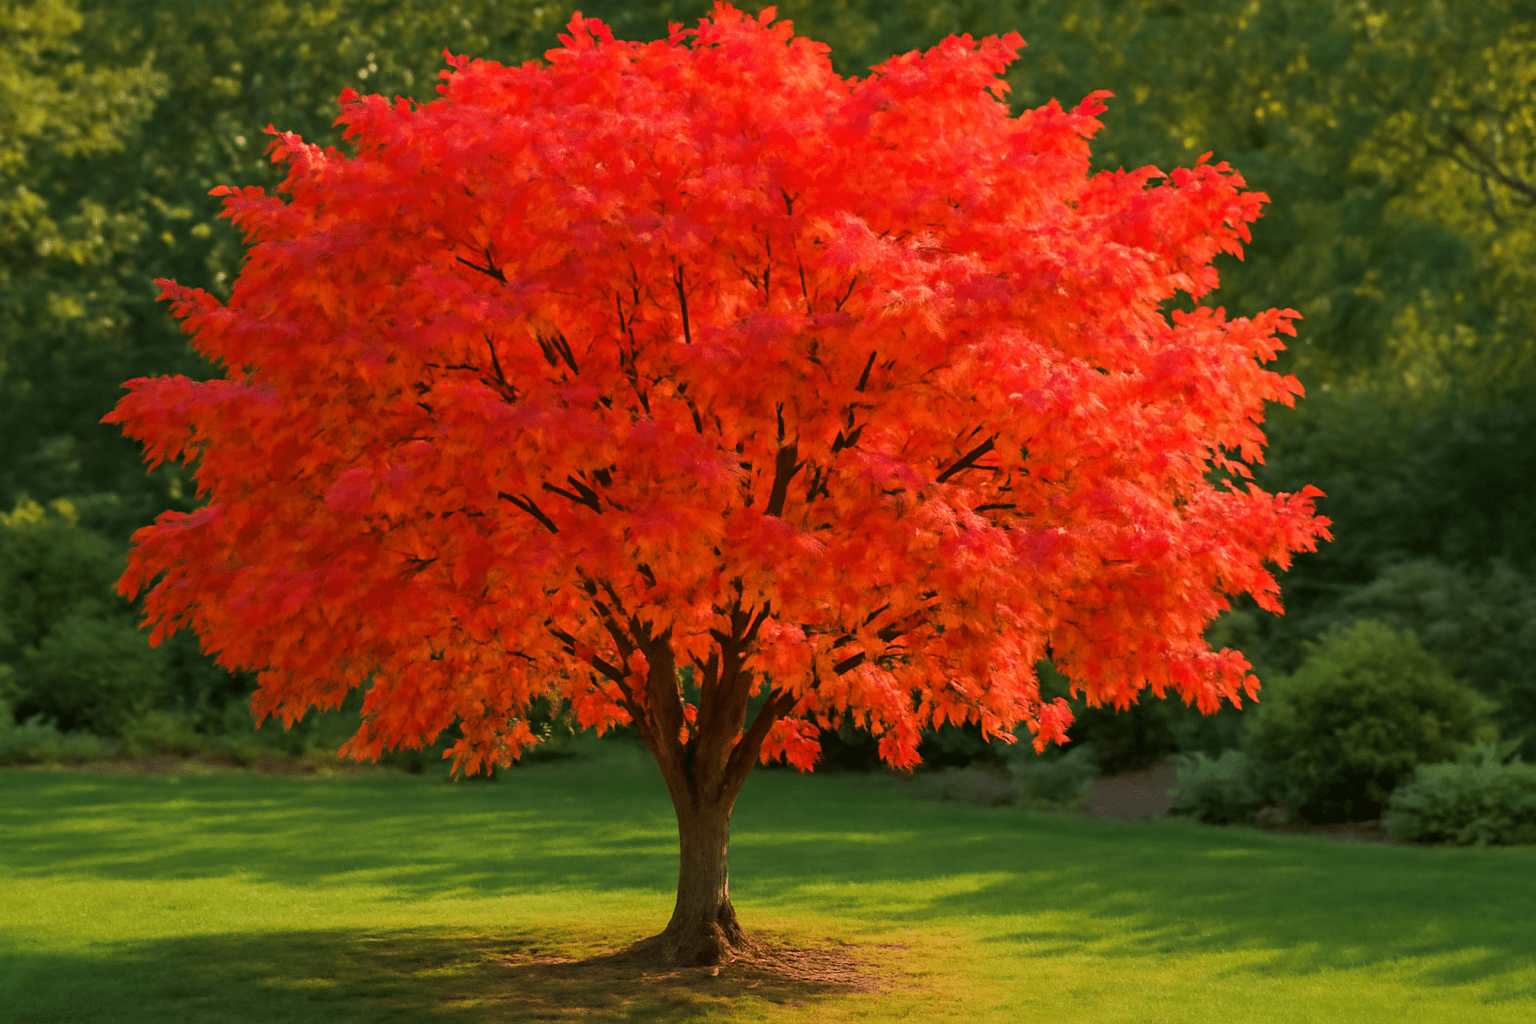
Remember, while growing from seeds takes time, it offers the unique satisfaction of watching a tree flourish from its very beginning. With the right care, your Japanese Maple will thrive, bringing beauty and elegance to your landscape. So, take the leap and start your journey today — your future garden will thank you!
Happy gardening, and best of luck with your Japanese Maple Tree seedlings!