
Is your garden looking a bit lackluster this season? Yellowing leaves on your favorite azaleas 🌼, stunted growth in your vegetable patch 🥕, sparse patches in your lawn 🌿, or fruit trees dropping immature fruits 🍎 prematurely? These frustrating symptoms often point to one hidden culprit: overly acidic soils. The good news? A well-timed lime application for acidic soils can transform your landscape, unlocking better nutrient availability, stronger roots, and vibrant, healthy plants and trees.
Soil acidity (low pH) is incredibly common, especially in regions with high rainfall, heavy use of ammonium-based fertilizers, or naturally acidic parent materials. When pH drops below optimal levels, essential nutrients like phosphorus, potassium, and magnesium become less available, while toxic elements like aluminum and manganese can harm roots. Proper liming neutralizes this acidity, raises pH to the sweet spot for most plants (typically 6.0–7.0), boosts microbial activity, improves soil structure, and makes your fertilizers work harder. In this ultimate guide, we’ll walk you through everything you need to know — from understanding why acidity happens to step-by-step application techniques — so you can revive your plants and trees effectively and sustainably. Let’s dig in! 🔍
Understanding Soil Acidity: Why Your Plants and Trees Struggle in Low pH 🌧️
Soil pH measures how acidic or alkaline your soil is on a scale from 0 to 14, with 7 being neutral. Below 7 is acidic; the lower the number, the more acidic. Most garden plants, lawns, and trees thrive when soil pH is slightly acidic to neutral (around 6.0–7.0), where nutrients are most available.
What Is Soil pH and How Does It Affect Plant Growth? pH influences nutrient solubility. In acidic conditions (pH <6.0), phosphorus binds with iron and aluminum, becoming unavailable. Calcium and magnesium leach away, while toxic aluminum damages root tips, leading to poor water and nutrient uptake. Acid-loving plants like blueberries, rhododendrons, and azaleas prefer pH 4.5–5.5, but most veggies, fruits, lawns, and ornamental trees do best at 6.0–7.0. For example:
- Lawns (cool-season grasses like fescue or Kentucky bluegrass): 6.0–7.0
- Vegetable gardens: 6.0–7.0
- Fruit trees (apples, pears, citrus): 6.0–6.8
- Ornamental trees/shrubs (oaks, maples): 5.5–7.5
Causes of Acidic Soils in Home Gardens and Orchards Acidity builds naturally from heavy rainfall leaching basic cations (calcium, magnesium), but human activities accelerate it:
- Ammonium-based fertilizers (urea, ammonium sulfate) release hydrogen ions during breakdown.
- Organic matter decomposition and plant residue removal.
- Heavy cropping that removes bases.
- Parent rock in high-rainfall areas (common in many tropical/subtropical regions like parts of Bangladesh).
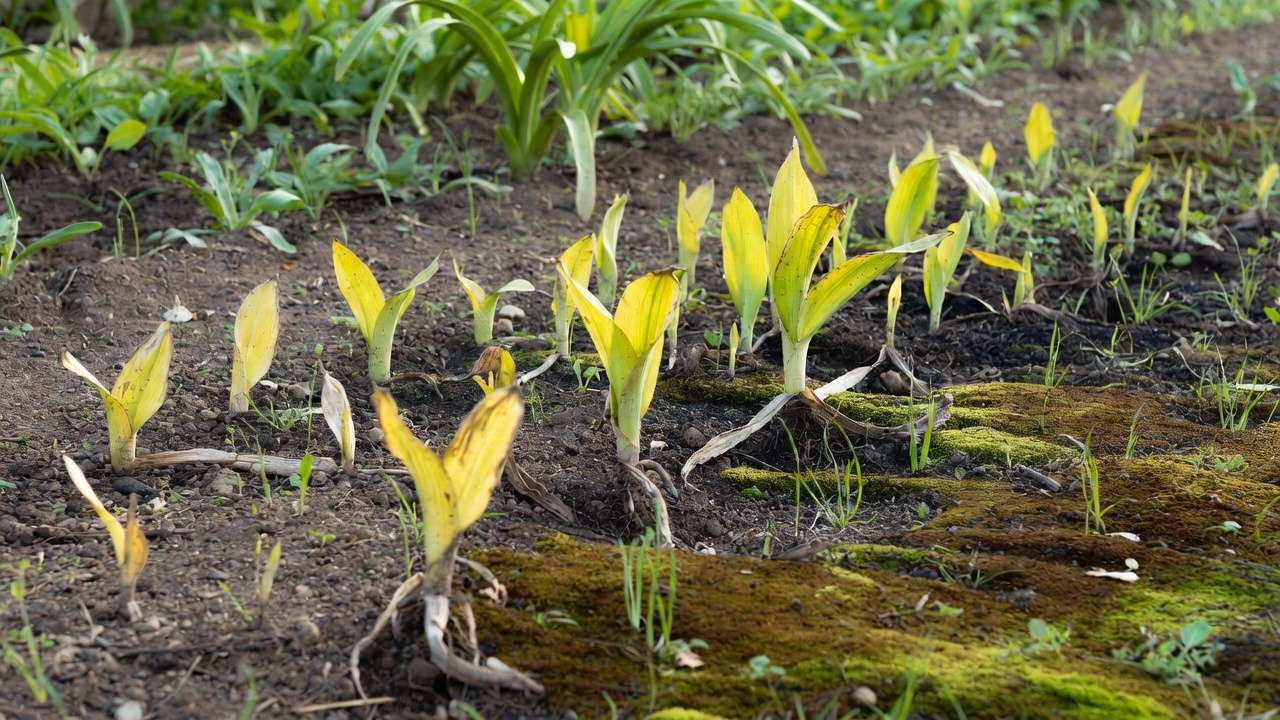
Signs Your Soil Is Too Acidic (With Photos Suggestions) 📸 Look for:
- Interveinal chlorosis (yellowing between leaf veins) on older leaves.
- Stunted growth and shallow roots.
- Poor fruit set or small yields.
- Moss or algae thriving in lawns (moss loves acidic conditions!).
- Bare patches or weak turf. If these sound familiar, a soil test is your next step — don’t guess!
Why Lime Application for Acidic Soils Is a Game-Changer 🌟
Lime (primarily calcium carbonate) neutralizes acidity through a simple chemical reaction. When added to soil, lime dissolves slowly (especially with moisture), releasing calcium (and magnesium in dolomitic types) ions that displace hydrogen (H⁺) and aluminum (Al³⁺) on soil particles. This reduces toxic ions and raises pH, making nutrients more available.
How Lime Works to Neutralize Acidity The reaction looks like this: CaCO₃ + 2H⁺ → Ca²⁺ + H₂O + CO₂ It neutralizes active acidity quickly and slowly tackles reserve acidity (bound on clay/organic matter) over months to years.
Key Benefits for Plants, Trees, Lawns, and Soil Health
- Enhanced uptake of N, P, K, Ca, Mg → greener leaves, stronger stems.
- Reduced aluminum toxicity → healthier roots and better drought resistance.
- Increased microbial activity → faster organic matter breakdown and nutrient cycling.
- Higher yields and better fruit/flower quality (studies show 10–30%+ improvements in many crops).
- Greener, thicker lawns with less moss invasion.
Long-Term Advantages: Cost Savings and Sustainability ♻️ Proper liming reduces fertilizer needs (up to 20–50% more efficient nutrient use), lowers disease risk, and builds resilient soil. It’s an investment that pays off year after year!
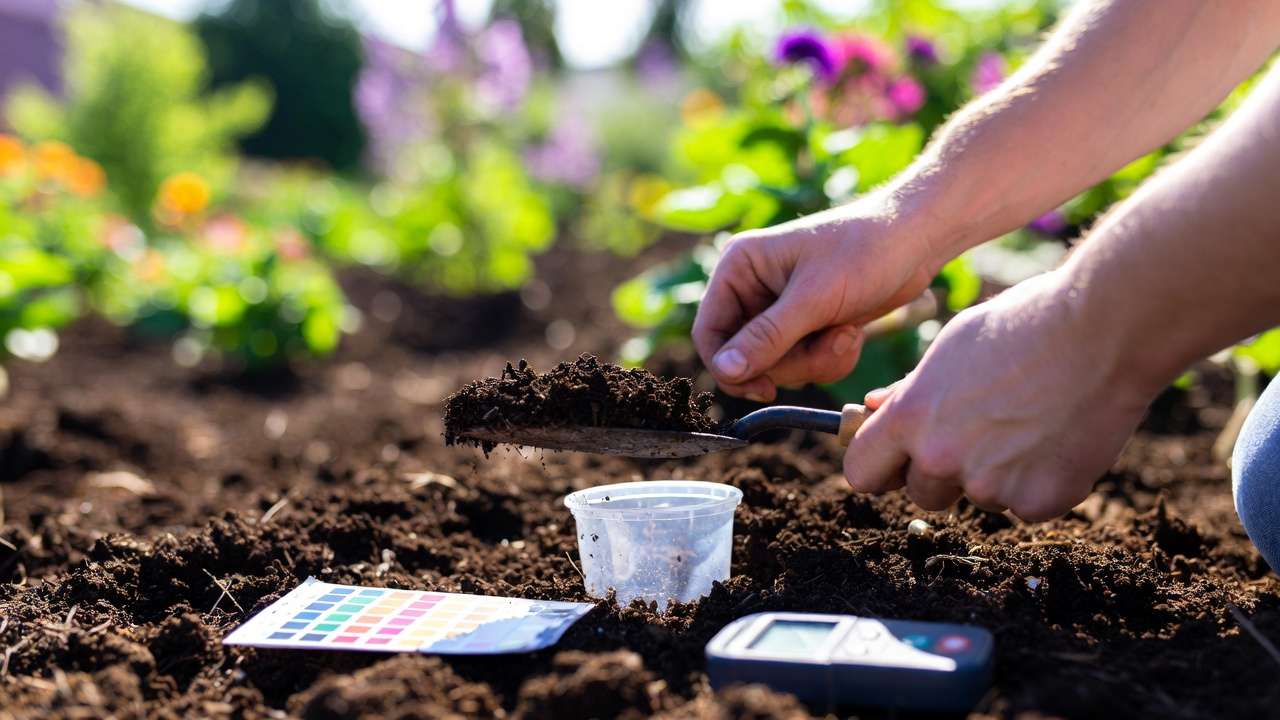
Step 1 – Always Start with Professional Soil Testing 🧪
Guessing pH or lime amounts is a common, costly mistake — overliming locks up micronutrients like iron, while underliming does nothing.
Why Guessing pH Leads to Over- or Under-Liming Soil buffering capacity varies; clay soils need more lime than sandy ones. Only a test reveals active pH, buffer pH (reserve acidity), and exact lime requirement.
How to Collect and Submit a Proper Soil Sample
- Use a clean trowel; sample 0–6/8 inches deep for gardens/lawns, deeper (12–18 inches) around trees.
- Take 10–15 subsamples in a zigzag pattern, mix thoroughly.
- Air-dry (don’t oven-dry) and send to a reputable lab (local agriculture extension or certified service).
- Sample every 2–4 years; test in fall for next-season planning.
Interpreting Soil Test Results Look for:
- Water pH (current acidity).
- Buffer pH (lime need).
- Target pH (crop-specific).
- Lime recommendation (lbs/1000 sq ft or tons/acre, adjusted for lime quality). Expert tip: Retest after 2–3 years — lime effects build gradually! 📈
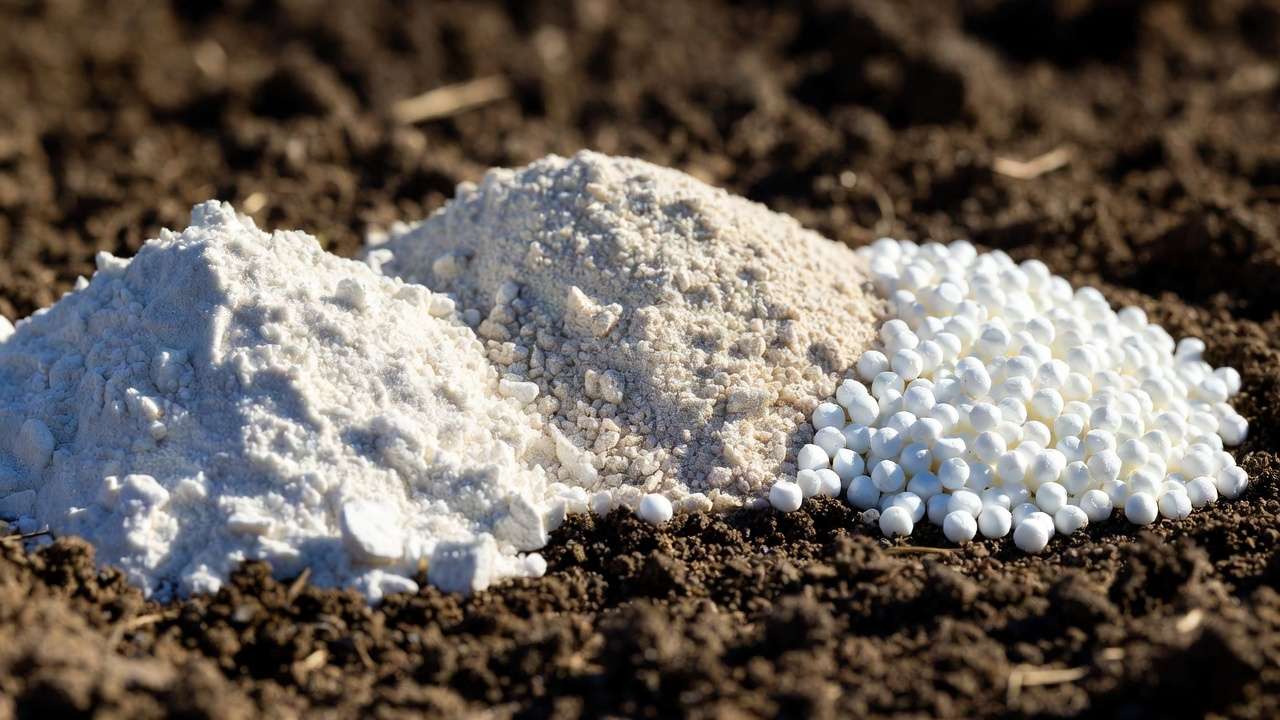
Choosing the Right Type of Lime for Your Needs 🛠️
Not all lime is created equal! The type you choose depends on your soil’s nutrient profile (especially magnesium levels from the soil test), desired speed of reaction, cost, and ease of application. Always match the lime to your soil test results.
Common Liming Materials Compared (Here’s a quick comparison table for clarity):
- Calcitic Lime (Calcium Carbonate): Pure CaCO₃ source. Fastest-acting for pH change. Ideal if your soil already has sufficient or high magnesium. Provides calcium without adding extra Mg. Often preferred for quick corrections in gardens and lawns.
- Dolomitic Lime (Calcium Magnesium Carbonate): Contains both CaCO₃ and MgCO₃ (typically 20-30% Mg). Best when soil tests show low magnesium (common in sandy or heavily cropped soils). Supplies both Ca and Mg, helping prevent deficiencies in plants like tomatoes or fruit trees.
- Pelletized Lime: Finely ground ag lime (calcitic or dolomitic) bound into easy-to-spread pellets. Dust-free, spreads evenly with a broadcast spreader. Reacts faster than coarse ag lime due to higher surface area — great for homeowners and lawns.
- Hydrated (Slaked) Lime / Quicklime: Very fast-acting but caustic — can burn plants/roots if over-applied. Rarely recommended for home use; use only with expert guidance.
- Alternatives like Wood Ash: Provides some lime-like benefits (high K, raises pH) but inconsistent; high potassium can imbalance nutrients. Use sparingly and test soil first.
Which One Is Best for Gardens, Lawns, and Trees?
- Lawns & Gardens: Pelletized calcitic or dolomitic for ease and even coverage.
- Fruit Trees & Orchards: Dolomitic if Mg is low (helps fruit quality); calcitic otherwise.
- Acid-loving plants (avoid liming near them!). Pro tip: Check the Calcium Carbonate Equivalent (CCE) or Relative Neutralizing Value (RNV) on the bag — higher values mean less material needed for the same effect. Finer particle size (e.g., 60-100% passing 60-mesh sieve) reacts faster. 🌟
How Much Lime Should You Apply? Calculating the Perfect Rate 📊
Never guess — base rates strictly on your soil test! Recommendations account for current pH, target pH, soil texture (clay needs more than sand), and lime quality.
Using Soil Test Recommendations Effectively Labs provide lime needs in tons/acre or lbs/1000 sq ft, often adjusted for a standard CCE of ~60-70%. If your lime’s CCE differs (check bag), adjust: Lime to apply = Recommended rate × (Standard CCE / Your lime’s CCE)
For example, if test recommends 2000 lbs/acre of 60% CCE lime, but yours is 90% CCE, apply ~1333 lbs/acre.
Application Rates Examples for Common Scenarios
- Lawns: Often 20–100 lbs/1000 sq ft (0.5–2 tons/acre) to raise pH from ~5.5 to 6.5. Split if >50 lbs/1000 sq ft.
- Vegetable Gardens: 50–150 lbs/1000 sq ft depending on severity; target 6.0–7.0.
- Fruit Trees/Orchards: 1–3 tons/acre surface-applied around drip line; avoid piling against trunks.
- Ornamental Trees/Shrubs: Lighter rates (0.5–1 ton/acre equivalent); focus on root zone.
Split Applications: When and Why to Apply in Stages If the total rate exceeds 50–100 lbs/1000 sq ft, split into 2–3 applications (e.g., fall + spring). This prevents nutrient lockout, allows gradual reaction, and reduces runoff risk. Many university extensions recommend no more than 50 lbs/1000 sq ft per application for lawns. 📏
The Best Time to Apply Lime for Fastest Results ⏰
Timing matters because lime reacts slowly (months to years) with soil moisture, temperature, and microbial activity.
Ideal Seasons: Fall vs. Spring vs. Summer
- Fall (Best Choice!) 🍂: Top recommendation from most experts (NC State, MSU, OSU). Winter rain, snow, freeze-thaw cycles help incorporate and dissolve lime. pH rises by spring planting/growth season. Apply after harvest but before ground freezes.
- Spring: Good if you missed fall; apply early (before growth surge) for summer benefits. Less ideal than fall due to shorter reaction time.
- Summer: Avoid — hot/dry conditions slow reaction; risk of uneven results or plant stress.
Timing Around Planting, Fertilizing, and Weather
- Allow 3–6 months before major planting for full reaction.
- Apply on dry days; avoid wet/muddy soil to prevent compaction.
- Don’t mix with high-nitrogen fertilizers simultaneously — space 2–4 weeks apart. In regions like Bangladesh with monsoon patterns, fall (post-monsoon) or early dry season works well for incorporation.
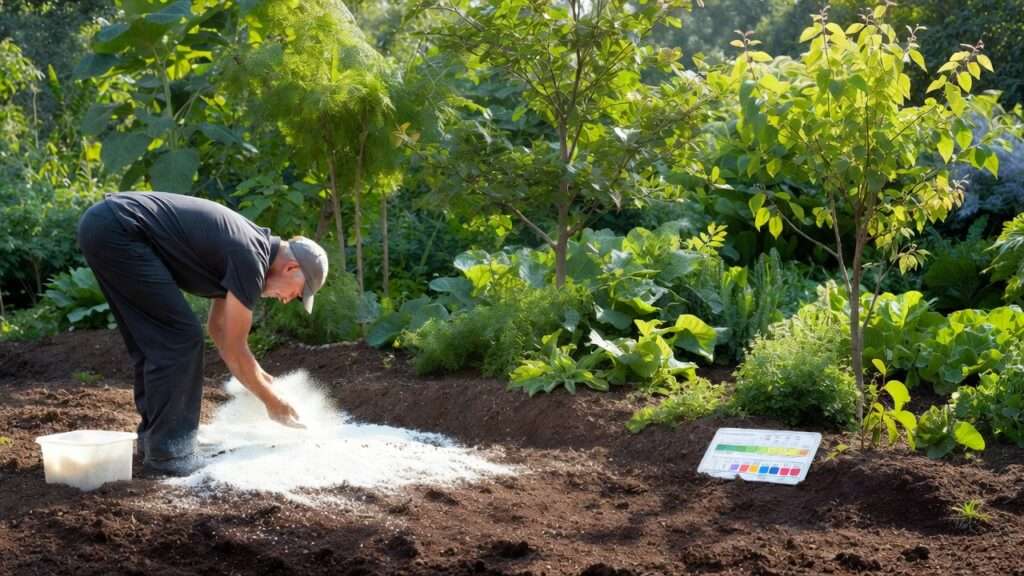
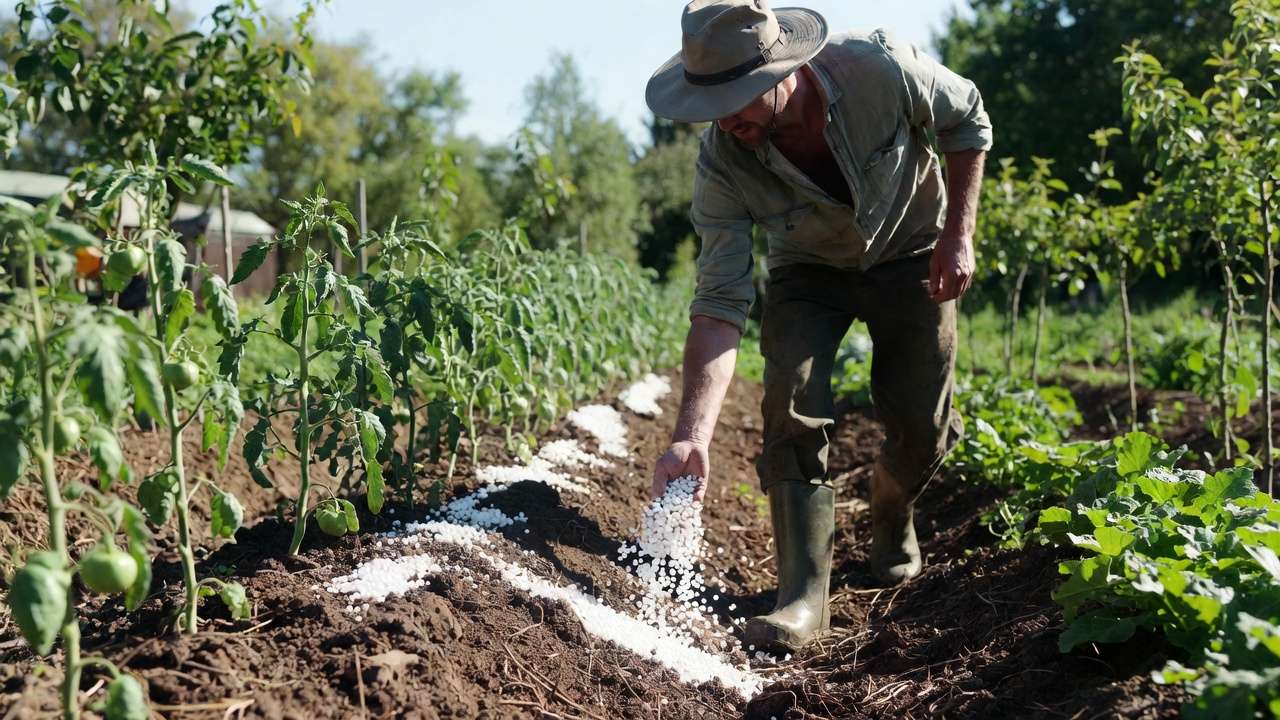
Step-by-Step Guide to Lime Application for Acidic Soils 🛠️
Now that you’ve tested your soil, chosen the right lime type, calculated the rate, and picked the best season — it’s time to apply! Proper technique ensures even coverage, good incorporation (where needed), and maximum effectiveness without harming plants.
Tools and Safety Precautions
- Tools you’ll need: Broadcast spreader (drop or rotary), gloves, dust mask (especially for powdery ag lime), measuring tape or wheel for area calculation, rake or tiller (for incorporation), watering can/hose (if needed post-application).
- Safety: Wear gloves and eye protection. Avoid windy days to prevent dust inhalation. Keep pets and children away during spreading. Never apply near open water sources to avoid runoff.
For Gardens and Vegetable Beds (Incorporation Methods)
- Mark out your garden area and calculate exact square footage.
- Apply half the recommended lime in one direction (e.g., north-south), then the second half perpendicular (east-west) for even coverage.
- Lightly incorporate into the top 4–6 inches using a rototiller, garden fork, or rake — especially important for faster reaction in clay soils.
- Water gently if soil is dry to activate the lime (but don’t create mud).
- Wait 2–4 weeks before planting or adding other amendments.
For Lawns and Turf (Surface vs. Core Aeration)
- Surface application (most common for established lawns): Use a broadcast spreader for uniform coverage. Apply in two passes at right angles. Water lightly afterward to settle pellets/powder.
- With core aeration (best for compacted or thatchy lawns): Aerate first, then spread lime — particles fall into holes, improving contact and reaction speed.
- Never lime when grass is wet or frost-covered — wait for dry conditions.
Special Considerations for Trees and Orchards
- Established trees: Do not till near roots! Apply lime as a surface top-dressing in a wide band around the drip line (outer edge of canopy), extending 1–2 feet beyond if possible.
- Avoid piling lime against the trunk — this can cause bark burn or rot.
- Young trees/planting holes: Mix recommended lime into backfill soil at planting time (follow test rates carefully — usually lower amounts).
- Fruit trees: Focus on dolomitic lime if magnesium is deficient (common in Barisal Division’s sandy-loam soils); improves fruit size and quality.
Even Spreading Tips
- Calibrate your spreader (most bags have settings; test on a tarp first).
- Walk at a steady pace; overlap passes by 50% to avoid stripes.
- For small areas, use a hand-crank spreader or even scoop-and-shake method.
After Application – What to Expect and How to Monitor Progress 📈
Lime doesn’t work overnight — patience is key!
Timeline for pH Changes
- First noticeable effects: 4–12 weeks (especially with pelletized or finely ground lime in moist conditions).
- Significant pH rise: 6–18 months.
- Full stabilization: 2–3 years for heavy applications on clay soils. You’ll often see greener leaves, better growth, and less moss before a retest confirms the change.
Retesting and Maintenance Liming Schedules
- Retest 1–2 years after the first application, then every 3–4 years.
- Many soils need “maintenance” liming of 0.5–1 ton/acre every 3–5 years to counteract ongoing acidification from rain and fertilizers.
- In high-rainfall areas like Barisal Division (with heavy monsoon leaching), retesting every 2 years is wise.
Combining Lime with Other Amendments
- Add compost or well-rotted manure after liming (not before) to boost organic matter without counteracting pH rise.
- If you also need sulfur (for acid-loving plants), apply it separately and at different times.
- Avoid applying phosphorus fertilizers right after heavy liming — wait until pH stabilizes to prevent fixation.

Common Mistakes to Avoid When Applying Lime ❌
Even experienced gardeners slip up. Here are the biggest pitfalls — and how to dodge them:
- Applying without a soil test → wastes money or causes nutrient imbalances.
- Overliming → pH shoots too high (>7.5), locking up iron, manganese, zinc → yellow chlorosis appears.
- Poor spreading → striped lawns or patchy garden response.
- Using coarse, low-quality lime → very slow reaction (years instead of months).
- Applying too much at once (>50–100 lbs/1000 sq ft) → risk of salt burn or runoff.
- Liming wet, compacted soil → poor incorporation and compaction damage.
- Ignoring acid-loving plants nearby → accidental pH rise harms blueberries, gardenias, etc.
FAQs About Lime Application for Acidic Soils ❓
1. Can I apply lime around established trees without harming them? Yes — surface-apply in the drip-line area, keep it away from the trunk, and use moderate rates. Trees respond beautifully once pH improves.
2. How long until I see results after liming? Visible improvements (greener leaves, better growth) often start in 1–3 months; full benefits take 6–24 months depending on soil type and weather.
3. Is lime the same as fertilizer? No. Lime corrects pH and supplies calcium/magnesium, but it’s not a source of N-P-K. Think of it as “unlocking” your existing soil nutrients and fertilizers.
4. Can I use lime and fertilizer at the same time? Space them 2–4 weeks apart. High-nitrogen fertilizers can temporarily increase acidity.
5. What if my soil test says no lime is needed? Trust the test! Overliming is more harmful than slight under-liming for most plants.
6. Is wood ash a good substitute for lime? It can raise pH and add potassium, but it’s inconsistent and can over-apply K. Use sparingly and retest.
7. Can lime burn plants or roots? Only if over-applied, applied as quicklime/hydrated lime, or piled against trunks. Agricultural/pelletized lime is very safe when used correctly.
8. Do I need to lime every year? No — most soils need it every 2–5 years. Regular soil testing tells you exactly when.
Conclusion: Transform Your Garden with Smart Liming Today 🌳💚
Acidic soil is one of the most common — and fixable — barriers to a thriving garden, lush lawn, or productive orchard. By following this complete guide to lime application for acidic soils, starting always with a proper soil test, choosing the right lime type, applying at the best time and rate, and avoiding common mistakes, you can unlock your soil’s full potential.
The result? Healthier roots, more vibrant foliage, better yields, and a garden that brings you joy season after season. Grab a soil test kit this week (many local agriculture offices in Barisal Division offer affordable testing), and take the first step toward revival.
Have you tested your soil recently? Drop your pH results or questions in the comments — I’d love to help you fine-tune your plan! 🌿
Happy gardening! 🚀


