
Imagine stepping into your garden on a crisp early spring day to find soft, dark, crumbly soil that’s already teaming with life—no thick mats of weeds, no compacted clumps from winter freeze-thaw cycles, and young seedlings that leap out of the ground with vigor. That’s the rewarding reality when you invest time in preparing raised beds for winter properly. Yet many gardeners overlook this crucial fall ritual, leaving beds bare and vulnerable. The result? Eroded topsoil, nutrient leaching, overwintering pests, and a delayed, frustrating spring start. 😩
As a passionate gardener with over 15 years of hands-on experience managing raised beds in varied climates—from harsh northern winters to milder temperate zones—I’ve seen firsthand how thoughtful winter prep transforms soil health and boosts next season’s yields. University extension services (like those from Cornell and Oregon State) consistently emphasize fall soil care as one of the highest-ROI practices for home gardeners. Mulching alone can reduce erosion by up to 90% and help retain soil moisture through dry spells. 🌿
In this comprehensive guide, we’ll walk through every essential step to winterize your raised beds the right way. Whether you’re growing vegetables, herbs, flowers, or even small fruiting plants, these proven techniques build living, fertile soil that wakes up ready for action in spring. Let’s turn your fall cleanup into next year’s secret weapon! 🚀
Why Preparing Raised Beds for Winter Matters More Than You Think 🤔
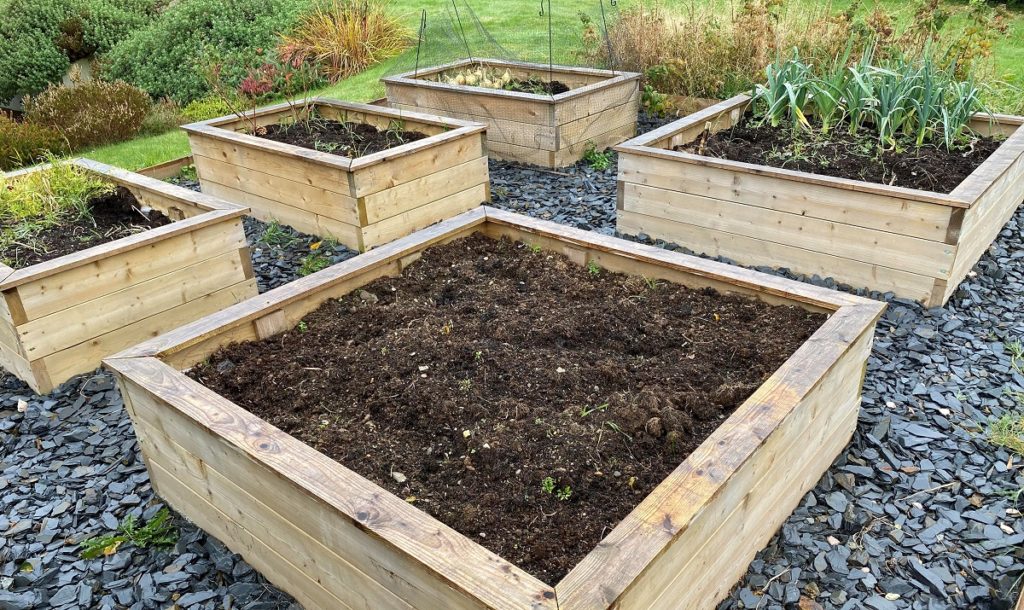
Raised beds offer fantastic advantages: better drainage, warmer soil earlier in spring, and easier access. But they also expose soil more quickly to winter elements—wind, heavy rain, snowmelt, and freeze-thaw cycles that compact and erode unprotected surfaces. Bare soil loses organic matter and key nutrients through leaching (especially nitrogen and potassium), while weed seeds germinate unchecked in spring. 🌬️
Beneath the surface, a healthy soil ecosystem thrives when protected. Beneficial microbes, earthworms, and mycorrhizal fungi go dormant but stay alive under insulation. Without cover, populations crash, leading to poorer nutrient cycling and structure next year.
The long-term payoff is huge: enriched organic matter improves water retention (crucial in dry springs), reduces compaction, suppresses weeds naturally, and supports stronger root systems for higher vegetable yields or more vibrant blooms. In cold zones (USDA 3–7), insulation prevents extreme root damage; in milder areas (8+), it maintains moisture and prevents nutrient washout during winter rains. Proper prep means less work and better results—it’s truly one of the smartest things you can do for your garden. 💚
When to Start Preparing Raised Beds for Winter ⏰
Timing is everything in gardening! The ideal window opens after your final major harvest and when annual plants begin dying back—typically late fall, 4–6 weeks before the ground freezes solid. Aim for after the first light frost (which kills tender annuals) but before persistent hard freezes make digging difficult.
Key signs it’s time:
- Daytime temperatures consistently below 50°F (10°C)
- Most summer crops finished or yellowing
- Perennial herbs slowing growth
Regional notes:
- Northern hemisphere cold climates (e.g., zones 4–6): Start mid-October to early November.
- Milder southern or coastal areas: Late November to December works, focusing more on mulching than cover crops.
- Subtropical/tropical gardeners: Minimal “winter” prep—focus on green manures for soil building year-round.
Quick 5-point readiness checklist: ✅ Harvest complete? ✅ Frost has nipped tender plants? ✅ Soil still workable (not frozen)? ✅ Weather forecast shows dry days ahead? ✅ You’ve gathered mulch/compost?
If yes to most, grab your tools—let’s get started! 🛠️
Step 1 – Clean Up: Remove Plants, Weeds, and Debris 🧹
A clean slate prevents problems from carrying over. Diseased foliage left behind harbors pathogens like blight or powdery mildew; weed seeds drop and build a massive spring bank.
What to Pull vs. What to Leave
- Annual vegetables and flowers: Pull spent plants completely. Healthy material goes to hot compost; diseased/bug-infested stuff gets bagged and discarded (or burned where permitted).
- Perennials and hardy herbs: Cut back tops to 4–6 inches, but leave roots in place—they stabilize soil and provide habitat for beneficial insects. Overwintering crops like garlic, leeks, or kale can stay. 🧄
- Weeds: Hand-pull or hoe thoroughly, especially perennials like dandelion or bindweed. Get the roots!
Disease & Pest Prevention Tips Inspect stems and leaves for eggs or fungal spots. Avoid composting anything suspect—better safe than sorry. Interestingly, some experts now recommend leaving small amounts of clean debris for overwintering ladybugs and lacewings. A balanced approach: tidy but not sterile. 🐞
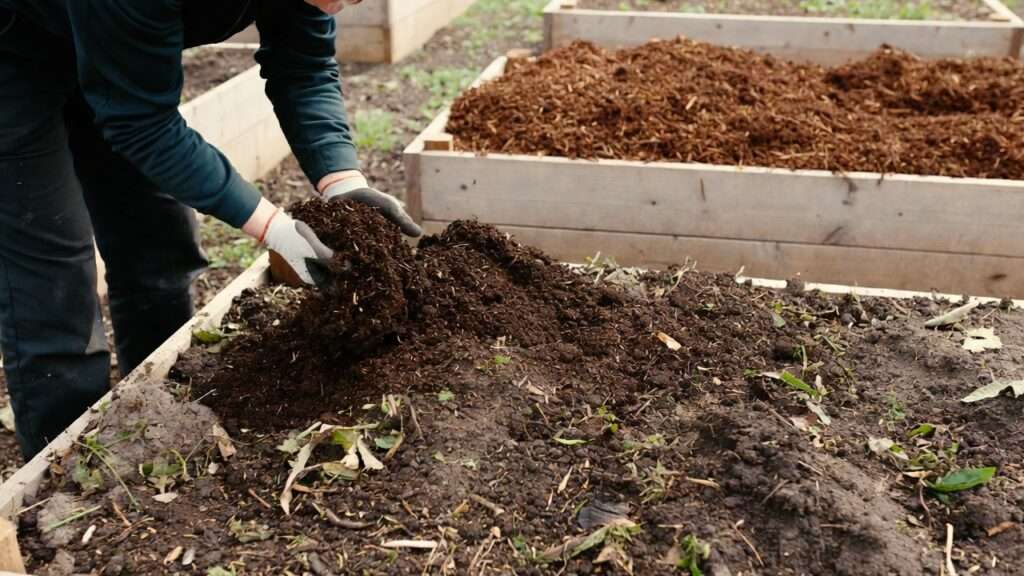
Step 2 – Test and Amend Your Soil 🔬
Healthy soil is the foundation of every thriving garden, and fall is the perfect time to assess and improve it before winter locks everything in place. Skipping this step often leads to imbalances that show up as stunted growth, yellowing leaves, or poor fruit set next season.
Why Soil Testing Is Non-Negotiable Soil pH affects nutrient availability—most vegetables prefer 6.0–7.0, but extremes lock up essentials like iron or phosphorus. Nutrient levels (N-P-K) deplete over the growing season, and organic matter naturally breaks down. Testing in fall gives amendments months to integrate via microbial activity and winter moisture.
How to test:
- Home kits: Quick and affordable for pH and basic nutrients (e.g., color-changing vials or digital probes).
- Lab tests: More accurate—send samples to your local cooperative extension service for detailed macro/micro-nutrient and organic matter analysis (highly recommended every 2–3 years).
Pro tip: Take samples from multiple spots in each bed (top 6–8 inches), mix them, and avoid testing right after fertilizing or liming. 🌡️

Best Amendments for Winter Once you know your results, layer on slow-acting, organic amendments—they feed the soil food web all winter without burning roots.
- Compost or well-aged manure: Add 1–2 inches on top (no-dig style). Rich in microbes and balanced nutrients.
- Worm castings: Excellent for gentle nutrient boost and beneficial bacteria.
- Leaf mold or shredded leaves: Builds humus and improves structure.
- Lime (if pH low) or elemental sulfur (if pH high): Adjust gradually—fall changes take effect by spring.
- Other options: Kelp meal for trace minerals, rock dust for long-term mineral replenishment.
Avoid: Fresh manure (risk of pathogens and nitrogen burn), synthetic fertilizers (can harm dormant microbes), or over-amending without testing. Spread evenly, then water lightly to settle.
This step alone can increase organic matter by 1–2% annually, leading to noticeably looser, more fertile soil come spring. 🌿

Step 3 – Plant Cover Crops or Green Manures (The Living Blanket Option) 🌾
For gardeners wanting maximum soil regeneration, cover crops are a game-changer. These “living mulches” prevent erosion, suppress weeds, add organic matter when chopped, and—best of all—fix nitrogen or improve structure.
Benefits and Best Choices by Climate
- Erosion control and weed suppression during bare months.
- Nitrogen fixation (legumes like vetch, clover).
- Deep roots break up compaction (daikon radish).
- Habitat for pollinators and beneficials.
Cold winters (zones 3–7):
- Winter rye or cereal rye: Hardy, excellent erosion fighter.
- Oats: Winter-kill in cold areas, easy spring cleanup.
- Hairy vetch: Nitrogen-fixer, pairs well with rye.
Milder winters (zones 8+):
- Crimson clover or Austrian winter peas: Great N-fixers.
- Daikon radish or forage radish: Bio-drills soil naturally.

How to Sow and Manage Broadcast seed at recommended rates (e.g., 2–3 lbs/1000 sq ft for rye), lightly rake in, and water. Sow 6–8 weeks before first hard freeze for establishment. In spring, mow or crimp when flowering, then plant directly into residue (no-dig) or lightly till if preferred.
If it’s too late for sowing, default to heavy mulching—still effective!
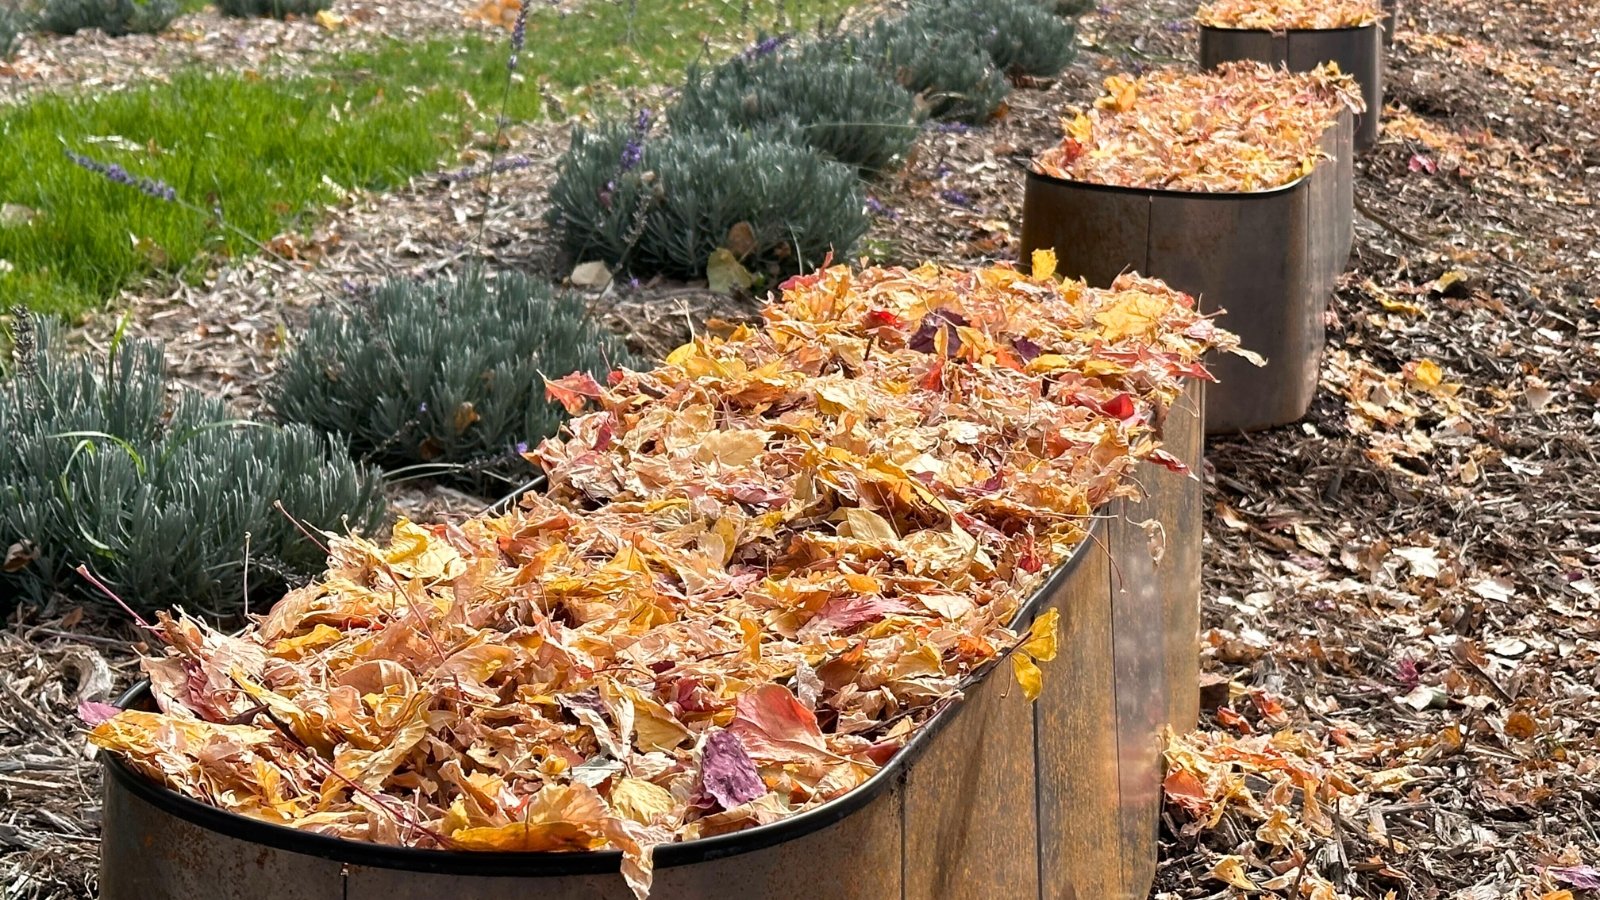
Step 4 – Mulch Like a Pro: Protect and Nourish 🍂
Mulching is arguably the single most powerful step in preparing raised beds for winter. A thick layer acts like a cozy blanket—shielding soil from pounding rain, wind erosion, extreme temperature swings, and sun exposure (even in winter). It suppresses weed germination, retains precious moisture, feeds soil organisms as it slowly breaks down, and prevents the dreaded freeze-thaw heaving that compacts and cracks soil structure.
Best Mulch Materials for Raised Beds Choose organic, biodegradable options that decompose into humus over time:
- Shredded fall leaves: Free, abundant, excellent structure-builder (shred first to prevent matting).
- Straw or seed-free hay: Classic choice—light, insulating, and slow to break down.
- Pine needles: Slightly acidic (great for blueberries, azaleas, or acid-loving plants).
- Compost (finished): Nutrient-rich top-dressing that doubles as mulch.
- Chopped cover crop residue (if you used green manures): Instant in-place mulch.
- Aged wood chips or bark: Fine in paths, but use sparingly on beds to avoid nitrogen tie-up.
Avoid:
- Fresh grass clippings (they mat and can heat up or smell).
- Dyed or treated mulches (potential chemicals).
- Black plastic or landscape fabric (prevents air/water exchange and harms soil life long-term).
Aim for 4–6 inches (10–15 cm) deep after settling—thicker is better in cold, windy regions.
Application Techniques
- Water the bed lightly first if soil is dry.
- Spread mulch evenly, leaving a small gap (2–3 inches) around the base of any overwintering plants or perennials to prevent rot.
- Reapply in spring as needed after removing cover crops.
- For no-dig gardeners: Simply layer amendments + mulch and plant through it next season.
Benefits backed by research: Studies from organic farming trials show mulched beds lose up to 95% less soil to erosion, maintain 20–30% higher moisture levels, and support significantly higher earthworm populations. Your spring self will love skipping the early weed battles! 🌱
Step 5 – Protect Remaining Plants and Structures 🛡️
Not everything comes out of the beds—many gardeners keep hardy crops going through winter or protect structures for longevity.
Overwintering Hardy Crops
- Kale, collards, Brussels sprouts, leeks, carrots, parsnips, spinach, Swiss chard: These often survive light to moderate freezes.
- Protection methods: Use floating row covers, low hoops with fabric, cloches, or mini hoop houses. In very cold zones, add straw mulch over roots or even snow as natural insulation.
- Garlic planted in fall: Already ideal—mulch heavily (6+ inches) to keep soil from freezing solid around cloves.
Tool & Bed Maintenance
- Remove and clean all trellises, cages, stakes—store indoors to prevent rust/rot.
- Oil wooden handles, sharpen blades, disinfect tools with 10% bleach solution or alcohol.
- Inspect raised bed frames: Tighten loose screws, replace rotting boards, reinforce corners if needed.
- Improve drainage: If your area gets heavy winter rain/snowmelt, ensure beds aren’t in low spots; add small channels or French drains if pooling occurs.
A few minutes now prevents hours of repair and replanting stress later. 🔧
Advanced Tips from Experienced Gardeners 💡
After years of trial, error, and conversations with master gardeners, here are pro-level refinements:
- Climate-specific tweaks Cold climates: Prioritize deep mulch + windbreaks (e.g., burlap screens). Mild/wet winters: Focus on well-drained amendments + lighter mulch to avoid sogginess. Dry winters: Heavy mulch + occasional deep watering if no snow/rain.
- No-dig / permaculture approach Layer cardboard → compost → amendments → thick mulch. Plant directly into pockets next spring. Builds fungal-dominated soil perfect for perennials and fruit trees.
- Organic pest & disease prevention Sprinkle diatomaceous earth or neem cake around beds before mulching. Plant garlic/onion edges as natural repellents.
- Common mistakes to avoid
- Tilling in fall (disrupts mycelium and brings weed seeds up).
- Leaving soil completely bare (“naked soil = dead soil”).
- Overwatering before mulching (creates ice lenses).
- Using too-thin mulch (2 inches barely helps).
These small adjustments separate average gardens from exceptional ones. 🌟
What to Expect in Spring – Your Reward! 🌷
After all your thoughtful work in fall, spring becomes a celebration instead of a scramble. Here’s what properly preparing raised beds for winter delivers when the soil thaws and temperatures rise:
- Earlier planting window — Mulched, amended beds warm up 1–3 weeks faster than bare or poorly prepped ones (especially valuable in cooler climates). You can often direct-sow peas, spinach, radishes, or lettuce weeks ahead of neighbors.
- Dramatically fewer weeds — A thick mulch layer and cover crops suppress 70–90% of spring weed germination. What does pop up is usually shallow-rooted and easy to pull.
- Softer, richer soil — Freeze-thaw cycles are buffered, compaction is minimized, and earthworms/mycorrhizae thrive. You’ll notice that beautiful “chocolate cake” crumb structure when you dig a small test hole.
- Explosive plant growth — Plants establish faster with abundant microbes, balanced nutrients, and consistent moisture. Expect stronger roots, healthier foliage, and noticeably higher yields or more vibrant blooms.
- Less spring workload — No frantic weeding, no emergency amendments, no soil rescue missions. More time to enjoy planting and less physical strain.
Transition tasks in early spring
- Pull back heavy mulch gradually (start 2–4 weeks before last frost date) to let soil warm.
- If you used winter-hardy cover crops, chop/mow them down at flowering stage (or when 6–12 inches tall), then let residue decompose as green mulch or lightly incorporate.
- Rake off any matted layers only if needed—most organic mulches can stay and break down naturally.
- Add a light top-dressing of compost if spring rains have washed nutrients.
- Test soil again if you notice issues (though fall prep usually makes spring testing optional).
The contrast is striking: gardeners who skip winter prep often spend March and April fighting weeds and poor soil, while prepared beds practically plant themselves. Your future garden thanks you already! 🌿
Frequently Asked Questions (FAQs) ❓
Should I empty raised beds completely for winter? No—emptying removes beneficial soil life and structure. Only remove spent annuals; leave roots of perennials and hardy crops to hold soil in place.
Can I still plant garlic or overwinter crops after the first frost? Yes! Fall-planted garlic, shallots, and some greens do best when planted 4–6 weeks before ground freeze. Mulch heavily after planting.
What if I live in a very mild climate with no hard freezes? Focus more on mulching, cover crops, and preventing nutrient leaching from winter rains. You can often keep more crops growing year-round with light protection.
Is it too late to prepare raised beds if frost has already hit? Not at all! Clean up, amend, and mulch anytime before the ground freezes solid. Even late mulching still protects against erosion and temperature swings.
What’s the best beginner-friendly mulch for raised beds? Shredded leaves (free and effective) or straw from a local farm/garden center. Both are easy to source, decompose well, and provide excellent insulation.
Do I need to water before winter? Lightly water after amending/mulching if the soil is very dry—helps settle layers and activates microbes. Avoid soaking right before a hard freeze.
Will mulch attract slugs or rodents? In damp climates, slugs can hide under mulch. Counter this by using drier materials (straw over leaves) or sprinkling diatomaceous earth around bed edges. Rodents usually prefer undisturbed areas—keep mulch away from structures.
Can I use cardboard or newspaper under mulch? Yes—great for no-dig beds! Layer cardboard/newspaper first (overlap edges), wet it down, then add compost and mulch on top. Smothers weeds and breaks down over winter.
How thick should mulch really be? 4–6 inches minimum; up to 8 inches in very cold or windy areas. Thicker = better protection, but leave space around plant crowns.
What if my raised beds are made of wood—do they need special winter care? Check for rot or loosening boards. Apply a natural sealant (like linseed oil) if needed, and ensure good drainage to prevent water pooling against sides.
Conclusion 💚
Preparing raised beds for winter isn’t just busywork—it’s one of the highest-leverage things you can do to set your garden up for success season after season. By cleaning up thoughtfully, testing and amending soil, adding living cover or heavy mulch, and protecting what remains, you create a resilient, living ecosystem that wakes up vibrant and ready in spring.
Here’s your quick printable checklist recap: ✅ Clean up plants, weeds, debris ✅ Test soil & add amendments ✅ Sow cover crops (if time allows) ✅ Apply 4–6+ inches of mulch ✅ Protect hardy plants & structures ✅ Store tools & check bed frames
Start this weekend (or whenever your local timing window opens), and next spring you’ll be smiling while everyone else is still battling weeds and poor soil. Your plants—and your back—will thank you!
Have you tried any of these winter prep steps before? Drop your favorite tip or climate-specific trick in the comments—I’d love to hear what works in your garden. And if you found this guide helpful, subscribe for more practical plant care and tree care articles delivered straight to your inbox. Happy gardening, and here’s to healthier soil and bigger harvests ahead! 🌱✨


