
Have you ever looked at that dusty old teacup, worn-out boot, or rusty bucket in your garage and thought, “What a waste”? What if I told you these everyday items could transform into beautiful, functional planters that save you money, reduce household waste, and bring unique charm to your indoor or outdoor garden? Repurposing old containers for plants is one of the most rewarding ways to embrace sustainable gardening while unleashing your creativity. ♻️🌱
In today’s world of rising costs and environmental concerns, upcycling isn’t just trendy—it’s practical. By turning “trash” into treasure, you can create one-of-a-kind planters that outperform many store-bought options when done right. As a plant care enthusiast with years of hands-on experience growing everything from delicate succulents to productive vegetable patches, I’ve seen firsthand how proper preparation turns quirky containers into thriving homes for plants. This guide goes beyond basic lists: it includes step-by-step prep tips, plant pairings that actually thrive, common pitfalls I’ve learned to avoid, and eco-friendly maintenance advice to keep your creations flourishing for seasons to come. Ready to declutter creatively and grow greener? Let’s dive in! 🚀
Why Repurpose Old Containers? The Real Benefits 🌍💚
Repurposing old containers for plants offers benefits that go far beyond aesthetics. Environmentally, it diverts waste from landfills—think about the millions of tons of household items discarded yearly that could instead nurture greenery. ♻️ Each upcycled planter you make contributes to a zero-waste lifestyle and reduces demand for new plastic or ceramic pots.
Financially, the savings add up fast. A single high-quality planter can cost $20–$50+, but with items you already own (or thrift cheaply), you might spend under $5 on soil and plants. Over a growing season, that’s potentially $50–$200 saved—money better spent on more greenery!
Aesthetically, these DIY projects deliver unmatched personalization. No two are identical, so your garden reflects your style: rustic farmhouse vibes from galvanized buckets, whimsical charm from vintage teacups, or modern edge from painted tins. They’re perfect for small spaces like balconies, patios, or windowsills, maximizing every inch for indoor herb gardens or outdoor focal points.
From my experience tending diverse collections, repurposed containers often provide better micro-environments—thicker materials retain moisture longer in hot climates, while natural textures improve airflow. When prepped correctly, they support healthier roots than mass-produced pots. Let’s make sure yours succeed!
Essential Preparation Steps Before You Start 🔧🛠️
Success starts with smart prep—skipping this leads to the most common failures like root rot or leaks. Here’s my expert checklist:
1. Add Proper Drainage Holes 🚰 Most plants hate soggy roots, so drainage is non-negotiable. Use a drill with a masonry bit for ceramic/glass, metal bit for tins/buckets, or hammer + nail for softer materials. Aim for 3–5 holes (1/4–1/2 inch) in the bottom. For large containers, add more. Pro tip: Place a small piece of screen or coffee filter over holes to prevent soil loss while allowing water flow.
2. Clean and Sanitize Thoroughly 🧼 Old items can harbor mold, pests, or residues. Wash with hot soapy water, then rinse with a diluted bleach solution (1:10 bleach to water) or vinegar. Let dry completely. This prevents fungal issues that plague many beginner upcyclers.
3. Line if Needed Metal containers (to prevent rust/leaching) or porous wood: Line with heavy-duty plastic (puncture for drainage) or landscape fabric. For acidic concerns (e.g., galvanized metal), add a gravel layer at the base for extra buffer.
4. Choose the Right Soil Mix Skip heavy garden soil—it compacts and drains poorly. Use a high-quality potting mix amended with perlite or vermiculite for drainage. For succulents/cacti: 50% potting mix + 50% coarse sand/perlite. Herbs/veggies: Standard potting mix with compost for nutrients. Always moisten soil before planting.
5. Consider Weight and Stability Heavy filled containers (e.g., wheelbarrows) need stable spots. For hanging items, use strong chains/rope and secure hooks. Test weight before final placement.
Follow these, and your upcycled planters will thrive like pros! 🌟
15 Creative Repurposing Ideas: Step-by-Step & Plant Pairings 🌟
Here are 15 practical, proven ideas with detailed steps, ideal plants, and care notes. Each turns ordinary items into stunning focal points.
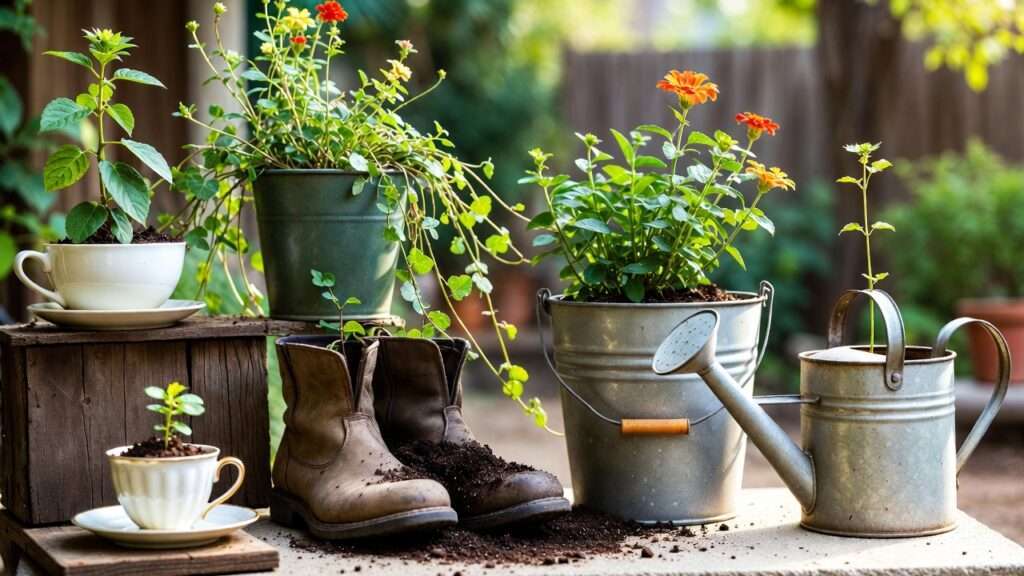
1. Vintage Teacups & Saucers for Delicate Succulents ☕🌵 Materials: Old china teacups/saucers, drill (or hammer/nail). Steps: Drill drainage holes in base; fill with cactus/succulent mix; plant shallow-rooted succulents. Best plants: Echeveria, Sedum, Haworthia—low-water lovers that adore the small space. Pros: Adorable indoor decor; great for desks/shelves. Cons: Limited size—repot as needed. Care: Bright indirect light; water sparingly (let dry fully).

2. Old Boots or Rain Boots as Whimsical Outdoor Accents 👢🌼 Materials: Worn boots, gravel for base. Steps: Clean thoroughly; add holes in sole if none; layer gravel then soil. Best plants: Trailing flowers (petunias), herbs, or succulents for drainage. Pros: Super cute garden art! Cons: May need winter protection in cold areas. Care: Full sun/part shade; moderate water.

3. Galvanized Buckets or Washtubs for Rustic Farmhouse Vibes 🪣🌻 Materials: Old buckets/tubs, drill. Steps: Drill multiple holes; line if concerned about zinc; fill with veggie mix. Best plants: Tomatoes, peppers, sunflowers—love the depth. Pros: Durable, large capacity. Cons: Heavy when filled. Care: Full sun; consistent moisture.

4. Kitchen Colanders for Instant Drainage Heroes 🥄🍅 Materials: Metal/plastic colander, chain/rope for hanging. Steps: Line with coco coir if gaps large; hang or place. Best plants: Herbs like basil, mint, oregano—excellent natural drainage. Pros: Built-in holes! Cons: May dry fast—monitor water. Care: Sunny spot; frequent checks.
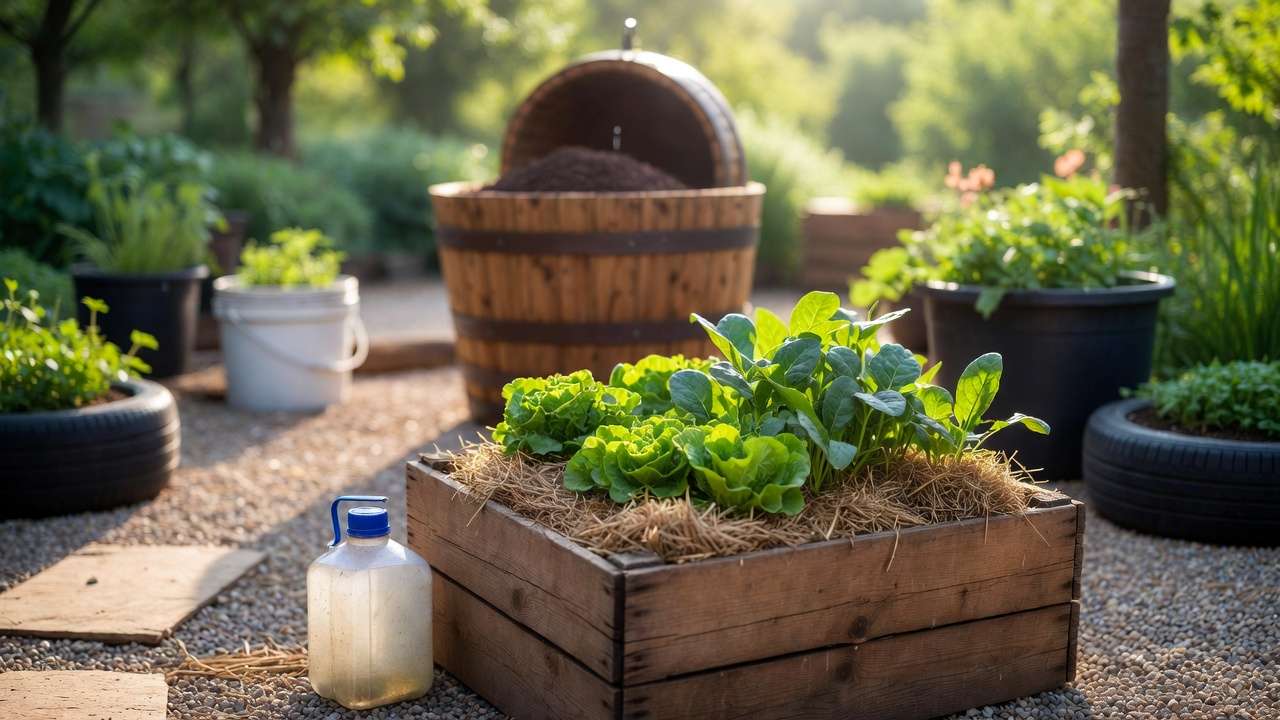
5. Wooden Crates or Drawers for Tiered Vegetable Patios 📦🥕 Materials: Old fruit crates, wooden dresser drawers, or shipping pallets (disassembled safely). Steps: Sand rough edges for safety; drill drainage holes every 4–6 inches in the bottom; apply non-toxic wood sealant if desired (optional for longevity); stack or arrange in tiers for visual interest; fill with rich potting mix + compost. Best plants: Root vegetables (carrots, radishes, beets), leafy greens (lettuce, spinach, kale), or compact bush beans—shallow to medium depth suits most crates well. Pros: Excellent for small-space vertical gardening; easy to rearrange seasonally. Cons: Wood can rot over time if not protected from constant moisture. Care: Full sun for veggies; keep soil consistently moist but never waterlogged. Rotate crops yearly to prevent nutrient depletion. 🌿
6. Mason Jars or Glass Bottles for Vertical Wall Gardens 🫙🌿 Materials: Assorted mason jars, old wine/soda bottles, wall-mounted brackets or wooden pallet base. Steps: For jars—drill small hole in metal lid or use as-is with no lid; for bottles—cut tops off carefully or use hanging method; secure to wall/pallet; fill with well-draining mix. Best plants: Trailing varieties like string of pearls, pothos, spider plant babies, or small herbs (thyme, chives). Pros: Stunning modern or boho look; maximizes vertical space. Cons: Glass can break if dropped—use sturdy mounts. Care: Bright indirect light indoors; water when top inch is dry. Great for kitchen herb walls! ✨
7. Old Wheelbarrows as Statement Centerpieces 🛒🌷 Materials: Rusty or chipped wheelbarrow (no need for perfect condition). Steps: Drill 6–10 drainage holes across bottom; add gravel layer for weight balance and drainage; fill with quality potting soil. Best plants: Mix of tall annuals (zinnias, cosmos), trailing lobelia or sweet potato vine, and a centerpiece like dwarf sunflowers or ornamental grasses. Pros: Instant large-scale impact; movable for seasonal display. Cons: Very heavy once filled—plan location carefully. Care: Full sun; regular watering and deadheading to encourage blooms all season. 🌸
8. Tin Cans (Coffee/Tea Tins) Painted for Pop of Color 🎨🥫 Materials: Empty food tins, acrylic paint (non-toxic), drill. Steps: Clean thoroughly; drill holes in base; paint exterior (fun patterns or solid colors); let cure fully before adding soil. Best plants: Compact herbs (parsley, cilantro, chives) or small flowering annuals like pansies. Pros: Super affordable and endlessly customizable. Cons: Small size limits root growth—refresh plants often. Care: Bright light; moderate water. Perfect for windowsill herb gardens. 🌈
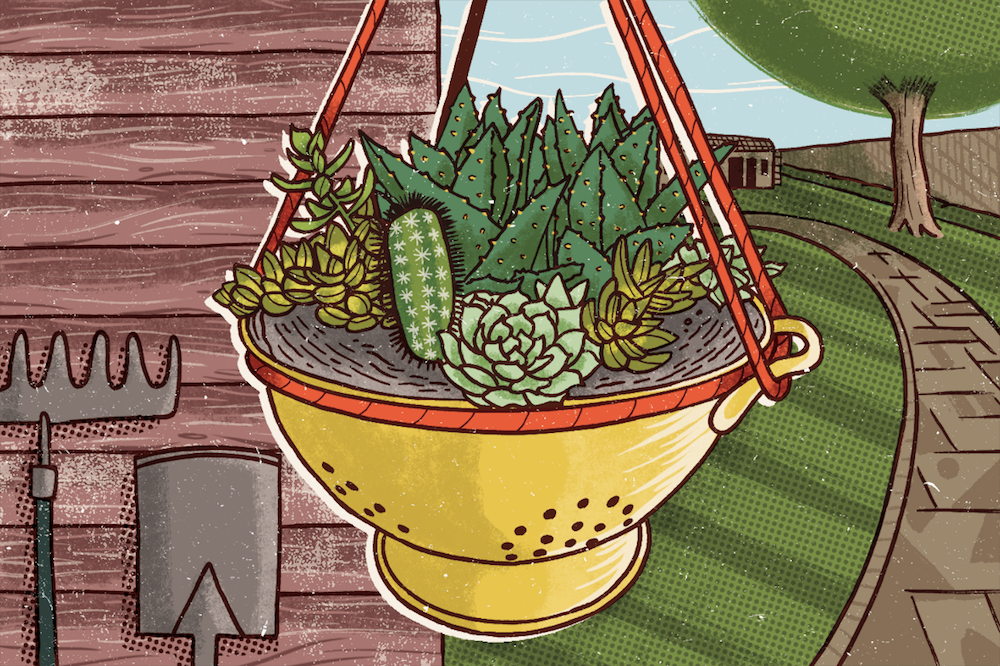
9. Birdbaths (Cracked Ones) for Shallow Succulent Displays 🐦🪴 Materials: Old concrete or ceramic birdbath (even with cracks). Steps: No extra holes needed if shallow; clean well; add cactus/succulent mix; arrange succulents artfully. Best plants: Various sedums, sempervivum (hens and chicks), echeveria—love the low, wide space. Pros: Creates a fairy-garden or desert vibe. Cons: Very shallow—best for drought-tolerant plants only. Care: Full sun; water sparingly (succulents thrive on neglect). 🧚
10. Old Toolboxes or Lunchboxes for Portable Mini Gardens 🧰🌱 Materials: Metal or plastic toolbox/lunchbox. Steps: Drill drainage; line with plastic if rusty; add soil mix. Best plants: Succulents, air plants, or small cacti for low-maintenance portability. Pros: Easy to move indoors/outdoors; industrial chic aesthetic. Cons: Limited depth. Care: Bright light; infrequent watering. Great for renters! 🔄
11. Wicker Baskets Lined for Natural Texture 🧺🌸 Materials: Old wicker basket, heavy-duty plastic liner. Steps: Insert plastic liner (puncture drainage holes); fill with potting mix. Best plants: Flowering annuals (geraniums, fuchsias) or ferns for shade. Pros: Soft, organic look. Cons: Wicker rots if liner leaks—check regularly. Care: Part shade to full sun depending on plants; consistent moisture. 🍃
12. Vintage Teapots or Kettles for Quirky Focal Points 🍵🌺 Materials: Old ceramic/metal teapot or kettle. Steps: Drill holes in base; use as upright planter or “spill” style with trailing plants. Best plants: Trailing ivy, nasturtiums, or lobelia for spill effect. Pros: Extremely charming and conversation-starting. Cons: Small capacity. Care: Bright light; moderate water. Perfect accent pieces. ☕
13. Plastic Yogurt/Food Containers for Seed Starting 🥛🌱 Materials: Cleaned yogurt tubs, berry boxes, etc. Steps: Poke holes in bottom; fill with seed-starting mix. Best plants: Any seeds—vegetables, flowers, herbs. Pros: Free, perfect for spring propagation. Cons: Temporary—transplant seedlings later. Care: Bright light; keep moist until germination. 🌱
14. Old Ladders with Pots Hung On Rungs 🪜🌿 Materials: Sturdy old ladder (wood or metal). Steps: Secure pots (using S-hooks or wire) on rungs; ensure ladder is stable. Best plants: Trailing vines, herbs, or small flowering pots. Pros: Dramatic vertical display. Cons: Needs very secure anchoring. Care: Match light/water to plant choices. Stunning space-saver! 📈
15. Broken Furniture Drawers or Shelves for Layered Arrangements 🛋️🍃 Materials: Old dresser drawers or shelf pieces. Steps: Drill drainage; stack or prop at angles; fill with soil. Best plants: Mixed layers—tall plants in back, trailers in front. Pros: Multi-level interest; upcycles large items. Cons: Requires planning for stability. Care: Full sun/part shade; regular maintenance. Ultimate creative statement! 🎨
Best Plants for Upcycled Planters: Matching Ideas to Containers 🪴❤️
One of the biggest secrets to long-lasting, thriving upcycled planters is choosing plants that naturally suit the container’s size, shape, material, drainage, and light exposure. Here’s my expert matching guide based on years of trial, success, and the occasional (but educational) failure:
- Shallow & Small Containers (teacups, tin cans, yogurt tubs, birdbaths) → Best: Succulents (echeveria, sedum, sempervivum/hens & chicks), cacti, air plants, small herbs like thyme or oregano. Why: Minimal root space and excellent drought tolerance prevent overwatering disasters.
- Medium-Depth Kitchen Items (colanders, mason jars, boots, toolboxes) → Best: Herbs (basil, mint, parsley, cilantro, chives), compact annual flowers (pansies, violas, marigolds), trailing houseplants (pothos cuttings, string of pearls, spider plant babies). Why: Good drainage + moderate root room = happy, bushy growth perfect for kitchens and windowsills.
- Large & Deep Containers (wheelbarrows, galvanized buckets, crates, washtubs) → Best: Vegetables (tomatoes [determinate varieties], peppers, bush beans, carrots, radishes), sun-loving annuals (sunflowers, zinnias, cosmos), ornamental grasses, or mixed flower beds. Why: Ample soil volume retains moisture and nutrients longer—ideal for heavy feeders.
- Hanging or Vertical Setups (ladders, wall-mounted jars, colanders on chains) → Best: Trailing plants (petunias, lobelia, nasturtiums, ivy, sweet potato vine, cascading strawberries). Why: Gravity helps showcase cascading growth; excellent airflow reduces fungal risk.
- Low-Light Indoor Favorites (most repurposed items indoors) → Best: Pothos, philodendron, peace lily babies, snake plant pups, ZZ plant divisions, ferns. Why: Forgiving of inconsistent light and irregular watering—perfect for apartments or shaded patios.

Pro tip: Always check a plant’s mature size before planting. A cute little seedling can quickly outgrow a teacup!
Common Mistakes to Avoid + Pro Tips from Experience ⚠️💡
I’ve made (and seen) these mistakes so you don’t have to:
- Skipping Drainage Holes — The #1 killer. Root rot sets in fast. Always drill!
- Using Garden Soil Instead of Potting Mix — Compacts, drains poorly, invites gnats. Stick to lightweight, sterile mixes.
- Overwatering Small Containers — Tiny pots dry out slower than you think. Finger-test the top 1–2 inches before watering.
- Ignoring Material Reactions — Galvanized metal can leach zinc (mildly toxic in excess); untreated wood rots quickly. Line or seal when needed.
- Planting Too Deep or Too Crowded — Roots need room to breathe. Follow spacing guidelines on plant tags.
- Forgetting Seasonal Adjustments — Move tender plants indoors before frost; reduce watering in winter.
Expert hacks I swear by:
- Add activated charcoal to soil mix in closed or poorly ventilated containers → reduces odors and fungal risk.
- Use broken pottery shards or rocks over drainage holes → prevents soil loss.
- Fertilize lightly every 4–6 weeks with diluted organic liquid fertilizer during growing season.
- Group similar-water-need plants together — drought-tolerant succulents hate living next to thirsty ferns.
Sustainability & Long-Term Care Guide ♻️🌳
Upcycling is already a win for the planet, but you can amplify the impact:
- Choose non-toxic paints/sealants (look for “low-VOC” or “plant-safe” labels).
- Reuse broken pots as drainage layers in new projects.
- Compost failed plant material or spent soil (if disease-free).
- Save rainwater for watering → reduces tap water use and is chlorine-free.
Seasonal Maintenance Checklist
- Spring: Refresh soil, divide overcrowded plants, start seeds in yogurt containers.
- Summer: Mulch tops with pebbles or bark to retain moisture; deadhead flowers.
- Fall: Bring tender plants indoors; clean containers thoroughly.
- Winter: Reduce watering; protect wood/metal from freeze-thaw cycles.
With proper care, many of these planters can last 3–10+ years, far outliving cheap plastic pots.
FAQs: Your Top Questions Answered ❓
Do all containers really need drainage holes? Yes—almost always. If you absolutely can’t drill (rare vintage piece), use a thick gravel layer + water very sparingly with drought-tolerant plants only. Still risky.
Are certain materials toxic to plants? Copper, heavily rusted iron, or pressure-treated wood can be problematic. Galvanized metal is usually fine in small amounts. Always line questionable materials.
How do I make hanging planters safe and secure? Use heavy-duty chains, macramé, or plant hangers rated for the filled weight. Anchor hooks into wall studs or ceiling joists—not just drywall.
Best sealants for wooden crates or baskets? Non-toxic, water-based polyurethane or marine varnish (exterior grade). Apply 2–3 thin coats; let cure fully before planting.
Can I keep these upcycled planters indoors year-round? Absolutely—especially herbs, succulents, and houseplants. Provide bright indirect light (or grow lights) and good airflow to prevent pests.
Conclusion: Start Your Upcycling Adventure Today! 🎉
Repurposing old containers for plants isn’t just about saving money or reducing waste—it’s about turning forgotten items into living art that brings joy, fresh herbs to your kitchen, vibrant flowers to your patio, and a little more green to our world. Every quirky teacup succulent or boot full of blooms tells a story of creativity and care.
So head to your garage, basement, or kitchen cupboard right now. Grab that “useless” item, follow the prep steps, pick plants that match, and get planting! Your first upcycled planter might become your favorite one.
I’d love to hear about your creations—what old container are you transforming first? Drop a comment below, share a photo if you can, or tag your results—I’m always excited to see how you make these ideas your own. 🌿✨
Happy planting, happy upcycling, and here’s to greener thumbs and lighter landfills! ♻️🌱


