
Imagine this: It’s a warm March morning in Dhaka, the sun is finally chasing away the winter chill, and you’re itching to get your hands dirty in the garden. But last year’s tomatoes were small and lackluster, your greens bolted too soon, and everything seemed to struggle despite your best efforts. 😔 Sound familiar?
The secret culprit is almost always the same — soil that wasn’t properly prepped in spring. Healthy, fertile soil is the true foundation of thriving plants, strong roots, vibrant blooms, and bountiful harvests. Without it, even the best seeds and seedlings can’t reach their full potential.
Spring garden soil preparation isn’t just a chore; it’s your biggest opportunity to set up success for the entire growing season. In tropical and subtropical climates like ours in Bangladesh, where heavy monsoon rains follow hot, dry spells, getting this right means better drainage, nutrient retention, and resilience against common issues like waterlogging or nutrient leaching.
In this comprehensive guide, we’ll walk you through every essential step — from timing and testing to advanced no-till methods and plant-specific tweaks. You’ll learn how to avoid costly mistakes, build living soil teeming with beneficial microbes, and create beds that support everything from vegetables and herbs to young trees and ornamentals. By the end, you’ll have a clear, expert-backed plan for your most productive garden yet! 🚀
Let’s dig in (gently, of course) 🌿
Why Soil Preparation Matters in Spring 🌍💚
Soil isn’t just “dirt” — it’s a living ecosystem full of microorganisms, fungi, earthworms, and nutrients that plants depend on. Good soil structure allows roots to breathe (oxygen), drink (water), and eat (nutrients) efficiently. Poor structure leads to compaction, poor drainage, nutrient lockup, and stressed plants prone to pests and diseases.
In spring, winter rains, frost heave (in cooler zones), or dry harmattan winds (in parts of South Asia) compact soil, leach nutrients, and disrupt microbial life. Spring prep restores balance just in time for planting.
Benefits include:
- Up to 20-30% better yields in vegetables
- Stronger root systems for drought and flood resistance
- Fewer weeds and diseases through healthy biology
- Improved water efficiency — crucial during Bangladesh’s hot pre-monsoon period
Compared to skipping prep: Stunted growth, yellow leaves, and disappointing harvests vs. lush, abundant plants that make gardening joyful! 📈

(Beautiful thriving raised bed garden after proper spring prep — imagine your own space looking this vibrant! 🌽🌻)
When to Start Spring Garden Soil Preparation ⏰
Timing is everything — start too early on wet soil, and you create brick-like compaction that lasts months.
The golden rule: Use the “wrung-out sponge” test 🧽. Grab a handful of soil from 4-6 inches deep:
- It forms a ball but crumbles easily when poked? Perfect — go time!
- It stays muddy and sticky? Wait a few days (or cover with plastic to dry/warm it).
- It’s dust-dry and powdery? Water lightly and wait 24-48 hours.
In Dhaka and similar tropical areas (March 2026 vibes right now!), aim for late February to mid-April before the heat ramps up. Watch the forecast for 2-3 dry days. Avoid working after heavy rain — compaction nightmare! 🚫💧
Pro tip: If your soil is heavy clay (common in Bangladesh riverine areas), early prep helps warm it faster for heat-loving crops like tomatoes and okra.
Step 1: Assess and Test Your Soil 🔍🧪
Never amend blindly — that’s like cooking without tasting! Soil testing every 2-3 years reveals pH, NPK levels, organic matter, and micronutrients. In tropical climates, soils often trend acidic from heavy rains, or saline in coastal zones.
DIY options:
- Jar test for texture: Shake soil + water in a jar; layers show sand/silt/clay percentages.
- Home pH kits or probes for quick checks.
For accuracy, send samples to local labs (in Bangladesh, Soil Resource Development Institute or agricultural universities offer affordable tests).
Ideal ranges:
- Vegetables/herbs: pH 6.0–7.0
- Acid-loving plants (azaleas, blueberries): 4.5–5.5
If acidic: Add agricultural lime (dolomite for magnesium boost). If alkaline: Elemental sulfur or organic acids. Low nutrients? Plan targeted organic fixes.

(Hands-on soil pH testing — a simple step that saves headaches later! 🧪🌱)
Step 2: Clean Up and Clear Debris 🧹🍂
Start fresh: Remove winter debris, dead annuals, fallen leaves, and weeds.
- Pull or cut perennials carefully — leave roots of nitrogen-fixers if beneficial.
- For tough weeds: Solarize with black plastic for 4-6 weeks if persistent.
- Compost healthy material; burn or dispose diseased stuff safely ♻️.
This prevents pest/disease carryover and stops weeds from seeding.
Step 3: Loosen and Aerate Without Damaging Structure 🌬️
Once your beds are cleared, it’s time to gently loosen the soil to improve air circulation, water infiltration, and root penetration — without destroying the microbial networks you’ve built over time.
The modern expert consensus leans heavily toward no-till or minimal-till methods, especially in home gardens. Excessive tilling (like using a rototiller year after year) brings buried weed seeds to the surface, disrupts fungal networks (mycorrhizae), and oxidizes organic matter too quickly, leading to long-term soil degradation.
Recommended tools and techniques:
- Broadfork — the gold standard for aeration. Step on it to plunge the tines 12–18 inches deep, then rock it back and forth to lift and fracture compacted layers without flipping soil. Perfect for clay-heavy soils common in Dhaka riverine areas.

(Using a broadfork to gently aerate without inverting layers — preserves soil life! 🦠)
- Garden fork or digging fork — For lighter work, insert and wiggle to create channels.
- Depth: 8–12 inches for most veggies; shallower (6–8 inches) if you’re transitioning to no-till.
If your soil is severely compacted from foot traffic or construction, a light single pass with a tiller might be needed once — but follow with heavy organic matter and commit to no-till afterward.
Pro insight: In tropical climates with intense rains, good aeration prevents waterlogging that causes root rot in crops like brinjal (eggplant) and chilli.
Step 4: Add Organic Matter – The Game Changer 🌱🥬
Organic matter is the single most important amendment for long-term soil health. It feeds microbes, improves structure (crumbly texture), increases water-holding capacity (vital during dry spells), and slowly releases nutrients.
Best sources (organic & locally available in Bangladesh):
- Well-aged compost (homemade or purchased)
- Cow/buffalo manure (fully composted — at least 6 months to avoid burning plants)
- Vermicompost (worm castings — excellent microbial booster)
- Leaf mold or decomposed leaves
- Coconut coir or rice husk (for improving drainage in clay soils)
How much to add:
- New beds: 2–4 inches (about 5–10 cm) spread evenly.
- Established beds: 1–2 inches top-dressed annually.
Application methods:
- Spread evenly over the surface.
- Gently fork or broadfork it into the top 4–6 inches (no deeper in no-till).
- Or use sheet mulching: Layer cardboard/newspaper → compost/manure → mulch on top for weed suppression.
Benefits breakdown:
- Boosts beneficial bacteria and fungi
- Reduces erosion during monsoons
- Helps sandy soils hold moisture; breaks up clay soils

(Spreading rich compost — watch your garden come alive! 🌿🍅)
Step 5: Balance Nutrients and pH Amendments ⚖️
With your soil test results in hand, target deficiencies naturally.
Common tropical soil issues & fixes:
- Low nitrogen (yellow leaves): Add composted manure, blood meal, or legume cover crop residues.
- Low phosphorus (poor fruiting): Bone meal or rock phosphate.
- Potassium boost: Wood ash (sparingly — raises pH) or banana peel compost.
- Acidic soil (pH <6.0): Agricultural lime or dolomite lime (apply 4–6 weeks before planting).
- Saline soils (coastal areas): Gypsum to displace sodium; flush with heavy watering if possible.
Always incorporate amendments gradually — overdoing it causes imbalances. Use organic slow-release options to avoid burning tender spring roots.
If time allows, sow a quick spring cover crop like mung bean or cowpea, then chop and drop before main planting.
Step 6: Final Bed Shaping, Raking, and Mulching Prep 🛏️
Now shape your beds for optimal performance:
- Raised beds (highly recommended in rainy climates): 8–12 inches high for better drainage and warmer soil.
- Level rows or mounds for in-ground planting.
Rake to a fine, crumbly tilth (especially for direct-sown seeds like carrots or spinach). Remove large clods and stones.
Apply 2–3 inches of organic mulch (straw, dried grass, chopped leaves) right after shaping — but wait until after planting tender seedlings to avoid smothering them.
Early mulching:
- Suppresses weeds
- Retains moisture
- Moderates soil temperature
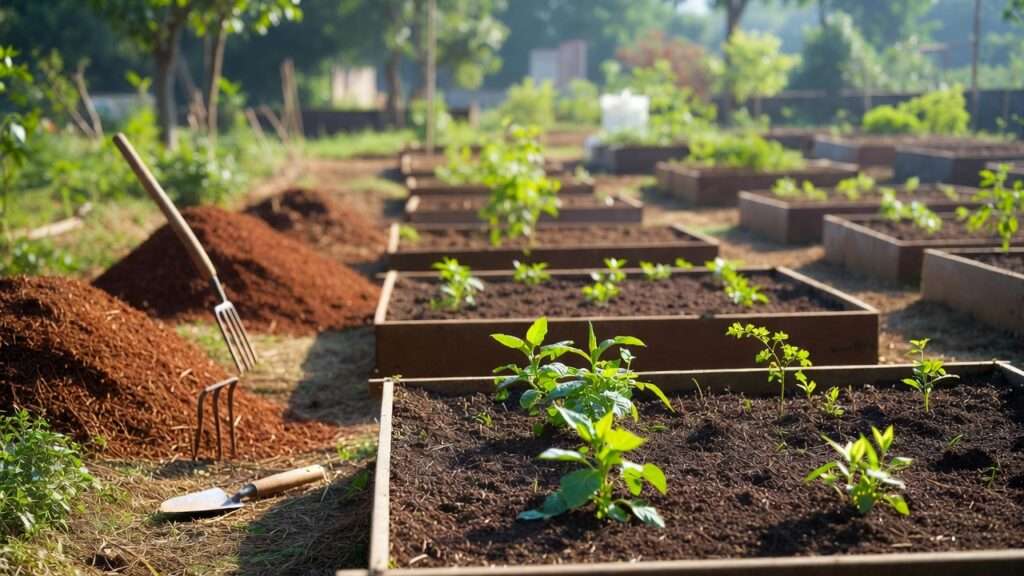
(Beautifully shaped raised beds ready for planting — clean, level, and mulched! 🌼)
(Continuing in next part — we’ve now covered up to Step 6!)
Reply with “Continue generating.” to pick up with Advanced Tips & Expert Insights and the rest! 🌿🚀
Step 3: Loosen and Aerate Without Damaging Structure 🌬️
Once your beds are cleared, it’s time to gently loosen the soil to improve air circulation, water infiltration, and root penetration — without destroying the microbial networks you’ve built over time.
The modern expert consensus leans heavily toward no-till or minimal-till methods, especially in home gardens. Excessive tilling (like using a rototiller year after year) brings buried weed seeds to the surface, disrupts fungal networks (mycorrhizae), and oxidizes organic matter too quickly, leading to long-term soil degradation.
Recommended tools and techniques:
- Broadfork — the gold standard for aeration. Step on it to plunge the tines 12–18 inches deep, then rock it back and forth to lift and fracture compacted layers without flipping soil. Perfect for clay-heavy soils common in Dhaka riverine areas.
(Using a broadfork to gently aerate without inverting layers — preserves soil life! 🦠)
- Garden fork or digging fork — For lighter work, insert and wiggle to create channels.
- Depth: 8–12 inches for most veggies; shallower (6–8 inches) if you’re transitioning to no-till.
If your soil is severely compacted from foot traffic or construction, a light single pass with a tiller might be needed once — but follow with heavy organic matter and commit to no-till afterward.
Pro insight: In tropical climates with intense rains, good aeration prevents waterlogging that causes root rot in crops like brinjal (eggplant) and chilli.
Step 4: Add Organic Matter – The Game Changer 🌱🥬
Organic matter is the single most important amendment for long-term soil health. It feeds microbes, improves structure (crumbly texture), increases water-holding capacity (vital during dry spells), and slowly releases nutrients.
Best sources (organic & locally available in Bangladesh):
- Well-aged compost (homemade or purchased)
- Cow/buffalo manure (fully composted — at least 6 months to avoid burning plants)
- Vermicompost (worm castings — excellent microbial booster)
- Leaf mold or decomposed leaves
- Coconut coir or rice husk (for improving drainage in clay soils)
How much to add:
- New beds: 2–4 inches (about 5–10 cm) spread evenly.
- Established beds: 1–2 inches top-dressed annually.
Application methods:
- Spread evenly over the surface.
- Gently fork or broadfork it into the top 4–6 inches (no deeper in no-till).
- Or use sheet mulching: Layer cardboard/newspaper → compost/manure → mulch on top for weed suppression.
Benefits breakdown:
- Boosts beneficial bacteria and fungi
- Reduces erosion during monsoons
- Helps sandy soils hold moisture; breaks up clay soils

(Spreading rich compost — watch your garden come alive! 🌿🍅)
Step 5: Balance Nutrients and pH Amendments ⚖️
With your soil test results in hand, target deficiencies naturally.
Common tropical soil issues & fixes:
- Low nitrogen (yellow leaves): Add composted manure, blood meal, or legume cover crop residues.
- Low phosphorus (poor fruiting): Bone meal or rock phosphate.
- Potassium boost: Wood ash (sparingly — raises pH) or banana peel compost.
- Acidic soil (pH <6.0): Agricultural lime or dolomite lime (apply 4–6 weeks before planting).
- Saline soils (coastal areas): Gypsum to displace sodium; flush with heavy watering if possible.
Always incorporate amendments gradually — overdoing it causes imbalances. Use organic slow-release options to avoid burning tender spring roots.
If time allows, sow a quick spring cover crop like mung bean or cowpea, then chop and drop before main planting.
Step 6: Final Bed Shaping, Raking, and Mulching Prep 🛏️
Now shape your beds for optimal performance:
- Raised beds (highly recommended in rainy climates): 8–12 inches high for better drainage and warmer soil.
- Level rows or mounds for in-ground planting.
Rake to a fine, crumbly tilth (especially for direct-sown seeds like carrots or spinach). Remove large clods and stones.
Apply 2–3 inches of organic mulch (straw, dried grass, chopped leaves) right after shaping — but wait until after planting tender seedlings to avoid smothering them.
Early mulching:
- Suppresses weeds
- Retains moisture
- Moderates soil temperature
(Beautifully shaped raised beds ready for planting — clean, level, and mulched! 🌼)
Advanced Tips & Expert Insights from Pros 👨🌾🔬
Once you’ve mastered the core steps, these pro-level strategies can take your garden to the next level — especially suited to Dhaka’s hot, humid, monsoon-influenced climate.
- Embrace Full No-Till Gardening After your initial prep, never turn the soil again. Layer compost and mulch on top each season. Over 2–3 years, earthworms and microbes create perfect crumb structure naturally. Studies from Rodale Institute and local agricultural research show no-till systems can increase soil organic matter by 1–2% per year while cutting water use by up to 30%.
- Inoculate with Beneficial Microbes & Mycorrhizae Add mycorrhizal fungi inoculants (available as powders or granules at good nurseries in Dhaka) when planting. These fungi form symbiotic relationships with roots, dramatically improving nutrient and water uptake — especially helpful for fruiting crops like tomatoes, brinjal, and papaya during dry spells.
- Climate-Adaptive Tweaks for Bangladesh
- Heavy pre-monsoon heat: Mulch thickly (4–5 inches) to keep soil cooler and retain moisture.
- Monsoon waterlogging risk: Build higher raised beds (12–18 inches) and incorporate 20–30% coarse organic matter (coir, rice husk) for better drainage.
- Salinity in low-lying areas: Apply gypsum annually and grow salt-tolerant green manures like sesbania.
- Companion Planting for Soil Health Pair nitrogen-hungry crops (corn, cucumber) with legumes (beans, cowpea) that fix nitrogen. Marigolds and basil deter nematodes while basil’s roots exude compounds that benefit nearby plants.
- Worm Composting On-Site Set up a simple vermicompost bin near your beds using red wigglers (Eisenia fetida). Feed kitchen scraps and garden waste — you’ll have rich castings ready every 2–3 months to top-dress beds.
Expert note: Many successful urban gardeners in Dhaka now achieve near-organic certification-level soil health within 3–4 seasons by combining no-till, heavy composting, and microbial boosts. 🌿🪱
Common Mistakes to Avoid in Spring Soil Prep (and How to Fix Them) 🚫❌
Even experienced gardeners slip up. Here are the top pitfalls and their easy corrections:
- Working wet soil → Creates hardpan that roots can’t penetrate. Fix: Wait for the sponge test; cover beds with plastic to speed drying if needed.
- Over-tilling → Kills soil biology and brings weed seeds up. Fix: Switch to broadfork or no-till after one corrective pass.
- Skipping the soil test → Leads to over-liming or nutrient burn. Fix: Test at least every 3 years; use local labs for accurate tropical soil readings.
- Adding fresh manure → High ammonia burns roots and introduces pathogens. Fix: Use only well-composted (6+ months old) manure.
- Planting too early in cold/wet soil → Seeds rot, seedlings damping-off. Fix: Wait until soil reaches 15–18°C (use a soil thermometer); warm beds with black plastic for 1–2 weeks beforehand.
Avoid these, and you’ll save yourself months of frustration!
Plant-Specific Soil Prep Quick Guides 📋🌽🥕
Different plants have slightly different preferences — tailor your prep for best results:
Vegetables
- Tomatoes, peppers, brinjal: pH 6.2–6.8, high phosphorus & potassium, 3–4 inches compost, good drainage.
- Leafy greens (spinach, red amaranth, lettuce): pH 6.0–7.0, steady nitrogen, light texture.
- Root crops (carrots, radish, beets): Loose, stone-free soil to 12+ inches deep, minimal fresh manure.
Flowers & Ornamentals
- Marigolds, zinnias, sunflowers: Average fertility, well-drained.
- Acid-lovers (hibiscus varieties, gardenias): Lower pH (5.5–6.5) with pine needle mulch or sulfur.
Young Trees & Shrubs in Garden Borders
- Dig wide planting holes (2–3× root ball width), mix 30–40% compost with native soil.
- Avoid fertilizer in the first year — focus on mycorrhizae and mulch ring to encourage deep rooting.
Quick reference table (imagine this styled nicely on your site!):
| Plant Type | Ideal pH | Key Amendment Focus | Extra Tip |
|---|---|---|---|
| Tomatoes | 6.2–6.8 | Phosphorus, calcium | Add crushed eggshells |
| Leafy Greens | 6.0–7.0 | Nitrogen-rich compost | Keep consistently moist |
| Root Crops | 6.0–7.0 | Loose, deep organic matter | Avoid fresh manure |
| Acid-Loving | 5.0–6.0 | Sulfur or pine mulch | Test pH annually |
After Preparation: What Comes Next? 🌼🚀
With your beds beautifully prepped:
- Warm the soil for heat-lovers: Cover with clear or black plastic for 7–14 days before planting.
- First planting timeline (Dhaka, March–April 2026):
- Early March: Cool-season remnants (if any), peas, spinach
- Mid-March to April: Tomatoes, brinjal, okra, beans, cucurbits
- Late April: Monsoon-ready crops (bitter gourd, ridge gourd)
- Ongoing care: Top-dress with compost mid-season, maintain mulch, monitor for nutrient signs.
Healthy soil keeps giving — less watering, fewer pests, bigger smiles at harvest time!
FAQs About Spring Garden Soil Preparation ❓
Q: Can I just use kitchen scraps directly in the soil? A: Not fresh — they attract pests and can cause nitrogen drawdown. Compost them first or bury deeply in trenches (trench composting).
Q: How deep should I dig/aerate? A: 8–12 inches for most veggies; use broadfork to go deeper without flipping layers.
Q: What’s the best compost for Bangladesh gardens? A: A mix of cow manure + kitchen waste + dried leaves. Vermicompost is fantastic if you can source worms.
Q: My soil is very clayey — will raised beds help? A: Yes! Raise 10–18 inches and mix in coir, rice husk, and compost for instant improvement.
Q: Is chemical fertilizer ever okay in spring prep? A: Organic is best long-term, but a balanced slow-release organic fertilizer can supplement if tests show severe deficiency.
Q: How soon after prep can I plant? A: Immediately for transplants; wait 1–2 weeks for direct seeds so amendments settle.
(And many more — feel free to ask in comments!)
Conclusion: Set Up for Your Best Garden Yet! 🎉🌟
Spring garden soil preparation is the single most powerful step you can take toward a thriving, low-maintenance, joyful garden. By testing, cleaning, aerating gently, enriching with organic matter, balancing nutrients, and shaping smartly, you create living soil that supports plants through heat, rain, and everything in between.
Start this week: Grab a handful, do the sponge test, and begin. Your future self (and your future harvests) will thank you!
Happy gardening, sajib — may your Dhaka beds overflow with abundance this season! 🍅🥭🌶️


