
After a long, harsh winter filled with freezing temperatures, heavy snow, ice storms, and biting winds, your trees may look worn out—bare branches, browned evergreens, or even cracked bark telling tales of stress. But spring is nature’s reset button! 🌸 This is the prime time when trees emerge from dormancy, redirect energy to new growth, heal wounds quickly, and build resilience for the hot summer ahead. Ignoring post-winter damage now can lead to declining health, pest invasions, or even tree loss later.
The good news? A structured spring tree care checklist can revive your trees, prevent hidden problems from escalating, and ensure a lush, vibrant landscape all season long. In this ultimate guide, we’ll walk you through every essential step with expert insights drawn from arborist best practices, species-specific tips, and proven techniques. Whether you’re tending shade trees, fruit trees, or evergreens, follow these phases to address winter injury recovery, promote strong structure, and boost overall vitality. Let’s get your trees thriving again! 🌱💚
(Word count so far: ~280)
Why Trees Need Special Attention in Spring ❄️➡️🌿
Winter takes a heavy toll on trees. Extreme cold causes desiccation (winter burn), where evergreens lose moisture faster than they can replace it, leading to browned needles or scorched tips. Frost cracks form from rapid temperature swings, especially on thin-barked species like maples, cherries, and fruit trees—often on the south or southwest sides exposed to afternoon sun. Animal damage from deer or rabbits stripping bark, root heaving from freeze-thaw cycles, and sunscald are common too. Heavy snow or ice can break branches, while salt from de-icing harms roots near driveways.
Spring action is crucial because trees are transitioning out of dormancy: buds swell, sap flows, and wounds compartmentalize (seal) faster as growth resumes. Early intervention catches issues before pests (like borers hatching from overwintered eggs) or diseases (such as anthracnose thriving in wet springs) take hold. Proper care now improves moisture retention, nutrient uptake, and structural integrity, helping trees withstand drought, storms, and heat later.
Timing varies by region—earlier in warmer zones, later in northern or cooler areas like parts of Bangladesh or similar climates. Always observe local bud break: oaks, ashes, and walnuts are often “late leafers,” so adjust tasks accordingly. Investing time now pays off in healthier trees, better shade, increased property value, and support for local wildlife. 🌍
Phase 1: Inspect Your Trees for Winter Damage – The First Critical Step 🔍
Before any cleanup or pruning, a thorough inspection reveals hidden winter injury. This step prevents wasting effort on unsalvageable trees and catches problems early for better recovery chances.
Signs of Winter Injury to Watch For ❄️
- Dieback and browning: Branch tips dead or needles/ leaves brown and dry, especially on evergreens (winter burn/desiccation).
- Cracked or split bark: Vertical frost cracks, often healing slowly but prone to decay if infected.
- Animal damage: Gnawed bark at base (rabbits/mice) or higher (deer), exposing cambium and risking girdling.
- Sunscald: Discolored, sunken bark on south/west trunk sides from winter sun warming followed by freezing.
- Leaning or root issues: Heaved roots from freeze-thaw, or leaning trunks from ice/snow load.
- Broken branches: Hanging or splintered limbs from storms.
Species vary: Maples and cherries crack easily; pines show needle browning; oaks may have branch dieback.
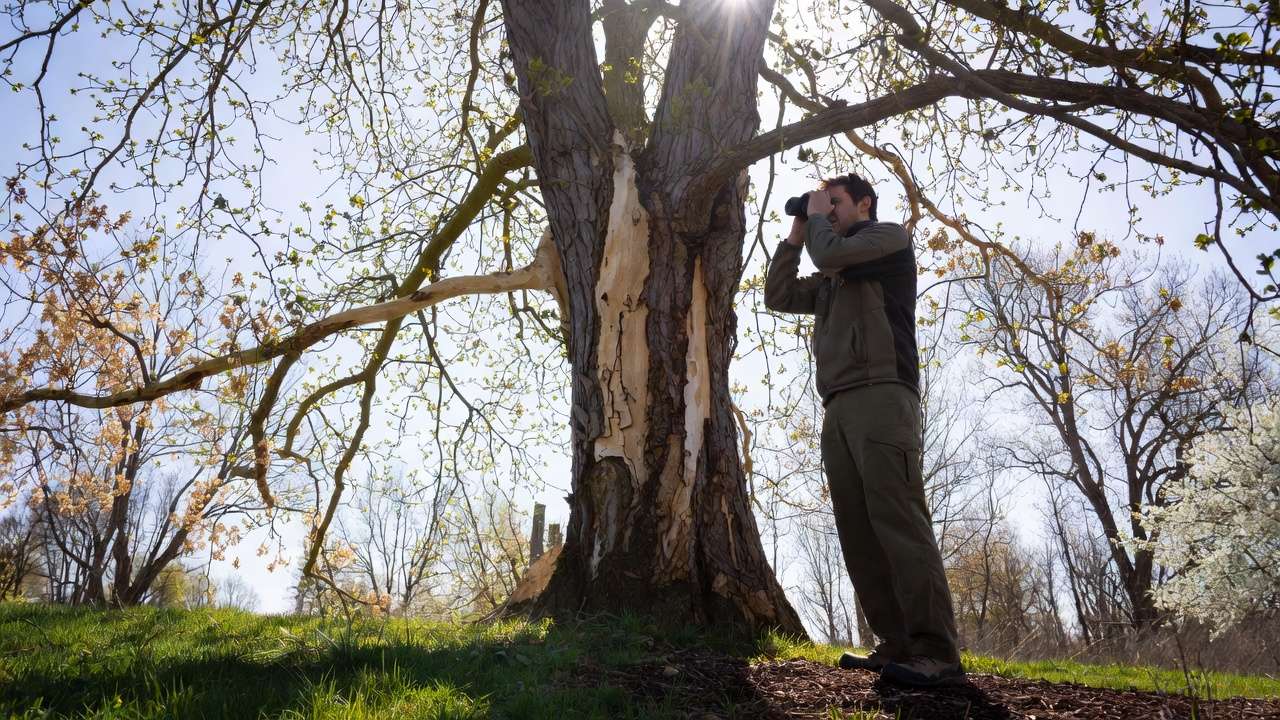
How to Perform a Thorough Tree Inspection – Step-by-Step
- Gather tools: Binoculars, flashlight, notepad/app for notes, sturdy ladder (use safely!).
- Start at the base: Check soil for heaving, exposed roots, mushrooms (decay sign), or bark stripping. Feel for soft spots.
- Examine trunk: Look for cracks, cankers, oozing, or discolored bark. Tap gently—hollow sounds may indicate internal rot.
- Scan branches: Use binoculars for canopy dieback, broken limbs, or crossing/rubbing branches. Note dead wood (no buds).
- Check overall lean: Trees leaning >15° often need pro evaluation.
- Document: Take photos from multiple angles; note species and size.
Do this on a dry, calm day in early spring before full leaf-out for clear views.
When to Call a Certified Arborist Immediately ⚠️
Don’t DIY if you see:
- Large vertical cracks (>2-3 inches wide/deep).
- Extensive dieback (>30-50% canopy).
- Leaning trunks, major lean, or root plate lifting.
- Fungi at base, oozing slime flux, or sudden wilting.
- Trees near structures/power lines with damage.
A certified arborist (ISA credential) uses tools like resistographs for internal decay assessment and can recommend cabling, bracing, or safe removal. Early pro help often saves trees and avoids thousands in emergency costs. Trust experts for accurate diagnosis—better safe than sorry! 🌳🛡️
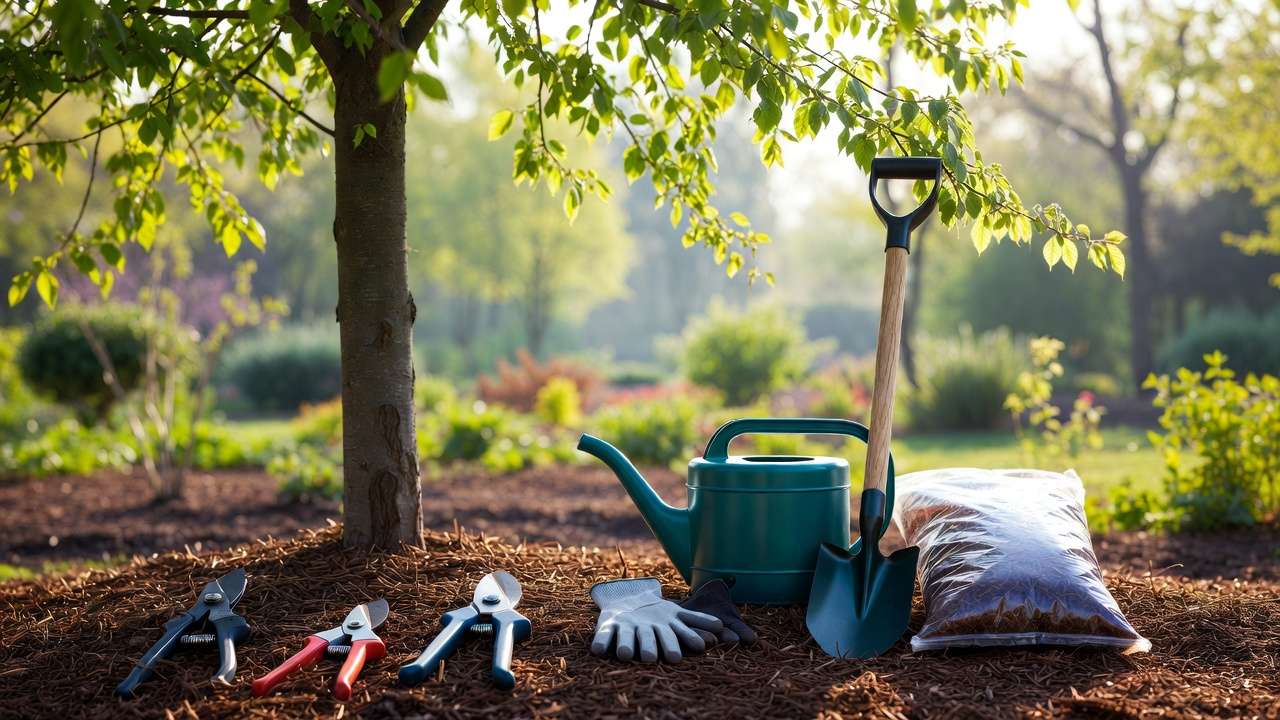
Phase 2: Clean Up and Prune for Healthy Growth 🧹✂️
Once you’ve inspected and identified issues, move to cleanup and pruning. This phase removes hazards, improves airflow, reduces disease risk, and directs energy to healthy parts—essential for winter tree damage recovery and strong spring growth.
Spring Cleanup Essentials
Start simple but thoroughly:
- Rake up fallen leaves, twigs, fruit, and debris around the base. Leftover winter litter harbors fungal spores (like anthracnose) and overwintering pests.
- Remove any broken or hanging branches immediately—don’t wait! Torn limbs from ice or snow can peel bark further if left.
- Clear weeds and grass within 2–3 feet of the trunk to cut competition for water/nutrients and reduce mower damage.
- Gently cultivate compacted soil lightly (avoid deep digging near roots) to improve oxygen and drainage.
Pro tip: Compost healthy debris away from trees; diseased material should be bagged and discarded to prevent reinfection. 🌿
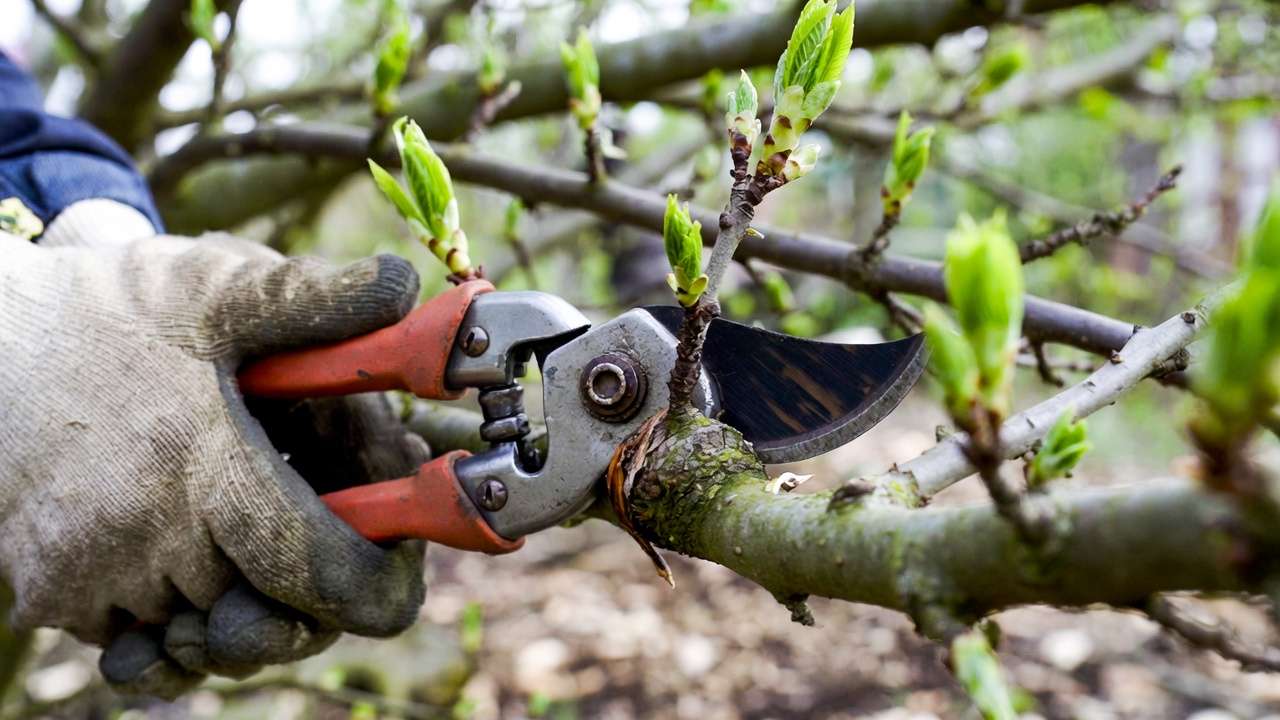
Pruning Guide: What, When, and How
Timing is everything—prune at the right moment to minimize stress and avoid issues like sap bleeding or disease spread.
- Best general timing: Late winter to early spring (before buds swell) for most deciduous trees. This allows fast healing as growth resumes. For spring-flowering species (e.g., crabapples, cherries, dogwoods), prune after blooming to preserve flowers.
- Species-specific notes:
- Maples, birches, walnuts: Avoid early spring (they “bleed” sap heavily); prune in late spring/summer after full leaf-out or late winter.
- Oaks: Prune only in dormant season (late fall to late winter) to avoid oak wilt transmission by beetles—never spring/summer!
- Fruit trees (apples, pears): Late winter/early spring before bud break for best shape and disease prevention (e.g., fire blight).
- Evergreens: Light pruning in spring after risk of hard frost passes.
Follow the “3 Ds” rule first: Remove all dead, diseased, or damaged branches. Then address:
- Crossing/rubbing limbs (causes wounds).
- Water sprouts/suckers (steal energy).
- Branches with narrow V-crotches (weak unions).
Techniques for success:
- Use sharp, clean tools (sterilize with alcohol between cuts to prevent spread).
- Cut just outside the branch collar (swollen area at base)—never flush or leave stubs.
- For larger branches: Use three-cut method (undercut first, top cut second, final close to trunk) to avoid tearing.
- Limit removal to 20–25% of canopy max in one season—more stresses the tree.
Avoid common mistakes: No “topping” (flat cuts that create weak regrowth and decay entry points). No heavy pruning on stressed trees—wait till they recover.
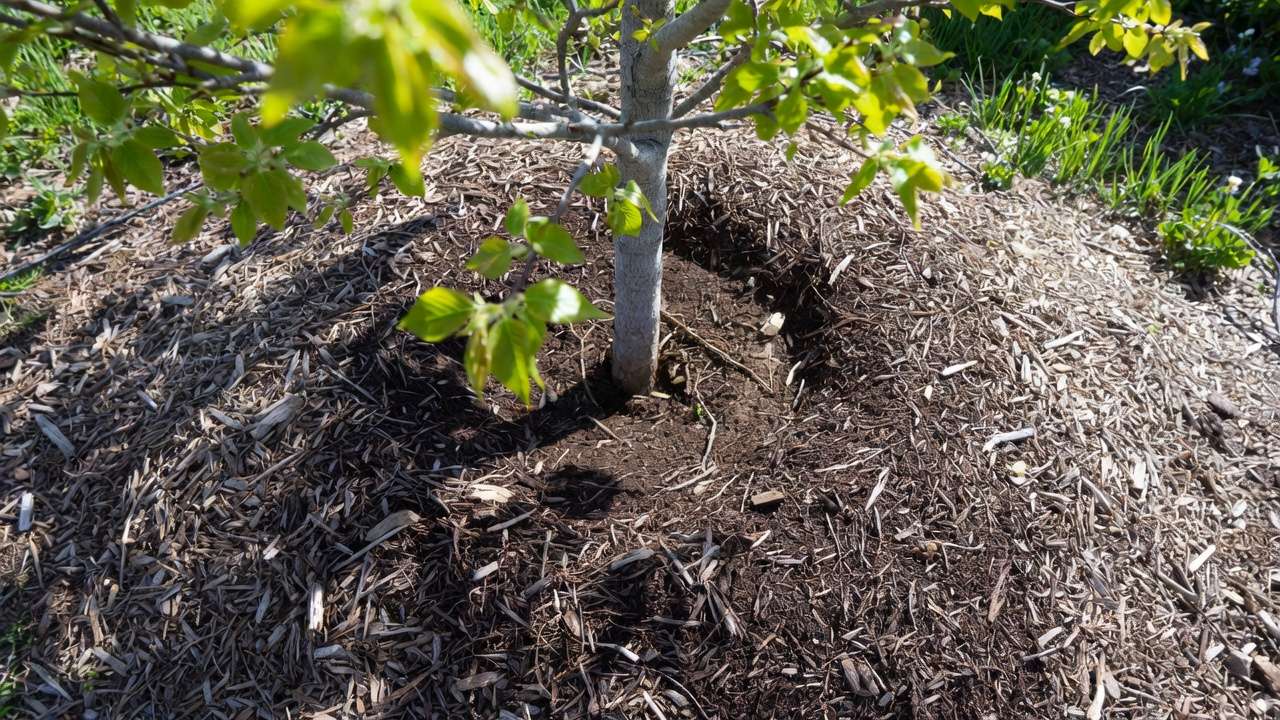
Mulching Done Right
Mulch is a superstar for revival: Retains moisture, moderates soil temperature, suppresses weeds, and adds organic matter as it breaks down.
- Apply 2–4 inches of organic mulch (wood chips, bark, shredded leaves) in a wide ring extending to the drip line.
- Keep it 2–3 inches away from the trunk—no “mulch volcanoes”! Piling against bark traps moisture, invites rot/insects, and hides root flare (critical for health checks).
- Refresh annually in spring for best results.
Done properly, mulch helps trees recover from winter desiccation and supports deeper rooting. 🌱
With cleanup and pruning complete, your trees are now structurally sound and ready to receive the support they need to explode with healthy new growth. This phase focuses on replenishing resources depleted over winter, maintaining consistent moisture, and building natural defenses against spring pests and diseases.
Fertilization: Feed Without Overdoing It
Many homeowners over-fertilize in spring, thinking “more is better”—but excess nitrogen can burn roots, promote weak, leggy growth, and make trees more attractive to pests.
- First rule: Always do a soil test (kits available at garden centers or through local extension services) to check pH and nutrient levels. Most trees thrive in slightly acidic to neutral soil (pH 6.0–7.0).
- Best choice: Use slow-release, granular, tree-specific fertilizers (e.g., 10-10-10 or organic options like composted manure, fish emulsion, or mycorrhizal blends). Avoid high-nitrogen lawn fertilizers near trees.
- Application timing & method: Early to mid-spring, just as buds begin to swell or leaves emerge. Spread evenly in the drip line (outer edge of canopy), lightly rake in, and water deeply. One application per year is usually enough for established trees.
- Young vs. mature trees: Newly planted trees benefit from starter fertilizer with higher phosphorus for root development; mature trees often need little to none if mulched organically.
Pro insight: Over-fertilized trees show dark green leaves but weak wood—prioritize balanced nutrition over quick green-up.
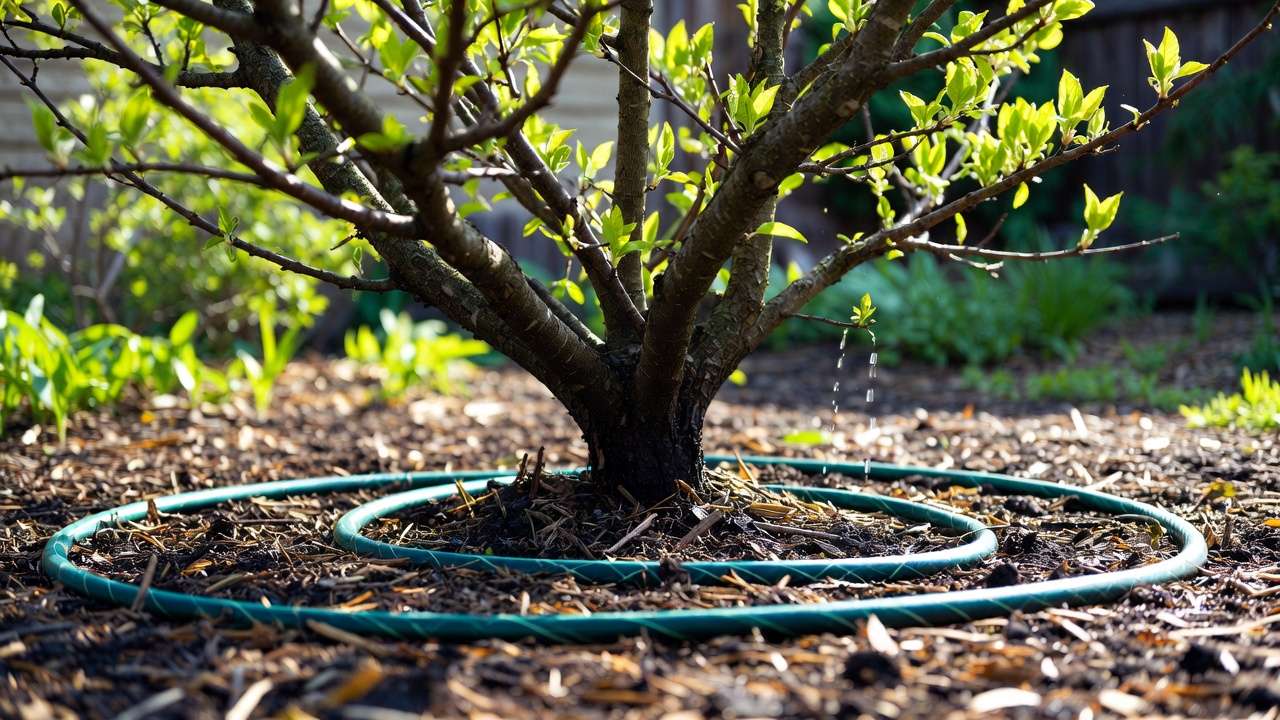
Watering Wisely After Winter
Winter often leaves soil dry at depth (especially under mulch or evergreen canopies), even if the surface looks wet from spring rains.
- Deep, infrequent watering is key: Aim for 1–2 inches of water per week (more during dry spells), delivered slowly so it soaks 12–18 inches deep.
- How to check: Use a soil probe, screwdriver, or trowel—soil should be moist but not soggy.
- Special cases:
- Newly planted or young trees: Water 2–3 times per week for the first season.
- Established trees: Rely mostly on rainfall unless drought persists.
- Evergreens: Need supplemental water in late winter/early spring if soil was frozen for long periods (prevents further desiccation).
- Avoid overwatering—soggy soil suffocates roots and invites root rot.
Install soaker hoses or drip irrigation under mulch for efficient delivery.
Pest and Disease Prevention
Spring is when many overwintered pests become active and fungal diseases explode in cool, wet conditions.
- Early scouting: Look for scale insects (small bumps on twigs), aphid eggs, tent caterpillar webs, or borer exit holes.
- Dormant oil / horticultural oil spray: Apply in early spring (before buds open) on a calm, dry day above 40°F (4°C) to smother scale, mites, and aphid eggs. Follow label rates carefully.
- Common spring threats & organic solutions:
- Anthracnose (leaf spots on sycamores, oaks): Improve airflow via pruning; rake fallen leaves.
- Apple scab / fire blight (fruit trees): Remove mummified fruit; copper-based sprays at green tip stage.
- Powdery mildew: Neem oil or baking soda sprays as leaves emerge.
- Integrated Pest Management (IPM): Encourage ladybugs, birds, and beneficial insects; use traps and barriers before resorting to chemicals.
Bonus: Planting New Trees in Spring 🌱
Spring is one of the best seasons to plant new trees in most climates (including regions like Bangladesh with warm, humid springs). Soil is warming, rainfall is often consistent, and trees have the entire growing season to establish strong roots before summer heat or winter stress returns.
Why Spring Planting Works So Well
- Roots grow actively while top growth is moderate → better establishment and less transplant shock.
- Cooler air temperatures reduce water loss through leaves.
- Gives new trees 6–9 months to anchor before potential dry or cold periods.
Step-by-Step Planting Guide
- Choose the right spot & species: Full sun to partial shade depending on type. Select natives or well-adapted varieties (e.g., neem, mango, jamun, krishnachura, or rain tree for tropical/subtropical areas; avoid invasives).
- Dig properly: Hole 2–3× wider than root ball, but only as deep. Plant so root flare (where trunk widens at base) sits slightly above soil line—never bury it.
- Amend wisely: Mix native soil with compost (30–40%), but don’t over-amend—roots need to adapt to surrounding soil.
- Water in deeply: Create a small berm around the edge to form a watering basin; soak thoroughly at planting.
- Stake only if necessary: Use loose ties and remove after 1 year—most trees don’t need permanent staking.
- Mulch immediately: 2–4 inch ring (no volcano!), keeping mulch away from trunk.
- Aftercare for first year: Water deeply 2–3×/week (more in dry spells), monitor for stress, avoid fertilizer for first 4–6 weeks.
Planting now lets your new tree sync perfectly with the spring tree care checklist rhythm—inspect, prune lightly (only damaged parts), mulch, and nourish alongside established trees.
Common Mistakes to Avoid in Spring Tree Care ⚠️
Even well-meaning homeowners make these errors—avoid them to protect your investment of time and trees:
- Mulch volcanoes → Piling mulch against the trunk invites rot, insects (borers, termites), and hides girdling roots. Always keep the root flare visible.
- Over-pruning or topping → Removing >25% canopy shocks trees; topping creates weak, disease-prone regrowth. Stick to the 3 Ds and structural pruning.
- Pruning at the wrong time → Cutting oaks/maples/bleeders in spring spreads disease or causes heavy sap loss—know your species!
- Ignoring small damage → A tiny crack or minor dieback can worsen quickly—early inspection saves big problems.
- Over-fertilizing → Excess nitrogen = lush but weak growth, pest magnets, and root burn. Soil test first.
- Watering too shallowly or too often → Encourages shallow roots vulnerable to drought. Deep, infrequent is best.
- Planting too deep → Buried root flare leads to stem girdling and early decline—common killer of new trees.
Spot these early and correct them—your trees will thank you with stronger health and beauty. 🌿
Quick-Reference Spring Tree Care Checklist – Printable Version 📋
Early Spring (as soon as soil thaws / buds swell)
- Inspect all trees for winter damage (trunk cracks, dieback, animal injury) 🔍
- Remove hazardous hanging/broken branches
- Rake debris & old leaves from base
- Apply dormant oil spray if scale/mites present
- Prune dormant-season species (before bud break) ✂️
Mid-Spring (leaves emerging / flowering)
- Finish structural pruning on non-bleeding trees
- Apply mulch ring (2–4 inches, no volcano)
- Soil test → fertilize only if needed (slow-release)
- Begin deep watering if rainfall is low
- Scout for early pests/disease signs
Late Spring (full leaf-out)
- Water consistently during dry spells
- Monitor new growth for stress/pests
- Prune spring bloomers AFTER flowering
- Plant new trees if not already done 🌱
Save or print this list—check off tasks as you go!
FAQs About Spring Tree Care ❓ (approx. 400 words)
Is it too late to prune in mid-spring? Not always—light pruning of dead/diseased branches is fine anytime. Major structural pruning is best before bud break for most trees, but wait until after bloom for flowering species. Avoid heavy cuts on bleeding trees or oaks in growing season.
How do I revive a tree with severe winter burn? Patience is key. Remove only clearly dead tips/branches. Mulch well, water deeply during dry periods, and fertilize lightly only after new growth appears. Many browned evergreens green up from the inside out over 1–2 seasons. If >50% is dead, consult an arborist.
When should I fertilize my trees? Early to mid-spring after soil warms and growth begins. One application of balanced slow-release is usually enough. Skip if tree is very young, newly planted, or soil test shows adequate nutrients.
Do fruit trees need different spring care than shade trees? Yes—fruit trees (mango, guava, citrus, etc.) benefit from heavier pruning in late winter/early spring to open canopy, improve fruit quality, and reduce disease (e.g., anthracnose). Remove crossing branches and water sprouts aggressively. They also respond well to balanced fertilizer with micronutrients like zinc and boron.
What if I see oozing or slime on the trunk? This is often bacterial wetwood/slime flux—usually not fatal but unsightly. Improve drainage, avoid wounding the tree, and let it compartmentalize naturally. Severe cases may need arborist evaluation.
Should I remove all old mulch before adding new? No—just refresh the top layer and pull back from trunk. Old mulch adds organic matter as it decomposes.
My tree is leaning—can I fix it myself? Minor leans sometimes self-correct with staking and root growth, but significant leans (>15°) often indicate root damage or instability. Call a certified arborist—DIY cabling/bracing can fail dangerously.
Conclusion: Enjoy a Lush, Healthy Landscape All Year 🌳💚
By following this ultimate spring tree care checklist, you’ve given your trees the best possible start after winter stress. You’ve inspected for hidden damage, cleaned up hazards, pruned intelligently, mulched properly, nourished thoughtfully, and protected against early threats. The reward? Stronger branches, vibrant leaves, better shade, improved air quality, higher property value, and a thriving habitat for birds, bees, and butterflies.
Tree care is an ongoing journey—continue monitoring through summer and fall, adjust for your local climate, and don’t hesitate to consult certified arborists for complex issues. Download/print the quick checklist above, bookmark this guide, and share it with fellow gardeners. Here’s to a beautiful, resilient landscape this year and beyond! 🌸
If you’d like species-specific advice (e.g., for mango, neem, or krishnachura trees common in Barisal Division), more regional tips for Bangladesh, or help expanding any section, just let me know. Happy tree reviving! 🌿✨


