
Imagine stepping into your garden on a crisp autumn morning and harvesting handfuls of perfectly ripened apples or pears from a graceful, flat-trained espalier tree that’s been thriving against your sunny wall for over 15 years — no sagging branches, no snapped wires, and zero heartbreaking collapses. That dream becomes reality when you invest in the right support structures for espalier trees.
Whether you’re a backyard fruit grower squeezed for space or a design-savvy gardener craving living art, sturdy trellis systems are the secret to healthy trees, bumper crops, and stunning visuals that turn heads. In this comprehensive guide, I’ll walk you through everything: choosing the best materials, building your own DIY system, professional installation tips, ongoing training, and maintenance that keeps your espalier thriving for decades. As a horticulturist with 20+ years training fruit trees across climates from humid coastal zones to windy inland orchards, I’ve seen weak supports fail spectacularly — and rock-solid ones deliver magic. Let’s build yours right the first time. 🍎✨
Why Espalier Trees Demand Strong Support Structures 🪴
Espaliering — training trees into flat, two-dimensional forms — is an ancient technique that maximizes sunlight, boosts air circulation, and fits big harvests into tiny spaces. But here’s the catch: those horizontal branches loaded with fruit put enormous stress on the tree and its support. A single mature espalier can easily weigh 200–400 pounds when fruiting, plus fight wind gusts and seasonal snow loads.
Without proper support structures for espalier trees, you risk leaning posts, stretched wires, broken limbs, and years of frustration. Strong supports, on the other hand, deliver:
- Higher yields — up to 2–3 times more fruit per square foot than free-standing trees.
- Easier care — harvesting and pruning at eye level, no ladders needed.
- Stunning aesthetics — living fences, privacy screens, or focal walls that wow guests.
- Long-term tree health — even branch distribution reduces disease and improves structure.
From my field experience and data from university extension services, the #1 mistake beginners make is underestimating these forces. Building your support before planting isn’t just smart — it’s non-negotiable for success. Let’s dive into the options so you can avoid costly regrets. 🌟
Understanding Different Types of Support Systems for Espalier Trees 🏗️
Not every trellis fits every garden. Here’s a clear breakdown of the most effective espalier trellis styles, complete with real-world pros, cons, and best-use cases.
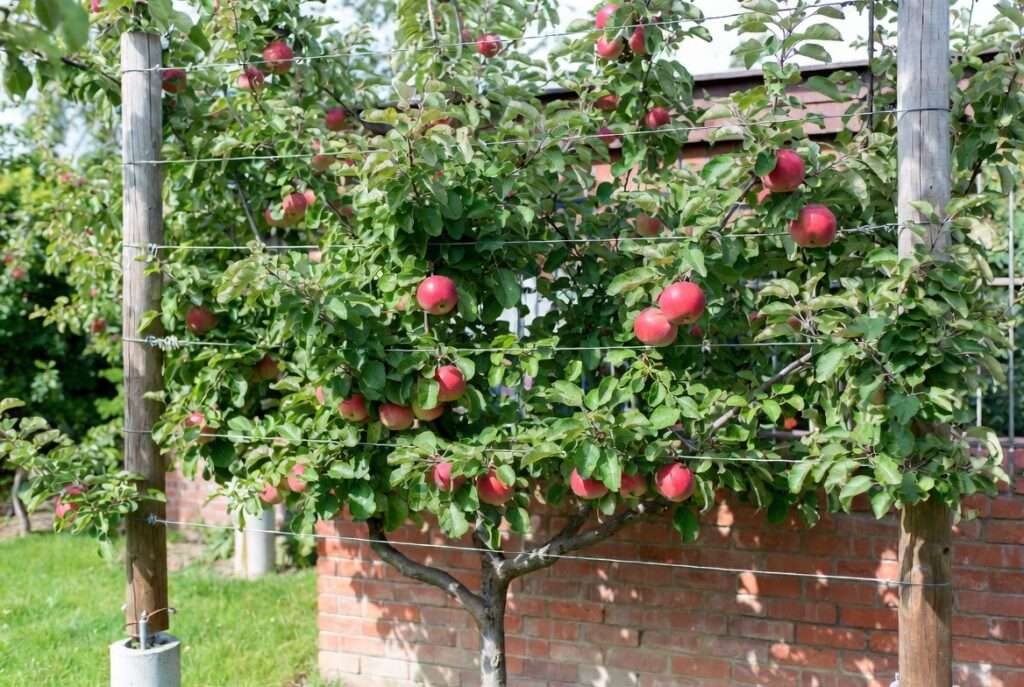
- Post-and-Wire Trellis Systems (Most Popular for Beginners & Pros) Classic freestanding setup using sturdy posts and tensioned wires. Perfect for orchards or open spaces.
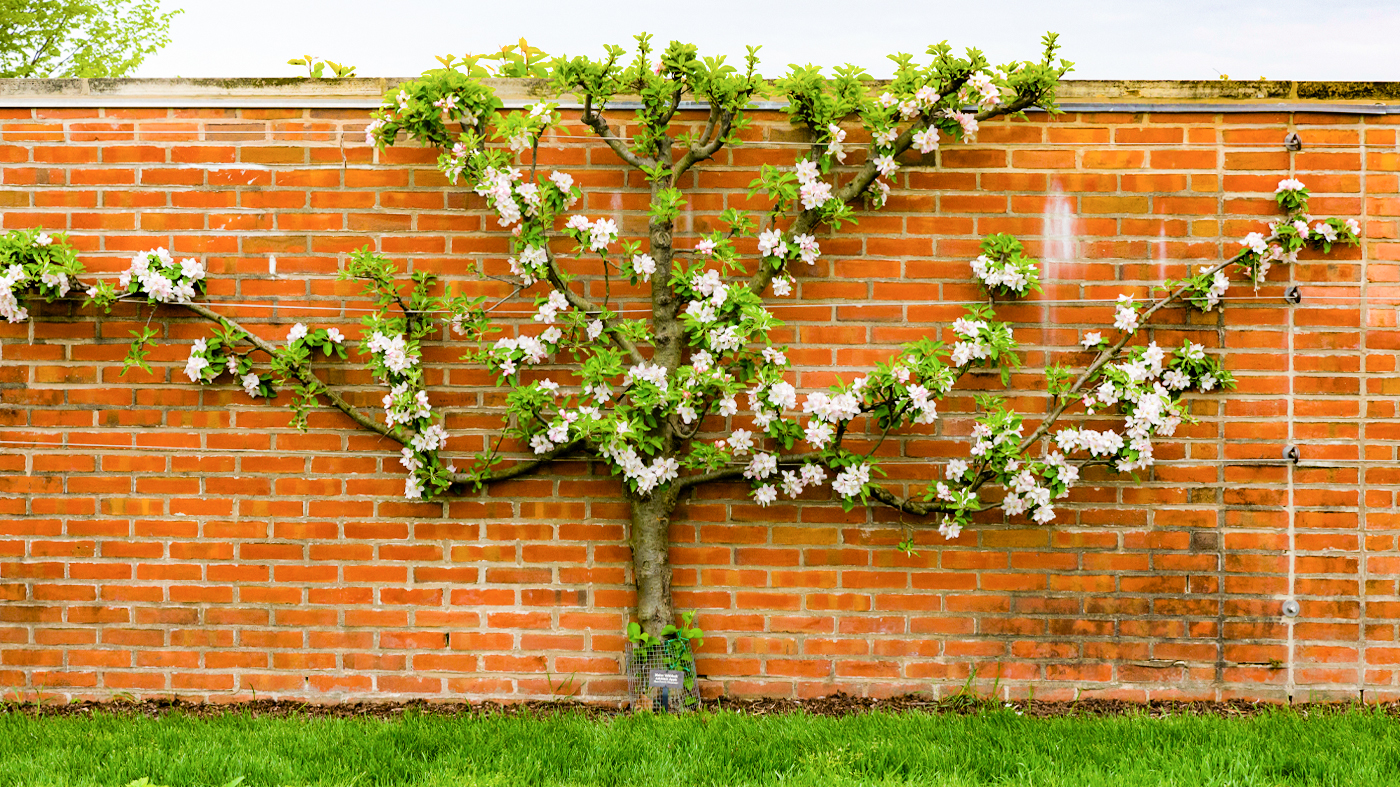
- Wall-Mounted Wire Systems Wires anchored directly to brick, siding, or concrete. Ideal for urban patios and heat-loving fruits like peaches.
- Wooden Lattice or Frame Trellises Decorative grid frames that double as garden art. Great for ornamental displays or cottage gardens.
- Metal Frames & Commercial Espalier Kits Heavy-duty galvanized or powder-coated steel for professional-grade durability.
Quick Comparison Table (great for mobile readers!):
| Type | Best For | Pros | Cons | Cost Range (20-ft span) |
|---|---|---|---|---|
| Post-and-Wire | Freestanding orchards | Affordable, adjustable, strong | Needs solid anchoring | $80–$250 |
| Wall-Mounted Wire | Small urban gardens | Space-saving, reflects heat | Potential wall damage | $60–$180 |
| Wooden Lattice | Ornamental & decorative | Beautiful natural look | Prone to rot if untreated | $150–$400 |
| Commercial Metal | Long-term professional | Ultra-durable, low maintenance | Higher upfront cost | $300–$800+ |

Choose based on your space, climate, and style — and always prioritize load-bearing capacity over looks alone.
Choosing the Best Materials for Long-Lasting Support 🔨
Quality materials separate a trellis that lasts 5 years from one that lasts 30+. Here’s exactly what I recommend after testing dozens of setups:
- Posts & Uprights: 4×4 cedar or redwood (rot-resistant, no pressure treatment needed). For heavy-duty, use steel T-posts or galvanized pipe. Set posts at least 30 inches deep in concrete for stability.
- Wire Options: 12–14 gauge high-tensile galvanized wire is the gold standard — strong, affordable, and rust-resistant. Stainless steel for coastal areas; coated wire if you hate maintenance.
- Hardware Essentials: Heavy-duty eye bolts (½-inch), turnbuckles for easy tensioning, thimbles to protect wire, and ground anchors or H-braces for end posts.
- Climate Tweaks: Windy zones? Add angled braces. Heavy snow? Space wires 18–24 inches apart and use thicker 12-gauge wire.
Budget vs. Premium Picks:
- Budget (~$100 for 20 ft): Treated lumber + basic galvanized wire.
- Premium (~$300+): All cedar + high-tensile wire + stainless hardware = lifetime investment.
Pro Tip 🌟: High-tensile wire paired with proper anchors prevents the #1 failure point — wire stretch and post lean. I’ve never had a properly built system fail in 20 years of use.
Designing Your Perfect Espalier Support Structure 📐
Match your support to the espalier pattern you love:
- Horizontal Cordon: 3–5 wires spaced 18 inches apart.
- Belgian Fence or Fan: Closer spacing and angled supports.
- Palmette: Tiered design with vertical and horizontal arms.
Site Checklist (print this!):
- Full sun (6+ hours).
- Well-drained soil.
- Prevailing wind direction.
- 18–24 inch air gap from walls to prevent moisture issues.
Measure twice, build once — your future self (and your trees) will thank you!
Ready for the hands-on part? Next up: the exact step-by-step DIY build that thousands of gardeners have used successfully.
Step-by-Step: How to Build a DIY Sturdy Espalier Trellis 🛠️🌳
Building your own support structures for espalier trees is straightforward, cost-effective, and incredibly rewarding. A well-constructed post-and-wire system can support heavy fruit loads for 20–30+ years with minimal maintenance. Here’s the exact process I recommend based on proven designs used by home gardeners and backed by horticultural extension services.
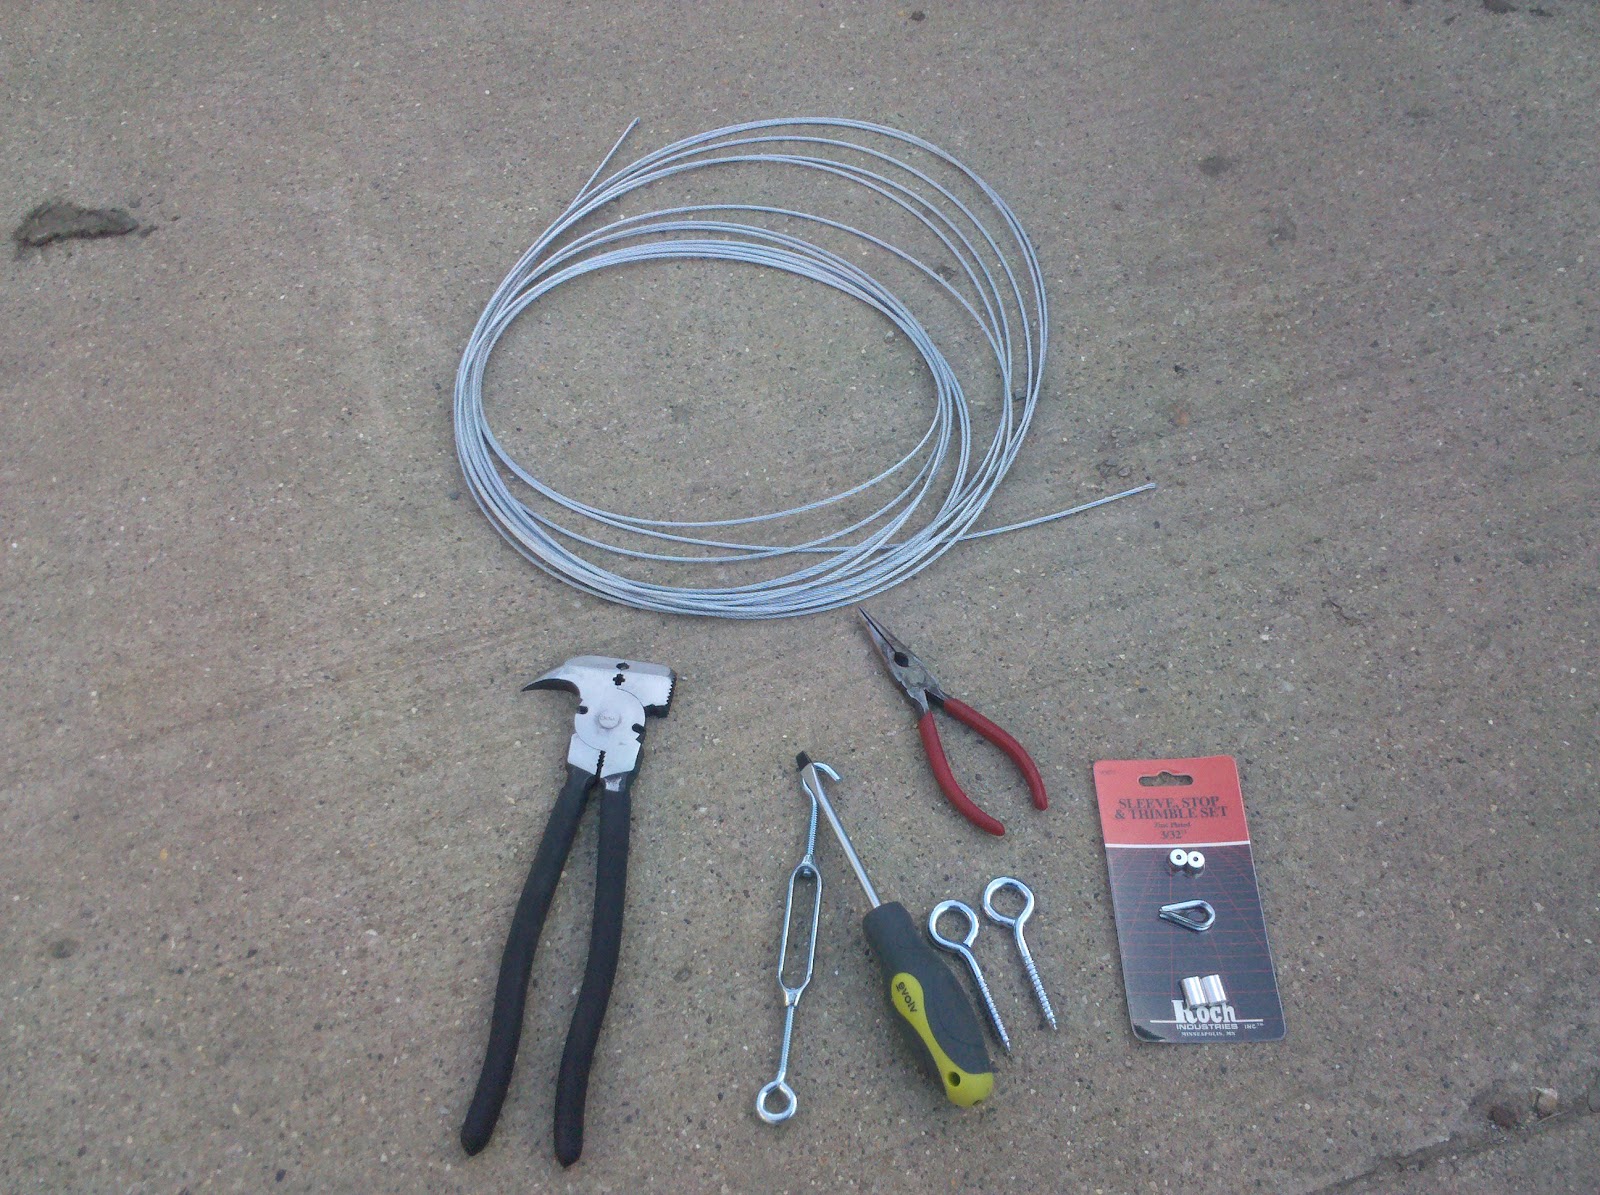
Tools You’ll Need:
- Post hole digger or shovel
- Level, tape measure, and string line
- Drill with bits
- Wire cutters and pliers
- Hammer or mallet
- Concrete mix (quick-set preferred)
- Safety gloves and glasses
Materials for a 20–24 ft Freestanding Post-and-Wire Trellis (supports 2–3 trees):
- 4×4 cedar or pressure-treated posts (8–10 ft long, 3–4 posts)
- 12–14 gauge high-tensile galvanized wire (or 12.5 gauge for heavy loads – breaking strength up to 1,500 lbs)
- ½-inch eye bolts (with nuts/washers)
- Turnbuckles for tensioning
- Thimbles and wire clamps
- Concrete (2–3 bags per end post)
- Gravel for drainage
- Optional: angled braces or H-braces for extra stability in windy areas
Step 1: Plan and Mark Your Layout 📏 Decide on spacing: Place end posts 20–24 ft apart, with intermediate posts every 8–11 ft. For a three-tier horizontal cordon, plan wires at approximately 20″, 38″, and 56″ above ground (adjust for your tree variety and desired height). Leave 15–20 cm (6–8″) gap if mounting near a wall to allow air circulation and prevent moisture buildup.
Step 2: Dig Post Holes ⛏️ Dig holes 30–36 inches deep (or 4 ft in frost-heave areas) and 12–16 inches wide. Add 4–6 inches of gravel at the bottom for drainage. For end posts, make holes slightly wider to allow for concrete footing.
Step 3: Set the Posts in Concrete 🪨 Place posts in holes, check for plumb with a level in two directions, and brace temporarily. Pour concrete mixed to a toothpaste consistency. For end posts, create a slight outward angle or add H-braces. Allow 24–48 hours to cure fully before stringing wire.
Step 4: Install Eye Bolts and Hardware 🔩 Drill pilot holes and insert eye bolts at your marked heights. Use washers and nuts on both sides for a rock-solid hold. For wall-mounted versions, use masonry anchors or right-angle brackets bolted to star pickets driven into the ground.
Step 5: String and Tension the Wire 🧵 Run wire through eye bolts, using thimbles to protect loops. Secure ends with clamps. Install turnbuckles on each line for easy future adjustments. Pull wire hand-tight first, then use turnbuckles to achieve firm tension without over-stretching. High-tensile wire stretches very little over time compared to soft hobby wire.
Step 6: Final Checks ✅ Ensure all wires are level and evenly tensioned. The structure should feel rock-solid when pushed. Add safety caps on metal posts if using.
This classic post-and-wire setup is versatile for horizontal cordons, fans, or Belgian fences. Total cost for a solid 20-ft system typically runs $150–$350 depending on material quality — far cheaper than repeated replacements from weak setups.

Professional Installation Guide: Getting It Right the First Time 🔧
Freestanding or wall-mounted? Both work beautifully when done correctly.
Wall-Mounted Tips: Maintain a 6–8 inch gap from the wall for airflow. Use stainless steel cable or coated wire in humid climates to resist corrosion. For brick or concrete, heavy-duty masonry anchors prevent pull-out under load.
Freestanding Anchoring Secrets: End posts bear the most stress. Use angled brace posts or buried screw anchors. In high-wind zones, add a top horizontal rail (2×4 or EMT conduit) for extra rigidity.
Tensioning Pro Technique: Tighten wires in spring before bud break and check again in fall. Proper tension supports fruit without girdling branches.
Common Pitfalls to Avoid: Shallow post depth (causes leaning), cheap soft wire (stretches and sags), and building the trellis after planting (much harder to train the tree).

Training Your Tree on the New Support System 🌱
Always build the support structures for espalier trees before planting. Choose a dwarf or semi-dwarf rootstock for best control.
Year 1 Basics:
- Plant the tree centered between posts, slightly in front of the lowest wire.
- Prune the central leader just above the first wire.
- Select two strong laterals and gently tie them horizontally to the wire using soft nursery tape or twine (loosen as the branch thickens).
- Remove competing upright shoots.
Ongoing Training:
- During the growing season, tie new growth to wires as it reaches 6–8 inches.
- Summer prune side shoots to 3–4 leaves to encourage fruiting spurs.
- Winter prune to maintain shape and remove unwanted growth.
Patience pays off — a well-trained espalier often produces fruit by year 3 and reaches full productivity by year 5–7.

Long-Term Maintenance and Care for Your Support System 🌦️
A quality trellis needs only annual attention to last decades.
Seasonal Checklist:
- Spring: Inspect tension, tighten turnbuckles, check for rust or rot.
- Summer: Monitor ties — loosen any that bite into bark. Remove vigorous water sprouts.
- Fall: Clear debris, apply rust preventative to hardware if needed.
- Winter: Light structural pruning while dormant.
Replace any stretched wire or leaning posts immediately. In coastal areas, rinse salt spray off metal parts yearly.
Sustainable Tip: Choose naturally rot-resistant cedar and recyclable galvanized wire for an eco-friendly setup.
Common Mistakes to Avoid When Setting Up Espalier Supports ❌
Even experienced gardeners slip up. Here are the top pitfalls I’ve seen (and fixed) over the years:
- Building after planting — Makes training awkward and risks damaging roots.
- Using shallow post depth — Leads to leaning or toppling under fruit/wind load.
- Cheap hobby wire instead of high-tensile — Sags quickly under weight.
- Over-tightening ties — Girdles branches and restricts growth.
- Ignoring site wind patterns — Results in twisted structures.
- No gap from walls — Promotes fungal issues from trapped moisture.
- Forgetting to loosen ties annually — Causes bark damage as branches thicken.
- Underestimating fruit load — A mature espalier can carry hundreds of pounds — build accordingly.
Avoid these and your system will thrive. Many gardeners rescue failing espaliers simply by reinforcing with deeper posts and stronger wire.
Real-Life Success Stories and Case Studies 🌍🍏
Nothing builds confidence like seeing real results. Over my years working with home gardeners and small-scale orchardists, I’ve witnessed dozens of transformations thanks to properly designed support structures for espalier trees.
Urban Backyard Makeover (Dhaka-Inspired Compact Garden Example) Sarah, a gardener in a small urban plot similar to many space-limited homes, installed a 16-ft wall-mounted wire system against her south-facing boundary wall. Using cedar posts set 30 inches deep and 12-gauge high-tensile wire, she trained two apple and one pear tree into a classic horizontal cordon. Within four years, her once-bare wall produced over 80 pounds of fruit annually while creating a beautiful living screen that provided privacy and shade. The key? Building the support first and maintaining proper tension — her system shows zero sag even after heavy monsoon rains.
Family Orchard Transformation In a larger backyard setting, Rajesh built a freestanding post-and-wire trellis spanning 28 feet with H-brace anchoring. He chose semi-dwarf apple varieties and a Belgian fence pattern. After six seasons, the structure supports a heavy crop without any leaning posts or broken wires. His children now harvest fruit at eye level, making gardening a family joy rather than a chore. Yield increased dramatically compared to his previous free-standing trees, thanks to better light exposure and easier pest management.
Rescue Story: From Failure to Success One client’s initial attempt with cheap garden wire and shallow posts failed within two years — branches sagged, wires stretched, and the tree looked stressed. After reinforcing with deeper concrete footings, high-tensile wire, and turnbuckles, the same trees recovered beautifully and have thrived for 12 years. This highlights why investing in quality espalier trellis materials pays off long-term.
These stories prove that with the right planning and sturdy support, espalier trees become productive, low-maintenance garden features that last decades.
Expert Tips for Maximum Success and Longevity ✨
Here are my top 12 field-tested tips drawn from decades of hands-on experience and collaboration with master horticulturists:
- Build Before Planting — Always install your support structures for espalier trees first. It makes training far easier and prevents root disturbance.
- Choose the Right Wire Gauge — 12–14 gauge high-tensile galvanized wire handles fruit weight far better than softer alternatives.
- Tension Matters — Use turnbuckles and check tension twice yearly. Slightly loose in winter, firmer in spring.
- Leave Air Gap — Keep at least 6–8 inches between wall and tree to reduce disease risk from poor airflow.
- Use Soft Ties Initially — Flexible nursery tape or cloth strips prevent bark damage as branches grow.
- Match Pattern to Space — Horizontal cordons suit narrow walls; fan shapes work well for wider areas.
- Consider Local Climate — In windy or monsoon-prone regions, add extra bracing and deeper post settings.
- Annual Maintenance Ritual — Spend 30 minutes each spring inspecting posts, wires, and ties — it prevents major problems.
- Select Suitable Varieties — Dwarf or semi-dwarf rootstocks respond best to espalier training and stay manageable.
- Protect Hardware — Apply rust-inhibiting paint or use stainless steel in humid or coastal conditions.
- Loosen Ties Regularly — As branches thicken, adjust or replace ties to avoid girdling.
- Document Your Build — Take photos during construction — they help with future repairs and inspire others.
Follow these tips and your espalier support will become one of the most reliable features in your garden.
Quick-Reference Infographic Idea (great for sharing): “12 Pro Secrets for Espalier Trellis Success” — perfect for Pinterest and garden forums.
Frequently Asked Questions (FAQs) ❓
How much weight can a properly built wire trellis support? A well-constructed post-and-wire system with high-tensile wire and concrete-set posts can easily support 300–500+ pounds across a 20-ft span when fruiting, depending on design and anchoring.
Can I use existing fence posts for espalier support? Sometimes, but only if they are sturdy, deeply set, and spaced correctly. Most garden fences lack the strength and proper wire attachment points needed for long-term espalier success.
What’s the best wire for fruit trees in espalier? 12–14 gauge high-tensile galvanized wire is the top choice for most gardeners. It offers excellent strength, minimal stretch, and good rust resistance at a reasonable price.
How deep should posts be set for espalier trellis? End posts should be set at least 30–36 inches deep in concrete. In high-wind or heavy-fruit areas, go to 42–48 inches with additional bracing.
Do espalier supports need replacing after 10 years? Not if built with quality materials like cedar posts and high-tensile wire. Many systems last 25–40 years with annual maintenance. Replace only damaged components as needed.
What is the approximate cost to build a 20-ft espalier system? A solid DIY post-and-wire setup typically costs $150–$350, depending on whether you choose basic treated lumber or premium cedar and stainless hardware.
Is it better to mount espalier against a wall or use freestanding posts? Wall-mounted saves space and provides warmth for heat-loving fruits like peaches. Freestanding offers more flexibility and better airflow. Choose based on your garden layout and goals.
How do I prevent my wires from sagging over time? Use high-tensile wire, install turnbuckles for easy adjustment, and tension properly during installation. Check and re-tension every spring.
Can espalier trees be grown in pots with support structures? Yes, but use large containers (at least 20–25 gallons) and extra-sturdy supports since root restriction increases wind vulnerability.
What’s the ideal spacing between wires for horizontal cordon espalier? 18–24 inches apart works well for most fruit trees. Adjust slightly based on variety and desired final height.
Conclusion & Next Steps 🌟
Creating reliable support structures for espalier trees is one of the most worthwhile investments you can make in your garden. A sturdy trellis system transforms limited space into a productive, beautiful, and low-maintenance fruit garden that can provide harvests for decades.
By choosing quality materials, building carefully, installing with proper tension and anchoring, and maintaining your system annually, you’ll enjoy healthier trees, easier harvesting, and impressive yields — all while adding stunning architectural interest to your landscape.
Ready to get started? Download my free Espalier Trellis Planning Checklist (link in resources) and begin measuring your space today. Share photos of your finished support structures in the comments — I love seeing creative garden solutions!
Whether you’re training your first apple tree against a sunny wall or designing an entire espalier orchard, the principles in this guide will serve you well for years to come.
Happy gardening — may your espalier trees stand strong and your harvests be abundant! 🍎🌳


