
Imagine walking into your living room or garden only to find your once-thriving monstera or beloved citrus tree looking sad and droopy. Several stems have turned soft, brown, or even black and mushy, with a faint unpleasant odor lingering. Your heart sinks — is your plant doomed? Not at all. Trimming away rotten stems to promote new growth is one of the most effective ways to rescue struggling plants and trees, redirect their energy, and encourage vibrant, bushy new foliage. 🌿
As a plant care specialist with over a decade of hands-on experience reviving thousands of houseplants and outdoor trees, I’ve seen dramatic transformations when gardeners act quickly and correctly. Removing diseased or decaying stems stops the spread of rot (often linked to fungal or bacterial issues from overwatering or poor drainage), reduces stress on the remaining healthy tissue, and stimulates fresh shoots from dormant buds. This simple yet powerful technique can turn a near-death plant into a lush, thriving specimen again.
In this comprehensive guide, you’ll learn exactly how to identify rotten stems, gather the right tools, execute precise cuts, provide proper aftercare, and prevent future problems. Whether you’re dealing with a leggy pothos, a fiddle leaf fig showing signs of stem rot, or an outdoor fruit tree with damaged branches, this step-by-step approach will give you the confidence to act. By the end, you’ll understand why trimming away rotten stems to promote new growth is an essential skill for every plant parent. Let’s dive in and save those green friends! 🪴
Why Rotten Stems Happen and Why You Must Act Fast 🦠🚫
Understanding Stem Rot: Causes, Risks, and the Science Behind It
Stem rot in plants and trees is more common than many realize. It often starts from the roots (root rot progressing upward) or directly on stems due to injury, excessive moisture, or pathogens. Common culprits include overwatering that keeps soil soggy, poor drainage in pots, high humidity without airflow, mechanical damage from pets or tools, pest infestations, and contaminated soil or pruning equipment. Fungi like Pythium or Fusarium and bacteria thrive in these conditions, breaking down plant tissue into soft, discolored mush.
If left unchecked, rotten stems drain the plant’s resources. The decaying tissue continues to pull nutrients and water that could otherwise support healthy leaves and roots. Disease can spread rapidly through the vascular system, leading to wilting, yellowing leaves, stunted growth, and eventually plant death. In severe cases, what begins as one mushy stem can compromise the entire plant within weeks.
The good news? Trimming away rotten stems to promote new growth interrupts this cycle. By removing the infected parts, you eliminate the source of decay, improve airflow around remaining tissue, and redirect the plant’s energy toward healthy growth points. This process leverages the plant’s natural response to pruning — breaking apical dominance and encouraging lateral budding for bushier, stronger regrowth. Many plants recover remarkably well, often producing new shoots within 2–6 weeks under proper care.
Benefits of Trimming Away Rotten Stems
- Prevents disease spread and further energy loss
- Stimulates fresh, vigorous new growth 🌱
- Enhances overall plant vigor and aesthetics
- Reduces risk of pests attracted to decaying material
Here’s a quick “Before vs. After” comparison:
Before Trimming ❌: Wilting leaves, soft blackened stems, slow or no new growth, foul smell from rot. After Proper Trimming ✅: Healthier remaining stems, bright new foliage emerging from nodes, improved resilience, and a happier plant overall.
Acting fast is crucial — the sooner you intervene, the higher the success rate.
Identifying Rotten Stems: Signs You Need to Prune Now 🔍
Spotting Trouble Early – Visual and Tactile Signs of Rot
Early detection is your best defense. Look for these telltale signs:
- Color changes: Stems turning brown, black, or translucent instead of firm green or woody brown.
- Texture: Soft, mushy, or slimy feel when gently squeezed (healthy stems are firm and resilient).
- Odor: A sour or rotten smell emanating from the base or affected areas.
- Above-ground symptoms: Wilting or yellowing leaves directly above the damaged stem, even when soil moisture seems appropriate; stunted new growth; or leaves dropping prematurely.
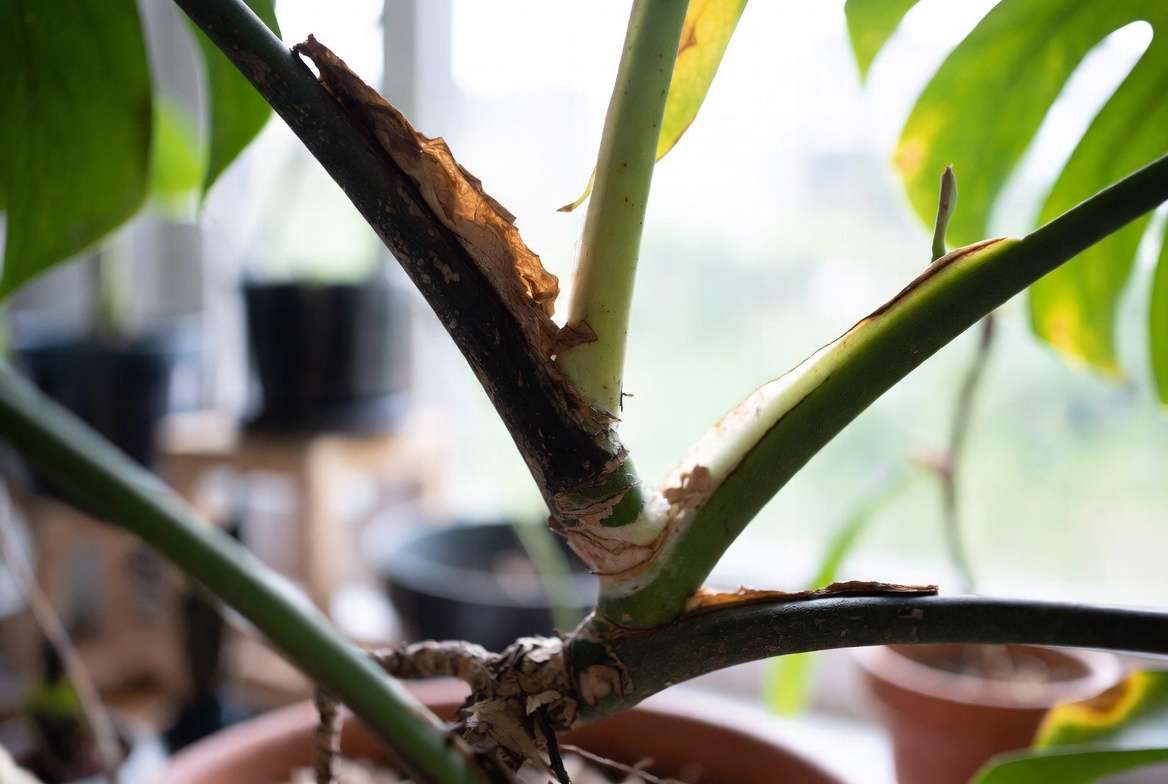
In houseplants like monstera, philodendron, or peace lilies, rot often starts at the soil line and moves upward. For outdoor trees (such as citrus, apple, or evergreens), check for cankers, sunken bark, or oozing sap around branches.
Differentiating Rot from Natural Dieback or Dormancy Not every brown stem means rot. Natural dieback (common in older leaves or seasonal dormancy) usually affects lower or oldest growth, feels dry and crispy rather than mushy, and lacks a foul odor. Dormant plants in winter may look bare but have firm stems. Always inspect by touch and smell — if it’s soft and smelly, it’s likely rot and needs immediate attention.
When to Inspect Your Plants Make it a habit to check weekly, especially after heavy watering or during humid seasons. For indoor plants, inspect during routine dusting or watering. Outdoor trees benefit from seasonal checks in spring and fall. Catching issues early can mean the difference between a quick trim and losing the whole plant.
(Pro tip: Take clear photos of suspect stems in good lighting for before-and-after tracking or sharing with fellow gardeners.)
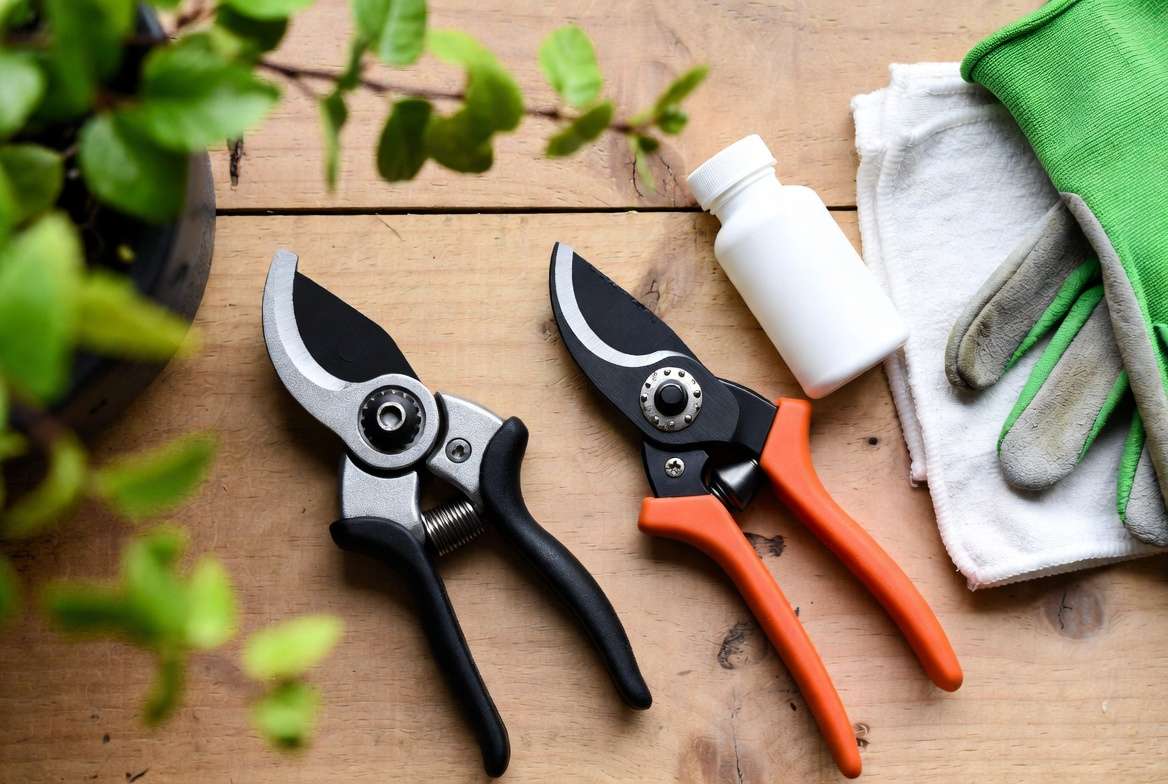
Essential Tools and Safety Tips for Clean Pruning 🛠️🧤
Gathering the Right Tools and Staying Safe
Successful trimming away rotten stems starts with proper equipment. Invest in quality tools to ensure clean cuts that heal quickly and minimize infection risk:
- Sharp bypass pruners or micro snips for thin houseplant stems
- Pruning shears or loppers for thicker branches
- Pruning saw for larger tree limbs
- Rubbing alcohol (70% isopropyl), bleach solution (10%), or disinfectant wipes for sterilizing tools
- Gardening gloves to protect hands (some plants have irritating sap)
- Optional: Fungicide powder or cinnamon as a natural wound dressing (though many experts skip sealing cuts for better air exposure)
How to Sterilize Tools Wipe blades thoroughly with alcohol or disinfectant between every cut, especially when moving between plants. This prevents spreading pathogens — a critical step for maintaining plant health across your collection. Clean tools after each session too.
Safety Precautions
- Wear gloves and eye protection if working with large trees or sap-producing plants like figs or poinsettias.
- Make cuts at a 45-degree angle to prevent water pooling on wounds.
- Never prune more than 25–30% of the plant’s foliage at once to avoid shock.
- Work on a dry day for outdoor plants to reduce infection risk.
With the right tools and hygiene, your pruning session becomes a healing ritual rather than a risky one.
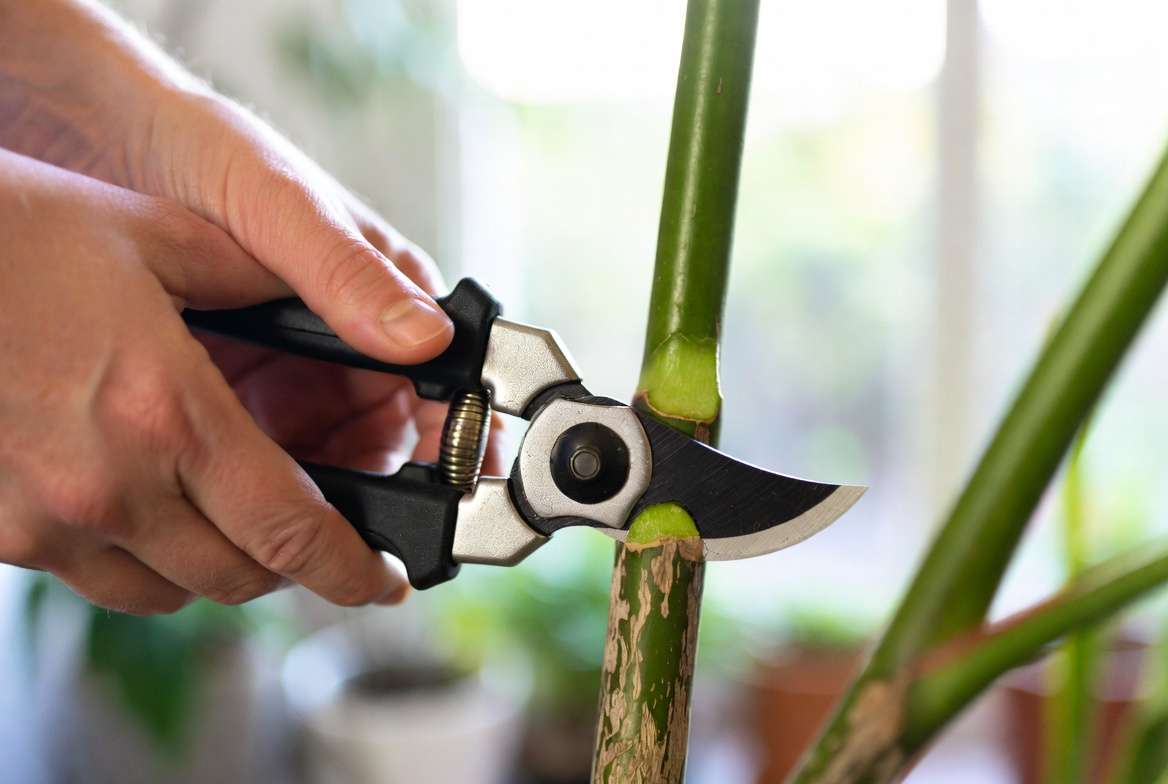
Step-by-Step Guide: How to Trim Rotten Stems Effectively ✂️🌿
Trimming Away Rotten Stems – Detailed Step-by-Step Instructions
Follow these steps carefully for the best results. The goal is to remove all infected tissue while preserving as much healthy plant as possible.
Preparation Before You Cut
- Water the plant lightly a day before if soil is very dry (this reduces stress).
- Gather sterilized tools and a clean workspace.
- Assess the plant: Identify all rotten areas and plan cuts. Rule of thumb — never remove more than one-third of the plant in one session. If rot is extensive, consider propagating healthy cuttings as backup.
Proper Cutting Technique
- Locate the highest point of visible rot.
- Cut at least ½ to 1 inch into clearly healthy tissue above the rotten section to ensure complete removal. Make a clean, angled cut just above a healthy node or outward-facing bud. This encourages new growth in the desired direction.
- For thicker branches on trees, use the three-cut method: First undercut to prevent tearing, then remove the bulk, and finally clean the stub at the branch collar (the swollen area where branch meets trunk). Avoid cutting flush to the trunk.
- Dispose of all removed material in the trash or green waste — never compost diseased parts.
Differences Between Houseplants and Outdoor Trees
- Houseplants (e.g., monstera, rubber plant, snake plant): Focus on aesthetics and propagation. Cuts can often be made anywhere healthy tissue remains. Many cuttings root easily in water or sphagnum moss.
- Outdoor Trees/Shrubs: Prioritize structure and seasonal timing. Remove crossing or damaged branches while maintaining the plant’s natural shape. For fruit trees, prune during dormancy when possible, but emergency rot removal can happen anytime.
What to Do With the Cuttings Healthy upper portions of stems can often be propagated! Let the cut end callus for a day or two, then place in water or well-draining soil mix. Many plants like pothos or philodendron root readily, giving you new babies as a bonus. 🪴
(Always work methodically and pause to sterilize tools.)
Aftercare: Helping Your Plant Recover and Thrive 💧☀️
Post-Pruning Care for Strong New Growth
Congratulations! You’ve successfully performed trimming away rotten stems to promote new growth. Now the real magic begins — helping your plant channel its energy into fresh, healthy shoots and leaves. Proper aftercare is just as important as the pruning itself. A well-cared-for plant can show signs of recovery in as little as 1–2 weeks and produce noticeable new growth within 3–6 weeks.
Immediate Aftercare Steps
- Watering adjustments: After pruning, reduce watering frequency. Allow the top 1–2 inches of soil to dry out before watering again. Overwatering is often the original cause of rot, so err on the side of underwatering during recovery. Use room-temperature water and ensure excellent drainage — never let pots sit in saucers full of water.
- Light conditions: Place the plant in bright, indirect light. Avoid harsh direct sun that can scorch freshly cut stems or stressed leaves. For outdoor trees, provide some afternoon shade if possible during the first 7–10 days.
- Temperature and humidity: Maintain stable temperatures between 65–75°F (18–24°C) for most tropical houseplants. Moderate humidity (40–60%) helps without encouraging fungal growth. Use a pebble tray or humidifier if your home is very dry.
- Avoid fertilizer shock: Skip fertilizing for at least 4–6 weeks after heavy pruning. The plant needs time to heal before processing extra nutrients. When you do resume, use a diluted, balanced liquid fertilizer (e.g., ½ strength) every 2–4 weeks during the growing season.
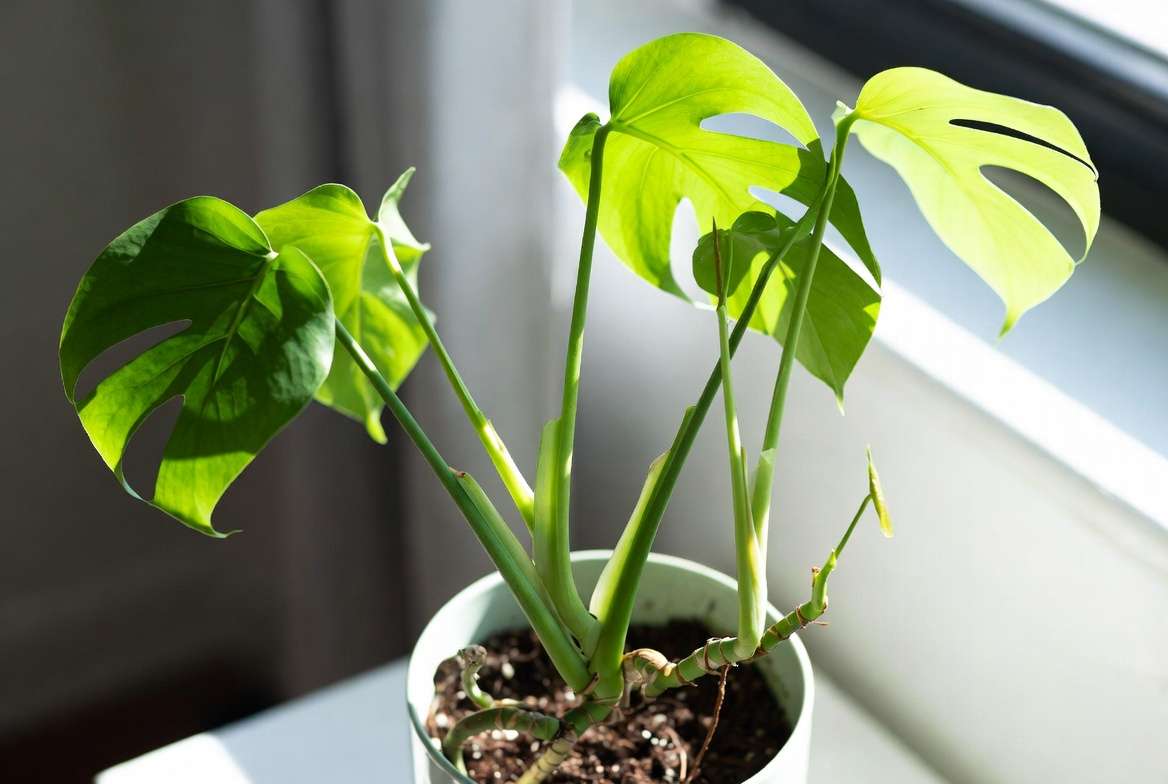
Monitoring Recovery and Encouraging Bushy Growth Watch daily for positive signs:
- Firming up of remaining stems
- New buds swelling at nodes
- Fresh green leaves unfurling
- Improved overall turgor (the plant looks perkier)
If new growth appears leggy, consider pinching the tips later to promote branching. Many plants respond to pruning by becoming fuller and more compact — exactly what most plant lovers want!
Fertilizing and Soil Tips to Boost Regeneration Once the plant stabilizes, repotting into fresh, well-draining soil can accelerate recovery. Use a high-quality mix tailored to the species (e.g., chunky aroid mix for monstera or philodendron, cactus mix for succulents). Adding perlite, orchid bark, or pumice improves aeration and prevents future waterlogging — the enemy of healthy roots and stems.
A light application of worm castings or compost tea can gently feed beneficial soil microbes that support vigorous new growth. Remember: healthy roots = healthy stems = beautiful foliage.
Common Mistakes to Avoid When Pruning Rotten Stems ❌
Pruning Pitfalls That Can Set Your Plant Back
Even experienced gardeners make mistakes. Here are the most common ones I see — and exactly how to avoid them:
- Cutting too much at once: Removing more than 25–30% of the plant in a single session can cause severe shock. If rot is widespread, prune in stages over several weeks or propagate healthy cuttings as insurance.
- Using dull or dirty tools: Blunt blades crush tissue instead of making clean cuts, slowing healing and inviting infection. Dirty tools spread pathogens from one plant to another. Always sterilize!
- Pruning at the wrong angle or location: Flat cuts allow water to sit and cause new rot. Always cut at a 45-degree angle just above a healthy node. Cutting too close to the node damages the growth point; cutting too far leaves a long stub that may die back.
- Ignoring the underlying cause: Simply trimming rotten stems without fixing overwatering, poor drainage, or pest issues means the problem will return quickly. Address root health and environmental conditions simultaneously.
- Sealing cuts unnecessarily: Many modern experts advise against using pruning paint or wax on small cuts. It can trap moisture and promote decay. Let cuts air-dry naturally for faster callusing.
- Pruning during extreme stress: Avoid heavy trimming when the plant is already suffering from heatwaves, cold drafts, or transplant shock.
Learning from these pitfalls will make your future pruning sessions far more successful and less stressful for both you and your plants.
Seasonal Timing and Plant-Specific Advice 🌸🍂
Best Time to Prune and Species-Specific Guidance
While emergency trimming away rotten stems can (and should) happen anytime you spot trouble, timing still matters for optimal recovery.
General Rules for Timing
- Growing season (spring and summer): Ideal for most houseplants. Plants are actively growing and recover faster.
- Dormant season (late fall/winter): Best for major structural pruning on outdoor trees and woody shrubs. However, remove rotten stems immediately regardless of season to prevent spread.
- Avoid pruning during extreme heat, cold snaps, or when plants are flowering heavily unless the rot threatens the entire plant.
Examples for Popular Plants
- Monstera & Philodendron: Trim rotten stems just above a node. These plants root easily — turn healthy cuttings into new plants! New leaves often emerge dramatically after pruning.
- Fiddle Leaf Fig: Be conservative. Cut above a node and provide bright indirect light. These plants can be dramatic but respond well when underlying watering issues are fixed.
- Snake Plant & ZZ Plant: Very forgiving. Remove entirely rotten leaves/stems at the base. They tolerate drier conditions and recover slowly but steadily.
- Fruit Trees (Citrus, Apple, etc.): Remove rotten or cankered branches during dormancy if possible. Use the three-cut method for larger limbs and maintain an open center for good airflow.
- Succulents & Cacti: Let cuts callus for several days before repotting. These plants prefer very dry conditions post-pruning.
- Peace Lily & Pothos: Excellent candidates for propagation. Many stems can be saved in water and turned into new plants.
Advanced Tips for Severe Cases When more than half the stems are affected, consider full rejuvenation pruning (cutting back to 2–4 inches above soil for herbaceous plants) combined with root inspection and repotting. In extreme cases, propagating healthy tips may be your best path to preserving the genetics of a beloved plant.
Prevention: Keeping Rotten Stems from Returning 🛡️
Long-Term Strategies to Maintain Healthy Plants and Trees
The best way to avoid repeated trimming away rotten stems is prevention. Consistent good habits can reduce pruning needs dramatically.
- Watering wisdom: Water only when the top inch or two of soil is dry. Use moisture meters or the finger test for accuracy.
- Excellent drainage: Always use pots with drainage holes and well-aerated soil mixes. Elevate pots on feet or saucers with pebbles.
- Good airflow: Space plants appropriately and use fans in humid environments. Avoid crowding.
- Clean practices: Sterilize tools regularly and quarantine new plants for 2–4 weeks.
- Balanced environment: Match light, humidity, and temperature to each species’ needs.
- Routine maintenance: Inspect plants weekly, dust leaves for better photosynthesis, and refresh soil every 1–2 years.
In my experience, gardeners who follow these practices see up to 80% fewer rot issues over time. Prevention truly is the ultimate plant care skill.
Real-Life Success Stories and Case Studies 📖
Before-and-After Transformations
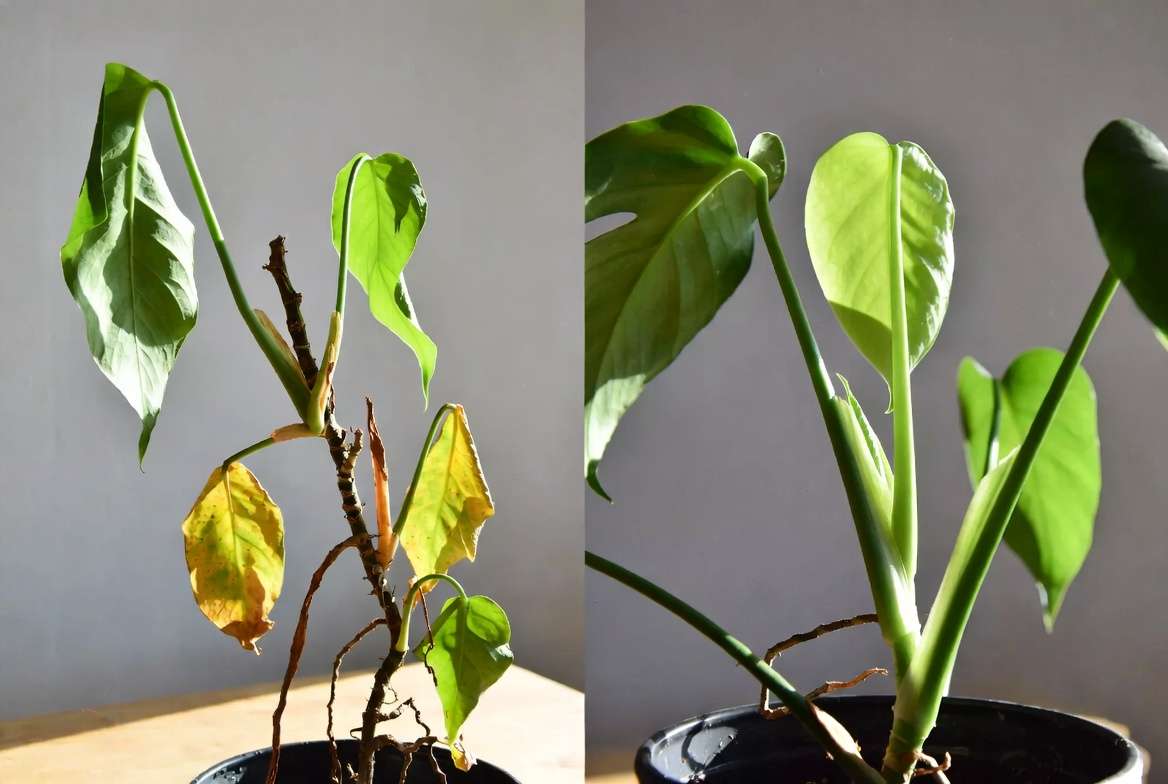
Case 1: “Sophie’s Monstera Rescue” Sophie’s large monstera had several black, mushy stems from overwatering during a vacation. After identifying the rot, sterilizing tools, and trimming away rotten stems to promote new growth (removing about 25% of the plant), she adjusted her watering schedule and moved it to brighter indirect light. Within 5 weeks, seven new leaves had unfurled, and the plant looked fuller than ever.
Case 2: “Citrus Tree Recovery” An outdoor lemon tree developed stem cankers after a wet winter. Prompt removal of affected branches using proper collar cuts, followed by improved drainage around the root zone and copper-based spray, stopped the spread. The tree produced abundant blossoms and fruit the following season.
These real recoveries show that with knowledge and timely action, most plants can bounce back beautifully.
Frequently Asked Questions (FAQs) ❓
FAQs About Trimming Rotten Stems
Q: Can a plant survive if many stems are rotten? A: Yes, in most cases! As long as some healthy tissue and roots remain, trimming away rotten stems and providing excellent aftercare often leads to full recovery. Severe cases may require propagation.
Q: Should I seal pruning cuts with wax or paint? A: Generally no for small houseplant cuts. Allowing natural callusing is healthier. For large tree branches, some gardeners use tree wound dressing, but many experts now recommend leaving them open.
Q: How soon will new growth appear after pruning? A: Signs of recovery can show in 1–3 weeks. New leaves or shoots typically emerge within 3–8 weeks, depending on species, season, and care.
Q: Is it okay to prune during flowering or fruiting? A: For emergency rot removal, yes. Otherwise, it’s better to wait until after blooming to avoid reducing flowers or fruit.
Q: What if the rot is at the base near the roots? A: Inspect and trim roots if necessary during repotting. Remove all mushy roots, treat with hydrogen peroxide if needed, and repot in fresh sterile mix. Severe root rot may require more aggressive measures.
Q: Can I use the cuttings for propagation? A: Absolutely! Many healthy stem tips root beautifully in water or soil, giving you bonus plants.
Conclusion: Grow Stronger, Greener Plants Today 🌟
Trimming away rotten stems to promote new growth is more than a rescue technique — it’s an act of thoughtful care that strengthens your bond with your plants and trees. By understanding the causes, acting quickly with proper technique, and following through with excellent aftercare and prevention, you can transform struggling plants into thriving, beautiful additions to your home or garden.
Remember: every healthy leaf and new shoot that emerges is proof of your growing expertise. Don’t fear the scissors — embrace them as a tool for renewal. This week, take a close look at your plants. If you spot any soft or discolored stems, you now have the knowledge to help them recover and flourish.
I’d love to hear your pruning success stories in the comments! Which plant did you rescue? Share your before-and-after photos or questions below. For more expert plant care guides, subscribe to our newsletter and explore related articles on propagation, soil mixes, and seasonal tree care.
Happy gardening — may your plants grow stronger and greener every day! 🌱🪴✨


