
Ever stumbled across a piece of wood so breathtaking it looks like a work of art? That’s the magic of walnut tree burl—nature’s masterpiece with swirling grains and rich hues that turn woodworking projects into showstoppers! 😍 Whether you’re a beginner dreaming of crafting a unique bowl or a seasoned woodworker struggling to source and handle this rare gem, the process can feel daunting. Where do you find walnut tree burl? How do you harvest and transform it without ruining its beauty? This Ultimate Guide to Harvesting and Using Walnut Tree Burl for Stunning Woodworking Projects answers it all, with beginner-friendly steps to unlock stunning creations. Keep reading to solve your burl challenges and craft with confidence! 🌟
🥰 What is Walnut Tree Burl and Why is it Special? 🥰
Have you ever seen wood that looks like it’s swirling with stories? That’s walnut tree burl! This unique wood is a favorite among woodworkers, and it’s easy to see why. Let’s break down what makes walnut tree burl so special and why it’s perfect for your next project. 🌟
🌳 What is Walnut Tree Burl? 🌳
A burl is an unusual growth on a walnut tree, often caused by stress, injury, or disease. Unlike regular wood, burls form round, knobby shapes with wild, swirling grain patterns. Think of it as nature’s way of creating a one-of-a-kind masterpiece! 😍
✨ Why is it So Special? ✨
Walnut tree burl stands out for its stunning looks and versatility: 🪵
- Unique Patterns: Each burl has a distinct, wavy grain that makes every project a work of art. 🎨
- Rich Colors: Expect deep browns, golds, and even hints of red that pop when polished. 🌈
- Durability: Burls are dense and strong, ideal for long-lasting creations. 💪
- Rarity: Burls are hard to find, making them a premium choice for woodworkers. 💎
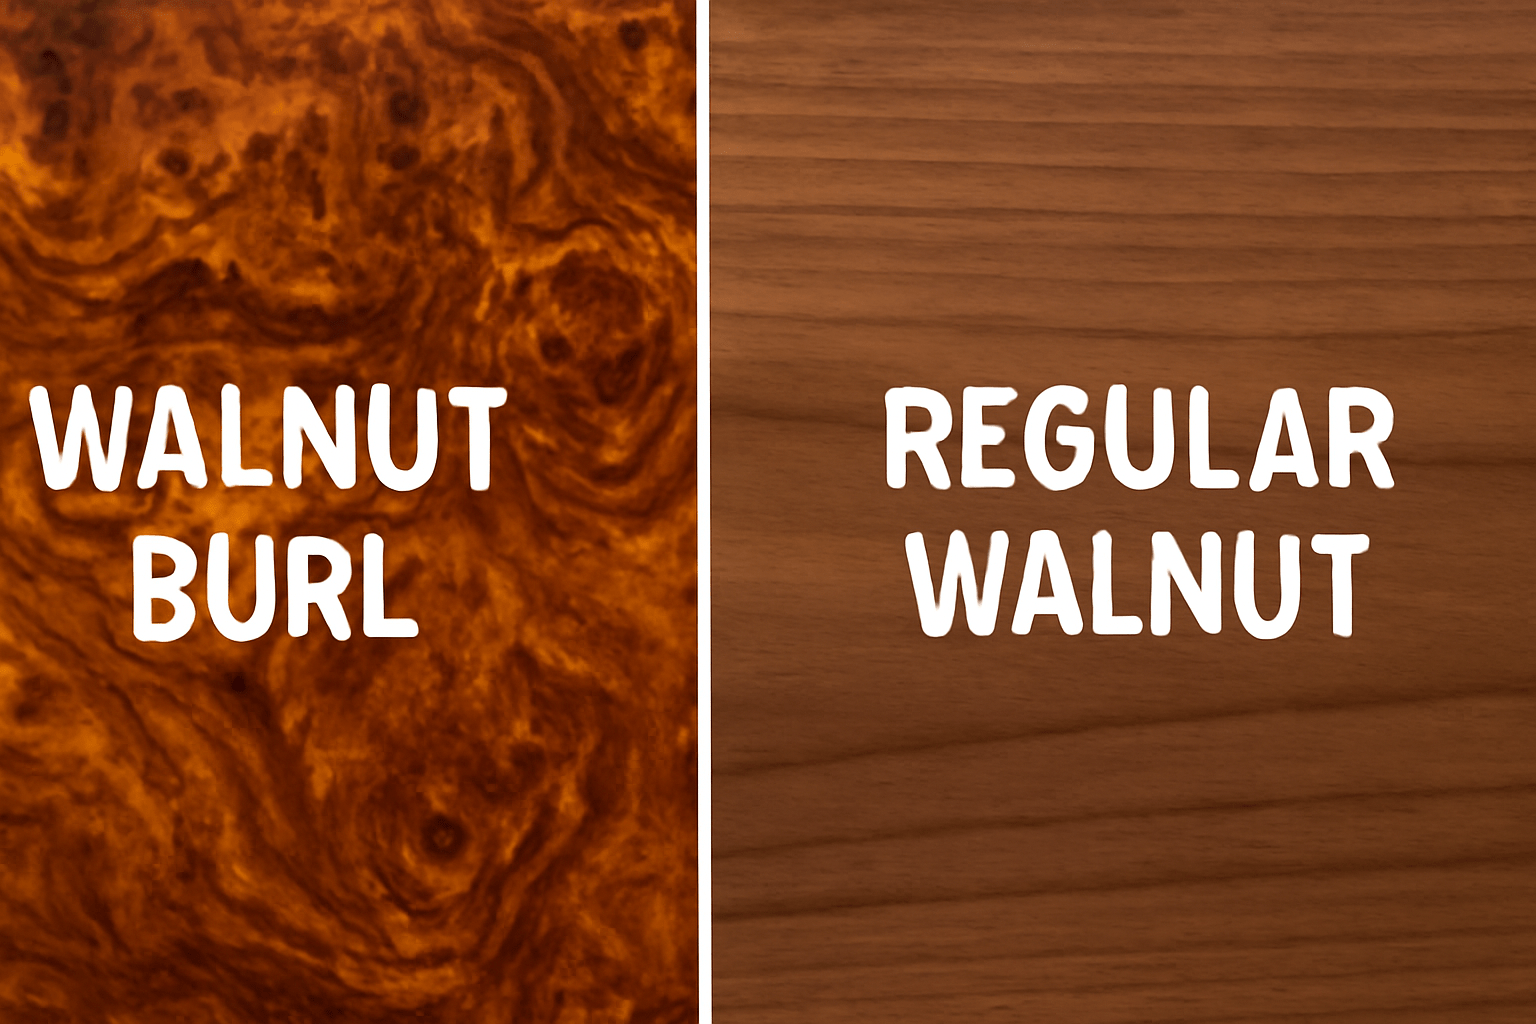
🪵 How Does it Compare to Regular Walnut Wood? 🪵
Regular walnut wood is beautiful, but burls take it to another level. While standard walnut has straight grains and a uniform look, burls are wild and unpredictable. This makes them pricier but perfect for statement pieces like: 🌟
- Furniture (tables, chairs) 🪑
- Decorative bowls or vases 🏺
- Knife handles or pens 🖋️
- Veneers for a luxurious finish ✨
😊 Why Should You Care? 😊
Whether you’re a beginner or a pro, walnut tree burl offers a chance to create something truly unique. Its beauty forgives small mistakes, making it great for first-timers. Plus, working with burl can boost your confidence and inspire your creativity! Ready to dive into this woodworker’s treasure? Let’s keep going! 🚀
🌟 Where to Find and Source Walnut Tree Burl 🌟
Wondering where to get your hands on the stunning walnut tree burl for your woodworking projects? 😊 Sourcing this rare wood can feel tricky, especially for beginners, but it’s easier than you think with the right tips! This section will guide you through finding high-quality burl ethically and legally, solving the common pain point of tracking down this woodworker’s gem. Let’s dive in! 🚀

🌳 Finding Walnut Tree Burl in Nature 🌳
Walnut tree burls grow naturally on black walnut trees (Juglans nigra), often in forests, orchards, or even backyards. Here’s how to spot them: 🔎
- Look for Knobby Growths: Burls appear as round, bulging masses on trunks or branches. 🌲
- Check Local Areas: Explore rural regions, walnut orchards, or private land (with permission). 🌾
- Partner with Arborists: Tree removal services often encounter burls during their work—reach out to them! 🤝
Pro Tip: Always ask for landowner permission before inspecting or harvesting burls to stay ethical and legal. 🙌
⚖️ Legal and Ethical Considerations ⚖️
Harvesting walnut tree burl requires care to avoid trouble: 📜
- Check Local Laws: Some areas protect walnut trees or restrict harvesting. Research regulations in your region. 📋
- Avoid Protected Lands: National parks or conservation areas often prohibit wood collection. 🚫
- Respect the Tree: Only harvest if it won’t harm the tree’s health, or choose fallen burls when possible. 🌱
Actionable Tip: Contact your local forestry office or extension service for guidance on legal harvesting. 📞
🛒 Buying Walnut Tree Burl 🛒
If harvesting isn’t an option, buying burl is a great choice! Here’s where to look: 🛍️
- Specialty Wood Suppliers: Retailers like Rockler or Woodcraft often stock burls. 🪚
- Online Marketplaces: Etsy, eBay, or dedicated sites like BurlWoodOnline.com offer a wide selection. 💻
- Local Sawmills: Many mills process walnut burls and sell directly to woodworkers. 🏭
- Woodworking Forums: Join communities like LumberJocks or Reddit’s r/woodworking to find trusted sellers. 🌐
🔍 How to Choose High-Quality Burl 🔍
Not all burls are created equal! Here’s what to check when sourcing: 👀
- Inspect for Cracks: Avoid burls with deep splits that could worsen during drying. 🚫
- Check for Voids or Bugs: Small voids are okay, but insect damage can weaken the wood. 🐛
- Prioritize Stabilized Burl: For beginners, stabilized (resin-treated) burls are easier to work with. ✨
- Size Matters: Choose a burl size that matches your project (e.g., small for pens, larger for tables). 📏
Beginner Tip: Ask sellers for photos or details about the burl’s condition to avoid surprises. 📷
🤝 Building Your Sourcing Network 🤝
Finding walnut tree burl gets easier with connections: 🌟
- Join Local Woodworking Groups: Attend meetups or clubs to swap sourcing tips. 🗣️
- Follow Social Media: Instagram or Facebook woodworking pages often share supplier recommendations. 📱
- Save Contacts: Keep a list of reliable arborists, mills, or sellers for future projects. 📋
With these strategies, you’ll be ready to source top-notch walnut tree burl without stress! Next, let’s explore how to harvest it safely. 🌿
🌳 How to Safely Harvest Walnut Tree Burl 🌳
Ready to harvest your own walnut tree burl? 😊 For beginners, cutting a burl from a tree can seem intimidating, but with the right steps and safety measures, it’s totally doable! This section provides a clear, beginner-friendly guide to safely harvesting walnut tree burl while protecting the tree and yourself. Let’s solve the challenge of getting that beautiful burl into your workshop! 🚀
🛠️ Tools You’ll Need 🛠️
Before you start, gather these essentials for a safe and smooth harvest: 🔧
- Chainsaw or Pruning Saw: For cutting larger burls; a pruning saw works for smaller ones. 🪚
- Chisels and Mallet: To refine cuts or separate burl from the tree. 🛠️
- Protective Gear: Safety goggles, gloves, and sturdy boots to prevent injuries. 🥽
- Pruning Sealant: To protect the tree after cutting. 🌱
- First-Aid Kit: Always have one nearby for emergencies. 🚑
Beginner Tip: If you’re new to chainsaws, practice on regular branches first to build confidence. 🪚
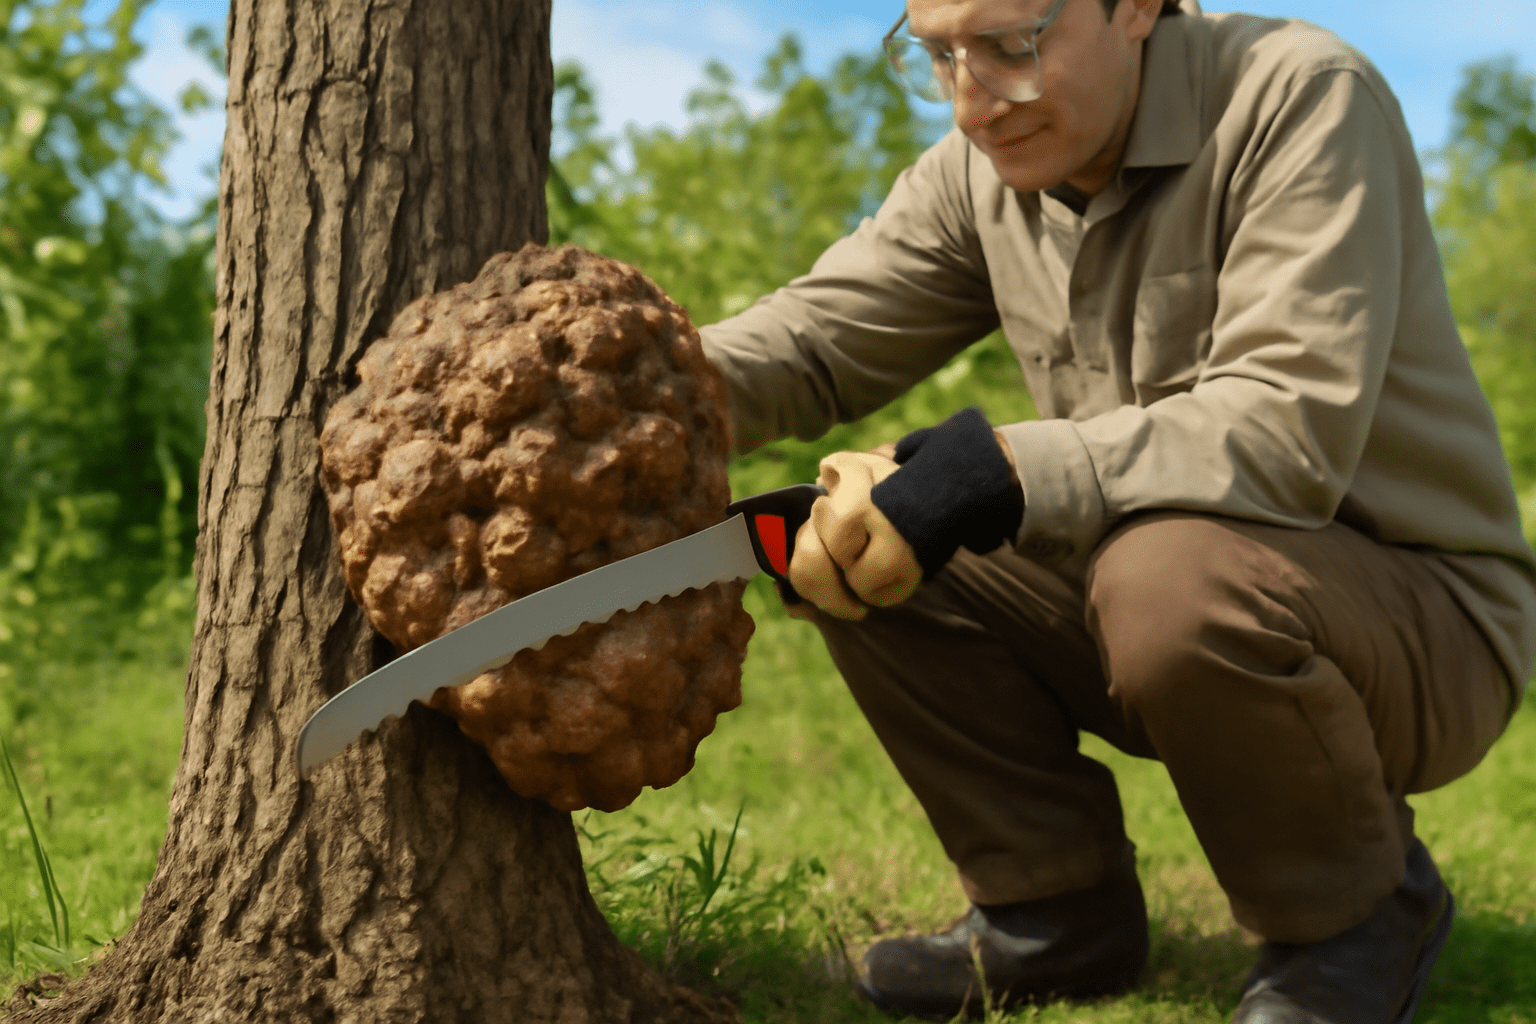
🌿 Step-by-Step Harvesting Guide 🌿
Follow these steps to safely remove walnut tree burl without harming yourself or the tree: 📋
- Identify a Healthy Burl: Look for a firm, knobby growth on the trunk or branches. Avoid harvesting if the tree looks unhealthy or stressed. 🔎
- Plan Your Cut: Mark a cutting line around the burl, leaving a small margin (1-2 inches) to avoid damaging the tree’s core. ✏️
- Cut Carefully: Use a chainsaw or pruning saw to remove the burl. Work slowly to maintain control and preserve the burl’s shape. 🪚
- Clean the Edge: Smooth the cut area on the tree with a chisel to reduce stress and promote healing. 🛠️
- Seal the Wound: Apply pruning sealant to the tree’s cut surface to prevent infection or pests. 🌳
⚠️ Safety First! ⚠️
Harvesting can be risky, so prioritize safety: 🛡️
- Never Work Alone: Have a friend nearby in case of accidents. 🤝
- Wear Protective Gear: Goggles and gloves protect against flying debris and sharp tools. 🥽
- Check Your Tools: Ensure blades are sharp to avoid slips or uneven cuts. 🔧
- Assess Tree Stability: Avoid harvesting from unstable trees that could fall or drop branches. 🌲
Pro Tip: If you’re unsure about tree health or safety, consult a professional arborist before cutting. 📞
🌍 Ethical Harvesting Tips 🌍
Harvesting walnut tree burl responsibly ensures trees stay healthy and ecosystems thrive: 🌿
- Minimize Tree Damage: Only take what you need and avoid over-cutting. ✂️
- Get Permission: Always obtain landowner approval before harvesting on private property. 📜
- Consider Timing: Harvest in late fall or winter when trees are dormant to reduce stress. ❄️
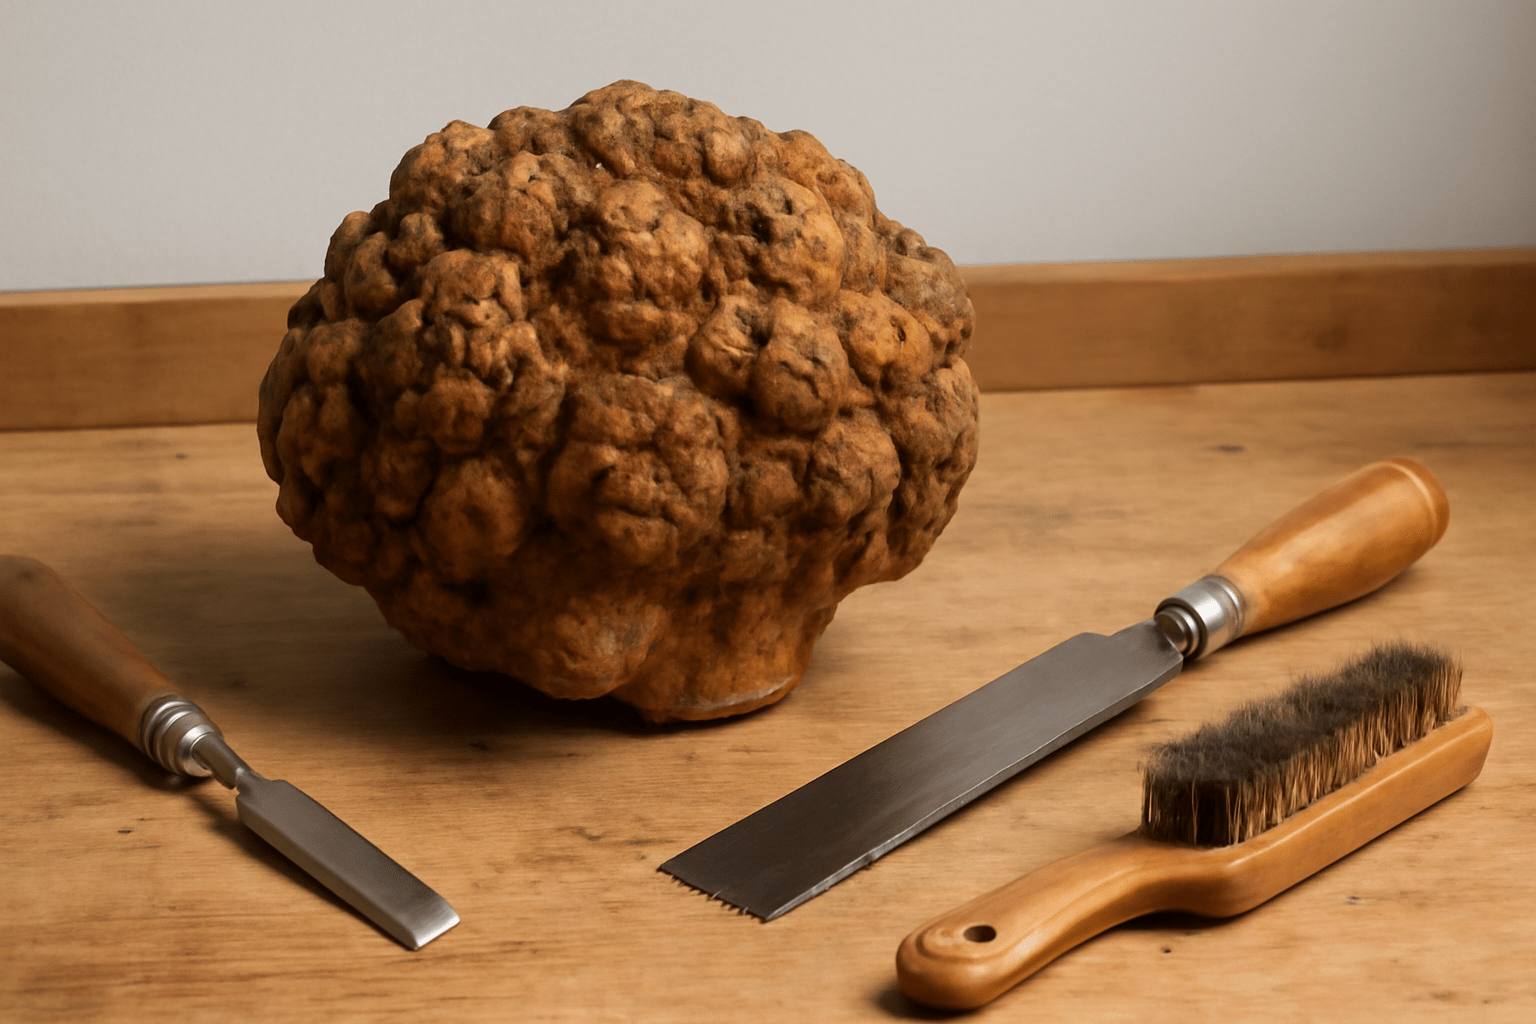
🪵 What to Do Post-Harvest 🪵
Once you’ve got your burl: ✨
- Clean It: Remove loose bark or dirt with a wire brush. 🧹
- Store Properly: Keep it in a cool, dry place to prevent mold while preparing for drying. 🏠
- Inspect for Quality: Check for cracks or damage that might affect your project. 🔍
With these steps, you’ll safely harvest walnut tree burl and be ready to transform it into stunning creations! Next, let’s dive into preparing your burl for woodworking. ✨
🪚 Preparing Walnut Tree Burl for Woodworking 🪚
You’ve got your walnut tree burl—congratulations! 😊 Now, how do you turn that raw, knobby treasure into workable wood for your next project? Preparing burl can feel tricky for beginners, but with the right steps, it’s straightforward and fun. This section breaks down cleaning, drying, stabilizing, and cutting walnut tree burl to ensure stunning results without common mistakes. Let’s get your burl ready to shine! ✨
🧹 Step 1: Cleaning Your Burl 🧹
Before anything else, clean your burl to remove debris: 🧽
- Remove Bark and Dirt: Use a wire brush or pressure washer to gently scrub off loose bark, dirt, or moss. 🪣
- Check for Damage: Inspect for cracks, insect holes, or soft spots that could affect quality. 🧐
- Trim Excess: Use a chisel or saw to remove any unwanted protrusions, keeping the burl’s unique shape intact. ✂️
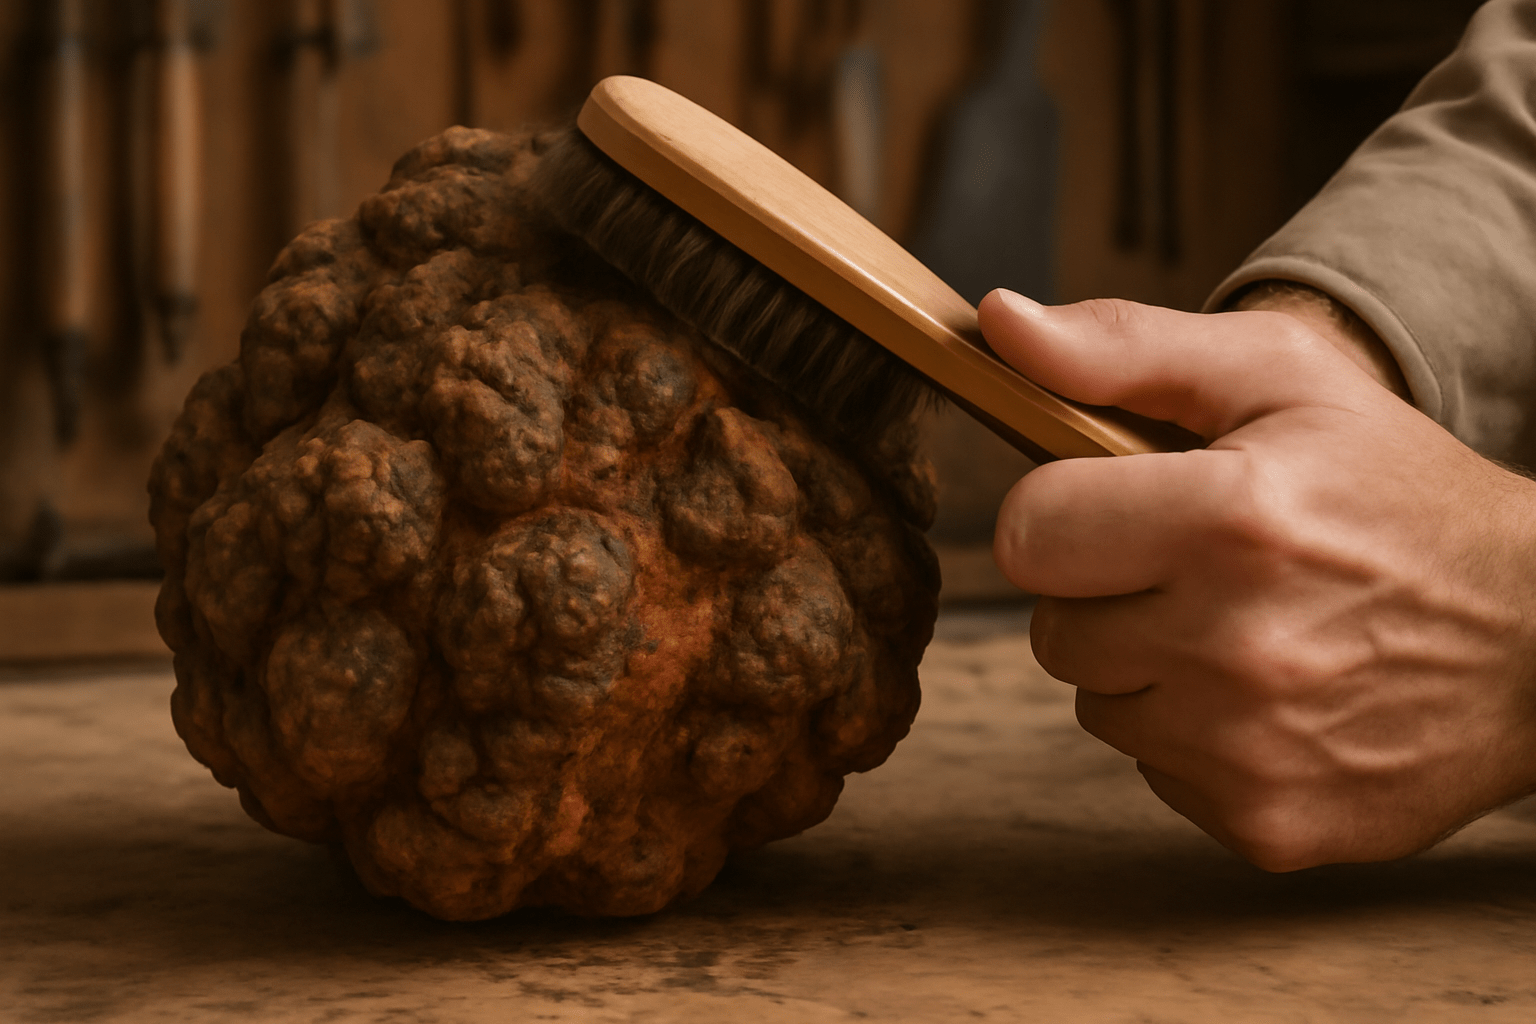
Beginner Tip: Wear gloves to protect your hands from sharp edges or splinters while cleaning. 🧤
🌬️ Step 2: Drying the Burl Properly 🌬️
Drying is critical to prevent cracking and ensure the burl is workable: 🌞
- Air-Drying: Place the burl in a cool, shaded, well-ventilated area for 6-12 months. Cover with a tarp to protect from rain. ☔
- Kiln-Drying: For faster results, use a kiln at low heat (100-120°F) to dry the burl evenly over weeks. 🔥
- Monitor Moisture: Use a moisture meter to aim for 6-8% moisture content before woodworking. 📊
- Seal the Ends: Apply wax or end-grain sealer to slow drying and reduce splitting. 🕯️

Pro Tip: Check your burl monthly for cracks. If small splits appear, seal them with epoxy to prevent worsening. 🔧
🧪 Step 3: Stabilizing the Burl (Optional but Helpful) 🧪
Stabilizing makes porous or soft burls stronger and easier to work with, especially for beginners: 🛠️
- What is Stabilizing? Soaking the burl in resin under a vacuum to fill voids and harden the wood. 🧴
- How to Do It:
- Place the burl in a vacuum chamber with stabilizing resin (e.g., Cactus Juice). 🍶
- Apply a vacuum for 30-60 minutes to draw resin into the wood. 💨
- Bake at 190°F for 1-2 hours to cure the resin. 🍞
- Why Bother? Stabilized burls are less likely to crack and easier to cut or turn. 💪

Beginner Tip: If you’re new, buy pre-stabilized burl to skip this step and jump straight to crafting. 🛒
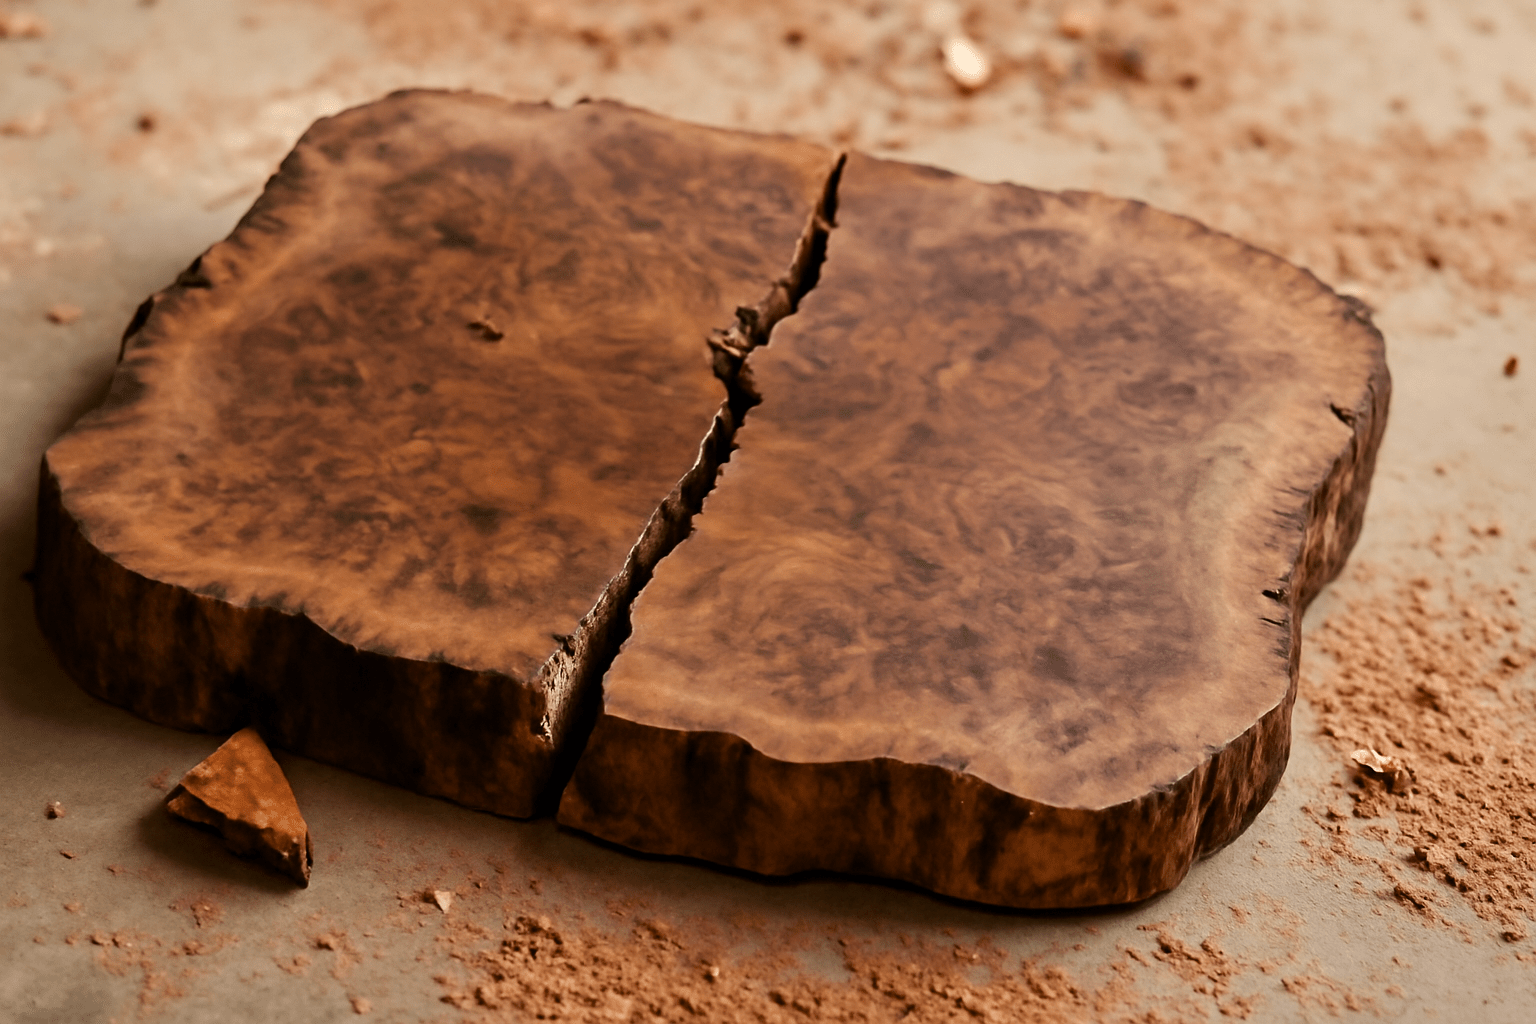
✂️ Step 4: Cutting the Burl into Usable Pieces ✂️
Now, shape your burl for your project: 🔨
- Tools Needed: Bandsaw or chainsaw for larger cuts; a table saw for precise slabs. 🪚
- Plan Your Cuts: Decide if you want slabs (for tables), blocks (for bowls), or smaller pieces (for pens). 📏
- Work Slowly: Use a steady hand to preserve the burl’s unique grain patterns. 🖋️
- Smooth Edges: Sand rough cuts lightly to prepare for woodworking. 🧳
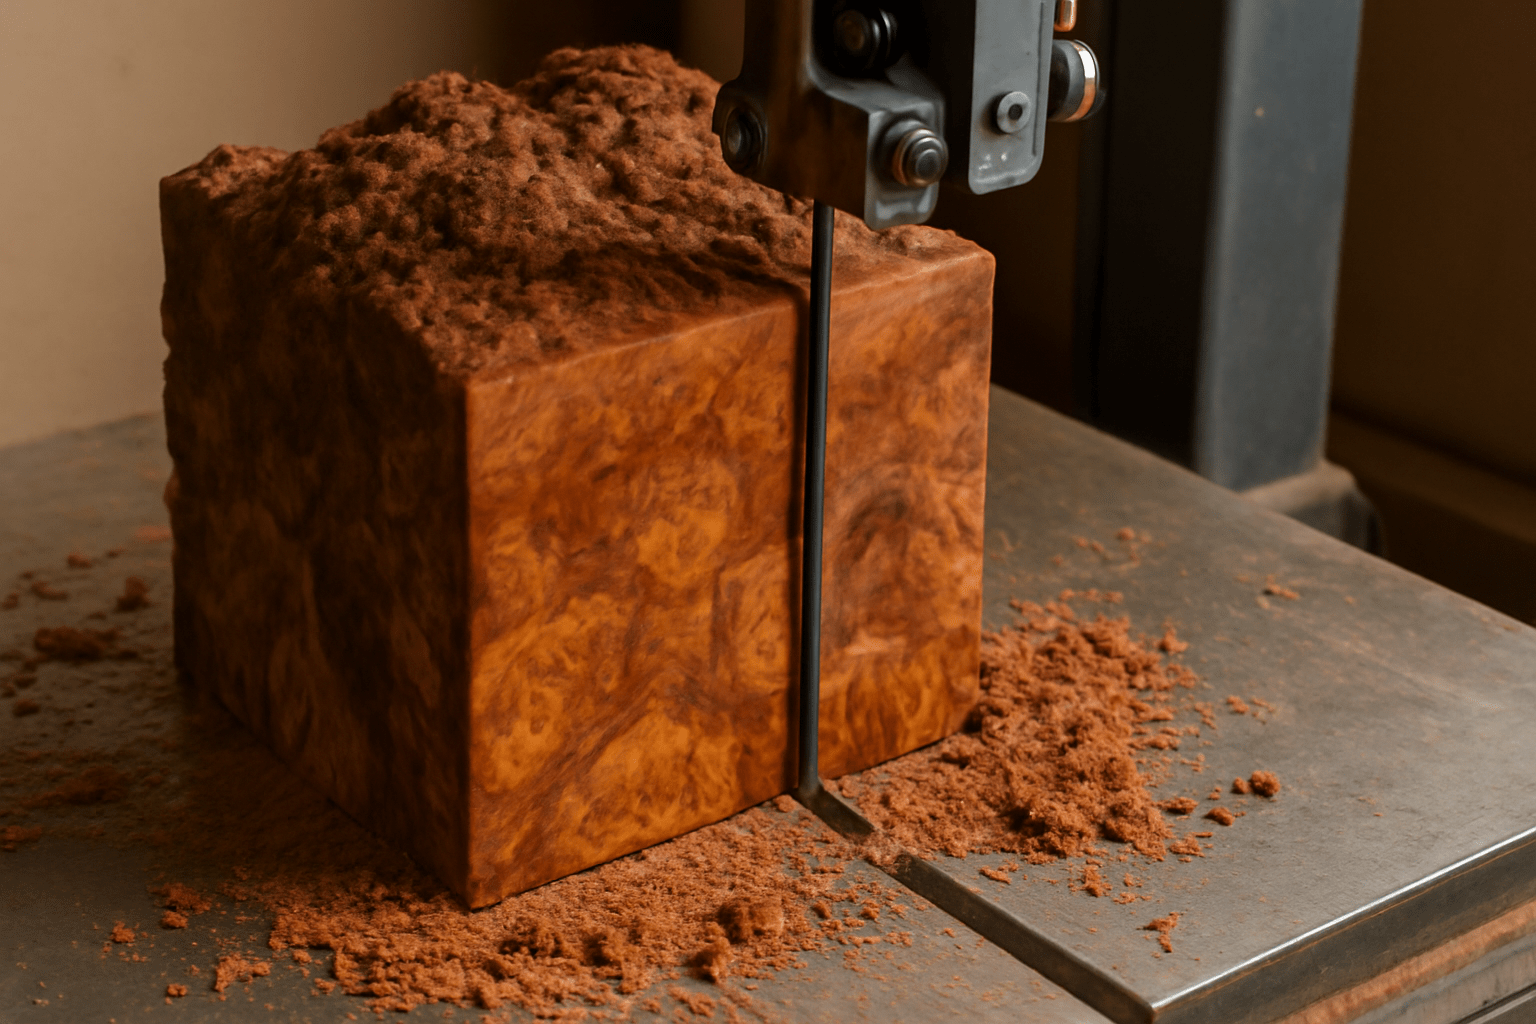
Actionable Tip: Sketch your project on paper first to plan cuts and maximize the burl’s beauty. 📝
🚫 Avoiding Common Mistakes 🚫
Beginners often face these pitfalls—here’s how to dodge them: ⚠️
- Rushing Drying: Fast drying causes cracks. Be patient or use a kiln. 🕰️
- Skipping Inspection: Always check for hidden voids or weak spots before cutting. 🔍
- Over-Cutting: Cut conservatively to keep as much of the burl’s pattern as possible. ✂️
With your walnut tree burl cleaned, dried, stabilized, and cut, you’re ready to craft something amazing! Next, let’s explore woodworking techniques to bring your burl to life. 🌟
🛠️ Woodworking Techniques for Walnut Tree Burl 🛠️
Your walnut tree burl is prepped and ready—now it’s time to turn it into a stunning masterpiece! 😊 Working with burl can feel daunting for beginners due to its unique grain and density, but with the right techniques, you’ll create gorgeous projects like bowls, pens, or furniture. This section shares practical, beginner-friendly woodworking methods to highlight the burl’s beauty while avoiding common pitfalls. Let’s craft something amazing! ✨
🪚 Essential Tools for Working with Burl 🪚
Before you start, gather these tools to make your work easier: 🧰
- Lathe: Perfect for turning bowls, pens, or rounded objects. 🌀
- Router: Great for inlays or shaping edges. 🔨
- Sandpaper (Various Grits): Use 80-400 grit for smoothing and 600-2000 for polishing. 🏖️
- Chisels and Gouges: For detailed carving and shaping. 🪓
- Epoxy and Fillers: To fill voids or cracks for a flawless finish. 💧
Beginner Tip: Start with sharp, high-quality tools to prevent tear-out and ensure clean cuts. 🔪
🌟 Key Woodworking Techniques for Burl 🌟
Here’s how to bring out the best in your walnut tree burl: 🌰
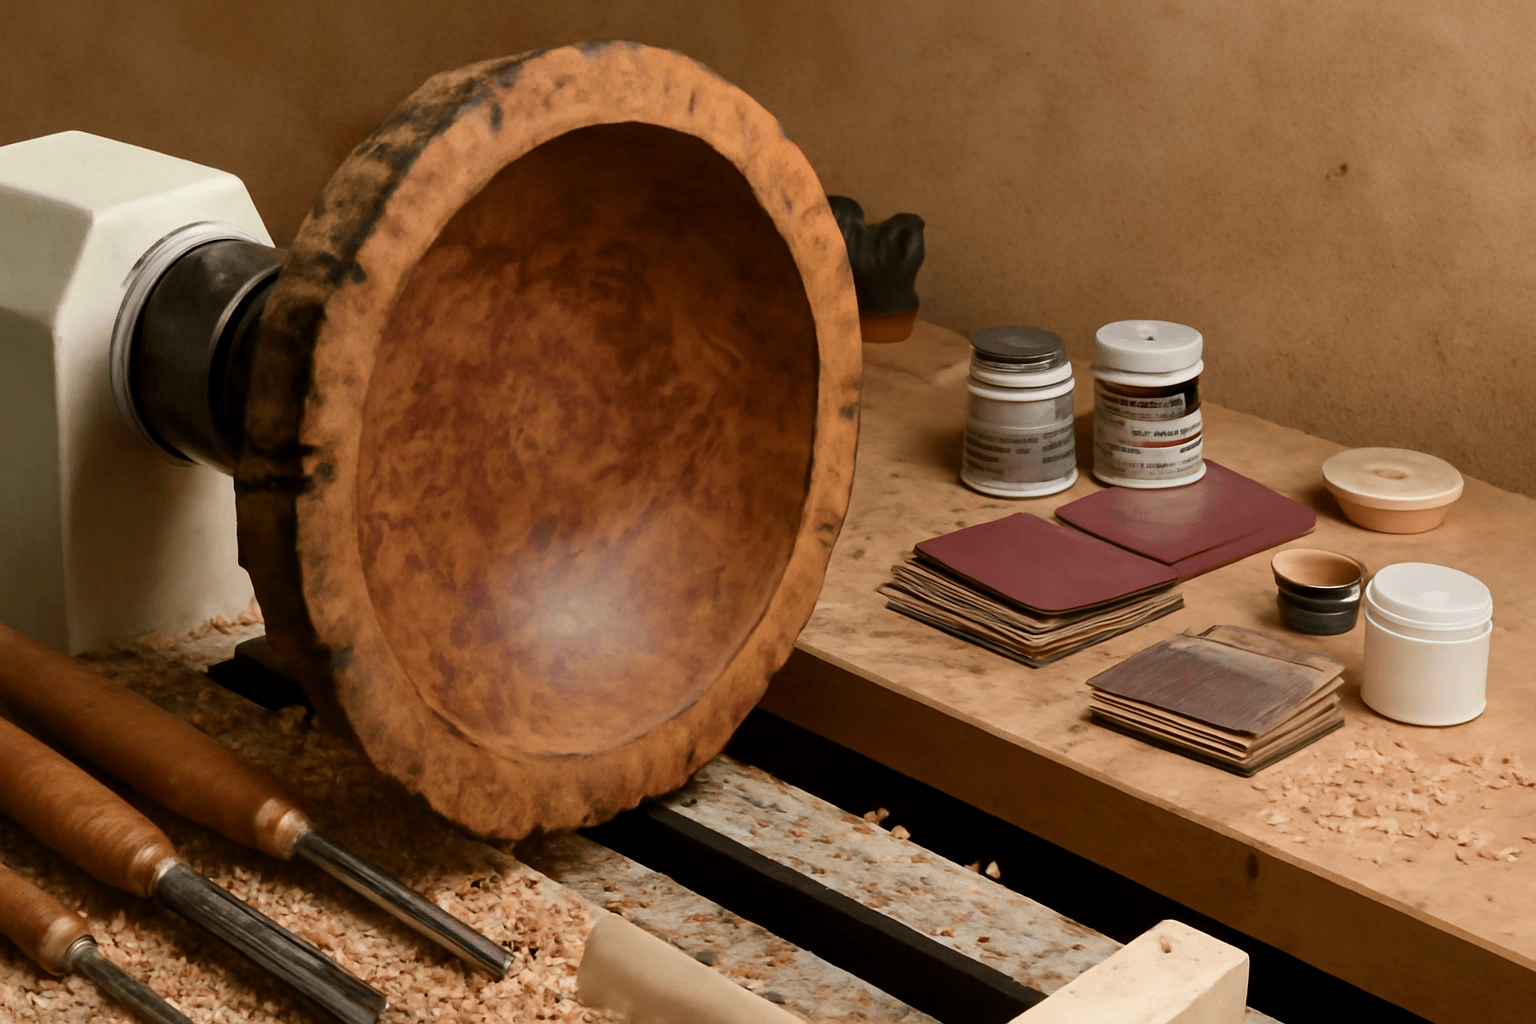
🌀 Turning on a Lathe 🌀
- Mount the burl securely on the lathe. ⚙️
- Use light, slow cuts to shape bowls, pens, or spindles, preserving the swirling grain. 🔄
- Sand progressively from 80 to 600 grit for a smooth surface. 🧽
🔨 Routing for Inlays 🔨
- Create grooves with a router for decorative inlays (e.g., resin or metal). 🔧
- Highlight the burl’s patterns by filling voids with colored epoxy. 🎨
🏖️ Sanding and Polishing 🏖️
- Start with coarse sandpaper (80-120 grit) to remove rough spots. 🏖️
- Progress to finer grits (up to 2000) for a glass-like finish. ✨
- Apply a polishing compound for extra shine. 💎
🪓 Hand Carving 🪓
- Use chisels for intricate designs like sculptures or knife handles. 🔪
- Work with the grain to avoid chipping. 🌾
🎨 Beginner-Friendly Project Ideas 🎨
Not sure where to start? Try these simple projects to build confidence: ✍️
- Pens or Bottle Stoppers: Small, forgiving projects that showcase burl’s beauty. ✒️
- Cutting Boards: Slice burl into slabs and glue for a stunning kitchen piece. 🍴
- Coasters: Cut thin rounds, sand, and seal for quick, giftable items. 🥂
- Bowl Turning: Use a lathe to create a small bowl, perfect for practicing curves. 🍲
Pro Tip: Start with a small project like a pen to master burl’s quirks before tackling larger pieces. 🖊️
🚫 Overcoming Common Challenges 🚫
Walnut tree burl’s unique grain can be tricky. Here’s how to handle issues: 🛠️
- Tear-Out: Use sharp tools and light cuts to avoid ripping the grain. If tear-out occurs, sand carefully or fill with epoxy. ⚠️
- Voids and Cracks: Fill with clear or colored epoxy for strength and beauty. Sand smooth after curing. 🧴
- Uneven Surfaces: Work slowly with a router or lathe to maintain control and even out irregularities. 🏗️
🌈 Tips for Stunning Results 🌈
- Highlight the Grain: Choose cuts that show off the burl’s swirls and colors. 🌟
- Test Finishes: Try a small area with oil or polyurethane to see how the grain pops. 💧
- Practice Patience: Work slowly to preserve the burl’s natural patterns. 🕰️
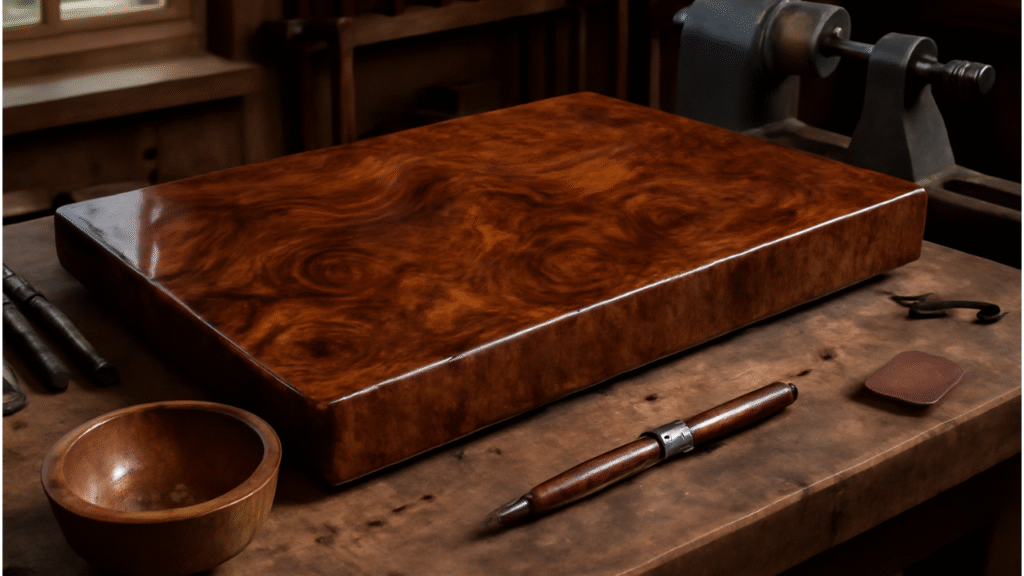
With these techniques, you’re ready to transform your walnut tree burl into a jaw-dropping project! Next, we’ll cover finishing and caring for your creations to make them last. 😍
🌟 Finishing and Caring for Walnut Burl Projects 🌟
You’ve crafted a stunning walnut tree burl project—now let’s make it shine and last for years! 😊 Finishing and caring for burl projects can feel overwhelming for beginners, but with simple techniques, you can enhance the wood’s natural beauty and protect it. This section covers beginner-friendly steps to polish, finish, and maintain your walnut burl creations, ensuring they stay gorgeous. Let’s dive in! ✨

🖌️ Choosing the Right Finish 🖌️
A good finish highlights the burl’s unique grain and protects it. Here are beginner-friendly options: 🎨
- Tung Oil or Danish Oil: Enhances natural colors with a warm, satin glow. Apply 2-3 thin coats with a cloth, sanding lightly (400 grit) between coats. 🧴
- Polyurethane: Offers a durable, glossy or matte finish. Brush on 2-4 thin layers, sanding between each for smoothness. 🖌️
- Epoxy Resin: Ideal for high-gloss tabletops or filling voids. Pour and spread evenly, then let cure for 24-48 hours. 💧
- Wax: Provides a soft, natural sheen for smaller items like pens. Buff with a cloth for a smooth finish. 🧼
Beginner Tip: Test your finish on a scrap piece of burl to see how it affects the grain and color. 🧪
🎨 Step-by-Step Finishing Process 🎨
Follow these steps for a professional, polished look: 🏆
- Sand Smoothly: Start with 400-grit sandpaper to remove any roughness, then progress to 800-2000 grit for a glass-like surface. 🧽
- Clean the Surface: Wipe with a damp cloth or tack cloth to remove dust. 💨
- Apply Finish: Use a brush, cloth, or pour (for epoxy) to apply thin, even coats. Follow product instructions for drying times. ⏳
- Buff Between Coats: Lightly sand (600 grit) between coats for a flawless finish. 🪣
- Final Polish: Buff with a soft cloth or polishing compound for extra shine. ✨
Pro Tip: Work in a dust-free area to avoid particles sticking to your wet finish. 🧹
🛡️ Caring for Your Walnut Burl Projects 🛡️
Proper care keeps your burl creations looking stunning: ✨
- Regular Cleaning: Dust with a soft, dry cloth. For deeper cleaning, use a damp cloth with mild soap, then dry immediately. 🧼
- Avoid Harsh Conditions: Keep projects away from direct sunlight, extreme heat, or humidity to prevent warping or fading. 🌞
- Reapply Finish: Every 1-2 years, lightly sand and apply a fresh coat of oil or wax to maintain protection and shine. 🛢️
- Handle with Care: For delicate items like bowls, avoid stacking heavy objects to prevent scratches. 🛑
🚫 Troubleshooting Common Finishing Issues 🚫
Don’t panic if things go wrong—here’s how to fix common problems: 🛠️
- Bubbles in Epoxy: Pop with a heat gun or torch before curing. Ensure even pouring next time. 🔥
- Sticky Finish: Wipe with mineral spirits and reapply thinner coats, allowing full drying time. 🧴
- Dull Spots: Buff with fine steel wool (0000) and reapply a thin finish coat. ✨
Beginner Tip: If you’re new, start with oil-based finishes—they’re forgiving and easy to apply. 😊
🌈 Showcasing Your Masterpiece 🌈
Your walnut tree burl project deserves to shine: 💎
- Display Strategically: Place in well-lit areas to highlight the grain, but avoid direct sun. 🌞
- Share Your Work: Post photos on woodworking forums or social media to inspire others and get feedback. 📸
- Gift or Sell: Burl projects make unique gifts or high-value items for craft markets. 🎁
With these finishing and care tips, your walnut tree burl projects will dazzle and endure! You’re now ready to create, finish, and cherish your woodworking treasures. 🎉
🌟 Final Thoughts 🌟
Working with walnut tree burl is like unlocking a piece of nature’s art—its swirling grains and rich colors can transform your woodworking projects into unforgettable masterpieces! 😊 From sourcing and harvesting to crafting and finishing, this guide has walked you through every step to make the process approachable, even for beginners. By now, you’re equipped to tackle common challenges, avoid mistakes, and create stunning pieces like bowls, pens, or furniture with confidence. Whether you’re starting small or dreaming big, let the beauty of walnut tree burl inspire your creativity. Grab your tools, dive in, and craft something extraordinary! 🚀