
Have you ever taken a cutting from your favorite houseplant, slipped it into water, and waited weeks—only for the stem to turn into a mushy, rotting mess instead of sprouting roots? You are definitely not alone. For beginners and seasoned gardeners alike, the primary culprit behind propagation failure is almost always a missed node. 🥀
Many plant parents feel intimidated by pruning and propagation because they simply don’t know exactly where to make the cut. Snapping a stem in the wrong spot can stunt your plant’s growth, introduce disease, or completely kill a fresh cutting.
If you want to stop wasting cuttings and master the art of shaping your indoor jungle or backyard trees, you need to understand one botanical secret. Knowing exactly what is a node in a plant is the ultimate game-changer. It is the structural blueprint for unlocking endless free plants and cultivating bushier, more vibrant foliage.
In this comprehensive guide, we will decode plant anatomy, show you exactly how to identify nodes across various indoor and outdoor species, and share expert secrets for foolproof propagation and pruning. 🚀
🔬 What is a Node in a Plant? (The Biological Breakdown) 🧬
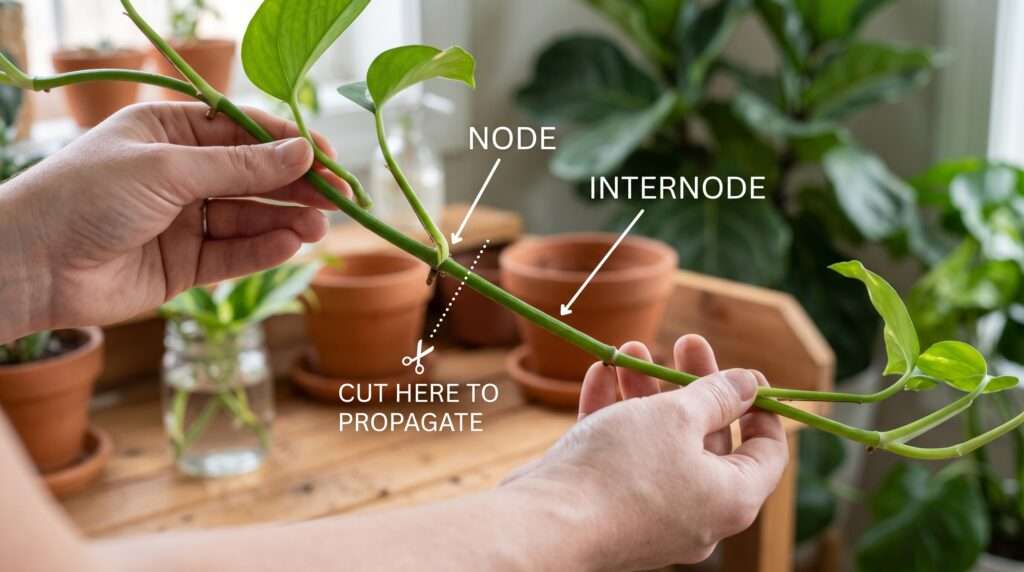
To master plant care, you have to look closer at how a plant physically builds itself. By definition, a plant node is the specific, highly active area on a stem where buds, leaves, aerial roots, and branching twigs originate. It is the vital intersection of a plant’s vascular system.
But why is this specific spot so magical? The secret lies in something called meristematic tissue. 🧪
Meristematic tissue is a collection of rapidly dividing, undifferentiated cells located within the node. Think of these cells like stem cells in the human body. Because they are undifferentiated, they have not yet “decided” what they are going to be. Depending on the environmental signals the plant receives—such as sunlight, gravity, or a pruning cut—these cells can magically transform into new root systems, fresh leaves, or thick branches.
When you understand this, the entire logic of gardening shifts. You aren’t just cutting a stem; you are manipulating meristematic tissue to trigger new growth.
What is an Internode?
To truly grasp the concept of a node, you must also understand the internode. The internode is the smooth, structural section of the stem that exists between the nodes.
Its primary job is simply to transport water and nutrients between the active nodes and provide structural support so the plant can reach toward the light. Crucially, internodes do not contain meristematic tissue.
If you take a cutting that consists only of an internode, it lacks the cellular ability to push out new roots or leaves. Without the regenerative power of the node, that piece of stem will simply sit in water or soil until it succumbs to stem rot.
💡 Expert Insight: Nodes are the beating heart of cellular regeneration in flora. Whether you are attempting to multiply a rare aroid or shaping an overgrown tree canopy, the node dictates exactly where the plant will heal and regenerate.
🕵♀️ How to Identify a Plant Node Like a Pro (Visual Guide) 🔍
Identifying a node is easy once you know what to look for, but the visual cues can vary drastically depending on the species. While they aren’t always blatantly obvious, you can train your eye to spot them in seconds.
Generally, you are looking for:
-
A physical swelling, bump, or thick “knuckle” on the stem.
-
A horizontal line or scar where an old leaf previously grew and fell off.
-
A tiny green nub (known as an axillary bud) resting exactly where a leaf petiole meets the main stem.
-
Brown, woody aerial roots pushing through the stem tissue.
Spotting Nodes on Vining Houseplants (Pothos, Philodendron, Monstera) 🌿
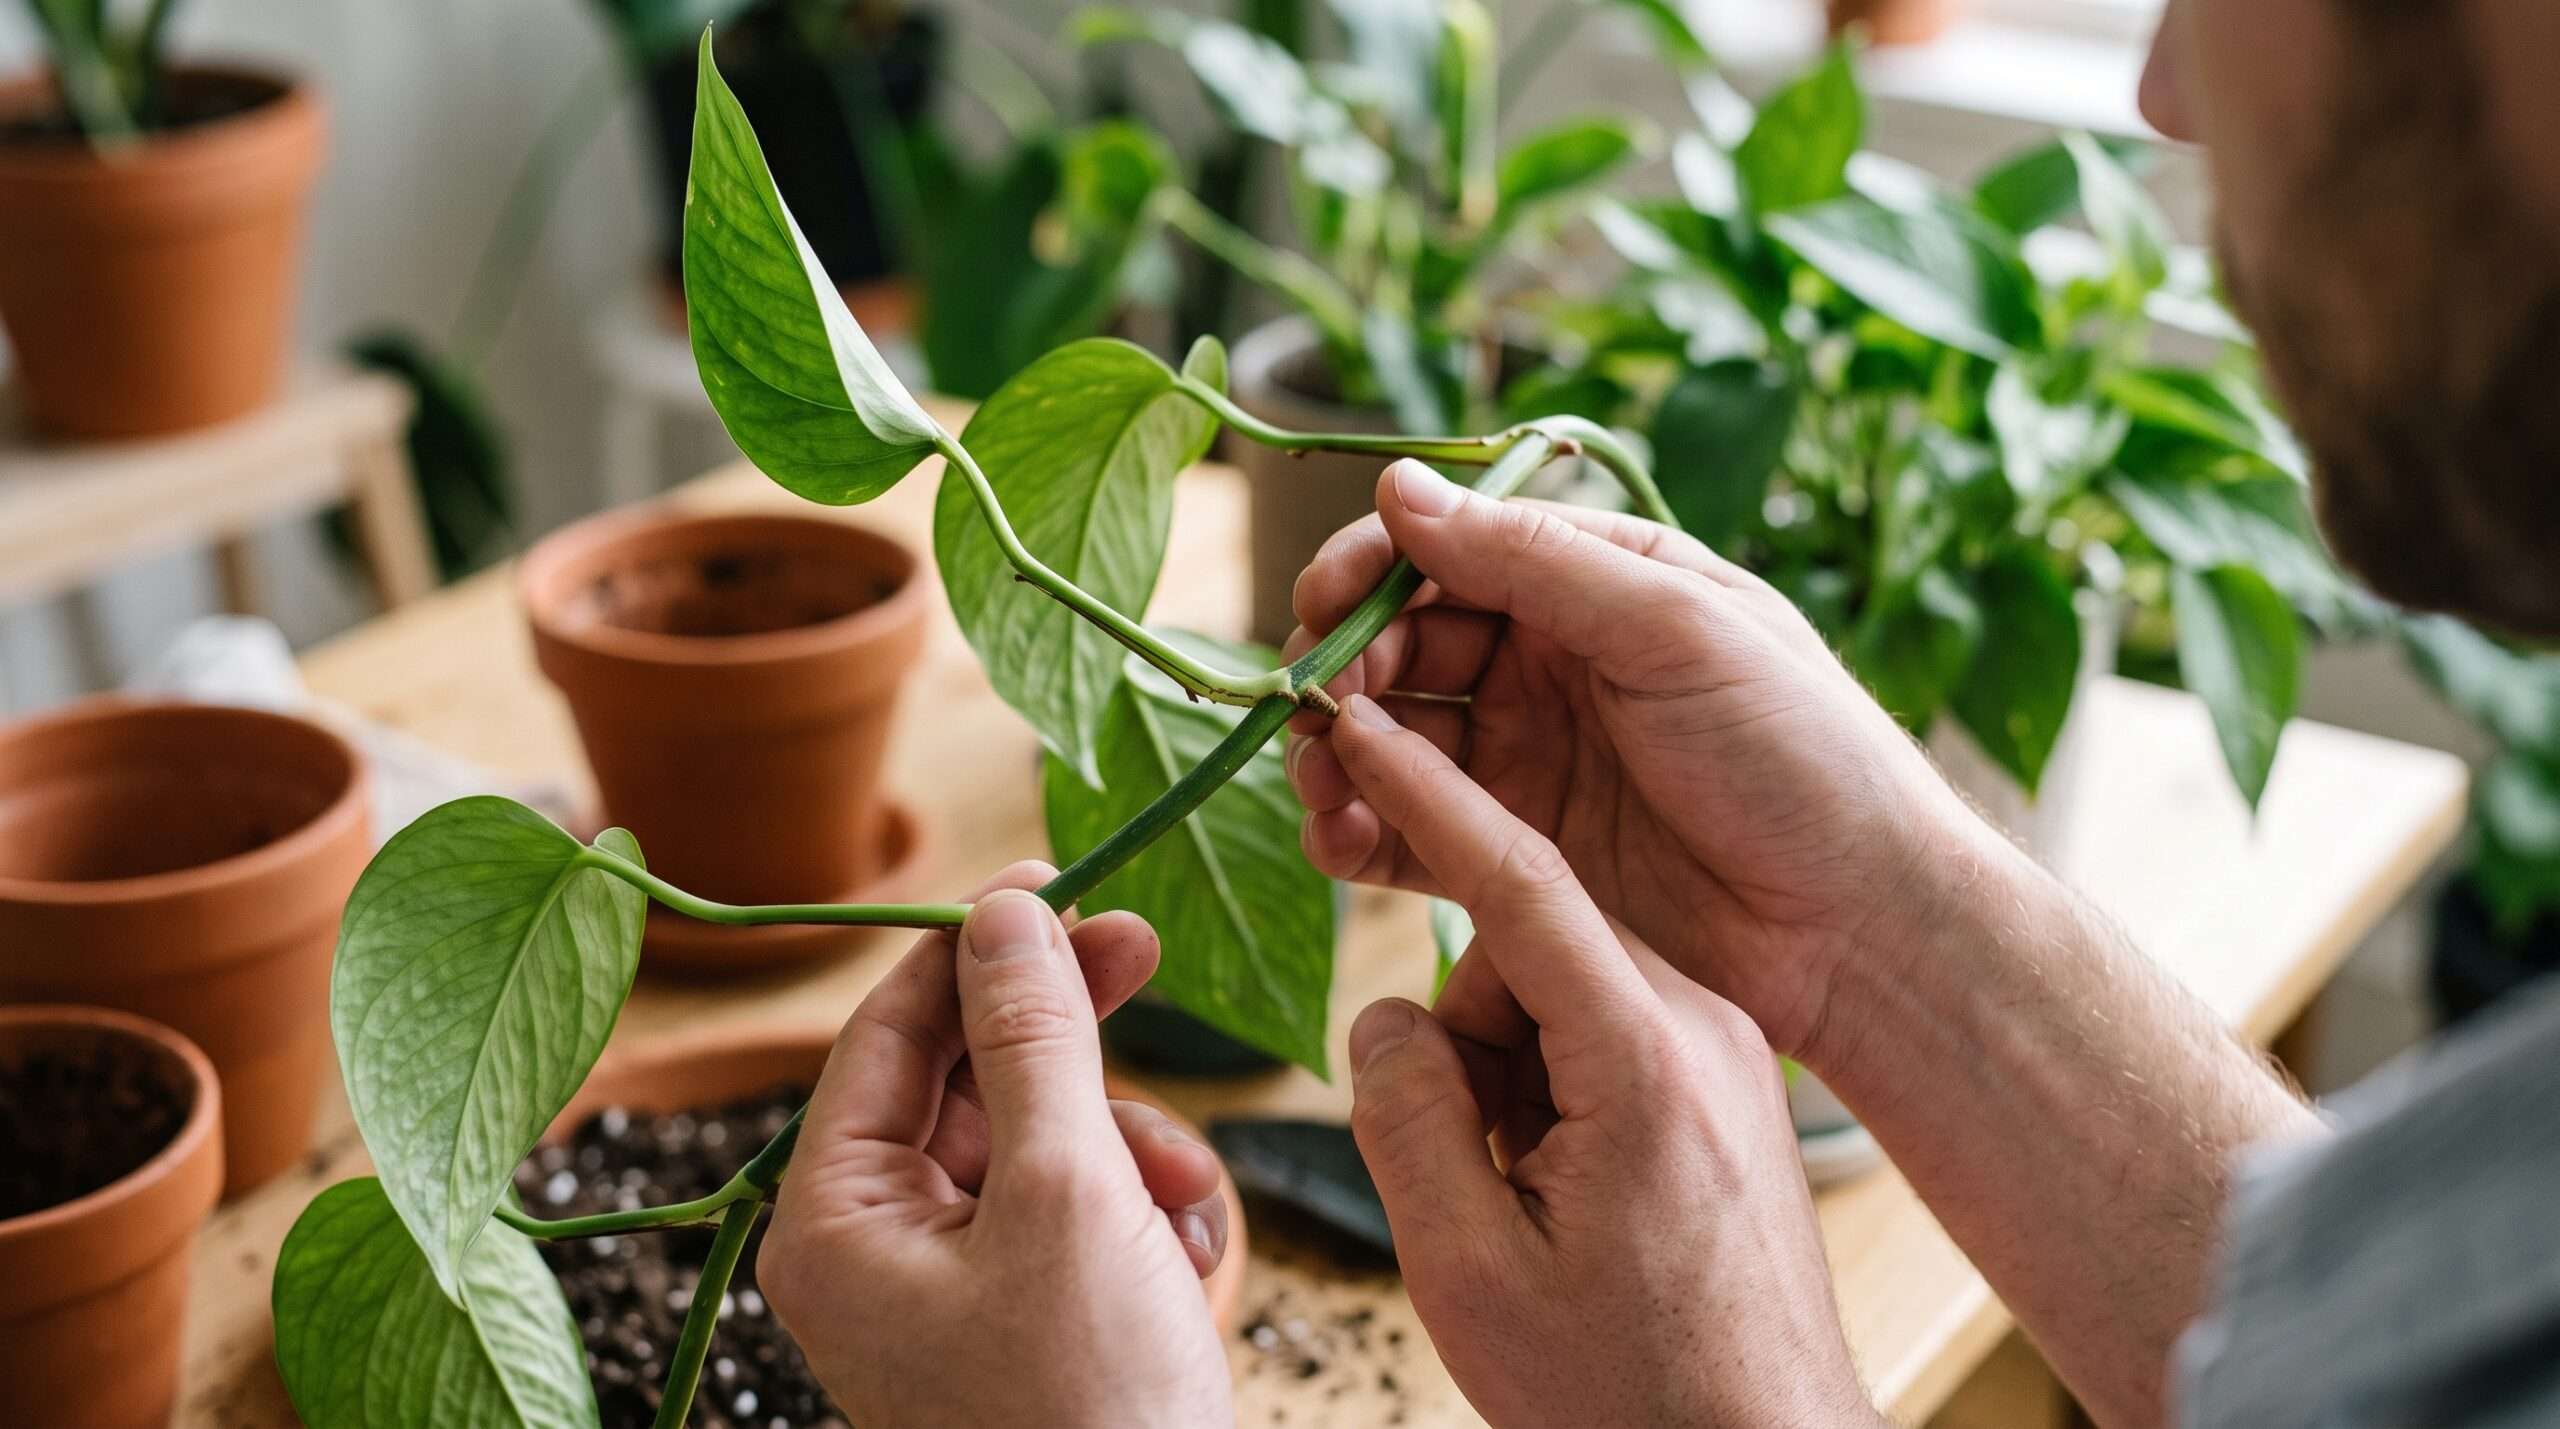
Tropical vining plants are the easiest species for beginners to study. On a Pothos or a Monstera Deliciosa, the nodes are incredibly prominent. Look along the smooth green vine until you see a distinct bump or a slight change in the stem’s thickness. You will almost always find a leaf emerging from this exact spot.
More importantly, on these tropical epiphytes, you will usually see a small, brown nub forming directly opposite the leaf. This is an aerial root. It emerges directly from the node, making it impossible to miss.
Spotting Nodes on Woody Plants (Trees & Shrubs) 🌳
Identifying nodes on outdoor woody plants requires a slightly different approach, as thick bark can obscure the swelling. When safely pruning a birch tree, shaping a cherry plum tree, or managing a ginkgo tree in your yard, you need to look for leaf scars and winter buds.
In the dormant season, when the leaves have dropped, run your finger along a young twig. You will feel small, raised crescents or dots—these are the leaf scars marking the nodes. Nestled just above these scars, you will usually find a small, tightly wrapped bud waiting to burst open in the spring.
Do All Plants Have Nodes? (Succulents, Ferns, & Snake Plants) 🌵
While all true stems have nodes, not all popular houseplants rely on them for propagation. It is vital to recognize the exceptions to avoid frustration:
-
Spider Plants: These resilient favorites bypass stem-node hunting altogether. Instead of requiring you to cut the main stem, they produce ready-to-root “pups” (offsets) at the ends of long, cascading runners.
-
Succulents: Many rosette succulents (like Echeveria) and Jade plants can propagate entirely from a single fleshy leaf. The meristematic tissue is located at the very base of the leaf where it attaches to the stem, rather than requiring a thick stem node.
-
Rhizomatous Plants: Snake plants (Sansevieria) and ZZ plants grow from thick, underground rhizomes. While you can propagate a snake plant from a leaf cutting, dividing the root rhizome is the fastest way to multiply them.
✂️ The Secret to Successful Pruning Using Nodes 🪴
Pruning isn’t just about damage control or removing dead leaves; it is a highly strategic practice used to shape a plant, control its size, and encourage lush, vigorous growth. The secret to all of this lies entirely in how you interact with the plant’s nodes.
When a plant grows naturally, it directs most of its energy to the topmost bud (the terminal bud) to reach upward toward the light. This biological phenomenon is known as apical dominance. By snipping off the top of a stem, you temporarily halt this upward momentum. The plant redistributes its growth hormones (auxins), redirecting that energy down to the dormant axillary buds waiting at the lower nodes. The result? The node activates, pushing out new lateral branches. This is exactly how you turn a leggy, thin plant into a full, bushy masterpiece!
Exactly Where to Cut (The 1/4-Inch Rule) 📏
The most common question plant parents ask is: Where exactly do I make the cut?
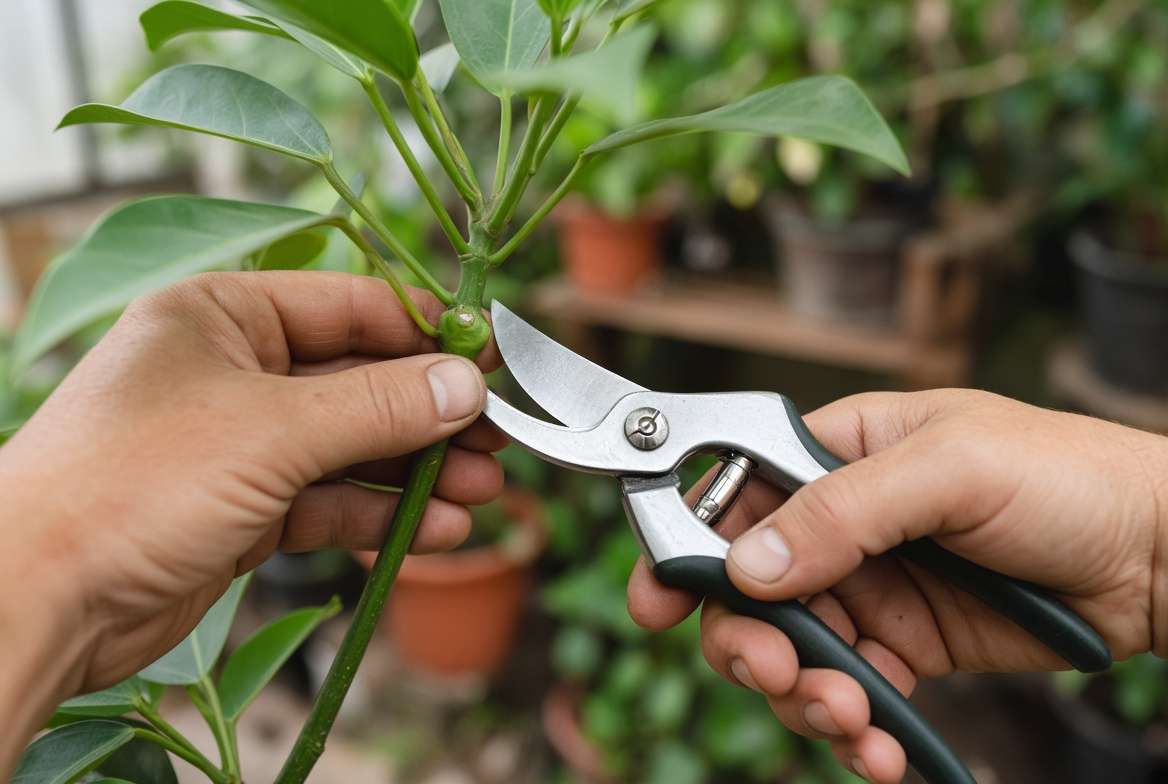
When your goal is pruning (leaving the main plant intact to encourage branching), you must always cut above a node.
To do this correctly, follow the 1/4-Inch Rule. Measure roughly 1/4 inch (or about half a centimeter) above a healthy leaf node and make your snip.
-
If you cut too close to the node: You risk damaging the fragile meristematic tissue and the axillary bud, meaning no new growth will emerge from that spot.
-
If you cut too far above the node: You will leave a long piece of internode sticking out. Because internodes cannot produce new growth, this “stump” will slowly die back, turn black, and rot. This rotting tissue is an open invitation for fungal infections, bacterial diseases, and pests to invade your healthy plant.
The 45-Degree Angle Trick 📐
Whether you are trimming an indoor Ficus or heading outside to prune birch tree branches or a sprawling cherry plum tree, the angle of your cut matters just as much as the location.
Always make your pruning cuts at a crisp 45-degree angle, sloping away from the node. Why? In outdoor tree care, a flat cut allows rainwater to pool on the wound, creating a damp environment where fungal spores thrive. An angled cut ensures water rolls right off, allowing the plant to heal and callus over quickly. Even for indoor houseplants, an angled cut increases the surface area for water absorption if you plan to propagate the piece you just removed!
🌱 Foolproof Plant Propagation: Using Nodes to Multiply Your Jungle 🪴➡️🪴🪴
Now that you know how to prune to shape the mother plant, what do you do with the pieces you just chopped off? You propagate them!
The golden rule of stem cuttings is simple: Without a node, a stem cutting will (usually) never grow roots. The meristematic cells inside the node are the magic ingredient required to transform a severed stem into a completely independent, thriving plant.
Step-by-Step Water Propagation Guide 💧
Water propagation is the most visually rewarding way to multiply your plants. Here is the expert, foolproof method:
-
Sanitize Your Shears: Before you make a single cut, wipe your pruning shears with rubbing alcohol. Plant sap is highly susceptible to bacterial infections, and dirty blades are the easiest way to ruin a propagation attempt.
-
Locate the Perfect Node: Look for a section of stem with healthy, vibrant leaves and at least one plump, unblemished node (or an existing aerial root).
-
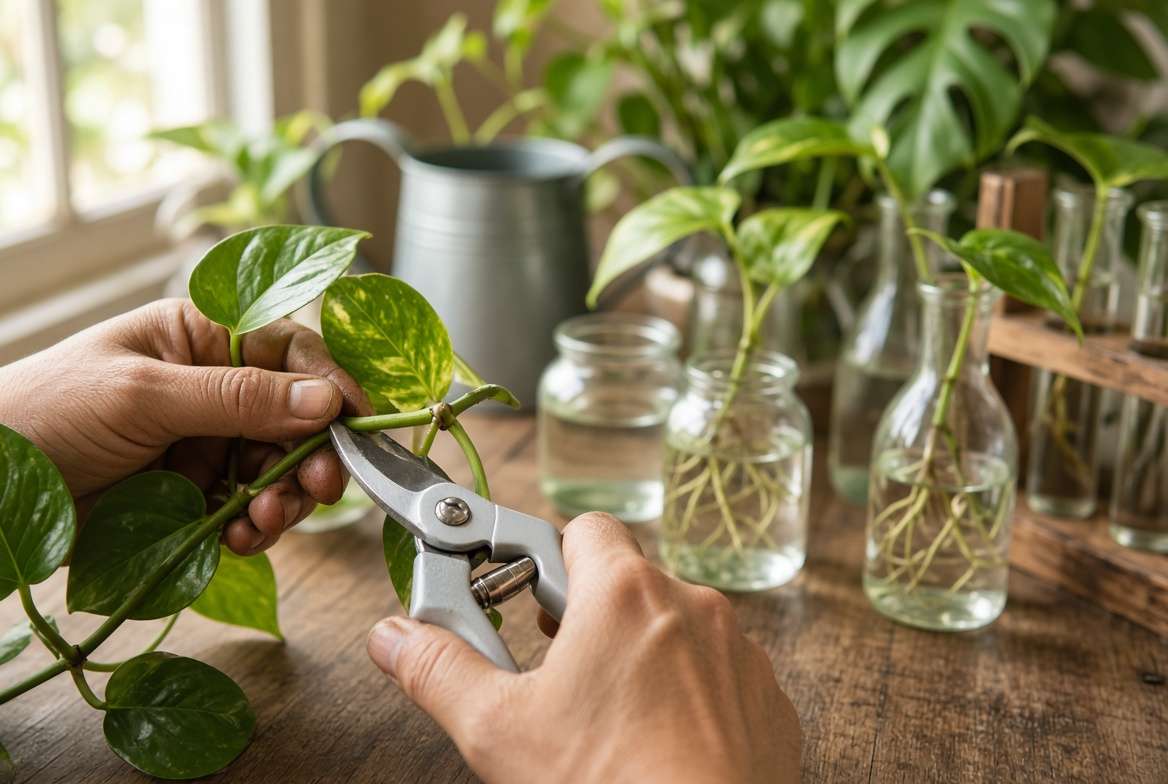
Make the Cut (Below the Node): This is where propagation differs from pruning! Because you want roots to grow from the node, you must make your cut 1/4 inch below the node. The node must remain attached to the cutting you are removing.
-
Submerge the Node, Not the Leaves: Place the cutting in a glass jar or propagation station filled with room-temperature water. Ensure the node is completely submerged. Crucial step: Make sure absolutely no leaves are touching the water, as submerged foliage will rot rapidly and spoil the water.
-
Patience and Light: Place the vessel in bright, indirect sunlight and change the water once a week to replenish oxygen levels. In 1 to 4 weeks, you will see delicate white water roots erupting right from the node!
Single-Node vs. Multi-Node Cuttings 🌿
When taking cuttings, you have two choices. A multi-node cutting includes a longer piece of stem with two or three nodes. This is the safest method for beginners because if the bottom node rots, you can trim it off and still have backup nodes above it to try again.
A single-node cutting involves chopping a long vine into multiple small pieces, each containing just one leaf and one node. This maximizes your yield—turning one long Pothos vine into 10 new plants!
For rare aroids, experts often use a specialized single-node method called “wet stick” propagation. This involves taking a leafless chunk of stem (featuring one node) and laying it horizontally on a bed of damp sphagnum moss or perlite inside a high-humidity propagation box.
🌟 Pro Tip: For stubborn woody plants, tree cuttings, or slow-rooting houseplants, water isn’t always enough. After making your cut just below the node, dip the node into a high-quality rooting hormone powder or gel before planting it directly into a moist potting mix. The artificial auxins in the rooting hormone rapidly stimulate the node’s cells to divide and produce roots.
🚫 Top 3 Mistakes Beginners Make with Nodes (And How to Fix Them) ⚠️
Even armed with the right knowledge, it is easy to make a few missteps. Avoid these three common node-related blunders to ensure a 100% success rate:
-
Mistake 1: The “Leaf-Only” Cutting (The Zombie Leaf) 🧟♂️ Many beginners snip a single leaf off a plant—like a heart-shaped Hoya kerrii or a Monstera leaf—leaving only the petiole (the tiny stalk attaching the leaf to the main stem) and plop it in water. While the petiole might eventually sprout a few roots, it lacks the node tissue required to grow a new stem. It will remain a single, rooted “zombie leaf” forever and will never grow into a full plant. Fix: Always include a piece of the main stem containing a true node.
-
Mistake 2: Drowning the Internode 💧 If you cut three inches below the node and stick the whole thing in water, that long, bare internode will rot before the node ever gets a chance to root. The rot will then spread upward, killing the node. Fix: Stick to the 1/4-inch rule! Trim away excess internode tissue below the node before propagating.
-
Mistake 3: Burying the Node Too Deep in Soil 🕳️ When transitioning a rooted cutting from water to soil, burying the node two or three inches deep suffocates the new growth point. Fix: Plant the cutting so the node rests just barely beneath the soil surface, ensuring the newly forming axillary bud can easily push through the dirt to find the light.
🙋♀️ Frequently Asked Questions (Targeting Long-Tail SEO) 💬
Can a plant grow without a node? A stem cutting cannot grow into a full plant without a node. However, there are alternative propagation methods that don’t rely on stem nodes. Rhizome division (splitting root bulbs), root cuttings, and leaf cuttings (for specific succulents and begonias) utilize different types of regenerative tissues to grow without stem nodes.
What is the difference between a node and an aerial root? A node is the structural location on the stem that houses regenerative cells. An aerial root is a specific growth that emerges from the node. The node is the origin point; the aerial root is the result.
Can you propagate a node without leaves? Yes! As long as the stem chunk contains a healthy, viable node, it can grow roots and eventually produce new leaves. This is known as “wet stick” or “chunk” propagation and requires high humidity—usually achieved by placing the leafless node in damp sphagnum moss inside a closed container.
How long does it take for a node to root in water? This heavily depends on the plant species, the time of year, and the lighting conditions. Fast-growing vines like Tradescantia or Pothos can push out roots in as little as 3 to 5 days. Thicker-stemmed plants like Monstera or Ficus may take 3 to 6 weeks. Always propagate during the active growing season (spring and summer) for the fastest results.
🎉 Conclusion: Master the Node, Master Your Garden 🏆
Understanding the hidden biology of your plants removes the guesswork from indoor and outdoor gardening. By simply learning how to spot this “magic bump” on a stem, you transition from a hopeful beginner to a confident plant expert.
Remember the golden rules of the node: Find the bump, cut a 1/4 inch above it to encourage a bushier mother plant, and cut a 1/4 inch below it to harvest a cutting for propagation.
Whether you are managing a raised garden bed, shaping up shade trees in your backyard, or trying to rescue a leggy houseplant, the node is your roadmap to success. Grab your sanitized pruning shears, examine your favorite plant’s stems, and confidently make your next cut! ✨
Did you successfully root a stubborn cutting using this guide? Share your propagation success stories in the comments below, and don’t forget to check out our related guides, like our deep dive into the Best Rooting Hormones for Water Propagation or Stop Root Rot: Why Your Houseplants Need Clear Plastic Plant Pots. Happy planting! 🔗











