
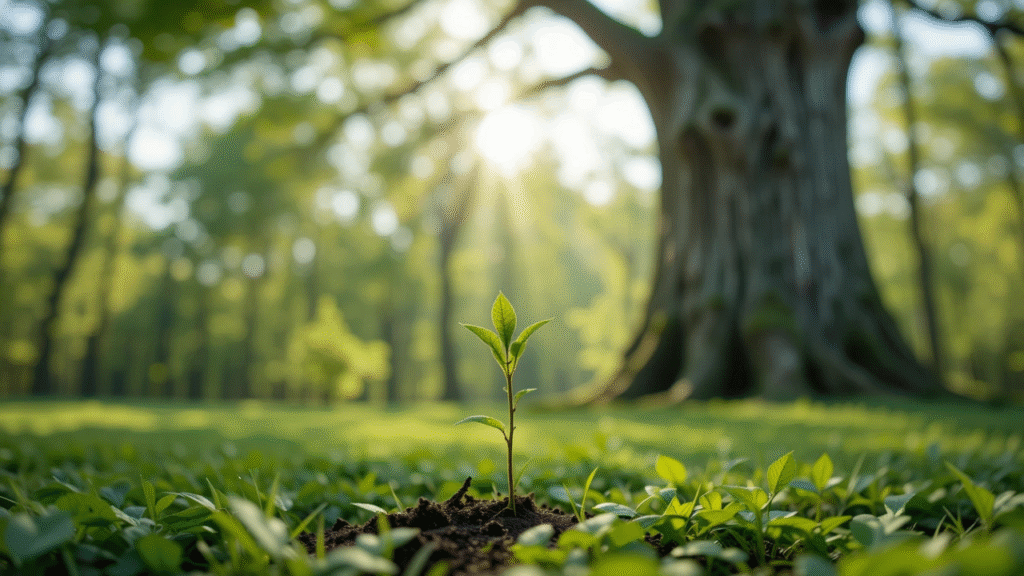
Imagine stepping into your backyard years from now, greeted by the towering beauty of a white ash tree you grew from a tiny seed. 🌱 The process of growing white ash tree seeds might seem daunting, but it’s an incredibly rewarding and sustainable way to create lasting greenery in your landscape. Whether you’re a seasoned gardener or a beginner, successfully planting and nurturing white ash tree seeds can bring joy and a sense of accomplishment.
However, many people struggle with knowing where to start. How do you get the seeds to germinate? When is the best time to plant them? What kind of care do they need to thrive? If you’ve been searching for answers to these common questions, you’ve come to the right place. This guide is designed to walk you through every step of the process, from understanding the seeds to harvesting your own saplings.
By the end of this article, you’ll be equipped with all the knowledge you need to confidently grow and harvest white ash tree seeds, setting you on the path to growing beautiful, thriving trees that will enhance your garden for years to come. Let’s dive in! 🌿
🌱🌳Understanding White Ash Tree Seeds 🌳🌱
Before diving into planting, it’s important to understand what you’re working with: white ash tree seeds! These seeds are the key to growing your own beautiful ash trees 🌳, but knowing how they work and how to handle them will make the whole process much smoother. Let’s break it down. 😊
🌿 What Are White Ash Tree Seeds? 🌿
White ash tree seeds are winged seeds known as samaras. They look like small, flat, elongated “helicopters” 🚁 that spin when they fall from the tree 🌳. This spinning helps the seeds travel away from the parent tree, increasing their chances of growing in new locations 🌱.
The samara consists of two parts:
- The Seed: A small, oval-shaped structure inside the samara, which will grow into the tree 🌳.
- The Wing: The thin, papery extension that helps the seed glide through the air when it’s released from the tree 🌬️.
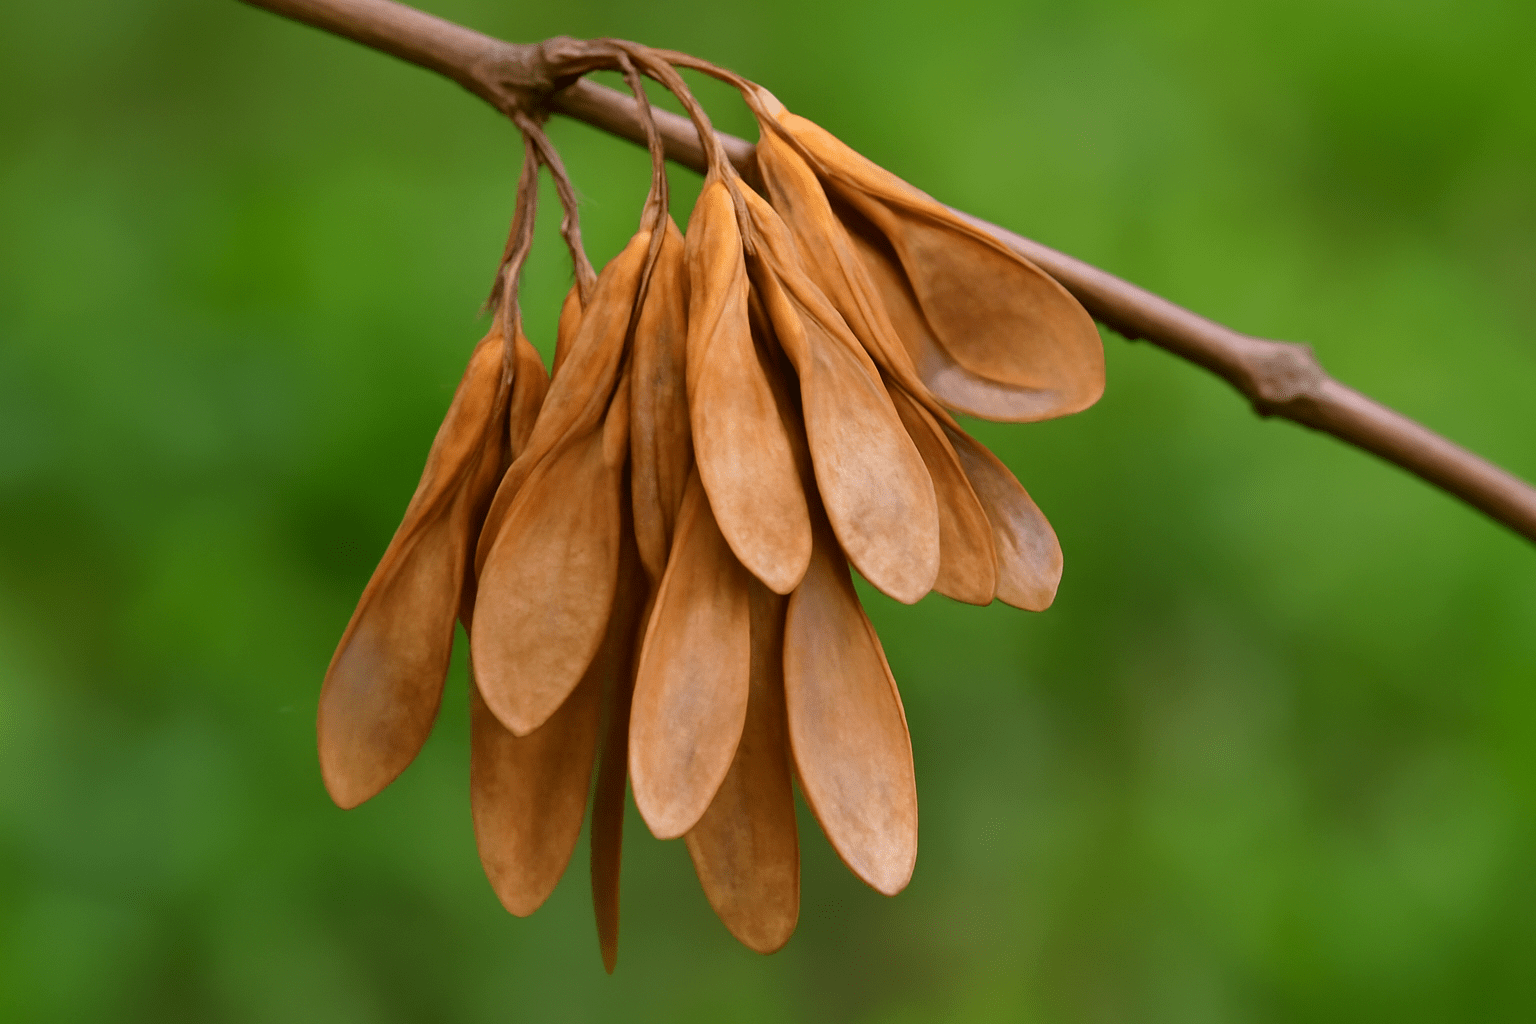
These seeds typically mature and fall in late summer to early fall 🍂, making that the perfect time to collect them for planting 🌱.
🌍 Why Should You Grow White Ash Tree Seeds? 🌍
Growing white ash trees from seeds has many benefits:
- Cost-Effective: Instead of purchasing expensive saplings 🌱, you can grow your own trees from seeds!
- Environmental Impact: Planting trees helps improve air quality 🌬️ and creates habitats for wildlife 🦋.
- Personal Satisfaction: Watching a seed sprout and grow into a majestic tree 🌳 is incredibly rewarding!
Plus, it’s a great way to preserve this iconic species 🌿, especially considering that white ash trees have been threatened by pests like the emerald ash borer 🦗.
👀 How to Identify White Ash Tree Seeds 👀
When collecting white ash seeds, look for the helicopter-like samaras on the ground 🍂 or still attached to the tree 🌳. These seeds are typically green when immature and turn brown when they’re ready for harvest 🌰. Make sure to pick only fully matured seeds to increase your chances of successful germination 🌱.
The seeds usually grow in clusters 🌿, so you may find a bunch of them hanging together on a single tree branch. If you’re unsure whether the seeds are ready, wait until late fall 🍁, as they should be dry and ready for collection by then.
⏰ The Best Time to Harvest White Ash Tree Seeds ⏰
Timing is everything when it comes to harvesting seeds 🕰️. White ash seeds are typically ready for collection late summer 🌞 to early fall 🍂, once they’ve turned a brownish color and are no longer green 🌱. If you wait too long, the seeds may fall to the ground naturally 🌳, but harvesting them at the right moment ensures you’re collecting viable, healthy seeds for planting. 🌱
Now that you have a good understanding of what white ash tree seeds are 🌳, their benefits 🌍, and how to spot them 👀, you’re ready to move on to the next step: preparing to plant! 🌱 Keep reading to learn how to turn those seeds into thriving ash trees 🌳.
🌿🌱 Preparing to Grow White Ash Tree Seeds 🌱🌿
Getting your white ash tree seeds ready for planting is a crucial step to ensure they germinate successfully 🌱. Proper preparation sets the foundation for healthy, strong trees 🌳 in the future. In this section, we’ll cover everything you need to get started, from gathering supplies to choosing the best planting location 🌍. Let’s dive in! 😊
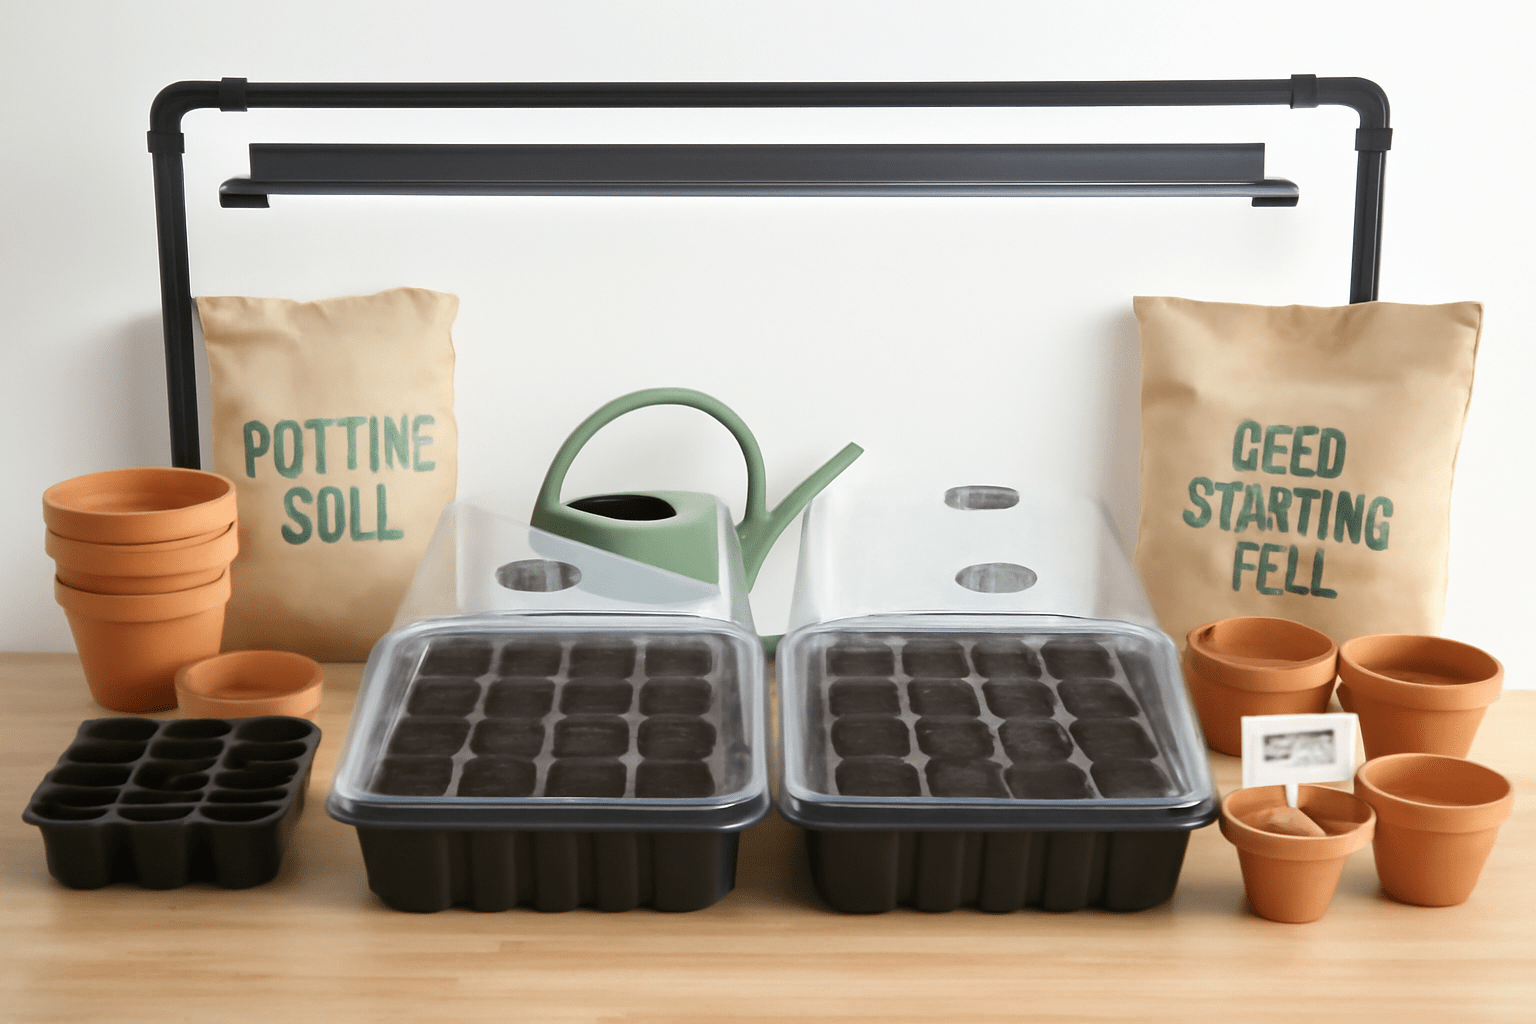
🛠️ Essential Tools and Supplies You’ll Need 🛠️
Before you begin, gather the following items to make your planting process smoother:
- White Ash Tree Seeds: Either collected from the tree 🌳 or purchased from a trusted source.
- Seed Trays or Pots: You’ll need containers with drainage holes 🪴 to plant your seeds in. Small pots or seed trays work perfectly.
- Well-Draining Soil: A mix of peat moss, perlite, and sand is ideal 🌱. It ensures the soil doesn’t get too soggy, which can lead to root rot 🦠.
- Clear Plastic Cover or Plastic Wrap: This helps maintain moisture and creates a mini greenhouse effect to aid in germination 🌞.
- Watering Can: A gentle watering can or spray bottle helps you keep the soil moist 💧 without over-watering.
- Grow Lights (optional): If you’re planting indoors 🏠, grow lights 🌟 can provide the necessary light for your seedlings.
🌍 Choosing the Right Planting Location 🌍
Where you place your pots or trays is just as important as the planting itself 🌱. The location should mimic the natural conditions white ash seeds would experience in the wild 🌳. Here’s what to look for:
- Indoors or Outdoors? 🌞
- If you’re starting your seeds indoors 🏠 (which is recommended for better control over conditions), find a sunny spot near a window where the seedlings can receive indirect light ☀️.
- If you’re planting outdoors 🌳, ensure the location is free of heavy shade 🌿 and has access to plenty of sunlight 🌞. The area should also have well-draining soil to prevent water from pooling around the seeds.
- Temperature: White ash seeds germinate best in moderate temperatures 🌡️—ideally between 65°F and 75°F (18°C to 24°C) 🌞. If you’re planting indoors, keep the room temperature in this range for optimal seedling growth.
- Humidity: Seeds need moisture 💧 to sprout. Keep the environment humid 🌦️, especially for the first few weeks. Using a clear plastic cover over your containers can help trap humidity and maintain moisture levels.
🏵️ Preparing the Soil Mix 🏵️
A good soil mix is key to giving your white ash tree seeds the best start 🌱. You can make your own by combining:
- 50% Peat Moss: Retains moisture without becoming soggy 💧.
- 25% Perlite: Improves drainage and helps the soil stay light and airy 🌬️.
- 25% Sand: Ensures good drainage and prevents the soil from compacting around the roots 🌱.
If you don’t want to make your own mix 🌱, look for a seed-starting mix at your local garden center 🏬. Just make sure it’s light, well-draining 🌿, and free of added fertilizers 🌱, as seedlings don’t need extra nutrients in the early stages.
🌰 Preparing the Seeds 🌰
Before you plant your white ash tree seeds 🌳, you need to prepare them for germination 🌱:
- Cold Stratification: White ash seeds require a cold treatment 🧊 to break their dormancy before they can germinate. This process is called stratification ❄️ and mimics the natural winter chill that seeds would experience in the wild.
- How to Cold Stratify: Place your seeds in a moist paper towel 🧻, then put the towel inside a plastic bag 🛍️. Store this in the refrigerator 🧊 for 30-60 days. This will increase your chances of successful germination 🌱.
Alternative: If you’re planting directly outdoors in the fall 🍂, nature will take care of the cold stratification for you as temperatures drop 🌧️.
By this point, you should have everything you need to prepare your seeds 🌱 and start planting 🌳. With the right supplies and the perfect environment 🌍, your white ash tree seeds will be ready for their journey toward becoming beautiful, thriving trees 🌳. Stay tuned to learn the next step in the process: how to plant those seeds for success! 🌱🌳
🌱🌿 The Step-by-Step Guide to Planting White Ash Tree Seeds 🌿🌱
Now that you’ve gathered your supplies and prepared your white ash tree seeds 🌳, it’s time to dive into the exciting part—planting them! The right planting techniques can make all the difference in how well your seeds germinate 🌱 and grow. Follow these simple steps to set your seeds up for success. 😊
❄️ Step 1: Stratify Your Seeds for Better Germination ❄️
Before planting 🌱, remember that cold stratification is essential for breaking the dormancy of white ash tree seeds. If you haven’t already done this, now’s the time to prepare them.
- Cold Stratification Method: Place your seeds in a moist paper towel 🧻, then seal them in a plastic bag 🛍️. Store the bag in the refrigerator 🧊 for 30-60 days.
- Why it’s important: This mimics the natural winter chill ❄️ that the seeds would experience outdoors, signaling that it’s time to sprout 🌱.
Once your seeds have been stratified 🌱, they’ll be ready for planting!
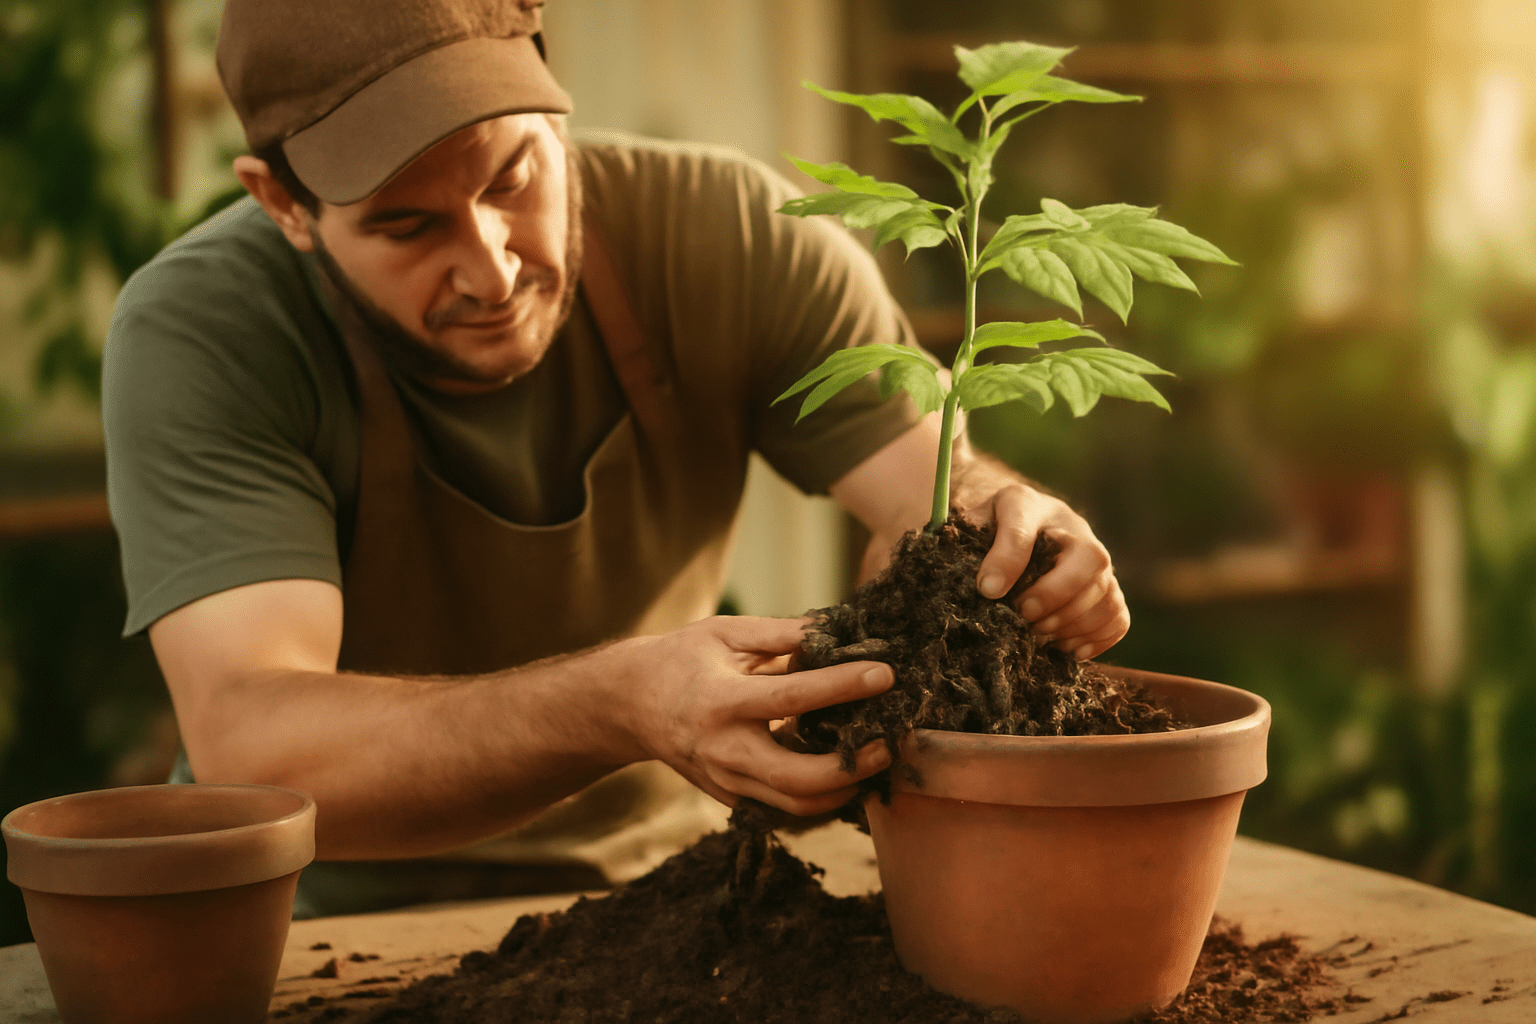
🌿 Step 2: Prepare Your Containers and Soil 🌿
- Choose Containers: Select small pots 🪴, seed trays, or any containers with drainage holes 💧 to allow excess water to escape. White ash trees don’t like their roots sitting in water, so good drainage is key!
- Fill with Soil: Fill your container with the well-draining soil mix you prepared earlier 🌱. Leave a little space at the top to avoid soil spilling over when watering. Ensure the soil is evenly spread and leveled 🌿.
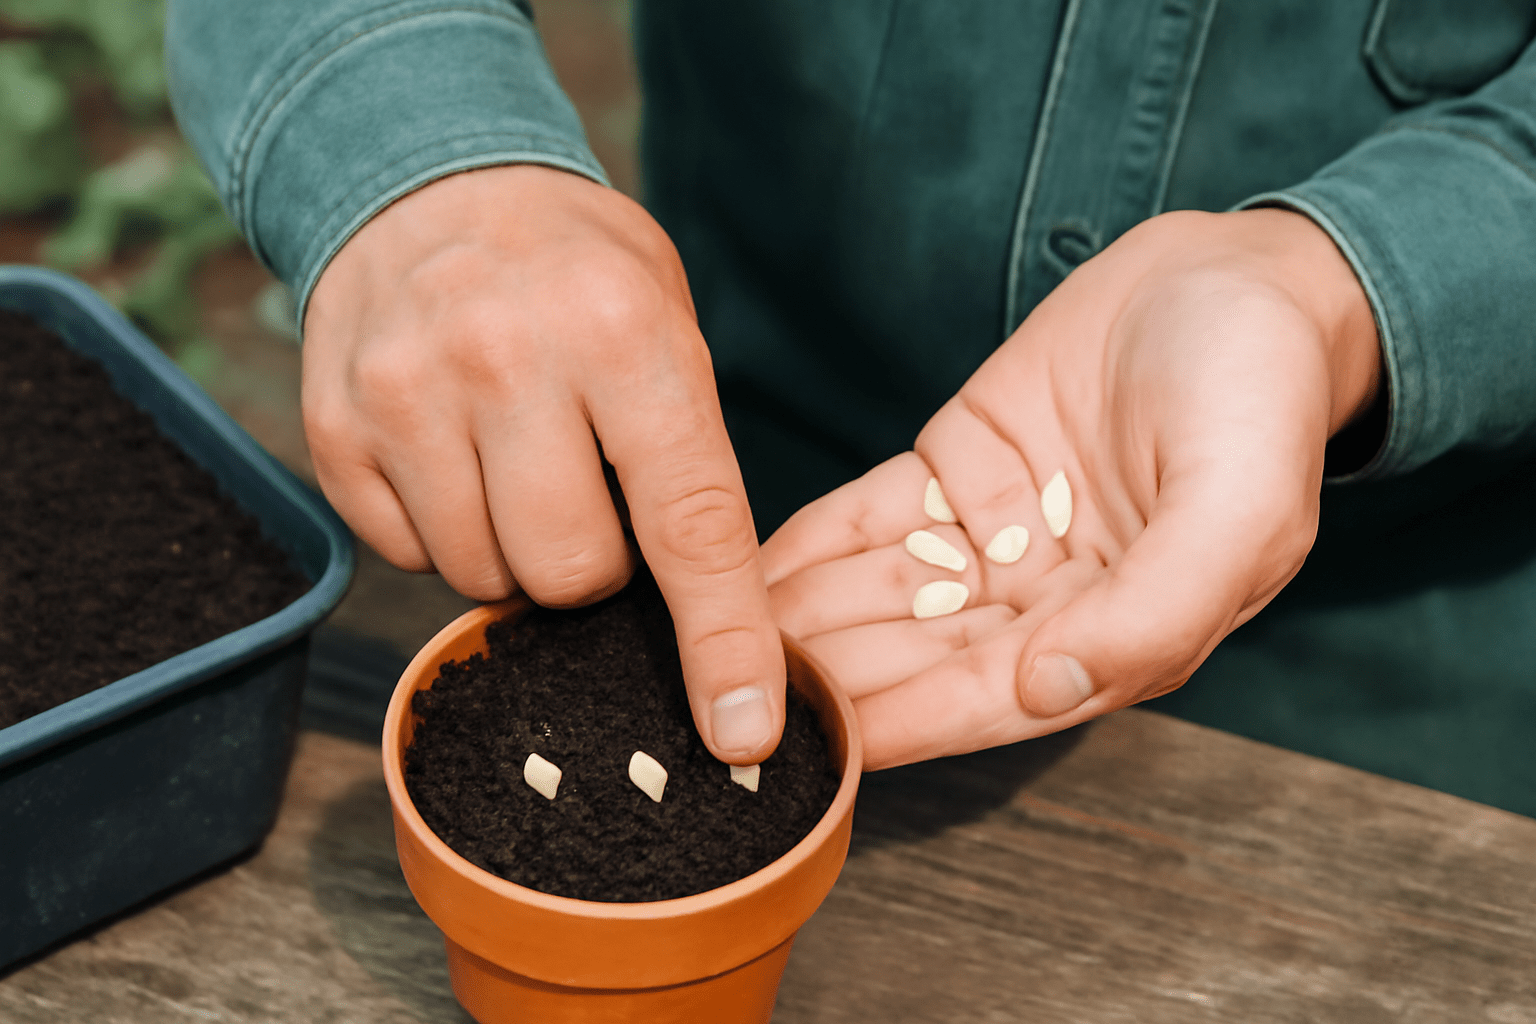
🌰 Step 3: Plant the Seeds 🌰
Now that your seeds are ready 🌱 and the soil is prepped, it’s time to plant! Follow these simple steps:
- Planting Depth: Make small holes in the soil about 1 to 2 inches deep 🏵️. This is the perfect depth for white ash seeds to germinate.
- Spacing: If you’re planting multiple seeds 🌱 in a tray or pot, space them at least 2-3 inches apart 🌿. This gives each seed room to grow without overcrowding.
- Plant the Seeds: Place one seed in each hole 🌰, then gently cover the seeds with soil. Lightly press down to ensure the seeds are in firm contact with the soil 🌱. Don’t pack the soil too tightly, though, as air must circulate to the seed 🌬️.
💧 Step 4: Watering and Moisture Management 💧
After planting your seeds 🌱, it’s time to water them—but not too much! Keep the soil moist, not soggy 💦.
- Water Gently: Use a watering can 💧 with a gentle spray nozzle or a spray bottle to moisten the soil without washing away the seeds 🌱.
- Humidity: If you’re planting indoors 🏡, cover your seed tray or pots with a clear plastic cover or plastic wrap 🛍️ to maintain humidity 🌥️. This mini-greenhouse effect will help the seeds germinate by trapping moisture 🌧️.
- Monitor Moisture: Keep the soil moist throughout the germination process 🌿, but be cautious not to overwater 🌊, as standing water can cause seeds to rot 🦠. A good rule of thumb is to check the soil regularly and water when it feels dry to the touch 🌾.
🌞 Step 5: Providing Light and Temperature 🌞
White ash seeds need the right amount of light 🌞 and warmth to sprout and grow strong 🌱:
- Light: Place your pots 🪴 or trays in a location that gets indirect sunlight 🌞. Direct sunlight can be too harsh for the seedlings, especially in the early stages 🌱. Aim for a spot with bright, filtered light 🌟.
- Temperature: Keep your seeds in a space where the temperature stays between 65°F and 75°F (18°C to 24°C) 🌡️. This is the ideal range for the seeds to germinate and sprout 🌱. Avoid placing them in drafts 🌬️ or areas with fluctuating temperatures 🌡️.
By following these steps 🌱, your white ash tree seeds will be well on their way to germinating and growing into strong, healthy seedlings 🌳. With a little care and patience, you’ll see tiny shoots pushing through the soil, marking the start of your new tree’s life 🌱.
🌿🌱 Caring for Ash Tree Seedlings 🌱🌿
Congratulations! Your white ash tree seeds 🌳 have germinated, and tiny seedlings 🌱 are emerging from the soil. Now comes the most important part—caring for your ash tree seedlings 🌱. With the right care, your young trees will thrive 🌳 and grow strong 💪. This section will guide you through the essential steps to ensure your seedlings get the best possible start in life 😊.
🌍 Transplanting Seedlings: When and How to Move Them 🌍
Once your seedlings have sprouted and grown a bit taller 🌱 (usually when they have a couple of sets of true leaves 🍃), it’s time to think about transplanting. Here’s what you need to know:
- When to Transplant: Seedlings are ready to be transplanted when they’re about 3-4 inches tall 🌱. This is usually when they’ve developed a few sets of leaves 🍂 and have a strong root system 🪴.
- Hardening Off: Before transplanting your seedlings outdoors 🏡, you must “harden them off.” This means gradually acclimating them to the outdoor environment 🌞:
- Start by placing the seedlings outside for a few hours each day in a shaded area 🌿.
- Slowly increase their time outdoors 🌞 over a week, exposing them to more direct sunlight ☀️ and outdoor conditions 🌳.
- After about a week, they should be ready for full exposure to outdoor conditions 🌞.
- Transplanting to Larger Pots or Outdoors:
- Larger Pots: If you’re not planting directly in the ground 🌍, move the seedlings to larger pots 🪴 with plenty of space for their roots 🌱 to grow. Ensure these pots have good drainage 💧.
- Outdoors: Choose a spot with well-drained soil 🌾 and full sunlight 🌞. Dig a hole deep enough to accommodate the roots without crowding them, and gently place the seedling in the hole 🌳. Cover the roots with soil 🌱, and water thoroughly 💦.
🌿 Ongoing Care for Ash Tree Seedlings 🌿
Once your seedlings are transplanted 🌱 and settling in, they will need consistent care to ensure they grow strong 🌳 and healthy 🌱. Here are some tips for keeping them happy:
- Watering: Seedlings need regular watering 💧, but avoid overwatering 🌊, as their roots are still developing. Water when the top inch of soil feels dry to the touch 🌱. Make sure the soil is moist, but not soggy 🌿.
- Fertilizing: Young ash tree seedlings don’t need fertilizer right away 🛑. In fact, fertilizing too early can burn their delicate roots 🌱. After a few months 🌱, you can start applying a light, balanced fertilizer 🌿 to encourage healthy growth. Use a slow-release fertilizer for the best results 🌱.
- Mulching: Mulch around the base of the seedlings 🍂 can help retain moisture 💧, suppress weeds 🌿, and maintain an even soil temperature 🌡️. Use organic mulch like wood chips 🌲 or bark for a natural option. Just be careful not to pile mulch directly against the trunk, as this can cause rot 🛑.
🦋 Pest and Disease Management 🦋
Keep an eye on your seedlings for signs of pests 🦠 or diseases. Common issues with ash trees include:
- Aphids: Small, soft-bodied insects 🐜 that suck the sap from leaves 🍃. You can wash them off with a gentle spray of water 💧 or use insecticidal soap 🧴.
- Powdery Mildew: A fungal infection that creates a white, powdery coating on leaves 🍂. Remove infected leaves 🍃 and avoid overhead watering 🌧️ to reduce moisture on the leaves.
✂️ Pruning ✂️
While your seedlings are still young 🌱, it’s a good idea to prune them ✂️ to help establish a strong structure. Trim any broken or damaged branches 🌿, and remove any competing stems 🌳 that are growing too close together. This will help the tree grow tall 🌳 and healthy.
🦋 Keeping Your Seedlings Safe and Healthy 🦋
- Protection from Harsh Elements: If you’re planting your seedlings outdoors 🏡, make sure they are protected from extreme weather conditions like strong winds 🌬️ or heavy rain 🌧️. Consider using temporary barriers 🛑 or row covers to shield them, especially in their early growth stages 🌱.
- Spacing: If you’re growing multiple seedlings 🌱, ensure they are spaced at least 6-8 feet apart when transplanting outdoors 🌳. Ash trees need plenty of space to spread out 🌿 as they grow.
With the right care and attention 🌱, your white ash tree seedlings 🌳 will continue to grow into strong, healthy trees 🌿. Keep monitoring their growth 📈, provide them with water 💧 and nutrients 🌱, and protect them from pests 🦠 and harsh weather 🌦️.
As they grow 🌳, you’ll witness the amazing transformation from tiny seedlings 🌱 to majestic trees 🌳 that will provide shade 🌞, beauty 🌸, and environmental benefits 🌍 for years to come. 🌳 In the next section, we’ll cover how to harvest your own seeds when it’s time to gather them for the future! Stay tuned! 🌱
🌳🍂 Harvesting and Collecting White Ash Tree Seeds 🍂🌳
Once your white ash trees 🌳 have grown strong, it’s time to think about harvesting seeds 🌱 for future planting. Whether you want to grow more trees 🌳 or collect seeds to share with others, understanding the best time and method to gather them is key. In this section, we’ll guide you through the process of harvesting and storing white ash tree seeds 🌱 so you can successfully grow more in the years to come! 🌱
⏰ When to Harvest White Ash Tree Seeds ⏰
Timing is crucial when it comes to harvesting white ash seeds 🌱. Collecting them at the right moment ensures that they are mature, viable, and ready to germinate 🌳. Here’s how to tell when it’s time to harvest:
- Mature Seeds: White ash seeds mature in late summer 🌞 to early fall 🍂, typically August to October. At this stage, the seeds have turned brown 🌰 and are fully developed, ready to be collected 🌿. If you wait too long ⏳, the seeds may naturally fall to the ground 🌍, so act before they drop!
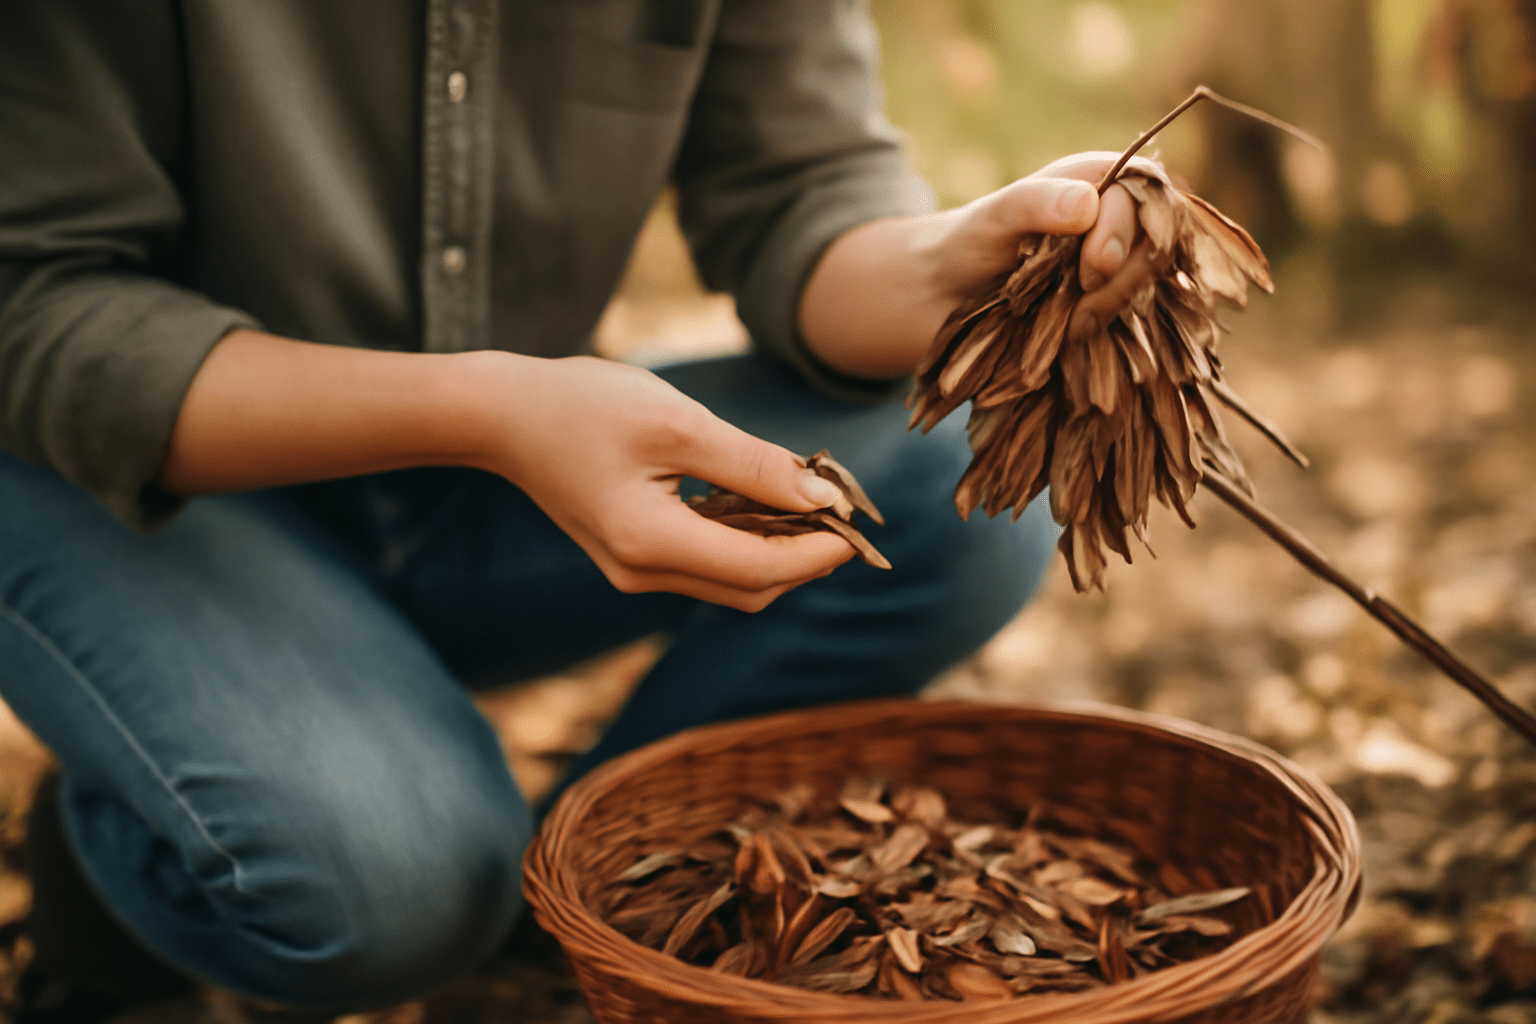
- Look for the Samaras: The seeds are contained in winged samaras, which look like small “helicopters” 🚁. When mature, these samaras should be brown 🍂 and papery. The wing will appear dry and the seed inside will be hard and firm to the touch 🌱.
- Dry Conditions: Ensure the seeds are dry when collected. If you collect them too early 🌧️, the seeds may still be immature and won’t germinate properly. If you wait too long ⏳, the seeds may lose their viability.
✂️ How to Harvest White Ash Tree Seeds ✂️
Harvesting white ash seeds 🌱 is easy, but it does require a bit of care. Follow these simple steps for a successful harvest 🌳:
- Pick the Seeds from the Tree: The seeds are typically attached to the branches 🌿 or already fallen to the ground 🌱. If they’re still on the tree, gently remove them using pruning shears ✂️ or your hands 🤲. Take care not to damage the samaras or surrounding branches 🌿.
- Collect Seeds from the Ground: If the seeds have already fallen, collect them from the ground beneath the tree 🌳. Look for clusters of samaras—they often fall in bunches, making collection easier 🌿.
- Avoid Wet or Moldy Seeds: If it’s been raining 🌧️ recently, check for any mold or moisture on the seeds. Avoid collecting any seeds that appear damaged or rotten 🍂, as these are less likely to germinate 🛑.
🌿 Cleaning and Preparing the Seeds 🌿
Once you’ve gathered the seeds 🌳, it’s time to clean and prepare them for storage or planting 🌱:
- Remove Debris: Gently shake or sift through the seeds to remove any leaves 🍃, twigs 🌿, or other debris. This ensures that only the seeds are stored 🍂.
- Dry the Seeds: Lay the collected seeds on a flat surface (like newspaper 📰 or a tray) and let them dry in a cool, dry area for a few days 🌬️. This prevents mold and ensures the seeds are completely dry before storage.
🏺 Storing White Ash Tree Seeds for Future Use 🏺
Proper storage is essential for keeping your white ash seeds 🌱 viable for future planting 🌳. Here’s how to store them:
- Airtight Containers: Store your dried seeds in airtight containers like glass jars 🍯, plastic bags 🛍️, or sealed plastic containers. This keeps moisture and air out 🌬️, preserving the seeds’ viability.
- Cool, Dry Location: Keep the stored seeds in a cool and dry place, like a pantry 🍽️, cellar, or refrigerator 🧊. Ideally, store them at temperatures between 34°F and 41°F (1°C to 5°C) 🌡️ to keep them dormant until you’re ready to plant them 🌱.
- Label and Date: It’s a good idea to label your storage containers with the type of seed 🌱 and the date you collected them 🗓️. This helps you keep track of the seeds’ age, as their germination rate decreases over time.
- Check Annually: If you’ve stored seeds for long periods ⏳, check their condition each year. Discard any seeds that show signs of mold or damage 🍂, and test the remaining seeds for germination before planting 🌱.
🌱 Tips for Seed Longevity 🌱
- Freezing Seeds: If you want to store seeds for longer periods 🕰️ (several years), you can freeze them ❄️. Make sure they’re in an airtight, moisture-proof container to prevent freezer burn. Freezing can help extend seed life 🌱 but should only be done with thoroughly dried seeds 🌿.
- Test Germination: Before planting stored seeds 🌳, perform a germination test by planting a few seeds in a small pot 🪴 or tray. If the seeds sprout 🌱 within a few weeks, they are ready to be used. If not, it may be time to get fresh seeds 🌱.
By following these steps 🌿, you’ll be able to harvest and store white ash tree seeds 🌳 effectively, ensuring that you can grow even more trees 🌱 in the future. The process of collecting and saving seeds is both practical and rewarding 🌿, allowing you to continue nurturing ash trees 🌳 for years to come 🌱.
🌳💪 Troubleshooting Common Issues in Growing White Ash Trees 💪🌳
Growing white ash trees 🌳 from seeds is an exciting and rewarding process 🌱, but like any gardening endeavor 🌿, you might face a few challenges along the way. Don’t worry! Every problem has a solution 🔧. In this section, we’ll address some of the most common issues you may encounter while growing your white ash trees 🌳 and provide practical, actionable tips to help you overcome them 😊.
🕑 1. Slow or No Germination 🕑
One of the most common frustrations when growing white ash trees from seeds 🌱 is slow or no germination. If your seeds aren’t sprouting, it could be due to several factors. Here’s what to check:
- Cold Stratification: Did you stratify the seeds before planting? ❄️ If not, this could be the reason for delayed germination 🌱. Cold stratification mimics winter conditions and breaks seed dormancy. If you forgot to do this, try re-stratifying your seeds in the fridge 🧊 for 30-60 days.
- Seed Viability: Make sure the seeds you planted were mature 🌰 and healthy when harvested 🌳. If you used seeds that were too immature or damaged, they may not germinate 🛑. Always select seeds that are firm, dry, and free of mold 🍂.
- Temperature: Ash seeds prefer temperatures between 65°F and 75°F (18°C to 24°C) 🌡️. If the temperature is too cold 🧊 or too hot 🔥, the seeds may not sprout. Consider moving your seedlings to a warmer or cooler spot, depending on the situation 🌞.
- Watering: Both overwatering 💧 and underwatering 🌊 can lead to poor germination. Keep the soil moist, but not soaked. If you notice standing water 💦 or overly dry soil 🌱, adjust your watering schedule accordingly.
🌊 2. Overwatering or Root Rot 🌊
Overwatering 💧 is a common problem, especially for beginners, and it can cause root rot 🪴, which harms or kills the seedlings. Here’s how to spot and fix it:
- Signs of Overwatering: Yellowing leaves 🍂, wilting despite wet soil 🌾, and a musty smell coming from the soil are all signs of overwatering. Ensure your pots have drainage holes 🪴 to allow excess water to escape.
- Fix: Allow the soil to dry out slightly before watering again 🌱. If the roots have started to rot, remove the seedlings from their pots 🌱 and check the roots 🪴. Trim away any mushy, discolored roots and repot the seedlings in fresh, well-draining soil 🌿.
- Prevention: Always check the top inch of the soil to ensure it’s dry before watering 💧. Use a spray bottle or a watering can with a gentle nozzle 🌬️ to prevent over-watering.
🌿 3. Leggy or Weak Seedlings 🌿
If your seedlings are growing tall and spindly 🌱, they might be stretching for light 🌞, a sign of insufficient sunlight. This is commonly referred to as “etiolation” 🌱. Here’s how to fix it:
- Increase Light Exposure: Ensure your seedlings are getting enough indirect sunlight 🌞. If you’re growing them indoors 🏡, consider adding a grow light 🌟 to supplement natural light. Place the seedlings near a window that gets bright, indirect light 🌞, or use a fluorescent or LED grow light for about 12-16 hours a day.
- Move to a Better Spot: If your seedlings are too far from the light source 💡, they may grow taller and weaker as they search for more light. Adjust their position to ensure they’re closer to the light source, but not directly in harsh sunlight 🌞.
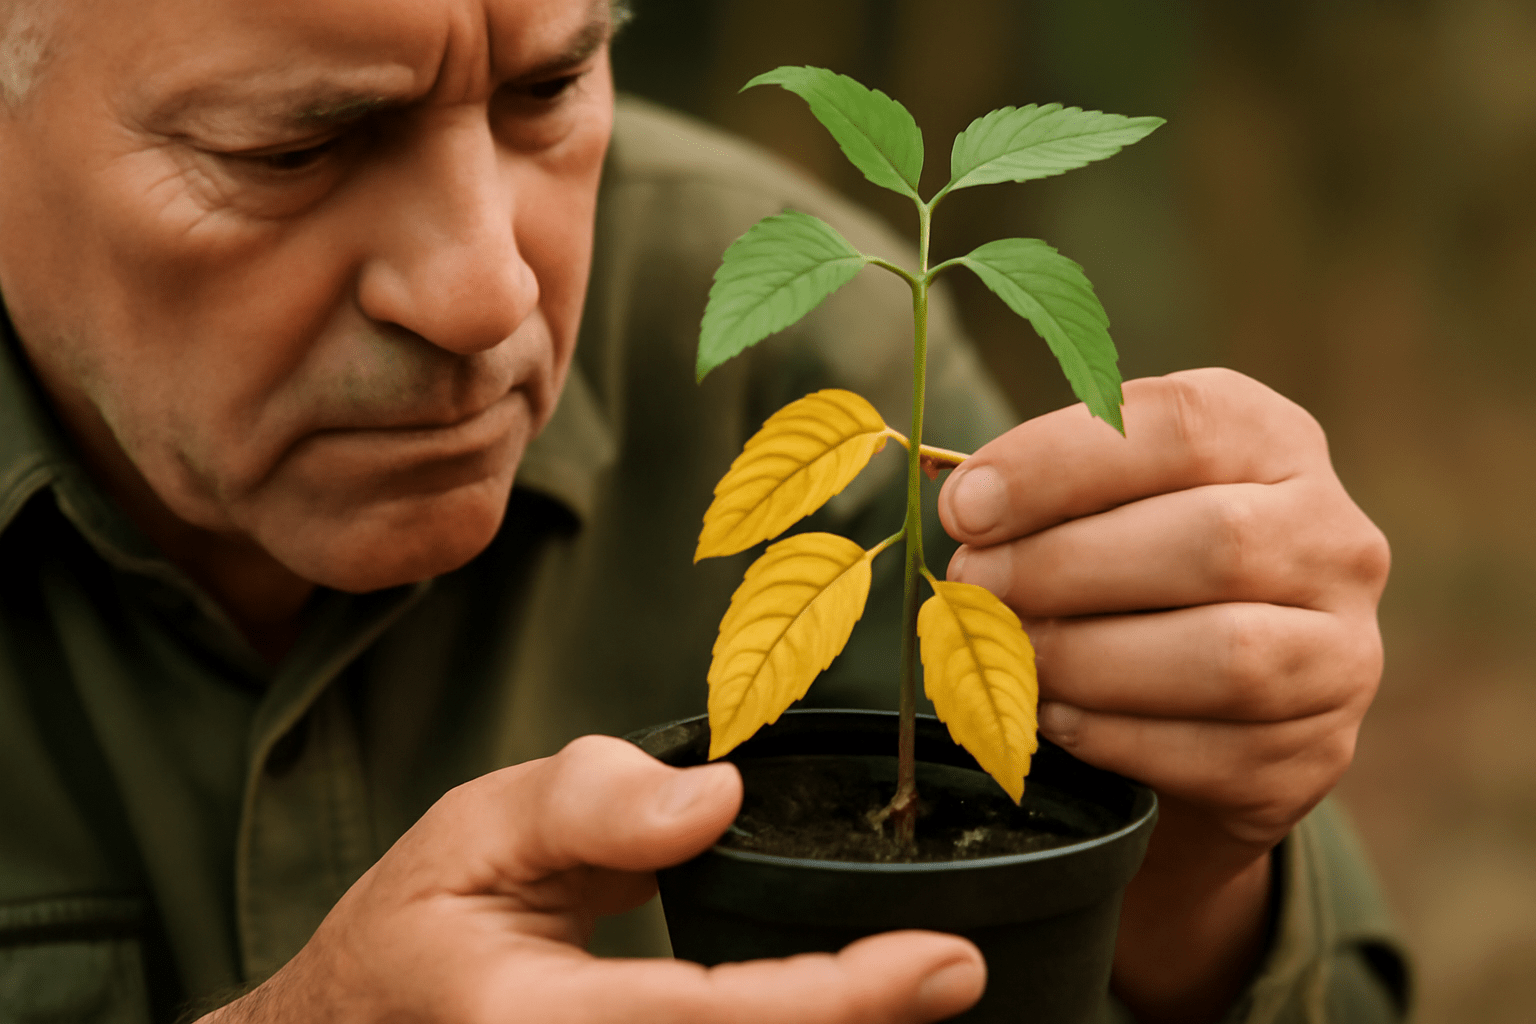
🍂 4. Yellowing Leaves 🍂
Yellowing leaves 🍃 can indicate several different problems 🌿. Here’s how to troubleshoot the issue:
- Nutrient Deficiency: If the seedlings are lacking essential nutrients like nitrogen, iron, or magnesium 🌱, their leaves may turn yellow 🍂. Once your seedlings are a few months old 🌿, you can apply a balanced fertilizer 🌾 to encourage healthy growth. Choose a slow-release fertilizer for best results.
- Watering Issues: As mentioned earlier, both overwatering 💦 and underwatering 🌾 can cause yellow leaves 🍃. Make sure the soil is properly moistened but not waterlogged 🌿. Check that your containers have good drainage 💧 to prevent standing water.
- Pests: Check the leaves 🍃 for signs of pests 🦠, such as aphids 🐜 or spider mites 🕷️, which can cause yellowing or speckled damage. If you notice pests, treat the plants with insecticidal soap 🧴 or rinse the leaves gently with water 💧.
🐛 5. Pests and Diseases 🐛
Young white ash seedlings 🌱 can be vulnerable to pests 🦠 and diseases 🦠. Here are some common issues and how to handle them:
- Aphids: These tiny, soft-bodied insects 🐜 suck the sap from leaves 🍃, causing distortion and yellowing 🌿. Remove aphids manually by spraying the leaves with a strong jet of water 💦 or use insecticidal soap 🧴.
- Powdery Mildew: This white, powdery fungus 🍂 can appear on leaves when the air is too humid 🌦️ and there’s poor air circulation 🌬️. Remove infected leaves 🍃 and make sure your seedlings have adequate airflow 💨. Avoid wetting the foliage when watering 🌧️.
- Emerald Ash Borer: Although primarily a problem for mature ash trees 🌳, this pest may affect young trees over time. If you notice dieback or visible damage to your tree’s bark 🌳, consider using pest control methods 🧴 or consult an expert about managing this invasive species 🦗.
🌍 6. Transplant Shock 🌍
When you transplant your seedlings 🌱 to larger pots 🪴 or outdoors 🌳, they may experience transplant shock, which can cause them to wilt or become stressed. Here’s how to minimize the risk:
- Hardening Off: Gradually acclimate your seedlings to outdoor conditions 🌞 by hardening them off over 7-10 days 🗓️. Start with a few hours of outdoor exposure in the shade 🌿 and gradually increase the time spent outside 🌳, eventually exposing them to direct sunlight 🌞.
- Watering After Transplanting: Make sure to water 💧 your seedlings thoroughly right after transplanting. This helps the roots settle into the new soil 🌱 and reduces stress 🌱.
By addressing these common issues and knowing how to troubleshoot them 🧑🌾, you can ensure that your white ash trees 🌳 stay healthy and grow strong 💪. Every plant faces challenges, but with a little knowledge 🧠 and patience ⏳, you’ll be able to overcome any hurdles that come your way 🌱.
🌳🌿 Final Thoughts: Growing White Ash Trees from Seeds 🌿🌳
Growing white ash trees from seeds 🌱 is a rewarding and fulfilling journey that brings both personal satisfaction 😊 and environmental benefits 🌍. From collecting seeds 🌰 to nurturing your young seedlings 🌱, every step you take brings you closer to creating a lasting, beautiful addition to your garden 🏡 or landscape 🌳.
By following the steps outlined in this guide 📚—whether you’re stratifying seeds ❄️, transplanting seedlings 🪴, or troubleshooting common issues 🛠️—you now have the tools and knowledge to grow healthy 🌿, thriving white ash trees 🌳. The process may take time ⏳ and patience 🧘♀️, but the reward is well worth the effort 🌱. With proper care 💧, your ash trees will provide shade 🌞, beauty 🌸, and a valuable contribution to the environment 🌳 for years to come.
Remember, every seed you plant 🌱 is a step towards a greener 🌍, more sustainable future 🌱. So, gather your supplies 🛠️, prepare your seeds 🌰, and start planting today 🌿. You’ve got this! 🙌
Happy planting 🌱, and may your white ash trees grow strong and tall 🌳! 🌿🌳