
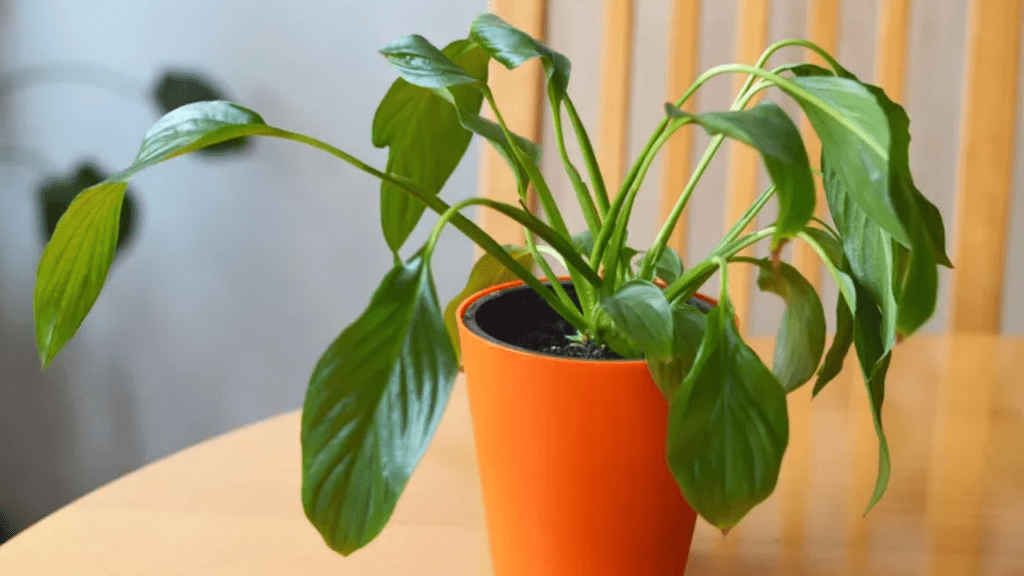
Peace lilies are popular houseplants known for their lush green leaves and elegant white flowers. However, many plant owners find themselves asking, “Why is my peace lily drooping?” This common issue can be caused by several factors, each requiring different care solutions. In this article, we’ll explore the top reasons your peace lily might be drooping and provide practical tips to revive your beloved plant.
Peace lilies are a popular choice for houseplants due to their beautiful appearance and relatively low maintenance care. However, many plant owners may encounter the issue of their peace lily drooping. This can be caused by a variety of factors such as overwatering, underwatering, or inadequate lighting. It’s important to identify the specific cause of the drooping in order to provide the appropriate care and revive the plant. By adjusting the watering schedule, ensuring proper light exposure, and addressing any issues with the roots or soil, you can help your peace lily regain its healthy, upright appearance. With the right care and attention, your peace lily can thrive and continue to bring beauty to your home.
Understanding Peace Lily Drooping
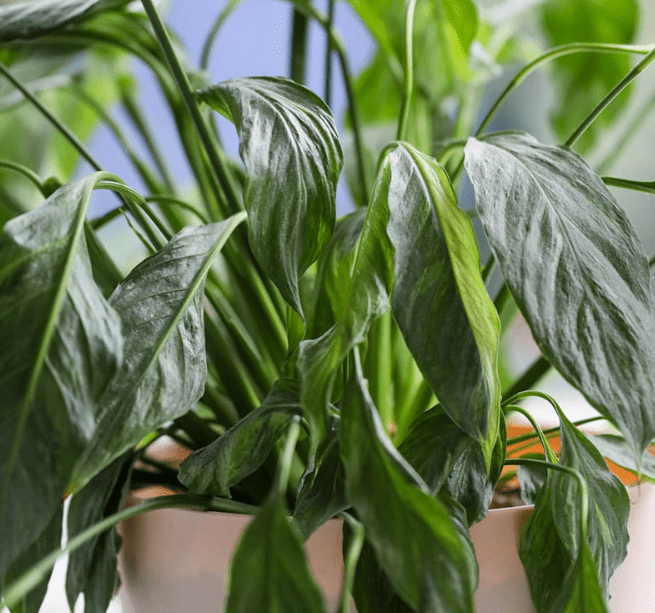
What Does Drooping Look Like?
Describe the signs and symptoms of a drooping peace lily.
When a peace lily is drooping, the leaves will appear wilted and may even start to turn yellow. The plant may also stop producing new blooms. It’s important to check the soil for overwatering or underwatering, as both can cause the plant to droop. Overwatering can lead to root rot, while underwatering can cause the plant to become dehydrated. Additionally, if the peace lily is not receiving enough light, it may start to droop. It’s important to assess the environment and make adjustments as necessary to ensure the plant is receiving the proper care. By addressing the specific cause of the drooping and providing the appropriate care, you can help your peace lily to regain its healthy, upright appearance.
Why It Matters
Explain the impact of drooping on the plant’s health and appearance.
When a peace lily is drooping, it can have a significant impact on the plant’s health and appearance. The leaves will appear wilted and may even start to turn yellow, which can make the plant look unhealthy and unattractive. In addition, the plant may stop producing new blooms, which can diminish its overall beauty. Drooping can also be a sign of underlying issues such as overwatering or underwatering. Overwatering can lead to root rot, which can ultimately kill the plant if not addressed. On the other hand, underwatering can cause the plant to become dehydrated and wilt. Additionally, if the peace lily is not receiving enough light, it may start to droop and look unhealthy. It’s important to address drooping promptly and provide the necessary care to ensure the plant’s health and appearance are maintained. By identifying and addressing the specific cause of the drooping, you can help your peace lily regain its healthy, upright appearance.
Common Causes of Drooping
Watering Issues
Overwatering: Symptoms, causes, and solutions.
Overwatering can have negative effects on your plants, including peace lilies. Some symptoms of overwatering include yellowing or browning of the leaves, wilting, and a soggy or mushy appearance of the plant. Overwatering can lead to root rot, which can ultimately kill the plant if not addressed. To avoid overwatering, make sure to allow the soil to dry out slightly between waterings and ensure proper drainage in the pot. Additionally, underwatering can cause the plant to become dehydrated and wilt. It’s important to find the right balance in watering to keep your peace lily healthy. Another cause of drooping in peace lilies can be lack of light. If the plant is not receiving enough light, it may start to droop and look unhealthy. To address drooping, it’s important to identify and address the specific cause, whether it’s overwatering, underwatering, or lack of light. By providing the necessary care, you can help your peace lily regain its healthy, upright appearance.

Light Conditions
Too Much Light: Effects and adjustments.
Peace lilies are generally hardy and easy to care for, but they can be sensitive to light conditions. Too much light can have negative effects on peace lilies, causing their leaves to turn yellow and become scorched. To prevent this, it’s important to place your peace lily in a location with indirect or filtered light. If your peace lily is receiving too much direct sunlight, consider moving it to a spot where it can get the right amount of light without being overwhelmed. You can also adjust the light conditions by using sheer curtains or placing the plant in a location that receives more shade. By making these adjustments, you can help your peace lily thrive and maintain its healthy, green foliage.
Too Little Light: Effects and adjustments.
Peace lilies are generally hardy and easy to care for, but they can be sensitive to light conditions. Too much light can have negative effects on peace lilies, causing their leaves to turn yellow and become scorched. To prevent this, it’s important to place your peace lily in a location with indirect or filtered light. If your peace lily is receiving too much direct sunlight, consider moving it to a spot where it can get the right amount of light without being overwhelmed. You can also adjust the light conditions by using sheer curtains or placing the plant in a location that receives more shade.
On the other hand, too little light can also be problematic for peace lilies. If they don’t receive enough light, they may not produce flowers or may have stunted growth. If you notice your peace lily isn’t thriving, consider moving it to a brighter location, but still avoiding direct sunlight. You can also supplement the natural light with artificial light sources, such as grow lights, to ensure your peace lily gets the right amount of light to thrive. By making these adjustments, you can help your peace lily maintain its healthy, green foliage and encourage it to bloom.
Temperature and Humidity
Temperature and Humidity are important factors to consider when caring for your peace lily. These plants thrive in temperatures between 65-80 degrees Fahrenheit, so it’s important to keep them in a comfortable indoor environment. Additionally, peace lilies prefer higher humidity levels, so it’s a good idea to mist the leaves regularly or place the plant on a shallow tray filled with water and pebbles to increase the humidity around the plant. However, make sure not to let the plant sit in water, as this can lead to root rot. It’s also important to avoid placing the peace lily near drafty windows or air vents, as sudden changes in temperature can stress the plant. By paying attention to the temperature and humidity levels in your home, you can create an ideal environment for your peace lily to thrive.
Soil Quality
Importance of well-draining soil.
The importance of well-draining soil cannot be overstated when it comes to caring for your peace lily. Peace lilies prefer soil that is rich and well-draining, which means it allows excess water to flow through and doesn’t become waterlogged. If the soil is too compacted or doesn’t drain well, it can lead to root rot and other issues that can harm the plant. To ensure your peace lily has the best soil conditions, consider using a mix of potting soil, perlite, and peat moss to create a well-draining environment for the roots. This will help to prevent water from pooling around the roots and causing damage to the plant. By paying attention to the soil quality and ensuring it is well-draining, you can help your peace lily maintain its healthy, green foliage and encourage it to bloom.
Nutrient deficiencies and appropriate fertilization.
It’s important to ensure that your peace lily has the right soil conditions to thrive. One key aspect of soil quality is ensuring that the soil is well-draining. Peace lilies prefer rich, well-draining soil that allows excess water to flow through and prevents waterlogging. If the soil is too compacted or doesn’t drain well, it can lead to issues such as root rot, which can harm the plant. To create an ideal soil environment for your peace lily, consider using a mix of potting soil, perlite, and peat moss to promote proper drainage and prevent water from pooling around the roots. By paying attention to the soil quality and ensuring it is well-draining, you can help your peace lily maintain its healthy, green foliage and encourage it to bloom. In addition to soil quality, it’s also important to consider nutrient deficiencies and appropriate fertilization to support the plant’s growth and health. By providing the right nutrients and soil conditions, you can help your peace lily thrive and flourish.
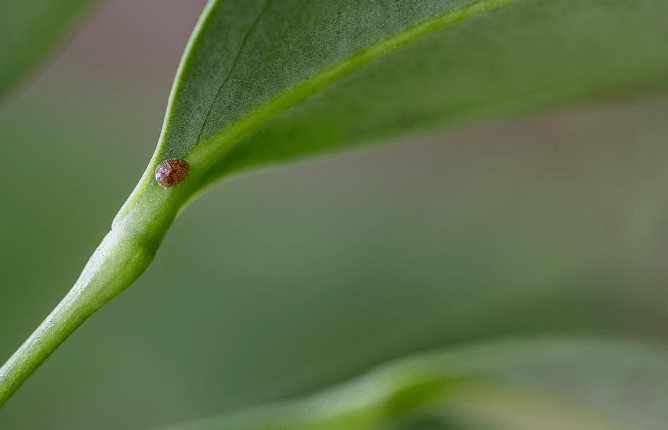
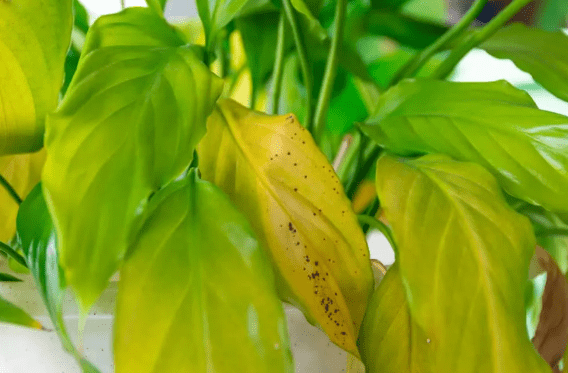
Pests and Diseases
Pests and Diseases can also pose a threat to the health of your peace lily. Common pests such as spider mites, mealybugs, and aphids can infest the plant and cause damage to its foliage. It’s important to regularly inspect your peace lily for any signs of pest infestation and take appropriate measures to control and mitigate the issue. In addition, fungal diseases such as powdery mildew and root rot can also affect peace lilies, especially if the soil is too moist and doesn’t drain well. To prevent and manage these diseases, it’s important to avoid overwatering, ensure proper air circulation around the plant, and remove any infected foliage. By being proactive in monitoring for pests and diseases and taking appropriate preventive measures, you can help keep your peace lily healthy and thriving.
Repotting Stress
How repotting can cause transplant shock.
When it comes to repotting your peace lily, it’s important to be aware of the potential for transplant shock. Transplant shock occurs when a plant is disturbed during repotting, causing stress and damage to the roots. This can lead to wilting, yellowing leaves, and overall decline in the plant’s health.
To minimize the risk of transplant shock, it’s important to be gentle when removing the plant from its old pot and to handle the roots carefully. It’s also important to provide the plant with the right growing conditions after repotting, including the appropriate amount of water and sunlight. By taking these precautions, you can help reduce the likelihood of transplant shock and give your peace lily the best chance of thriving after being repotted.
Tips for minimizing stress during repotting.
When repotting your plants, it’s important to be aware of the potential for transplant shock. Transplant shock occurs when a plant is disturbed during repotting, causing stress and damage to the roots. This can lead to wilting, yellowing leaves, and an overall decline in the plant’s health. To minimize the risk of transplant shock, it’s important to be gentle when removing the plant from its old pot and to handle the roots carefully. Choose a new pot that is only slightly larger than the old one to minimize the amount of soil used and reduce the shock to the roots.
It’s also important to provide the plant with the right growing conditions after repotting, including the appropriate amount of water and sunlight. Make sure to water the plant thoroughly after repotting and then allow the soil to dry out slightly before watering again. This will help the plant adjust to its new environment without becoming waterlogged. Additionally, place the plant in a location where it will receive the amount of sunlight it needs to thrive.
By taking these precautions and providing the plant with proper care after repotting, you can help reduce the likelihood of transplant shock and give your plant the best chance of thriving in its new pot. Remember to be patient and allow the plant to adjust to its new environment, and it will reward you with healthy growth.
Detailed Solutions and Care Tips
Watering Best Practices
How to properly water a peace lily.
Proper watering is essential for the health and well-being of a peace lily. When repotting your peace lily, it’s important to choose a new pot that is only slightly larger than the old one. This minimizes the amount of soil used and reduces the shock to the roots. After repotting, it’s crucial to provide the plant with the right growing conditions, including the appropriate amount of water and sunlight.
When watering a peace lily, it’s best to water the plant thoroughly after repotting and then allow the soil to dry out slightly before watering again. This helps the plant adjust to its new environment without becoming waterlogged. Additionally, it’s important to place the plant in a location where it will receive the amount of sunlight it needs to thrive.
By following these watering best practices and providing the plant with proper care after repotting, you can help reduce the likelihood of transplant shock and give your peace lily the best chance of thriving in its new pot. It’s important to be patient and allow the plant to adjust to its new environment, and it will reward you with healthy growth.
Signs of correct and incorrect watering.
Correct watering is essential for the health of your plants. Signs of correct watering include healthy, vibrant leaves and strong, sturdy stems. The soil should be consistently moist, but not waterlogged, and the plant should not show signs of wilting. On the other hand, signs of incorrect watering can include yellowing or browning of the leaves, wilting, and a general lack of vigor in the plant. Overwatering can lead to root rot and other issues, while underwatering can cause the plant to become dehydrated and stressed. It’s important to monitor the soil moisture and adjust your watering routine as needed to ensure the plant’s health and vitality. Remember to water the plant thoroughly, allowing the water to penetrate the root system, and then allow the soil to dry out slightly before watering again. This helps to prevent waterlogging and gives the plant’s roots a chance to breathe. By paying attention to these signs and adjusting your watering habits accordingly, you can help your plants thrive and grow beautifully.
Optimizing Light Conditions
Optimizing Light Conditions is crucial for the health and growth of your plants. Different plants have different light requirements, so it’s important to do your research and understand the specific needs of your plants. Some plants thrive in bright, direct sunlight, while others prefer indirect or shaded light. Pay attention to the light conditions in your home or garden and place your plants accordingly. If you notice that your plant is leaning towards the light source or if it is not getting enough light, consider moving it to a different location. Using grow lights can also be an effective way to supplement natural light and ensure that your plants are getting the right amount of light. Remember to monitor the light conditions regularly and make adjustments as needed to help your plants thrive.
Maintaining Ideal Temperature and Humidity
Maintaining Ideal Temperature and Humidity is essential for the optimal growth and health of your plants. Different plants have different temperature and humidity requirements, so it’s important to create the right environment for each type of plant. Most plants thrive in temperatures between 65-75 degrees Fahrenheit during the day and slightly cooler at night. Humidity levels also play a crucial role in plant health, with most plants preferring humidity levels between 50-60%. You can monitor the temperature and humidity levels using a thermometer and hygrometer, and make adjustments as needed to maintain the ideal conditions for your plants. Using a humidifier or misting your plants can help increase humidity levels, while opening windows or using a dehumidifier can help reduce humidity when needed. By maintaining the ideal temperature and humidity for your plants, you can promote healthy growth and prevent issues such as wilting or yellowing leaves. Remember to regularly monitor and adjust the temperature and humidity levels to ensure that your plants are thriving in the optimal environment.
Improving Soil Quality
Choosing the right potting mix.
When it comes to choosing the right potting mix for your plants, it’s important to consider the specific needs of each type of plant. Different plants require different levels of moisture retention, aeration, and nutrient content in the soil. Some plants may need a well-draining mix with plenty of organic matter, while others may thrive in a heavier mix with higher water retention. You can also consider adding amendments such as perlite or vermiculite to improve drainage and aeration, or adding compost or fertilizer to boost nutrient content. It’s important to do your research and understand the specific needs of the plants you are working with in order to choose the best potting mix for them. Additionally, regularly repotting your plants with fresh potting mix can help ensure that they have access to the nutrients and environment they need to thrive. By choosing the right potting mix and regularly repotting your plants, you can promote healthy growth and ensure that your plants are getting the support they need to flourish.
How and when to fertilize peace lilies.
Peace lilies are beautiful and easy to care for indoor plants that can thrive with the right fertilization. It’s best to fertilize peace lilies during their growing season, which is typically in the spring and summer months. You can use a balanced, water-soluble fertilizer and dilute it to half strength before applying it to the soil. Be sure to water your peace lily thoroughly before applying the fertilizer to avoid burning the roots. Fertilizing your peace lily every six to eight weeks during the growing season can help promote healthy growth and beautiful blooms. Remember to follow the instructions on the fertilizer package and avoid over-fertilizing, as this can damage the plant. With the right care and fertilization, your peace lily can continue to thrive and bring beauty to your indoor space.
Dealing with Pests and Diseases
Preventive measures and regular inspections.
Peace lilies are beautiful and relatively easy to care for indoor plants, but they do require some preventive measures and regular inspections to keep them healthy. When it comes to fertilizing peace lilies, it’s best to do so during their growing season, which is typically in the spring and summer months. You can use a balanced, water-soluble fertilizer and dilute it to half strength before applying it to the soil. Before applying the fertilizer, be sure to water your peace lily thoroughly to avoid burning the roots.
Fertilizing your peace lily every six to eight weeks during the growing season can help promote healthy growth and beautiful blooms. However, it’s important to follow the instructions on the fertilizer package and avoid over-fertilizing, as this can damage the plant. In addition to fertilization, it’s important to also take preventive measures and regularly inspect your peace lily for pests and diseases.
By following these steps and providing the right care and fertilization, your peace lily can continue to thrive and bring beauty to your indoor space.
Natural and chemical treatments for pests and diseases.
When it comes to treating pests and diseases in your plants, there are both natural and chemical options available. Natural treatments can include using neem oil, insecticidal soap, or homemade remedies using ingredients like garlic, onion, or chili peppers. These natural treatments can be effective in controlling pests and diseases without harming the environment. On the other hand, chemical treatments such as synthetic pesticides and fungicides can also be used to combat pests and diseases. However, it’s important to use these chemicals sparingly and according to the instructions on the labels to prevent any harm to the plant or the environment. When choosing a treatment, consider the severity of the pest or disease, the type of plant, and any potential harm to beneficial insects or wildlife. It’s also important to take preventive measures such as proper watering, pruning, and maintaining good plant health to reduce the risk of pests and diseases. By being proactive and using the right treatments, you can effectively control pests and diseases and keep your plants healthy and thriving.
Proper Repotting Techniques
Step-by-step guide to repotting peace lilies.
Repotting peace lilies is an important part of their care to ensure they continue to thrive and grow. Here is a step-by-step guide to repotting peace lilies:
- Prepare the new pot: Choose a pot that is 1-2 inches larger in diameter than the current pot the peace lily is in. Make sure the pot has drainage holes at the bottom to prevent waterlogging.
- Remove the peace lily: Gently tip the peace lily out of its current pot, being careful not to damage the roots. If the plant is root-bound, you may need to gently loosen the roots to encourage new growth.
- Prepare the soil: Use a well-draining, high-quality potting mix that is suitable for peace lilies. You can also mix in some perlite or sand to improve drainage.
- Repot the peace lily: Place a layer of soil at the bottom of the new pot, then carefully place the peace lily in the pot. Add more soil around the sides and gently firm it down to provide support for the plant.
- Water the plant: After repotting, water the peace lily thoroughly to help settle the soil and hydrate the plant.
- Place the plant in a suitable location: Peace lilies prefer bright, indirect light, so find a spot in your home that provides these conditions.
By following these steps, you can ensure that your peace lily is repotted successfully and continues to grow and thrive in its new pot.
Aftercare tips to help the plant recover from repotting.
When repotting a peace lily, it’s important to take care of the plant to ensure it recovers and continues to thrive. One of the most important aftercare tips is to prepare the soil properly. Use a well-draining, high-quality potting mix that is suitable for peace lilies. You can also mix in some perlite or sand to improve drainage. When repotting the peace lily, make sure to place a layer of soil at the bottom of the new pot, then carefully place the peace lily in the pot. Add more soil around the sides and gently firm it down to provide support for the plant. After repotting, water the peace lily thoroughly to help settle the soil and hydrate the plant. Finally, place the plant in a suitable location. Peace lilies prefer bright, indirect light, so find a spot in your home that provides these conditions. By following these steps, you can ensure that your peace lily is repotted successfully and continues to grow and thrive in its new pot.
Trimming and Pruning
How to trim old and yellowing leaves.
Trimming old and yellowing leaves from your peace lily is important for the health and appearance of the plant. To trim the leaves, simply use a pair of clean, sharp scissors or pruning shears to carefully cut the leaves at the base where they meet the main stem. Be sure to trim the leaves close to the stem to promote new growth. It’s important to regularly remove old and yellowing leaves to prevent the spread of disease and to encourage the plant to focus its energy on producing new, healthy leaves. Additionally, removing old leaves can improve the overall appearance of the plant and prevent it from looking untidy. After trimming the leaves, it’s important to properly care for the plant to ensure its continued health and growth. This includes providing the peace lily with the right amount of water, sunlight, and fertilizer, as well as monitoring for any signs of pests or disease. By regularly trimming old and yellowing leaves and providing the necessary care, you can help your peace lily to thrive and continue to be a beautiful addition to your home.
Benefits of regular pruning for plant health.
Pruning is an important aspect of plant care that can greatly benefit the health of your plants. When you regularly prune your plants, you are removing dead or dying leaves and branches, which can help prevent the spread of disease and pests. This also allows the plant to focus its energy on producing new, healthy growth. Regular pruning can also improve the overall appearance of the plant, making it look more tidy and well-kept. By removing old and yellowing leaves, you are ensuring that the plant can continue to thrive and flourish. Additionally, pruning can promote better air circulation and sunlight exposure for the plant, leading to improved overall health. Overall, regular pruning is essential for maintaining the health and vitality of your plants. Remember to use clean, sharp tools and to properly care for the plant after pruning to ensure its continued health and growth.
In conclusion, it’s important to pay attention to the care and maintenance of your peace lily to prevent it from drooping. Common reasons for drooping include overwatering, underwatering, or inadequate light. By adjusting your watering schedule and providing the right amount of light, you can revive your peace lily and help it thrive. Additionally, regularly checking the soil moisture and providing a well-draining pot can also contribute to the health of your plant. With the right care and attention, your peace lily can bounce back and continue to bring beauty to your space.