
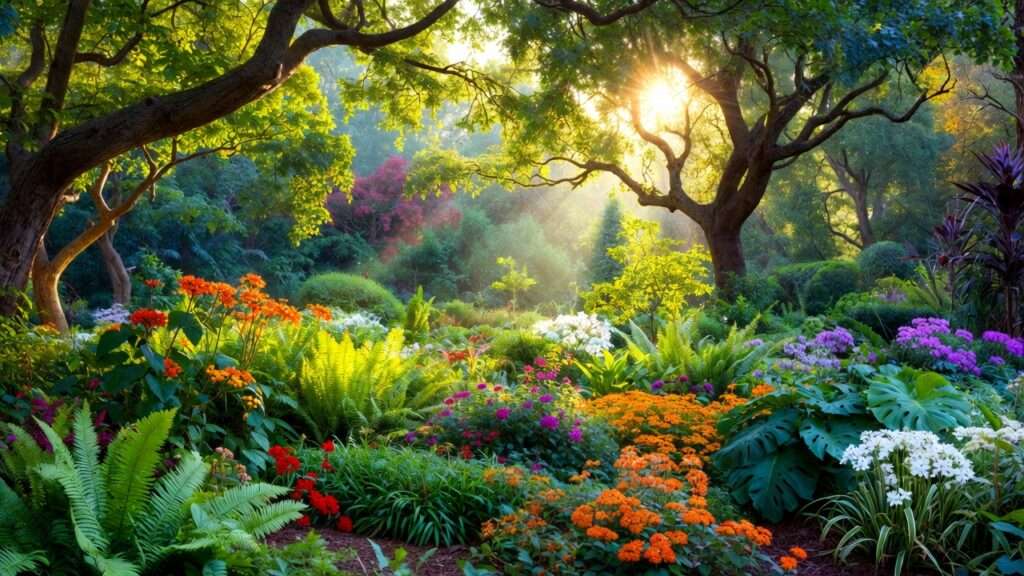
Is your once-beautiful garden slowly turning into a dim, struggling shadow-land? 🌱😔 Maybe the lawn is patchy and thin, your prized hostas are stretching desperately toward the few sunbeams that sneak through, and even the tomatoes on the sunny side of the house refuse to ripen properly.
The culprit is almost always the same: a dense tree canopy that has grown too thick and is now blocking precious sunlight from reaching the plants below.
Pruning dense canopies for sunlight is one of the most powerful, yet surprisingly underutilized, tools available to home gardeners and tree owners. When done correctly, it can dramatically transform a dark, tired landscape into a vibrant, healthy, sun-dappled paradise — all while actually improving the long-term health and beauty of your trees. ✨
In this in-depth expert guide, you’ll learn exactly:
- Why too much shade silently damages gardens and trees
- When, why, and — most importantly — how to safely thin a dense canopy
- Professional techniques used by certified arborists
- Species-specific advice for the most common problem trees
- Critical mistakes that can harm (or even kill) your trees
- Aftercare steps that help your tree bounce back stronger than ever
Let’s bring the sunshine back where it belongs — without sacrificing your beautiful trees. Ready? 🌳💚
Why Dense Canopies Cause Problems — And Why Strategic Pruning Helps (H2)
Too much shade creates a cascade of negative effects that most homeowners don’t connect to their trees until it’s already quite advanced.
Common symptoms of excessive canopy density:
- Thin, weak, patchy turf grass that struggles to grow
- Leggy, stretched-out perennials and groundcovers
- Poor flowering and reduced fruit set/quality 🍎
- Increased fungal diseases (powdery mildew, sooty mold, leaf spot) due to poor air circulation 🍄
- Bare lower branches and early leaf drop inside the canopy
- Moss and algae buildup on trunks and soil surface
But here’s the good news: trees are remarkably resilient when we help them the right way.
Scientifically proven benefits of proper crown thinning for sunlight penetration:
- Increased photosynthetic efficiency in the interior and lower canopy → healthier overall tree
- Better branch taper and structural strength (less wind sail effect in storms) 🌬️
- Reduced risk of fungal and bacterial infections through improved airflow and drying
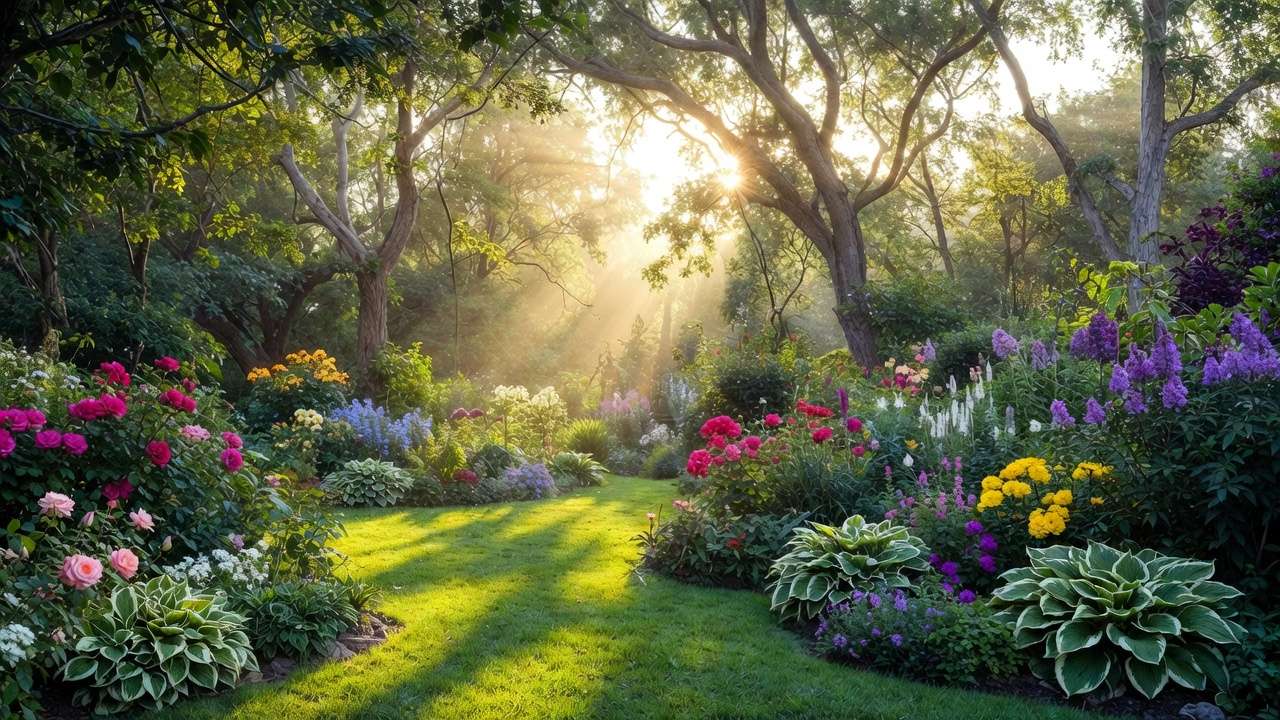
- Enhanced wildlife habitat (more light = more understory plants = more insects = more birds!)
- Significantly better aesthetics — a beautifully dappled light pattern instead of deep gloom
- Higher property value (landscaped, healthy trees are a major selling point)
Important myth-buster 🙅♂️ You do not need to drastically reduce tree size or remove the tree entirely to get more sunlight. Most of the time, selective thinning (removing 10–25% of the canopy) achieves dramatic light improvement while preserving the tree’s natural beauty and structure.
When Is Your Canopy Actually Too Dense? Quick Diagnostic Checklist (H2)
Ask yourself these questions while standing under your tree on a bright day:
- Is there almost no dappled sunlight reaching the ground?
- Do lower branches die back year after year (natural shade-out)?
- Is the turf grass thin, yellowish, or completely bare in large patches?
- Do shade-loving plants look stretched and weak instead of lush?
- Are flowers small, pale, and produced in smaller numbers?
- Does the tree feel “heavy” and dark even in early spring before full leaf-out?
If you answered “yes” to 3 or more questions → it’s time to seriously consider pruning dense canopies for sunlight.
Pro tip from arborists: The best time to evaluate canopy density is late winter / very early spring before buds open — you can see the branch structure clearly without leaves blocking the view ❄️🌱
Best Time to Prune Dense Canopies for Sunlight (H2)
Timing is critical — pruning at the wrong time can invite disease, cause excessive bleeding, or trigger unwanted water sprout growth.
Recommended windows (most temperate climates):
- Ideal: Late winter to very early spring (dormant season) → February–early April in most zones (before buds swell) → Lowest risk of disease, easiest to see structure, tree uses stored energy efficiently
- Acceptable (lighter work only): Summer (late June–early August) → Good for removing water sprouts, crossing branches, or light thinning → Trees are actively growing and can compartmentalize wounds quickly
- Avoid these periods:
- Spring (bud break to full leaf-out) — high risk of bleeding + disease
- Fall (September–November) — trees are preparing for dormancy, wounds heal slowly
- During oak wilt season (spring–early summer in oak regions) — never prune oaks
Golden rule: Always prune on dry days with several dry days forecast afterward to minimize fungal spore infection risk ☔
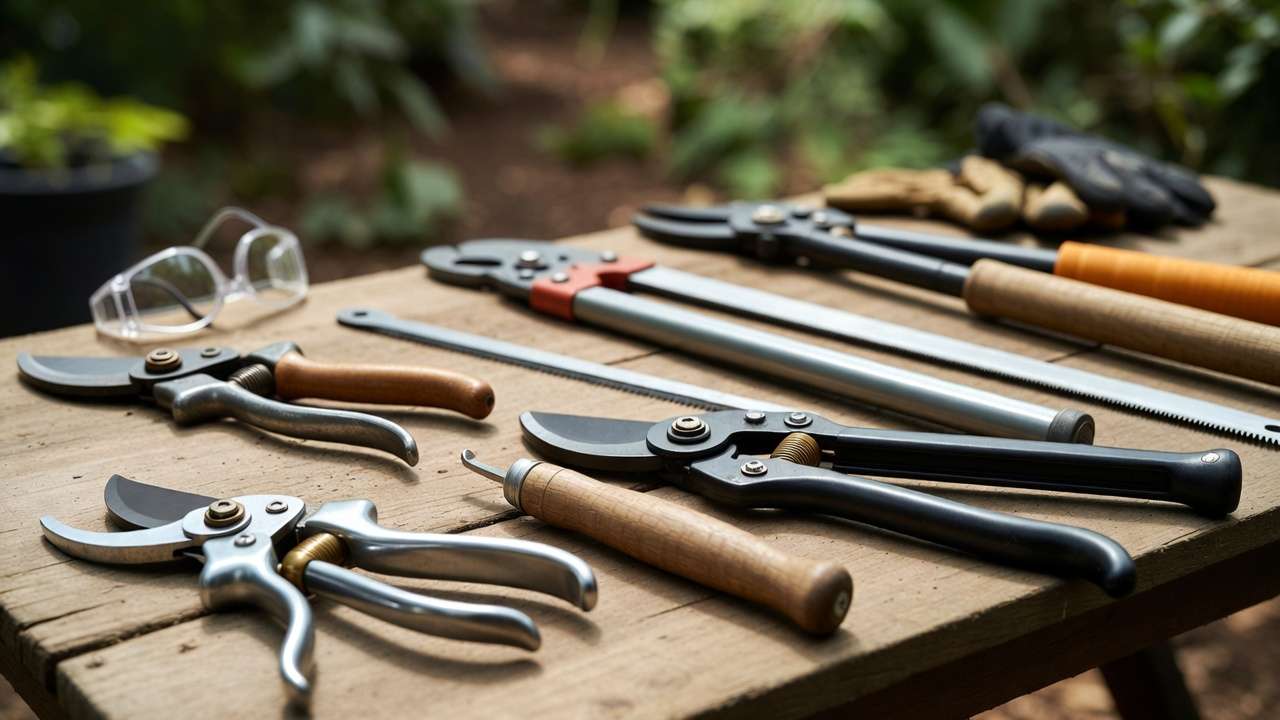
Tools & Safety Essentials Every Home Gardener Needs (H2) 🔧🛡️
Before you make a single cut, gather the right tools and prioritize safety — this is non-negotiable for protecting both yourself and your tree. Poor equipment or rushing without protection is one of the top reasons DIY pruning goes wrong 😱
Essential pruning tools (keep them sharp!):
- Bypass pruners — for branches up to ¾ inch (clean, precise cuts on live wood)
- Loppers — for 1–2 inch branches (long handles give leverage)
- Pruning saw — folding or curved for 2–4+ inch limbs (cuts on the pull stroke)
- Pole pruner/saw combo — reach higher branches safely from the ground
- Sharpening stone/file — dull tools tear bark and invite disease
Must-have safety gear:
- Safety glasses or goggles
- Heavy-duty gloves (cut-resistant if possible)
- Hard hat (especially under large trees)
- Sturdy, non-slip boots
- Long pants & sleeves
- Stable ladder or platform (never over-reach!)
Expert safety rule: If the tree is taller than 30 feet, has branches near power lines, shows signs of decay, or you’re uncomfortable at height — call a certified arborist ⚠️. Professionals follow ANSI A300 standards and ISA best practices for safe, effective work.
Step-by-Step Guide: How to Thin Dense Canopies for Maximum Sunlight (H2) 🌳✂️
This is the heart of the article — the actionable, pro-level process that transforms dense, dark canopies into open, light-filled ones. Follow these steps carefully, and you’ll see results that rival professional work.
Understanding Crown Thinning vs. Other Methods (H3)
Crown thinning is selective removal of smaller branches (mostly inside the canopy) to reduce density by 10–25%, improve light penetration, airflow, and tree health — while keeping the natural shape and size intact.
Compare to:
- Crown raising/lifting → removes lower branches for clearance (not primary for sunlight)
- Crown reduction → shortens branches to reduce overall size (use sparingly)
- Topping → NEVER do this! It creates weak, ugly regrowth and stresses the tree severely 🙅♂️
Thinning is the gold standard for pruning dense canopies for sunlight.
Step 1: Assess & Plan Your Pruning (H3)
Stand back and observe from multiple angles on a sunny day:
- Identify dead, diseased, damaged, crossing/rubbing branches first (remove these regardless)
- Look for water sprouts (vigorous upright shoots), suckers, and inward-growing branches
- Visualize light paths — target areas blocking sun to the garden below
Safe removal limits (per ISA & university extension guidelines):
- Young trees: up to 25–30% of live canopy
- Mature/older trees: 10–20% max per session (spread heavy work over 2–3 years)
- Never remove more than 25% in one go — trees need foliage for energy!
Mark branches with flagging tape if needed.
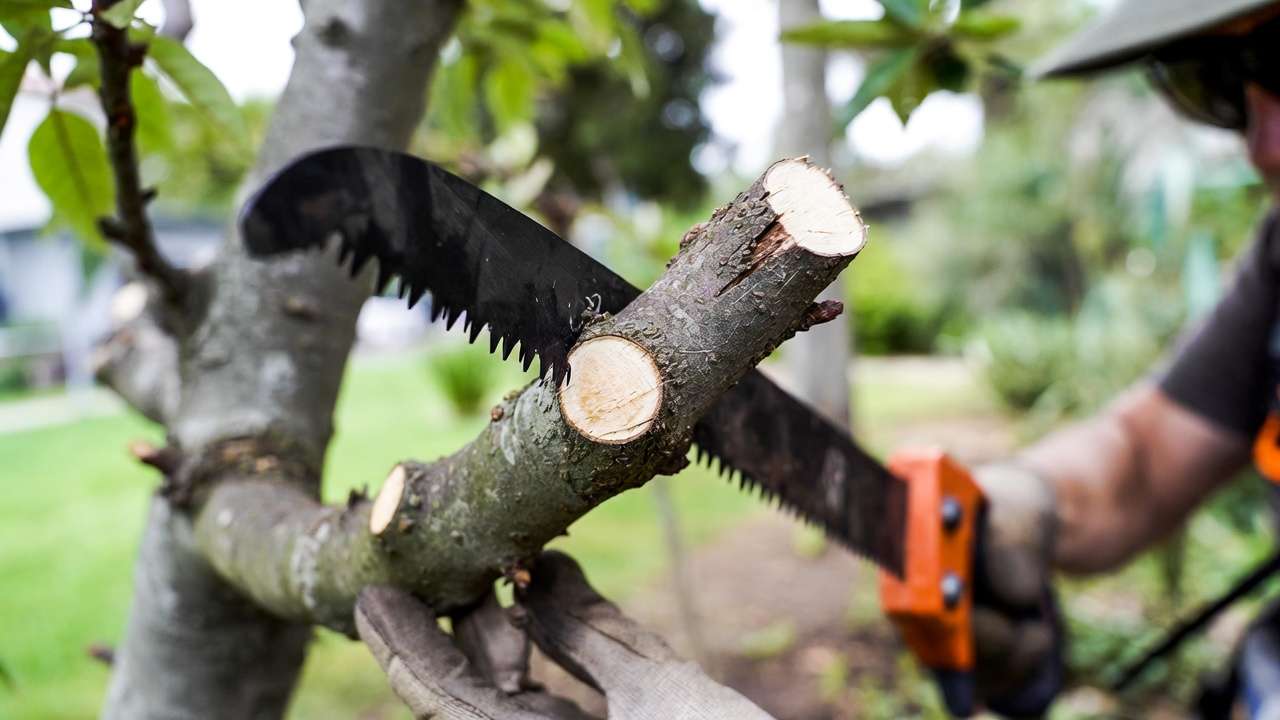
Step 2: Make Proper Pruning Cuts (H3)
Always cut just outside the branch collar (swollen area where branch meets trunk/parent branch) — this is where the tree heals best.
Use the 3-cut method for branches >1–2 inches:
- Undercut 6–12 inches out to prevent bark tearing
- Top cut farther out to remove the branch
- Final cut just outside the collar (slight angle, no stubs!)
Avoid flush cuts or leaving long stubs — both cause decay.
Step 3: Target the Right Branches for Sunlight Penetration (H3) ☀️
Now that you know how to make clean cuts, focus on which branches to remove to achieve the biggest increase in light while keeping the tree healthy and attractive.
Priority removal list (in this order):
- Dead, dying, diseased or damaged branches — always first (the “three Ds” + broken)
- Crossing or rubbing branches — choose the weaker, smaller, or less well-positioned one to remove
- Inward-growing branches — those heading toward the center instead of outward
- Water sprouts — vigorous, vertical shoots that sap energy and block light
- Suckers at the base or on the trunk
- Weak, narrow-angled branches (V-shaped unions are structurally weak)
- Excessively dense clusters of small twigs in the outer canopy
Pro sunlight strategy:
- Focus 60–70% of your thinning effort on the upper and outer parts of the canopy
- Open “windows” or light channels toward the areas of your garden that need sun most (lawn, vegetable patch, flower beds)
- Aim for even light dapple rather than harsh full sun — 30–50% sky visible through the canopy is often ideal for mixed landscapes
Think of it like creating a beautiful stained-glass effect on the ground instead of a blackout curtain 🌞
Step 4: Thin for Balance & Aesthetics (H3)
After removing problem branches, step back frequently (every 5–10 cuts) and assess:
- Maintain the tree’s natural shape and growth habit
- Avoid creating large empty holes or lopsided appearance
- Keep branch spacing relatively even throughout the canopy
- For fruit trees: Open the center more aggressively (goblet or vase shape) to improve fruit color, size, and air circulation 🍏🍑
Quick visual test: After pruning, you should be able to throw a softball through many parts of the canopy without it getting stuck — that’s usually about the right density.
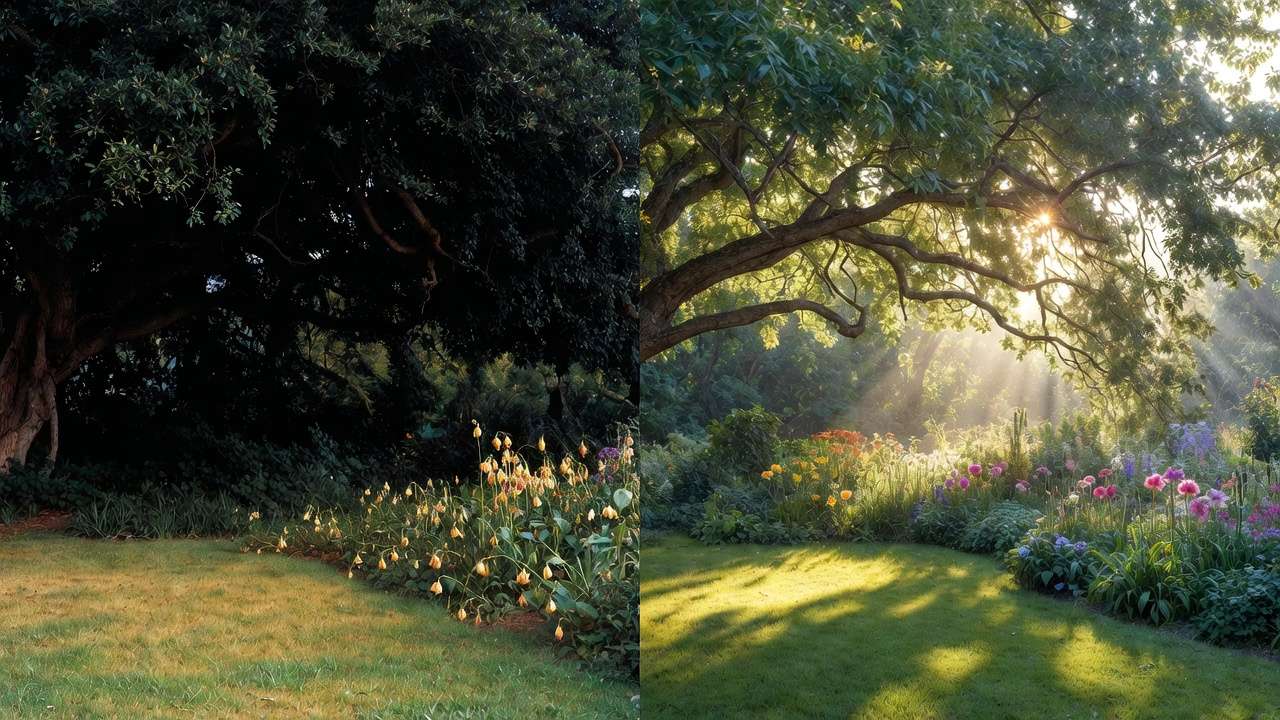
Before & After Examples (H3) — Real-World Transformations
Here are some common scenarios and what proper thinning can achieve:
- Old silver maple shading entire backyard lawn → Before: almost no grass, only moss and weeds → After 15–20% thinning over two seasons: dappled light returns, turf fills in, hostas and astilbe thrive again
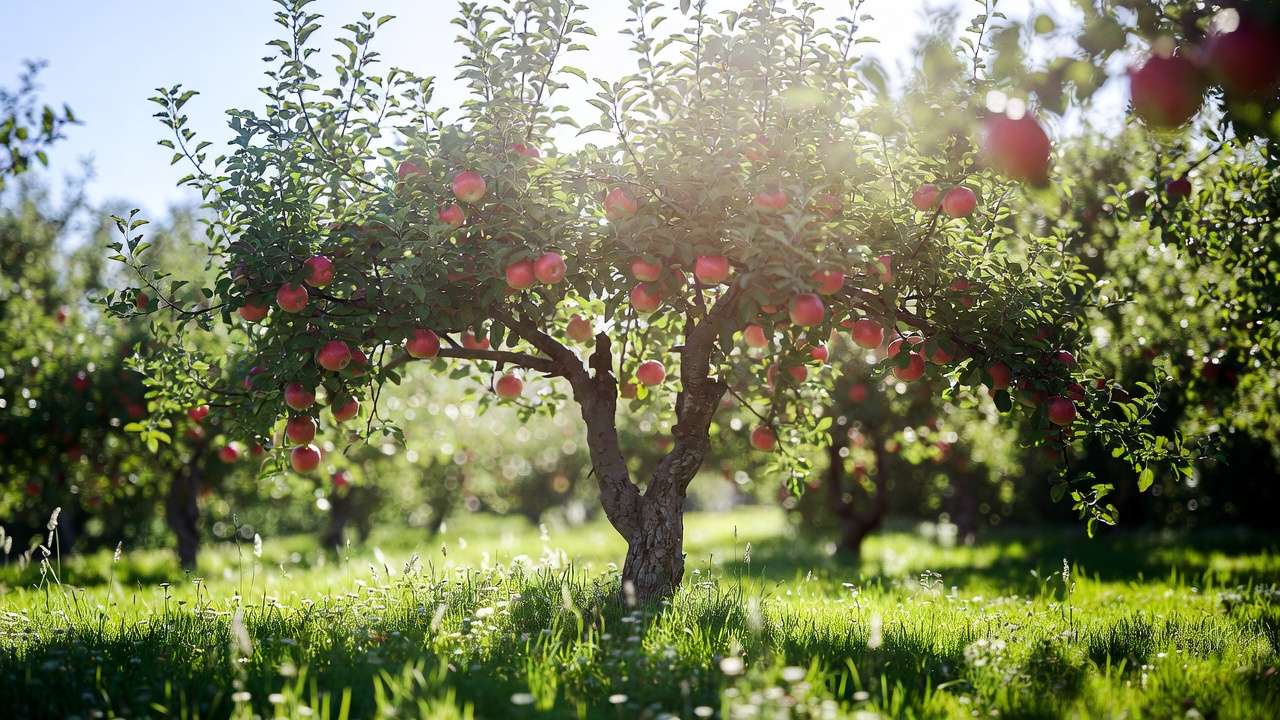
- Overgrown apple orchard trees → Before: small, green, shaded fruit, heavy disease pressure → After: larger, redder apples, better spray coverage, 30–50% yield increase
- Large pin oak over patio → Before: constant leaf drop, dark seating area → After: light, airy feel, cleaner patio, oak still majestic
(If you’d like, I can describe diagrams or suggest stock photo ideas for these examples when you publish!)
Special Considerations for Different Tree Types (H2) 🌲🍎🌳
Not all trees respond the same way to thinning — here’s tailored advice for the most common problem-makers:
Deciduous shade trees (maple, oak, beech, ash, elm):
- Light thinning every 3–5 years is usually perfect
- Remove ≤15–20% at once on mature specimens
- Focus on deadwood and interior clutter first
Fruit trees (apple, pear, peach, citrus, cherry):
- Can handle 20–30% removal in one season (they’re pruned more aggressively for production)
- Prioritize opening the center and removing vertical water sprouts
- Goal: sunlight on most fruiting wood for color and sugar development
Evergreens & conifers (pine, spruce, cedar, hemlock):
- Very cautious — they do not regrow from old wood like deciduous trees
- Only remove dead/diseased branches + very light tip pruning
- Never thin more than 10–15% total canopy
Young vs. mature trees:
- Young trees (under 15 years): train early with 20–25% thinning to establish good structure
- Mature/declining trees: smaller sessions (10–15%), multiple years, prioritize safety
Common Mistakes to Avoid When Pruning for Sunlight (H2) 🚫✂️
Even experienced gardeners can make costly errors when trying to open up a dense canopy. Here are the most frequent (and damaging) mistakes — and exactly how to avoid them:
-
Over-pruning in one session Removing more than 20–25% of the live canopy at once shocks the tree, triggers excessive water sprout regrowth, and can lead to sunscald on newly exposed bark.
Rule to live by: If you’re unsure, remove less — you can always take more next year.
-
Topping the tree Cutting large branches back to stubs or flat tops is one of the worst things you can do. It creates weak, poorly attached regrowth that’s prone to breaking in storms, ruins the tree’s natural form, and invites decay.
-
Pruning at the wrong time Cutting during active growth (especially spring) or late fall increases disease risk and causes heavy bleeding in species like maple, birch, and walnut.
-
Cutting too close or leaving stubs Flush cuts remove the branch collar (the tree’s natural healing zone), while long stubs die back and become entry points for rot.
-
Ignoring structural issues Focusing only on light and removing co-dominant stems or narrow V-crotches can actually weaken the tree long-term.
-
DIY on very large or hazardous trees Attempting to prune 40+ ft trees without proper equipment, training, or safety measures is extremely dangerous.
Quick safety reminder: When in doubt, hire an ISA Certified Arborist — it’s far cheaper than emergency tree removal or hospital bills! ⚠️
Aftercare: Helping Your Tree Recover & Maximize Sunlight Benefits (H2) 🌱💧
Proper post-pruning care is what separates good results from great, long-lasting transformations.
Immediate aftercare steps:
- Water deeply — Give the tree a slow, thorough soaking (20–30 minutes with a hose at the drip line) the day of pruning and weekly for the next 4–6 weeks (unless it rains).
- Apply mulch — Add 2–4 inches of organic mulch (wood chips, shredded bark) in a wide ring around the base, keeping it 3–6 inches away from the trunk. This conserves moisture and reduces competition from grass.
- Avoid fertilizer — Do not fertilize immediately after heavy pruning — it forces soft, vulnerable new growth.
- Monitor for stress — Watch for wilting, excessive leaf drop, or insect activity over the next growing season.
Long-term benefits you’ll notice:
- Denser, healthier interior foliage by next summer
- Improved turf and understory plant growth within 1–2 seasons
- Better fruit quality and quantity (if applicable)
- Stronger resistance to wind, drought, and pests
FAQs About Pruning Dense Canopies for Sunlight (H2) ❓
Here are the questions I hear most often from homeowners just like you:
Q: How much of the canopy can I safely remove? A: For most mature trees, 10–20% of live foliage is the safe maximum per year. Young, vigorous trees can handle up to 25–30%. Always err on the conservative side.
Q: Will pruning really fix my shaded lawn and flower beds? A: Yes — in most cases! Increasing light to 30–50% dappled sun is often enough to revive cool-season grasses, shade-tolerant perennials, and even some vegetables. Results typically show within 1–2 growing seasons.
Q: Is it safe to DIY large trees? A: Only if the tree is small to medium (under 30 ft), you have proper tools, and you’re comfortable working at height. For anything larger, near structures, or showing decay — hire a professional.
Q: Which trees respond best to thinning for sunlight? A: Maples, oaks, elms, ash, fruit trees (apple, pear, peach), and many landscape shade trees respond beautifully. Conifers and beech are more limited in how much you can safely thin.
Q: What if my tree is near power lines or a house? A: Never attempt it yourself. Utility companies often offer free pruning for lines, but for safety near homes, call a certified arborist with liability insurance and crane experience if needed.
Final Thoughts & Expert Tip (Conclusion) 🌳✨
Pruning dense canopies for sunlight is far more than a cosmetic fix — it’s one of the most impactful ways you can improve the health of both your trees and your entire garden ecosystem.
When done thoughtfully and with respect for the tree’s natural structure, this single intervention can:
- Bring life back to shaded lawns and struggling plants
- Produce healthier, more beautiful trees for decades
- Create that magical dappled light effect every gardener dreams of
- Save you money compared to removing and replacing trees
My favorite expert tip? Start small and go slow. Prune one tree this winter, observe the changes next summer, and you’ll gain the confidence to tackle bigger projects. Your garden (and your trees!) will thank you with brighter blooms, lusher growth, and more joyful outdoor moments. 🌞💚
Have you tried thinning a dense canopy before? Share your before-and-after experience in the comments — I’d love to hear your success stories!
Happy pruning, and here’s to more sunlight in your garden! ☀️🌿


