
Have you ever stepped onto your patio or balcony, admired your beautiful potted plants, and then felt a twinge of disappointment because they look more like a scattered collection than a polished, intentional garden feature? 😩 You’re definitely not alone! Many homeowners and urban gardeners pour love (and money!) into stunning containers only to end up with a mismatched, chaotic vibe that doesn’t quite tie into the overall landscape.
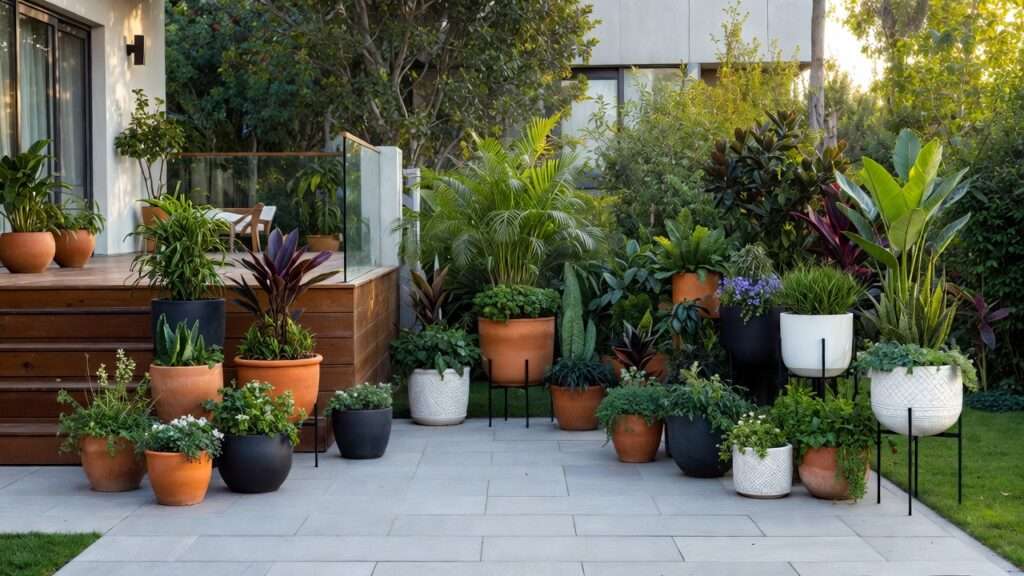
The good news? Grouping pots for a cohesive landscape design is the secret sauce that transforms ordinary container setups into breathtaking focal points. By thoughtfully arranging pots — considering height, color, texture, repetition, and scale — you can create harmony, depth, and flow that mimics professional landscaping, even in small spaces like patios, entrances, balconies, or yards with poor soil. 🌱
As a plant care and tree specialist with over a decade of experience designing container landscapes for homes, rentals, and urban rooftops, I’ve seen firsthand how proper grouping boosts curb appeal, maximizes limited space, adds year-round interest, and solves common frustrations like visual clutter or bare hardscapes. In this ultimate guide, you’ll get step-by-step mastery, core principles, real-world examples, expert tips, seasonal tweaks, and fixes for common pitfalls — all to help you achieve stunning, cohesive results that feel effortless and professional. Ready to turn your pots into a masterpiece? Let’s dive in! 🚀
Why Grouping Pots Matters in Modern Landscape Design 🌍
Container gardening has exploded in popularity, especially for urban dwellers, renters, and anyone craving low-maintenance greenery. Pots let you grow vibrant plants where in-ground planting isn’t possible — think concrete patios, balconies, or compacted soil. But without thoughtful grouping, even the prettiest individual pots can feel disjointed.
Cohesive groupings bridge that gap: they mimic natural garden borders, add structure and rhythm, guide the eye through your space, and make areas feel larger and more intentional. Psychologically, unified arrangements create calm and invitation — your outdoor space suddenly feels like an extension of your home rather than an afterthought. 🏡 Plus, strategic clusters solve practical issues: they provide privacy screens, define seating zones, soften hard edges, and allow easy seasonal swaps without digging up beds.
In short, mastering grouping pots for a cohesive landscape design elevates your entire yard from “nice plants” to “wow, professional landscape!”
Understanding Core Design Principles for Cohesive Groupings 🎨
Before arranging a single pot, grasp these foundational principles. They’re the building blocks every expert uses for balanced, eye-catching displays.
Principle 1: Unity & Harmony
Unity ties everything together so the grouping feels like one cohesive unit rather than random items.
- Repeat elements: Echo 2–3 colors, textures, or plant families across pots (e.g., silvery foliage in multiple containers).
- Limit your palette: Stick to 2–3 main colors plus greens for foliage — analogous schemes (blues/greens/purples) feel serene; complementary (reds/greens) add drama. Avoid rainbow chaos! 🌈
Principle 2: Balance & Scale
Balance prevents top-heaviness or emptiness.
- Vary heights and sizes dramatically: Use large anchor pots, medium supports, and small accents.
- Odd numbers rule: Groups of 3, 5, or 7 feel organic and dynamic; even numbers suit formal symmetry.
- Consider visual weight: Dark pots or bold plants feel “heavier” — balance them with lighter elements.
Principle 3: Rhythm & Repetition
Rhythm creates movement and flow, preventing monotony.
- Repeat key plants or pot styles to guide the eye (e.g., the same trailing ivy spilling from several pots).
- Add subtle variations: Echo shapes or colors with slight differences for interest without confusion.
Principle 4: Focal Points & Hierarchy
Every great grouping needs a star!
- Designate a thriller: The tallest or most striking pot/plant as the focal point.
- Layer from back to front: Tall → medium → low for depth (like a mini border).
- Use elevation: Stands, stairs, or inverted pots raise elements for drama.
Principle 5: Negative Space & Breathing Room
Don’t overcrowd!
- Leave gaps for plants to grow and air to circulate (prevents disease).
- Negative space provides visual rest, making the grouping feel intentional rather than cluttered. 🌬️
Step-by-Step Guide: How to Group Your Pots Like a Pro 🛠️
Follow this proven process for foolproof results.
Step 1: Assess Your Space & Goals
- Evaluate conditions: Sun exposure, wind, size, and style (modern minimalist? Rustic cottage? Tropical escape?).
- Define purpose: Privacy screen? Welcoming entry? Cozy corner retreat? Focal point near seating?
- Sketch a quick layout: Note pathways, furniture, and views — pots should enhance, not block.
Step 2: Choose the Right Pots for Cohesion
- Materials & colors: Coordinate (e.g., all terracotta for warmth, neutral grays/blacks for modern). Mix subtly for interest.
- Shapes: Combine tall columnar, squat rounded, and angular for variety.
- Sizes: Go big-to-small — one large statement pot anchors the group.
Step 3: Select Plants That Work Together
- Apply thriller-spiller-filler per pot, then scale to the group: Thriller (height/focal), spiller (cascading edges), filler (bulk/mounding).
- Harmony first: Match light/water needs; use color wheels for palettes.
- Texture magic: Mix feathery grasses, bold leaves, fuzzy succulents.
- Seasonal picks: Perennials/evergreens for structure, annuals for pops, edibles for function.
Step 4: Arrange & Layer Your Groupings
- Start with odd-number clusters (triangle/asymmetrical for natural flow).
- Elevate: Use plant stands, steps, or stacked pots for vertical interest.
- Create vignettes: Back tall anchors, front low spillers — like a mini border.
- Examples:
- Patio corner jungle: Tall palms + medium ferns + low succulents.
- Entryway symmetry: Matching pairs framing the door + central focal.
- Balcony privacy wall: Layered heights along railing.
Step 5: Fine-Tune & Test
- Step back 10–15 feet; view from multiple angles (including seated).
- Adjust for future growth: Plants expand — leave room!
- Photograph seasonally to track tweaks. 📸
10 Expert Tips for Stunning, Low-Effort Results 🌟
Here are my battle-tested tips distilled from years of designing container landscapes for clients and my own home garden. These shortcuts deliver maximum wow-factor with minimal extra work.
- Stick to odd numbers for organic appeal 🔢 Groups of 3, 5, or 7 pots almost always look more natural and dynamic than even numbers. Even groupings can feel stiff and formal unless you’re deliberately creating symmetry (like flanking a doorway).
- Repeat 2–3 key plants across multiple pots 🔄 Repetition is the fastest way to create unity. Plant the same trailing ivy, the same upright grass, or the same colorful calibrachoa in several containers — suddenly the whole grouping reads as one intentional design.
- Layer heights like a city skyline for instant depth 🏙️ Arrange from tallest in the back to shortest in the front. A 4–5 foot thriller (like a dwarf citrus or ornamental grass) anchors the group, medium-height fillers add bulk, and low spillers soften the edges.
- Incorporate evergreens or structural plants for year-round interest 🌲 Mix in at least one evergreen (boxwood topiary, dwarf conifer, or hardy sedum) in every major grouping. This ensures your display looks good even in winter when annuals fade.
- Add pops of color strategically — never rainbow chaos 🎨 Choose one hero color (e.g., deep purple or bright coral) and repeat it 2–3 times, then let green foliage do the heavy lifting. Too many colors dilute impact.
- Elevate smaller pots for drama without buying big new ones 📈 Use affordable plant stands, upside-down pots, wooden crates, or even sturdy bricks to raise mid- and small-sized containers. Instant height variation and better visibility!
- Group by theme for effortless cohesion 🏖️ Create mini collections: Mediterranean (lavender, olive, rosemary in terracotta), tropical (canna, elephant ears, colocasia in bold pots), succulent desert scene, or herb kitchen garden. Theme unifies instantly.
- Treat pot color as part of the plant palette 🪴 A black or charcoal pot makes bright foliage pop; warm terracotta complements earthy tones; white or light gray keeps things clean and modern. Coordinate pots with your chosen plant colors.
- Leave space for airflow and easy maintenance 🌬️ Overcrowded pots lead to fungal issues and make watering/pruning a nightmare. Aim for 6–12 inches between pots so air circulates and you can reach everything comfortably.
- Photograph your groupings seasonally and tweak 📸 Snap a quick photo every few months. You’ll spot what’s working (and what’s flopping) much faster than memory allows. Small adjustments keep the design fresh year after year.
Real-Life Examples & Inspiration Gallery Ideas 📸
Let these proven vignettes spark your creativity:
- Small Balcony Transformation A 6×8 ft balcony with limited floor space. One tall (4 ft) bird of paradise as the thriller in the back corner, flanked by two medium-height pots of Boston fern and calibrachoa spillers, plus three low succulent bowls on a tiered stand in front. Result: lush privacy screen that feels expansive.
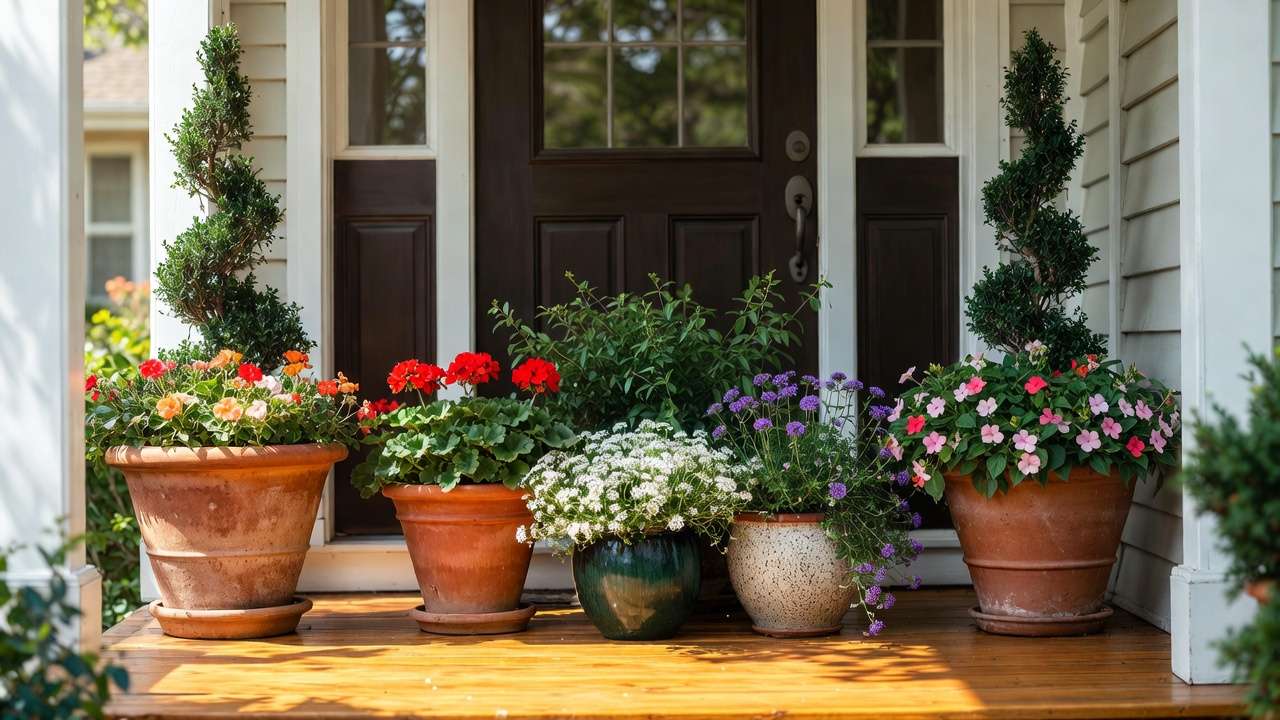
- Front Porch Welcoming Vignette Symmetrical entryway grouping: Two identical large terracotta pots with matching topiary spirals on either side of the door (formal balance), plus a central cluster of three odd-sized pots featuring colorful annuals and trailing vinca. Welcoming, polished, and low-maintenance.
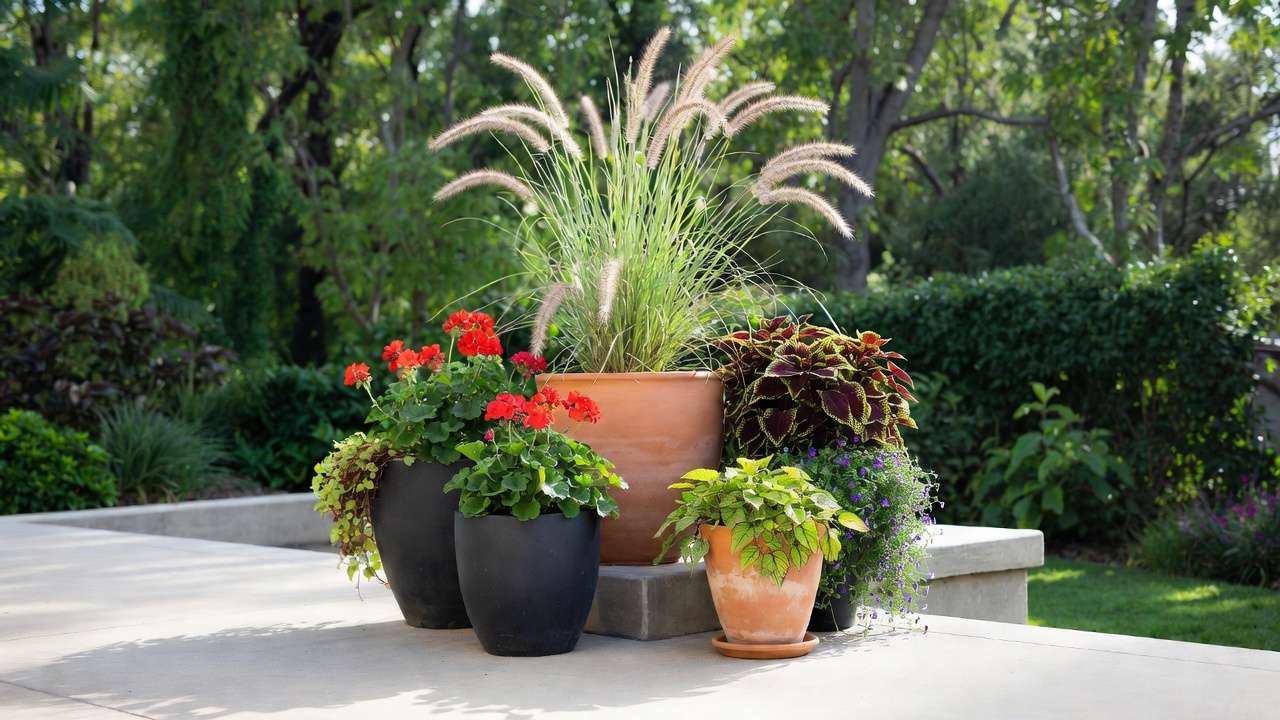
- Backyard Corner Retreat A previously bare corner turned cozy reading nook. Five pots in a loose triangle: tall fountain grass thriller, medium-height hydrangea and coleus fillers, low-spilling sweet potato vine and lobelia. Rustic wooden stands and gravel mulch underneath tie it to the natural landscape.
- Poolside Modern Grouping Clean lines for a contemporary look: Three tall, narrow black fiberglass pots with dracaena marginata, underplanted with silver falls dichondra spillers. Two lower rectangular troughs filled with blue fescue and white bacopa. Sleek, cooling, and heat-tolerant.
(Pro tip: If you’re visualizing these, search for “container garden vignettes” or “potted plant groupings patio” for photo inspiration — the principles are universal!)
Common Mistakes to Avoid (and How to Fix Them) ❌
Even experienced gardeners slip up. Here are the top pitfalls I see most often — and easy corrections:
- Mistake: Scattering pots randomly across the space Fix: Collect them into 1–3 intentional clusters. Start small with one strong grouping, then expand.
- Mistake: Matching everything too perfectly (sterile look) Fix: Allow subtle variety in pot size/shape and plant texture while repeating color or form.
- Mistake: Ignoring scale relative to surroundings Fix: A tiny pot next to a large patio chair looks lost. Go bigger — statement pots make a bigger impact.
- Mistake: Overcrowding groups so plants touch Fix: Leave breathing room. Plants double in size by midsummer; plan for growth.
- Mistake: Forgetting drainage and weight distribution Fix: Always use pots with holes + saucers. Place heaviest pots first; use lightweight potting mix for upper tiers.
Seasonal Adjustments & Maintenance for Long-Lasting Beauty 🍂
One of the biggest advantages of container groupings is how adaptable they are to the changing seasons — far easier than ripping up in-ground beds! With a little planning, your cohesive design can look fresh and intentional from spring through winter. Here’s how to keep your groupings thriving year-round.
Spring Refresh (Wake-Up Time!) 🌷
- Remove any winter-damaged foliage and prune back perennials/evergreens.
- Top-dress with fresh potting mix or slow-release fertilizer.
- Swap out tired winter annuals for bright spring stars: pansies, violas, primroses, ranunculus, or early bulbs in smaller accent pots.
- Introduce new spillers like lobelia or bacopa to soften edges as temperatures rise.
Summer Heat Strategies (Keep It Lush!) ☀️
- Group pots in dappled shade if possible during peak heat — especially in hot climates.
- Mulch the soil surface with bark, pebbles, or decorative stones to retain moisture and cool roots.
- Water deeply but less frequently; check soil moisture 2–3 inches down rather than surface-only.
- Refresh color with heat-tolerant performers: lantana, portulaca, zinnias, calibrachoa, angelonia, or mandevilla climbers for vertical drama.
- Mist foliage in early morning to boost humidity around tropical groupings.
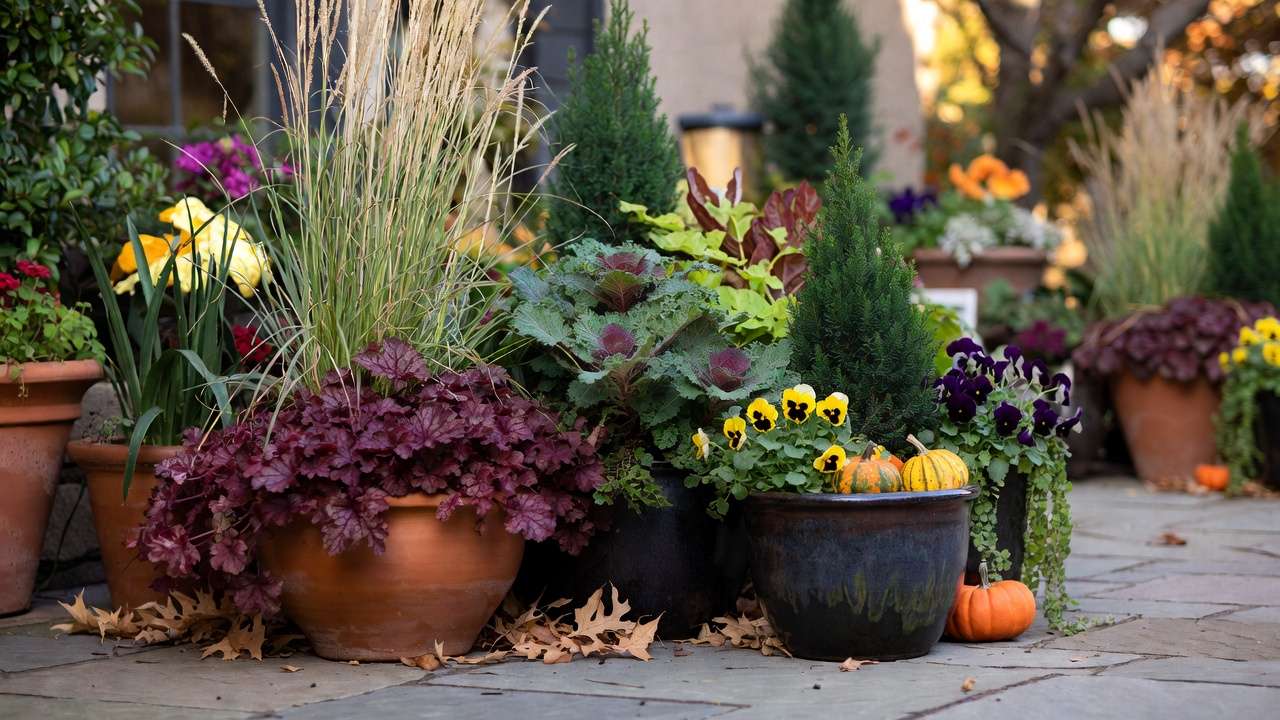
Fall Transition (Warm Tones & Structure) 🍁
- Gradually replace summer annuals with fall favorites: ornamental kale, cabbage, chrysanthemums, pansies, and asters.
- Lean into warm hues — burgundy, gold, rust — to echo autumn foliage.
- Add pumpkins, gourds, or mini corn stalks as temporary accents (remove before rot sets in).
- Boost evergreens and structural grasses (fountain grass, miscanthus, pennisetum) so the grouping retains form after hard frosts.
Winter Interest (Don’t Let It Go Bare!) ❄️
- Rely on hardy evergreens: dwarf Alberta spruce, boxwood, holly, rosemary (in milder zones), or hardy succulents like sedum and sempervivum.
- Use evergreen boughs, pinecones, or birch branches tucked into pots for texture.
- Add subtle lighting — solar string lights or small spotlights — to highlight shapes at night.
- Move tender pots to sheltered spots or group near south-facing walls for extra warmth.
- Reduce watering significantly; most plants need far less in cool months.
General Maintenance Tips for Grouped Pots
- Rotate pots every 2–4 weeks for even sun exposure.
- Fertilize every 4–6 weeks during active growth (spring–summer) with a balanced, water-soluble formula.
- Deadhead regularly to encourage blooming and tidy appearance.
- Inspect for pests (aphids, spider mites) early — groupings can spread issues quickly if ignored.
- Re-pot or refresh soil every 1–2 years to prevent root-binding and nutrient depletion.
FAQs: Your Grouping Pots Questions Answered ❓
How many pots should I group together? Start with 3–5 for most spaces — it’s the sweet spot for visual impact without overwhelming small areas. Larger patios or yards can handle 7–9 in a loose, naturalistic cluster.
Can I mix different pot styles and still look cohesive? Yes — as long as you limit variety. Stick to 2–3 materials/colors (e.g., terracotta + glazed gray) and repeat shapes or sizes subtly. Too much contrast creates visual noise.
What if my space is tiny (like a small balcony or narrow walkway)? Use verticality! Tiered stands, wall-mounted shelves, railing planters, and elevated small pots create the illusion of a larger grouping. Focus on one strong vignette of 3–5 pots rather than spreading them out.
Best beginner-friendly plants for cohesive groupings? Go-to combo: Tall thriller — ornamental grass (like blue fescue or carex); medium filler — geraniums or petunias; low spiller — sweet potato vine, ivy, or lobelia. All are forgiving, colorful, and widely available.
How can I make groupings look expensive on a budget? Invest in one or two large, high-quality statement pots as anchors — they set the tone. Fill the rest with affordable resin or plastic pots painted to match. Repeat premium-looking plants (like lush ferns or dramatic cannas) across containers.
Conclusion: Transform Your Space Today! 🌈
Mastering grouping pots for a cohesive landscape design isn’t about having the most expensive pots or rarest plants — it’s about intention, repetition, balance, and a little planning. When you apply these principles, your outdoor space shifts from “a few nice pots” to a unified, professional-looking landscape that feels curated and welcoming.
Start small this weekend: Pick one corner or entryway, gather 3–5 pots, apply the odd-number rule, repeat a couple of key plants or colors, layer heights, and step back to admire. You’ll be amazed at the instant upgrade!
I’d love to hear how your groupings turn out — drop a comment below with your before-and-after photos or favorite plant combos. Your patio (or balcony, or porch) is about to become the envy of the neighborhood. Happy planting! 🌺🪴


