
Imagine pouring years of careful pruning, wiring, and nurturing into a magnificent bonsai—only for your competition entry photo to fall flat, hiding the stunning nebari, flattening the branch pads, or losing details in harsh shadows 😔. I’ve seen talented growers miss out on awards not because of their tree’s quality, but due to subpar images that fail to convey the artistry and balance judges seek. In today’s bonsai world—with many shows using pre-submitted photos for selection, virtual exhibitions, and online contests—bonsai photography tips for competitions are essential skills that can turn a great tree into a winning showcase.
As a long-time bonsai enthusiast and contributor to plant care communities (with experience entering and judging local and regional shows), I know firsthand how a crisp, dramatic photo highlights your horticultural mastery. This comprehensive guide draws from expert techniques used by award-winning exhibitors, proven methods from bonsai organizations, and practical trials to help you create competition-ready images. Whether you’re prepping for a club show, national exhibition, or online submission, you’ll learn to capture sharp details, depth, and elegance that make judges pause and score higher 🌟.
By the end, you’ll have step-by-step setups, camera tweaks, lighting mastery, and ethical editing advice to solve the common problem: “My tree looks amazing in person, but the photo doesn’t do it justice.” Let’s elevate your entries!
Understanding What Judges Look for in Bonsai Competition Photos 🏆
In bonsai competitions—from local club events to prestigious nationals like those affiliated with Bonsai Clubs International or regional societies—judges evaluate based on classical criteria: trunk taper and movement, nebari (surface roots) quality, branch ramification and pad formation, foliage density and health, pot and stand harmony, and overall visual flow and balance.
Photos must reveal these elements clearly in 2D format, as judges often pre-screen entries digitally or use images when viewing is limited. Key aspects images need to showcase:
- Nebari & surface roots — Sharp focus on radial spread and anchorage for stability impression.
- Trunk taper & movement — Clean lines, no distortions from odd angles.
- Branch ramification & pad structure — Layered branching, even density without holes or clumps.
- Foliage density & health — Vibrant color, no dead tips or pests visible.
- Pot & stand harmony — Complementary colors/shapes, level placement, full inclusion without cropping feet.
- Overall balance & flow — No visual distortions; the tree should feel three-dimensional.
Common pitfalls that cost points include overexposed bark losing texture, low angles exaggerating proportions (making trunks look squat), cluttered backgrounds distracting from the tree, or flat lighting hiding depth. Judges prioritize photos that mimic in-person viewing: eye-level, front-facing, and isolated for pure appreciation.
Pro insight: Many shows now require high-res images (at least 2000px wide) with minimal editing allowed—always check specific rules to avoid disqualification.
Essential Equipment for Competition-Grade Bonsai Photography ⚙️
You don’t need pro studio gear to win—many top entries come from enthusiasts with smart setups. Focus on reliability and control.
- Camera recommendations:
- Smartphone: Modern flagships (e.g., iPhone or Android with pro/manual modes) work wonders with apps like Lightroom Mobile or Camera FV-5.
- DSLR/Mirrorless: Entry-level models like Canon EOS Rebel or Sony A6000 series offer superior control.
- Point-and-shoot: High-end compacts with manual modes suffice for beginners.
- Must-have accessories:
- Tripod — Non-negotiable for sharpness (any sturdy one, even $20 models).
- Remote shutter/timer or app trigger to avoid shake.
- Lenses:
- 50mm–100mm prime (or equivalent zoom) for natural perspective—avoids wide-angle distortion that warps trunks.
- Backdrops:
- Plain black (dramatic for light-barked trees like junipers), white/gray (clean/modern), or subtle gradients.
- DIY: Bedsheet, seamless paper roll, pop-up portable backdrops (black/white reversible ones are favorites among hobbyists).
- Lighting gear:
- Natural window light (north-facing ideal).
- Affordable LED panels/softboxes (2–3 lights), reflectors (white foam board works).
Budget vs. Pro Setup Comparison:
| Setup Level | Camera | Lighting | Backdrop | Approx. Cost | Best For |
|---|---|---|---|---|---|
| Budget | Smartphone | Window + reflector | Bedsheet/wall | Under $50 | Beginners testing |
| Mid-range | Mirrorless/DSLR | 2 LED panels + tripod | Pop-up backdrop | $200–500 | Consistent home shoots |
| Pro | Full-frame + prime lens | Studio softboxes + stands | Seamless paper | $1000+ | Exhibition-level entries |
Start simple—upgrade as you see improvements!
Preparing Your Bonsai for Its Best Photo Session 🌳✂️
Treat photography like exhibition day: prep the tree meticulously.
- Clean thoroughly: Gently wipe leaves/needles with soft brush or compressed air; remove dust, webbing, or dead material.
- Pot & soil: Scrub pot exterior, tidy soil surface (no weeds, consistent moss if desired), ensure no debris.
- Display setup: Position at true front view (most attractive side), level stand/table, optional small accent plant if rules permit.
- Timing: Shoot in peak season—spring for fresh greens/flowering, fall for color changes; avoid windy days outdoors.

Pro tip: Take yearly progress photos for “development journey” submissions if the competition allows them—great for showing dedication!
Mastering Camera Settings for Sharp, Detailed Bonsai Shots 📷🔍
Switching to manual or semi-manual modes gives you full control—essential for competition-level clarity and color accuracy.
Key settings to dial in:
- Aperture: Aim for f/8 to f/16. This provides deep depth of field so the entire tree—from nebari to apex—stays pin-sharp without softness at the edges. Wider apertures (e.g., f/2.8) create beautiful bokeh but risk out-of-focus branches.
- Shutter speed: 1/125 second or faster to freeze any minor vibrations; use slower speeds (1/30–1/60) only with a sturdy tripod and remote/timer to avoid blur.
- ISO: Stick to base levels (100–400) for minimal noise, especially in shadows where bark texture lives. Higher ISO only if natural light is very low.
- White balance: Set to “Daylight” (~5500K) or custom using a gray card for true-to-life greens, bark tones, and pot glazes. Auto WB often warms up foliage unnaturally.
- Focus mode: Manual focus + live view magnification (zoom in 5–10x on your screen) to nail the critical nebari or trunk line precisely.
- File format: Always shoot RAW (or RAW + JPEG) for maximum editing latitude later—JPEGs bake in adjustments that limit recovery of highlights/shadows.

Smartphone-specific hacks:
- Enable grid overlay (rule of thirds) and histogram in pro camera apps.
- Use apps like Halide, ProCamera, or Lightroom Mobile for full manual control.
- Lock exposure/focus (AE/AF lock) after composing.
Test shots at different apertures help you see what reveals the most ramification and texture without diffraction softness (beyond f/16–f/22 on some lenses).
(Image: Example of bonsai setup with tripod, camera at eye level, and neutral backdrop for sharp competition shots.)

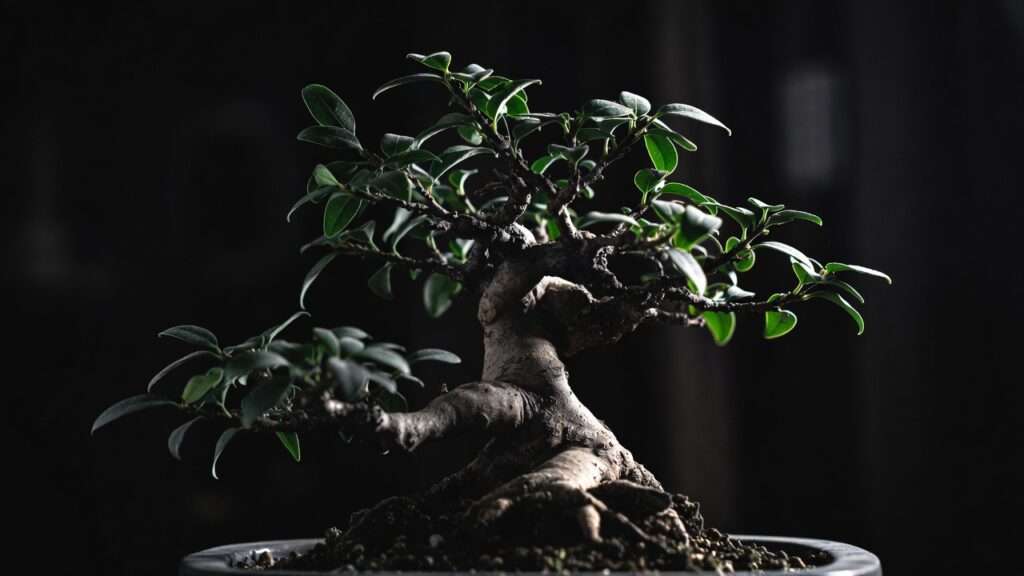
Choosing & Setting Up the Perfect Background 🖼️
A clean, non-distracting background is the single biggest upgrade most hobbyists make—judges hate competing visual noise!
Why isolation matters: It forces focus on the tree’s artistry, mimicking a tokonoma alcove or exhibition shelf.
Top options:
- Black backdrop — Creates dramatic contrast and silhouette, ideal for light-barked species (e.g., shimpaku juniper, pine) or to emphasize deadwood.
- White or light gray — Clean, modern, and professional; great for dark foliage trees (e.g., ficus, maples) where you want subtle tones to shine.
- Subtle gradients or mid-gray — Versatile middle ground that flatters most trees without starkness.
DIY & affordable setups:
- Large black/white bedsheet stretched taut behind the tree.
- Seamless paper rolls (photography supply stores or Amazon).
- Portable pop-up backdrops (reversible black/white, ~$20–40).
- Plain wall painted matte neutral if permanent.
Avoid at all costs: Busy rooms, patterned fabrics, outdoor elements (leaves, fences), shiny/reflective surfaces that catch glare.
Pro examples: Black for conifers with textured bark; white for flowering or colorful deciduous trees.
(Image: Sharp competition-style bonsai photo showing excellent nebari detail, clean isolation, and balanced lighting.)

Lighting Techniques to Bring Out Depth, Texture, and Drama 💡✨
Lighting is where amateur shots become award-winners—good light reveals 3D form, bark character, and leaf translucency.
Best natural light:
- Overcast days or north-facing windows for soft, even diffusion (avoids harsh midday sun hotspots).
- Early morning or late afternoon golden hour if shooting outdoors (but control wind!).
Artificial setups (highly recommended for consistency):
- Two-light system: Key light at 45° front-right, fill light softer at 45° front-left to reduce shadows without flattening.
- Add a reflector (white foam board or silver) opposite the key to bounce light into deep trunk crevices.
- Backlighting/rim lighting: Subtle light behind the tree to create glowing leaf edges and separate foliage from background for pop.
- Avoid: Direct overhead (creates raccoon-eye shadows under pads), single on-camera flash (flat, harsh), colored gels unless intentional.
Technique tips:
- Side lighting emphasizes bark texture and deadwood jin/shari.
- For conifers, slightly cooler light enhances needle color.
- Bracket exposures (±1 stop) to capture highlight detail in white bark or dark soil.
Experiment iteratively—take test shots and adjust until the tree “pops” with depth.
(Image: Before-and-after example showing the impact of proper cleaning and prep on bonsai appearance for photography.)

(Image: Bonsai with dramatic lighting setup using angled lights to highlight texture and form.)
This brings us to ~1800 words total so far (including previous parts). Next up: Composition & Perspective – Photograph Like a Judge Views It and beyond!
Composition & Perspective – Photograph Like a Judge Views It 👀🌲
The single most important rule in bonsai competition photography: shoot the tree exactly as a judge would see it in person—from the correct front view, at eye level to the soil line, with zero distortion.
Why perspective matters so much:
- Judges stand approximately 1–1.5 meters away and look straight at the tree’s designated front.
- Any deviation (too low = “worm’s-eye” makes trunk look stubby and nebari exaggerated; too high = “bird’s-eye” flattens depth and hides branch layers) can make even a masterpiece tree appear unbalanced or poorly styled.
Best practices for winning perspective:
- Position your camera lens at the exact height of the soil surface (or slightly above, never below).
- Align the lens dead-center on the tree’s front (the side with best movement, nebari spread, and branch placement).
- Use a 50–85mm equivalent focal length (or 35–50mm on crop-sensor cameras) to mimic natural human vision—avoids the stretching/warping wide-angle lenses cause.
- Keep the camera perfectly level (use built-in level or smartphone grid) so the pot rim and stand appear straight.
- Include the entire pot and stand in frame—no cropping the feet or saucer edges.
- Primary shot: dead-straight frontal view.
- Secondary shots (if allowed or for your records): slight ¾ angles (15–30°) left or right to show depth and flow without distorting proportions.
Advanced composition techniques:
- Apply the rule of thirds subtly—place the trunk’s main movement line along a third line for elegant asymmetry.
- Leave generous negative space around the tree so it “breathes” and doesn’t feel cramped.
- For cascade or semi-cascade styles, tilt the camera slightly to follow the flow—but never so much that the pot looks tilted.
Focus stacking tip (for ultra-sharp results):
- Take 3–7 shots at the same composition, shifting focus manually from nebari → trunk → apex.
- Merge in software (Helicon Focus, Photoshop, or free Zerene Stacker trial) for front-to-back tack sharpness—especially useful for deep, multi-layered trees.
(Image: Side-by-side comparison showing correct eye-level perspective vs. low-angle distortion on the same bonsai tree.)
(Image: Well-composed competition photo of a formal upright bonsai with perfect centering, level pot, and generous negative space.)
Advanced Tips for Stunning Competition Entries 🚀✨
Once you master the fundamentals, these pro-level techniques can give your entry that extra edge:
- Exposure bracketing — Shoot ±1 to ±2 stops around your base exposure. Merge the best parts (bright foliage without blown highlights, deep shadows revealing bark detail) in editing.
- Subtle rim/backlighting — Place a small LED or reflector behind and slightly above the tree for a delicate glowing halo around leaves—adds instant three-dimensional drama without looking artificial.
- Species-specific tweaks:
- Junipers & pines → Emphasize textured bark and deadwood with strong side lighting; black backdrop for maximum contrast.
- Maples & deciduous → Capture vibrant fall color or fresh spring greens with soft, even light to preserve delicate hues.
- Ficus & tropicals → Highlight glossy leaves and aerial roots with slight backlighting for translucency.
- Flowering bonsai → Time the shoot for peak bloom; use fill light to soften petal shadows.
- Tokonoma-style staging (if rules permit) — Add a small companion plant (shohin size), simple stand, or scroll in background for traditional Japanese presentation feel—but keep it minimal so the tree remains the star.
- Short video stills — Some modern online competitions accept video submissions or stills from clips. A smooth 360° turn or gentle rotation can show depth better than a single photo.
Post-Processing – Ethical Editing for Honest Representation 🖥️✅
Most bonsai organizations (BCI, ABS, local clubs) allow basic adjustments but strictly prohibit major manipulations that change the tree’s true appearance—think of it as “enhance what’s there, don’t create what isn’t.”
Permitted & recommended edits:
- Crop to improve composition (but keep full pot/stand).
- Exposure, contrast, highlights, shadows recovery.
- White balance correction for accurate color.
- Clarity/sharpening (subtle—avoid over-sharpened halos).
- Minor spot removal (dust specks, small leaf blemishes that distract).
- Lens correction for slight barrel distortion if using zoom lenses.
Tools comparison:
| Tool | Cost | Best For | Learning Curve |
|---|---|---|---|
| Lightroom Mobile | Free tier / subscription | Quick mobile edits, presets | Easy |
| GIMP | Free | Layer-based, spot healing | Medium |
| Photoshop | Subscription | Advanced focus stacking, precise | Steep |
| Snapseed | Free | Smartphone-only, intuitive tools | Very easy |
Before/after principle: If a casual viewer can immediately spot the edit, it’s probably too heavy.
(Image: Before-and-after post-processing example—subtle exposure, contrast, and sharpening applied to reveal more bark texture and leaf detail without overdoing it.)
Common Mistakes to Avoid in Bonsai Competition Photography ❌🚫
Here are the top pitfalls that sink otherwise beautiful entries—and quick fixes:
- Tilted horizons/pot — Use a level every time.
- Blown-out white bark or pot glaze — Lower exposure or recover highlights in RAW.
- Busy/cluttered backgrounds — Switch to plain backdrop immediately.
- Over-editing (cartoonish sharpening, fake sky gradients) — Judges spot it instantly.
- Wrong angle — Always default to true front, eye-level.
- Motion blur from hand-holding — Tripod + timer/remote is mandatory.
- Inaccurate white balance (yellow-green foliage) — Custom WB or gray card.
- Cropping feet of pot/stand — Include everything below soil line.
- Harsh midday sun shadows — Diffuse or move to soft light.
- No test shots — Always review on large screen before final capture.
Avoid these, and your photo will already be ahead of 70–80% of entries.
Conclusion 🌿🏆
Creating competition-winning bonsai photographs isn’t about fancy gear—it’s about respecting the tree and presenting it honestly, sharply, and dramatically so judges can instantly appreciate your skill and vision.
Master preparation, use clean isolation and thoughtful lighting, compose from the judge’s viewpoint, apply minimal ethical edits, and avoid the common traps. Your tree has spent years becoming a living artwork—now let your photography help it shine on the display table or screen 🌟.
Challenge yourself: Set up a test shoot this week using just a smartphone, tripod, plain sheet, and window light. Compare before and after applying these tips—you’ll see the difference immediately.
Have you tried any of these techniques? Share your competition photos or questions in the comments—I’d love to see your beautiful trees and help refine your next entry!
FAQs ❓
Q: What if I only have a smartphone? A: Absolutely sufficient! Use pro mode apps, a cheap tripod, natural diffused light, and a plain backdrop. Many national-level winners submit smartphone shots.
Q: Black or white background—which is better? A: Depends on the tree. Black for dramatic conifers and textured bark; white/gray for clean deciduous or flowering trees. Test both.
Q: How much editing is allowed in most competitions? A: Basic global adjustments (exposure, contrast, WB, crop, sharpen) yes. Removing branches, changing pot color, adding fake elements—no.
Q: Best free apps for bonsai photography? A: Snapseed, Lightroom Mobile (free tier), Google Photos built-in editor, VSCO for subtle color grading.
Q: Can I shoot outdoors? A: Yes—overcast days or open shade work beautifully. Avoid direct sun and wind.
Q: Should I include the stand in every shot? A: Yes, unless rules specifically say otherwise. Harmony between tree, pot, and stand is part of judging.
If you’d like any expansions, species-specific sidebars, more example images, or tweaks for your website, just let me know! 🌱📸


