

Have you ever accidentally knocked a plump leaf off your favorite succulent while repotting and felt a pang of guilt? What if that little “mistake” is actually your golden ticket to an endless supply of free plants?
If you have tried saving these fallen leaves before, only to watch them turn to mush or shrivel up like sad raisins, you are in the right place. Mastering leaf propagation for succulents step-by-step is the ultimate plant care superpower. As a dedicated cultivator who has propagated hundreds of succulents and spent years diagnosing soil health and plant root systems, I can tell you that the secret isn’t magic—it is biology.
In this comprehensive guide, we are going to eliminate the guesswork. I will share the exact, fail-proof method that prevents rot, encourages explosive root growth, and guarantees a high success rate so you can turn a single plant into a thriving indoor jungle.
1. The Science of Succulent Leaves: Why They Propagate So Easily 🧬🌿
To truly master succulent propagation, it helps to understand what is happening beneath the surface. Succulents are evolutionary marvels designed to survive harsh, dry conditions. When a leaf is bumped off an animal or strong wind in the wild, the plant’s survival mechanism kicks in.
At the very base of a succulent leaf (the part attached to the stem) lies a cluster of highly active cells known as meristematic tissue. Think of these like stem cells in humans. When the leaf is separated cleanly from the mother plant, this tissue gets the signal to transform, simultaneously generating delicate new roots to seek water and a brand-new rosette (the baby plant) to harvest sunlight.

Which Succulents Work Best? Not all succulents are created equal when it comes to leaf propagation. Setting yourself up for success means picking the right candidates:
-
High Success Rate (Beginner Friendly): Echeveria (Ghost plants), Graptopetalum, Sedum (Jelly Beans, Burro’s Tail), and Crassula (Jade Plants). These practically propagate themselves!
-
Low to No Success Rate (Avoid for this method): Aeoniums, Sempervivums (Hens and Chicks), and Haworthia. These lack the right cellular structure in their leaves and are much better propagated by offsets or “pups.”
Expert Insight 💡: The health of your “mother” leaf dictates the health of your baby plant. Always choose a firm, plump leaf from the lower middle section of the stem. A leaf that is already yellowing, translucent, or severely dehydrated lacks the water and nutrient reserves necessary to sustain a new baby plant during the rooting process.
2. Tools of the Trade: What You Need Before You Start ✂️🧤
One of the best things about propagating succulents is how little equipment you actually need. However, getting the foundational elements right—especially your soil—will make or break your success.
-
A Healthy “Mother” Succulent: Hydrate your main plant a day or two before taking leaf cuttings. A fully hydrated leaf has a much higher chance of surviving the propagation journey.
-
A Clean, Shallow Tray or Saucer: You don’t need deep pots yet. A shallow terracotta saucer, a clean baking sheet, or a dedicated propagation tray works perfectly.
-
The Right Soil (Crucial for Disease Prevention): Soil health is the most common stumbling block for beginners. Standard potting soil is too rich in organic matter and holds too much moisture, creating a breeding ground for rot-inducing bacteria. You need a highly aerated, sterile, and fast-draining mix. Use a base of high-quality cactus mix and amend it with at least 50% pumice, perlite, or coarse sand. This ensures optimum oxygen flow around the fragile new roots.
-
A Precision Watering Tool: A small squeeze bottle or a fine-mist spray bottle.
-
Rooting Hormone (Optional): While a light dusting of rooting powder can speed up cellular division, succulents are incredibly eager to root on their own. If your environment and soil are healthy, you can easily skip this.
3. The Main Event: Leaf Propagation Step-by-Step 🚀
This is where the magic happens. Follow these steps meticulously to bypass the common pitfalls of succulent cloning.
Step 1: The Perfect Twist and Pull 🤌
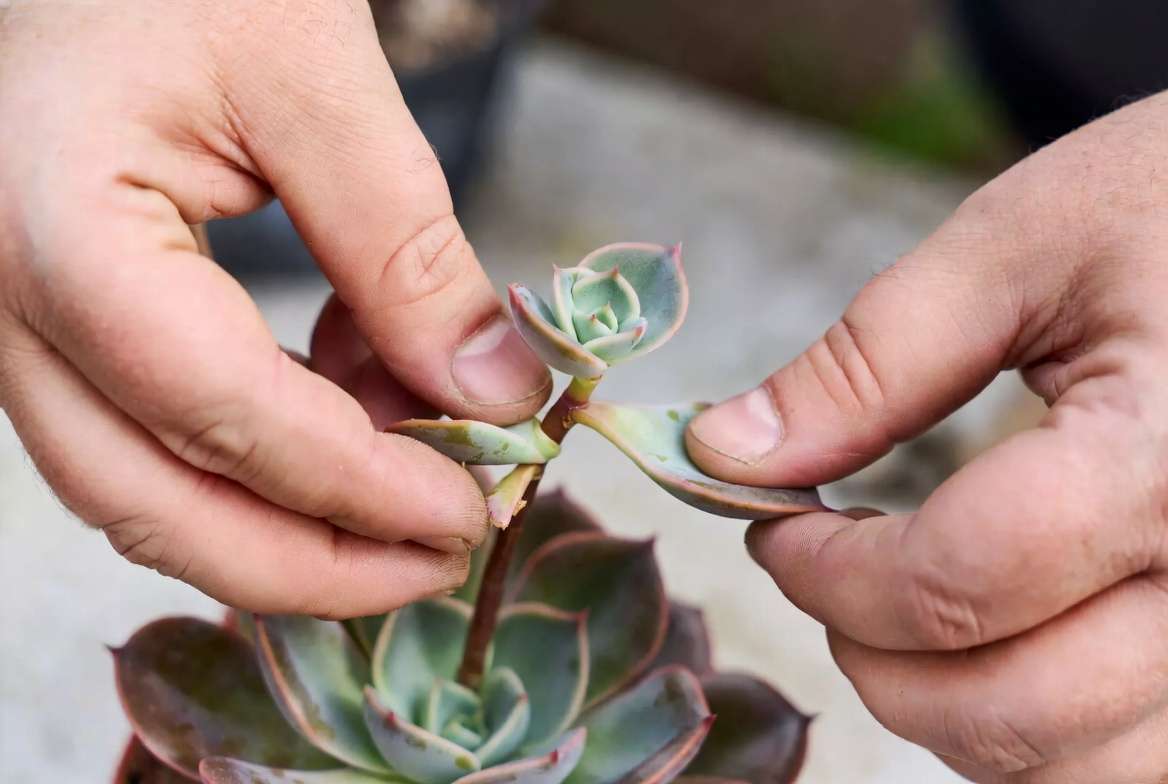
The most critical moment in this entire process happens in the first three seconds. If you rip the leaf and leave the meristematic tissue attached to the mother stem, the leaf will never grow a baby.
-
Gently pinch the leaf as close to the stem as possible.
-
Wiggle it horizontally from side to side (left to right) rather than pulling it straight down.
-
Listen and feel for a satisfying snap.
-
Inspect the base of the leaf. It should be a perfectly clean, U-shaped break. If the base looks jagged or torn, discard it—it will only rot.
Step 2: The Waiting Game (Callousing) ⏳
The number one reason succulent leaves turn into black mush is that beginners place fresh, open wounds directly onto damp soil. Pathogens immediately enter the leaf, and it’s game over.
-
Take your freshly plucked leaves and lay them out on a dry paper towel or an empty tray.
-
Keep them in a warm spot with bright, indirect sunlight.
-
Wait 3 to 7 days. You are waiting for the raw, wet end of the leaf to dry out and form a protective scab, known as a callous. This seals the leaf, preventing bacteria from getting in while keeping the stored moisture from escaping.
Step 3: Laying the Groundwork (Soil Setup) 🪨
Once the bases of your leaves are completely calloused and hard to the touch, it is time to introduce them to their temporary nursery.
-
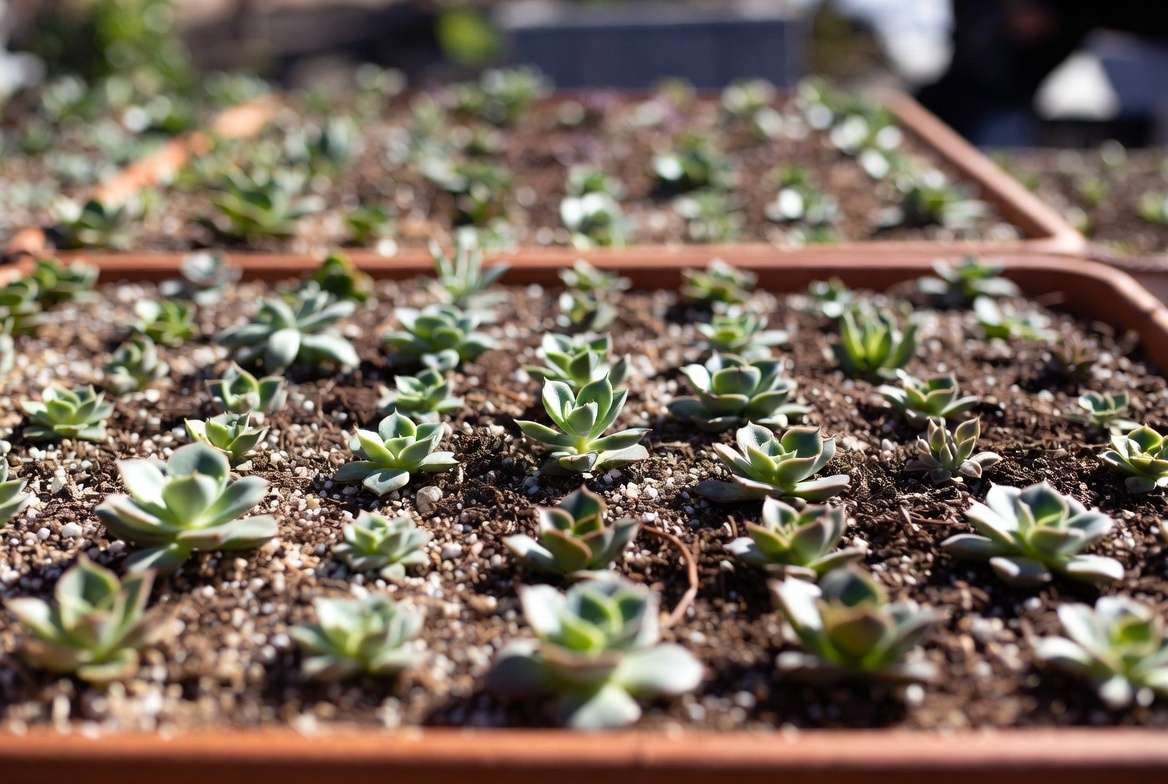
Fill your shallow tray or saucer with the highly aerated succulent and cactus soil blend we discussed earlier.
-
Smooth the soil surface so it is relatively flat.
-
The Golden Rule: Never bury the leaf. Lay the calloused leaves flat on top of the dry soil. You want the calloused end to gently rest against the soil surface, not beneath it. Burying the tip cuts off oxygen and invites rot.
Step 4: Placement and Lighting ☀️
Your propagating leaves are incredibly vulnerable right now. While mature succulents love basking in harsh sunlight, unrooted leaves will quickly fry and shrivel up under those same conditions.
-
Place your propagation tray in an area that receives bright, indirect light.
-
An east-facing window with morning sun, or a spot a few feet away from a bright south-facing window, is ideal.
-
If you are growing indoors without great natural light, a standard LED grow light positioned about 12 inches above the tray (on for 10-12 hours a day) works wonders.
Step 5: The Watering Debate (To Mist or Not to Mist?) 💧
If you spend any time in plant care forums, you will see a fierce debate regarding watering propagating leaves. Here is the expert breakdown of how to handle moisture:
-
The “Dry” Method: Many experienced growers simply leave the leaves completely dry until a baby rosette and roots form. The leaf contains all the water the baby needs.
-
The Misting Method: Others mist the leaves lightly every few days to encourage humidity.
The Fail-Proof Compromise: Ignore the leaves entirely until you see tiny pink roots emerging from the calloused tip. Once roots appear, do not mist the entire leaf—this can cause water to pool and rot the mother leaf. Instead, use a precision squeeze bottle or dropper to put a few drops of water directly onto the soil right in front of the new roots every few days. This trains the roots to dig downward into the soil in search of moisture, establishing a strong, healthy root system early on.
4. The Timeline: What to Expect and When 📅🔍
Patience is the hardest part of leaf propagation. Understanding the timeline will stop you from throwing away perfectly good leaves out of frustration. Keep in mind that temperature and humidity will slightly alter this schedule.
-
Weeks 1-2 (The Waiting Period): You will twist, callous, and lay your leaves on the soil. Absolutely nothing visible will happen. Do not panic; cellular division is happening inside.
-
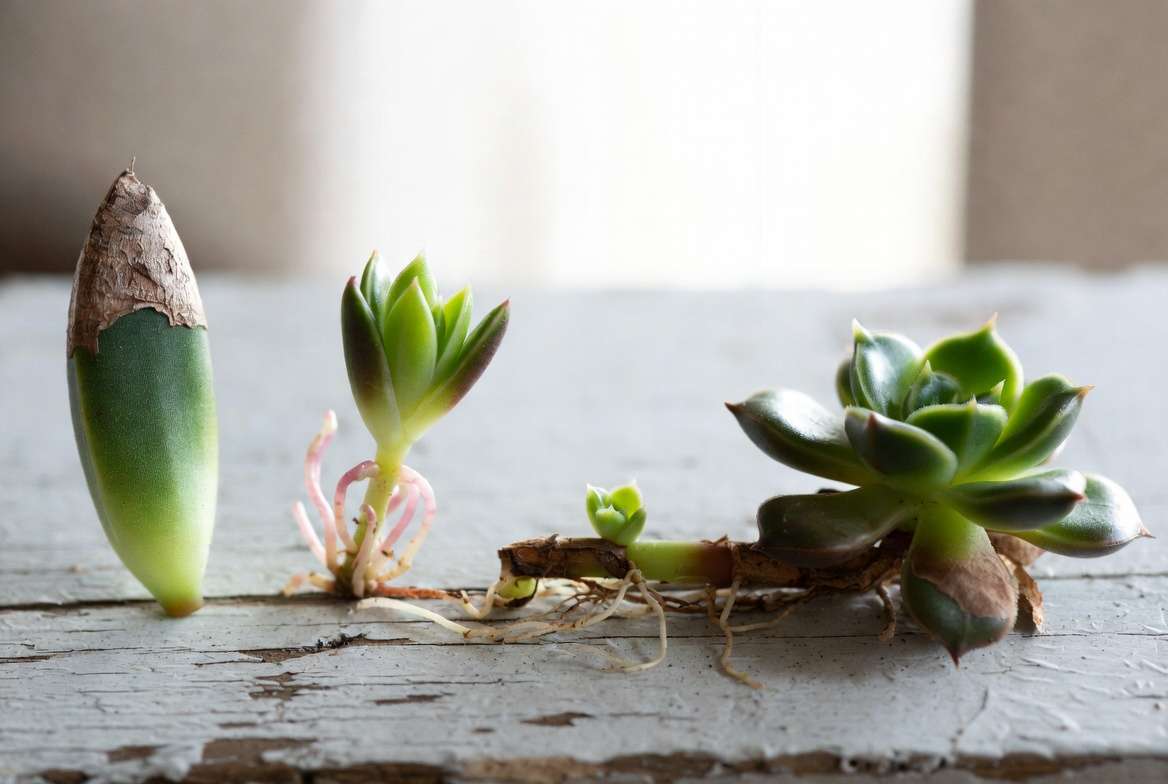
Weeks 3-4 (The Spark of Life): You will notice tiny, vibrant pink or white roots poking out of the calloused end, or perhaps a microscopic cluster of green leaves forming.
-
Months 2-3 (The Growth Spurt): The baby rosette will become distinctly visible, looking like a miniature version of the mother plant. As the baby grows, the large mother leaf will begin to look wrinkly and deflated. This is entirely normal! The baby is actively consuming the water and nutrients stored in the mother leaf.
-
Months 4+ (Independence): The mother leaf will dry up completely, turning into a crispy, brown husk, and easily detach from the baby. Congratulations, you now have a fully independent succulent!
5. Troubleshooting Common Propagation Fails 🚑🥀
Even with the best techniques, nature sometimes has a mind of its own. Here is how to diagnose and fix common propagation problems:
-
Problem: The leaf turned black, translucent, and mushy.
-
The Cause: This is classic rot. It means the leaf was overwatered, placed on wet soil before callousing, or lacked proper airflow.
-
The Fix: Discard the mushy leaf immediately to prevent the bacteria from spreading to your healthy leaves.
-
-
Problem: The leaf completely dried up and crisped away before growing anything.
-
The Cause: The leaf was subjected to too much direct sunlight, extreme heat, or it was unhealthy and dehydrated before you plucked it.
-
-
Problem: It grew a massive root system, but no baby plant (rosette)!
-
The Cause: Sometimes called “blind leaves,” these leaves will root and live for months but never produce a pup.
-
The Fix: Keep waiting! Sometimes they are just incredibly late bloomers. If a baby never forms, the leaf will eventually die off naturally.
-
-
Problem: It grew a beautiful baby plant, but no roots!
-
The Cause: The baby is surviving entirely off the mother leaf and the ambient humidity.
-
The Fix: Move the tray slightly further away from the light source and ensure the soil directly under the baby is kept ever-so-slightly damp to coax roots out.
-
6. Graduation Day: Potting Up Your Baby Succulents 🪴🎉
Knowing when to move your propagated succulent from the shallow nursery tray to its permanent home is crucial for its long-term survival.
When is it time? Wait until the mother leaf is completely dry, crispy, and falls off the baby rosette with the gentlest touch. Never forcibly rip the mother leaf off while it is still plump, as you risk destroying the baby’s fragile new root system.
The Potting Process:
-
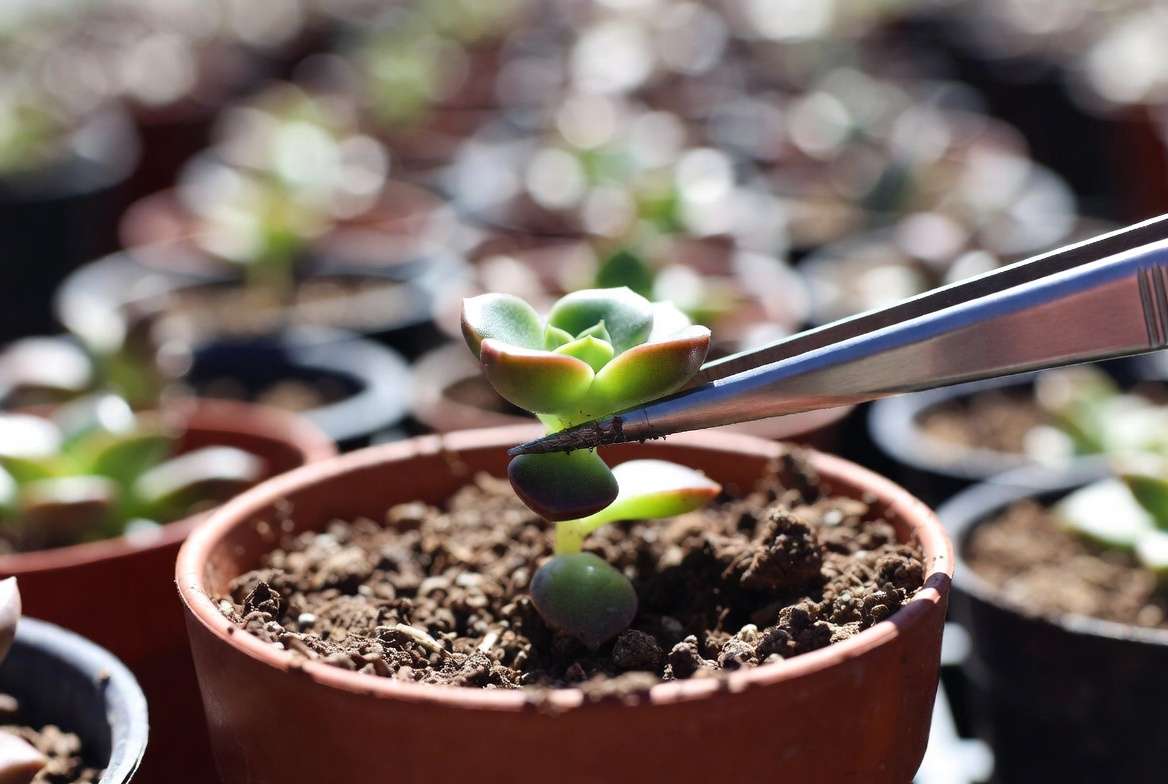
Choose a Micro-Pot: Do not put a tiny baby succulent in a large pot. Too much excess soil will hold too much moisture and cause root rot. Choose a tiny 2-inch nursery pot.
-
Focus on Soil Health: Fill the pot with a fresh, nutrient-light but highly porous soil blend. Ensuring exceptional drainage at this juvenile stage promotes deep, robust root systems that will anchor the plant for life.
-
Transplant Gently: Use a small spoon or tweezers to gently lift the baby plant and its roots out of the propagation tray. Nestle it into the new pot, gently covering the roots with soil.
-
Transition to Adult Care: Wait a few days before watering to allow any minor root damage from the move to heal. Afterward, treat it like an adult succulent: water deeply only when the soil is 100% dry, and gradually acclimate it to brighter sunlight.
7. Frequently Asked Questions (FAQs) 🙋♀️💬
To make this guide truly comprehensive, let’s answer the most common questions plant lovers ask when learning how to propagate succulents.
Can you propagate succulents from a broken or cut leaf? No. If a leaf is snapped in half or the base is torn leaving tissue on the stem, it will not propagate. The meristematic cells required to grow a new plant are located exclusively at the very base where the leaf attaches to the stem.
Can you propagate succulents in water? Yes, water propagation is a popular alternative! Instead of laying the calloused leaves on soil, you suspend them just above a glass of water (using plastic wrap with holes poked in it). The leaves sense the moisture and send out water roots. However, soil propagation is generally preferred as soil roots are stronger and don’t require an adaptation period when eventually potted up.
Do succulent leaves need rooting hormone to grow? Rooting hormone can be a helpful catalyst, but it is entirely optional. Because succulents are highly adapted to reproduce this way in nature, a healthy leaf will almost always root on its own without chemical intervention.
Should I cover my propagating leaves with a humidity dome? Absolutely not. While tropical houseplants love humidity domes, succulents despise them. Trapping moisture around succulent leaves eliminates airflow and almost guarantees your leaves will succumb to fungal or bacterial rot. Keep them in open air!
Conclusion: Ready to Grow Your Jungle? 🌴💚
Mastering leaf propagation for succulents step-by-step is one of the most rewarding skills you can learn as a plant parent. It transforms the anxiety of a broken plant into the excitement of new growth.
Remember the golden rules: always secure a clean break, let the leaf callous completely, provide bright indirect light, and prioritize an airy, well-draining soil mix over heavy watering. Nature wants these little leaves to survive—you just have to provide the right environment and step back.
Are you ready to start multiplying your collection? Go pluck a few leaves (gently!), set up your propagation tray, and let the magic unfold.
Have you successfully propagated a succulent before, or are you currently dealing with mushy leaves? Let me know in the comments below, or subscribe to our newsletter for weekly deep dives into plant diagnostics, soil health, and more free propagation cheat sheets











