

We have all been there. You are gently repotting your prized Echeveria, or perhaps just admiring your cascading String of Pearls, when snap—a beautiful, healthy stem breaks right off. Panic sets in. You might have tried sticking broken stems directly into soil before, only to dig them up a week later and find a black, mushy, rotten mess. 😥
If you are tired of the guesswork and heartbreak of traditional soil rooting, you are in the right place. Mastering the water propagation of succulent cuttings is the ultimate, transparent way to watch roots grow faster, completely eliminating the mystery of what is happening beneath the surface.
As a plant care specialist who has propagated hundreds of succulents—from stubborn Jade plants to delicate trailing varieties—I have perfected a method that practically guarantees robust root growth while dodging the dreaded stem rot. In this comprehensive guide, we will dive deep into the science of water rooting, the crucial preparation steps you cannot skip, and the exact process to transition your new roots safely back into the soil. 🪴
⚖️ Why Choose Water Propagation for Succulents? (Soil vs. Water)
There is a long-standing myth in the gardening community that succulents absolutely hate water. While it is true that mature succulents in pots will rot if left sitting in soggy soil, a severed cutting behaves entirely differently. When a succulent stem is cut, its survival mechanisms kick in. It desperately needs to seek out moisture to sustain its fleshy leaves until a new root system can form. 🌵💦
When you suspend a cutting over water, you are providing a localized pocket of high humidity. The plant senses this moisture and rapidly pushes out roots to reach it. This technique is especially miraculous for severely dehydrated cuttings that are too weak to push roots through heavy, dry soil.
Here is a breakdown of why this method might be your new favorite plant care hack, along with a few drawbacks to keep in mind.
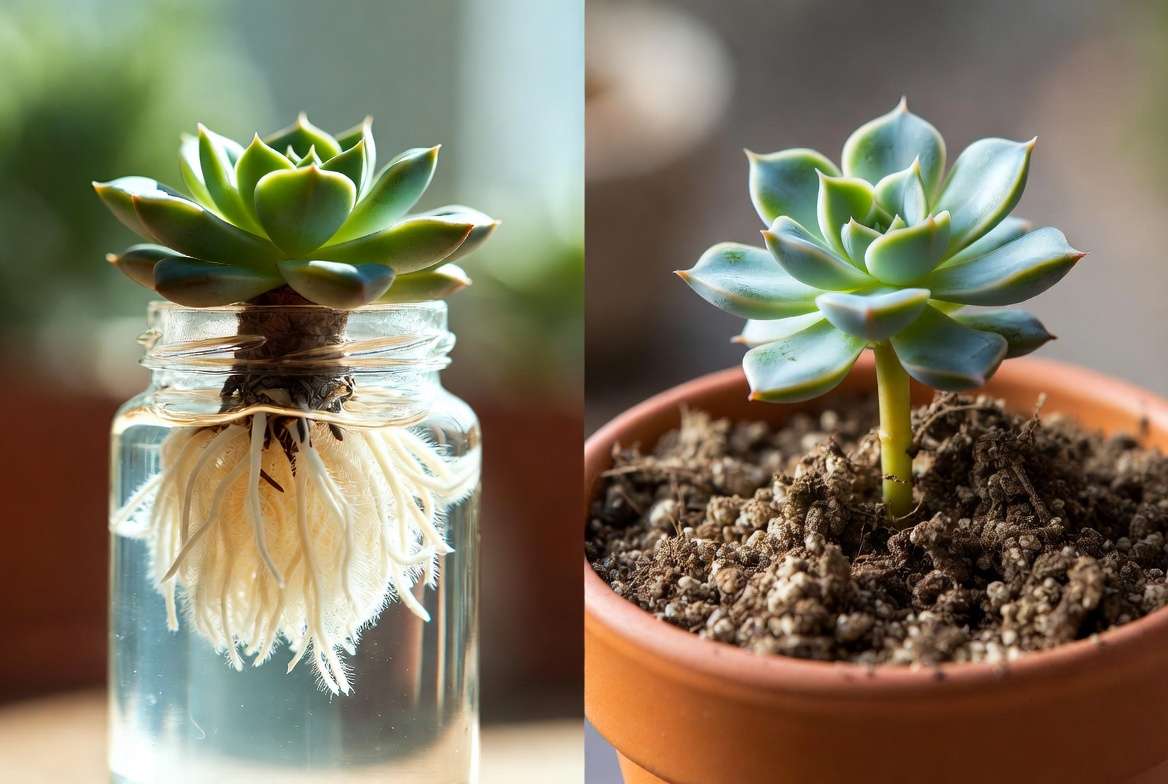
Pros and Cons of Water Rooting
| Feature | Water Propagation ✅ | Soil Propagation ❌ |
| Speed | Often produces roots in 2 to 4 weeks. | Can take 4 to 8 weeks or more. |
| Visibility | 100% transparent. You can see the roots growing daily. | Blind process. Requires digging to check progress. |
| Hydration | Excellent for reviving wrinkled, severely dehydrated cuttings. | Dry soil can cause weak cuttings to shrivel and die. |
| Root Strength | Roots are more fragile and adapted to an aquatic environment. | Roots are robust and ready for drought conditions. |
| Transition | Requires a careful, gradual acclimation back to soil. | No transition needed; already in its final medium. |
✂️ The Secret to Zero Rot: Preparation is Everything
Expert Insight: 🛑 90% of water propagation failures happen before the plant even touches the water. If you simply chop a succulent and drop it into a glass, it will rot. Preparation and patience are non-negotiable.
Selecting the Healthiest Cuttings 🪴
Your propagation will only be as successful as the cutting you start with. Look for a stem that is plump, vibrantly green (or its natural healthy color), and completely free of pests like mealybugs or fungal spots.
When taking your cutting, you want to make the snip just below a “node.” A node is the point on the stem where leaves attach. This area is packed with meristematic tissue, which acts essentially like stem cells for the plant, ready to differentiate into root tissue when given the right environmental cues. Gently twist and pull away the bottom few leaves of your cutting to expose at least one to two inches of bare stem.
The Clean Cut (Sterilization) 🧼
Plant tissue is highly susceptible to bacterial and fungal infections when wounded. Always use a sharp pair of pruning shears, floral snips, or a precision craft knife. Before making the cut, wipe the blades down with 70% isopropyl (rubbing) alcohol. This ensures you are not transferring invisible pathogens into the fresh wound of your succulent, which is a primary cause of rapid rotting.
The Golden Rule: Let it Callous! ⏳
If you take only one piece of advice from this entire guide, let it be this: You must let your cuttings callous.
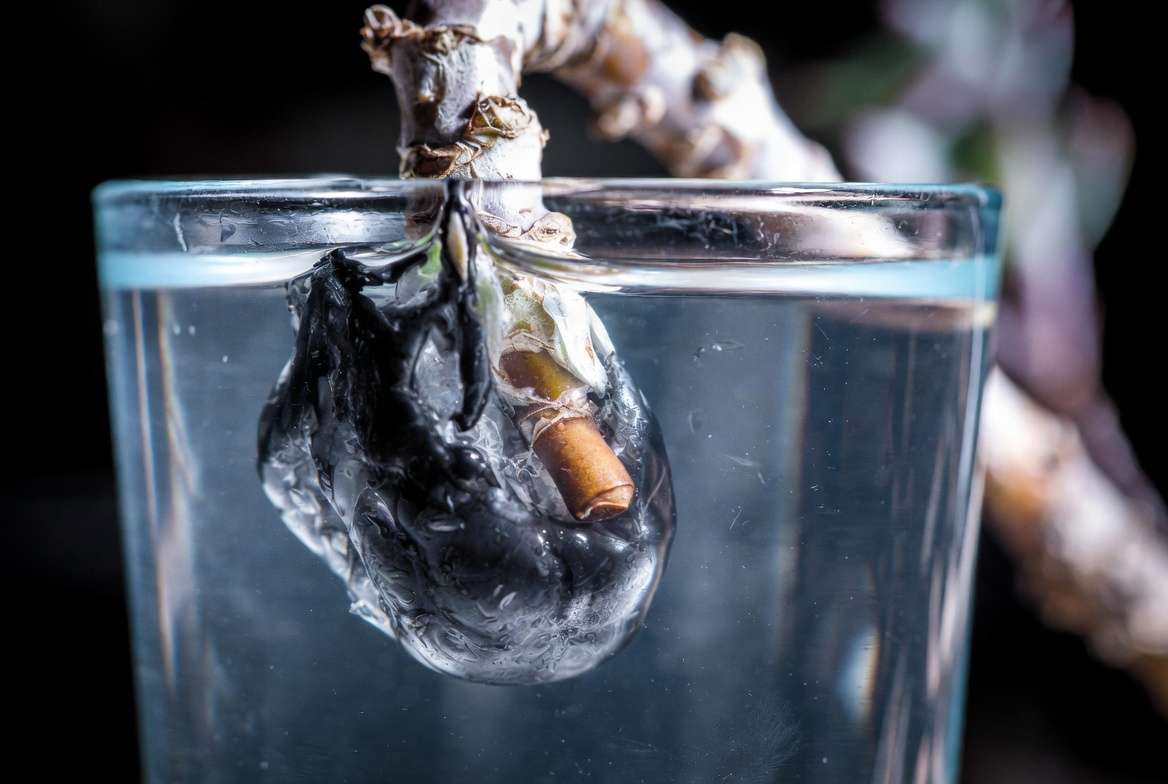
A callous is essentially a plant scab. When you cut a succulent, the wound is wet and exposed. If you expose this fresh wound to water, bacteria will enter the stem, and the plant cells will burst from osmotic shock, turning the stem to black mush.
Leave your fresh cuttings on a dry paper towel in a bright area (out of direct sunlight) for anywhere from 3 to 7 days. You are waiting for the cut end to dry out, harden, and form a tough, white or brown seal. Thinner stems (like String of Hearts) may only need 48 hours, while thick, fleshy stems (like a mature Jade plant) might need a full week to properly scab over.
🚰 Step-by-Step: Water Propagation of Succulent Cuttings
Once your cuttings have a tough, hardened callous, you are finally ready for the fun part. Setting up your propagation station correctly will encourage rapid root development.
Step 1: Choosing the Perfect Vessel 🧪
The container you choose matters. While you can technically use any cup, narrow-necked glass bottles, propagation test tubes, or small shot glasses work best.
Clear glass is highly recommended for two reasons. First, it allows you to monitor root growth and water clarity without disturbing the plant. Second, ambient sunlight passing through the clear glass naturally inhibits the growth of certain harmful, dark-loving bacteria. Just ensure the neck of the vessel is narrow enough to support the leaves of the succulent, preventing the entire plant from falling in.
Step 2: The “Hover” Method (Suspending Your Cutting) 🪄
This is the technique that guarantees zero rot. The goal is not to submerge the stem deeply like a bouquet of cut flowers.
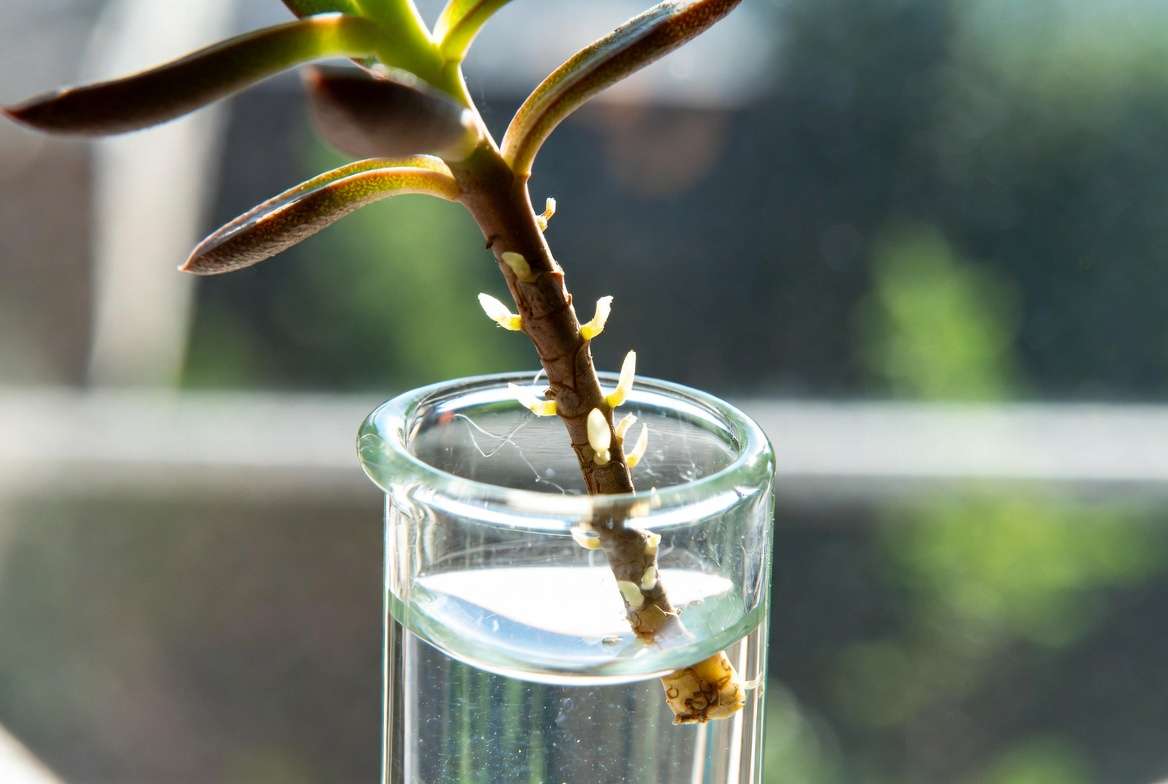
Instead, fill your vessel with water and place the cutting so that the calloused tip is hovering just a millimeter above the water line, or at most, barely brushing the surface. The high humidity evaporating off the water’s surface is enough to trigger root growth. Once the roots sprout, they will actively reach down into the water on their own.
-
The Cling Wrap Hack: If your vessel’s opening is too wide and the cutting keeps falling in, stretch a piece of plastic cling wrap tightly over the top of the glass and secure it with a rubber band. Poke a small hole in the plastic wrap with a toothpick, and gently slide your succulent stem through. This creates a secure, humid microclimate.
Step 3: Finding the Ideal Environment ☀️
Succulent cuttings need energy to push out new roots, and that energy comes from photosynthesis. Place your propagation station in a spot that receives bright, indirect light.
An east-facing windowsill is usually perfect. Strictly avoid harsh, direct afternoon sunlight. Because the glass vessel acts like a magnifying glass, direct sun will quite literally boil the water and cook your fragile cutting. Keep the room temperature comfortable, ideally between 65°F and 75°F.
Step 4: Maintenance and Water Changes 🔄
Stagnant water depletes oxygen and becomes a breeding ground for algae and bacteria. To keep your cutting healthy, you must change the water every 5 to 7 days.
When replacing the water, room temperature is best so you do not shock the delicate new roots. If your local tap water is heavily treated with chlorine or contains high levels of hard minerals, consider using filtered water, distilled water, or rainwater for the best results.
🪴 Soil vs. Water Roots: The Crucial Transition Phase
Congratulations! After a few weeks, you should see beautiful, white, fuzzy roots suspended in the water. But your journey is not over. This is the stage where many beginners fail.
Roots grown in water are structurally different from roots grown in soil. Water roots are thick, brittle, and lack the microscopic root hairs needed to extract moisture from dry dirt. If you take a water-propagated succulent and shove it directly into bone-dry cactus soil, the roots will suffer from shock, dry up, and die within days.
When is the Cutting Ready for Soil? 📏
Patience is key. Do not rush to plant your cutting the second you see a tiny root nub. Wait until the main roots are at least 1 to 2 inches long. Ideally, you want to see secondary roots—tiny little branches growing off the main roots. This indicates a robust root system capable of surviving the transition.
The Step-by-Step Acclimation Process 🔄
To successfully move your succulent from water to soil, you must use the Gradual Drying Technique.
-
The Soil Mix: Prepare a small pot with drainage holes. Fill it with a highly gritty, well-draining succulent mix. A blend of 50% standard potting soil and 50% inorganic grit (like pumice, perlite, or coarse sand) is perfect.
-
The Planting: Gently create a hole in the soil and lower the delicate water roots into it. Backfill the soil very softly so you do not crush the brittle roots.
-
The Moist Phase: Unlike mature succulents, this newly planted cutting needs moisture. Water the soil thoroughly immediately after planting. For the first week, keep the soil slightly moist (but never muddy). This mimics the aquatic environment the roots are used to.
-
The Tapering Phase: Over the next three weeks, gradually increase the time between waterings. Allow the top inch of soil to dry out, then water. By week four, you should transition completely to the standard “soak and dry” method used for adult succulents.
🚑 Troubleshooting Common Water Propagation Problems
Even with the best preparation, nature can be unpredictable. Here is how to diagnose and fix the most common water propagation issues.
Help! My Stem is Turning Black or Mushy 🖤
-
The Cause: This is classic stem rot. It is almost always caused by failing to let the stem callous properly, submerging the stem too deeply, or using dirty water.
-
The Solution: Act fast. Remove the cutting from the water. Sterilize your shears and cut the stem an inch above the rot until you see only clean, green tissue. Throw away the rotten piece. Let the healthy cutting callous for a full week, wash your glass vessel with hot soapy water, and start the process over.
The Leaves are Shriveled but There Are No Roots 🥀
-
The Cause: The cutting is losing moisture through its leaves faster than it can produce roots. This often happens in very dry indoor environments with low humidity.
-
The Solution: Try a “Humidity Dome.” Place a clear plastic bag or a glass cloche loosely over the top of the cutting and vessel. This traps ambient moisture, preventing the leaves from shriveling while the stem works on pushing out roots.
The Water is Cloudy or Smelly 🤢
-
The Cause: A bacterial or algal bloom has taken over your propagation station.
-
The Solution: Immediately dump the water. Gently rinse the succulent roots under a lukewarm tap to wash away any slime. Wash the glass vessel thoroughly with soap and water. Refill with fresh, filtered water.
White Bumps on the Stem? ⚪
If you see clusters of tiny, hard white bumps forming near the calloused end of the stem, do not panic! These are not mealybugs or diseases. These are called root primordia. It is the earliest stage of root development, meaning your beautiful water roots are just days away from bursting through the stem tissue.
🌟 Which Succulents Root Best in Water? (The Hit List)
Not all succulents are created equal when it comes to water rooting. Some thrive in an aquatic setup, while others stubbornly refuse to cooperate. Here is a quick guide to help you choose the best candidates for your propagation station.
| Succulent Type | Success Rate | Notes for Water Propagation |
| Echeveria | Very High 🟢 | Perfect for “beheaded” succulents that got too tall and leggy. Roots quickly and visibly. |
| Jade Plant (Crassula) | Very High 🟢 | Thick, woody stems push out aggressive root systems in water. |
| Trailing Succulents (String of Pearls, Hearts, Dolphins) | High 🟢 | Incredibly easy. Just ensure no leaves are submerged in the water, only the bare nodes. |
| Sedum (Jelly Beans, Burro’s Tail) | Moderate 🟡 | Leaves drop easily during handling. Best to use the cling-wrap hack for these delicate stems. |
| Haworthia & Aloe | Low 🔴 | These species are highly prone to rot in water. They naturally prefer to produce “pups” (offsets) in dry soil. Avoid water propagation for these. |

🙋♀️ Frequently Asked Questions (FAQs)
Can you put succulent cuttings straight into water?
Absolutely not. Bypassing the callousing stage is a guaranteed recipe for rot. Always leave the cutting in the open air for 3 to 7 days until the cut end is completely dry and sealed over before introducing it to water.
Do water-propagated succulents grow faster?
Yes, the initial root development is significantly faster in water compared to dry soil. The constant access to high humidity triggers rapid cell division in the meristematic tissue. However, once transplanted into soil, their growth rate will normalize to match soil-propagated plants.
Can succulents live in water forever (Hydroponics)?
While it is technically possible to grow succulents hydroponically, it requires precise nutrient management (liquid fertilizers), oxygenated water pumps, and LECA (clay pebbles) to stabilize the plant. Keeping a succulent indefinitely in a plain glass of tap water will eventually lead to nutrient deficiency, stunted growth, and eventual death. Water propagation is a transitional phase, not a permanent home.
Should I add rooting hormone to the water?
It is generally unnecessary for succulents, as they root incredibly easily on their own. Powdered rooting hormones can also clump up and turn the water cloudy, encouraging bacterial growth. If you are struggling, you can dip the calloused tip in rooting powder before hovering it over the water, but avoid mixing liquid hormone directly into the vessel.
🎉 Conclusion
Water propagation of succulent cuttings does not have to be an intimidating process. By taking the time to sterilize your tools, allowing the crucial callousing period, and hovering the stem just above clean water, you are setting your plants up for absolute success. The joy of watching those bright white roots stretch down into the water is one of the most rewarding experiences in indoor gardening.
Remember, propagation is as much a science as it is an art, so do not be afraid to experiment and find the micro-adjustments that work best for the light and humidity in your specific home. Happy propagating, and may your stems never rot! 💚











