

Picture this: a stunning, weathered piece of reclaimed wood resting perfectly on your dining table, overflowing with vibrant, geometric rosettes and cascading greenery. It looks like a slice of a fairy-tale forest brought right into your living room. Creating artistic succulent arrangements in driftwood is one of the most rewarding botanical DIY projects you can undertake. However, there is a giant elephant in the room that most social media tutorials conveniently ignore: a beautiful arrangement is useless if the plants rot and die within a month.
As plant care specialists, we know that combining living flora with decaying wood presents a unique set of horticultural challenges. Moisture retention, lack of drainage, and poor soil health are the silent killers of these beautiful displays.
In this comprehensive guide, we are going completely beyond the basic aesthetics. We will dive deep into the botanical science and preparation secrets required to create a breathtaking, Pinterest-worthy arrangement that is structurally sound and scientifically built to thrive for years. Ready to bridge the gap between art and botany? Let’s dig in! 🌿✨
Why Driftwood Makes the Perfect Succulent Canvas 🌊
Driftwood isn’t just a trendy vessel; it’s a dynamic, organic foundation that interacts with your plants. The appeal of using reclaimed wood goes far beyond its rustic charm.
-
Striking Aesthetic Contrast: The visual success of these arrangements relies on texture. The rugged, bleached, and chaotic lines of weathered wood provide the perfect backdrop for the smooth, fleshy, and highly structured leaves of succulents.
-
Dynamic Micro-Climates: Unlike a ceramic or plastic pot, wood is porous. It naturally absorbs excess moisture from the soil and slowly releases it into the air. When properly managed, this creates a micro-climate that mimics the natural, arid environments where many shallow-rooted succulents natively grow.
-
Eco-Friendly and Upcycled Decor: In an era of mass-produced plastic planters, utilizing a piece of fallen, naturally sculpted wood is a beautiful way to practice sustainable indoor gardening.

Sourcing Your Driftwood Responsibly 🌿
Before you can plant, you need the perfect piece of wood.
-
Foraging: If you live near a beach, river, or lake, foraging is a wonderful option. Look for pieces with natural crevices, deep knots, or a hollowed-out center. Always check local regulations, as some protected beaches prohibit the removal of natural materials.
-
Purchasing: If foraging isn’t an option, local aquarium supply stores, reptile shops, or online craft marketplaces are excellent sources for pest-free, pre-cleaned wood (like Ghostwood, Mopani, or Malaysian driftwood).

The Crucial First Step: Prepping and Curing Your Driftwood 🧼🪵
This is where standard DIY tutorials fail and where true plant expertise comes in. You cannot simply scoop potting soil into a random log and hope for the best. To protect the delicate root systems of your succulents and ensure long-term soil health, the wood must be meticulously prepared.
Cleaning and Sanitizing 🧽
If you foraged your wood, it is currently a luxury condo for bacteria, fungal spores, hidden insects, and potentially toxic salts.
-
The Brush Down: Use a stiff-bristled brush to aggressively scrub away loose bark, sand, and debris.
-
The Soak: Submerge the wood entirely in a tub of clean water for at least 48 to 72 hours. Change the water daily. This process leaches out trapped tannins and, most importantly, salt.
-
The Boil (or Bake): To kill lingering pathogens and pests, boil the wood in a large stockpot for 1 to 2 hours. If the piece is too large to boil, bake it in an oven at 200°F (93°C) for 2 to 3 hours, keeping a very close eye on it to prevent burning.
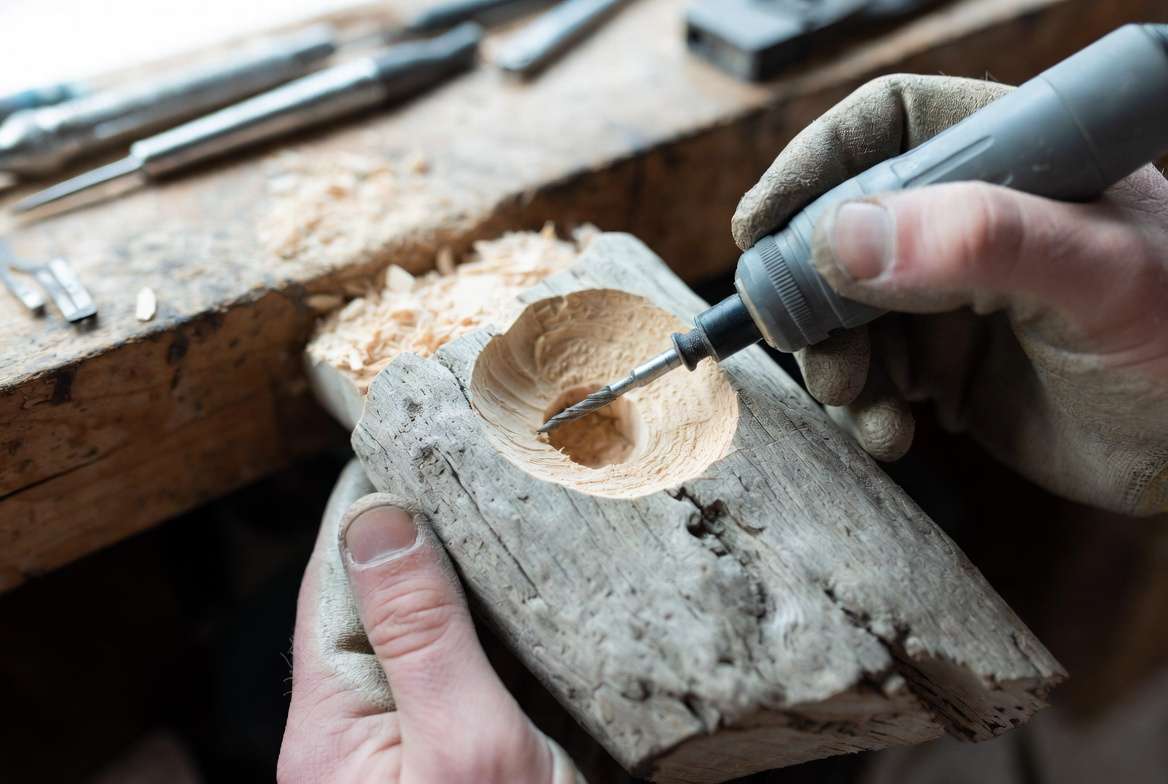
Carving and Creating Planter Pockets 🛠️
Once your wood is completely dry (which can take a few days in the sun), it’s time to sculpt. Succulents have notoriously shallow root systems, which makes them ideal for this project, but they still need room to establish themselves.
-
Assess the Natural Grooves: Work with the wood, not against it. Identify existing cracks or hollows that can be widened.
-
Excavate: Using a chisel, a drill with a spade bit, or a Dremel tool, carve out planting pockets. Aim for a depth of at least 2 to 3 inches and a width that can comfortably hold a small nursery plug.
-
Smooth the Edges: Sand down the interior of your carved pockets to remove sharp splinters that could damage delicate plant tissues during planting.
Preserving the Wood (Without Harming the Plants) 🛡️
When wet soil sits directly against raw wood for months, the wood will inevitably begin to rot, attracting fungus gnats and compromising the arrangement.
To prevent this, you must seal the inside of your carved pockets. Use a non-toxic, plant-safe sealant. A brush-on water-based polyurethane (allowed to cure for 72 hours) or a thick layer of natural beeswax works wonders. Only seal the carved hollows where the soil will sit; leave the exterior of the wood natural so it can continue to breathe and maintain its rustic aesthetic.
Selecting the Perfect Succulents for Wood Planters 🌸🌵
With your driftwood fully cured, sealed, and sculpted, you are ready to choose your botanical palette. Not all succulents are created equal when it comes to non-traditional planters. Because driftwood pockets are inherently shallow, you must select species that are structurally compact and possess shallow, forgiving root systems.
The Best Species for Shallow Roots 🌱
When selecting your plants, look for varieties that naturally cling to rocks or thrive in minimal substrate in their native habitats.
-
Echeveria: These stunning, rose-like rosettes come in a spectrum of pastel colors and stay relatively compact, making them perfect focal points.
-
Sedum (Stonecrop): Highly resilient and excellent at spreading, compact Sedums are the ultimate ground cover to tuck into tiny crevices.
-
Sempervivum (Hens and Chicks): Frost-hardy and incredibly tough, these multiply by producing small “pups” that can beautifully cascade down the natural ridges of the wood.
-
Haworthia: Known for their architectural, striped leaves (like the Zebra Plant), these tolerate lower light conditions exceptionally well.
💡 Expert Insight: You do not have to buy fully mature nursery plants for this project. If you actively root succulent cuttings or practice leaf propagation, those tiny, newly established pups—especially those rooted in a lightweight medium like perlite—are the absolute perfect size to nestle into the small, carved nooks of your driftwood.
Designing with Color, Texture, and “Thriller, Filler, Spiller” 🎨
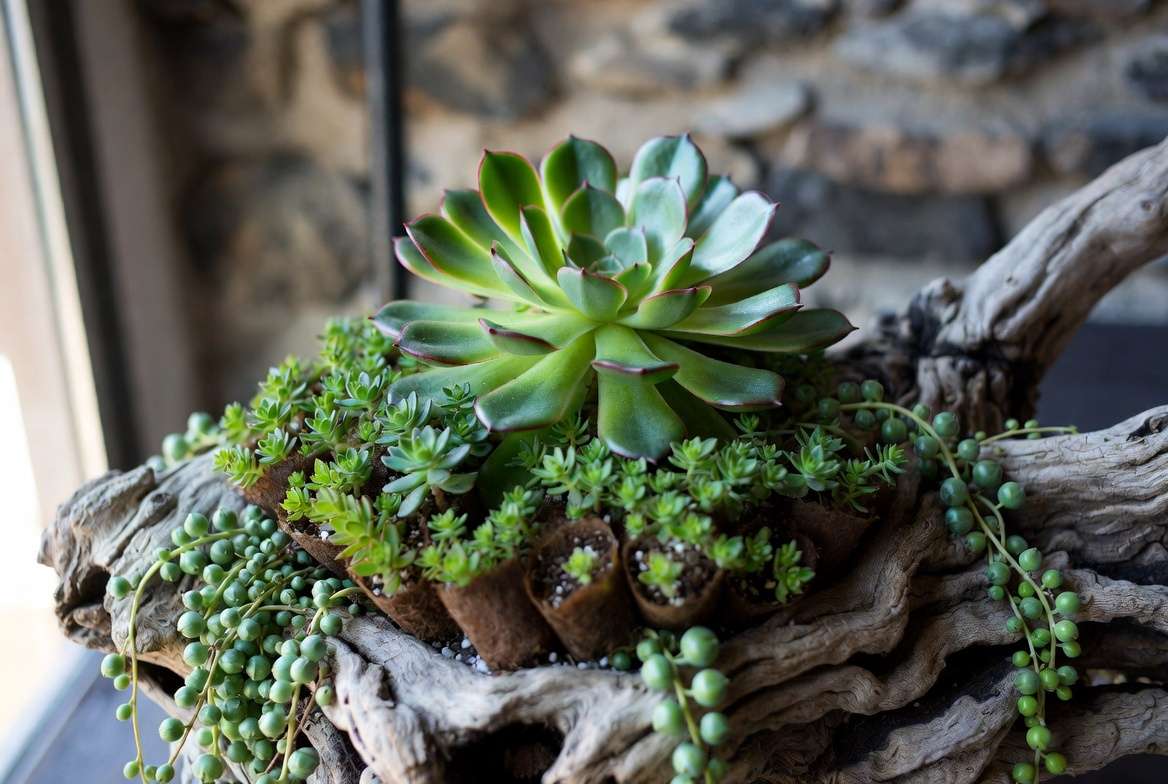
To elevate your piece from a simple craft to a true botanical art installation, apply the classic “Thriller, Filler, Spiller” container gardening design principle:
-
The Thriller: Choose one or two large, brightly colored succulents (like a vibrant purple Echeveria ‘Perle von Nurnberg’) to act as the undeniable focal point. Place these in the deepest pockets of your driftwood.
-
The Filler: Surround your thrillers with low-growing, tightly clustered plants. Think of these as the mortar holding your visual bricks together. Green or blue-toned Sedums work beautifully to contrast against pink or purple thrillers.
-
The Spiller: To integrate the plants with the wood, you need movement. Plant trailing succulents like String of Pearls (Senecio rowleyanus) or String of Bananas near the edges of the planter pockets so they can cascade naturally over the rustic sides of the log.
The Step-by-Step Guide: Planting Your Artistic Succulent Arrangements in Driftwood 🪴✨
Now comes the most exciting part: bringing your vision to life. This process requires a delicate touch and an understanding of how to anchor plants securely without suffocating their roots.
Step 1: Preparing the Base Layer 🪨
Because driftwood arrangements lack traditional drainage holes, you need a buffer zone. Line the very bottom of your sealed planter pockets with a thin layer of horticultural charcoal. This acts as a natural filter, absorbing impurities and preventing the stagnant water from turning sour and causing bacterial root rot.
Over the charcoal, add a thin layer of long-fibered sphagnum moss. This moss acts like a sponge, holding just enough moisture for the roots to drink from without leaving the soil soaking wet.
Step 2: Mixing the Ultimate Drainage Soil 🏜️
Standard, off-the-shelf potting soil is a death sentence for a driftwood planter; it simply holds too much water. You need an ultra-porous, fast-draining substrate.
The Expert Driftwood Soil Recipe:
-
40% High-Quality Organic Potting Soil: To provide necessary nutrients.
-
40% Perlite or Pumice: The cornerstone of excellent drainage. Perlite keeps the soil lightweight, airy, and highly oxygenated, which is vital when planting in wood.
-
20% Coarse Horticultural Sand or Grit: To weigh the mixture down slightly and mimic the gritty texture of a desert environment.
Step 3: Arranging and Planting 👐
-
Unpot and Inspect: Gently remove your succulents from their nursery pots. Massage the root ball to remove as much of the old, compacted nursery soil as possible. If the roots are excessively long, you can give them a very slight, clean trim to fit the pocket.
-
Dry Fitting: Before committing, arrange your plants in the driftwood while they are still bare-root. Play with the positioning until you achieve a balanced, organic look.
-
Planting: Add a small mound of your custom drainage soil over the moss layer. Gently press the roots into the soil and backfill the gaps using a small spoon, chopstick, or soft brush to pack the soil securely around the roots without crushing them.
A note on floral glue: Some tutorials suggest gluing succulent cuttings directly to the wood. While this creates instant gratification, it is a temporary display. The plants will eventually stretch and die without soil. For an arrangement that actually thrives, always plant rooted succulents in a soil medium.
Step 4: Top Dressing for a Polished Look 💎
Exposed soil detracts from the artistic illusion. Once your plants are secure, apply a layer of “top dressing”—such as decorative gravel, natural river sand, or even small pieces of preserved reindeer moss—over the exposed soil. This not only makes the arrangement look like a cohesive landscape but also helps lock the soil in place so it doesn’t wash away when you water.
The Secret to Longevity: Watering and Care 💧☀️
The number one question plant specialists get asked is: “How on earth do I water this without ruining my table or killing the plants?” The secret lies in precision and restraint.
How to Water a Driftwood Planter Without Drainage Holes 🚿
You must abandon your watering can. Pouring water directly over a driftwood arrangement will lead to a disastrous overflow and inevitable root rot.
Instead, adopt a targeted “Soak and Dry” approach using a watering syringe or a squeeze bottle with a narrow, angled neck.
-
Wait until the succulent leaves feel slightly soft and pliable (a sign they are actively thirsty) and the soil is completely bone dry.
-
Insert the tip of the syringe or squeeze bottle directly under the leaves, bypassing the top dressing, and inject the water directly into the soil root zone.
-
Administer only enough water to lightly moisten the soil—do not flood the pocket. The sphagnum moss layer will catch the excess, but there is nowhere for a flood of water to drain.

Lighting Requirements ☀️
Succulents crave light, but a raw piece of driftwood can become brittle and severely sun-bleached if baked in direct outdoor sunlight.
Find the sweet spot: Place your arrangement near a South or East-facing window where it will receive plenty of bright, indirect light for at least 6 hours a day. If your succulents begin to lose their vibrant colors and stretch out (etiolation), they need more light. Consider supplementing with a full-spectrum LED grow light during the darker winter months.
Fertilizing in a Confined Space 🧪
Because your succulents are living in a tiny amount of soil, they will eventually exhaust the available nutrients. During the active growing season (Spring and Summer), feed your arrangement sparingly. Use a specialized liquid fertilizer formulated specifically for cacti and succulents, diluted to one-quarter of the recommended strength. Inject this diluted fertilizer directly into the soil using your watering syringe just once every 6 to 8 weeks. Over-fertilizing in a confined space will cause rapid, leggy growth that quickly ruins the artistic shape of your arrangement.
Troubleshooting Common Driftwood Planter Problems 🩺🔍
Even with the most meticulous preparation and perfect soil mix, indoor gardening is a living, breathing experiment. As your arrangement settles into its new environment, you might encounter a few hiccups. Being able to diagnose and treat these issues early is what separates novice crafters from true plant care experts.
Soft, Mushy, or Translucent Leaves 🥀
The Diagnosis: This is the universal sign of overwatering and impending root rot. When a succulent takes up more water than it can store, its cell walls literally burst, turning the leaves translucent, yellow, and mushy. The Fix: Stop watering immediately! If only the bottom leaves are mushy, gently pull them off and let the soil dry completely. If the center of the rosette is black or mushy, the plant is unfortunately rotting from the inside out. You must remove it using a small spoon to prevent the rot from spreading to the neighboring succulents.
Stretching and Pale Growth (Etiolation) 🦒
The Diagnosis: If your normally compact Echeveria or Sempervivum is suddenly growing tall, leaving large gaps between its leaves, and leaning heavily in one direction, it is starving for sunlight. The Fix: Move your driftwood arrangement to a brighter location. While you cannot reverse the stretched growth that has already occurred, providing more light will ensure the new growth at the top is compact and vibrant. If the plant becomes too leggy and ruins the aesthetic, simply snip off the top rosette, let it callous for a few days, and replant it right back into the soil pocket!
Wood Mold or Fungal Growth 🍄
The Diagnosis: You might notice fuzzy white or green patches appearing on the surface of the wood, especially near the planter pockets. This happens when the wood remains damp for too long and ambient airflow is poor. The Fix: Don’t panic! Surface mold usually won’t harm the plants, but it does ruin the artistic aesthetic. Gently wipe the mold away with a damp cloth or a soft toothbrush. Next, generously sprinkle natural cinnamon powder over the affected wood. Cinnamon is an incredible, natural horticultural fungicide that will stop the mold spores in their tracks. Going forward, increase the airflow around your arrangement and reduce watering frequency.

Pest Invasions: Mealybugs and Spider Mites 🕷️
The Diagnosis: Keep an eye out for tiny, cotton-like webs tucked into the tight crevices where the leaves meet the stem (a hallmark of mealybugs). If you see fine, dusty webbing across the leaves, you are likely dealing with spider mites. The Fix: Because you are working with an intricate, densely planted arrangement, pest control requires precision. Dip a cotton swab in 70% isopropyl alcohol and dab it directly onto the pests to kill them instantly. Avoid spraying heavy horticultural oils or neem oil over the entire arrangement, as this can strip the natural powdery coating (farina) off your succulents and leave the driftwood looking greasy.
Frequently Asked Questions (FAQs) 🙋♀️🌱
To ensure this guide leaves no stone (or piece of wood) unturned, here are the answers to the most common questions regarding driftwood succulent care.
How long do succulent driftwood arrangements last?
When constructed correctly using the carved-pocket method, proper drainage soil, and adequate lighting, these arrangements can thrive for 1 to 3 years before needing an overhaul. Over time, the succulents will naturally outgrow their shallow pockets. When this happens, you can easily pull them out, trim the roots, and replant them, or take cuttings to start the process all over again.
Can I use hot glue to attach succulents to driftwood?
While many quick-craft tutorials recommend hot glue or floral glue, we strongly advise against it if your goal is long-term survival. Gluing a succulent directly to wood without soil provides no nutrients and restricts natural root growth. The plant will survive temporarily by slowly consuming its own lower leaves for moisture, but it will eventually desiccate and die. Always use a carved pocket with high-drainage soil for a living, thriving arrangement.
Does salt from beach driftwood kill succulents?
Yes, absolutely. Succulents are highly sensitive to soil salinity. Salt pulls moisture directly out of the plant’s root cells, causing rapid dehydration. If you forage your wood from a saltwater beach, you must soak it in fresh water for several days, changing the water daily, to leach out the accumulated salt before planting.
Can I keep my driftwood planter outside?
You can, but it requires caution. If placed outdoors, the arrangement must be protected from heavy rainfall, as the lack of drainage holes means a single rainstorm can flood the pockets and rot the plants. Furthermore, direct, intense afternoon sun can severely bleach and crack the wood. A covered patio or a bright, protected porch is the ideal outdoor setting.
Conclusion: Bringing Nature Indoors 🏡💚
Crafting artistic succulent arrangements in driftwood is so much more than a simple weekend DIY project. It is a beautiful convergence of sculpture and horticulture. By taking the time to properly cure your wood, mix a specialized, porous substrate, and select the right shallow-rooting species, you elevate this craft into a sustainable, long-lasting piece of living art.
Remember that indoor gardening is a journey. Your plants will grow, shift, and change colors with the seasons. Don’t be afraid to prune them, swap them out, or adjust their care as they adapt to their beautiful wooden home.
Now it’s your turn to get your hands dirty! If you build your own masterpiece using these expert techniques, we would love to see it. Drop a comment below with your favorite succulent pairings, or share this guide with a fellow plant lover who is ready to take their botanical displays to the next level. Happy planting! 🌵✨











