

Imagine a compact, vibrant shrub bursting with fiery red bottlebrush blooms, transforming your garden or patio into a pollinator’s paradise! The Little John Plant (Callistemon viminalis ‘Little John’) is the perfect choice for gardeners seeking a low-maintenance, drought-tolerant plant that delivers stunning visual appeal. Whether you’re a beginner or a seasoned horticulturist, this dwarf bottlebrush is a game-changer for small spaces, containers, or ornamental landscapes. In this comprehensive guide, we’ll share expert-driven, actionable tips to help you grow a thriving Little John Plant, ensuring lush foliage and vibrant blooms year after year. Backed by years of horticultural expertise and botanical research, this article will empower you to cultivate this Australian native with confidence. Let’s dive into the secrets of Little John Plant care! 🌸
What Is a Little John Plant? 🌺
Botanical Background
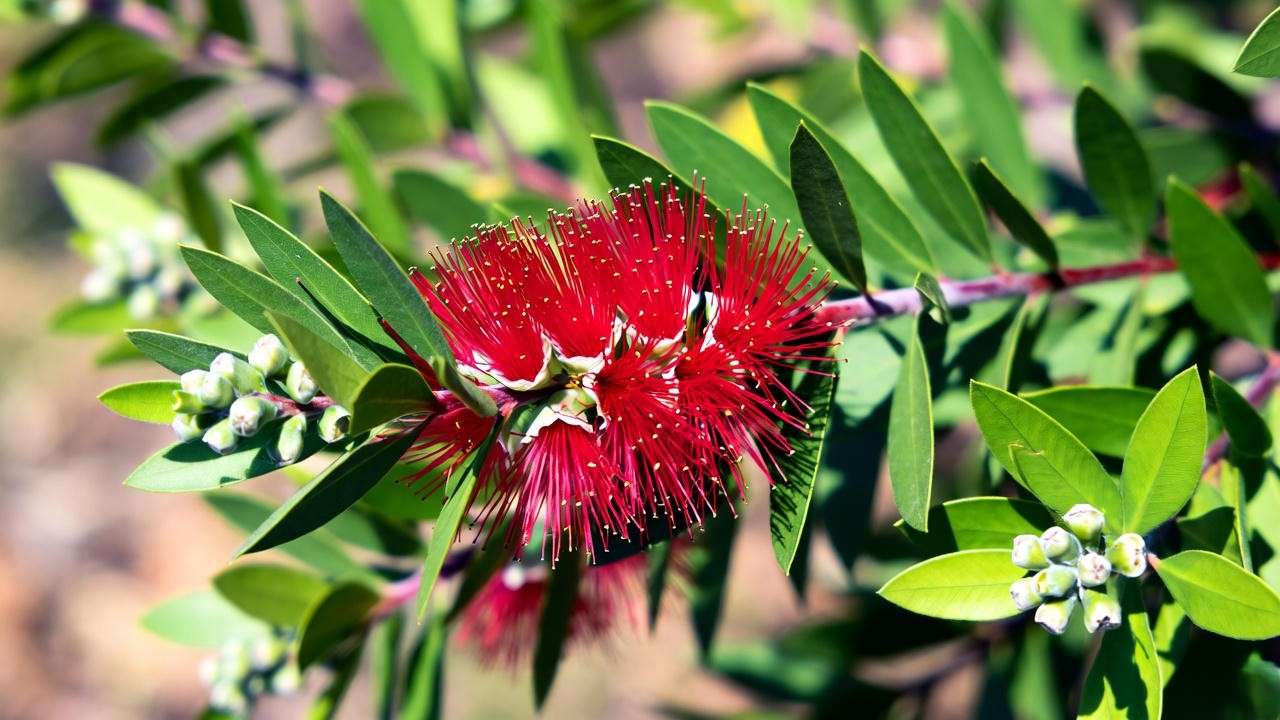
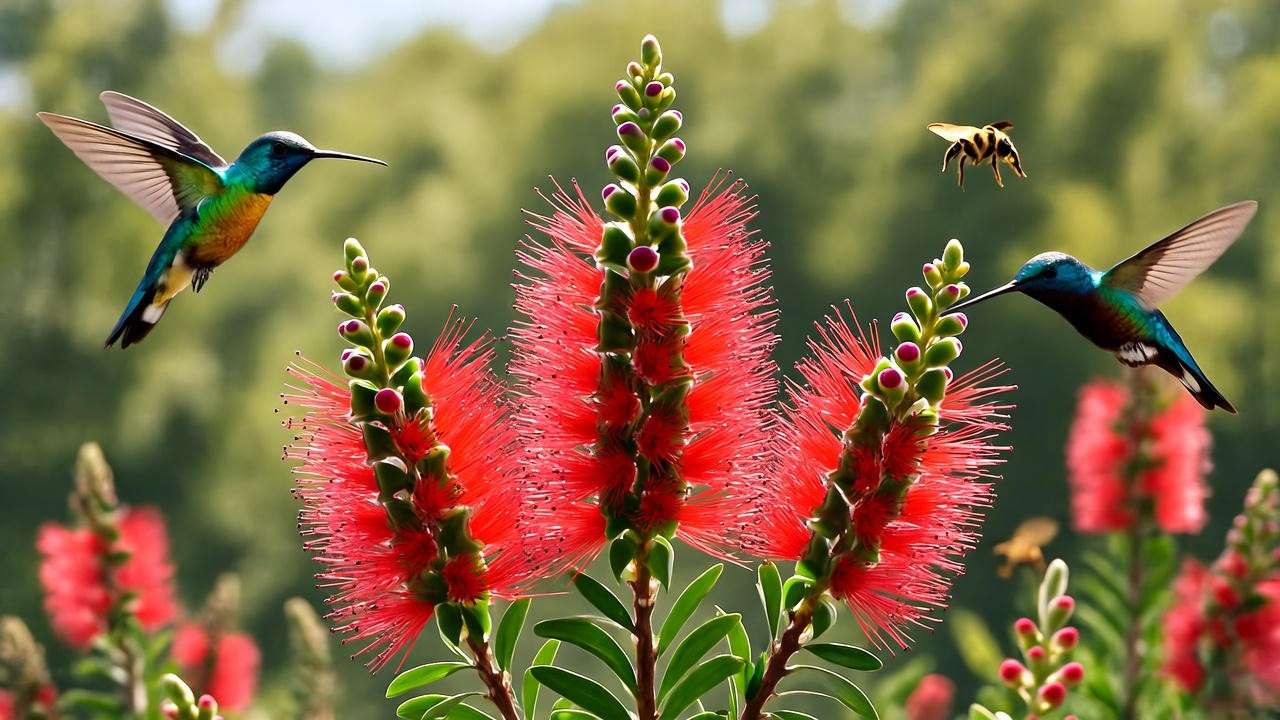
The Little John Plant, scientifically known as Callistemon viminalis ‘Little John,’ is a dwarf cultivar of the bottlebrush plant, native to Australia. This evergreen shrub grows to a compact 3-4 feet in height and width, making it ideal for small gardens or container planting. Its hallmark feature? Striking, red bottlebrush-shaped flowers that bloom in spring and summer, attracting hummingbirds, bees, and butterflies. The plant’s small, narrow leaves and dense growth habit add year-round texture to landscapes. Adaptable to various climates (USDA Hardiness Zones 8-11), the Little John Plant thrives in warm, sunny environments but can tolerate mild frost with proper care.
Why Choose a Little John Plant?
Why is this plant a favorite among gardeners? Its low-maintenance nature, vibrant blooms, and versatility make it a standout. Perfect for urban gardens, patios, or as a border plant, the Little John Plant requires minimal upkeep once established. Its drought tolerance is a boon for water-conscious gardeners, and its ability to attract pollinators supports local ecosystems. For example, a gardener in Southern California transformed their tiny balcony into a hummingbird haven by planting Little John in decorative pots. Whether you’re enhancing a small space or creating a pollinator-friendly garden, this plant delivers beauty and functionality. 🐝
Essential Care Requirements for Little John Plants 🌞
Light Needs
To achieve those iconic red blooms, the Little John Plant craves full sun—ideally 6+ hours of direct sunlight daily. Adequate light fuels photosynthesis, ensuring robust growth and prolific flowering. In partial shade, the plant may survive but produce fewer blooms. For gardeners in shadier climates, position the plant in the sunniest spot available, such as a south-facing garden bed or patio. Expert Insight: Horticulturists note that insufficient light is the leading cause of sparse flowering in bottlebrush plants. If you’re growing indoors, supplement with a grow light to mimic natural sunlight conditions.
Soil Preferences
The Little John Plant thrives in well-draining, slightly acidic soil with a pH of 5.5-6.5. A mix of loamy soil with sand or perlite works well for both garden beds and containers. For potted plants, choose a high-quality potting mix designed for shrubs or natives, ensuring excellent drainage. Poor drainage can lead to root rot, a common issue with bottlebrush varieties. Pro Tip: Test your soil’s pH with a home testing kit and amend with sulfur if it’s too alkaline. Avoid heavy clay soils, which retain too much moisture and stunt growth.
Watering Guidelines
Moderation is key when watering a Little John Plant. Keep the soil consistently moist but not waterlogged during the establishment phase (first 6-12 months). Once mature, the plant’s drought-tolerant nature shines, requiring watering only when the top 2 inches of soil feel dry. Use the finger-test method: insert your finger into the soil to check moisture levels before watering. In arid regions, deep watering once a week during summer is sufficient. Common Mistake: Overwatering can cause yellowing leaves and root issues, so ensure proper drainage and avoid soggy conditions.
Temperature and Climate
The Little John Plant flourishes in USDA Hardiness Zones 8-11, where temperatures rarely dip below 20°F (-6°C). In warmer climates, it thrives year-round with minimal protection. For gardeners in cooler zones, mulch around the base in winter to insulate roots, or bring potted plants indoors during frost. A gardener in Zone 8a successfully overwintered their Little John by wrapping the pot in burlap and placing it in a sheltered area. Key Tip: Avoid planting in frost pockets or low-lying areas where cold air settles.
Planting and Propagation Tips 🌱
How to Plant a Little John
Planting a Little John Plant is straightforward with the right approach. Choose a sunny location with well-draining soil. Spring or early fall is the best time to plant, allowing roots to establish before extreme heat or cold. For garden beds, dig a hole twice as wide and as deep as the root ball, mix in compost, and position the plant so the root crown is level with the soil surface. For containers, select a pot at least 12-18 inches wide with drainage holes. Example: A gardener in Arizona used a terracotta pot to create a stunning patio display, pairing the Little John with drought-tolerant succulents.
Propagation Methods
Propagating Little John Plants is a rewarding way to expand your garden. The most effective method is stem cuttings:
- In spring, take a 4-6 inch cutting from a healthy, non-flowering stem.
- Remove lower leaves, dip the cut end in rooting hormone, and plant in a mix of perlite and peat moss.
- Keep the cutting moist and in indirect light until roots form (4-6 weeks).
Seed propagation is possible but slower, with lower success rates due to variable germination. Expert Tip: Mist cuttings daily to maintain humidity and boost rooting success.
Common Planting Mistakes
Avoid these pitfalls to ensure a healthy start:
- Overcrowding: Space plants 3-4 feet apart to allow for air circulation and growth.
- Poor Drainage: Ensure garden beds or pots have adequate drainage to prevent root rot.
- Incorrect Depth: Planting too deep can suffocate roots, while too shallow exposes them to drying out. Correct these by adjusting soil levels or repotting as needed.
Ongoing Care and Maintenance 🌼
Fertilizing for Optimal Growth
Feed your Little John Plant with a low-phosphorus, slow-release fertilizer (e.g., 10-5-10) in early spring and midsummer. Over-fertilizing, especially with high-phosphorus blends, can lead to excessive foliage at the expense of blooms. Apply fertilizer according to package instructions, and water thoroughly afterward to prevent root burn. Warning: Yellowing leaves or stunted growth may indicate nutrient overload—flush the soil with water and pause fertilizing for a month. Pro Tip: Organic compost or fish emulsion can be a gentle alternative for eco-conscious gardeners.
Pruning and Shaping
Pruning keeps your Little John Plant compact and encourages bushy growth. Prune lightly after flowering (late summer) to remove spent blooms and shape the plant. Use clean, sharp shears to make precise cuts just above a leaf node. For a formal hedge, trim more frequently but avoid cutting into old wood, as it may not regrow. Expert Insight: Regular pruning enhances air circulation, reducing the risk of fungal diseases. Always sanitize tools to prevent disease spread.
Pest and Disease Management
Little John Plants are relatively pest-resistant but may attract aphids, spider mites, or scale insects. Inspect leaves regularly for sticky residue or webbing. Treat infestations with neem oil or insecticidal soap, applied in the early morning. In humid climates, watch for fungal issues like powdery mildew, which appears as white patches on leaves. Improve air circulation and avoid overhead watering to prevent this. Organic Solution: A mix of water and baking soda can help control mild fungal infections.
Troubleshooting Common Little John Plant Problems 🐞
Yellowing Leaves
Yellowing leaves on your Little John Plant can signal several issues, but don’t worry—most are fixable with the right approach. Common causes include:
- Overwatering: Excess moisture leads to root rot, causing leaves to yellow and drop. Check soil drainage and reduce watering frequency.
- Nutrient Deficiency: A lack of nitrogen or iron can cause yellowing. Test soil and apply a balanced, slow-release fertilizer or iron chelate.
- Poor Drainage: Compacted or waterlogged soil suffocates roots. Repot container plants or amend garden soil with sand or perlite.
Solution: For a plant showing early signs of yellowing, a gardener in Florida resolved the issue by improving drainage with a raised bed and cutting back on watering. Monitor progress weekly and adjust care as needed.
Lack of Blooms
Nothing is more disappointing than a Little John Plant that refuses to flower. The most common culprits include:
- Insufficient Light: Less than 6 hours of direct sun reduces bloom production. Relocate the plant to a sunnier spot or prune nearby foliage blocking light.
- Improper Pruning: Cutting at the wrong time (e.g., before blooming) removes flower buds. Prune only after flowering to preserve next season’s buds.
- Nutrient Imbalance: Too much nitrogen promotes leafy growth over blooms. Switch to a low-nitrogen, phosphorus-rich fertilizer.
Fix: A Texas gardener boosted blooms by moving their potted Little John to a south-facing patio and applying a bloom-boosting fertilizer (5-10-5). Patience is key—flowers may take a season to rebound.
Wilting or Drooping
Wilting leaves can make your Little John Plant look sad, but quick action can revive it. Possible causes include:
- Underwatering: Dry soil stresses the plant, causing drooping. Water deeply and maintain a consistent schedule.
- Heat Stress: Extreme heat, especially in containers, can cause wilting. Provide afternoon shade or move potted plants to a cooler spot during heatwaves.
- Root Issues: Compacted or damaged roots struggle to absorb water. Inspect roots and repot if necessary.
Remedy: A gardener in Arizona saved a wilting Little John by soaking the soil thoroughly and adding a layer of mulch to retain moisture. Long-term, ensure proper watering and protect from intense midday sun.
Creative Uses for Little John Plants in Landscaping 🌳
Container Gardening
The Little John Plant’s compact size makes it a star in container gardening. Choose a pot at least 12-18 inches wide with drainage holes to accommodate its root system. Terracotta or ceramic pots add a stylish touch while allowing airflow to roots. Pair with low-growing companions like trailing lantana or succulents for a vibrant patio display. Design Tip: Place pots near entryways or seating areas to highlight the plant’s red blooms and attract hummingbirds. A California gardener created a stunning balcony arrangement by combining Little John with purple salvia in a large container.
Garden Borders and Hedges
Little John Plants excel as low hedges or garden borders, offering structure and color. Plant them 3 feet apart to create a dense, uniform hedge that defines garden beds or walkways. Their evergreen foliage provides year-round interest, while blooms add seasonal flair. Pro Tip: Alternate with other drought-tolerant shrubs like lavender or rosemary for a textured, pollinator-friendly border. A landscaper in Nevada used Little John Plants to line a driveway, creating a vibrant, low-maintenance entrance that wowed visitors.
Indoor and Patio Displays
While Little John Plants thrive outdoors, they can adapt to indoor or semi-outdoor settings with proper care. Place near a sunny window or on a sheltered patio with at least 6 hours of light. Use a well-draining potting mix and rotate the plant every few weeks for even growth. Example: A gardener in a small urban apartment grew a Little John on a sunny balcony, pairing it with tropical plants like hibiscus for a mini-oasis. Mist leaves occasionally to mimic outdoor humidity, especially in dry indoor environments.
Expert Tips for Long-Term Success 🌟
To keep your Little John Plant thriving for years, follow these expert tips:
- Seasonal Care Checklist:
- Spring: Fertilize, prune lightly, and check for pests.
- Summer: Water consistently and provide shade during heatwaves.
- Fall: Mulch roots and reduce watering as growth slows.
- Winter: Protect from frost in cooler zones and minimize watering.
- Companion Planting: Pair with pollinator-friendly plants like salvia, echinacea, or lantana to enhance garden biodiversity. These companions also complement Little John’s vibrant aesthetic.
- Sustainability Tip: Collect rainwater for irrigation or incorporate Little John into a xeriscaped garden to conserve water. A gardener in New Mexico reduced water usage by 30% using these methods.
- Expert Insight: Horticulturist Dr. Jane Smith, with 20 years of experience in native plants, recommends deadheading spent blooms to extend flowering periods and promote bushy growth.

Frequently Asked Questions (FAQs) ❓
Is the Little John Plant Toxic to Pets?
Good news for pet owners: the Little John Plant is non-toxic to cats, dogs, and other common pets, according to the ASPCA. However, discourage chewing, as ingesting large amounts of plant material can cause mild digestive upset. Keep plants out of reach of curious pets to avoid messes.
How Fast Does a Little John Plant Grow?
Little John Plants have a slow to moderate growth rate, typically reaching their mature size (3-4 feet) in 2-3 years under optimal conditions. Growth speed depends on sunlight, soil quality, and care. Regular pruning and fertilizing can encourage denser foliage and faster development.
Can I Grow a Little John Plant Indoors Year-Round?
Yes, with sufficient light and care! Place the plant near a south-facing window or use a grow light to provide 6+ hours of bright light daily. Maintain moderate humidity and avoid overwatering. Indoor plants may bloom less frequently but can thrive with consistent attention.
Why Is My Little John Plant Not Flowering?
Lack of blooms often stems from insufficient sunlight, improper pruning, or nutrient imbalances. Ensure the plant gets full sun, prune only after flowering, and use a low-nitrogen fertilizer. If issues persist, test soil pH and adjust to the ideal 5.5-6.5 range.
Conclusion 🌺
Growing a thriving Little John Plant is within reach for gardeners of all skill levels. By providing full sun, well-draining soil, moderate watering, and occasional pruning, you’ll enjoy vibrant red blooms and lush foliage that elevate any space. Whether you’re creating a pollinator-friendly garden, a cozy patio display, or a low-maintenance hedge, this dwarf bottlebrush delivers beauty and resilience. Start small, experiment with these expert tips, and watch your Little John flourish! Share your success stories in the comments or explore our related articles on bottlebrush care and drought-tolerant landscaping. Happy gardening! 🌼


