
Successful plant propagation often hinges on a delicate balance of factors, but one stands out above the rest: the perfect temperature for rooting cuttings. When trying to grow new plants from cuttings, understanding and maintaining the ideal temperature range is crucial for promoting root development and ensuring a healthy start for your plants. Too high or too low, and your efforts could fall short. In this article, we’ll explore the optimal temperature conditions, share expert tips, and guide you on how to achieve the perfect environment for rooting cuttings. Whether you’re a seasoned gardener or a beginner, mastering this key factor can make all the difference in your propagation success.
What is Rooting and Why Temperature Matters? 

Rooting is the process where a plant cutting or section begins to develop roots, allowing it to grow independently. It’s an essential step in plant propagation, helping gardeners clone their favorite plants or start new ones. The success of rooting depends on several factors, and temperature plays a major role in this process.
1. What is Rooting? 
Rooting occurs when a plant cutting is placed in the right environment to stimulate the growth of new roots. These roots will then anchor the plant into the soil, allowing it to absorb water and nutrients. It’s the foundation for healthy plant growth.
2. Why Temperature is Key
Temperature has a direct impact on root development. Plants typically root best when the temperature is consistent and within a specific range, usually between 65°F (18°C) and 75°F (24°C). If the temperature is too low, rooting slows down, and if it’s too high, it can cause stress or even damage to the cutting.
- Warm temperatures promote faster root growth by encouraging the cutting to focus its energy on forming roots.
- Cooler temperatures can delay rooting or cause the cutting to rot if it’s too cold for the roots to develop properly.
3. Creating the Right Environment 
To achieve the ideal temperature for rooting:
- Use a propagation box or heat mat to maintain a consistent warmth around your cuttings.
- Place the cuttings in a warm, bright spot but avoid direct sunlight, which can overheat the cuttings.
By understanding and controlling the temperature, you ensure your cuttings have the best chance to develop healthy roots. Happy propagating!
The Ideal Temperature Range for Rooting Cuttings
When it comes to successfully rooting plant cuttings, maintaining the right temperature is key to ensuring strong root development. Here’s what you need to know:
1. Optimal Temperature Range
The ideal temperature for rooting most plant cuttings falls between 65°F and 75°F (18°C to 24°C). This range provides the perfect balance of warmth to encourage root growth without stressing the cutting.
2. Why Temperature Matters 
Temperatures that are too cold can slow down the rooting process, while excessive heat can cause the cutting to dry out or rot. Keeping the temperature steady within this range promotes healthy root formation and helps the cutting stay hydrated and strong.
3. Using Heat Mats for Extra Warmth
If you’re rooting cuttings in a cooler environment, consider using a seedling heat mat to maintain the ideal warmth. These mats help to gently raise the temperature around your cuttings, speeding up root development.
4. Avoid Extreme Heat
Avoid placing your cuttings in direct sunlight or near heat sources, as temperatures above 80°F (27°C) can be detrimental to rooting success. Excessive heat can dry out the cutting before roots have a chance to form.
5. Consistent Temperature is Key 
Keep the temperature steady throughout the rooting process. Fluctuating temperatures can stress your cuttings and reduce their chances of success. A consistent environment promotes healthier roots and a higher chance of successful propagation.
By maintaining the right temperature range, you’ll give your cuttings the best chance to root effectively and grow into healthy plants. Happy propagating!
How Temperature Affects Rooting: The Dos and Don’ts 
Temperature plays a vital role in the rooting process of plants. Understanding how heat and cold affect your cuttings can help ensure successful propagation. Here’s what you need to know:
1. Ideal Temperature Range
For most plants, the ideal temperature for rooting is between 65°F and 75°F (18°C to 24°C). This temperature range encourages strong root development without causing stress. Consistency is key—avoid drastic temperature fluctuations.
2. Don’t Overheat
Excessive heat can lead to root rot or dehydration. If temperatures rise above 80°F (27°C), it can stress the cutting, leading to poor root growth. Avoid placing cuttings in direct, hot sunlight or in areas where the temperature exceeds this range for prolonged periods.
3. Don’t Let it Get Too Cold
Cold temperatures below 50°F (10°C) can stunt or even halt root growth. Cold environments slow down the plant’s metabolism and can lead to weak roots or rotting. Ensure your cuttings are kept in a warm space with consistent warmth.
4. Use a Heat Mat When Needed
If you live in a cooler climate or are propagating in the winter, consider using a heat mat under your pots. This will provide consistent warmth to the soil, promoting faster and healthier root development. Just make sure the mat doesn’t overheat the soil.
5. Avoid Temperature Shocks 
Sudden changes in temperature can shock the plant and stunt root growth. Avoid moving your propagated plants from one extreme temperature to another. For instance, don’t transfer a cutting from a warm indoor area to a cold outdoor space without allowing it to adjust gradually.
6. Monitor with a Thermometer
To stay on top of temperature conditions, use a thermometer in your propagation area. This will help you maintain the ideal temperature for rooting and adjust if needed.
By keeping temperatures in check, you’ll give your plants the best chance to root quickly and successfully.
Adjusting Temperature Based on Plant Types
Temperature plays a crucial role in the health of your plants, and different plant types have varying temperature needs. Adjusting the temperature based on your plant’s specific requirements is essential for optimal growth. Here’s how to do it:
1. Tropical Plants 
Tropical plants, like palms and ferns, thrive in warm, humid environments. Aim for temperatures between 65°F to 85°F (18°C to 29°C). Keep them away from cold drafts or sudden temperature changes. These plants do best in consistently warm conditions, so if you’re growing them indoors, make sure your home stays on the warmer side.
2. Succulents and Cacti 
Succulents and cacti love warmth but need a bit of a temperature shift between day and night. Ideal daytime temperatures range from 70°F to 85°F (21°C to 29°C), while nighttime temperatures can drop to 50°F to 55°F (10°C to 13°C). Be mindful of overwatering, as succulents and cacti prefer dry, warm conditions.
3. Cool-Season Plants
Cool-season plants, such as lettuce, spinach, and peas, prefer lower temperatures. They grow best in 50°F to 65°F (10°C to 18°C). If the temperature rises too high, these plants may bolt (go to seed) or become stressed. Grow them in cooler months or provide some shade in hotter weather.
Practical Tips for Maintaining the Perfect Temperature 
Maintaining the ideal temperature is essential for the health and growth of your plants. Too much heat or cold can stress your plants, but the right temperature helps them thrive. Here are some practical tips to help you keep your plants in their optimal temperature range:
1. Know Your Plant’s Ideal Temperature
Different plants have different temperature needs. Research the specific temperature range for each plant. Most indoor plants thrive between 65°F and 75°F (18°C to 24°C). Outdoor plants vary, so check the guidelines for your specific plant type.
2. Avoid Temperature Extremes
Sudden temperature fluctuations can shock plants. Avoid placing your plants near drafts, air conditioners, or heating vents. These spots can cause inconsistent temperatures that may harm your plant’s growth.
3. Use a Thermometer
Invest in a reliable thermometer to monitor the temperature in your plant’s environment. This helps you stay on top of any temperature changes and make adjustments as needed.
4. Temperature Control for Indoor Plants 
If you’re growing plants indoors, try to keep your space consistently warm. During cooler months, consider using a space heater (but keep it at a safe distance). During hot weather, fans or air conditioning can help keep things cool.
5. Temperature Considerations for Outdoor Plants 
For outdoor plants, the season plays a significant role. Use row covers or shade cloth during extreme heat or frost to protect your plants. Early morning sunlight is often the best for most outdoor plants, as it helps them gradually warm up.
6. Use Heating Mats for Seedlings 
If you’re starting seeds indoors, consider using a heating mat to maintain a consistent, warm temperature that encourages germination. These mats can be placed under your seed trays to create a warm environment for growth.
7. Monitor Humidity Levels 
Temperature and humidity go hand in hand. High humidity can make warm temperatures feel hotter, while dry air can make cooler temperatures seem colder. Use a humidity gauge to keep track of both for optimal plant growth.
By following these tips, you’ll create the perfect environment for your plants to grow strong and healthy!
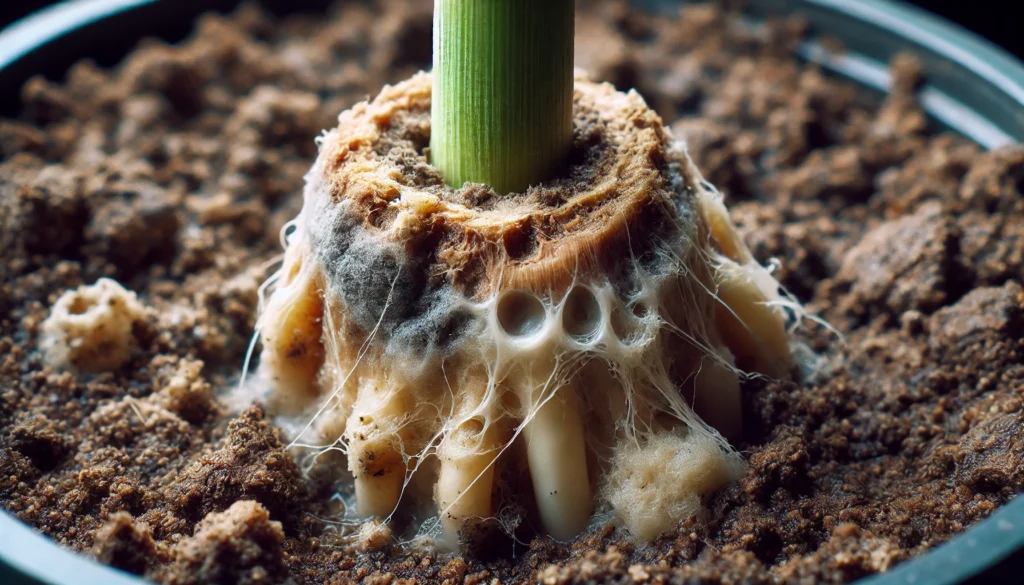
Signs That Your Cuttings Are Rooting Successfully
Knowing when your plant cuttings are rooting successfully is essential to ensure they’ll thrive once transplanted. Here are the key signs to look for:
1. New Growth Appearing
One of the most obvious signs that your cutting is rooting successfully is new growth. If you notice small leaves or shoots emerging, this means the plant is establishing roots and starting to develop.
2. Root Development 
After a few weeks, gently check the bottom of your cutting’s container or rooting medium. If you see small, white roots emerging, your cutting is successfully rooting. Healthy roots should be firm and white or light-colored.
3. Firmness in the Stem 
The stem of your cutting should feel firm and strong, not wilting or soft. A healthy cutting that’s rooting well will have a robust, rigid stem, indicating the roots are actively supporting the plant.
4. Visible Signs of Resistance
When you gently tug on the cutting, there should be some resistance. If it pulls away easily, the roots may not be fully established yet. If it stays put, you’re on the right track!
5. Clear Roots in Water
If you’re rooting in water, look for clear, white roots. As they grow, you may even start to notice the water turning cloudy due to root activity. This is normal and indicates strong root development.
6. Healthier, Vibrant Leaves 
Healthy, vibrant leaves are another good indicator. If your cutting’s leaves are turning yellow or wilting, it could mean the cutting isn’t rooting properly. Strong, green leaves suggest the plant is getting the nutrients it needs through its roots.
7. Rooting Hormone Effectiveness 
If you’ve used rooting hormone, you may notice faster root growth. This can speed up the rooting process and help ensure your cutting’s success.
By keeping an eye on these signs, you’ll know exactly when to transplant your rooted cutting into its permanent home. 
Additional Factors That Influence Rooting Success 
Rooting new plants can be tricky, but several key factors can greatly influence the success of your propagation efforts. Understanding these elements will help ensure your plants take root and thrive. Let’s dive into the most important ones:
1. Temperature
The right temperature is essential for successful rooting. Most plants root best in temperatures between 65°F-75°F (18°C-24°C). Too cold or too hot can slow down the process or prevent roots from forming. Aim for a warm, stable environment.
2. Humidity 
High humidity levels encourage root development, as they prevent the cutting from drying out. Using a humidity dome or misting your cuttings regularly can help maintain the moisture level. For best results, aim for around 50-70% humidity during the rooting process.
3. Light
While cuttings need light, direct sunlight can be too harsh and may damage them. Place your propagated plants in a bright, indirect light spot. A south or west-facing windowsill works well. Too little light will delay rooting, but too much can cause stress.
4. Soil or Medium Quality 
The rooting medium should be well-draining to avoid waterlogged conditions. A mix of perlite, vermiculite, and peat moss is ideal for most plants. The right medium provides both stability and moisture retention, promoting faster root development.
5. Type of Plant 
Different plants have varying requirements for rooting. Softwood cuttings (e.g., herbs, leafy plants) often root faster than hardwood cuttings (e.g., trees, shrubs). Knowing your plant’s specific needs can help you tailor the environment for success.
6. Water Quality
Clean water is crucial. Use distilled or rainwater, as tap water may contain chemicals that hinder root development. Ensure your cuttings stay hydrated but not waterlogged.
7. Rooting Hormones
Some plants benefit from the use of rooting hormones. These encourage root growth and can speed up the process. Simply dip the end of your cutting into the hormone powder before placing it in the rooting medium.
By paying attention to these factors, you’ll greatly increase your chances of successful plant propagation. Keep these tips in mind for thriving roots and healthy plants! 
Common Mistakes to Avoid During Rooting 
Rooting new plants can be a rewarding experience, but it’s easy to make mistakes that can hinder success. Avoiding these common pitfalls will help you achieve better results and healthier plants. Here’s what to watch out for:
1. Overwatering
One of the most common mistakes is overwatering the cuttings. Too much water can lead to root rot and mold growth. Keep the soil or medium moist, but not soggy. Ensure good drainage to avoid standing water.
2. Using the Wrong Medium
Not all rooting mediums are the same. Some, like regular garden soil, are too dense and can suffocate young roots. Use a well-draining medium like perlite, vermiculite, or a mix designed for propagation to give your cuttings the best start.
3. Insufficient Light
While propagating plants need light, too much direct sunlight can scorch delicate cuttings. Place your propagating plants in a bright, indirect light location. Avoid placing them in full sun until they’ve established strong roots.
4. Not Checking Humidity Levels 
Many cuttings need high humidity to root successfully. If the air is too dry, the cutting can wilt and fail to develop roots. To solve this, cover your cuttings with a plastic bag or use a humidity dome to keep the environment moist.
5. Handling Cuttings Roughly
Be gentle when handling your cuttings. Rough handling can damage the delicate root system as it forms. Always support the base of the cutting and avoid pulling or tugging on the plant during the rooting process.
6. Transplanting Too Soon 
Patience is key! Don’t rush the transplanting process. Cuttings should have a strong root system before being moved to their permanent spot. If transplanted too early, they may struggle to adapt and grow.
7. Using Non-sterile Tools 
Using unclean scissors or tools can introduce diseases or harmful bacteria to your cuttings. Always sterilize your tools before taking cuttings to prevent infection and ensure the health of your plants.
By avoiding these common mistakes, you’ll increase your chances of successful propagation and have thriving, healthy plants. Keep it simple, stay patient, and watch your garden grow!
Final Thought
Successfully rooting cuttings is an incredibly rewarding process, and understanding the perfect temperature for rooting cuttings is a key factor in ensuring your efforts pay off. By maintaining the right temperature range, typically between 65°F and 75°F (18°C to 24°C), you create the ideal environment for your cuttings to grow healthy roots and thrive. Remember, it’s not just about temperature—other factors like humidity, light, and proper watering play important roles in the rooting process.
With a little patience and attention to detail, you can master the art of propagation and watch your plants grow strong and healthy. So, take the tips you’ve learned, set up your propagation station, and enjoy the satisfaction of growing new plants from cuttings. Your journey toward successful propagation is just beginning, and with the perfect temperature, the possibilities are endless! 