
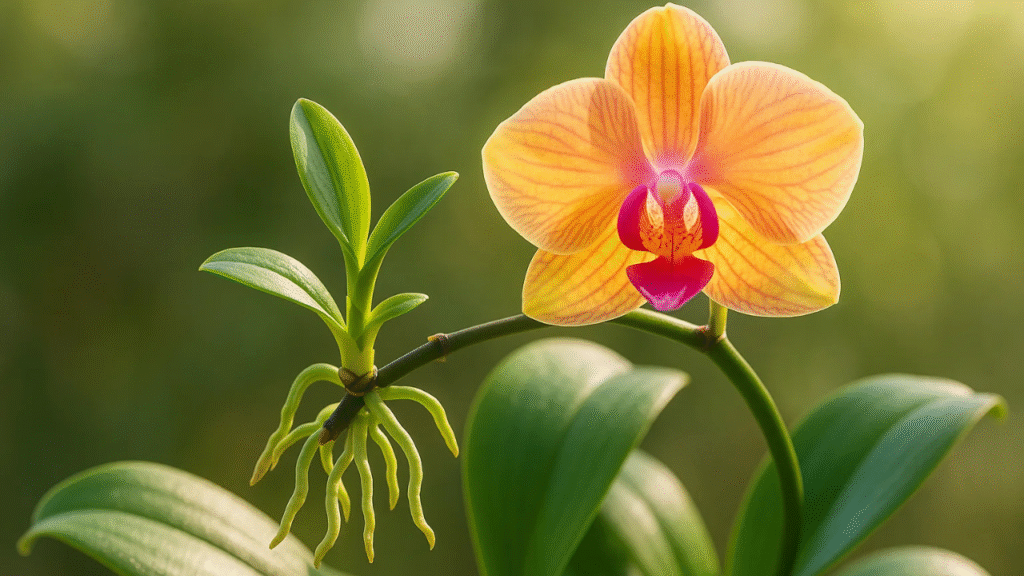
Have you ever noticed a tiny baby orchid sprouting from the stem of your plant and wondered what to do with it? 🤔 That little growth is called a keiki—a natural gift your orchid gives you, offering a chance to grow a brand-new plant. 🌿 For many plant lovers, the propagation of tropical orchids from keikis is one of the easiest and most rewarding ways to expand their orchid collection. 🌺 In this guide, you’ll discover a simple, step-by-step approach to turn those baby offshoots into thriving, blooming orchids—no greenhouse or expert experience required. 🌱 Let’s help you grow with your plants! 🌻
🌱✨ What Is a Keiki? 🌸
A keiki (pronounced kay-key) is a baby orchid that grows directly from the stem or flower spike of a mature orchid plant. 🌿 The word “keiki” comes from Hawaiian, meaning “child”—perfectly describing these tiny offshoots! 👶🌱
Keikis are natural clones of the parent plant. That means they carry the exact same DNA, making them ideal for orchid propagation. 🌸 You’ll mostly see them on tropical orchids like Phalaenopsis and Dendrobium. 🌺
They start as a small bump on a node, then slowly develop leaves and roots. With a little care, keikis grow into healthy orchids of their own! 🪴💚
Great news? You don’t need to be a plant expert to get it right. 🧤 Just a bit of patience and love!
🌸🌱 Why Propagate Orchids from Keikis? 🌿
The propagation of tropical orchids from keikis is a smart and satisfying way to expand your orchid collection. 🌱 Keikis offer a natural shortcut to growing new plants—no need for seeds or complicated techniques. 🌸

One of the biggest benefits? They’re genetic copies of the parent orchid. 🌼✨ That means you’ll get the exact same flower color, shape, and beauty you already adore.
It’s also budget-friendly—you’re getting new orchids for free! 🎁 And unlike seed propagation, which takes years, keikis grow up much faster and are easier to care for. 🪴
For beginners, it’s one of the most reliable propagation methods. 🌿 With just a bit of love and patience, even new plant parents can succeed. 💚👩🌾
So if your orchid gives you a keiki, consider it a gift—and a great opportunity to grow something new! 🎉
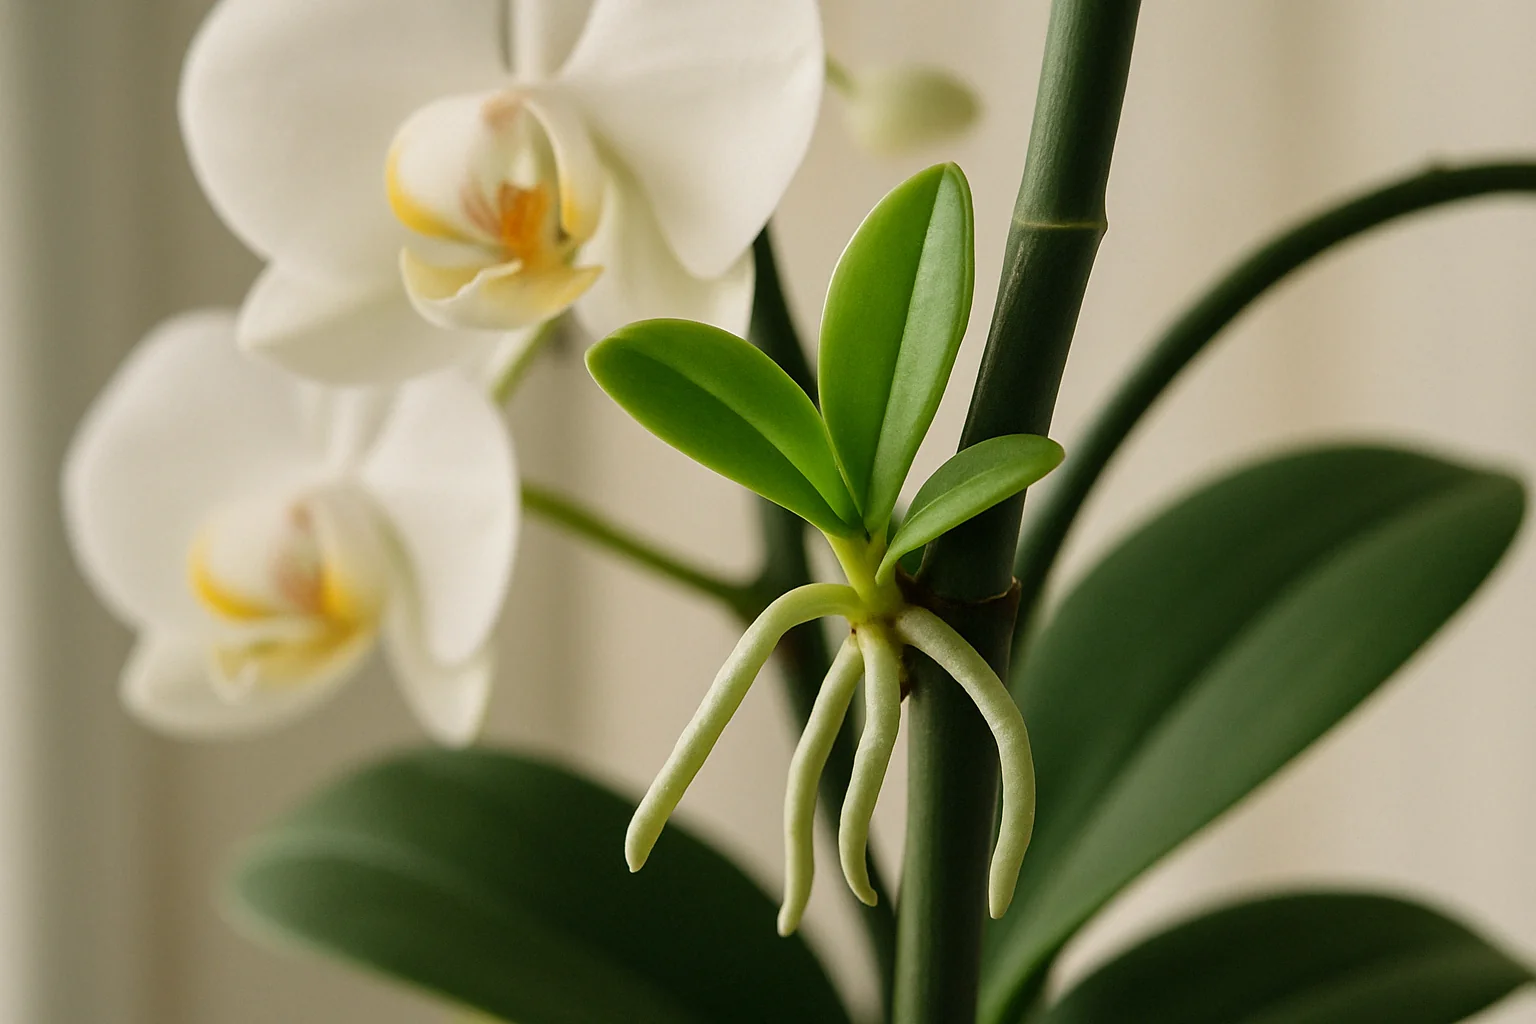
🌱💚 How to Identify a Healthy Keiki 🌸
Before you start the propagation of tropical orchids from keikis, it’s important to know when a keiki is ready to be removed and potted. 🌿 Not all keikis grow strong enough right away—so timing matters! ⏳✨
Here’s how to spot a healthy, mature keiki:
🔍 Well-Formed Leaves 🍃
Look for 2 to 3 firm, green leaves. They should look just like the parent plant’s leaves—no wrinkles or yellowing. 🌱
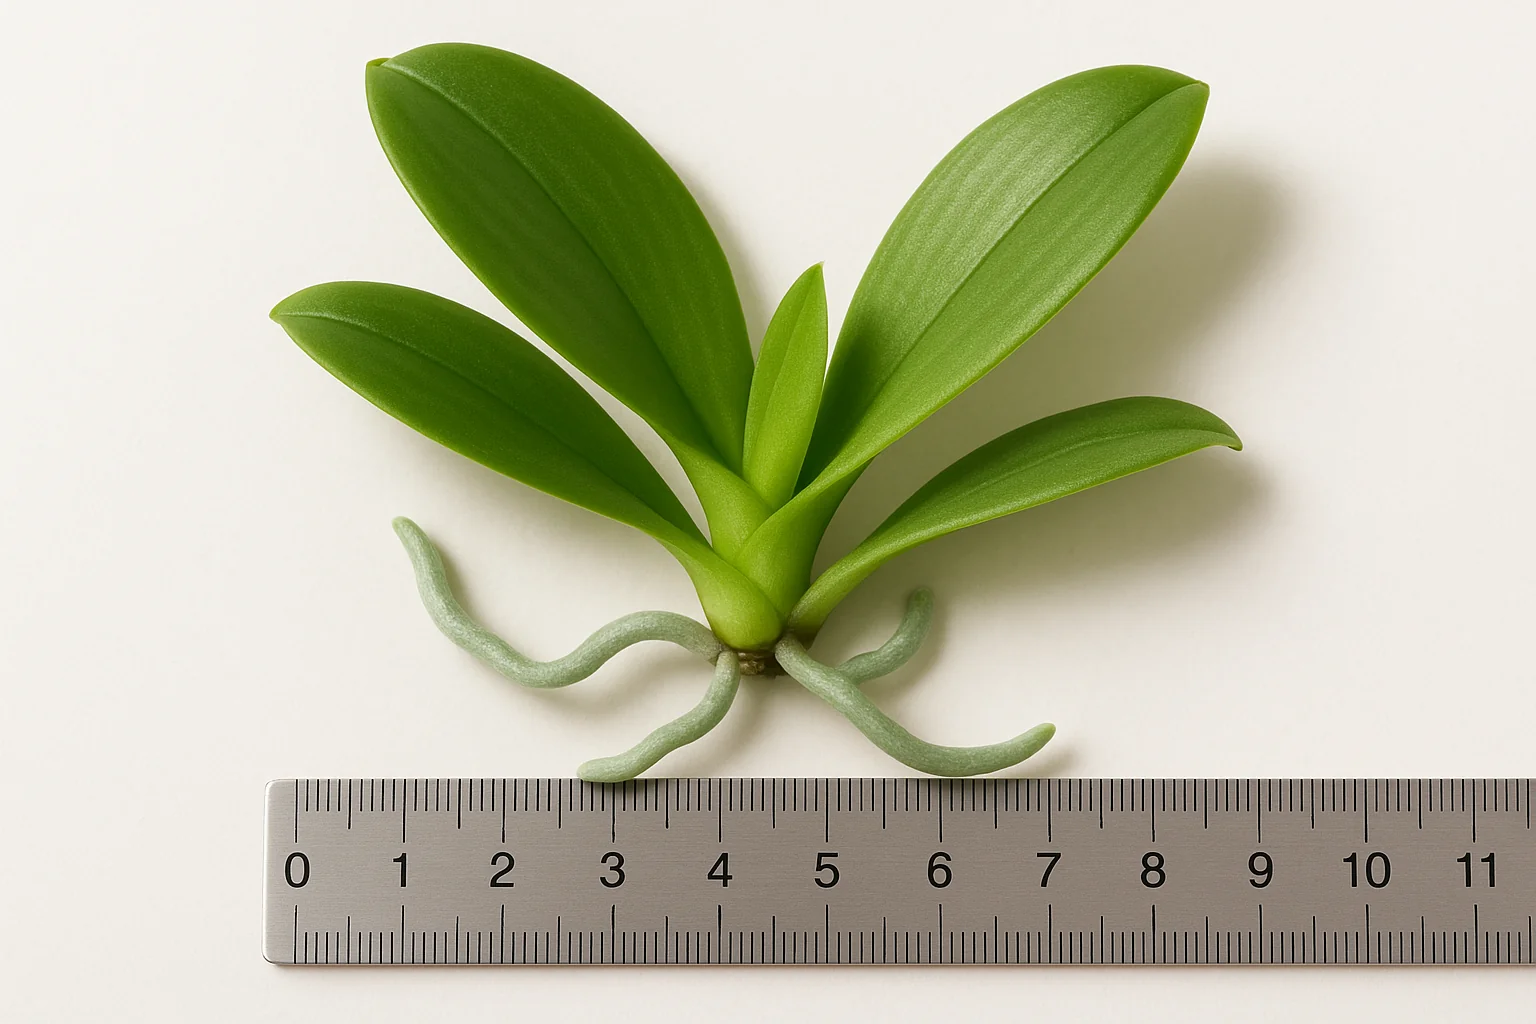
🌿 Strong Roots 🌱
A healthy keiki will have at least 2 to 3 roots that are around 2–3 inches long. 🌿 The roots should be thick and silvery-green—signs they’re ready to absorb water and nutrients. 💧
🪴 Several Months Old ⏳
Most keikis take a few months to mature. 🌼 If it still looks tiny or rootless, give it more time on the parent plant. 🌱
🚫 Avoid Early Removal ⚠️
Don’t rush! ⏳ If the roots are short or the leaves look soft, wait until it’s stronger. 🌸 Early removal can stunt growth or even kill the keiki. 😢
Once you spot a plump little keiki with roots and leaves, you’ve got a great candidate for propagation. 🌱 Get ready to give it a home of its own! 🏡✨
🧰🌸 Tools and Supplies You’ll Need
To successfully begin the propagation of tropical orchids from keikis, having the right tools and materials makes the process smooth and stress-free—for both you and the plant! 🪴💚
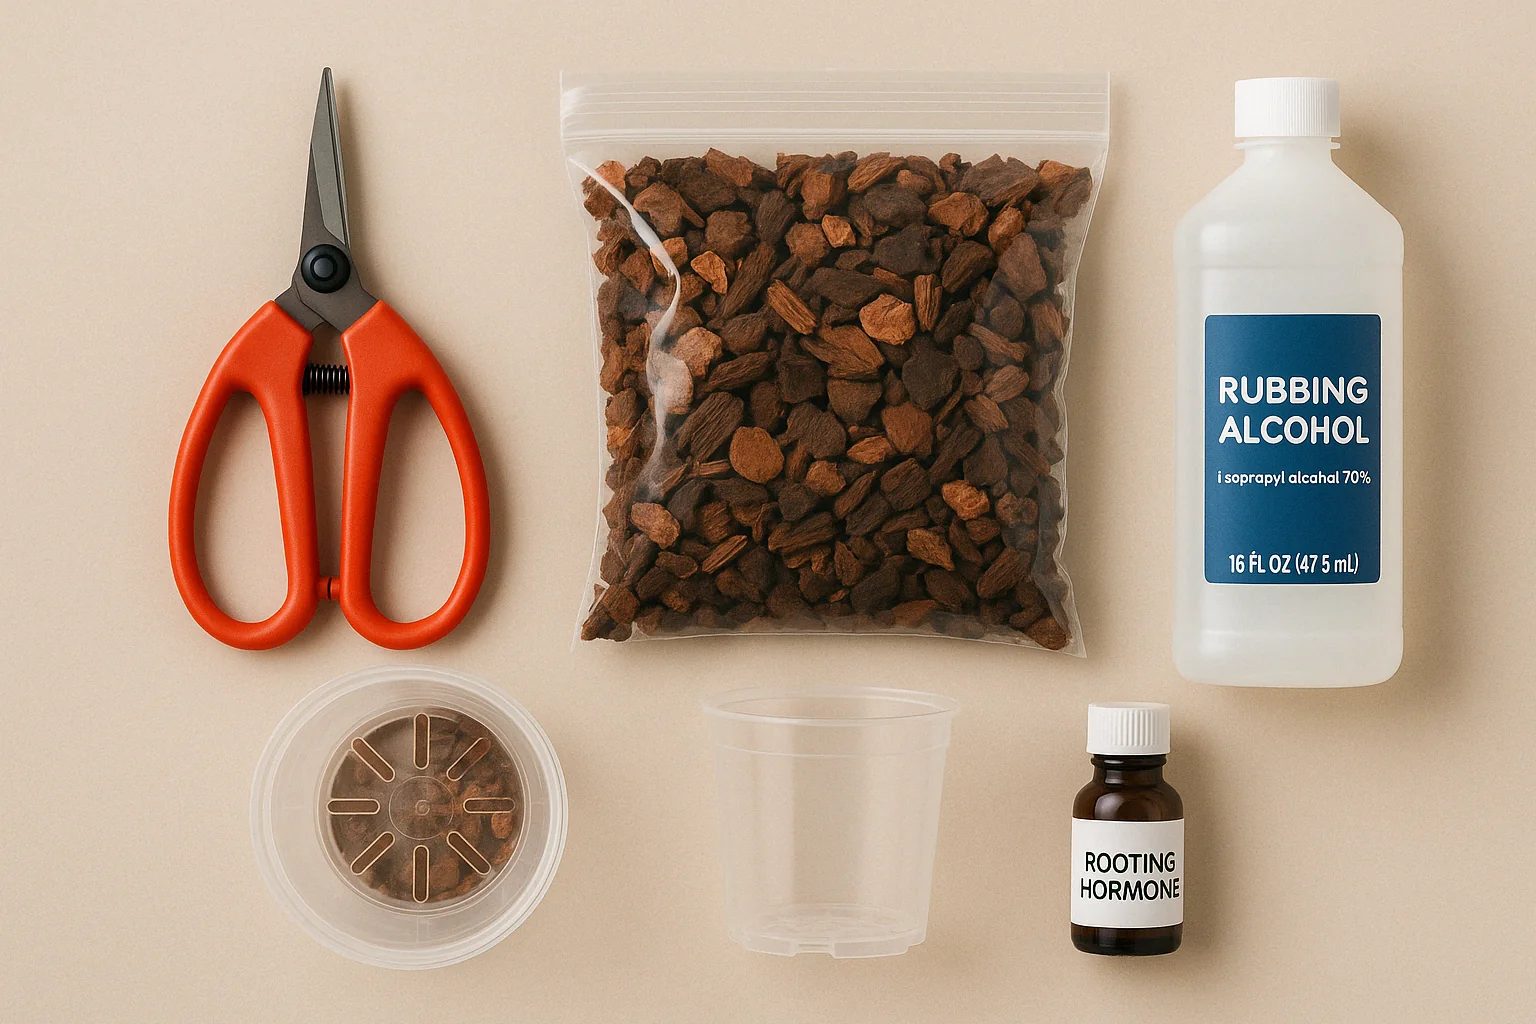
Here’s your simple checklist:
✂️ Sterile Pruning Shears or Scissors
Use sharp, sterilized tools to safely cut the keiki from the parent plant. You can sterilize with rubbing alcohol or a flame. 🔥🧼
🧴 Rubbing Alcohol or Flame Source
Disinfect your tools before and after cutting to prevent infections. Hygiene is key! 🧼
🪵 Orchid Potting Mix
Choose a loose, airy mix like bark chips, sphagnum moss, or coconut husk—great for healthy root development and drainage. 🌿
🪣 Small Pot with Drainage Holes
Go for a clear or breathable orchid pot to help monitor root growth and avoid waterlogging. Size should match the young keiki—not too big! 🌸
🌿 Rooting Hormone (Optional)
Encourages faster and stronger root growth, though many keikis do fine without it. 🌱
🌫️ Humidity Dome or Plastic Bag (Optional)
Helps maintain high humidity for young keikis, especially in dry environments. 🌧️
💧 Spray Bottle for Misting
Gentle misting keeps roots hydrated without overwatering. 💦
Having these essentials ready makes it easier to give your keiki the best start in life. 🍼🌱 Ready to get planting? Let’s go! 🎉
Step-by-Step: Removing the Keiki ✂️🌱
Now that your keiki is healthy and ready, it’s time to separate it from the parent orchid! Don’t worry—this step is simple and gentle when done right. The propagation of tropical orchids from keikis is a delicate but rewarding process. Here’s how to do it step by step:
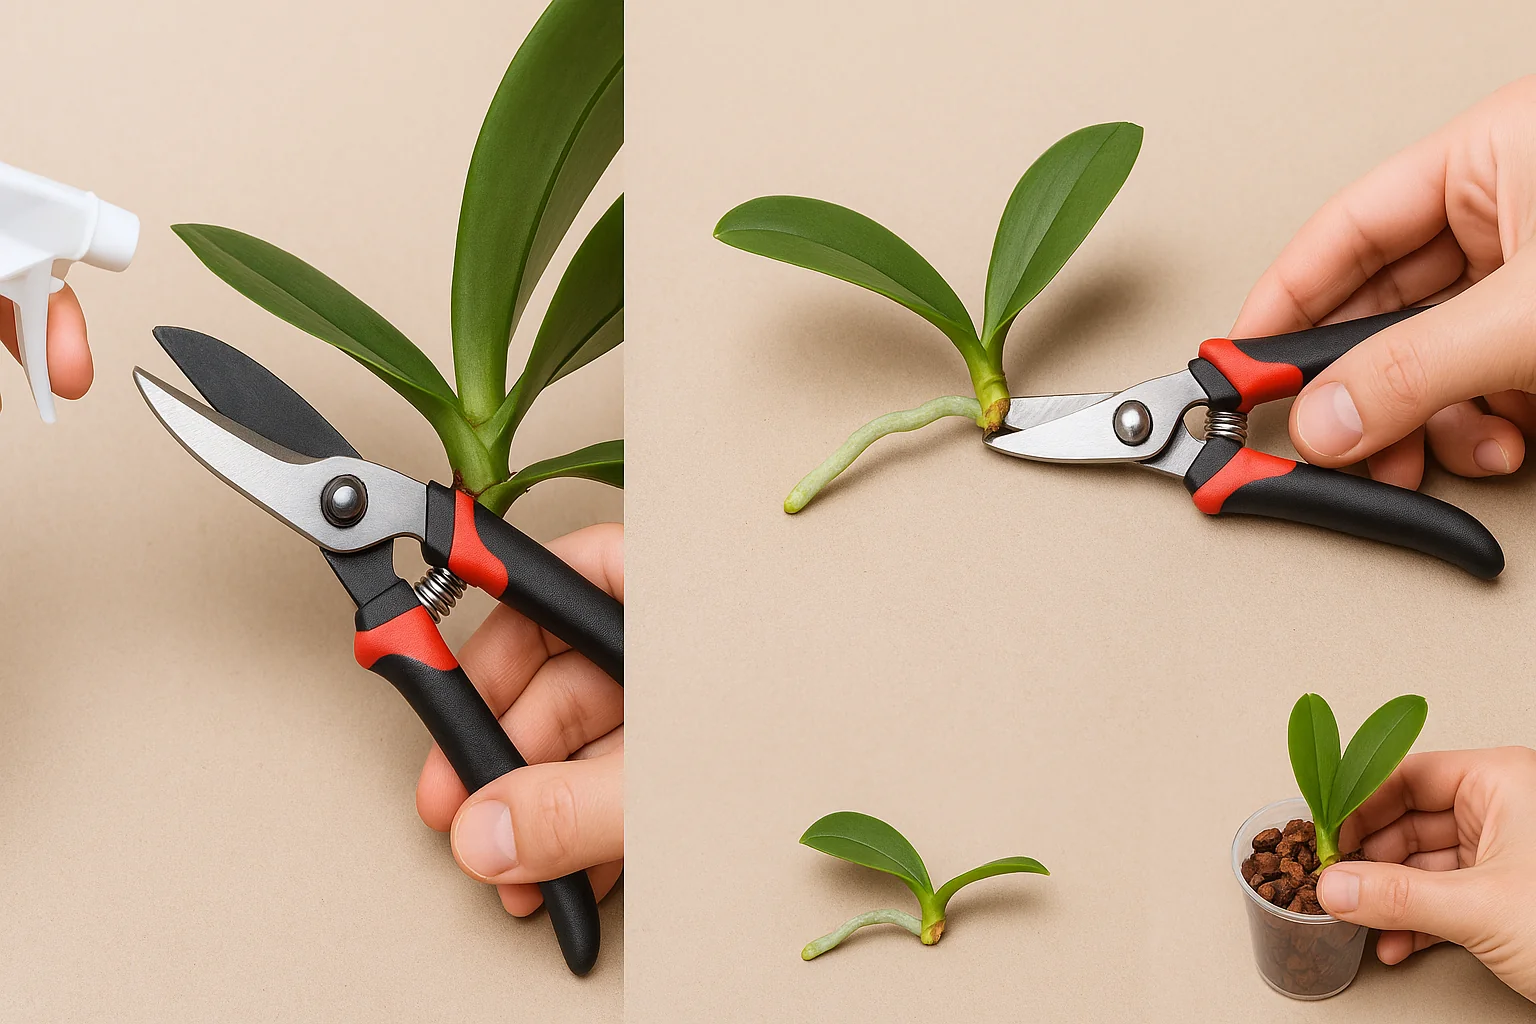
1️⃣ Sterilize Your Tools
Use rubbing alcohol or a flame to disinfect your scissors or pruning shears. This helps prevent bacteria or fungal infections. 🧼🔥
2️⃣ Locate the Base of the Keiki
Find where the keiki is attached to the mother plant. You’ll usually see it on a flower spike or cane. Make sure the roots are long enough (2–3 inches). 🌿
3️⃣ Make a Clean Cut
Gently snip the stem or spike about 1 inch below the keiki’s base. Try to keep a small piece of the connecting tissue attached. ✂️💚
4️⃣ Let the Cut End Callus (Optional)
Place the keiki on a clean paper towel in a dry, shaded spot for 1–2 days. This helps the cut area dry and lowers the risk of rot. 🕊️
5️⃣ Prepare the Pot and Potting Mix
Fill a small orchid pot with damp (not soggy!) orchid mix—bark, moss, or a combo. The pot should be just big enough for the roots. 🪴✨
6️⃣ Plant the Keiki
Position the keiki so the roots are gently tucked into the potting mix. Keep the leaves above the surface. Don’t pack the mix too tightly—orchids love airflow! 🍃
7️⃣ Water Lightly
Mist or lightly water the potting mix to settle the roots. Avoid soaking. 🌧️ A light mist every few days works well until the keiki gets established. 💦
You’ve done it! 🎉 Your keiki is now officially on its way to becoming a beautiful, blooming orchid. All it needs now is a little love and proper care. 💕🌸
Aftercare: Helping Your Keiki Thrive 🌿💚
Now that your keiki is potted and settled in, it’s time to give it the best care to ensure it grows strong and healthy. Here’s what you need to do to help your new orchid thrive:
1️⃣ Provide Bright, Indirect Light 🌞
Keikis need bright, indirect light—similar to what they would get in their natural environment. A windowsill with filtered light works perfectly. Avoid direct sunlight, which can scorch the young leaves. 🌿
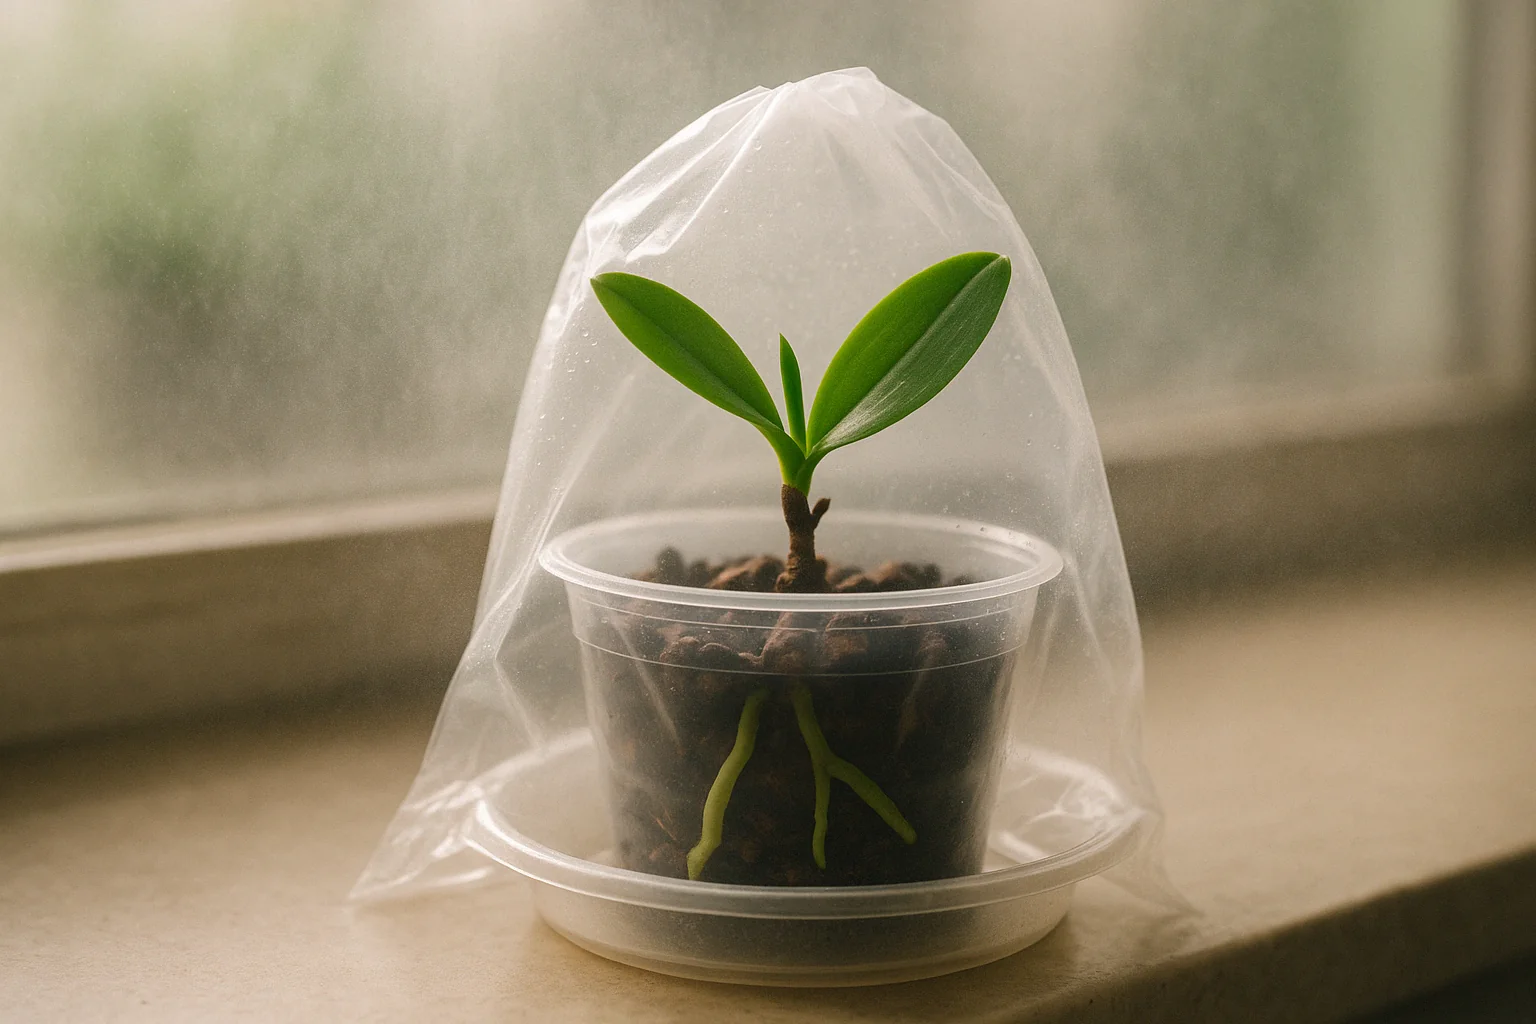
2️⃣ Maintain Humidity 💧
Keikis love humidity! Keep the humidity around 50–70%. If your home is dry, consider using a humidity tray, misting the plant, or covering the pot with a clear plastic bag or humidity dome. 🌫️
3️⃣ Water Lightly 🌧️
Water the keiki lightly, keeping the potting mix moist but not soggy. Overwatering can cause root rot, so ensure proper drainage. A gentle mist every few days helps maintain humidity without soaking the roots. 💦
4️⃣ Fertilize Carefully 🌸
Wait about 2–4 weeks after potting before using a diluted orchid fertilizer. A balanced liquid fertilizer will help encourage growth. Apply monthly, but don’t overdo it—keikis are still fragile. 🌱
5️⃣ Monitor Growth 📈
Look for new root growth and healthy leaves. The keiki may stay small for a while, but with time, it will grow bigger and stronger. Patience is key! 🕰️
6️⃣ Repot When Needed 🌿
As the keiki grows, you may need to repot it into a larger container. Make sure to choose a pot that allows for good root expansion, and always use fresh, well-draining orchid mix. 🌳
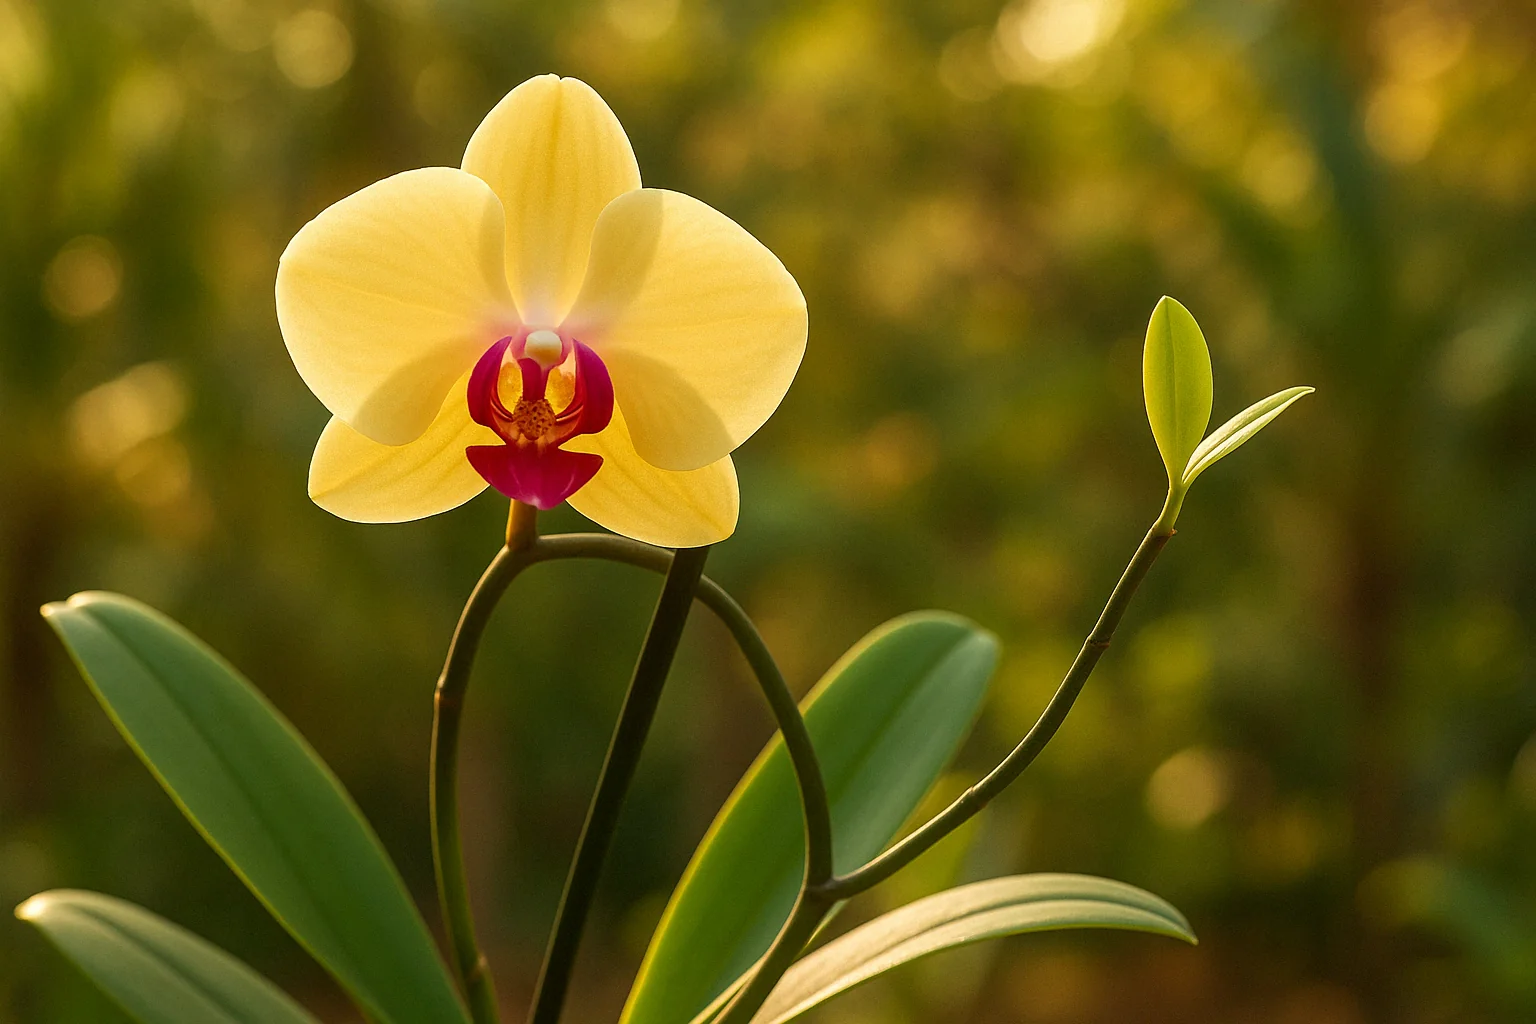
With the right care, your keiki will thrive and eventually bloom, giving you another stunning orchid to enjoy. 🌸 Keep an eye on it, and soon you’ll have a new plant friend! 💚🌱
Common Mistakes to Avoid 🚫🌿
When propagating tropical orchids from keikis, it’s easy to make a few missteps that could slow down the process or harm the plant. To help ensure success, here are some common mistakes to avoid:
1️⃣ Removing Keikis Too Early ⏳
One of the biggest mistakes is removing the keiki before it’s ready. Make sure it has at least 2–3 inches of roots and a few healthy leaves. Taking it too soon can prevent it from growing properly. 🌱
2️⃣ Overwatering 💦
While keikis need moisture, they don’t like soggy roots. Overwatering can lead to root rot, especially in the early stages. Keep the potting mix lightly moist, but ensure it drains well. 🌧️
3️⃣ Using the Wrong Potting Mix 🪴
Keikis need a well-draining, airy mix to develop healthy roots. Avoid using regular potting soil, which can be too dense and hold too much moisture. Opt for orchid bark, sphagnum moss, or a mix designed for orchids. 🌿
4️⃣ Skipping Sterilization 🔪
Not sterilizing your tools before cutting the keiki can introduce harmful bacteria or fungi. Always disinfect scissors or pruning shears with rubbing alcohol or flame to protect the plant. 🧴
5️⃣ Too Much Sunlight ☀️
While keikis need bright light, direct sun can scorch their delicate leaves. Keep them in a spot with indirect, filtered light. 🌞
6️⃣ Not Giving Enough Time for Root Growth 🌱
Be patient! Sometimes it takes a while for the keiki to establish strong roots. Don’t rush the process—give it the time it needs to grow healthy and strong. ⏳
7️⃣ Skipping Humidity 🌬️
Keikis thrive in high humidity. If your environment is dry, use a humidity dome, mist the keiki, or place the pot on a humidity tray to keep moisture levels up. 🌫️
By avoiding these common mistakes, you’ll set your keiki up for success and enjoy a thriving orchid in no time! 🌸🌿
Troubleshooting Tips 🛠️🌱
Even with the best care, things don’t always go as planned. If your keiki isn’t thriving, here are some troubleshooting tips to help you get back on track:

1️⃣ Keiki Isn’t Growing 🐢
If your keiki seems to be stuck or growing very slowly, it might not have enough light or humidity. Move it to a brighter spot with indirect light and increase humidity with a humidity tray or misting. 🌞💧
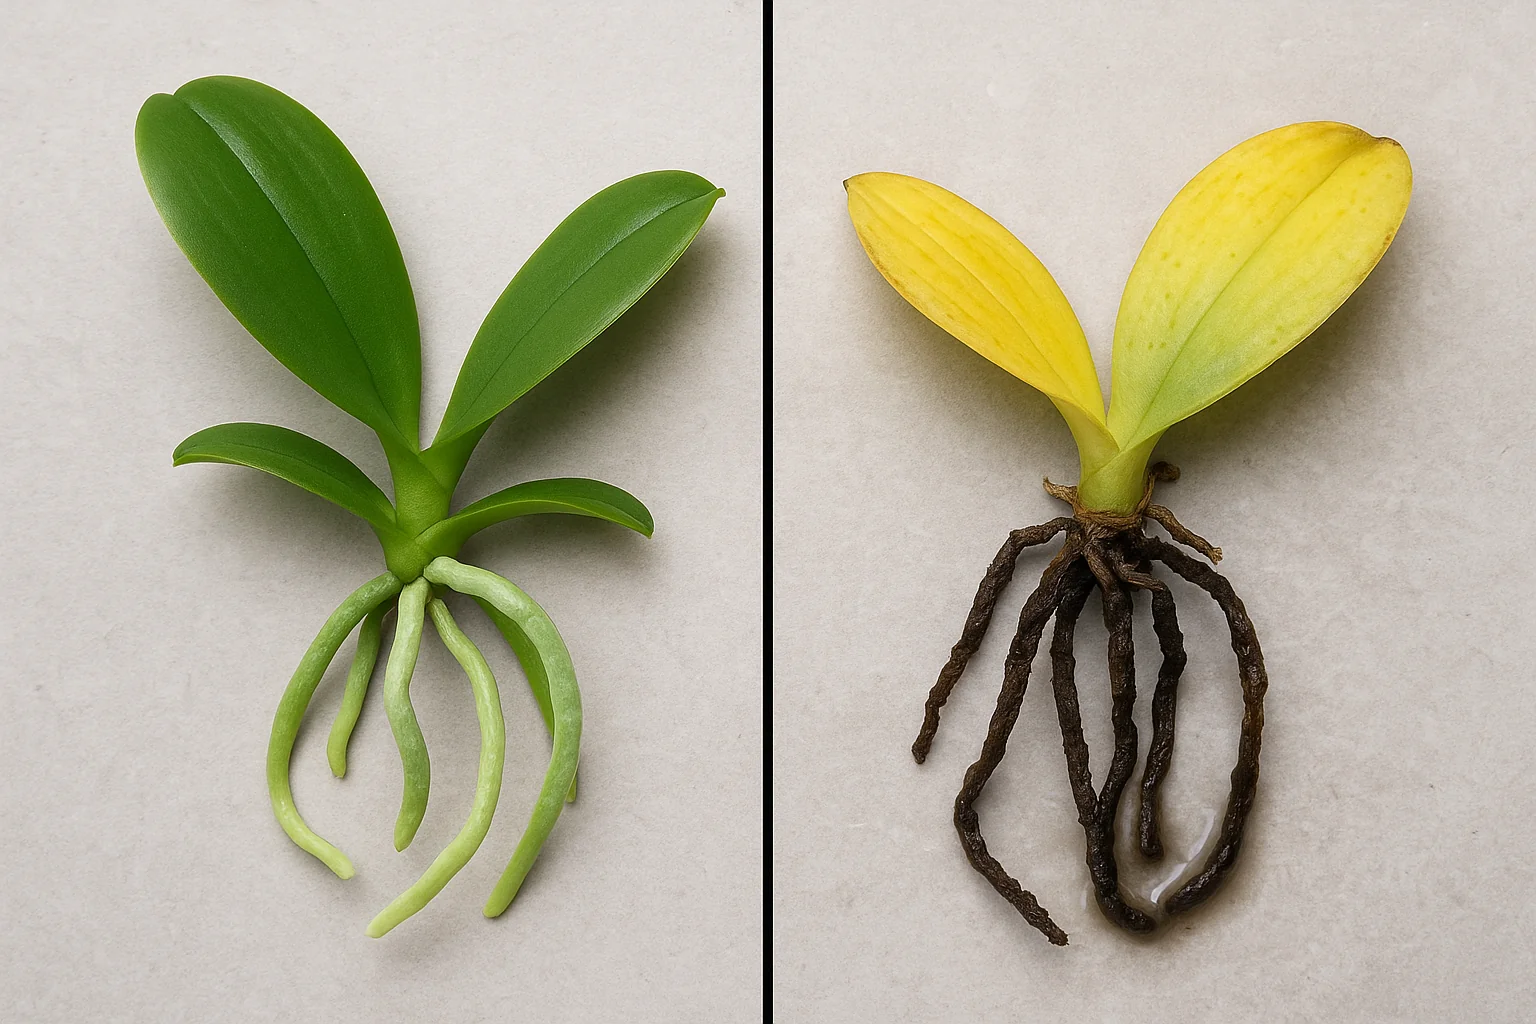
2️⃣ Yellowing Leaves 💛
Yellow leaves often signal overwatering or root rot. Make sure your pot has good drainage, and check the roots for signs of rot (black, mushy roots). Trim any damaged roots, and reduce watering. 🌿
3️⃣ Keiki Looks Stunted or Weak 🚶♀️
Weak growth can happen if the keiki was removed too early or if the roots aren’t well-established. Give it more time on the parent plant if possible, and ensure it has a proper environment (light, humidity, and temperature). ⏳🌱
4️⃣ Wilting or Drooping Keiki 🥀
If your keiki is wilting, it could be due to dehydration or too much sun. Check the moisture level of the potting mix and adjust watering. Also, ensure it’s getting bright, indirect light—not direct sun. 🌿💦
5️⃣ No Root Growth 🚫🌱
If no new roots are forming, the keiki might need more humidity or warmth. Try misting more often or using a humidity dome. Also, ensure the potting mix isn’t too dry or too wet. 🧴🌡️
6️⃣ Keiki Falls Over 😔
If the keiki is top-heavy and falling over, it might need more support. Use a small stake to gently hold it in place until the roots are stronger and the plant becomes more stable. 🌿
By keeping an eye on these potential issues and acting quickly, you can get your keiki back on track and help it grow into a healthy, blooming orchid. 🌸🌱
Final Thoughts 🌸💭
The propagation of tropical orchids from keikis is a fulfilling and rewarding experience that lets you grow new orchids for free, while also nurturing a deeper connection with your plants. 🌿 Whether you’re a beginner or an experienced grower, following the right steps can turn a small keiki into a vibrant, blooming orchid.
Remember to be patient, as the process may take time, but with the right care—bright light, proper humidity, and attention to detail—you’ll see your keiki flourish. 🌱
Every keiki you successfully propagate adds not only to your collection but also to your gardening skills. So, take a moment to celebrate each new growth and blossom that comes your way. 🌸🌱
Happy propagating, and may your orchid journey be filled with many beautiful blooms! 💚🌿