

Picture this: you purchase a crisp, vibrant bunch of green onions for a specific weeknight stir-fry. Fast forward a few days, and the remaining stalks are languishing in the back of your crisper drawer, wilted, slimy, and destined for the compost bin. It is a frustrating and incredibly common cycle of food waste and wasted grocery money. But what if you could break that cycle completely today? The magic lies in scallions regrowing from kitchen scraps. This simple, zero-cost botanical trick transforms discarded root ends into an infinite, year-round supply of fresh, flavorful garnish.
Over my years of deep-diving into plant diagnostics and soil health management, I have tested countless plant propagation methods. While many require specialized rooting hormones, precise humidity domes, or expensive grow lights, propagating alliums is remarkably different. It requires nothing more than water, sunlight, and a little bit of patience. Whether you are an experienced urban farmer or someone who struggles to keep a basic houseplant alive, this guide will provide you with the exact blueprint to cultivate a continuous harvest right on your kitchen windowsill.
Why Regrowing Scallions is the Ultimate Kitchen Hack 💡
Before we dive into the methodology, it is important to understand why this practice is more than just a fun science experiment for the kitchen. Regrowing grocery store produce is a practical lifestyle shift with tangible benefits.
A Highly Cost-Effective Habit With the rising cost of fresh produce, finding ways to stretch your grocery budget is more crucial than ever. A standard bunch of organic green onions might cost a few dollars. While that seems negligible, buying a fresh bunch every week adds up to over a hundred dollars annually. By applying the “cut and come again” method to your scraps, your initial investment of a few dollars can yield months of fresh herbs, effectively dropping your future cost to zero.
Championing Eco-Friendly Kitchen Practices Food waste is a significant contributor to greenhouse gas emissions. When fresh produce ends up in a landfill, it decomposes anaerobically, releasing methane. Furthermore, commercially grown scallions are heavily irrigated, packaged in single-use plastics, and shipped hundreds or thousands of miles in refrigerated trucks. By utilizing the root ends you normally throw away, you are actively reducing your household food waste and shrinking your carbon footprint. It is a micro-action that promotes deep environmental sustainability.
The Perfect Beginner-Friendly Gateway Plant Horticulture can feel intimidating. Many aspiring home gardeners abandon the hobby after failing to start seeds or accidentally overwatering a demanding tropical plant. Scallions are incredibly forgiving. They exhibit noticeable cellular growth within 24 hours of starting the propagation process. This rapid visual feedback provides instant gratification and builds the essential confidence needed to tackle more complex gardening projects in the future.
The Science Behind the Sprout: How It Works 🔬
To truly master plant care, it helps to understand the underlying biology. Scallions (often used interchangeably with green onions) belong to the Allium genus, which includes garlic, leeks, and traditional bulb onions. The secret to their incredible regenerative capability lies in a specific anatomical feature at their base.
If you inspect the white bottom of a scallion, you will notice a slightly tough, flat disc right where the tiny, stringy roots emerge. This is called the basal plate.
The basal plate is the biological powerhouse of the plant. It is a highly compressed stem that acts as a central hub for energy storage and cell division. Even when the green leafy tops are entirely severed, the basal plate retains enough stored carbohydrates to push out emergency shoot growth.
When exposed to moisture and light, the meristematic tissues within the basal plate activate rapidly. As long as the root system remains intact to absorb water, and the basal plate is not damaged by cutting too closely, the allium will prioritize survival by rapidly generating new photosynthetic foliage.
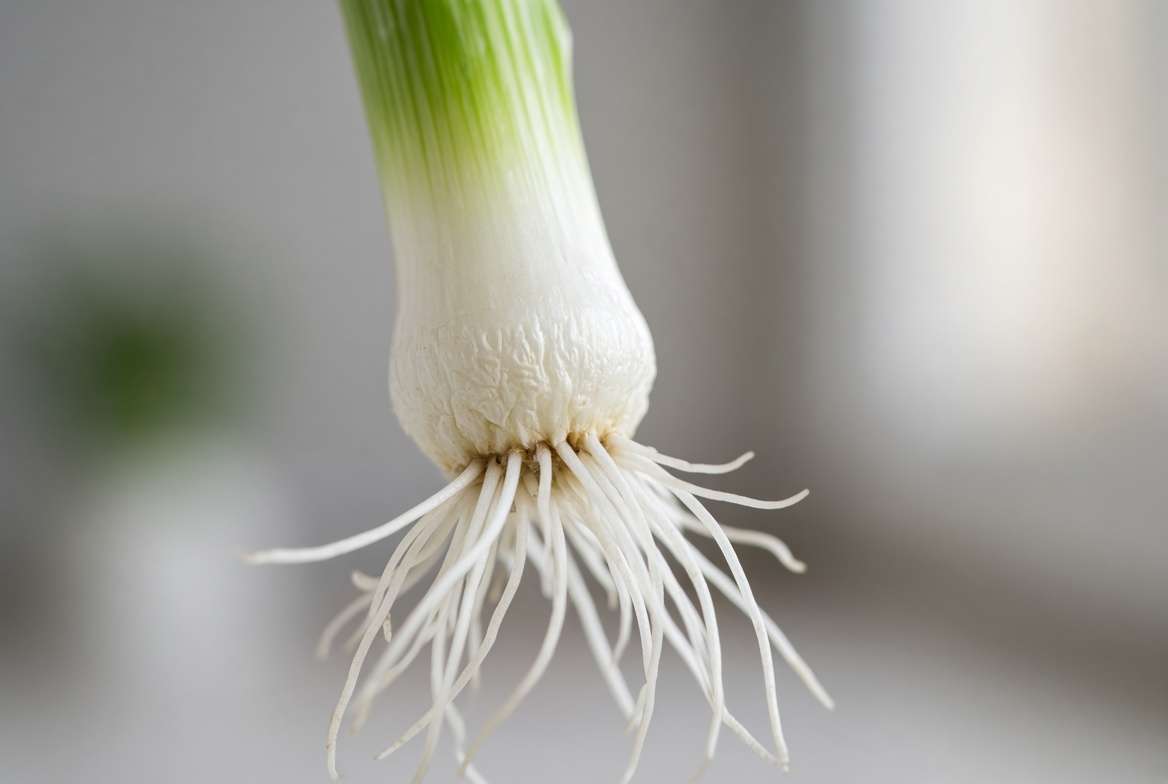
Understanding this science dictates exactly how we must treat our kitchen scraps to ensure optimal, continuous growth.
Step-by-Step Guide: Scallions Regrowing From Kitchen Scraps 🚰🌱
Ready to start your continuous harvest? Follow these meticulously tested steps to transition your grocery store produce from the cutting board to the windowsill.
Step 1: Selecting the Best Store-Bought Scallions 🛒
Your propagation success is heavily dependent on the quality of your starter material. Not all grocery store scallions are created equal. When shopping, actively inspect the bunches and prioritize the following traits:
-
Plump, firm white bulbs: Avoid any bunches where the white bases feel squishy, hollow, or slimy.
-
Intact root systems: Look for scallions that still have a generous amount of fuzzy, stringy roots attached to the basal plate. If the roots have been shaved off entirely by the supplier, the scrap will struggle to absorb water and will likely rot.
-
Vibrant green stalks: While you will be cutting these off, healthy green stalks indicate the plant is fresh and has not depleted its internal energy reserves sitting on a store shelf for weeks.
Step 2: Making the Perfect Cut ✂️
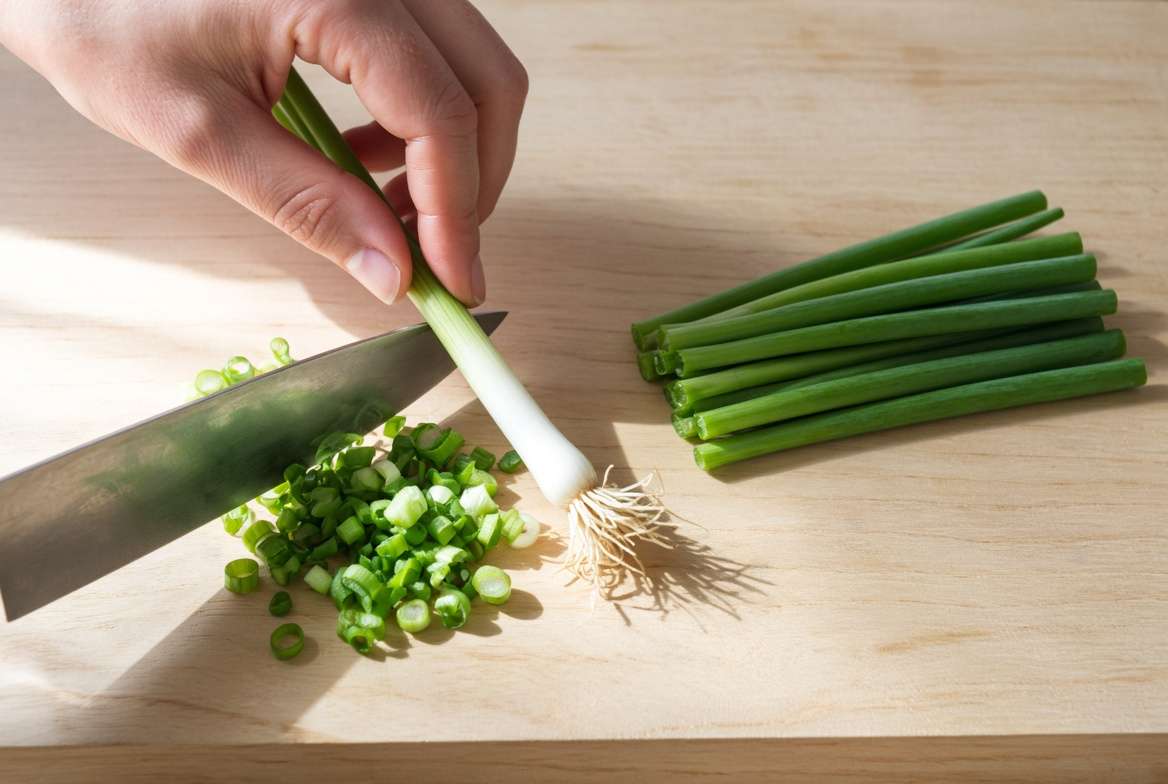
The most common mistake beginners make is cutting the scallion too close to the roots to maximize the edible portion. Doing so severely damages the basal plate and leaves the plant without enough stored energy to sprout.
Using a sharp, clean kitchen knife, slice the green onion exactly 1 to 1.5 inches above the root line. This leaves a sturdy white stump. The green portions go straight into your recipe, and the white stumps are your new propagation candidates. Ensure your knife is sharp; a dull blade will crush the cellular structure rather than cutting it cleanly, increasing the risk of bacterial infection.
Step 3: The Water Propagation Method 💧
Water propagation is the fastest way to kickstart the root system and observe immediate growth.
-
Selecting the Vessel: Choose a narrow glass jar or a small juice glass. A narrow vessel helps keep the cuttings upright, preventing them from tipping over and fully submerging.
-
Optimal Water Depth: Place your white cuttings root-side down in the glass. Add room-temperature, filtered water so that only the roots and the very bottom quarter-inch of the white bulb are submerged. The top of the cutting must remain completely dry. If the entire scrap is sitting in water, it will quickly turn into a mushy, rotting mess.
-
Sunlight Requirements: Place the jar on a windowsill that receives bright, indirect sunlight. Direct, scorching afternoon sun can overheat the water and cook the fragile roots.
-
The Golden Rule of Maintenance: You absolutely must change the water every 1 to 2 days. Stagnant water depletes oxygen and creates a breeding ground for anaerobic bacteria. Rinse the roots gently under the tap when replacing the water to keep them clean and healthy.
Within 24 to 48 hours, you will witness pale green shoots emerging from the center of the cut stumps. It is a thrilling process to watch unfold!
Step 4: Transplanting for Long-Term Success 🪴
A common misconception in the world of kitchen scrap gardening is that scallions can live in a glass of water indefinitely. While the water method is visually exciting and incredibly fast, plain tap water is practically devoid of the essential macronutrients (Nitrogen, Phosphorus, and Potassium) the plant needs to sustain robust, long-term growth.
If left in water for weeks, you will notice the newly sprouted green stalks becoming progressively thinner, paler, and significantly weaker in flavor. To achieve true sustainability and that sharp, peppery bite that elevates your cooking, the cuttings must eventually graduate to soil.
The ideal time to transplant is typically after 5 to 7 days in the water jar. By this point, the initial root system should have expanded, featuring bright white, sturdy new rootlets measuring at least 1 to 2 inches long.
Soil Health Management for Thriving Green Onions 🪱
To ensure your scallions regrowing from kitchen scraps flourish into a permanent indoor garden fixture, we must apply core principles of soil health management. Alliums are surprisingly heavy feeders, especially when we are demanding continuous foliar (leaf) production.
Creating the Ideal Soil Mix
You cannot simply dig up compacted dirt from your backyard and expect your green onions to thrive. Heavy outdoor garden soil suffocates fragile roots in a container setting. Instead, you need a loose, well-draining environment that allows for optimal oxygen exchange at the root zone.
As an expert in plant care, I highly recommend mixing your own premium potting blend:
-
60% High-Quality Organic Potting Soil: This forms the base, providing moisture retention and structure.
-
20% Perlite or Pumice: These volcanic glasses are essential for creating air pockets and ensuring excellent drainage, preventing the dreaded root rot.
-
20% Organic Compost or Worm Castings: Because scallions are grown entirely for their green tops, they crave Nitrogen. Organic compost provides a steady, slow-release supply of nitrogen and introduces beneficial microbial life to the root zone.
Fill a small pot (ensure it has drainage holes at the bottom!) with your soil mix. Plant the rooted cuttings about 1 inch deep—just deep enough to cover the white basal plate and the roots, leaving the newly sprouted green tips exposed to the air.
Lighting and Watering Needs ☀️
Once potted in soil, your scallions are ready to photosynthesize in earnest. Transition the pot to the sunniest windowsill in your home. South-facing windows are ideal, as alliums require at least 6 hours of direct sunlight daily to produce thick, dark green, and highly flavorful stalks.
Water the soil thoroughly until water escapes from the bottom drainage holes, then wait until the top inch of soil feels dry to the touch before watering again. Overwatering is the number one killer of container-grown herbs.
Plant Diagnostics: Troubleshooting Common Regrowth Issues 🩺
Even with an expert setup, you might encounter a few bumps along the road. A key part of successful plant care is swift diagnostics. If your scallions are struggling, consult this troubleshooting matrix to identify and resolve the issue immediately:
| Symptom | Diagnosis (The Problem) | The Cure (Actionable Fix) |
| Slimy, foul-smelling water | Bacterial overgrowth / Root rot | Remove cuttings, rinse roots thoroughly under cool water, sterilize the glass with soap, and resume daily water changes. |
| Pale, yellowing green tips | Nutrient deficiency / Lack of sunlight | If in water, transplant to nutrient-rich soil immediately. If already in soil, move to a sunnier location or supplement with a mild, liquid organic fertilizer. |
| Mushy, translucent white bulbs | Overwatering (in soil) / Planted too deep | Ensure pots have unblocked drainage holes. Allow the soil to dry out further between waterings. Never bury the green portions of the stem. |
| Thin, wispy, slow growth | Depleted energy reserves | The basal plate has exhausted its stored carbohydrates. Retire this specific cutting to the compost bin and start fresh with new kitchen scraps. |

Water vs. Soil: Which Method Wins? 🏆
When discussing scallion propagation, the debate often comes down to water versus soil. Let’s break down the pros and cons of each so you can choose the method that best aligns with your goals.
-
The Water Method:
-
Pros: Zero mess, visually appealing (great for teaching kids about root growth!), and requires zero gardening supplies.
-
Cons: Limited lifespan, requires daily maintenance to prevent rot, and yields progressively weaker, flavorless harvests.
-
-
The Soil Method:
-
Pros: Produces robust, restaurant-quality green onions with a sharp, complex flavor profile. Requires less daily maintenance (no daily water changes) and allows the plant to produce multiple abundant harvests over several months.
-
Cons: Requires purchasing soil and pots, and takes slightly longer to establish the initial root system.
-
The Expert Verdict: Use water to jumpstart the roots for the first week, then transition to soil for a permanent, endless supply.

Pro Tips for Harvesting Your Endless Supply 🍽️
Knowing how to harvest your regrown scallions is just as important as knowing how to grow them. Improper harvesting can traumatize the plant and halt future growth.
The “Cut and Come Again” Method
When your scallions have reached a desirable height (typically 6 to 8 inches tall), it is time to harvest. Never pull the entire plant out of the soil. Instead, take a clean, sharp pair of kitchen scissors and snip the green stalks off, leaving about 1 to 2 inches of the green stem remaining above the soil line.
Leaving this small amount of green foliage ensures the plant can continue to photosynthesize and gather energy to push out the next wave of growth.
Knowing When to Retire a Bulb
It is important to manage expectations: an endless supply of green onions does not mean a single scrap will live forever. Every time the plant regrows, it expends energy. Even in perfect soil conditions, the basal plate will eventually tire out. After 4 or 5 full harvests, you will likely notice the new shoots becoming incredibly thin and taking much longer to grow. This is the natural life cycle of the cutting. Simply pull the exhausted bulb, compost it, and replace it with a fresh kitchen scrap to keep the rotation going!
Frequently Asked Questions (FAQs) ❓
To ensure you have absolute clarity on this process, let’s address some of the most common questions from the home gardening community.
How many times can you regrow scallions from the same scrap?
If kept exclusively in water, you will realistically get 1 to 2 good harvests before the plant runs out of nutrients. If transplanted into high-quality, nutrient-dense soil, you can expect 4 to 5 robust harvests before the bulb becomes exhausted and needs replacing.
Does regrowing scallions in water make them lose flavor?
Yes, absolutely. Plants synthesize flavor compounds utilizing the minerals and nutrients absorbed from their environment. Because tap water lacks these complex minerals, water-grown scallions become noticeably bland, watery, and mild after the first harvest. Soil is essential for flavor retention.
Can you grow store-bought green onions outdoors in the garden?
Yes! Once your kitchen scraps have established a strong root system in a starter pot, they can easily be transplanted into outdoor raised beds or garden plots after the last frost has passed. They are quite hardy and thrive in outdoor organic soil.
Are scallions and green onions the exact same thing?
From a culinary and grocery retail perspective, yes, they are the exact same plant (Allium fistulosum). They are harvested young before a large, swollen bulb forms at the base.
Conclusion: Turn Your Scraps into a Mini-Garden 🏁
The practice of scallions regrowing from kitchen scraps is the gateway to a more sustainable, self-sufficient kitchen. By understanding the simple biology of the basal plate, providing the right balance of water and soil, and practicing proper harvesting techniques, you can easily transform a few discarded root ends into a lush, thriving indoor herb garden. It is a rewarding process that saves money, reduces food waste, and elevates your daily meals with the freshest possible ingredients.
Now that you possess the expert knowledge required to build your own endless supply of green onions, it is time to put it into practice. Save those scraps from tonight’s dinner, grab a glass jar, and watch the magic of plant regeneration unfold right before your eyes!











