
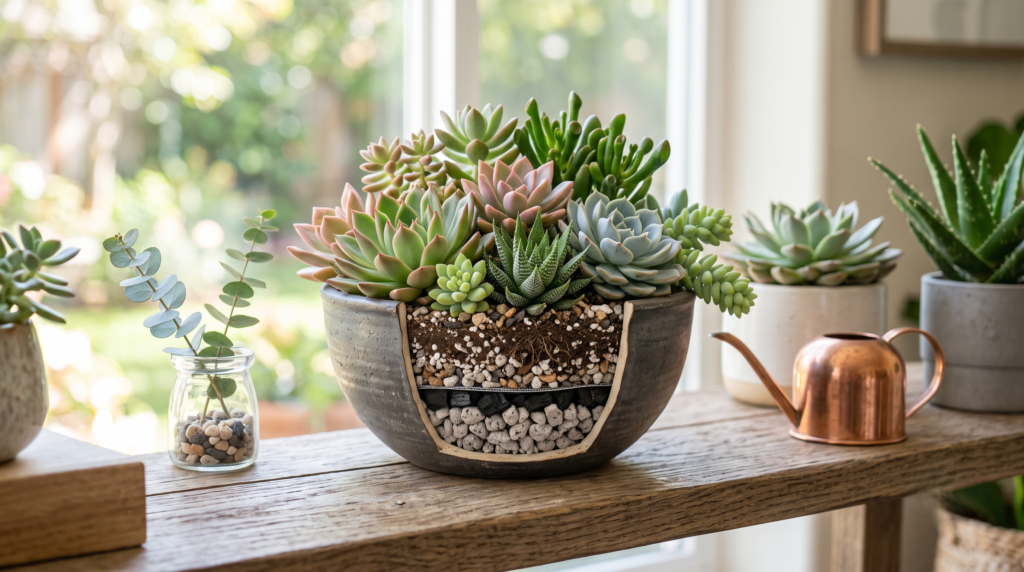
We have all been there. You are wandering through a thrift store or a local boutique, and you find it: the perfect vintage teacup, a sleek geometric glass terrarium, or a stunning, artisan-crafted ceramic bowl. It is practically begging to be filled with a pastel rosette Echeveria, a structural Haworthia, or a trailing String of Pearls. But there is a massive catch—it doesn’t have a drainage hole.
If you have ever excitedly planted your new green companions in a gorgeous decorative container, only to watch them turn into a squishy, yellow, translucent mess a few weeks later, you are not alone. To keep your desert plants thriving in these tricky containers, implementing proper succulent arrangement drainage solutions is absolutely essential.
Root rot is the silent killer of indoor plants. Succulents are highly specialized, drought-tolerant desert natives that absolutely despise having “wet feet.” When water pools at the bottom of a container with nowhere to go, it creates an anaerobic (oxygen-starved) environment that quickly breeds deadly fungal and bacterial infections.
However, you do not have to sacrifice your interior design aesthetic for the sake of plant health. In this comprehensive guide, we will explore five expert-level methods to keep your arrangements stunning and your roots healthy, from drilling techniques to modifying soil chemistry.
II. Why Succulents Demand Good Drainage (The Science of Root Rot) 🔬
To understand why a lack of drainage is so lethal, we have to look at the biology of succulents.
The Anatomy of a Desert Plant Unlike tropical houseplants (such as ferns or Calatheas) that constantly transpire and require steady soil moisture, succulents have evolved to survive in some of the harshest, driest climates on earth. They survive by storing massive amounts of water in their fleshy leaves, stems, and robust root systems. Because they are biologically engineered to hoard water, constant moisture in their potting soil is not just redundant; it is actively dangerous.
What Actually Causes Root Rot? When you water a plant in a container without a drainage hole, the water trickles to the bottom and stays there. Healthy plant roots require oxygen to function. In waterlogged soil, the air pockets are completely filled with water, suffocating the roots. This anaerobic environment is the perfect breeding ground for Phytophthora and Pythium, the water molds responsible for root rot. The roots turn black and mushy, failing to transport nutrients or water to the rest of the plant. Ironically, a succulent dying of root rot often looks underwatered because the dead roots can no longer drink.

III. 5 Proven Succulent Arrangement Drainage Solutions 🛠️
If you have a beautiful container without a hole, here are the top five solutions to ensure your succulents live a long, healthy life, ranked from the easiest fix to the most advanced techniques.
1. The “Cachepot” or Double-Potting Method (The Easiest Fix) 🪴
The simplest and most foolproof way to handle a hole-less decorative container is to not plant directly inside it at all. The cachepot method (from the French word cacher, meaning “to hide”) involves keeping your succulent in a cheap, plastic nursery pot that already has ample drainage holes, and placing that inner pot inside your decorative vessel.
-
How it Works: The decorative pot acts purely as an aesthetic sleeve. The plant lives in the perfectly draining nursery pot.
-
Step-by-Step Guide:
-
Measure the internal diameter and depth of your decorative container.
-
Select a thin plastic nursery pot that fits snugly inside. If the inner pot sits too low, add a few small rocks at the bottom of the decorative pot to boost its height.
-
If the plastic rim is visible and ruins the aesthetic, camouflage it! Use a top dressing like decorative river pebbles, crushed quartz, or preserved reindeer moss around the edges to hide the plastic completely.
-
-
The Watering Routine: When it is time to water, simply remove the plastic inner pot from the cachepot. Take it to the sink, water it thoroughly until water pours out of the drainage holes, and let it sit for about 15 minutes to drain completely. Once it stops dripping, pop it back into the decorative container. No mess, no standing water, and zero risk of rot.

2. Drilling a Drainage Hole (The Gold Standard) 🪛
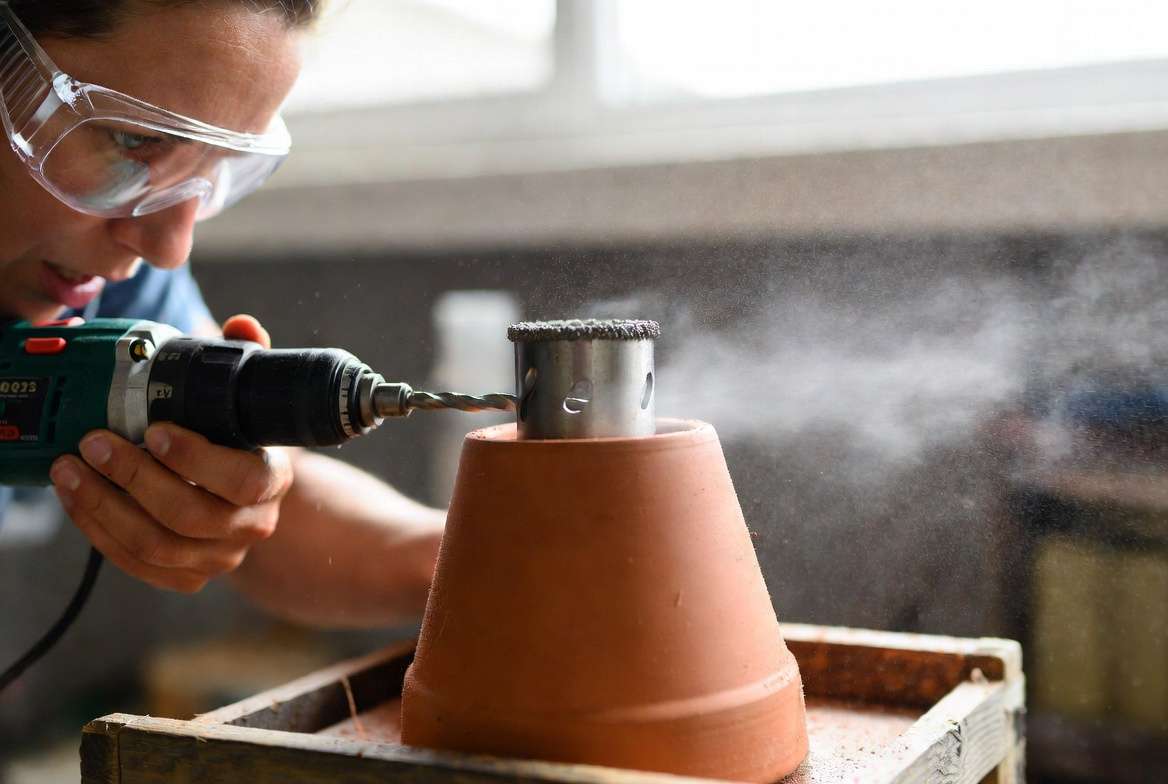
If you want to create a permanent, cohesive arrangement where plants share the same soil, double-potting won’t work. The absolute best solution is to modify the container itself. While it sounds intimidating, drilling a hole into ceramic, terracotta, or even glass is incredibly easy with the right tools.
-
Why it’s the Best Option: It permanently transforms any thrifted bowl or novelty mug into a perfect, functional plant pot, completely eliminating the danger of pooled water.
-
Tools Required: You cannot use standard wood or metal drill bits. You must use diamond-tipped hole saw drill bits or masonry drill bits (usually a 1/2 inch or 1/4 inch size works best). You will also need masking tape, a spray bottle of water, and safety goggles.
-
Step-by-Step Tutorial:
-
Place a piece of masking tape over the exact spot on the bottom of the pot where you want the hole. This provides traction and prevents the drill bit from dangerously skidding across the slippery glaze.
-
Put on your safety goggles.
-
Spray the taped area generously with water. Friction causes extreme heat, which can crack the ceramic or glass. Water keeps the drill bit and the pot cool.
-
Hold the drill at a slight 45-degree angle to start the cut. Once it bites into the ceramic and makes a small groove, slowly tilt the drill up to a 90-degree vertical angle.
-
Apply gentle, even pressure. Let the drill do the work—do not force it! Keep spraying water every 15-20 seconds.
-
Within a minute or two, the bit will pop through cleanly. Rinse the pot, and you now have a perfectly draining container!
-
3. The Gritty Soil Mix Substitution (Modifying Soil Chemistry) 🪨
If you absolutely cannot drill a hole (for instance, it is a priceless antique or fragile crystal) and you cannot double-pot, your next line of defense is the soil itself. Standard potting soil—even commercial “cactus/succulent” soil—is often heavily loaded with peat moss. Peat moss is highly absorbent; it acts like a sponge, holding onto water for weeks. In a hole-less pot, this is a death sentence.
-
The Strategy: If water cannot drain out of the pot, the soil inside must hold as little water as possible. You must switch to a highly inorganic, gritty mix.
-
Creating a High-Inorganic Mix: You want a substrate that consists of large particles. This creates massive air pockets, allowing the roots to breathe even if water pools slightly at the very bottom.
-
The Recipe: Aim for a 70% to 80% inorganic and 20% to 30% organic mix.
-
Inorganic elements (70-80%): Use a blend of horticultural pumice, crushed granite (like poultry grit), calcined clay (Turface), or perlite. These materials absorb minimal water and ensure rapid evaporation.
-
Organic elements (20-30%): Use sifted pine bark fines or a very small amount of high-quality compost. Completely avoid peat moss or coconut coir.
-
-
The Result: Water runs straight through this chunky mix, meaning the upper root system will dry out in a matter of days, drastically reducing the risk of rot.

4. Hyper-Precise Watering (The Terrarium Technique) 💧
When working with glass bowls, closed terrariums, or shallow dishes without holes, the margin for error with watering is zero. Since you can’t rely on drainage, you must control the input with absolute precision. This is not for the faint of heart, but it is entirely possible if you pay close attention.
-
The “Measure and Monitor” Method: Never take a watering can to a hole-less arrangement. Instead, you must calculate the water volume. A good rule of thumb is to provide water equivalent to only 1/3 or 1/4 of the total soil volume in the container.
-
Tools of the Trade:
-
Medical Syringe or Pipette: Ideal for small arrangements. You can measure out exact milliliters of water.
-
Squeeze Bottle: A laboratory wash bottle with a curved, narrow nozzle allows you to direct water perfectly to the base of the plant.
-
-
How to Apply: Inject the water directly into the soil near the root zones of the individual succulents. Do not wet the leaves, as trapped moisture between succulent rosettes causes crown rot. Look through the glass (if transparent) to ensure the water only moistens the top and middle layers of the soil, stopping well before it pools at the bottom. Wait until the soil is 100% bone dry before repeating.
5. The Activated Charcoal & Pumice Layer (The Modern “False Bottom”) 🕳️
Let’s address the most common, harmful myth in houseplant care: putting rocks or gravel at the bottom of a pot to “create drainage.”
-
Debunking the Gravel Myth: Putting gravel under potting soil creates a scientific phenomenon called a perched water table. Water does not easily move from a fine material (soil) to a coarse material (gravel) due to capillary action. Instead, the soil acts like a sponge, holding all the water just above the gravel line. By adding rocks, you simply push the soggy, saturated soil closer to the roots!
-
The Correct Way to Layer: If you must create a drainage layer (a “false bottom”) in a deep, hole-less container, you need functional materials, not just dead-weight river rocks.
-
Base Layer: Use large-chunk horticultural pumice or lava rock. These are porous and allow for better gas exchange than smooth river rocks.
-
The Charcoal Layer: Top the pumice with a generous layer of horticultural activated charcoal. Charcoal is naturally antimicrobial and highly porous. It acts as a filter, absorbing impurities, toxins, and preventing the stagnant water at the bottom from smelling like swamp mud.
-
The Barrier (Crucial Step): Cut a piece of fiberglass window screen or permeable landscaping fabric and place it perfectly over the charcoal layer. Then put your gritty soil mix on top. This barrier prevents the fine soil particles from sifting down into your drainage layer and turning the whole thing into a brick of mud.
-
IV. Essential Tips for Maintaining Hole-Less Succulent Arrangements ☀️
Even with the best succulent arrangement drainage solutions in place, container environment management is key to long-term success.
-
Maximize Sunlight Exposure: Light and water are deeply connected. The more intense the light, the faster a plant processes water through photosynthesis, and the faster the soil dries out through evaporation. Place your hole-less arrangements in your brightest south-facing or west-facing windows. If natural light is lacking, invest in a full-spectrum LED grow light.
-
Increase Ambient Airflow: Stagnant air allows soil to stay wet longer. In outdoor environments, wind evaporates soil moisture rapidly. Replicate this indoors by ensuring good air circulation. A small oscillating fan in your plant room can drastically reduce the drying time of your soil, protecting the roots.
-
Mastering the “Taco Test”: Throw away your watering schedule. Succulents should never be watered on a rigid calendar (e.g., “every Sunday”). Instead, use the Taco Test. Gently squeeze the outermost, lowest leaves of your succulent.
-
If the leaf is rock hard and firm, do not water it. The plant is fully hydrated, even if the soil is bone dry.
-
If the leaf yields to pressure, wrinkles slightly, and folds inward like a taco shell, the plant is dipping into its water reserves. Now it is safe to water your arrangement.
-

V. Frequently Asked Questions (FAQs) ❓
Can I put rocks at the bottom of a planter for drainage? No! As mentioned in the false bottom section, adding standard gravel or river rocks beneath standard potting soil creates a perched water table. It brings the soggy, saturated zone of soil closer to the succulent roots, rapidly accelerating root rot. Always drill a hole or use the cachepot method first.
What are the first signs of root rot in succulents? Because the damage happens below the soil, the first signs appear on the leaves. Look for lower leaves that turn pale yellow, become slightly translucent (like they are filled with water), and feel squishy to the touch. These leaves will drop off the stem with the slightest bump. If the stem itself begins to turn brown or black and gets mushy, rot is severely advanced.
Can a succulent recover from root rot? Yes, but immediate action is required. If the roots are dead but the upper rosette is still green, you must perform plant surgery. Use sterilized shears to “behead” the succulent, cutting at least an inch above the highest sign of black/mushy stem rot. Throw away the rotted base and soil. Let the healthy cutting sit in a dry, shady spot for 3 to 5 days so the wound can “callous” (form a scab). Once calloused, place it on top of dry, gritty succulent soil. It will sprout brand new, healthy pink roots within a few weeks.
Are glass terrariums bad for succulents? Generally, yes. Glass terrariums are designed to trap humidity and moisture, creating a rainforest-like microclimate. This is incredible for ferns and moss, but it is the exact opposite of what a desert succulent needs. The high humidity limits evaporation and encourages fungal growth. If you must use a glass vessel, choose a shallow dish rather than a tall globe, never put a lid on it, and use the hyper-precise watering method with a highly gritty soil mix. Open-air arrangements are always superior for desert flora.
VI. Conclusion: Beautiful, Healthy Arrangements are Possible 🌟
Creating stunning indoor plant displays shouldn’t require you to compromise the health and longevity of your plants. While a lack of drainage is the quickest way to kill a desert plant, utilizing proper succulent arrangement drainage solutions puts you firmly back in control.
Remember the hierarchy of solutions: drilling a hole is always your best, most reliable option. If that isn’t possible, leaning on the clever cachepot method will save you endless headaches. And if you are committed to planting directly into a unique, sealed vessel, success relies entirely on switching to a gritty soil mix, using the precise watering technique, and listening to what your plant’s leaves are telling you.
Armed with these expert strategies, you can confidently turn that vintage teacup or gorgeous glass bowl into a thriving, long-lasting succulent masterpiece. Happy planting! 💚🌵











