

Picture this: You carefully harvest a plump, beautiful leaf from your favorite Echeveria, lay it gently on some potting soil, and eagerly check on it every single morning. But after a week, instead of tiny, exciting pink roots, you are greeted by a translucent, yellow, soggy blob of mush. Sound familiar?
If you are endlessly frustrated and searching for exactly how to root succulent leaves without rot, you are absolutely not alone. Succulent propagation is famously touted as “easy,” but what many tutorials fail to mention is that rot is the number one silent killer of baby plants.
In this expert guide, you will learn the exact, step-by-step methods to root succulent cuttings successfully every single time. We will dive into the science of why leaves turn to mush and how to create a foolproof setup that protects your delicate plant tissue from fungal and bacterial decay. Let us rescue your propagation station! 🌿
Why Do Succulent Leaves Rot Instead of Rooting? (The Science of the Mush) 🔬💧
Before we can fix the problem, we need to understand the biological ‘why’ behind it. Rot does not happen by magic; it is a biological process triggered by specific environmental failures. Succulent leaves are essentially tiny reservoirs designed to store water for long periods of drought. When they fail to propagate, it is rarely due to a lack of water, but rather an excess of it combined with opportunistic pathogens.

1. Skipping the Callus Phase ⏳
When you remove a leaf from the mother plant, you are creating an open wound. If you immediately place that freshly picked leaf onto damp soil, bacteria and fungi in the dirt have a direct, unhindered pathway right into the plant’s vascular system.
To prevent this, the leaf must form a callus—the botanical equivalent of a scab. This dry, hardened tissue seals the wound and protects the meristematic tissue (the plant stem cells that will eventually push out new roots and pups). Skipping this crucial drying phase is a guaranteed recipe for bacterial rot.
2. The Urge to Overwater (Suffocation) 🌊
As humans, our nurturing instinct tells us that babies need water to grow. However, a severed succulent leaf has absolutely zero roots. Without roots, the leaf physically cannot absorb moisture from the surrounding environment.
When a rootless leaf sits in wet soil or is constantly misted, the water simply pools around the plant tissue. This suffocates the leaf, preventing cellular respiration, and breaks down the cell walls, resulting in that dreaded, squishy translucence.
3. Incorrect Lighting and Humidity ☁️
Fungus thrives in dark, damp, and stagnant environments. If your propagation tray is kept in a humid bathroom, a poorly ventilated terrarium, or a dark corner of your living room, you are cultivating the perfect breeding ground for rot. Succulent leaves need proper airflow to keep their surface dry and bright, indirect sunlight to provide the energy required for cellular division and root growth.
🪴 Expert Insight: “A healthy succulent leaf already contains 100% of the water and nutrients it needs to produce a completely new pup. When you water a leaf that has no roots, you aren’t hydrating it—you are composting it.”
The Perfect Setup: Everything You Need for Rot-Free Propagation 🛠️
Preparation is half the battle. By setting up the right environment and selecting the correct materials, you can virtually eliminate the risk of mushy leaves before you even begin the propagation process.
Choosing the Right Leaves (Healthy vs. Doomed) 🌱
Not all leaves are destined for greatness. The success of your propagation depends heavily on the health of the mother leaf you select.
-
Choose plump, firm leaves: These have enough stored energy and water to sustain the growth of a new pup.
-
Check the base: The break must be clean and U-shaped. If the base of the leaf is torn or jagged, the meristem tissue is likely damaged, and it will simply rot.
-
Avoid the doomed: Leaves that are already wrinkled, yellowing, translucent, or pest-damaged will rot no matter how perfect your technique is. Throw them in the compost.

The Ideal Soil Mix (Drainage is Everything) 🪨
Standard indoor potting soil is designed to retain moisture for tropical plants like pothos and ferns. Using this for succulent propagation is a fatal error. Peat moss-heavy soils hold water against the leaf, encouraging fungal spores to germinate.
Instead, you need a highly gritty, well-draining medium that dries out rapidly.
-
The Perfect Recipe: Mix 50% high-quality succulent or cactus soil with 50% inorganic grit, such as perlite, pumice, or coarse horticultural sand.
This blend ensures maximum aeration. Even if a few drops of water fall on the soil, it will drain away instantly, keeping the leaf surface safely dry.
The Right Environment: Light, Airflow, and Temperature ☀️
To mimic the natural, arid environments where succulents naturally reproduce, you must control three vital elements:
-
Light: Place your propagation tray in bright, indirect sunlight. A spot near an east-facing window is usually perfect. Direct, scorching afternoon sun will fry and shrivel the leaves before they can root.
-
Airflow: Good circulation evaporates sitting moisture. A gentle breeze from an open window or a small oscillating fan on a low setting does wonders for preventing fungal growth.
-
Temperature: Aim for comfortable room temperatures between 65 to 75 degrees Fahrenheit. Extreme cold stalls growth, while extreme heat dehydrates the leaves prematurely.
Step-by-Step Guide: How to Root Succulent Leaves Without Rot 📋✨
Now that your propagation station is optimized for success, it is time for the main event. Follow these exact steps to ensure your succulent cuttings develop healthy root systems rather than succumbing to decay.
Step 1: The “Clean Twist” (Harvesting the Leaf) ✂️
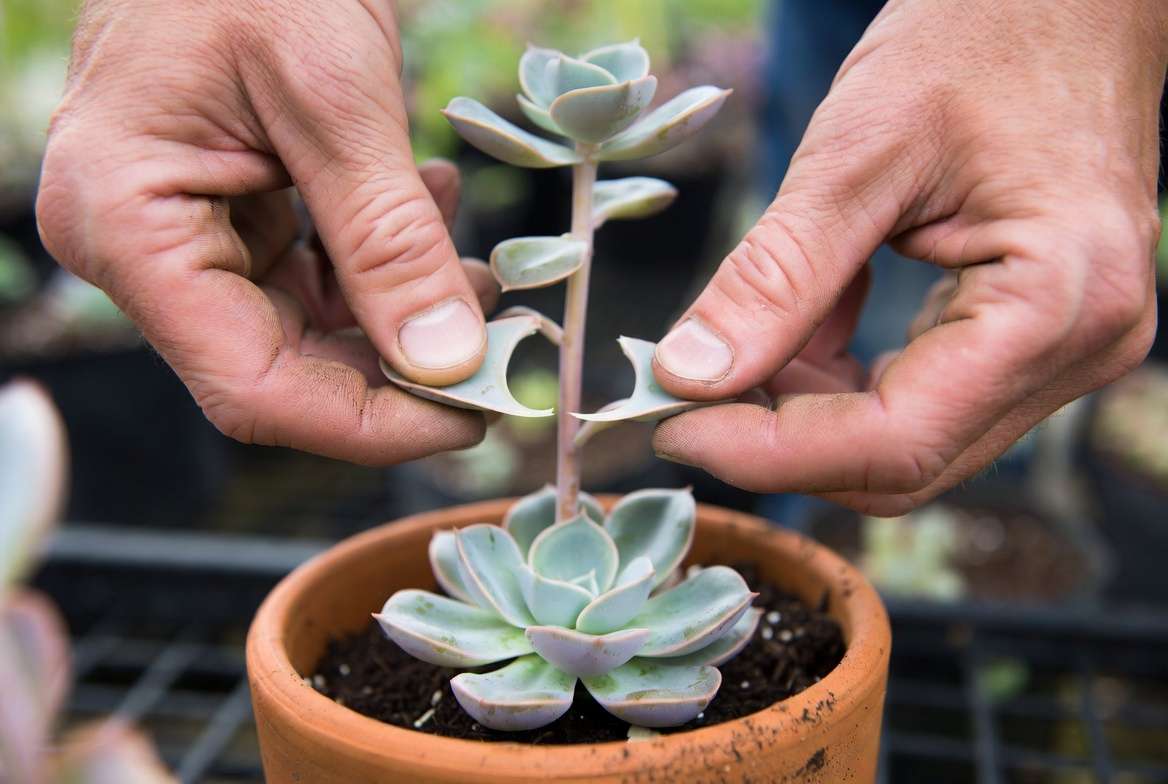
A successful propagation starts directly on the mother plant. When removing a leaf, grab it gently but firmly between your thumb and index finger, as close to the stem as possible. Wiggle it slightly from side to side and apply a gentle twisting motion.
You want to hear a satisfying, tiny “snap.” A clean break ensures that the meristem tissue—the vital cluster of cells that generates new growth—remains attached to the base of the leaf. If the leaf tears, leaving a piece behind on the stem, discard it. A torn leaf has a highly irregular wound that cannot heal properly, making it incredibly vulnerable to bacterial rot.
Step 2: The Crucial Callus Phase (Do Not Skip!) 🛑
This is the single most important step for preventing mush. Once you have harvested your healthy succulent leaves, do not put them on soil yet.
Instead, place them on a dry paper towel, a wooden cutting board, or an empty tray. Leave them indoors in a dry, shaded area for 3 to 7 days. You are waiting for the raw, wet wound at the base of the leaf to dry out and form a hard, white or brownish scab (the callus).
The thicker the leaf, the longer it takes to callus. For example, a plump Graptopetalum leaf might need a full week, while a thinner Sedum leaf might seal in three days. By allowing the leaf to callus completely, you are essentially closing the door on the fungi and bacteria that cause rot.
Step 3: Laying the Groundwork 🛏️
Fill a shallow tray with the well-draining, gritty soil mix we discussed earlier. The soil must be bone dry.
Gently place your fully callused leaves flat on top of the soil.
-
Crucial Rule: Never bury the ends of the leaves in the dirt.
Many beginners try to stick the leaf upright into the soil, thinking it will help roots anchor better. In reality, burying the tip restricts airflow and traps ambient moisture against the most vulnerable part of the cutting. Laying them flat on top mimics how leaves naturally fall and propagate in the wild.
Step 4: The Waiting Game (When to Finally Introduce Water) ⏱️
Patience is your greatest tool. Leave your tray in bright, indirect light and wait. Do not water them. Do not mist them. Just watch.
Depending on the season, temperature, and species, you will start to see tiny pink or white roots poking out of the callused end within 2 to 6 weeks. Shortly after, a microscopic rosette (the baby plant) will begin to form. Only after a substantial network of roots has formed and buried itself into the soil should you even consider introducing moisture.
The Great “Watering” Debate: Misting vs. Ignoring 💦🚫
If there is one topic that divides the plant community, it is how to water propagating succulent leaves. However, if your main goal is figuring out how to root succulent leaves without rot, the answer is remarkably clear.
Why Misting Often Leads to Rot 🌧️
A vast majority of outdated plant care blogs recommend misting your succulent leaves with a spray bottle every day. As botanists and experienced growers know, this is incredibly risky.
When you mist, water droplets sit on the surface of the mother leaf. Because succulents do not have porous leaves that absorb water externally, the moisture just sits there. This creates localized high humidity—a microclimate that actively invites fungal spores to settle, germinate, and rot the leaf from the outside in.
The “Dry Propagation” Method (Expert Recommended) 🏜️
The safest, most foolproof way to avoid rot is the Dry Propagation Method. In this method, you provide exactly zero water throughout the entire process.
Remember, the mother leaf is essentially a canteen filled with all the hydration the baby pup needs to grow. As the new rosette and root system develop, you will notice the mother leaf beginning to shrivel and dry up. This is a fantastic sign! It means the nutrients are successfully transferring from the old leaf to the new plant. Once the mother leaf is completely papery and dry, it will fall off with a gentle touch. Only then do you plant the new baby succulent and begin watering it normally.
The “Targeted Watering” Method 🎯
If you live in an exceptionally hot or arid climate (like Arizona or Nevada), dry propagation might cause the newly sprouted roots to crisp up and die before the baby pup can establish itself.
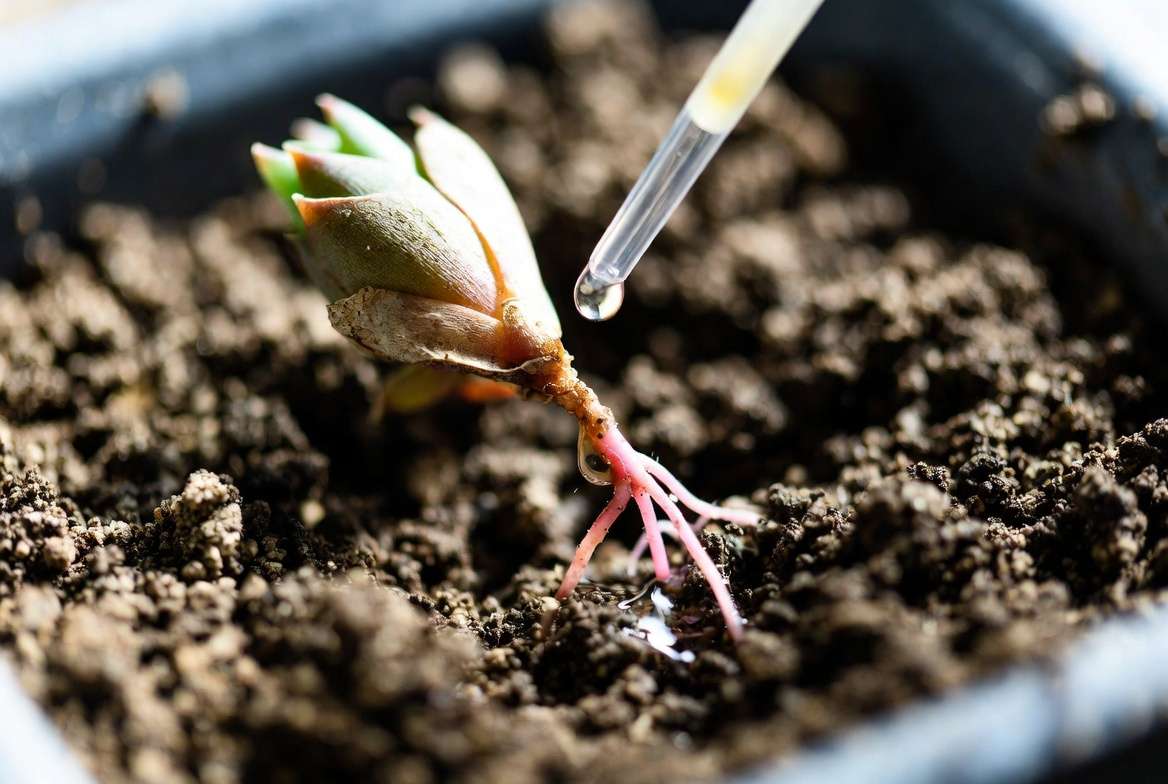
In this case, use the Targeted Watering Method. Instead of a spray bottle, use a squeeze bottle or a pipette. Once the roots are at least an inch long, squeeze a few drops of water directly onto the soil where the roots are. Keep the mother leaf completely bone dry. This hydrates the root system without risking fungal rot on the parent leaf.
Troubleshooting Common Propagation Problems 🩺🌵
Even with the perfect setup, nature can be unpredictable. Here is how to diagnose issues without panicking.
“My Leaf Grew Roots, But No Baby Plant!” 🌱
This is a very common anomaly. Sometimes, a leaf will shoot out an impressive root system but absolutely no rosette. We call these “blind leaves.” Give it time—sometimes the pup is just a late bloomer. However, if several months pass and it is just a pile of roots, the meristem tissue for foliage was likely damaged during harvesting. The leaf will eventually die off, but it will not rot your other plants.
“The Mother Leaf is Shriveling—Is it Rot or Thirst?” 🍂
Many beginners see a shriveling mother leaf and immediately panic, thinking they need to water it to save it.
-
Healthy Shriveling: The leaf gets thinner, slightly wrinkled, but remains firm and retains its color (or turns slightly yellow/pink before drying into a crispy husk).
-
Rot: The leaf becomes translucent, squishy to the touch, turns black or dark brown, and leaks fluid.
If it is healthy shriveling, let it be. If it is rot, remove it immediately so the bacteria doesn’t spread to neighboring healthy leaves.
Black Spots on the Mother Leaf ⚫
If you notice small, sooty black spots appearing on a leaf that was previously healthy, you are dealing with a fungal infection. This is almost always caused by excess humidity or water sitting on the leaf. Remove the infected leaf from the propagation tray immediately and adjust your airflow to save the rest.
Frequently Asked Questions (FAQs) 🙋♀️
How long does it take for a succulent leaf to root? It typically takes 2 to 6 weeks for roots to appear, depending on the species and environmental conditions. Warm temperatures and bright, indirect light speed up the process, while winter dormancy can slow it down considerably.
Can I propagate a broken succulent leaf? Generally, no. If a leaf is broken in half or lacks a clean break at the stem, it does not have the intact meristem tissue necessary to create a new pup. Broken leaves will almost always succumb to rot.
Should I root succulent leaves in water or soil to avoid rot? While “water propagation” (suspending the leaf above water) is a trendy experiment, soil propagation is significantly safer and yields stronger, soil-adapted roots. Water propagation often requires a delicate transition to soil later, which can shock the plant and cause sudden rot.
Why do my propagated succulent leaves turn clear and yellow? A translucent, clear, or yellow squishy leaf is the hallmark sign of overwatering and cellular rot. The leaf has taken in too much moisture (or was exposed to unhealed moisture), causing the cell walls to burst and decay.
Conclusion & Next Steps 🪴💚
Learning how to root succulent leaves without rot does not require magic; it requires a basic understanding of plant biology and the patience to let nature do its work.
To recap your golden rules for a rot-free propagation station:
-
Always twist cleanly to preserve the meristem tissue.
-
Always allow the leaf to callus for several days before exposing it to soil.
-
Always use a bone-dry, gritty soil mix and lay the leaves on top—never bury them!
-
Never mist the leaves, and rely on the dry propagation method whenever possible.
Propagation is ultimately a numbers game. Even expert botanists lose a leaf or two to the occasional mush! But by following this skyscraper guide, your success rate will skyrocket, leaving you with trays full of thriving, beautiful baby succulents.
Now that your babies are rooting and growing, you will soon need to graduate them to their own pots! Check out our next guides: [The Ultimate Guide to Repotting Succulent Pups] and [The Best Gentle Fertilizers for Indoor Succulents]. Happy propagating!











